
As the name implies, javax.ejb.Singleton is a session bean that guarantees that there is at most one instance in the application.
Note
Besides this, singleton EJBs fill a well-known gap in EJB applications, that is, the ability to have an EJB notified when the application starts and also when the application stops. So, you can do all sorts of things with an EJB that you previously (before EJB 3.1) could only do with a load-on-startup servlet. EJB also gives you a place to hold data that pertains to the entire application and all the users using it, without the need for static class fields.
In order to turn your EJB into a singleton, all that is needed is to apply the @javax.ejb.Singleton annotation on top of it.
Note
A singleton bean is similar to a stateful bean, in that, state information is maintained across method invocations. However, there is just one singleton bean for each server JVM, and it is shared by all of the EJBs and clients of an application. This type of bean provides a convenient means to maintain the overall state of an application. However, if the application is distributed on multiple machines (and therefore multiple JVMs), the singleton is unique on every one of them. Any application state must be synchronized between the nodes.
Another annotation that is worth learning is @javax.ejb.Startup, which causes the bean to be instantiated by the container when the application starts. This invokes the method decorated with the @javax.annotation.PostConstruct annotation if you have defined one in your EJB.
We now have enough information to understand our first EJB example. There is more than one alternative to create a Java Enterprise project. In the earlier chapter, we illustrated how to start from a project based on Eclipse Java EE (a dynamic web project), binding it later to a WildFly runtime installation. This is obviously the simplest choice, and you can easily run the examples contained in this book using this pattern; however, when it comes to enterprise solutions, it's no surprise that almost every project now uses some kind of build automation tool. For this book, we will propose Apache Maven, as it is one of the most popular choices, but not the only one. Gradle is a similar project that uses the Groovy language to describe project structure, dependencies, and build workflow.
Some of the benefits that you will achieve when turning to Maven projects include a well-defined dependency structure, the conventions of a project build's best practices, and project modular design, just to mention a few. Additionally, when you have an automated build process, you can use continuous integration tools (such as Jenkins) to schedule automated tests and deployments of your applications.
All major IDEs have built-in Maven support. This includes the Eclipse Java EE Luna release.
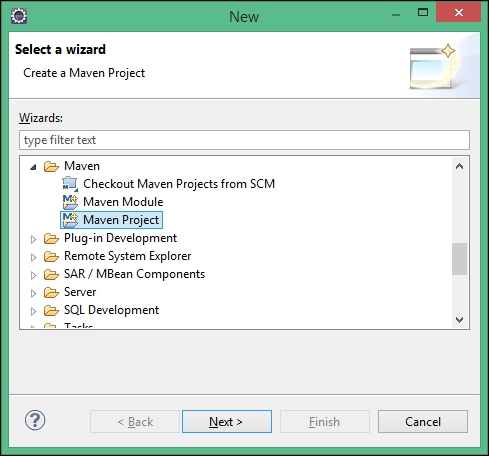
So, let's create our first Maven project directly from Eclipse. Navigate to File | New | Other | Maven | Maven Project. This is shown in the following screenshot:
Click on Next; you will be taken to the following intermediary screen:
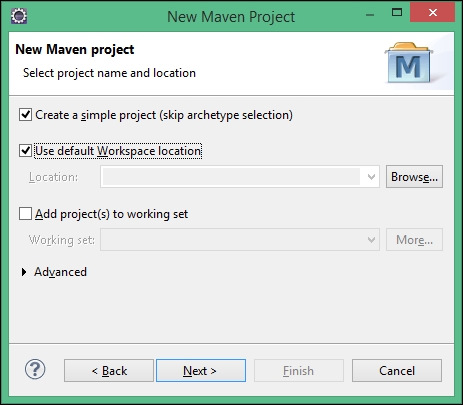
Maven allows the use of archetypes when creating a new project. They define a project's basic dependencies, resources, structure, and so on. For example, you can use a web application archetype in order to get an empty project skeleton, which you can just build and deploy. Unfortunately, archetypes are often outdated, and you still need to adjust them for your needs. In order to use some Java EE 7 archetypes, you have to first define a repository and archetypes you would like to use, and then you can create a project. In real life, you will probably create every new project by just looking at your previous ones, without using any archetypes. So, here we will show how to create a project from scratch. You might also be interested in some additional Java EE-related tools such as JBoss Forge, whose description you will find in the Appendix, Rapid Development Using JBoss Forge.
On the visible screen, check the Create a simple project checkbox. With this option, we will skip the archetype selection. You can click on Next. Now, you have to complete some basic project information. We are creating a server-side EJB application, which also has a standalone client. These two projects can share some common information, for example, about dependencies and their versions. Hence, we want to create a Maven multimodule project. In this first step, let's create a parent project that has a POM packaging. POM is a Maven convention used to describe the structure of a project and its modules. More information on this can be found in Sonatype free books that we mentioned in previous chapters.
You can complete the wizard by entering some package-specific information, as shown in the following screenshot:
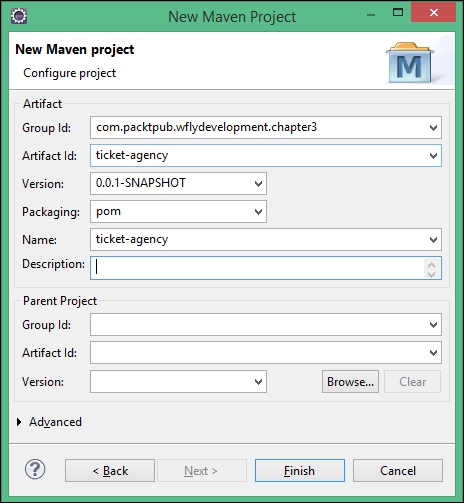
For Group ID (an abstract identifier with a similar role as in Java packages), you can use com.packtpub.wflydevelopment.chapter3. For Artifact ID (a simplified name of our project), just use ticket-agency. Set the Packaging field to pom, and you can leave the default selection for the project's Version field. Click on Finish in order to complete the wizard.
Take a look at our newly created project. At the moment, it contains only pom.xml, which will be the base for new modules. Navigate again to File | New | Other | Maven but now choose the New Maven Module. You can now see the following screenshot:
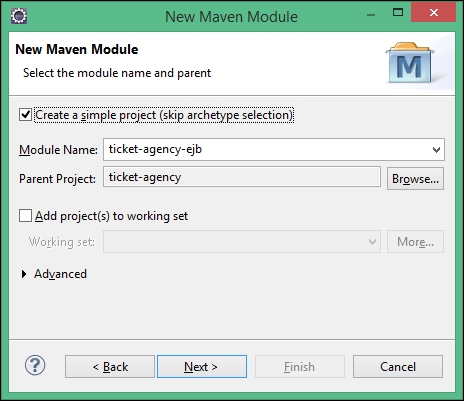
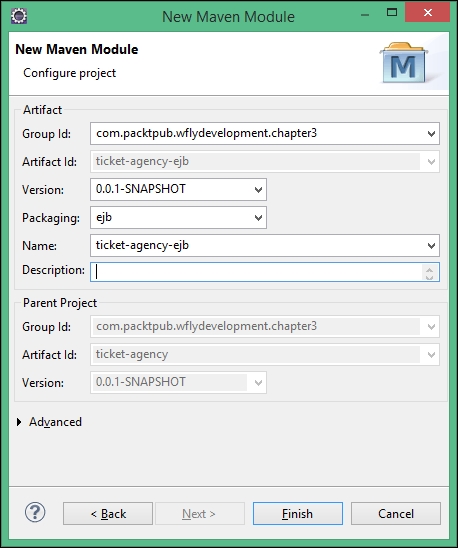
Again, we want to skip the archetype selection, so check the Create a simple project option. Under the Parent Project, click on Browse and select the parent we created a while ago. Under Module Name, enter ticket-agency-ejb. Click on Next. You will be presented with the following screen.
Now, let's discuss the packaging type. There are a few possible archive types for Java EE deployments:
- The EJB module: This module usually contains classes for EJBs, packed as a .
jarfile. - The web module: This archive can additionally contain web elements such as servlets, static web files, REST endpoints, and so on. It is packed as a
.warfile (web archive) file. - The resource adapter module: This archive contains files related to JCA connectors (described in Chapter 6, Developing Applications with JBoss JMS Provider). It is packed as a
.rarfile. - The Enterprise archive: This archive aggregates multiple Java EE modules (EJB, Web) with related descriptors. It is packed as a
.earfile.
Here, we want to deploy only EJBs without any web elements, so let's set the packaging to EJB (if it is not visible in the Eclipse drop-down menu, just manually type it) and click on Finish.
Follow the same steps to add a second module with the name ticket-agency-ejb-client and JAR packaging . This will be a simple client for services exposed in ticket-agency-ejb.
Now, look at our parent project pom.xml. It should define two recently created modules, which are as follows:
    <modules>
        <module>ticket-agency-ejb</module>
        <module>ticket-agency-ejb-client</module>
    </modules>
The expected outcome of these operations should match the following screenshot, which has been taken from the Project Explorer view:
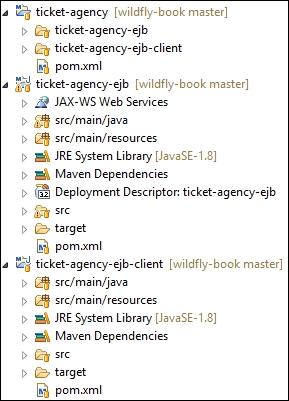
As you can see, the ticket-agency-ejb and ticket-agency-ejb-client projects have been organized as a standard Maven project:
src/main/javawill contain our source codesrc/main/resourcesis meant for the configuration (containing a bare-bonesejb-jar.xmlconfiguration file for the EJB project)src/test/javais used to store the test classes
At the moment, we will focus on the main file pom.xml, which needs to be aware of the Java EE dependencies.
Before digging into the code, first you need to configure Maven's pom.xml configuration file further. This file is quite verbose, so we will illustrate just the core elements here that are required to understand our example, leaving the full listing to the code example package of this book.
The first thing we are going to add just after the properties section is a reference to Java EE 7 API, which is as follows:
<dependencies>
    <dependency>
        <groupId>javax</groupId>
        <artifactId>javaee-api</artifactId>
        <version>7.0</version>
        <scope>provided</scope>
    </dependency>
</dependencies>
This dependency will add all Java EE 7.0 APIs' definitions. Scope is set to be provided, which means the dependency is available on the target environment (in our case, the application server), and does not need to be included in the built archive. This dependency is universal, and should work with all Application Servers that are compatible with Java EE 7.0, not only with WildFly.
We also want to add a second dependency, which is the JBoss logging API. Place this definition in the same <dependencies> </dependencies> tags, for example, below javaee-api, as follows:
<dependency>
    <groupId>org.jboss.logging</groupId>
    <artifactId>jboss-logging</artifactId>
    <version>3.1.4.GA</version>
    <scope>provided</scope>
</dependency>
Note
The scope provided includes the enterprise dependencies and corresponds to adding a library to the compilation path. Therefore, it expects the JDK or a container to provide the dependency at runtime. Besides dependencies, we would like to configure the build process. The created project specifies the EJB packaging, but the build is performed with the JDK 1.5 compliance level and an old EJB version. This is why we want to add an additional block to pom.xml, which is as follows:
<build>
    <plugins>
        <plugin>
           <groupId>org.apache.maven.plugins</groupId>
           <artifactId>maven-compiler-plugin</artifactId>
            <version>3.1</version>
            <configuration>
                <!-- enforce Java 8 -->
                <source>1.8</source>
                <target>1.8</target>
           </configuration>
        </plugin>
        <plugin>
           <groupId>org.apache.maven.plugins</groupId>
           <artifactId>maven-ejb-plugin</artifactId>
           <version>2.3</version>
           <configuration>
                <ejbVersion>3.2</ejbVersion>
                <!-- Generate ejb-client for client project -->
                <generateClient>true</generateClient>
           </configuration>
        </plugin>
    </plugins>
</build>
This block does two things, which are as follows:
- The
maven-compiler-pluginconfiguration enforces the usage of Java 8 - The
maven-ejb-pluginconfiguration defines that EJB 3.2 version was used, and enables generation of the EJB client (disabled by default) package for EJB client applications
Also, check the src/main/resources/META-INF/ejb-jar.xml file. It might contain the configuration from EJB 2.1. Instead, use the following code:
<?xml version="1.0" encoding="UTF-8"?>
<ejb-jar xmlns="http://xmlns.jcp.org/xml/ns/javaee"
         xmlns:xsi="http://www.w3.org/2001/XMLSchema-instance"
         xsi:schemaLocation="http://xmlns.jcp.org/xml/ns/javaee"
         version="3.2">
    <display-name>ticket-agency-ejb</display-name>
    <ejb-client-jar>ticket-agency-ejbClient.jar</ejb-client-jar>
</ejb-jar>
At this point, you will be able to compile your project; so, we will start adding classes, but we will return to the pom.xml file when it's time to deploy your artifact.
Creating EJB classes does not require getting mixed up with fancy wizards; all you need to do is add bare Java classes. Therefore, from the File menu, go to New | Java Class, and enter TheatreBox as the classname and com.packtpub.wflydevelopment.chapter3.control as the package name.
We will add the following implementation to the class:
@Singleton
@Startup
@AccessTimeout(value = 5, unit = TimeUnit.MINUTES)
public class TheatreBox {

    private static final Logger logger = Logger.getLogger(TheatreBox.class);

    private Map<Integer, Seat> seats;

    @PostConstruct
    public void setupTheatre() {
        seats = new HashMap<>();
        int id = 0;
        for (int i = 0; i < 5; i++) {
            addSeat(new Seat(++id, "Stalls", 40));
            addSeat(new Seat(++id, "Circle", 20));
            addSeat(new Seat(++id, "Balcony", 10));
        }
        logger.info("Seat Map constructed.");
    }

    private void addSeat(Seat seat) {
        seats.put(seat.getId(), seat);
    }

    @Lock(READ)
    public Collection<Seat> getSeats() {
        return Collections.unmodifiableCollection(seats.values());
    }

    @Lock(READ)
    public int getSeatPrice(int seatId) throws NoSuchSeatException {
        return getSeat(seatId).getPrice();
    }

    @Lock(WRITE)
    public void buyTicket(int seatId) throws SeatBookedException, NoSuchSeatException {
        final Seat seat = getSeat(seatId);
        if (seat.isBooked()) {
            throw new SeatBookedException("Seat " + seatId + " already booked!");
        }
        addSeat(seat.getBookedSeat());
    }

    @Lock(READ)
    private Seat getSeat(int seatId) throws NoSuchSeatException {
        final Seat seat = seats.get(seatId);
        if (seat == null) {
            throw new NoSuchSeatException("Seat " + seatId + " does not exist!");
        }
        return seat;
    }
}
Let's see our application code in detail; the void method setupTheatre is invoked as soon as the application is deployed and takes care of assembling the theatre seats, creating a simple map of the Seat objects. Seat identifiers are key factors in this map. This happens right after deployment because our bean is annotated with @Singleton and @Startup that force the container to initialize the bean during startup. Each Seat object is constructed using a set of three field constructors, which includes the seat ID, its description, and the price (the booked field is initially set as false). This is given in the following code:
public class Seat {
    public Seat(int id, String name, int price) {
        this(id, name, price, false);
    }
    private Seat(int id, String name, int price, boolean booked) {
        this.id = id;
        this.name = name;
        this.price = price;
        this.booked = booked;
    }
    public Seat getBookedSeat() {
        return new Seat(getId(), getName(), getPrice(), true);
    }
    // Other Constructors, Fields and Getters omitted for brevity
}
Note that our Seat object is an immutable one. After we create an instance, we will not be able to change its state (the value of the fields, all of them are final, and no setters are exposed). This means that when we return a Seat object to the client (local or remote), it will be only available for reading.
Next, the singleton bean exposes four public methods; the getSeats method returns an unmodifiable collection of Seat objects, which will return the information regarding whether they have been reserved or not to the user. The collection must be unmodifiable because our Singleton exposes a no-interface view, which means that we are using the pass-by-reference semantic. If we will not protect the collection, then every change on an element of the returned collection will be done on our cache. What's more, the client can add or remove elements to our internal collection!
The getSeatPrice method is an utility method, which will pick up the seat price and return it as int, so it can be used to verify whether the user can afford to buy the ticket.
The getSeat method returns an immutable Seat object for a given ID. Once more, we return an immutable Seat because we don't want the client to change the object without using the TheatherBox bean.
Finally, the buyTicket method is the one that actually buys the ticket and, therefore, sets the ticket as booked. We cannot change the value of an immutable object, but we can replace it with a new one, which contains another value. The newly created object is placed in the hashmap instead of the old one.
As you might have noticed, the bean includes a @Lock annotation on top of the methods managing our collection of Seat objects. This kind of annotation is used to control the concurrency of the singleton.
Concurrent access to a singleton EJB is, by default, controlled by the container. Read/write access to a singleton is limited to one client at a time. However,it is possible to provide a finer level of concurrency control through the use of annotations. This can be achieved using the @Lock annotation, whose arguments determine the type of concurrency access permitted.
By using a @Lock annotation of type javax.ejb.LockType.READ, multithreaded access will be allowed to the bean. This is shown in the following code:
    @Lock(READ)
    public Collection<Seat> getSeats() {
        return Collections.unmodifiableCollection(seats.values());
    }
On the other hand, if we apply javax.ejb.LockType.WRITE, the single-threaded access policy is enforced, as shown in the following code:
    @Lock(WRITE)
    public void buyTicket(int seatId) throws SeatBookedException, NoSuchSeatException {
        final Seat seat = getSeat(seatId);
        if (seat.isBooked()) {
            throw new SeatBookedException("Seat " + seatId + " already booked!");
        }
        addSeat(seat.getBookedSeat());
    }
The general idea is to use READ type locks on methods that just read values from the cache and WRITE type locks for methods that change the values of elements contained in the cache. Keep in mind that WRITE type locks block all methods with READ type locks. It is crucial that the singleton will have exclusive control of the modifications of its state. Lack of proper encapsulation mixed with the pass-by-reference semantic (used in local and no-interface views of EJBs) can lead to hard-to-find concurrency bugs. Using immutable objects as return values for singletons is a good strategy to solve these kind of problems. Another strategy would be to return only copies of our objects or switching to the pass-by-value semantic. The last strategy can be applied by switching to a remote business interface in the singleton.
In the TheatreBox code, you have probably noticed a @AccessTimeout annotation (with value 5 and unit TimeUnit.MINUTES). When you execute a query against a method with @Lock (WRITE), and if some other thread is already accessing it, then after 5 seconds of waiting, you will get a timeout exception. In order to change this behavior (for example, by prolonging the allowed wait time), you can specify a @javax.ejb.AccessTimout annotation at the method or class level.
The other possible option is to use a bean-managed concurrency strategy that can be pursued by applying the @javax.ejb.ConcurrencyManagement annotation with an argument of ConcurrencyManagementType.BEAN. This annotation will disable the effect of the @Lock annotation we have used so far, putting the responsibility of ensuring that the singleton cache does not get corrupted on the developer.
So, in order to ensure that our bookings are preserved, we will need to use a well-known synchronized keyword on top of the buyTicket method, which is as follows:
@Singleton
@Startup
@ConcurrencyManagement(ConcurrencyManagementType.BEAN)
public class TheatreBox {
. . . .
  public synchronized void buyTicket(int seatId) {
    final Seat seat = getSeat(seatId);
    if (seat.isBooked()) {
        throw new SeatBookedException("Seat " + seatId + " already booked!");
    }
    addSeat(seat.getBookedSeat());
}
Since concurrent access is restricted when a thread enters the synchronized block, no other methods are allowed to access the object while the current thread is in the block. Using a synchronized block is equivalent to having a container-managed concurrency with default locks of type WRITE on all methods. This is one of the few places in Java EE when the developer may use synchronization primitives without affecting the stability of the container.
Our singleton EJB is equipped with the methods to handle our store of theatre seats. We will now add a couple of session beans to our project to manage the business logic, a stateless session bean that will provide a view of the theatre seats and stateful beans that will behave as a payment gateway to our system.
So, the first bean we will create is com.packtpub.wflydevelopment.chapter3.boundary.TheatreInfo, which barely contains the logic to look up the list of theatre seats. In practice, this bean acts as a facade for our singleton bean, as shown in the following code:
@Stateless
@Remote(TheatreInfoRemote.class)
public class TheatreInfo implements TheatreInfoRemote {
    @EJB
    private TheatreBox box;

    @Override
    public String printSeatList() {
        final Collection<Seat> seats = box.getSeats();
        final StringBuilder sb = new StringBuilder();
        for (Seat seat : seats) {
            sb.append(seat.toString());
            sb.append(System.lineSeparator());
        }
        return sb.toString();
    }
}
Since we are planning to invoke this EJB from a remote client, we defined a remote interface for it with the @Remote(TheatreInfoRemote.class) annotation.
Next, take a look at the @EJB TheatreBox box, which can be used to safely inject an EJB into your class without the need of a manual JNDI lookup. This practice can be used to increase the portability of your application between different application servers, where different JNDI rules might exist.
The remote interface of your bean will be as simple as the following code:
public interface TheatreInfoRemote {
    String printSeatList();
}
Note
If you are planning to expose your EJB to local clients only (for example, to a servlet), you can leave out the remote interface definition and simply annotate your bean with @Stateless. The application server will create a no-interface view of your session bean, which can safely be injected into your local clients such as servlets or other EJBs. Be mindful that this also changes the semantics of the methods parameters and return values. For remote views, they will be serialized and passed by value.
In order to keep track of how much money our customer has got in his pocket, we will need a session-aware component. Turning a Java class into a stateful session bean is just a matter of adding a @Stateful annotation on top of it, as in our example com.packtpub.wflydevelopment.chapter3.boundary.TheatreBooker class. This is shown in the following code:
@Stateful
@Remote(TheatreBookerRemote.class)
@AccessTimeout(value = 5, unit = TimeUnit.MINUTES)
public class TheatreBooker implements TheatreBookerRemote {
    private static final Logger logger = Logger.getLogger(TheatreBooker.class);

    @EJB
    private TheatreBox theatreBox;
    private int money;

    @PostConstruct
    public void createCustomer() {
        this.money = 100;
    }

    @Override
    public int getAccountBalance() {
        return money;
    }

    @Override
    public String bookSeat(int seatId) throws SeatBookedException, NotEnoughMoneyException, NoSuchSeatException {
        final int seatPrice = theatreBox.getSeatPrice(seatId);
        if (seatPrice > money) {
            throw new NotEnoughMoneyException("You don't have enough money to buy this " + seatId + " seat!");
        }

        theatreBox.buyTicket(seatId);
        money = money - seatPrice;

        logger.infov("Seat {0} booked.", seatId);
        return "Seat booked.";
    }
}
As you can see, the previous bean bears a @PostConstruct annotation to initialize a session variable (money) that will be used to check whether the customer has enough money to buy the ticket. When using EJBs, we don't use constructors and destructors to perform actions on an object to create or destroy. The reason is that the point object might not have injected all objects it depends on. The method annotated with @PostConstruct is executed when object creation is already finished, that is, all objects are injected to it. There is a second annotation related to the EJB life cycle, @PreDestroy, which is executed before the object is destroyed.
Besides this, the ultimate purpose of our SFSB is to invoke the buyTicket method of our singleton after having performed some business checks.
If the business checks do not pass, the application will issue some exceptions. This is the case, for example, if the seat has already been booked or if the customer hasn't got enough money to buy the ticket. In order to keep our conversation going, it's important that our exception will be an extension of the generic Exception class. Refer to the following code for more information:
public class SeatBookedException extends Exception {
  // some code
}
If we use a runtime exception (for example, EJBException), the bean instance will be discarded, and the communication between the remote client and server will be dropped. So, always take care to choose the appropriate type of exception when dealing with EJBs—choose to throw a runtime exception if you are dealing with an unrecoverable scenario (the connection with the enterprise information system is dropped). This kind of exception is called a System Exception. On the other hand, consider throwing a checked exception (or simply not throwing exceptions at all), if you are dealing with a business kind of exception; for example, if the booked seat is already engaged. Recoverable exceptions are called Application Exceptions.
There is also a possibility to mark a runtime exception (which would normally be a System Exception) as a recoverable exception, using the @ApplicationException annotation. You may even decide if the current transaction should be rolled back (which is the default behavior for system exceptions) using @ApplicationException (with rollback true) on an exception class or the EJBContext.setRollbackOnly statement inside a business method. The decision to roll back a transaction is up to the developer, and in most cases, it depends on the business scenario.