In this chapter, you will learn:
- What the new input/output is
- How to create different types of buffers
- How to read data from buffers and write data to buffers
- How to manipulate position, limit, and mark properties of a buffer
- How to create different types of views of a buffer
- How to encode/decode data in a buffer using different charsets
- What channels are and how to use channels to read/write the file contents
- How to use memory-mapped files for faster I/O
- How to use file locks
- How to know the byte order of a machine and how to deal with byte order when using buffers
All example programs in this chapter are a member of a jdojo.nio module, as declared in Listing 9-1.
// module-info.java
module jdojo.nio {
exports com.jdojo.nio;
}
Listing 9-1.
The Declaration of a jdojo.nio Module
What Is NIO?
The stream-based I/O uses streams to transfer data between a data source/sink and a Java program. The Java program reads from or writes to a stream one byte at a time. This approach to performing I/O operations is slow. The new input/output
(NIO) solves the slow speed problem in the old stream based I/O.
In NIO
, you deal with channels and buffers for I/O operations. A channel is like a stream. It represents a connection between a data source/sink and a Java program for data transfer. There is one difference between a channel and a stream. A stream can be used for one-way data transfer. That is, an input stream can only transfer data from a data source to a Java program; an output stream can only transfer data from a Java program to a data sink. However, a channel provides a two-way data transfer facility. You can use a channel to read data as well as to write data. You can obtain a read-only channel, a write-only channel, or a read-write channel, depending on your needs.
In stream-based I/O
, the basic unit of data transfer is a byte. In channel-based NIO
, the basic unit of data transfer is a buffer. A buffer is a bounded data container. That is, a buffer has a fixed capacity that determines the upper limit of the data it may contain. In stream-based I/O, you write data directly to the stream. In channel-based I/O, you write data into a buffer; you pass that buffer to the channel, which writes the data to the data sink. Similarly, when you want to read data from a data source, you pass a buffer to a channel. The channel reads data from the data source into the buffer. You read data from the buffer. Figure 9-1 depicts the interaction between a channel, a buffer, a data source, a data sink, and a Java program. It is evident that the most important parts in this interaction are reading from a buffer and writing into a buffer. I discuss buffers and channels in detail in subsequent sections.
Figure 9-1.
Interaction between a channel, buffers, a Java program, a data source, and a data sink
Buffers
A buffer is a fixed-length data container. There is a separate buffer type to hold data for each type of primitive value, except for boolean type values. A buffer is an object in your program. You have a separate class to represent each type of buffer. All buffer classes are inherited from an abstract Buffer class. Buffer classes that hold primitive values
are as follows:
- ByteBuffer
- ShortBuffer
- CharBuffer
- IntBuffer
- LongBuffer
- FloatBuffer
- DoubleBuffer
An object of an XxxBuffer class is used to hold data of the Xxx primitive data type. For example, a ByteBuffer holds byte values; a ShortBuffer holds short values; a CharBuffer is holds characters, and so on. The following are the four important properties
of a buffer, which you must understand to use it effectively:
- Capacity
- Position
- Limit
- Mark
The capacity of a buffer is the maximum number of elements that it can hold. The capacity of a buffer is fixed when the buffer is created. You can think of the capacity of a buffer as the length of an array. Once you create an array, its length is fixed. Similarly, once you create a buffer, its capacity is fixed. However, a buffer is not necessarily backed by an array. You can check if a buffer is backed by an array by calling its hasArray()
method, which returns true if the buffer is backed by an array. You can get access to the backing array of a buffer by using the array()
method of the buffer object. Once you get access to the backing array of a buffer, any changes made to that array will be reflected in the buffer. A buffer has a capacity()
method that returns its capacity as an int.
You can create a buffer of a particular kind in many ways. You can create a buffer by using the allocate()
factory method of a particular buffer class as follows:
// Create a byte buffer with the capacity as 8
ByteBuffer bb = ByteBuffer.allocate(8);
// Assigns 8 to the capacity variable
int capacity = bb.capacity();
// Create a character buffer with the capacity as 1024
CharBuffer cb = CharBuffer.allocate(1024);
A byte buffer gets special treatment in NIO. It has an extra method called allocateDirect()
that creates a byte buffer for which the memory is allocated from the operating system memory, not from the JVM heap. This avoids copying the contents to intermediate buffers during I/O operations. A direct buffer has an additional creation cost. However, it is faster during the I/O operations. You should use a direct byte buffer when a buffer is long-lived. You can use the isDirect()
method of the ByteBuffer class to check if a buffer is direct or non-direct.
// Create a direct byte buffer of 512 bytes capacity
ByteBuffer bbd = ByteBuffer.allocateDirect(512);
Another way to create a buffer is to wrap an array using the buffer’s static wrap()
method:
// Create an array of bytes
byte[] byteArray = new byte[512];
// Create a byte buffer by wrapping the byteArray
ByteBuffer bb = ByteBuffer.wrap(byteArray);
You can use the same technique to create a buffer to store other primitive values. I discuss other ways of creating a buffer later in this section.
When you create a buffer, all elements of the buffer are initialized to a value of zero. Each element of a buffer has an index. The first element has an index of 0 and the last element has an index of capacity – 1.
Position and limit are two properties of a buffer. When a buffer is created, its position is set to 0 and its limit is equal to its capacity. A buffer’s position is the index of the next element to be read or written. A buffer’s limit is the index of the first element that should not be read or written. So, a read/write operation start at the buffer’s position (inclusive) and may continue up to the buffer’s limit (exclusive).
Figure 9-2 shows the state of a buffer with a capacity of 8 just after its creation. All its elements have a value of 0. Its position is set to zero. Its limit is set to 8, which is equal to its capacity. In the figure, P and L denote the position and the limit of the buffer, respectively. Note that the figure shows the index at 8, which is out of range for the buffer, to show the value of the limit.
Figure 9-2.
A buffer of capacity 8 after its creation
You can get/set the position of a buffer using its overloaded position() method. The position()
method returns the current value of the position of a buffer. The position(int newPosition) method sets the position of the buffer to the specified newPosition value and returns the reference of the buffer.
You can get/set the limit of a buffer using its overloaded limit() method. The limit()
method returns the current value of the limit of a buffer. The limit(int newLimit) method sets the limit of a buffer to the specified newLimit value and returns the reference of the buffer.
You can bookmark a position of a buffer by using the mark() method. When you call the mark()
method, the buffer stores the current value of its position as its mark value. You can set the position of a buffer to its previously bookmarked value by using the reset() method. The buffer’s mark is not defined when it is created. You must call the reset() method on a buffer only when its mark is defined. Otherwise, the reset()
method throws an InvalidMarkException.
The following invariant must hold during the lifetime of a buffer:
0 <= mark <= position <= limit <= capacity
Since the capacity of a buffer never changes and mark has limited use through the mark() and reset() methods, I limit the discussion only to the position and limit properties of a buffer. There are some indirect consequences of changing the position and limit values. Since the mark cannot be greater than the position, the mark is discarded if the position is set less than the current mark value. If you set the limit less than the position, the position is automatically set equal to the limit value.
So far, you have read a great deal on buffers. It’s time to see a buffer in action. Listing 9-2 contains the code to create a new buffer and display its four properties.
// BufferInfo.java
package com.jdojo.nio;
import java.nio.ByteBuffer;
import java.nio.InvalidMarkException;
public class BufferInfo {
public static void main(String[] args) {
// Create a byte buffer of capacity 8
ByteBuffer bb = ByteBuffer.allocate(8);
System.out.println("Capacity: " + bb.capacity());
System.out.println("Limit: " + bb.limit());
System.out.println("Position: " + bb.position());
// The mark is not set for a new buffer. Calling the reset() method
// throws a runtime exception if the mark is not set. If the mark is set,
// the position is set to the mark value.
try {
bb.reset();
System.out.println("Mark: " + bb.position());
} catch (InvalidMarkException e) {
System.out.println("Mark is not set");
}
}
}
Capacity: 8
Limit: 8
Position: 0
Mark is not set
Listing 9-2.
Mark, Position, Limit, and Capacity of a New Buffer
Reading from and Writing to a Buffer
There are two ways to read data
from a buffer:
- Using absolute position
- Using relative position
In an absolute position read, you specify the index in the buffer from which you want to read the data. The position of the buffer is unchanged after an absolute position read.
In a relative position read, you specify how many data elements you want to read. The current position of the buffer determines which data elements will be read. In a relative position read, the read starts at the current position of the buffer and the position is incremented by one after reading each data element.
The get()
method is used to read data from a buffer. The get() method is overloaded. It has four versions. Just replace the data type byte with another data type for other primitive type buffers in the following methods:
- get(int index): Returns the data at the given index. For example, get(2) will return the data at index 2 from the buffer. It is an absolute way of reading data from a buffer because you provide the absolute position of the element from which you want to read the data. This method does not change the current position of the buffer.
- get(): Returns the data from the current position in the buffer and increases the position by 1. For example, if position is set at index 2, calling the get() method will return the value at index 2 from the buffer and set the position to 3. It is a relative way of reading data from a buffer because you read the data relative to the current position.
- get(byte[] destination, int offset, int length): Reads data from a buffer in bulk. It reads length number of bytes from the current position of the buffer and puts them in the specified destination array starting at the specified offset. If it cannot read the length number of bytes from the buffer, it throws a BufferUnderflowException. If there is no exception, it increases the current position by length. It is a relative read from a buffer.
- get(byte[] destination): Fills the specified destination array by reading data from the current position of the buffer and increments the current position by one each time it reads a data element. If there is not enough data to fill the array, it will throw a BufferUnderflowException. It is a relative way of reading data from a buffer. This method call is the same as calling get(byte[] destination, 0, destination.length).
Writing data
to a buffer is the opposite of reading data from it. The put() method is used to write data to a buffer. The put()
method has five versions: one for absolute position write and four for relative position write. The absolute version of the put() method does not affect the position of the buffer. The relative versions of the put() method write the data and advance the position of the buffer by one for each written element. Different buffer classes have different versions of the put() method; however, there are five versions that are common among all types of buffers. The following are the five versions of the put() method for ByteBuffer. These methods throw a ReadOnlyBufferException when the buffer is read-only. Just replace the data type byte with another data type for other primitive type buffers in the following methods.
- put(int index, byte b): Writes the specified b data at the specified index. The call to this method does not change the current position of the buffer.
- put(byte b): It is a relative put() method that writes the specified byte at the current position of the buffer and increments the position by 1. It throws a BufferOverflowException if there is not enough room in the buffer to the specified byte.
- put(byte[] source, int offset, int length): Writes the length number of bytes from the source array starting at offset to the buffer starting at the current position. The position of the buffer is incremented by length. It throws a BufferOverflowException if there is not enough room in the buffer to write all bytes.
- put(byte[] source): It is the same as calling put(byte[] source, 0, source.length).
- ByteBuffer put(ByteBuffer src): Reads the remaining bytes from the specified byte buffer src and writes them to the buffer. If the remaining space in the target buffer is less than the remaining bytes in the source buffer, a runtime BufferOverflowException is thrown.
Let’s have some pictorial views of the state
of a buffer and its properties after each read and write. Figure 9-3 through Figure 9-6 depict how the position of a buffer with a capacity of 8 is advanced after each write in the buffer. After the eighth write in the buffer, the position and the limit become equal. If you attempt to write a ninth time, you would get a BufferOverflowException. Note that I have used a relative write using the put(byte b) method.


Figure 9-3.
Buffer state with capacity 8 after creation; buffer state is (position=0, limit=8)
Figure 9-4.
Buffer state after calling put((byte)50); buffer state is (position= 1, limit=8)
Figure 9-5.
Buffer state after calling put((byte)51); buffer state is (position= 2, limit=8)
Figure 9-6.
Buffer state after calling put((byte)52), put((byte)53), put((byte)54), put((byte)55), put((byte)56), and put((byte)57); buffer state is (position= 8, limit=8)
Let’s read the data that you have just written into the buffer whose state is shown in Figure 9-6. Note that the position of the buffer is 8 and its limit is also 8. If you call the get() method (a relative read) to read data from this buffer, you would get a BufferUnderflowException. You have just filled the buffer with data. However, when you attempt to read the data, you get an exception because the get() method returns data from the current position of the buffer, which is out of range in this case. The get() method will return data only if the position of the buffer is in the range of 0 and 7. Let’s not lose hope and try to read the data using an absolute position with the get(int index) method. If you call get(0), get(1) ... get(7), you will be surprised to know that you can read all the data you had written. Listing 9-3 demonstrates this.
// BufferReadWrite.java
package com.jdojo.nio;
import java.nio.ByteBuffer;
public class BufferReadWrite {
public static void main(String[] args) {
// Create a byte buffer with a capacity of 8
ByteBuffer bb = ByteBuffer.allocate(8);
// Print the buffer info
System.out.println("After creation:");
printBufferInfo(bb);
// Populate buffer elements from 50 to 57
for (int i = 50; i < 58; i++) {
bb.put((byte) i);
}
// Print the buffer info
System.out.println("After populating data:");
printBufferInfo(bb);
}
public static void printBufferInfo(ByteBuffer bb) {
int limit = bb.limit();
System.out.println("Position = " + bb.position() + ", Limit = " + limit);
// Use absolute reading without affecting the position
System.out.print("Data: ");
for (int i = 0; i < limit; i++) {
System.out.print(bb.get(i) + " ");
}
System.out.println();
}
}
After creation:
Position = 0, Limit = 8
Data: 0 0 0 0 0 0 0 0
After populating data:
Position = 8, Limit = 8
Data: 50 51 52 53 54 55 56 57
Listing 9-3.
Writing to and Reading from a Buffer
Now you understand that there is a big difference in using relative and absolute
methods for reading from and writing to a buffer. Both methods have a working range. The data must be read and written in the working range. The working range for relative and absolute methods is different.
The working range for a relative read/write are the indices between position and limit –1 of the buffer, where position is less than limit -1. That is, you can read/write data using the relative get() and put() methods if the position of the buffer is less than its limit.
The working range for the absolute read/write is the index between zero and limit -1. So, how do you read all the data from a buffer using a relative position read, after you have finished writing data into the buffer? One way to accomplish this is to set the limit of the buffer equal to its position and set its position to 0. The following snippet of code shows this technique:
// Create a byte buffer of capacity 8 and populate its elements
ByteBuffer bb = ByteBuffer.allocate(8);
for(int i = 50; i < 58; i++) {
bb.put((byte)i);
}
// Set the limit the same as the position and set the position to 0
bb.limit(bb.position());
bb.position(0);
// Now bb is set to read all data using relative get() method
int limit = bb.limit();
for(int i = 0; i < limit; i++) {
byte b = bb.get(); // Uses a relative read
System.out.println(b);
}
50
51
52
53
54
55
56
57
The Buffer class has a method to accomplish just what you have coded in this snippet of code. You can set the limit of the buffer to its position and set the position to 0 by using its flip() method. Figure 9-7 shows the state of a buffer, which has a capacity of 8, after it has been created and after its two elements at index 0 and 1 have been written. Figure 9-8 shows the state of the buffer after its flip()
method is called. The flip() method discards the mark of a buffer if it is defined.

Figure 9-7.
Buffer’s state just after you have written two elements at indexes 0 and 1
Figure 9-8.
Buffer’s state after writing two elements at indexes 0 and 1 and calling the flip() method
In the previous snippet of code, you used a for loop to read the data from the buffer. The index of the for loop runs from zero to limit –1. However, there is an easier way to read/write data from/to a buffer using a relative read/write method. The hasRemaining()
method of a buffer returns true if you can use relative get() or put() method on the buffer to read/write at least one element. You can also get the maximum number of elements you can read/write using relative get() or put() methods by using its remaining() method. Listing 9-4 demonstrates the use of these methods.
// BufferReadWriteRelativeOnly.java
package com.jdojo.nio;
import java.nio.ByteBuffer;
public class BufferReadWriteRelativeOnly {
public static void main(String[] args) {
// Create a byte buffer of capacity 8
ByteBuffer bb = ByteBuffer.allocate(8);
// Print the buffer info
System.out.println("After creation:");
printBufferInfo(bb);
// Must call flip() to reset the position to zero because the printBufferInfo()
// method uses relative get() method, which increments the position.
bb.flip();
// Populate buffer elements from 50 to 57
int i = 50;
while (bb.hasRemaining()) {
bb.put((byte) i++);
}
// Call flip() again to reset the position to zero,
// because the above put() call incremented the position
bb.flip();
// Print the buffer info
System.out.println("After populating data:");
printBufferInfo(bb);
}
public static void printBufferInfo(ByteBuffer bb) {
int limit = bb.limit();
System.out.println("Position = " + bb.position() + ", Limit = " + limit);
// We use relative method of reading the data, so it affects the
// the position of the buffer
System.out.print("Data: ");
while (bb.hasRemaining()) {
System.out.print(bb.get() + " ");
}
System.out.println();
}
}
After creation:
Position = 0, Limit = 8
Data: 0 0 0 0 0 0 0 0
After populating data:
Position = 0, Limit = 8
Data: 50 51 52 53 54 55 56 57
Listing 9-4.
Using the flip() and hasRemaining() Methods of a Buffer Between Relative Reads and Writes
Apart from the flip() method, there are three more methods of a buffer that change its mark, position, and/or limit. They are clear(), reset(), and rewind().
The clear() method of a buffer sets the position to zero, limit to its capacity, and discards its mark. That is, it sets the buffer’s properties as if the buffer has just been created. Note that it does not change any data in the buffer. Figure 9-9 and Figure 9-10 show the mark, position, and limit of a buffer before and after calling the clear() method. Typically, you call the clear() method on a buffer before you start filling it with fresh data.

Figure 9-9.
Buffer’s state before calling its clear()
method
Figure 9-10.
Buffer’s state after calling its clear() method; the clear() method discarded the mark
The reset() method sets the position of a buffer equal to its mark. If a mark is not defined, it throws an InvalidMarkException. It does not affect the limit and data of the buffer. Typically, it is called to revisit (for rereading or rewriting) the buffer’s elements starting from the previously marked position and up to the current position. The mark of the buffer remains unchanged by the reset() method. Figure 9-11 and Figure 9-12 show the states of a buffer before and after its reset() method is called.

Figure 9-11.
Buffer’s state before calling its reset()
method
Figure 9-12.
Buffer’s state after calling its reset() method
The rewind() method sets the position of the buffer to zero and discards its mark. It does not affect the limit. Typically, you call this method between multiple read/write operations to use the same number of data elements in the buffer multiple times. Figure 9-13 and Figure 9-14 show the state of a buffer before and after calling its rewind() method.

Figure 9-13.
Buffer’s state before calling its rewind()
method
Figure 9-14.
Buffer’s state after calling its rewind() method
Read-Only Buffers
A buffer can be read-only
or read-write. You can only read the contents of a read-only buffer. Any attempt to change the contents of a read-only buffer results in a ReadOnlyBufferException. Note that the properties of a read-only buffer such as its position, limit, and mark can be changed during the read operations, but not its data.
You may want to get a read-only buffer from a read-write buffer, so you can pass it as an argument to a method to make sure the method does not modify buffer’s contents. You can get a read-only buffer by calling the asReadOnlyBuffer()
method of the specific buffer class. You can check if a buffer is read-only by calling the isReadOnly()
method as follows:
// Create a buffer that is read-write by default
ByteBuffer bb = ByteBuffer.allocate(1024);
boolean readOnly = bb.isReadOnly(); // Assigns false to readOnly
// Get a read-only buffer
ByteBuffer bbReadOnly = bb.asReadOnlyBuffer();
readOnly = bbReadOnly.isReadOnly(); // Assigns true to readOnly
The read-only buffer returned by the
asReadOnlyBuffer() method
is a different view of the same buffer. That is, the new read-only buffer shares data with its original buffer. Any modifications to the contents of the original buffer are reflected in the read-only buffer. A read-only buffer has the same value of position, mark, limit, and capacity as its original buffer at the time of creation and it maintains them independently afterwards.
Different Views of a Buffer
You can obtain different views of a buffer. A view of a buffer shares data with the original buffer and maintains its own position, mark, and limit. I discussed getting a read-only view of a buffer in the previous section that does not let its contents be modified. You can also duplicate a buffer, in which case they share contents, but maintain mark, position, and limit independently. Use the duplicate() method of a buffer to get a copy of the buffer as follows:
// Create a buffer
ByteBuffer bb = ByteBuffer.allocate(1024);
// Create a duplicate view of the buffer
ByteBuffer bbDuplicate = bb.duplicate();
You can also create a sliced view of a buffer. That is, you can create a view of a buffer that reflects only a portion of the contents of the original buffer. You use the slice() method of a buffer to create its sliced view as follows:
// Create a buffer
ByteBuffer bb = ByteBuffer.allocate(8);
// Set the position and the limit before getting a slice
bb.position(3);
bb.limit(6);
// bbSlice buffer will share data of bb from index 3 to 5.
// bbSlice will have position set to 0 and its limit set to 3.
ByteBuffer bbSlice = bb.slice();
Tip
JDK9 added the duplicate() and slice() methods to the Buffer class, which is the superclass of other buffer types. In JDK8, these methods were in subclasses of the Buffer class. The return type of these methods in the Buffer class is Buffer, whereas subclasses override these methods and their return types are specific subclass types. For example, the return types of these methods in the ByteBuffer class are ByteBuffer.
You can also get a view of a byte buffer for different primitive data types. For example, you can get a character view, a float view, etc. of a byte buffer. The ByteBuffer class contains methods such as asCharBuffer(), asLongBuffer(), asFloatBuffer(), etc. to obtain a view for other primitive data types.
// Create a byte buffer
ByteBuffer bb = ByteBuffer.allocate(8);
// Create a char view of the byte buffer
CharBuffer cb = bb.asCharBuffer();
// Create a float view of the byte buffer
FloatBuffer fb = bb.asFloatBuffer();
Character Set
A character is not always stored in one byte. The number of bytes used to store a character depends on the coded character set and the character-encoding scheme. A coded-character set is a mapping between a set of abstract characters and a set of integers. A character-encoding scheme is a mapping between a coded-character set and a set of octet sequence. Refer to Appendix A in the first volume of this series for more details on character set and character encoding.
An instance of the java.nio.charset.Charset class represents a character set and a character-encoding scheme. Examples of some character set names are US-ASCII, ISO-8859-1, UTF-8, UTF-16BE, UTF-16LE, and UTF-16.
The process of converting a character into a sequence of bytes based on an encoding scheme is called character
encoding
. The process of converting a sequence of bytes into a character based on an encoding scheme is called
decoding
.
In NIO, you can convert a Unicode character to a sequence of bytes and vice versa using an encoding scheme. The java.nio.charset package provides classes to encode/decode a CharBuffer to a ByteBuffer and vice versa. An object of the Charset class represents the encoding scheme. The
CharsetEncoder
class performs the encoding. The
CharsetDecoder
class performs the decoding. You can get an object of the Charset class using its forName() method by passing the name of the character set as its argument.
The String and InputStreamReader classes support character encoding and decoding. When you use str.getBytes("UTF-8"), you are encoding the Unicode-characters stored in the string object str to a sequence of bytes using the UTF-8 encoding-scheme. When you use the constructor of the String class String(byte[] bytes, Charset charset) to create a String object, you are decoding the sequence of bytes in the bytes array from the specified character set to the Unicode-character set. You are also decoding a sequence of bytes from an input stream into Unicode-characters when you create an object of the InputStreamReader class using a character set.
For simple encoding and decoding tasks, you can use the encode() and decode() methods of the Charset class. Let’s encode a sequence of characters in the string Hello stored in a character buffer and decode it using the UTF-8 encoding-scheme. The snippet of code to achieve this is as follows:
// Get a Charset object for UTF-8 encoding
Charset cs = Charset.forName("UTF-8");
// Character buffer to be encoded
CharBuffer cb = CharBuffer.wrap("Hello");
// Encode character buffer into a byte buffer
ByteBuffer encodedData = cs.encode(cb);
// Decode the byte buffer back to a character buffer
CharBuffer decodedData = cs.decode(encodedData);
The encode() and decode() methods of the Charset class are easy to use. However, they cannot be used in all situations. They require you to know the inputs in advance. Sometimes you do not know the data to be encoded/decoded in advance.
CharsetEncoder
and
CharsetDecoder
classes provide much more power during the encoding and decoding process. They accept a chunk of input to be encoded or decoded. The encode() and decode() methods of the Charset class return the encoded and decoded buffers to you. However, CharsetEncoder and CharsetDecoder will let you use your buffers for input and output data. The power comes with a little complexity! If you want more powerful encoding/decoding, you need to use the following five classes instead of just the Charset class:
- Charset
- CharsetEncoder
- CharsetDecoder
- CoderResult
- CodingErrorAction
You still need to use the Charset class to represent a character set. A CharsetEncoder object lets you encode characters into a sequence of bytes using its encode() method. A sequence of bytes is decoded using the decode() method of a CharsetDecoder object. The newEncoder() method of a Charset object returns an instance of the CharsetEncoder class, whereas its newDecoder() method returns an instance of the CharsetDecoder class.
// Get encoder and decoder objects from a Charset object
Charset cs = Charset.forName("UTF-8");
CharsetEncoder encoder = cs.newEncoder();
CharsetDecoder decoder = cs.newDecoder();
Two buffers, an input buffer and an output buffer, are needed for encoding and decoding. A character buffer supplies the input characters
to the encoding process and receives the decoded characters from the decoding process. The encoding process writes the encoded result into a byte buffer and the decoding process reads its input from a byte buffer. The following snippet of code illustrates the few steps in using an encoder and a decoder:
// Encode characters, which are in the inputChars buffer.
// The outputBytes buffer receives encoded bytes.
CharBuffer inputChars = /* get input characters to be encoded */;
ByteBuffer outputBytes = /* get the output buffer for the encoded data */;
boolean eoi = true; // Indicates the end of the input
CoderResult result = encoder.encode(inputChars, outputBytes, eoi);
// Decode bytes, which are in the inputBytes buffer.
// The outputChars buffer receives the decoded characters.
ByteBuffer inputBytes = /* get the input bytes to be decoded */;
CharBuffer outputChars = /* get the output buffer for the decoded characters */;
boolean eoi = true; // Indicates the end of the input
CoderResult result = decoder.decode(inputBytes, outputChars, eoi);
Consider a situation of encoding 16 characters stored in a character buffer using a 4-byte buffer. The encoding process cannot encode all characters in one call to the encode() method. There must be a way to read all encoded output repeatedly. You can apply the same argument for the decoding process. You can pass an input to the encoding/decoding process and receive an output from them in chunks. The encoder’s encode() method and decoder’s decode() method return an object of the
CoderResult class
, which contains the status of the encoding/decoding process. There are two important results that this object can indicate:
- Underflow
- Overflow
An
underflow
indicates that the process needs more input. You can test for this condition by using the isUnderflow() method of the CoderResult object. You can also test this condition by comparing the return value of the encode() or decode() method with CoderResult.UNDERFLOW object as follows:
CoderResult result = encoder.encode(input, output, eoi);
if (result == CoderResult.UNDERFLOW) {
// Supply some more input
}
An overflow indicates that the process has produced more output than the capacity of the output buffer. You need to empty the output buffer and call the encode()/decode() method again to get more output. You can test for this condition by using the
isOverflow() method
of the CoderResult object. You can also test for this condition by comparing the return value of the encode() or decode() method with CoderResult.OVERFLOW object as follows:
CoderResult result = encoder.encode(input, output, eoi);
if (result == CoderResult.OVERFLOW) {
// Empty output buffer to make some room for more output
}
Tip
Apart from reporting buffer underflow and overflow, a CoderResult object is also capable of reporting a malformed-input error and an unmappable-character error. You can also customize the default action of the encoding/decoding engine for these error conditions by using their onMalformedInput() and onUnmappableCharacter() methods.
The last argument to the encode()/decode() method is a boolean value, which indicates the end of the input. You should pass true for the end of the input argument when you pass the last chunk of data for encoding or decoding.
After passing the last chunk of data, you need to call the flush()
method to flush the internal buffer of the engine. It returns an object of CoderResult that can indicate underflow or overflow. If there is an overflow, you need to empty the output buffer and call the flush() method again. You need to keep calling the flush() method until its return value indicates an underflow. The flush() method call should be placed in a loop, so you get all of the encoded/decoded data.
The DataSourceSink class in Listing 9-5 serves as a data source and a data sink. I created this class only for illustration purposes; you would not need a class like this in a real-world application. It supplies a stanza from the poem Lucy by William Wordsworth in a character buffer. The getCharData() method fills the character buffer. It returns -1 when there are no more characters to supply. You use this method during the encoding process. The storeByteData()
method is used to accumulate the encoded bytes during the encoding process. The getByteData()
method is used during the decoding process to supply the encoded bytes in chunks that you accumulate during the encoding process.
// DataSourceSink.java
package com.jdojo.nio;
import java.nio.ByteBuffer;
import java.nio.CharBuffer;
public class DataSourceSink {
private CharBuffer cBuffer = null;
private ByteBuffer bBuffer = null;
public DataSourceSink() {
String text = this.getText();
cBuffer = CharBuffer.wrap(text);
}
public int getByteData(ByteBuffer buffer) {
if (!bBuffer.hasRemaining()) {
return -1;
}
int count = 0;
while (bBuffer.hasRemaining() && buffer.hasRemaining()) {
buffer.put(bBuffer.get());
count++;
}
return count;
}
public int getCharData(CharBuffer buffer) {
if (!cBuffer.hasRemaining()) {
return -1;
}
int count = 0;
while (cBuffer.hasRemaining() && buffer.hasRemaining()) {
buffer.put(cBuffer.get());
count++;
}
return count;
}
public void storeByteData(ByteBuffer byteData) {
if (this.bBuffer == null) {
int total = byteData.remaining();
this.bBuffer = ByteBuffer.allocate(total);
while (byteData.hasRemaining()) {
this.bBuffer.put(byteData.get());
}
this.bBuffer.flip();
} else {
this.bBuffer = this.appendContent(byteData);
}
}
private ByteBuffer appendContent(ByteBuffer content) {
// Create a new buffer to accommodate new data
int count = bBuffer.limit() + content.remaining();
ByteBuffer newBuffer = ByteBuffer.allocate(count);
// Set the position of bBuffer that has some data
bBuffer.clear();
newBuffer.put(bBuffer);
newBuffer.put(content);
bBuffer.clear();
newBuffer.clear();
return newBuffer;
}
public final String getText() {
String newLine = System.getProperty("line.separator");
StringBuilder sb = new StringBuilder();
sb.append("My horse moved on; hoof after hoof");
sb.append(newLine);
sb.append("He raised, and never stopped:");
sb.append(newLine);
sb.append("When down behind the cottage roof,");
sb.append(newLine);
sb.append("At once, the bright moon dropped.");
return sb.toString();
}
}
Listing 9-5.
A Data Source and Sink that Supplies Character Data and Stores and Supplies Byte Data
Listing 9-6 demonstrates how to use a character set encoder/decoder. The encode() and decode() methods of the CharEncoderDecoder class have the encoding and decoding logic. This example displays the decoded characters on the standard output.
// CharEncoderDecoder.java
package com.jdojo.nio;
import java.nio.ByteBuffer;
import java.nio.CharBuffer;
import java.nio.charset.Charset;
import java.nio.charset.CharsetDecoder;
import java.nio.charset.CharsetEncoder;
import java.nio.charset.CoderResult;
public class CharEncoderDecoder {
public static void main(String[] args) throws Exception {
DataSourceSink dss = new DataSourceSink();
// Display the text we are going to encode
System.out.println("Original Text:");
System.out.println(dss.getText());
System.out.println("--------------------");
// Encode the text using UTF-8 encoding. We will store
// encoded bytes in the dss object during the encoding process
encode(dss, "UTF-8");
// Decode bytes stored in the dss object using UTF-8 encoding
System.out.println("Decoded Text:");
decode(dss, "UTF-8");
}
public static void encode(DataSourceSink ds, String charset) {
CharsetEncoder encoder = Charset.forName(charset).newEncoder();
CharBuffer input = CharBuffer.allocate(8);
ByteBuffer output = ByteBuffer.allocate(8);
// Initialize variables for loop
boolean endOfInput = false;
CoderResult result = CoderResult.UNDERFLOW;
while (!endOfInput) {
if (result == CoderResult.UNDERFLOW) {
input.clear();
endOfInput = (ds.getCharData(input) == -1);
input.flip();
}
// Encode the input characters
result = encoder.encode(input, output, endOfInput);
// Drain output when
// 1. It is an overflow. Or,
// 2. It is an underflow and it is the end of the input
if (result == CoderResult.OVERFLOW
|| (endOfInput && result == CoderResult.UNDERFLOW)) {
output.flip();
ds.storeByteData(output);
output.clear();
}
}
// Flush the internal state of the encoder
while (true) {
output.clear();
result = encoder.flush(output);
output.flip();
if (output.hasRemaining()) {
ds.storeByteData(output);
output.clear();
}
// Underflow means flush() method has flushed everything
if (result == CoderResult.UNDERFLOW) {
break;
}
}
}
public static void decode(DataSourceSink dss, String charset) {
CharsetDecoder decoder = Charset.forName(charset).newDecoder();
ByteBuffer input = ByteBuffer.allocate(8);
CharBuffer output = CharBuffer.allocate(8);
boolean endOfInput = false;
CoderResult result = CoderResult.UNDERFLOW;
while (!endOfInput) {
if (result == CoderResult.UNDERFLOW) {
input.clear();
endOfInput = (dss.getByteData(input) == -1);
input.flip();
}
// Decode the input bytes
result = decoder.decode(input, output, endOfInput);
// Drain output when
// 1. It is an overflow. Or,
// 2. It is an underflow and it is the end of the input
if (result == CoderResult.OVERFLOW
|| (endOfInput && result == CoderResult.UNDERFLOW)) {
output.flip();
while (output.hasRemaining()) {
System.out.print(output.get());
}
output.clear();
}
}
// Flush the internal state of the decoder
while (true) {
output.clear();
result = decoder.flush(output);
output.flip();
while (output.hasRemaining()) {
System.out.print(output.get());
}
if (result == CoderResult.UNDERFLOW) {
break;
}
}
}
}
Original Text:
My horse moved on; hoof after hoof
He raised, and never stopped:
When down behind the cottage roof,
At once, the bright moon dropped.
--------------------
Decoded Text:
My horse moved on; hoof after hoof
He raised, and never stopped:
When down behind the cottage roof,
At once, the bright moon dropped.
Listing 9-6.
Charset Encoder and Decoder Using a DataSourceSink as a Data Supplier/Consumer for Encoding/Decoding
You can get the list of all available character sets supported by the JVM using the static availableCharsets() method of the Charset class, which returns a SortedMap<String,Charset> whose keys are character set names and values are Charset objects.
Tip
You can create your own character encoder/decoder by using the CharsetProvider class in java.nio.charset.spi package. You need to explore the java.nio.charset and java.nio.charset.spi packages for details on how to create and install your own character set. This book does not cover how to create and install a custom character set.
Listing 9-7 demonstrates how to list all character sets supported by the JVM. A partial output is shown. You may get a different output.
// AvailableCharsets.java
package com.jdojo.nio;
import java.util.Map;
import java.nio.charset.Charset;
import java.util.Set;
public class AvailableCharsets {
public static void main(String[] args) {
Map<String, Charset> map = Charset.availableCharsets();
Set<String> keys = map.keySet();
System.out.println("Available Character Set Count: " + keys.size());
for(String charsetName : keys) {
System.out.println(charsetName);
}
}
}
Available Character Set Count: 170
Big5
ISO-8859-1
US-ASCII
UTF-16
UTF-16BE
UTF-16LE
UTF-32
UTF-32BE
UTF-32LE
UTF-8
windows-1250
x-iso-8859-11
...
Listing 9-7.
List of Available Character Sets Supported by Your JVM
Channels
A channel is an open connection between a data source/data sink and a Java program to perform some I/O operations. The Channel interface is in the java.nio.channels package. It is used as a base to implement channels in Java. It declares only two methods: close() and isOpen(). When a channel is created, it is open and its isOpen() method returns true. Once you are finished using a channel, you should call its close()
method to close it. At that point, isOpen()
returns false. Figure 9-15 depicts the class diagram for the Channel interface.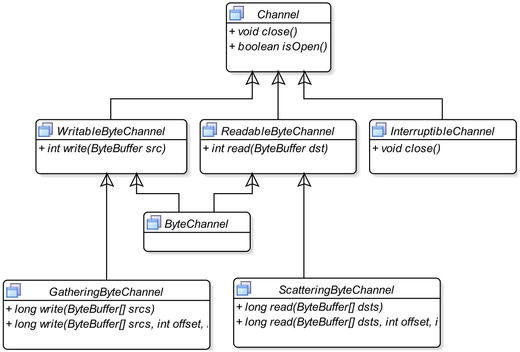
Figure 9-15.
A class diagram for the channel interface
Java program interacts with a channel for an I/O operation using byte buffers. That is, even if you have many different kinds of buffers, you will need to convert them to a byte buffer before you can pass them to a channel for reading/writing data.
A ReadableByte
Channel
is used to read data from a data source into a byte buffer using its read() method. A WritableByte
Channel
is used to write data from a byte buffer to a data sink using its write() method. A ByteChannel is capable of both reading and writing byte data.
A ScatteringByte
Channel
reads data from a data source into multiple byte buffers. It is useful to read data from a known file format or a similar data source, where data is supplied in some fixed-length headers followed by a variable length body. For example, suppose a file has a 256-byte fixed-length header and a variable length body. An object of the ScatteringByteChannel class is used to read data from this kind of file using two byte buffers. The first byte buffer will be of capacity 256. The second buffer will be of a size of your choice. When you pass these two buffers to this channel, the fixed-length header of 256 bytes will be read in the first buffer. The second buffer will have the file data and you may have to use the second buffer multiple times to read the rest of bytes from the file. The advantage of using this channel is separating the fixed-length header data from other data.
A GatheringByte
Channel
performs just the opposite of what a ScatteringByteChannel performs. It writes data from multiple byte buffers to a data sink. It is used to write data in a format that is grouped in some fixed-length headers, followed by a variable length body.
An
InterruptibleChannel
channel can be closed asynchronously. If a thread is blocked on an I/O operation on this channel, another thread can call its close() method to close it. The blocked thread will receive an AsynchronousCloseException. If a thread is blocked on an I/O operation on this channel, another thread can call the interrupt() method on the blocked thread. This channel is closed, and the blocked thread receives a ClosedByInterruptException exception.
Typically, you do not deal with these channel interfaces directly in your programs. You deal with concrete channel classes that implement one or more of these interfaces. Unlike I/O streams, you do not create a channel directly. You get it indirectly by calling a method. To obtain a channel for a data source and a data sink, you need to create an object of InputStream and OutputStream—using old ways of working with I/O using classes in the java.io package. The Channels class in the java.nio.channels package is a utility class that has many static methods to convert streams into channels and vice versa. The Channels class also provides methods to convert readers/writers to channels and vice versa. For example, if you have an input stream object named myInputStream, you can obtain a ReadableByteChannel as follows:
ReadableByteChannel rbc = Channels.newChannel(myInputStream);
If you have a ReadableByteChannel named rbc, you can obtain the underlying InputStream object as follows:
// Get the InputStream of the ReadableByteChannel
InputStream myInputStream = Channels.newInputStream(rbc);
The
FileInputStream and FileOutputStream classes
contain methods to work with channels. They have a method called get
Channel()
, which returns a FileChannel object. A FileChannel is used to read and write data to a file. A FileChannel obtained from a FileInputStream is opened in a read-only mode. A FileChannel obtained from a FileOutputStream object is opened in a write-only mode. If you obtain a FileChannel from a RandomAccessFile, it is opened in a read-only, write-only, or read-write mode, depending on the way you create that RandomAccessFile object. The following snippet of code obtains FileChannel objects for different kinds of file streams:
FileInputStream fis = new FileInputStream("luci1.txt");
FileChannel fcReadOnly = fis.getChannel(); // A read-only channel
FileOutputStream fos = new FileOutputStream("luci1.txt");
FileChannel fcWriteOnly = fos.getChannel(); // A write-only channel
// Open file in a read-only mode
RandomAccessFile raf1 = new RandomAccessFile("luci1.txt", "r");
FileChannel rafReadOnly = raf1.getChannel(); // A read-only channel
// Open file in a read-write mode
RandomAccessFile raf2 = new RandomAccessFile("luci1.txt", "rw");
FileChannel rafReadWrite = raf2.getChannel(); // A read-write channel
Tip
You can also obtain a FileChannel using the FileChannel.open() static method. This avoids the need to create an input/output stream to create a FileChannel. The new open() method uses a Path object, which is part of NIO 2. Refer to Chapter 9 on NIO 2 for more details on using a Path object.
Reading/Writing Files
I covered the basic concepts of buffers and channels. A FileChannel maintains a position as a buffer does. The read() and write() methods for FileChannel come in two varieties: relative position read/write and absolute position read/write. The meanings of relative and absolute position read/write are the same as in the context of a buffer read/write. When you open a FileChannel, its position is set to 0, which is the beginning of the file. When you read from a FileChannel using a relative read() method, its position is incremented by the number of bytes read. An absolute position read from a FileChannel does not affect its position. You can get the current value of the position of a FileChannel using its position() method. You can set its position to a new position using its position(int newPosition) method. You need to follow a few easy steps to read data from a file and to write data to a file using NIO.
The steps to read data
from a file using buffer and channel are as follows:
- 1.Create an object of the FileInputStream class.
- 2.Get a FileChannel object using the getChannel() method of the FileInputStream object that you created in the previous step.
- 3.Create a ByteBuffer object to read data from the file.
- 4.Call the read() method of the FileChannel object by passing a ByteBuffer object. Make sure that before you pass the ByteBuffer, the buffer’s position and limit are set appropriately. A simple rule of thumb is to always call the clear() method on the ByteBuffer before passing it to a channel to read data into it. The read() method of a channel returns the number of bytes read into the buffer.
- 5.Call the flip() method of the ByteBuffer, so you can read data into your program from the buffer. The previous step will change the position of the buffer because the channel reads data into it. You may need to use a CharsetDecoder object to decode the ByteBuffer into a character buffer if the bytes you have read represent characters.
- 6.Read data from the ByteBuffer into your program.
- 7.Repeat the process of reading data from the FileChannel into the ByteBuffer by calling its read() method until the read() method returns 0 or –1.
- 8.Close the channel using its close() method.
Tip
Like input/output streams, channels are also AutoCloseable. If you use a try-with-resources statement to obtain a channel, the channel will be closed automatically, thus avoiding a need for you to call the close() method of the channel explicitly.
Listing 9-8 puts all of these steps together. It reads text from a file named luci1.txt. The file should be in your current working directory. If the file does not exist, the program prints a message with the full path where the file is expected to exist. If you do not have this file, create it and enter the following text in the file, before you run the program:
STRANGE fits of passion have I known:
And I will dare to tell,
But in the lover's ear alone,
What once to me befell.
You need to pay close attention to the call to the clear() and flip() methods on a buffer. When you call the read() or write() method of a channel, it performs a relative position read/write on the buffer. Therefore, you must call the flip() method of the buffer to read data from it after the channel writes data into the buffer.
// FileChannelRead.java
package com.jdojo.nio;
import java.io.File;
import java.io.FileInputStream;
import java.io.IOException;
import java.nio.ByteBuffer;
import java.nio.channels.FileChannel;
public class FileChannelRead {
public static void main(String[] args) {
// The input file to read from
File inputFile = new File("luci1.txt");
// Make sure the input file exists
if (!inputFile.exists()) {
System.out.println("The input file " + inputFile.getAbsolutePath()
+ " does not exist.");
System.out.println("Aborted the file reading process.");
System.exit(1);
}
// Obtain channel for luci1.txt file to read from it
try (FileChannel fileChannel = new FileInputStream(inputFile).getChannel()) {
// Create a buffer
ByteBuffer buffer = ByteBuffer.allocate(1024);
// Read all data from the channel
while (fileChannel.read(buffer) > 0) {
// Flip the buffer before we can read data from it
buffer.flip();
// Display the read data as characters on the console.
// Note that we are assuming that a byte represents a
// character, which is not true all the time. In a
// real world application, you should use
// CharsetDecoder to decode the bytes into character
// before you display/use them.
while (buffer.hasRemaining()) {
byte b = buffer.get();
// Assuming a byte represents a character
System.out.print((char) b);
}
// Clear the buffer before the next read into it
buffer.clear();
}
} catch (IOException e) {
e.printStackTrace();
}
}
}
STRANGE fits of passion have I known:
And I will dare to tell,
But in the lover's ear alone,
What once to me befell.
Listing 9-8.
Reading from a File Using a Buffer and a Channel
The steps to write data
to a file using a buffer and a channel are as follows:
- 1.Create an object of the FileOutputStream class.
- 2.Get a FileChannel object using the getChannel() method of the FileOutputStream object that you created in the previous step.
- 3.Create a ByteBuffer object to write data to the file.
- 4.Fill the ByteBuffer with data.
- 5.Call the flip() method of the buffer to get it ready to be read by the channel.
- 6.Call the write() method of the FileChannel object by passing the ByteBuffer object filled with data.
- 7.Close the channel by calling its close() method.
Listing 9-9 puts all these steps together to write the following text to a luci5.txt file:
In one of those sweet dreams I slept,
Kind Nature's gentlest boon!
And all the while my eyes I kept
On the descending moon.
The code creates a string from the text inserting a platform-dependent new line character between two lines. It converts the text into a byte array, creates a ByteBuffer by wrapping the byte array, and writes the buffer to the file channel. Note that you do not need to use the flip() method on the buffer because, before passing it to the channel for writing, your buffer object was just created with the text, and its position and limit were set appropriately by the wrap() method. The program prints the path of the file in which the text was written that may be different on your machine.
// FileChannelWrite.java
package com.jdojo.nio;
import java.io.File;
import java.nio.channels.FileChannel;
import java.io.IOException;
import java.nio.ByteBuffer;
import java.io.FileOutputStream;
public class FileChannelWrite {
public static void main(String[] args) {
// The output file to write to
File outputFile = new File("luci5.txt");
try (FileChannel fileChannel = new FileOutputStream(outputFile).getChannel()) {
// Get the text as string
String text = getText();
// Convert text into byte array
byte[] byteData = text.getBytes("UTF-8");
// Create a ByteBuffer using the byte array
ByteBuffer buffer = ByteBuffer.wrap(byteData);
// Write bytes to the file
fileChannel.write(buffer);
System.out.println("Data has been written to "
+ outputFile.getAbsolutePath());
} catch (IOException e1) {
e1.printStackTrace();
}
}
public static String getText() {
String lineSeparator = System.getProperty("line.separator");
StringBuilder sb = new StringBuilder();
sb.append("In one of those sweet dreams I slept,");
sb.append(lineSeparator);
sb.append("Kind Nature's gentlest boon!");
sb.append(lineSeparator);
sb.append("And all the while my eyes I kept");
sb.append(lineSeparator);
sb.append("On the descending moon.");
return sb.toString();
}
}
Data has been written to C:Java9LanguageFeaturesluci5.txt
Listing 9-9.
Writing to a File Using a Buffer and a Channel
A file has two kinds of data associated with it. One is its contents and the other is metadata such as creation time, last-modified time, etc. When you write data to a file channel, the data may not be actually written to the storage device (for example, the hard disk) immediately. To write the data to the storage device immediately, after a call to the write() method on a file channel, you can call its force(boolean metaData) method. It guarantees that the file’s contents and metadata are written to its storage device. If you call force(false), only the file’s metadata is written to the storage device. If you call force(true), both the file’s content and its metadata are written to the storage device. In fact, this is guaranteed only if the storage device is local. Otherwise, the JVM tries its best to write the data to the storage device.
Tip
A file channel works only with byte buffers. In the examples in this section, I assumed that a character is represented in a byte, which is true only when you are using an encoding such as US-ASCII or UTF-8 for English alphabets. Refer to the “Character Set” section on how to encode a character buffer into a byte buffer and how to decode a byte buffer into a character buffer.
Memory-Mapped File I/O
There is another way to perform I/O on a file, which is by mapping a region of the file into physical memory and treating it as a memory array. This is the fastest way available to perform file I/O in Java. Using a special kind of byte buffer called MappedByteBuffer lets you perform memory-mapped file I/O.
For memory-mapped file I/O, start by obtaining a FileChannel for the file, and use the map() method of the FileChannel to get a MappedByteBuffer. Read or write directly to the mapped byte buffer instead of using the read() or write() method of the FileChannel. When you read from the mapped byte buffer, you read from the file’s region you have mapped. When you write to the mapped byte buffer, you write to the mapped region of the file. If you want to write the written data to the mapped byte buffer immediately to the storage device, you need to use the force() method of the mapped byte buffer. There is no boolean argument to force() related to metadata.
Once you obtain the mapped byte buffer from a FileChannel, closing the channel has no effect on your buffer. You can keep reading/writing the mapped byte buffer, even after the FileChannel is closed.
You can map a region of a file in a read-only, read-write, or private mode. In a read-only mode, you can only read from the mapped byte buffer. In a read-write mode, you can read from as well as write to the mapped byte buffer. The private mode needs a little explanation. This mode is also called a copy-on-write mode. When multiple programs map the same region of a file, a separate copy of that region is not created for each program. Rather, all programs share the same region of the file. When a program modifies the mapped region, a separate copy of that region is created only for that program, which is its private copy. Any modification to the private copy is not visible to other programs.
The following snippet of code maps the entire luci5.txt file in read-only mode. It reads the file and displays the contents on the standard output.
FileInputStream fis = new FileInputStream("luci5.txt");
FileChannel fc = fis.getChannel();
long startRegion = 0;
long endRegion = fc.size();
MappedByteBuffer mbb = fc.map(FileChannel.MapMode.READ_ONLY, startRegion, endRegion);
while(mbb.hasRemaining()) {
System.out.print((char) mbb.get());
}
fc.close();
File Locking
NIO supports file locking to synchronize access to a file. You have the ability to lock a region of a file or the entire file. The file locking mechanism is handled by the operating system and, therefore, its exact effect is platform-dependent. On some operating systems, a file lock is advisory, whereas on some, it is mandatory. Since it is handled by the operating system, its effect is visible to other programs as well as to Java programs running in other JVMs.
Tip
An advisory lock lets other users use the file on which you have acquired the lock, but prevents them from acquiring a lock on the same file. A mandatory lock forces the user to acquire a lock on the file before the file can be used.
There are two kinds of file locking:
exclusive
and
shared
. Only one program can hold an exclusive lock on a region of a file. Multiple programs can hold shared locks on the same region of a file. You cannot mix an exclusive lock and a shared lock on the same region of a file. If a program has a shared lock on a region, another program must wait to get an exclusive lock on that region and vice versa. Some operating systems do not support a shared file lock, and, in that case, the request for a shared file lock is converted to a request for an exclusive file lock.
An object of the FileLock class, which is in the java.nio.channels package, represents a file lock. You acquire a lock on a file by using the lock() or tryLock() method of the FileChannel class. The lock()
method blocks if the lock on the requested region of the file is not available. The tryLock()
method does not block; it returns immediately. It returns an object of the FileLock class if the lock was acquired; otherwise, it returns null.
Both lock() and tryLock() methods have two versions: one without an argument and another with three arguments. The version without an argument locks the entire file. The version with three arguments accepts the starting position of the region to lock, the number of bytes to lock, and a boolean flag to indicate if the lock is shared. The isShared() method of the FileLock object returns true if the lock is shared; otherwise, it returns false.
The following snippet of code shows different ways of obtaining locks on a file. The exception handling code is omitted for clarity.
// Create a random access file and obtain a channel for it
RandomAccessFile raf = new RandomAccessFile("test.txt", "rw");
FileChannel fileChannel = raf.getChannel();
// Get an exclusive lock on the file
FileLock lock = fileChannel.lock();
// Get an exclusive lock on first 10 bytes
FileLock lock = fileChannel.lock(0, 10, false);
// Try to get an exclusive lock on the entire file
FileLock lock = fileChannel.tryLock();
if (lock == null) {
// Could not get the lock
} else {
// Got the lock
}
// Try to lock 100 bytes starting from the 11th byte in a shared mode
FileLock lock = fileChannel.tryLock(11, 100, true);
if (lock == null) {
// Could not get the lock
} else {
// Got the lock
}
The region of a file that you lock may not be contained in the range of the file size. Suppose you have a file with a size of 100 bytes. When you request a lock on this file, you can specify that you want to lock a region of this file starting at byte 11 and covering 5000 bytes. Note that this file contains only 100 bytes; you are locking 5000 bytes. In such a case, if the file size grows beyond 100 bytes, your lock covers the additional region of the file. Suppose you locked the entire file, which is 100 bytes in size. If this file grows to 150 bytes, your lock does not cover the last 50 bytes that was added after you acquired the lock. The lock() and tryLock() methods of the FileChannel object, where you do not specify any argument, lock a region from 0 to Long.MAX_VALUE of the file. The two method calls—fc.lock() and fc.lock(0, Long.MAX_VALUE, false)—have the same effect.
When you are done with the file lock, you need to release it by using the release() method. A file lock is released in three ways: by calling its release()
method, by closing the file channel it is obtained from, and by shutting down the JVM. It is good practice to use a
try-catch-finally
block to acquire and release a file lock as follows:
RandomAccessFile raf = new RandomAccessFile("test.txt", "rw");
FileChannel fileChannel = raf.getChannel();
FileLock lock = null;
try {
lock = fileChannel.lock(0, 10, true);
/* Work with the file here */
} catch(IOException e) {
// Handle the exception
} finally {
if (lock != null) {
try {
lock.release();
} catch(IOException e) {
// Handle the exception
}
}
}
Copying the Contents of a File
You can use buffers and channels to copy a file much faster. Copying the contents of a file to another file is just one method call when you use a FileChannel. Get the FileChannel object for the source file and the destination file, and call the transferTo() method on the source FileChannel object or call the transferFrom() method on the sink FileChannel object. The following snippet of code shows how to copy the luci5.txt file to luci5_copy.txt:
// Obtain the source and sink channels
FileChannel sourceChannel = new FileInputStream(sourceFile).getChannel();
FileChannel sinkChannel = new FileOutputStream(sinkFile).getChannel();
// Copy source file contents to the sink file
sourceChannel.transferTo(0, sourceChannel.size(), sinkChannel);
// Instead of using the transferTo() method on the source channel,
// you can also use the transferFrom() method on the sink channel
sinkChannel.transferFrom(sourceChannel, 0, sourceChannel.size());
Listing 9-10 contains the complete code. The program prints the path of the source and destination files when the file copy succeeds.
// FastestFileCopy.java
package com.jdojo.nio;
import java.io.IOException;
import java.io.File;
import java.io.FileInputStream;
import java.io.FileOutputStream;
import java.nio.channels.FileChannel;
public class FastestFileCopy {
public static void main(String[] args) {
File sourceFile = new File("luci5.txt");
File sinkFile = new File("luci5_copy.txt");
try {
copy(sourceFile, sinkFile, false);
System.out.println(sourceFile.getAbsoluteFile()
+ " has been copied to " + sinkFile.getAbsolutePath());
} catch (IOException e) {
System.out.println(e.getMessage());
}
}
public static void copy(File sourceFile,
File sinkFile, boolean overwrite) throws IOException {
// Perform some error checks
if (!sourceFile.exists()) {
throw new IOException("Source file "
+ sourceFile.getAbsolutePath() + " does not exist.");
}
if (sinkFile.exists() && !overwrite) {
throw new IOException("Destination file "
+ sinkFile.getAbsolutePath() + " already exists.");
}
// Obtain source and sink file channels in a
// try-with-resources block, so they are closed automatically.
try (FileChannel srcChannel = new FileInputStream(sourceFile).getChannel();
FileChannel sinkChannel = new FileOutputStream(sinkFile).getChannel()) {
// Copy source file contents to the sink file
srcChannel.transferTo(0, srcChannel.size(), sinkChannel);
}
}
}
Listing 9-10.
Copying a File’s Contents Using a FileChannel
Knowing the Byte Order of a Machine
If you ever wanted to know the byte order (also called endian-ness) of your machine, you need to use the nativeOrder() method of the ByteOrder class, as shown in Listing 9-11. The byte order of a machine/buffer is discussed in detail in the next section. The program prints the byte order of the machine on which it is run. You may get a different output.
// MachineByteOrder.java
package com.jdojo.nio;
import java.nio.ByteOrder;
public class MachineByteOrder {
public static void main(String args[]) {
ByteOrder b = ByteOrder.nativeOrder();
if (b.equals(ByteOrder.BIG_ENDIAN)) {
System.out.println("Big endian");
} else {
System.out.println("Little endian");
}
}
}
Little endian
Listing 9-11.
Knowing the Endian-ness (Byte Order) of Your Machine
Byte Buffer and Its Byte Order
A byte order is the order in which bytes of a multi-byte value are stored. Suppose you have a short value 300 stored in a variable as follows:
short s = 300;
A short value is stored in two bytes. The value 300 can be represented in 16-bits as 0000000100101100, where the right-most bit is the least significant bit and the left-most bit is the most significant bit. You can split the 16-bit into two bytes as 00000001 and 00101100. At the byte level, you can think of 00000001 as the most significant byte and 00101100 as the least significant byte. If you consider two bytes separately for a short value, you may store them as either 00000001 followed by 00101100 or 00101100 followed by 00000001. As long as you know the order of the bytes in which they are stored, you can compute the correct value 300 using either form of the 16 bits: 0000000100101100 or 0010110000000001.
A byte order is called
big endian
if the bytes of a multi-byte value are stored from the most significant byte to the least significant byte. If the bytes of a multi-byte value are stored from the least significant byte to the most significant byte, it is known as little endian. To remember the two definitions easily, you can replace the word “big” with “most significant,” “little” with “least significant,” and “endian” with “first”. That is, remember “big endian” as “most significant first” and “little endian” as “least significant first.”
If you store a short value of 300 as 0000000100101100, you are using the big endian byte order. In the little endian byte order, you would store 300 as 0010110000000001, which seems backwards for representing a 16-bit value.
When you deal with byte data in a byte buffer, you may be considering each byte as an independent byte. A byte in a byte buffer may be part of a bigger value. When a byte value in a byte buffer is independent, the byte order is not a consideration. When a byte in a byte buffer is part of a bigger value (e.g., two bytes of a short value 300), the byte order becomes very important in reading. If you read two bytes from a byte buffer to compute a short value, you must know how those two bytes are stored. Suppose you read two bytes as 0000000100101100. If it is in a big endian byte order, it represents a value of 300. If it is in a little endian byte order, it represents a value of 11265.
Java uses a big-endian byte order to store data. By default, a byte buffer uses a big endian byte order. An instance of the java.nio.ByteOrder class represents a byte order. You will not need to instantiate this class because you always use the value that represents a byte order; you don’t create a new byte order. In fact, this class has no public constructor. You can use two constants, BIG_ENDIAN and LITTLE_ENDIAN, which are defined in the ByteOrder class to represent these byte orders.
Tip
A byte order is meaningful only in a multi-byte value stored in a byte buffer. You may also need to deal with byte orders when you are dealing with two different systems that use different byte orders.
Listing 9-12 demonstrates how to get and set byte order for a byte buffer. You use the order()
method of the ByteBuffer class to get or set the byte order. The program stores a short value of 300 in two bytes of a byte buffer. It displays the values stored in the first and the second bytes using both big endian and little endian byte orders. The output shows the values of bytes in decimal as 1 and 44, whose binary equivalents are 00000001 and 00101100, respectively.
// ByteBufferOrder.java
package com.jdojo.nio;
import java.nio.ByteBuffer;
import java.nio.ByteOrder;
public class ByteBufferOrder {
public static void main(String[] args) {
ByteBuffer bb = ByteBuffer.allocate(2);
System.out.println("Default Byte Order: " + bb.order());
bb.putShort((short) 300);
bb.flip();
showByteOrder(bb);
// Repopulate the buffer in little endian byte order
bb.clear();
bb.order(ByteOrder.LITTLE_ENDIAN);
bb.putShort((short) 300);
bb.flip();
showByteOrder(bb);
}
public static void showByteOrder(ByteBuffer bb) {
System.out.println("Byte Order: " + bb.order());
while (bb.hasRemaining()) {
System.out.print(bb.get() + " ");
}
System.out.println();
}
}
Default Byte Order: BIG_ENDIAN
Byte Order: BIG_ENDIAN
1 44
Byte Order: LITTLE_ENDIAN
44 1
Listing 9-12.
Setting the Byte Order of a Byte Buffer
Summary
New input/output (NIO) provides faster I/O compared to the stream-based input/output. NIO uses buffers and channels for I/O operations. A channel represents a connection between a data source/sink and a Java program for data transfer. A buffer contains data to be written to a file or data that is read from a file. Buffers for holding different types of primitive values are supported as instances of separate classes. You can use only a ByteBuffer for file I/O operations. NIO also supports memory-mapped file I/O that is the fastest way to read/write files.
A buffer maintains several properties that are affected by reading its data or writing data to it. The position property of a buffer is the index in the buffer that is the starting position to be read or written in the next read/write operation. The limit property of a buffer is the index in the buffer that is the starting index indicating the invalid read/write position. The buffer’s position may change as you read from the buffer or write to the buffer.
Buffer-related classes contain methods to manipulate those properties directly as well. A buffer supports absolute read/write and relative read/write. In absolute read/write, the buffer’s position is unaffected. In a relative read/write, the position property of the buffer is automatically advanced.
Byte buffers support different views. You can use a view of a buffer to access the data buffer’s data as different primitive type values or to see only part of the buffer’s data.
A character is not always stored in one byte. The number of bytes used to store a character depends on the coded character set and the character-encoding scheme. A coded-character set is a mapping between a set of abstract characters and a set of integers. A character-encoding scheme is a mapping between a coded-character set and a set of octet sequence. An instance of the java.nio.charset.Charset class represents a character set and a character-encoding scheme. Examples of some character set names are US-ASCII, ISO-8859-1, UTF-8, UTF-16BE, UTF-16LE, and UTF-16. The process of converting a character into a sequence of bytes based on an encoding scheme is called character
encoding
. The process of converting a sequence of bytes into a character based on an encoding scheme is called
decoding
. In NIO, you can convert a Unicode character to a sequence of bytes and vice versa using an encoding scheme. The java.nio.charset package provides classes to encode/decode a CharBuffer to a ByteBuffer and vice versa. An object of the Charset class represents the encoding scheme. The
CharsetEncoder
class performs the encoding. The
CharsetDecoder
class performs the decoding. You can get an object of the Charset class using its forName() method by passing the name of the character set as its argument.
A FileChannel, along with buffers, are used to read/write files. You can obtain a FileChannel from an InputStream, an OutputStream, or using the factory method of the FileChannel class. You can also lock a file in exclusive or shared mode using the lock() method of the FileChannel class.
The byte order is the order in which bytes of a multi-byte value are stored. A byte order is called big endian if the bytes of a multi-byte value are stored from the most significant byte to the least significant byte. If the bytes of a multi-byte value are stored from the least significant byte to the most significant byte, it is known as little endian. You need to deal with the byte order of a byte buffer if the buffer represents multi-byte data. The java.nio.ByteOrder class represents the byte order. It contains two constants, BIG_ENDIAN and LITTLE_ENDIAN, to represent big-endian and little-endian byte orders, respectively.
Questions and Exercises
- 1.What is new input/output?
- 2.What is a buffer? Name three classes that represent three different types of buffers.
- 3.Define the capacity, position, and limit of a buffer. Write the invariant that must be true all the time for these three properties of a buffer.
- 4.What is the difference between relative read and absolute read from a buffer?
- 5.After you have written into a Buffer, what method do you need to call on the Buffer before you start reading the written data using a relative read?
- 6.What is the difference between the remaining() and hasRemaining() methods of the Buffer class?
- 7.What is the effect of calling the clear() method of a Buffer?
- 8.What is the effect of calling the reset() method of a Buffer?
- 9.What is the effect of calling the rewind() method of a Buffer?
- 10.Write the output when the following code for a TestReadOnlyBufferTest class is run. This exercise is to test your knowledge about the properties of a read-only buffer.// ReadOnlyBufferTest.javapackage com.jdojo.nio;import java.nio.IntBuffer;public class ReadOnlyBufferTest {public static void main(String[] args) {// Create an IntBuffer of capacity 1IntBuffer data = IntBuffer.allocate(1);System.out.println(data.isReadOnly());// Get a read-only copy of the IntBufferIntBuffer copy = data.asReadOnlyBuffer();System.out.println(copy.isReadOnly());// Print the contents of the read-only bufferSystem.out.println(copy.get());// Write into the original bufferdata.put(64);// Print the contents of the read-only buffer againcopy.rewind();System.out.println(copy.get());}}
- 11.Suppose you have an IntBuffer. What is the difference between creating two copies of the IntBuffer, one by using the asReadOnlyBuffer() method and another by using the duplicate() method?
- 12.What do instances of the following classes represent: Charset, CharsetEncoder, and CharsetDecoder?
- 13.What is a channel? What is the fully qualified name of the interface that every implementation of a channel implements? If you have a reference to a channel, how would you tell if the channel is open?
- 14.When do you use instances of the GatheringByteChannel and ScatteringByteChannel classes?
- 15.Suppose you have a file named test.txt in your current directory. Write a snippet of code to get a FileChannel for this file in read-write mode.
- 16.What is memory-mapped file I/O? Name a class whose instances are used to work with memory-mapped file I/O.
- 17.What is the difference in using the lock() and tryLock() methods of the FileChannel class while locking a region of a file?
- 18.Write a snippet of code that prints the byte order (little-endian or big-endian) of the current machine.