In this chapter, you will learn:
- What input/output is
- How to work with a File object to represent an abstract pathname for a file or a directory in a file system
- The decorator pattern
- Byte-based and character-based input/output streams
- Reading data from a file and writing data to a file
- Reading and writing primitive type and reference type data to input/output streams
- Object serialization and deserialization
- How to develop custom input/output stream classes
- Using the Console and Scanner classes to interact with the console
- The StringTokenizer and StreamTokenizer classes to split text into tokens based on delimiters
All example programs in this chapter are members of a jdojo.io module, as declared in Listing 7-1.
// module-info.java
module jdojo.io {
exports com.jdojo.io;
}
Listing 7-1.
The Declaration of a jdojo.io Module
What Is Input/Output?
Input/output (I/O) deals with reading data from a source and writing data to a destination. Data is read from the input source (or simply input) and written to the output destination (or simply output). For example, your keyboard works as a standard input, letting you read data entered using the keyboard into your program. You have been using the System.out.println() method to print text on the standard output from the very first Java program without your knowledge that you have been performing I/O.
Typically, you read data stored in a file or you write data to a file using I/O. However, your input and output are not limited to only files. You may read data from a
String object
and write it to another String object. In this case, the input is a String object; the output is also a String object. You may read data from a file and write it to a String object, which will use a file as an input and a String object as an output. Many combinations for input and output are possible. Input and output do not have to be used together all the time. You may use only input in your program, such as reading the contents of a file into a Java program. You may use only output in your program, such as writing the result of a computation to a file.
The java.io and java.nio (nio stands for New I/O) packages contain Java classes that deal with I/O. The java.io package has an overwhelming number of classes to perform I/O. It makes learning Java I/O a little complex. The situation where the number of classes increases to an unmanageable extent is called a
class explosion
and the java.io package is a good example of that. It is no wonder that there are some books in the market that deal only with Java I/O. These books describe all Java I/O classes one by one. This chapter looks at Java I/O from a different perspective. First, you will look at the design pattern that was used to design the Java I/O classes. Once you understand the design pattern, it is easy to understand how to use those classes to perform I/O. After all, I/O is all about reading and writing data and it should not be that hard to understand! Before you start looking at the design pattern for the I/O classes, you will learn how to deal with files in the next section.
Working with Files
How do you refer to a file in your computer? You refer to it by its pathname. A file’s pathname
is a sequence of characters by which you can identify it uniquely in a file system. A pathname consists of a file name and its unique location in the file system. For example, on a Windows platform, C:usersdummy.txt is the pathname for a file named dummy.txt, which is located in the directory named users, which in turn is located in the root directory in the C: drive. On a UNIX platform, /users/dummy is the pathname for a file named dummy, which is located in the directory named users, which in turn is located in the root directory.
A pathname can be either absolute or relative. An absolute pathname points to the same location in a file system irrespective of the current working directory. For example, on a Windows platform, C:usersdummy.txt is an absolute pathname.
A relative pathname is resolved with respect to the working directory. Suppose dummy.txt is your pathname. If the working directory is C:, this pathname points to C:dummy.txt. If the working directory is C:users, it points to C:usersdummy.txt. Note that if you specify a relative pathname for a file, it points to a different file depending on the current working directory. A pathname that starts with a root is an absolute pathname. The forward slash (/) is the root on the UNIX platform and a drive letter followed with a backslash such as A: or C: defines the root for the Windows platform.
Tip
The pathname syntax is platform-dependent. Programs using platform-dependent syntax to represent pathnames may not work correctly on other platforms. In this chapter, most of the time I use the term “file” to mean a file or a directory.
Creating a File Object
An object of the File class is an abstract representation of a pathname of a file or a directory in a platform-independent manner. Using the following constructors of the File class, you can create a File object from a pathname, a parent pathname and a child pathname, and a URI:
- File(String pathname)
- File(File parent, String child)
- File(String parent, String child)
- File(URI uri)
If you have a file pathname called “dummy.txt”, you can create a File object, like so:
File dummyFile = new File("dummy.txt");
Note that a file named dummy.txt does not have to exist to create a File object using this statement. The dummyFile object represents an abstract pathname, which may or may not point to a real file in a file system.
The File class contains several methods to work with files and directories. Using a File object, you can create a new file, delete an existing file, rename a file, change permissions on a file, and so on. You will see all these operations on a file in action in subsequent sections.
Tip
The File class contains two methods, isFile() and isDirectory(). Use these methods to determine whether a File object represents a file or a directory.
Knowing the Current Working Directory
The concept of the current working directory is related to operating systems, not to the Java programming language or Java I/O. When a process starts, it uses the current working directory to resolve the relative paths of files. When you run a Java program, the JVM runs as a process, and therefore it has a current working directory. The value for the current working directory for a JVM is set depending on how you run the java command. You can get the current working directory for the JVM by reading the user.dir system property as follows:
String workingDir = System.getProperty("user.dir");
At this point, you may be tempted to use the System.setProperty() method to change the current working directory for the JVM in a running Java program. The following snippet of code will not generate any errors; it will not change the current working directory either:
System.setProperty("user.dir", "C:\kishori");
After you try to set the current working directory in your Java program, the System.getProperty("user.dir") will return the new value. However, to resolve the relative file paths, the JVM will continue to use the current working directory that was set when the JVM was started, not the one changed using the System.setProperty() method
.
Tip
Java designers found it too complex to allow changing the current working directory for the JVM in the middle of a running Java program. For example, if it were allowed, the same relative pathname would resolve to different absolute paths at different times in the same running JVM, giving rise to inconsistent behavior of the program.
You can also specify the current working directory for the JVM as the user.dir property value as a JVM option. To specify C: est as the user.dir system property value on Windows, you run your program like so:
java –Duser.dir=C: est <other-arguments>
Checking for a File’s Existence
You can check if the abstract pathname of a File object exists using the exists() method of the File class:
// Create a File object
File dummyFile = new File("dummy.txt");
// Check for the file's existence
boolean fileExists = dummyFile.exists();
if (fileExists) {
System.out.println("The dummy.txt file exists.");
} else {
System.out.println("The dummy.txt file does not exist.");
}
I have used dummy.txt as the file name that is a relative path for this file. Where in the file system does the exists() method look for this file for its existence? There could be no file with this name or there could be multiple files with this name. When a relative file path is used, the JVM prepends the current working directory to the file path and uses the resulting absolute path for all file-related actual operations. Note that the absolute path is constructed in a platform-dependent way. For example, if the current working directory on Windows is C:ksharan, the file name will be resolved to C:ksharandummy.txt; if the current working directory on UNIX is /users/ksharan, the file name will be resolved to /users/ksharan/dummy.txt.
Which Path Do You Want to Go?
In addition to a relative path, a file has an absolute path and a canonical path
. The absolute path identifies the file uniquely on a file system. A canonical path is the simplest path that uniquely identifies the file on a file system. The only difference between the two paths is that the canonical path is simplest in its form. For example, on Windows, if you have pathname dummy.txt whose absolute pathname is C:usersdummy.txt, the pathname C:userssharan..dummy.txt also represents an absolute pathname for the same file. The two consecutive dots in the pathname represent one level up in the file hierarchy. Among the two absolute paths, the second one is not the simplest one. The canonical path for dummy.txt is the simplest absolute path, which is C:usersdummy.txt.
The getAbsolutePath() and getCanonicalPath() methods in the File class return the absolute and canonical paths, respectively. Note that in a Java program you need to use double backslashes in a string literal to represent one backward slash; for example, the path C:userssharan needs to be written as "C:\users\sharan" as a string.
Tip
The getAbsoluteFile() and getCanonicalFile() methods of the File class returns the absolute and canonical paths, respectively, as a File, whereas the getAbsolutePath() and getCanonicalPath() methods return the same paths as a String.
Different platforms use different name-separate character to separate parts in a pathname. For example, Windows uses a backslash () as name-separator, whereas UNIX-like operating systems use a slash (/). The File class defines two constants, File.separator and File.separatorChar, to represent a platform-dependent name-separator as a String and as a char, respectively. For example, on Windows, the value of the File.separator is "\" and the value of File.separatorChar is '' and on UNIX their values are "/" and '/'. The benefit of using these constants in your program is that Java will use the appropriate file-separator character in your file pathname depending on the operating system in which your program is executed.
Listing 7-2 illustrates how to get the absolute and canonical paths of a file. You may get different output when you run the program. All examples in this chapters were run on Windows and the output will show Windows pathnames, unless specified otherwise.
// FilePath.java
package com.jdojo.io;
import java.io.File;
import java.io.IOException;
public class FilePath {
public static void main(String[] args) {
String workingDir = System.getProperty("user.dir");
System.out.println("Working Directory: " + workingDir);
System.out.println("----------------------");
String pathname = "dummy.txt";
printFilePath(pathname);
System.out.println("----------------------");
pathname = ".." + File.separator + "notes.txt";
printFilePath(pathname);
}
public static void printFilePath(String pathname) {
File f = new File(pathname);
System.out.println("File Name: " + f.getName());
System.out.println("File exists: " + f.exists());
System.out.println("Absolute Path: " + f.getAbsolutePath());
try {
System.out.println("Canonical Path: " + f.getCanonicalPath());
} catch (IOException e) {
e.printStackTrace();
}
}
}
Working Directory: C:Java9LanguageFeatures
----------------------
File Name: dummy.txt
File exists: false
Absolute Path: C:Java9LanguageFeaturesdummy.txt
Canonical Path: C:Java9LanguageFeaturesdummy.txt
----------------------
File Name: notes.txt
File exists: false
Absolute Path: C:Java9LanguageFeatures..
otes.txt
Canonical Path: C:
otes.txt
Listing 7-2.
Getting the Absolute and Canonical Paths of a File
You have to deal
with two “devils” when you work with I/O in Java. If you do not specify the absolute pathname, your absolute path will be decided by the Java runtime and the operating system. If you specify the absolute pathname, your code may not run on different operating systems. One way to handle this situation is to use a configuration file, where you specify a different file pathname for different operating systems, and you pass the configuration file path to your program at startup.
The canonical path of a file is system-dependent and the call to the getCanonicalPath() may throw an IOException. You must place this method call inside a try-catch block or throw an IOException from the method in which you invoke this method. Some of the I/O method calls throw an IOException in situations when the requested I/O operation fails.
Creating, Deleting, and Renaming Files
You can create
a new file using the createNewFile() method of the File class:
// Create a File object to represent the abstract pathname
File dummyFile = new File("dummy.txt");
// Create the file in the file system
boolean fileCreated = dummyFile.createNewFile();
The createNewFile() method creates a new, empty file if the file with the specified name does not already exist. It returns true if the file is created successfully; otherwise, it returns false. The method throws an IOException if an I/O error occurs.
You can also create a temporary file in the default temporary file directory or a directory of your choice using the following createTempFile() static method of the File class:
- File createTempFile(String prefix, String suffix) throws IOException
- File createTempFile(String prefix, String suffix, File directory) throws IOException
The method accepts a prefix (at least three characters in length) and a suffix to generate the temporary file name. The following snippet of code shows examples of using both versions of the method:
// Create a temporary file in the default temporary directory
File tempFile1 = File.createTempFile("kkk", ".txt");
// Create a temporary file in the existing C:kishori emp directory
File tempDir = new File("C:\kishori\temp");
File tempFile2 = File.createTempFile("kkk", ".txt", tempDir);
You can use the mkdir() or mkdirs() method to create a new directory. The mkdir() method creates a directory only if the parent directories specified in the pathname already exists. For example, if you want to create a new directory called home in the users directory in the C: drive on Windows, you construct the File object representing this pathname like so:
File newDir = new File("C:\users\home");
Now the newDir.mkdir() method will create the home directory only if the C:users directory already exists. However, the newDir.mkdirs() method will create the users directory if it does not exist in the C: drive, and hence, it will create the home directory under the C:users directory.
Deleting
a file is easy. You need to use the delete() method of the File class to delete a file/directory. A directory must be empty before you can delete it. The method returns true if the file/directory is deleted; otherwise, it returns false. You can also delay the deletion of a file until the JVM terminates by using the deleteOnExit() method. This is useful if you create temporary files in your program that you want to delete when your program exits.
File dummyFile = new File("dummy.txt");
// To delete the dummy.txt file immediately
dummyFile.delete();
// To delete the dummy.txt file when the JVM terminates
dummyFile.deleteOnExit();
Tip
The call to the deleteOnExit() method is final. That is, once you call this method, there is no way for you to change your mind and tell the JVM not to delete this file when it terminates. You can use the delete() method to delete the file immediately even after you have requested the JVM to delete the same file on exit.
To rename
a file, you can use the renameTo() method, which takes a File object to represent the new file:
// Rename old-dummy.txt to new_dummy.txt
File oldFile = new File("old_dummy.txt");
File newFile = new File("new_dummy.txt");
boolean fileRenamed = oldFile.renameTo(newFile);
if (fileRenamed) {
System.out.println(oldFile + " renamed to " + newFile);
} else {
System.out.println("Renaming " + oldFile + " to " + newFile + " failed.");
}
The renameTo() method returns true if renaming the file succeeds; otherwise, it returns false. You are advised to check the return value of this method to make sure the renaming succeeded because the behavior of this method is very system-dependent.
Tip
The File object is immutable. Once created, it always represents the same pathname, which is passed to its constructor. When you rename a file, the old File object still represents the original pathname. An important point to remember is that a File object represents a pathname, not an actual file in a file system.
Listing 7-3 illustrates the use of some of the methods described in this section. You may get different output; the output is shown when the program ran on Windows. When you run the program the second time, you may get different output because it may not be able to rename the file if it already existed from the first run.
// FileCreateDeleteRename.java
package com.jdojo.io;
import java.io.File;
import java.io.IOException;
public class FileCreateDeleteRename {
public static void main(String[] args) {
try {
File newFile = new File("my_new_file.txt");
System.out.println("Before creating the new file:");
printFileDetails(newFile);
// Create a new file
boolean fileCreated = newFile.createNewFile();
if (!fileCreated) {
System.out.println(newFile + " could not be created.");
}
System.out.println("After creating the new file:");
printFileDetails(newFile);
// Delete the new file
newFile.delete();
System.out.println("After deleting the new file:");
printFileDetails(newFile);
// Let's recreate the file
newFile.createNewFile();
System.out.println("After recreating the new file:");
printFileDetails(newFile);
// Let's tell the JVM to delete this file on exit
newFile.deleteOnExit();
System.out.println("After using deleteOnExit() method:");
printFileDetails(newFile);
// Create a new file and rename it
File firstFile = new File("my_first_file.txt");
File secondFile = new File("my_second_file.txt");
fileCreated = firstFile.createNewFile();
if (fileCreated || firstFile.exists()) {
System.out.println("Before renaming file:");
printFileDetails(firstFile);
printFileDetails(secondFile);
boolean renamedFlag = firstFile.renameTo(secondFile);
if (!renamedFlag) {
System.out.println("Could not rename " + firstFile);
}
System.out.println("After renaming file:");
printFileDetails(firstFile);
printFileDetails(secondFile);
}
} catch (IOException e) {
e.printStackTrace();
}
}
public static void printFileDetails
(File f) {
System.out.println("Absolute Path: " + f.getAbsoluteFile());
System.out.println("File exists: " + f.exists());
System.out.println("------------------------------");
}
}
Before creating the new file:
Absolute Path: C:Java9LanguageFeaturesmy_new_file.txt
File exists: false
------------------------------
After creating the new file:
Absolute Path: C:Java9LanguageFeaturesmy_new_file.txt
File exists: true
------------------------------
After deleting the new file:
Absolute Path: C:Java9LanguageFeaturesmy_new_file.txt
File exists: false
------------------------------
After recreating the new file:
Absolute Path: C:Java9LanguageFeaturesmy_new_file.txt
File exists: true
------------------------------
After using deleteOnExit() method:
Absolute Path: C:Java9LanguageFeaturesmy_new_file.txt
File exists: true
------------------------------
Before renaming file:
Absolute Path: C:Java9LanguageFeaturesmy_first_file.txt
File exists: true
------------------------------
Absolute Path: C:Java9LanguageFeaturesmy_second_file.txt
File exists: false
------------------------------
After renaming file:
Absolute Path: C:Java9LanguageFeaturesmy_first_file.txt
File exists: false
------------------------------
Absolute Path: C:Java9LanguageFeaturesmy_second_file.txt
File exists: true
------------------------------
Listing 7-3.
Creating, Deleting
, and Renaming a File
Working with File Attributes
The File class contains methods that let you get/set attributes of files and directories in a limited ways. You can set a file as read-only, readable, writable, and executable using the setReadOnly(), setReadable(), setWritable(), and setExecutable() methods, respectively. You can use the lastModified() and setLastModified() methods to get and set the last modified date and time of a file. You can check if a file is hidden using the isHidden() method. Note that the File class does not contain a setHidden() method, as the definition of a hidden file is platform-dependent.
Tip
I discuss working with file attributes using the New Input/Output 2 (NIO.2) API in Chapter 10. NIO.2 has extensive support for file attributes.
Copying a File
The File class does not provide a method to copy a file. To copy a file, you must create a new file, read the content from the original file, and write it into the new file. I discuss how to copy the contents of a file into another file later in this chapter, after I discuss the input and output streams. The NIO 2.0 API, which was added in Java 7, provides a direct way to copy a file contents and its attributes. Refer to Chapter 10 for more details.
Knowing the Size of a File
You can get the size of a file in bytes using the length() method of the File class.
File myFile = new File("myfile.txt");
long fileLength = myFile.length();
If a File object represents a non-existent file, the length() method returns zero. If it is a directory name, the return value is not specified. Note that the return type of the length() method is long, not int.
Listing Directories and Files
You can get a list of the available root directories
in a file system by using the listRoots() static method of the File class. It returns an array of File objects.
// Get the list of all root directories
File[] roots = File.listRoots();
Root directories are different across platforms. On Windows, you have a root directory for each drive (e.g., C:, A:, D:, etc.). On UNIX, you have a single root directory represented by a slash (/).
Listing 7-4 illustrates how to get the root directories on a machine. The output is shown when this program ran on Windows. You may get different output when you run this program on your machine. The output will depend on the operating system and the drives that are attached to your machine.
// RootList.java
package com.jdojo.io;
import java.io.File;
public class RootList {
public static void main(String[] args) {
File[] roots = File.listRoots();
System.out.println("List of root directories:");
for (File f : roots) {
System.out.println(f.getPath());
}
}
}
List of root directories:
C:
E:
Listing 7-4.
Listing All Available Root Directories on a Machine
You can list all files and directories in a directory by using the list() or listFiles() methods of the File class. The only difference between them is that the list() method returns an array of String, whereas the listFiles() method returns an array of File. You can also use a file filter with these methods to exclude some files and directories from the returned results.
Listing 7-5 illustrates how to list the files and directories in a directory. Note that the list() and listFiles() methods do not list the files and directories recursively. You need to write the logic to list files recursively. You need to change the value of the dirPath variable in the main() method. You may get different output. The output shows the results when the program ran on Windows
.
// FileLists.java
package com.jdojo.io;
import java.io.File;
public class FileLists {
public static void main(String[] args) {
// Change the dirPath value to list files from your directory
String dirPath = "C:\";
File dir = new File(dirPath);
File[] list = dir.listFiles();
for (File f : list) {
if (f.isFile()) {
System.out.println(f.getPath() + " (File)");
} else if (f.isDirectory()) {
System.out.println(f.getPath() + " (Directory)");
}
}
}
}
C:gradle (Directory)
C:hiberfil.sys (File)
C:Java9LanguageFeatures (Directory)
C:virtualbox (Directory)
C:VS_EXPBSLN_x64_enu.CAB (File)
C:Windows (Directory)
...
Listing 7-5.
Listing All Files and Directories in a Directory
Suppose you wanted to exclude all files from the list with an extension .SYS. You can do this by using a file filter
that is represented by an instance of the functional interface FileFilter. It contains an accept() method that takes the File being listed as an argument and returns true if the File should be listed. Returning false does not list the file. The following snippet of code creates a file filter that will filter files with the extension .SYS:
// Create a file filter to exclude any .SYS file
FileFilter filter = file -> {
if (file.isFile()) {
String fileName = file.getName().toLowerCase();
if (fileName.endsWith(".sys")) {
return false;
}
}
return true;
};
Using lambda expressions makes it easy to build the file filters. The following snippet of code creates two file filters—one filters only files and another only directories:
// Filters only files
FileFilter fileOnlyFilter = File::isFile;
// Filters only directories
FileFilter dirOnlyFilter = File::isDirectory;
Listing 7-6 illustrates how to use a file filter. The program is the same as in Listing 7-5 except that it uses a filter to exclude all .SYS files from the list. You can compare the output of these two listings to see the effect of the filter.
// FilteredFileList.java
package com.jdojo.io;
import java.io.File;
import java.io.FileFilter;
public class FilteredFileList {
public static void main(String[] args) {
// Change the dirPath value to list files from your directory
String dirPath = "C:\";
File dir = new File(dirPath);
// Create a file filter to exclude any .SYS file
FileFilter filter = file -> {
if (file.isFile()) {
String fileName = file.getName().toLowerCase();
if (fileName.endsWith(".sys")) {
return false;
}
}
return true
;
};
// Pass the filter object to listFiles() method to exclude the .sys files
File[] list = dir.listFiles(filter);
for (File f : list) {
if (f.isFile()) {
System.out.println(f.getPath() + " (File)");
} else if (f.isDirectory()) {
System.out.println(f.getPath() + " (Directory)");
}
}
}
}
C:gradle (Directory)
C:Java9LanguageFeatures (Directory)
C:virtualbox (Directory)
C:VS_EXPBSLN_x64_enu.CAB (File)
C:Windows (Directory)
...
Listing 7-6.
Using FileFilter to Filter Files
The Decorator Pattern
Suppose you need to design classes for a bar that sells alcoholic drinks. The available drinks are rum, vodka, and whiskey. It also sells two drink flavorings: honey and spices. You have to design classes for a Java application so that when a customer orders a drink, the application will let the user print a receipt with the drink name and its price.
What are the things that you need to maintain in the classes to compute the price of a drink and get its name? You need to maintain the name and price of all ingredients of the drink separately. When you need to print the receipt, you will concatenate the names of all ingredients and add up the prices for all ingredients. One way to design the classes for this application would be to have a Drink class with two instance variables: name and price. There would be a class for each kind of drink; the class would inherit from the Drink class. Some of the possible classes would be as follows:
- Drink
- Rum
- Vodka
- Whiskey
- RumWithHoney
- RumWithSpices
- VodkaWithHoney
- VodkaWithSpices
- WhiskeyWithHoney
- WhiskeyWithSpices
- WhiskeyWithHoneyAndSpices
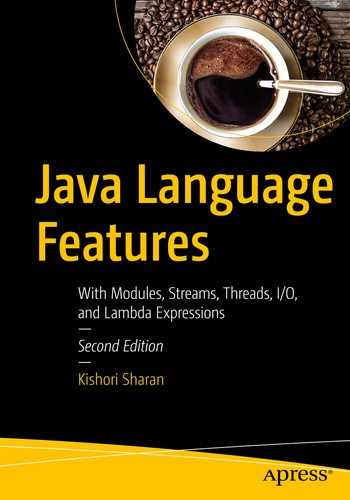
Note that we have already listed 11 classes and the list is not complete yet. Consider ordering whiskey with two servings of honey. You can see that the number of classes involved is huge. If you add some more drinks and flavorings, the classes will increase tremendously. With this class design, you will have a problem maintaining the code. If the price of honey changes, you will need to revisit every class that has honey in it and change its price. This design will produce a class explosion. Fortunately, there is a design pattern to deal with such a problem. It is called the decorator pattern. Typically, classes are organized as shown in Figure 7-1 to use the decorator pattern.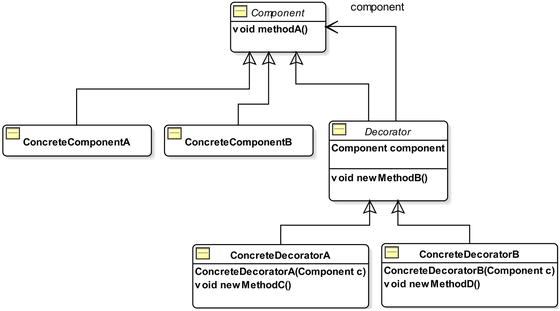
Figure 7-1.
A generic class diagram
based on the decorator pattern
The decorator pattern requires you to have a common abstract superclass
from which you inherit your concrete component classes and an abstract decorator class. Name the common superclass Component. You can use an interface instead of an abstract class. Concrete components, shown as ConcreteComponentA and ConcreteComponentB in the class diagram, are inherited from the Component class. The Decorator class is the abstract decorator class, which is inherited from the Component class. Concrete decorators, shown as ConcreteDecoratorA and ConcreteDecoratorB in the class diagram, are inherited from the Decorator class. The Decorator class keeps a reference to its superclass Component. The reference of a concrete component is passed to a concrete decorator as an argument in its constructor as follows:
ConcreteComponentA ca = new ConcreteComponentA();
ConcreteDecoratorA cd = new ConcreteDecoratorA(ca);
When a method is called on a concrete decorator, it takes some actions and calls the method on the component it encloses. The decorator may decide to take its action before and/or after it calls the method on the component. This way, a decorator extends the functionality of a component. This pattern is called a decorator pattern because the decorator class adds functionality to (or decorates) the component it encloses. It is also known as the
wrapper pattern
for the same reason: it encloses (wraps) the component that it decorates.
The decorator has the same interface as the concrete components because both of them are inherited from the common superclass, Component. Therefore, you can use a Decorator object wherever a Component object is expected. Sometimes decorators add functionality by adding new methods that are not present in the component, as shown in the class diagram: newMethodB(), newMethodC() and newMethodD().
Let’s apply this discussion about the generic class diagram of the decorator pattern to model classes for your drink application. The class diagram
is shown in Figure 7-2.
Figure 7-2.
The class diagram
for the drink application based on the decorator pattern
In the drink application, Rum, Vodka, and Whiskey are the concrete components (main drinks). Honey and Spices are the two decorators that are added to decorate (or to change the flavor) of the main drinks.
The Drink class, shown in Listing 7-7, serves as the abstract common ancestor class for the main drinks and decorators. The name and price instance variables in the Drink class hold the name and price of a drink; the class also contains the getters for these instance variables. These methods define the common interface for the main drinks as well as the flavors.
// Drink.java
package com.jdojo.io;
public abstract class Drink {
protected String name;
protected double price;
public String getName() {
return name;
}
public double getPrice() {
return price;
}
}
Listing 7-7.
An Abstract Drink Class
to Model the Abstract Component in the Decorator Pattern
Listing 7-8 contains the code for the Rum class that inherits from the Drink class. It sets the name and price in its constructor. Listing 7-9 and Listing 7-10 list the Vodka and Whiskey classes, respectively. The three classes are similar.
// Rum.java
package com.jdojo.io;
public class Rum extends Drink {
public Rum() {
this.name = "Rum";
this.price = 0.9;
}
}
Listing 7-8.
A Rum Class
// Vodka.java
package com.jdojo.io;
public class Vodka extends Drink {
public Vodka() {
this.name = "Vodka";
this.price = 1.2;
}
}
Listing 7-9.
A Vodka Class
// Whiskey.java
package com.jdojo.io;
public class Whiskey extends Drink {
public Whiskey() {
this.name = "Whisky";
this.price = 1.5;
}
}
Listing 7-10.
A Whiskey Class
The DrinkDecorator, shown in Listing 7-11, is the abstract decorator class that is inherited from the Drink class. The concrete decorators Honey and Spices inherit from the DrinkDecorator class. It has an instance variable named drink, which is of the type Drink. This instance variable represents the Drink object that a decorator will decorate. It overrides the getName() and getPrice() methods for decorators. In its getName() method, it gets the name of the drink it is decorating and appends its own name to it. This is what I mean by adding functionality to a component by a decorator. The getPrice() method works the same way. It gets the price of the drink it decorates and adds its own price to it.
// DrinkDecorator.java
package com.jdojo.io;
public abstract class DrinkDecorator extends Drink {
protected Drink drink;
@Override
public String getName() {
// Append its name after the name of the drink it is decorating
return drink.getName() + ", " + this.name;
}
@Override
public double getPrice() {
// Add its price to the price of the drink it is decorating/
return drink.getPrice() + this.price;
}
public Drink getDrink() {
return drink;
}
}
Listing 7-11.
An Abstract DrinkDecorator Class
Listing 7-12 lists a concrete decorator, the Honey class, which inherits from the DrinkDecorator class. It accepts a Drink object as an argument in its constructor. It requires that before you can create an object of the Honey class, you must have a Drink object. In its constructor, it sets its name, price, and the drink it will work with. It will use the getName() and getPrice() methods of its superclass DrinkDecorator class.
// Honey.java
package com.jdojo.io;
public class Honey extends DrinkDecorator{
public Honey(Drink drink) {
this.drink = drink;
this.name = "Honey";
this.price = 0.25;
}
}
Listing 7-12.
A Honey Class
, a Concrete Decorator
Listing 7-13 lists another concrete decorator, the Spices class, which is implemented the same way as the Honey class.
// Spices.java
package com.jdojo.io;
public class Spices extends DrinkDecorator {
public Spices(Drink drink) {
this.drink = drink;
this.name = "Spices";
this.price = 0.10;
}
}
Listing 7-13.
A Spices Class
, a Concrete Decorator
It is the time to see the drink application in action. Let’s order whiskey with honey. How will you construct the objects to order whiskey with honey? It’s simple. You always start by creating the concrete component. Concrete decorators are added to the concrete component. Whiskey is your concrete component and honey is your concrete decorator. You always work with the last component object you created in the series. Typically, the last component that you created is one of the concrete decorators unless you are dealing with only a concrete component.
// Create a Whiskey object
Whiskey w = new Whiskey();
// Add Honey to the Whiskey. Pass the object w in Honey's constructor
Honey h = new Honey(w);
// At this moment onwards, we will work with the last component we have
// created, which is h (a honey object). To get the name of the drink,
// call the getName() method on the honey object
String drinkName = h.getName();
Note that the
Honey class
uses the getName() method, which is implemented in the DrinkDecorator class. It will get the name of the drink, which is Whiskey in your case, and add its own name. The h.getName() method will return “Whiskey, Honey”.
// Get the price
double drinkPrice = h.getPrice();
The h.getPrice() method will return 1.75. It will get the price of whiskey, which is 1.5 and add the price of honey, which is 0.25.
You do not need a two-step process to create a whiskey with honey drink. You can use the following one statement to create it:
Drink myDrink = new Honey(new Whiskey());
By using this coding style, you get a feeling that
Honey
is really enclosing (or decorating) Whiskey. You ordered a drink: whiskey with honey. Therefore, it is better to store the reference of the final drink to a Drink variable (Drink myDrink) rather than a Honey variable (Honey h). However, if the Honey class implemented some additional methods than those inherited from the Drink class and you intended to use one of those additional methods, you need to use a variable of the Honey class to store the final reference.
// If our Honey class has additional methods, which are not defined in the Drink
// class, store the reference in Honey type variable
Honey h = new Honey(new Whiskey());
How would you order a drink of whiskey with two servings of honey? It’s simple. Create a Whiskey object, enclose it in a Honey object, and enclose the Honey object in another Honey object, like so:
// Create a drink of whiskey with double honey
Drink myDrink = new Honey(new Honey(new Whiskey()));
Similarly, you can create a drink of vodka with honey and spices, and get its name and price as follows:
// Create a drink of vodka with honey and spices
Drink myDrink = new Spices(new Honey(new Vodka()));
String drinkName = myDrink.getName();
double drinkPrice = myDrink.getPrice();
Sometimes reading the construction of objects based on the decorator pattern may be confusing because of several levels of object wrapping in the constructor call. You need to read the object’s constructor starting from the innermost level. The innermost level is always a concrete component and all subsequent levels will be concrete decorators. In the previous example of vodka with honey and spices, the innermost level is the creation of vodka, new Vodka(), which is wrapped in honey, new Honey(new Vodka()), which in turn is wrapped in spices, new Spices(new Honey(new Vodka())). Figure 7-3 depicts how these three objects are arranged. Listing 7-14 demonstrates how to use your drink application.
Figure 7-3.
The arrangement of components
in the decorator pattern
// DrinkTest.java
package com.jdojo.io;
public class DrinkTest {
public static void main(String[] args) {
// Have Whiskey only
Drink d1 = new Whiskey();
printReceipt(d1);
// Have Whiskey with Honey
Drink d2 = new Honey(new Whiskey());
printReceipt(d2);
// Have Vodka with Spices
Drink d3 = new Spices(new Vodka());
printReceipt(d3);
// Have Rum with double Honey and Spices
Drink d4 = new Spices(new Honey(new Honey(new Rum())));
printReceipt(d4);
}
public static void printReceipt(Drink drink) {
String name = drink.getName();
double price = drink.getPrice();
System.out.println(name + " - $" + price);
}
}
Whisky - $1.5
Whisky, Honey - $1.75
Vodka, Spices - $1.3
Rum, Honey, Honey, Spices - $1.5
Listing 7-14.
Testing the Drink Application
You need to consider the other aspects of the decorator pattern:
- The abstract Component class (the Drink class in the example) can be replaced with an interface. Note that you have included two instance variables in the Drink class. If you want to replace the Drink class with an interface, you must move these two instance variables down the class hierarchy.
- You may add any number of new methods in abstract decorators and concrete decorators to extend the behavior of its component.
- With the decorator pattern, you end up with lots of small classes, which may make your application hard to learn. However, once you understand the class hierarchy, it is easy to customize and use them.
- The goal of the decorator pattern is achieved by having a common superclass for the concrete components and concrete decorators. This makes it possible for a concrete decorator to be treated as a component, which in turn allows for wrapping a decorator inside another decorator. While constructing the class hierarchy, you can introduce more classes or remove some. For example, you could have introduced a class named MainDrink between the Drink class, and the Rum, Vodka, and Whiskey classes.
- The concrete decorator need not be inherited from an abstract decorator class. Sometimes you may want to inherit a concrete decorator directly from the abstract Component class . For example, the ObjectInputStream class is inherited from the InputStream class in the java.io package, not from the FilterInputStream class. Refer to Figure 7-5 for details. The main requirement for a concrete decorator is that it should have the abstract component as its immediate or non-immediate superclass and it should accept an abstract component type argument in its constructor.
Input/Output Streams
The literal meaning of the word stream is “an unbroken flow of something.” In Java I/O, a stream means an unbroken flow (or sequential flow) of data. The data in the stream could be bytes, characters, objects, etc.
A river is a stream of water where the water flows from a source to its destination in an unbroken sequence. Similarly, in Java I/O, the data flows from a source known as a data source to a destination known as a data sink. The data is read from a data source to a Java program. A Java program writes data to a data sink. The stream that connects a data source and a Java program is called an input stream. The stream that connects a Java program and a data sink is called an output stream. In a natural stream, such as a river, the source and the destination are connected through the continuous flow of water. However, in Java I/O, a Java program comes between an input stream and an output stream. Data flows from a data source through an input stream to a Java program. The data flows from the Java program through an output stream to a data sink. In other words, a Java program reads data from the input stream and writes data to the output stream. Figure 7-4 depicts the flow of data
from an input stream to a Java program and from a Java program to an output stream.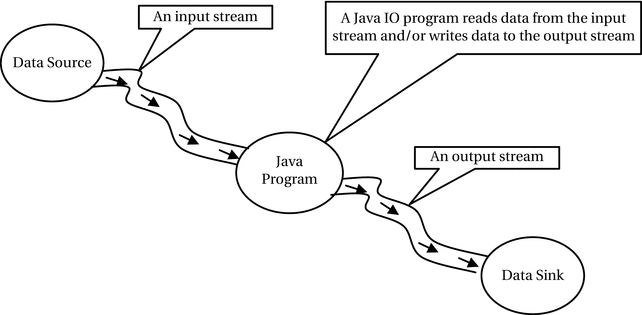
Figure 7-4.
Flow of data
using an input/output stream in a Java program
To read data
from a data source into a Java program, you need to perform the following steps:
- Identify the data source. It may be a file, a string, an array, a network connection, etc.
- Construct an input stream using the data source.
- Read the data from the input stream. Typically, you read the data in a loop until you have read all the data from the input stream. The methods of an input stream return a special value to indicate the end of the input stream.
- Close the input stream. Note that constructing an input stream itself opens it for reading. There is no explicit step to open an input stream. However, you must close the input stream when you are done reading data from it. From Java 7, you can use a try-with-resources block, which closes the input stream automatically.
To write data
to a data sink from a Java program, you need to perform the following steps:
- 1.Identify the data sink. That is, identify the destination where data will be written. It may be a file, a string, an array, a network connection, etc.
- 2.Construct an output stream using the data sink.
- 3.Write the data to the output stream.
- 4.Close the output stream. Note that constructing an output stream itself opens it for writing. There is no explicit step to open an output stream. However, you must close the output stream when you are done writing data to it. From Java 7, you can use a try-with-resources block, which closes the output stream automatically.
Input/output stream classes in Java are based on the decorator pattern. By now, you know that a class design based on the decorator pattern results in several small classes. So is the case with Java I/O. There are many classes involved in Java I/O. Learning each class at a time is no easy task. However, learning these classes can be made easy by comparing them with the class arrangements in the decorator pattern. I compare the Java I/O classes with the decorator pattern later. In the next two sections, you will see input/output streams in action using simple programs, which will read data from a file and write data to a file.
Reading from a File Using an Input Stream
In this section, I show you how to read data from a file. The data will be displayed on the standard output. You have a file called luci1.txt, which contains the first stanza from the poem Lucy by William Wordsworth (1770-1850). One stanza from the poem is as follows:
STRANGE fits of passion have I known:
And I will dare to tell,
But in the lover's ear alone,
What once to me befell.
You can create a
luci1.txt file
with this text and save it in your current working directory. The following steps are needed to read from the file:
- 1.Identify the data source, which is the file path for the luci1.txt file in this case.
- 2.Create an input stream using the file.
- 3.Read the data from the file using the input stream.
- 4.Close the input stream.
Identifying the Data Source
Your data source could be simply the file name as a string or a File object representing the pathname of the file. Let’s assume that the luci1.txt file is in the current working directory.
// The data source
String srcFile = "luci1.txt";
Creating the Input Stream
To read from a file, you need to create an object of the FileInputStream class, which will represent the input stream:
// Create a file input stream
FileInputStream fin = new FileInputStream(srcFile);
When the data source for an input stream is a file, Java wants you to make sure that the file exists when you construct the file input stream. The constructor of the FileInputStream class throws a FileNotFoundException if the file does not exist. To handle this exception, you need to place your code in a try-catch block, like so:
try {
// Create a file input stream
FileInputStream fin = new FileInputStream(srcFile);
} catch (FileNotFoundException e){
// The error handling code goes here
}
Reading the Data
The FileInputStream class has an overloaded read() method to read data from the file. You can read one byte or multiple bytes at a time using the different versions of this method. Be careful when using the read() method. Its return type is int, although it returns a byte value. It returns -1 if the end of the file is reached, indicating that there are no more bytes to read. You need to convert the returned int value to a byte to get the byte read from the file. You can read a byte at a time in a loop, like so:
int data;
byte byteData;
// Read the first byte
data = fin.read();
while (data != -1) {
// Display the read data on the console. Note the cast from int to byte
byteData = (byte) data;
// Cast the byte data to char to display the data
System.out.print((char) byteData);
// Try reading another byte
data = fin.read();
}
You can rewrite the previous file-reading logic in a compact form, like so:
byte byteData;
while ((byteData = (byte) fin.read()) != -1){
System.out.print((char) byteData);
}
I use the compact form of reading the data from an input stream in subsequent examples. You need to place the code for reading data from an input stream in a try-catch block because it may throw an IOException.
Closing the Input Stream
Finally, you need to close the input stream using its close() method:
// Close the input stream
fin.close();
The close() method may throw an IOException, and because of that, you need to enclose this call inside a try-catch block.
try {
// Close the input stream
fin.close();
} catch (IOException e) {
e.printStackTrace();
}
Typically, you construct an input stream inside a try block and close it in a finally block to make sure it is always closed after you are done with it.
All input/output streams are auto closeable. You can use a try-with-resources to create their instances, so they will be closed automatically regardless of an exception being thrown, avoiding the need to call their close() method explicitly. The following snippet of code shows using a try-with-resources to create a file input stream
:
String srcFile = "luci1.txt";
try (FileInputStream fin = new FileInputStream(srcFile)) {
// Use fin to read data from the file here
} catch (FileNotFoundException e) {
// Handle the exception here
}
A Utility Class
You will frequently need to perform things such as closing an input/output stream and printing a message on the standard output when a file is not found, etc. Listing 7-15 contains the code for a FileUtil class that you will use in the example programs.
// FileUtil.java
package com.jdojo.io;
import java.io.Closeable;
import java.io.IOException;
public class FileUtil {
// Prints the location details of a file
public static void printFileNotFoundMsg(String fileName) {
String workingDir = System.getProperty("user.dir");
System.out.println("Could not find the file '"
+ fileName + "' in '" + workingDir + "' directory ");
}
// Closes a Closeable resource such as an input/output stream
public static void close(Closeable resource) {
if (resource != null) {
try {
resource.close();
} catch (IOException e) {
e.printStackTrace();
}
}
}
}
Listing 7-15.
A Utility Class Containing Convenience Methods to Work with I/O Classes
Completing the Example
Listing 7-16 illustrates the steps involved in reading the file luci1.txt. If you receive an error message indicating that the file does not exist, it will also print the directory where it is expecting the file. You may use an absolute path of the source file instead of a relative path by replacing the statement
String srcFile = "luci1.txt";
with an absolute path like c:smithluci1.txt on Windows or /users/smith/luci1.txt on UNIX. Note that you must use c:\smith\luci1.txt (two backslashes to escape a backslash) when you construct a string that contains a backslash.
String srcFile = "absolute path of luci1.txt file";
By simply using luci1.txt as the data source file path, the program expects that the file is present in your current working directory when you run the program.
// SimpleFileReading.java
package com.jdojo.io;
import java.io.FileInputStream;
import java.io.FileNotFoundException;
import java.io.IOException;
public class SimpleFileReading {
public static void main(String[] args) {
String dataSourceFile = "luci1.txt";
try (FileInputStream fin = new FileInputStream(dataSourceFile)) {
byte byteData;
while ((byteData = (byte) fin.read()) != -1) {
System.out.print((char) byteData);
}
} catch (FileNotFoundException e) {
FileUtil.printFileNotFoundMsg(dataSourceFile);
} catch (IOException e) {
e.printStackTrace();
}
}
}
STRANGE fits of passion have I known:
And I will dare to tell,
But in the lover's ear alone,
What once to me befell.
Listing 7-16.
Reading a Byte
at a Time from a File Input Stream
Writing Data to a File Using an Output Stream
In this section, I show you how to write a stanza from the poem Lucy by William Wordsworth to a file named luci2.txt. The stanza is as follows:
When she I loved look'd every day
Fresh as a rose in June,
I to her cottage bent my way,
Beneath an evening moon.
The following steps are needed to write to the file:
- 1.Identify the data sink, which is the file to which the data will be written.
- 2.Create an output stream using the file.
- 3.Write the data to the file using the output stream.
- 4.Flush the output stream.
- 5.Close the output stream.
Identifying the Data Sink
Your data sink could be simply the file path as a string or a File object representing the pathname of the file. Let’s assume that the luci2.txt file is in the current working directory.
// The data sink
String destFile = "luci2.txt";
Creating the Output Stream
To write to a file, you need to create an object of the FileOutputStream class, which will represent the output stream.
// Create a file output stream
FileOutputStream fos = new FileOutputStream(destFile);
When the data sink for an output stream is a file, Java tries to create the file if the file does not exist. Java may throw a FileNotFoundException if the file name that you have used is a directory name, or if it could not open the file for any reason. You must be ready to handle this exception by placing your code in a try-catch block, as shown:
try {
FileOutputStream fos = new FileOutputStream(srcFile);
} catch (FileNotFoundException e){
// Error handling code goes here
}
If your file contains data at the time of creating
a FileOutputStream, the data will be erased. If you want to keep the existing data and append the new data to the file, you need to use another constructor of the FileOutputStream class, which accepts a boolean flag for appending the new data to the file.
// To append data to the file, pass true in the second argument
FileOutputStream fos = new FileOutputStream(destFile, true);
Writing the Data
Write data to the file using the output stream. The FileOutputStream class has an overloaded write() method to write data to a file. You can write one byte or multiple bytes at a time using the different versions of this method. You need to place the code for writing data to the output stream in a try-catch block because it may throw an IOException if data cannot be written to the file.
Typically, you write binary data using a FileOutputStream. If you want to write a string such as “Hello” to the output stream, you need to convert the string to bytes. The String class has a getBytes() method that returns an array of bytes that represents the string. You write a string to the FileOutputStream as follows:
String text = "Hello";
byte[] textBytes = text.getBytes();
fos.write(textBytes);
You want to write four lines of text to luci2.txt. You need to insert a new line after every line for the first three lines of text. A new line is different on different platforms. You can get a new line for the platform on which your program is running by reading the line.separator system variable as follows:
// Get the new line for the platform
String lineSeparator = System.getProperty("line.separator");
Note that a line separator may not necessarily be one character. To write a line separator to a file output stream, you need to convert it to a byte array and write that byte array to the file as follows:
fos.write(lineSeparator.getBytes());
Flushing the Output Stream
You need to flush the output stream using the flush() method:
// Flush the output stream
fos.flush();
Flushing an output stream indicates that if any written bytes were buffered, they may be written to the data sink. For example, if the data sink is a file, you write bytes to a FileOutputStream, which is an abstraction of a file. The output stream passes the bytes to the operating system, which is responsible for writing them to the file. For a file output stream, if you call the flush() method, the output
stream passes the bytes to the operating system for writing. It is up to the operating system when it writes the bytes to the file. If an implementation of an output stream buffers the written bytes, it flushes the bytes automatically when its buffer is full or when you close the output stream by calling its close() method.
Closing the Output Stream
Closing an output stream is similar to closing an input stream. You need to close the output stream using its close() method.
// Close the output stream
fos.close();
The close() method may throw an IOException. Use a try-with-resources to create an output stream if you want it to be closed automatically.
Completing the Example
Listing 7-17 illustrates the steps involved in writing to a file named luci2.txt. If the file does not exist in your current directory, the program will create it. If it exists, it will be overwritten. The file path displayed in the output may be different when you run the program.
// SimpleFileWriting.java
package com.jdojo.io;
import java.io.File;
import java.io.FileNotFoundException;
import java.io.FileOutputStream;
import java.io.IOException;
public class SimpleFileWriting {
public static void main(String[] args) {
String destFile = "luci2.txt";
// Get the line separator for the current platform
String lineSeparator = System.getProperty("line.separator");
String line1 = "When she I loved look'd every day";
String line2 = "Fresh as a rose in June,";
String line3 = "I to her cottage bent my way,";
String line4 = "Beneath an evening moon.";
try (FileOutputStream fos = new FileOutputStream(destFile)) {
// Write all four lines to the output stream as bytes
fos.write(line1.getBytes());
fos.write(lineSeparator.getBytes());
fos.write(line2.getBytes());
fos.write(lineSeparator.getBytes());
fos.write(line3.getBytes());
fos.write(lineSeparator.getBytes());
fos.write(line4.getBytes());
// Flush the written bytes to the file
fos.flush();
// Display the output file path
System.out.println("Text has been written to "
+ (new File(destFile)).getAbsolutePath());
} catch (FileNotFoundException e1) {
FileUtil.printFileNotFoundMsg(destFile);
} catch (IOException e2) {
e2.printStackTrace();
}
}
}
Text has been written to C:Java9LanguageFeaturesluci2.txt
Listing 7-17.
Writing Bytes
to a File Output Stream
Input Stream Meets the Decorator Pattern
Figure 7-5 depicts the class diagram that includes some commonly used input stream classes. You can refer to the API documentation of the java.io package for the complete list of the input stream classes. The comments in the class diagram compare input stream classes with the classes in the decorator pattern. Notice that the class diagram for the input streams is similar to the class diagram for your drink application, which was also based on the decorator pattern. Table 7-1 compares the classes in the decorator pattern, the drink application, and the input streams.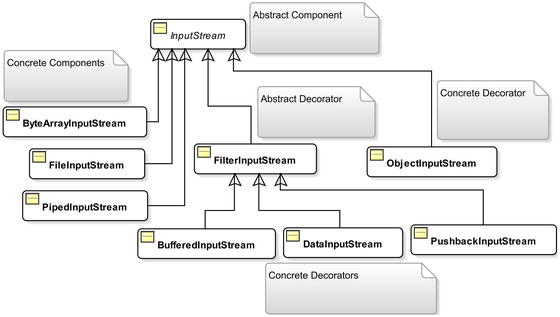
Figure 7-5.
Commonly used classes for input streams compared with the decorator pattern
Table 7-1.
Comparing the Class Design
in the Decorator Pattern, the Drink Application, and Input Streams
Decorator Pattern | Drink Application | Input Stream |
|---|---|---|
Component
|
Drink
|
InputStream
|
ConcreteComponentA
ConcreteComponentB
|
Rum
Vodka
Whisky
|
FileInputStream
ByteArrayInputStream
PipedInputStream
|
Decorator
|
DrinkDecorator
|
FilterInputStream
|
ConcreteDecoratorA
ConcreteDecoratorB
|
Honey
Spices
|
BufferedInputStream
PushbackInputStream
DataInputStream
ObjectInputStream
|
The abstract base component
is the InputStream class, which is similar to the Drink class. You have concrete component classes of FileInputStream, ByteArrayInputStream, and PipedInputStream, which are similar to the Rum, Vodka, and Whiskey classes. You have a FilterInputStream class, which is similar to the DrinkDecorator class. Notice the decorator class in the input stream family does not use the word “Decorator” in its class name; it is named as FilterInputStream instead. It is also not declared abstract as you had declared the DrinkDecorator class. Not declaring it abstract seems to be an inconsistency in the class design. You have concrete decorator classes of BufferedInputStream, DataInputStream, and PushbackInputStream, which are similar to the Honey and Spices classes in the drink application. One noticeable difference is that the ObjectInputStream class is a concrete decorator and it is inherited from the abstract component InputStream, not from the abstract decorator FilterInputStream. Note that the requirement for a concrete decorator is that it should have the abstract component class in its immediate or non-immediate superclass and it should have a constructor that accepts an abstract component as its argument. The ObjectInputStream class fulfills these requirements.
Once you understand that the class design for input streams in Java I/O is based on the decorator pattern, it should be easy to construct an input stream using these classes. The superclass InputStream contains the basic methods to read data from an input stream, which are supported by all concrete component classes as well as all concrete decorator classes. The basic operation on an input stream is to read data from it. Some important methods defined in the InputStream class are listed in Table 7-2. Note that you have already used two of these methods, read() and close(), in the SimpleFileReading class to read data from a file.
Table 7-2.
Some Important Methods
of the InputStream Class
Method | Description |
|---|---|
int read()
| Reads one byte from the input stream and returns the read byte as an int. It returns -1 when the end of the input stream is reached. |
int read(byte[] buffer)
| Reads maximum up to the length of the specified buffer. It returns the number of bytes read in the buffer. It returns –1 if the end of the input stream is reached. |
int read(byte[] buffer,
int offset, int length)
| Reads maximum up to the specified length bytes. The data is written in the buffer starting from the offset index. It returns the number of bytes read or -1 if the end of the input stream is reached. |
byte[] readAllBytes()
| Reads all remaining bytes from the input stream and returns the read bytes in a byte[].This method was added to the InputStream class in JDK9. |
int readNBytes(byte[] buffer, int offset, int length)
| Reads the requested number of bytes, as specified by length, from the input stream into the given byte array. It returns the actual number of bytes read into the buffer. The read data is stored in the buffer starting at offset. This method was added to the InputStream class in JDK9. |
void close()
| Closes the input stream. |
int available()
| Returns the estimated number of bytes that can be read from this input stream without blocking. |
long transferTo(OutputStream out)
| Reads all bytes from this input stream and writes the bytes to the specified output stream. It returns the number of bytes transferred. This method was added to the InputStream class in JDK9. |
Tip
All methods in InputStream that read data block until the input data is available for reading, the end of the input stream is reached, or an exception is thrown.
Let’s briefly discuss the four input stream concrete decorators: BufferedInputStream, PushbackInputStream, DataInputStream, and ObjectInputStream. I discuss BufferedInputStream and PushbackInputStream in this section. I discuss DataInputStream in the “Reading and Writing Primitive Data Types” section. I discuss ObjectInputStream in the “Object Serialization” section.
BufferedInputStream
A BufferedInputStream adds functionality to an input stream by buffering the data. It maintains an internal buffer to store bytes read from the underlying input stream. When bytes are read from an input stream, the BufferedInputStream reads more bytes than requested and buffers them in its internally maintained buffer. When a byte read is requested, it checks if the requested byte already exists in its buffer. If the requested byte exists in its buffer, it returns the byte from its buffer. Otherwise, it reads some more bytes in its buffer and returns only the requested bytes. It also adds support for the mark and reset operations on an input stream to let you reread bytes from an input stream. The main benefit of using BufferedInputStream is faster speed because of buffering. Listing 7-18 shows how to use a BufferedInputStream to read contents of a file.
// BufferedFileReading.java
package com.jdojo.io;
import java.io.BufferedInputStream;
import java.io.FileInputStream;
import java.io.FileNotFoundException;
import java.io.IOException;
public class BufferedFileReading {
public static void main(String[] args) {
String srcFile = "luci1.txt";
try (BufferedInputStream bis
= new BufferedInputStream(new FileInputStream(srcFile))) {
// Read one byte at a time and display the read data
byte byteData;
while ((byteData = (byte) bis.read()) != -1) {
System.out.print((char) byteData);
}
} catch (FileNotFoundException e1) {
FileUtil.printFileNotFoundMsg(srcFile);
} catch (IOException e2) {
e2.printStackTrace();
}
}
}
STRANGE fits of passion have I known:
And I will dare to tell,
But in the lover's ear alone,
What once to me befell.
Listing 7-18.
Reading from a File Using a BufferedInputStream for Faster Speed
The code in the BufferedFileReading class reads the text in the luci1.txt file. The only difference between SimpleFileReading in Listing 7-14 and BufferedFileReading in Listing 7-18 is that the latter uses a decorator BufferedInputStream for a FileInputStream and the former simply uses a FileInputStream. In
SimpleFileReading
, you constructed the input stream as follows:
String srcFile = "luci1.txt";
FileInputStream fis = new FileInputStream(srcFile);
In BufferedFileReading, you constructed the input stream as follows:
String srcFile = "luci1.txt";
BufferedInputStream bis = new BufferedInputStream(new FileInputStream(srcFile));
You may not find any noticeable speed gain using BufferedFileReading over SimpleFileReading in this example because the file size is small. You are reading one byte at a time in both examples to keep the code simpler to read. You should be using another version of the read() method of the input stream so you can read more bytes at a time. Using the readAllBytes() method, which was added to the InputStream in JDK9, you can read the entire contents of the file in one go.
PushbackInputStream
A PushbackInputStream adds functionality to an input stream that lets you unread bytes (or push back the read bytes) using its unread() method. There are three versions of the unread() method.
- void unread(byte[] buffer)
- void unread(byte[] buffer, int offset, int length)
- void unread(int buffer)
The unread(int buffer) method lets you push back one byte at a time and other two methods let you push back multiple bytes at a time. If you call the read() method on the input stream after you have called its unread() method, you will first read those bytes that you have pushed back. Once all unread bytes are read again, you start reading fresh bytes from the input stream. For example, suppose your input stream contains a string of bytes, HELLO. If you read two bytes, you would have read HE. If you call unread((byte) 'E') to push back the last byte you have read, the subsequent read will return E and the next reads will read LLO.
Listing 7-19 illustrates the use of the PushbackInputStream. The program reads the first stanza of the poem Lucy by William Wordsworth from the luci1.txt in the current working directory. It reads each byte from the file twice, as shown in the output. For example, STRANGE is read as SSTTRRAANNGGEE. You may notice a blank line between two lines because each new line is read twice.
// PushbackFileReading.java
package com.jdojo.io;
import java.io.PushbackInputStream;
import java.io.FileInputStream;
import java.io.FileNotFoundException;
import java.io.IOException;
public class PushbackFileReading {
public static void main(String[] args) {
String srcFile = "luci1.txt";
try (PushbackInputStream pis
= new PushbackInputStream(new FileInputStream(srcFile))) {
// Read one byte at a time and display it
byte byteData;
while ((byteData = (byte) pis.read()) != -1) {
System.out.print((char) byteData);
// Unread the last byte that we have just read
pis.unread(byteData);
// Reread the byte we unread (or pushed back)
byteData = (byte) pis.read();
System.out.print((char) byteData);
}
} catch (FileNotFoundException e1) {
FileUtil.printFileNotFoundMsg(srcFile);
} catch (IOException e2) {
e2.printStackTrace();
}
}
}
SSTTRRAANNGGEE ffiittss ooff ppaassssiioonn hhaavvee II kknnoowwnn::
AAnndd II wwiillll ddaarree ttoo tteellll,,
BBuutt iinn tthhee lloovveerr''ss eeaarr aalloonnee,,
WWhhaatt oonnccee ttoo mmee bbeeffeellll..
Listing 7-19.
Using the PushbackInputStream Class
Output Stream Meets the Decorator Pattern
Figure 7-6 depicts the class diagram that includes some commonly used output stream classes. You can refer to the API documentation of the java.io package for the complete list of the output stream classes. The comments in the class diagram compare the output stream classes with the classes required to implement the decorator pattern. Notice that the class diagram
for the output stream is similar to that of the input stream and the drink application.
Figure 7-6.
Some commonly used classes
for output streams compared with the decorator pattern
Most of the time, if you know the name of the input stream class, you can get the corresponding output stream class by replacing the word “Input” in the class name with the word “Output.” For example, for the FileInputStream class, you have a corresponding FileOutputStream class; for the BufferedInputStream class, you have a corresponding BufferedOutputStream class, and so on. You may not find a corresponding output stream class for every input stream class; for example, PushbackInputStream class has no corresponding output stream class. You may find some new classes that are not in the input stream class hierarchy because they do not make sense while reading data; for example, you have a new concrete decorator class PrintStream in the output stream class hierarchy. Table 7-3 compares the classes in the decorator pattern, your drink application, and the output streams.
Table 7-3.
Comparing Classes
in the Decorator Pattern, the Drink Application, and the Output Streams
Decorator Pattern | Drink Application | Output Stream |
|---|---|---|
Component
|
Drink
|
OutputStream
|
ConcreteComponentA
ConcreteComponentB
|
Rum
Vodka
Whisky
|
FileOutputStream ByteArrayOutputStream
PipedOutputStream
|
Decorator
|
DrinkDecorator
|
FilterOutputStream
|
ConcreteDecoratorA
ConcreteDecoratorB
|
Honey
Spices
|
BufferedOutputStream
DataOutputStream
ObjectOutputStream
|
There are three important methods
defined in the abstract superclass OutputStream: write(), flush(), and close(). The write() method is used to write bytes to an output stream. It has three versions that let you write one byte or multiple bytes at a time. You used it to write data to a file in the SimpleFileWriting class in Listing 7-17. The flush() method is used to flush any buffered bytes to the data sink. The close() method closes the output stream.
The technique to use concrete decorators with the concrete component classes for the output stream is the same as for the input stream classes. For example, to use the
BufferedOutputStream
decorator for better speed to write to a file, use the following statement:
BufferedOutputStream bos = new BufferedOutputStream(
new FileOutputStream("your output file path")
);
To write data to a
ByteArrayOutputStream
, use the following statements:
ByteArrayOutputStream baos = new ByteArrayOutputStream();
baos.write(buffer); // Here, buffer is a byte array
ByteArrayOutputStream provides some important methods: reset(), size(), toString(), and writeTo(). The reset() method discards all bytes written to it; the size() method returns the number of bytes written to the stream; the toString() method returns the string representation of the bytes in the stream; the writeTo() method writes the bytes in the stream to another output stream. For example, if you have written some bytes to a ByteArrayOutputStream called baos and want to write its content to a file represented by FileOutputStream named fos, you would use the following statement:
// All bytes written to baos is written to fos
baos.writeTo(fos);
I don’t cover any more examples of writing to an output stream in this section. You can use SimpleFileWriting class in Listing 7-17 as an example to use any other type of output stream. You can use any output stream’s concrete decorators by using them as an enclosing object for a concrete component or another concrete decorator. I discuss the DataOutputStream, ObjectOutputStream, and PrintStream classes with examples in subsequent sections.
PrintStream
The PrintStream class is a concrete decorator for the output stream as shown in Figure 7-6. It adds the following functionality to an output stream:
- It contains methods that let you print any data type values, primitive or object, in a suitable format for printing.
- Its methods to write data to the output stream do not throw an IOException. If a method call throws an IOException, it sets an internal flag, rather than throwing the exception to the caller. The flag can be checked using its checkError() method, which returns true if an IOException occurs during the method execution.
- It has an auto-flush capability. You can specify in its constructor that it should flush the contents written to it automatically. If you set the auto-flush flag to true, it will flush its contents when a byte array is written, one of its overloaded println() methods is used to write data, a new line character is written, or a byte ( ) is written.
Some of the important methods in PrintStream class are as follows:
- void print(Xxx arg)
- void println(Xxx arg)
- PrintStream printf(String format, Object... args)
- PrintStream printf(Locale l, String format, Object... args)
Here, Xxx is any primitive data type (int, char, float, etc.), String, or Object.
The print(Xxx arg) method writes the specified arg value to the output stream in a printable format. For example, you can use print(10) to write an integer to an output stream. Xxx also includes two reference types: String and Object. If your argument is an object, the toString() method on that object is called, and the returned string is written to the output stream. If the object type argument is null, a string “null” is written to the output stream. Note that all input and output streams are byte based. When I mention that the print stream writes a “null” string to the output stream, it means that the print stream converts the string “null” into bytes and writes those bytes to the output stream. The character-to-byte conversion is done based on the platform’s default character encoding. You can also provide the character encoding to use for such conversions in some of the constructors of the PrintStream class.
The println(XXX arg) method works like the print(XXX arg) method with one difference. It appends a line separator string to the specified arg. That is, it writes an arg value and a line separator to the output stream. The method println() with no argument is used to write a line separator to the output stream. The line separator is platform-dependent and it is determined by the system property named line.separator.
The printf() method is used to write a formatted string to the output stream. For example, if you want to write a string in the form "Today is: <today-date>" to a output stream, you can use its printf() method as follows:
// Assuming that date format is mm/dd/yyyy and ps is the PrintStream object reference
ps.printf("Today is: %1$tm/%1$td/%1$tY", java.time.LocalDate.now());
Listing 7-20 illustrates how to use a PrintStream to write to a file. It writes another stanza from the poem Lucy by William Wordsworth to a file named luci3.txt. The contents of the file after you run this program would be as follows:
Upon the moon I fix'd my eye,
All over the wide lea;
With quickening pace my horse drew nigh
Those paths so dear to me.
// FileWritingWithPrintStream.java
package com.jdojo.io;
import java.io.File;
import java.io.FileNotFoundException;
import java.io.PrintStream;
public class FileWritingWithPrintStream {
public static void main(String[] args) {
String destFile = "luci3.txt";
try (PrintStream ps = new PrintStream(destFile)) {
// Write data to the file. println() appends a new line
// and print() does not append a new line
ps.println("Upon the moon I fix'd my eye,");
ps.println("All over the wide lea;");
ps.println("With quickening pace my horse drew nigh");
ps.print("Those paths so dear to me.");
// flush the print stream
ps.flush();
System.out.println("Text has been written to "
+ (new File(destFile).getAbsolutePath()));
} catch (FileNotFoundException e1) {
FileUtil.printFileNotFoundMsg(destFile);
}
}
}
Text has been written to C:Java9LanguageFeaturesluci3.txt
Listing 7-20.
Using the PrintStream Class to Write to a File
Listing 7-20 is very similar in structure to Listing 7-17. It creates a PrintStream object using the data sink file name. You can also create a PrintStream object using any other OutputStream object. You may notice that you do not have to handle the IOException in the catch block because unlike another output stream, a PrintStream object does not throw this exception. In addition, you use the println() and print() methods to write the four lines of text without worrying about converting them to bytes. If you want to use auto-flush in this program, you need to create the
PrintStream
object using another constructor as follows:
boolean autoFlush = true;
PrintStream ps = new PrintStream(new FileOutputStream(destFile), autoFlush);
Using Pipes
A pipe connects an input stream and an output stream. A piped I/O is based on the producer-consumer pattern.
The producer produces data and the consumer consumes the data, without caring about each other. It works similar to a physical pipe, where you inject something at one end and gather it at the other end. In a piped I/O, you create two streams representing two ends of the pipe. A PipedOutputStream object represents one end and a PipedInputStream object the other end. You connect the two ends using the connect() method on the either object. You can also connect them by passing one object to the constructor when you create another object. You can imagine the logical arrangement
of a piped input stream and a piped output stream as depicted in Figure 7-7.
Figure 7-7.
The logical arrangement
of piped input and output streams
The following snippet of code shows two ways of creating and connecting
the two ends of a pipe:
// Method #1: Create piped input and output streams and connect them
PipedInputStream pis = new PipedInputStream();
PipedOutputStream pos = new PipedOutputStream();
pis.connect(pos); /* Connect the two ends */
// Method #2: Create piped input and output streams and connect them
PipedInputStream pis = new PipedInputStream();
PipedOutputStream pos = new PipedOutputStream(pis);
You can produce and consume data after you connect the two ends of the pipe. You produce data by using one of the write() methods of the PipedOutputStream object. Whatever you write to the piped output stream automatically becomes available to the piped input stream object for reading. You use the read() method of PipedInputStream to read data from the pipe. The piped input stream is blocked if data is not available when it attempts to read from the pipe.
Have you wondered where the data is stored when you write it to a piped output stream? Similar to a physical pipe, a piped stream has a buffer with a fixed capacity to store data between the time it is written to and read from the pipe. You can set the pipe capacity when you create it. If a pipe’s buffer is full, an attempt to write on the pipe blocks.
// Create piped input and output streams with the buffer capacity of 2048 bytes
PipedOutputStream pos = new PipedOutputStream();
PipedInputStream pis = new PipedInputStream(pos, 2048);
Tip
Typically, a pipe is used to transfer data from one thread to another. One thread will produce data and another thread will consume the data. Note that the synchronization between two threads is taken care of by the blocking read and write.
Listing 7-21 demonstrates how to use a piped I/O. The main() method creates and connects a piped input and a piped output stream. The piped output stream is passed to the produceData() method, producing numbers from 1 to 50. The thread sleeps for a half second after producing a number. The consumeData() method reads data from the piped input stream. I used a quick and dirty way of handling the exceptions to keep the code smaller and readable. Data is produced and read in two separate threads.
// PipedStreamTest.java
package com.jdojo.io;
import java.io.PipedInputStream;
import java.io.PipedOutputStream;
public class PipedStreamTest {
public static void main(String[] args) throws Exception {
// Create and connect piped input and output streams
PipedInputStream pis = new PipedInputStream();
PipedOutputStream pos = new PipedOutputStream();
pos.connect(pis);
// Creates and starts two threads, one to produce data (write data)
// and one to consume data (read data)
Runnable producer = () -> produceData(pos);
Runnable consumer = () -> consumeData(pis);
new Thread(producer).start();
new Thread(consumer).start();
}
public static void produceData(PipedOutputStream pos) {
try {
for (int i = 1; i <= 50; i++) {
pos.write((byte) i);
pos.flush();
System.out.println("Writing: " + i);
Thread.sleep(500);
}
pos.close();
} catch (Exception e) {
e.printStackTrace();
}
}
public static void consumeData(PipedInputStream pis) {
try {
int num = -1;
while ((num = pis.read()) != -1) {
System.out.println("Reading: " + num);
}
pis.close();
} catch (Exception e) {
e.printStackTrace();
}
}
}
Writing
: 1
Reading: 1
...
Writing: 50
Reading: 50
Listing 7-21.
Using
Piped Input and Output Streams
Reading and Writing Primitive Data Types
An object of the DataInputStream class is used to read values of the primitive data types in a machine-independent way from an input stream. An object of the DataOutputStream class is used to write values of the primitive data type in a machine-independent way to an output stream.
The
DataInputStream class
contains readXxx() methods to read a value of data type Xxx, where Xxx is a primitive data type such as int, char, etc. For example, to read an int value, it contains a readInt() method; to read a char value, it has a readChar() method, etc. It also supports reading strings using the readUTF() method.
The
DataOutputStream class
contains a writeXxx(Xxx value) method corresponding to each the readXxx() method of the DataInputStream class, where Xxx is a Java primitive data type. It supports writing a string to an output stream using the writeUTF(String text) method.
The DataInputStream and DataOutputStream classes are concrete decorators, which provide you a convenient way to read and write values of the primitive data types and strings using input and output streams, respectively. You must have an underlying concrete component linked to a data source or a data sink to use these classes. For example, to write values of the primitive
data types to a file named primitives.dat, you construct an object of DataOutputStream as follows:
DataOutputStream dos = new DataOutputStream(new FileOutputStream("primitives.dat"));
Listing 7-22 writes an int value, a double value, a boolean value, and a string to a file named primitives.dat. The file path in the output may be different when you run this program.
// WritingPrimitives.java
package com.jdojo.io;
import java.io.DataOutputStream;
import java.io.File;
import java.io.FileNotFoundException;
import java.io.FileOutputStream;
import java.io.IOException;
public class WritingPrimitives {
public static void main(String[] args) {
String destFile = "primitives.dat";
try (DataOutputStream dos = new DataOutputStream(
new FileOutputStream(destFile))) {
// Write some primitive values and a string
dos.writeInt(765);
dos.writeDouble(6789.50);
dos.writeBoolean(true);
dos.writeUTF("Java Input/Output is cool!");
// Flush the written data to the file
dos.flush();
System.out.println("Data has been written to "
+ (new File(destFile)).getAbsolutePath());
} catch (FileNotFoundException e) {
FileUtil.printFileNotFoundMsg(destFile);
} catch (IOException e) {
e.printStackTrace();
}
}
}
Data has been written to C:Java9LanguageFeaturesprimitives.dat
Listing 7-22.
Writing Java Primitive Values and Strings
to a File
Listing 7-23 reads those primitive values back. Note that you must read the values in the same order using a DataInputStream as they were written using the DataOutputStream. You need to run the
WritingPrimitives class
before you run the ReadingPrimitives class.
// ReadingPrimitives.java
package com.jdojo.io;
import java.io.IOException;
import java.io.FileInputStream;
import java.io.FileNotFoundException;
import java.io.DataInputStream;
public class ReadingPrimitives {
public static void main(String[] args) {
String srcFile = "primitives.dat";
try (DataInputStream dis = new DataInputStream(
new FileInputStream(srcFile))) {
// Read the data in the same order they were written
int intValue = dis.readInt();
double doubleValue = dis.readDouble();
boolean booleanValue = dis.readBoolean();
String msg = dis.readUTF();
System.out.println(intValue);
System.out.println(doubleValue);
System.out.println(booleanValue);
System.out.println(msg);
} catch (FileNotFoundException e) {
FileUtil.printFileNotFoundMsg(srcFile);
} catch (IOException e) {
e.printStackTrace();
}
}
}
765
6789.5
true
Java Input/Output is cool!
Listing 7-23.
Reading Primitive Values and Strings from a File
Object Serialization
You create an object using the new operator. For example, if you have a Person class that accepts a person’s name, gender, and height as arguments in its constructor, you can create a Person object as follows:
Person john = new Person("John", "Male", 6.7);
What would you do if you wanted to save the object john to a file and later restore it in memory without using the new operator again? You have not learned how to do it yet. This is the subject of the discussion in this section.
The process of converting an object in memory to a sequence of bytes and storing the sequence of bytes in a storage medium such as a file is called object serialization. You can store the sequence of bytes
to permanent storage such as a file or a database. You can also transmit the sequence of bytes over a network. The process of reading the sequence of bytes produced by a serialization process and restoring the object back in memory is called object deserialization. The serialization of an object is also known as deflating or
marshaling
the object. The deserialization of an object is also known as inflating or unmarshaling the object. You can think of serialization as writing an object from memory to a storage medium and deserialization as reading an object into memory from a storage medium.
An object of the
ObjectOutputStream class
is used to serialize an object. An object of the ObjectInputStream class is used to deserialize an object. You can also use objects of these classes to serialize values of the primitive data types such as int, double, boolean, etc.
The ObjectOutputStream and ObjectInputStream classes are the concrete decorator classes for output and input streams, respectively. However, they are not inherited from their abstract decorator classes. They are inherited from their respective abstract component classes. ObjectOutputStream is inherited from OutputStream and ObjectInputStream is inherited from InputStream. This seems to be an inconsistency. However, this still fits into the decorator pattern.
Your class must implement the
Serializable
or
Externalizable interface
to be serialized or deserialized. The Serializable interface is a marker interface. If you want the objects of a Person class to be serialized, you need to declare the Person class as follows:
public class Person implements Serializable {
// Code for the Person class goes here
}
Java takes care of the details of reading/writing a Serializable object from/to a stream. You just need to pass the object to write/read to/from a stream to one of the methods of the stream classes.
Implementing the
Externalizable interface
gives you more control in reading and writing objects from/to a stream. It inherits the Serializable interface. It is declared as follows:
public interface Externalizable extends Serializable {
void readExternal(ObjectInput in) throws IOException, ClassNotFoundException;
void writeExternal(ObjectOutput out) throws IOException;
}
The readExternal() method is called when you read an object from a stream. The writeExternal() method is called when you write an object to a stream. You have to write the logic to read and write the object’s fields inside the readExternal() and writeExternal() methods, respectively. Your class implementing the Externalizable interface looks like the following:
public class Person implements Externalizable {
public void readExternal(ObjectInput in) throws IOException, ClassNotFoundException {
// Write the logic to read the Person object fields from the stream
}
public void writeExternal(ObjectOutput out) throws IOException {
// Write the logic to write Person object fields to the stream
}
}
Serializing Objects
To serialize an object, you need to perform the following steps:
- 1.Have the references of the objects to be serialized.
- 2.Create an object output stream for the storage medium to which the objects will be written.
- 3.Write objects to the output stream.
- 4.Close the object output stream.
Create an object of the ObjectOutputStream class by using it as a decorator for another output stream that represents the storage medium to save the object. For example, to save an object to a person.ser file, create an object output stream as follows:
// Create an object output stream to write objects to a file
ObjectOutputStream oos = new ObjectOutputStream(new FileOutputStream("person.ser"));
To save an object to a ByteArrayOutputStream, you construct an object output stream as follows:
// Creates a byte array output stream to write data to
ByteArrayOutputStream baos = new ByteArrayOutputStream();
// Creates an object output stream to write objects to the byte array output stream
ObjectOutputStream oos = new ObjectOutputStream(baos);
Use the writeObject() method of the ObjectOutputStream class to serialize the object by passing the object reference as an argument, like so:
// Serializes the john object
oos.writeObject(john);
Finally, use the close() method to close the object output stream when you are done writing all objects to it:
// Close the object output stream
oos.close();
Listing 7-24 defines a Person class that implements the Serializable interface. The Person class contains three fields: name, gender, and height. It overrides the toString() method and returns the Person description using the three fields. I have not added getters and setters for the fields in the Person class to keep the class short and simple.
// Person.java
package com.jdojo.io;
import java.io.Serializable;
public class Person implements Serializable {
private String name = "Unknown";
private String gender = "Unknown";
private double height = Double.NaN;
public Person(String name, String gender, double height) {
this.name = name;
this.gender = gender;
this.height = height;
}
@Override
public String toString() {
return "Name: " + this.name + ", Gender: " + this.gender
+ ", Height: " + this.height;
}
}
Listing 7-24.
A Person Class That Implements the Serializable Interface
Listing 7-25 demonstrates how to write Person objects to a person.ser file. The output displays the objects written to the file and the absolute path of the file, which may be different on your machine.
// PersonSerializationTest.java
package com.jdojo.io;
import java.io.File;
import java.io.FileOutputStream;
import java.io.IOException;
import java.io.ObjectOutputStream;
public class PersonSerializationTest {
public static void main(String[] args) {
// Create three Person objects
Person john = new Person("John", "Male", 6.7);
Person wally = new Person("Wally", "Male", 5.7);
Person katrina = new Person("Katrina", "Female", 5.4);
// The output file
File fileObject = new File("person.ser");
try (ObjectOutputStream oos
= new ObjectOutputStream(new FileOutputStream(fileObject))) {
// Write (or serialize) the objects to the object output stream
oos.writeObject(john);
oos.writeObject(wally);
oos.writeObject(katrina);
// Display the serialized objects on the standard output
System.out.println(john);
System.out.println(wally);
System.out.println(katrina);
// Print the output path
System.out.println("Objects were written to "
+ fileObject.getAbsolutePath());
} catch (IOException e) {
e.printStackTrace();
}
}
}
Name: John, Gender: Male, Height: 6.7
Name: Wally, Gender: Male, Height: 5.7
Name: Katrina, Gender: Female, Height: 5.4
Objects were written to C:Java9LanguageFeaturesperson.ser
Listing 7-25.
Serializing an Object
Deserializing Objects
It is time to read the objects back from the person.ser file. Reading a serialized object is the opposite of serializing it. To deserialize an object, you need to perform the following steps:
- 1.Create an object input stream for the storage medium from which objects will be read.
- 2.Read the objects.
- 3.Close the object input stream.
Create an object of the ObjectInputStream class by using it as a decorator for another input stream that represents the storage medium where serialized objects were stored. For example, to read an object from a person.ser file, create an object input stream as follows:
// Create an object input stream to read objects from a file
ObjectInputStream ois = new ObjectInputStream(new FileInputStream("person.ser"));
To read objects from a ByteArrayInputStream, create an object output stream as follows:
// Create an object input stream to read objects from a byte array input stream
ObjectInputStream ois = new ObjectInputStream(Byte-Array-Input-Stream-Reference);
Use the readObject() method of the ObjectInputStream class to deserialize the object, like so:
// Read an object from the stream
Object obj = oos.readObject();
Make sure to call the readObject() method to read objects
in the same order you called the writeObject() method to write objects. For example, if you wrote three pieces of information in the order object-1, a float, and object-2, you must read them in the same order: object-1, a float, and object-2.
Finally, close the object input stream as follows:
// Close the object input stream
ois.close();
Listing 7-26 demonstrates how to read objects from the person.ser file. Make sure that the person.ser file exists in your current directory. Otherwise, the program will print an error message with the expected location of this file.
// PersonDeserializationTest.java
package com.jdojo.io;
import java.io.File;
import java.io.FileInputStream;
import java.io.FileNotFoundException;
import java.io.IOException;
import java.io.ObjectInputStream;
public class PersonDeserializationTest {
public static void main(String[] args) {
// The input file
File fileObject = new File("person.ser");
try (ObjectInputStream ois
= new ObjectInputStream(new FileInputStream(fileObject))) {
// Read (or deserialize) the three objects
Person john = (Person) ois.readObject();
Person wally = (Person) ois.readObject();
Person katrina = (Person) ois.readObject();
// Let's display the objects that are read
System.out.println(john);
System.out.println(wally);
System.out.println(katrina);
// Print the input path
System.out.println("Objects were read from "
+ fileObject.getAbsolutePath());
} catch (FileNotFoundException e) {
FileUtil.printFileNotFoundMsg(fileObject.getPath());
} catch (ClassNotFoundException | IOException e) {
e.printStackTrace();
}
}
}
Name: John, Gender: Male, Height: 6.7
Name: Wally, Gender: Male, Height: 5.7
Name: Katrina, Gender: Female, Height: 5.4
Objects were read from C:Java9LanguageFeaturesperson.ser
Listing 7-26.
Reading Objects from a File
Externalizable Object Serialization
In the previous sections, I showed you how to serialize and deserialize Serializable objects. In this section, I show you how to serialize and deserialize Externalizable objects. I have modified the Person class to implement the Externalizable interface. I named the new class PersonExt and it’s shown in Listing 7-27.
// PersonExt.java
package com.jdojo.io;
import java.io.Externalizable;
import java.io.IOException;
import java.io.ObjectInput;
import java.io.ObjectOutput;
public class PersonExt implements Externalizable {
private String name = "Unknown";
private String gender = "Unknown";
private double height = Double.NaN;
// You must define a no-arg constructor for this class. It is
// used to construct the object during deserialization process
// before the readExternal() method of this class is called.
public PersonExt() {
}
public PersonExt(String name, String gender, double height) {
this.name = name;
this.gender = gender;
this.height = height;
}
// Override the toString() method to return the person description
@Override
public String toString() {
return "Name: " + this.name + ", Gender: " + this.gender
+ ", Height: " + this.height;
}
@Override
public void readExternal(ObjectInput in) throws IOException, ClassNotFoundException {
// Read name and gender in the same order they were written
this.name = in.readUTF();
this.gender = in.readUTF();
}
@Override
public void writeExternal(ObjectOutput out) throws IOException {
// Write only the name and gender to the stream
out.writeUTF(this.name);
out.writeUTF(this.gender);
}
}
Listing 7-27.
A PersonExt Class That Implements the Externalizable Interface
Java will pass the reference of the object output stream and object input stream to the writeExternal() and readExternal() methods of the PersonExt class, respectively.
In the writeExternal() method, you write the name and gender fields to the object output stream. Note that the height field is not written to the object output stream. It means that you will not get the value of the height field back when you read the object from the stream in the readExternal() method. The writeUTF() method is used to write strings (name and gender) to the object output stream.
In the readExternal() method, you read the name and gender fields from the stream and set them in the name and gender instance variables.
Listing 7-28 and Listing 7-29 contain the serialization and deserialization logic for PersonExt objects.
// PersonExtSerializationTest.java
package com.jdojo.io;
import java.io.File;
import java.io.FileOutputStream;
import java.io.IOException;
import java.io.ObjectOutputStream;
public class PersonExtSerializationTest {
public static void main(String[] args) {
// Create three Person objects
PersonExt john = new PersonExt("John", "Male", 6.7);
PersonExt wally = new PersonExt("Wally", "Male", 5.7);
PersonExt katrina = new PersonExt("Katrina", "Female", 5.4);
// The output file
File fileObject = new File("personext.ser");
try (ObjectOutputStream oos = new ObjectOutputStream(
new FileOutputStream(fileObject))) {
// Write (or serialize) the objects to the object output stream
oos.writeObject(john);
oos.writeObject(wally);
oos.writeObject(katrina);
// Display the serialized objects on the standard output
System.out.println(john);
System.out.println(wally);
System.out.println(katrina);
// Print the output path
System.out.println("Objects were written to "
+ fileObject.getAbsolutePath());
} catch (IOException e1) {
e1.printStackTrace();
}
}
}
Name: John, Gender: Male, Height: 6.7
Name: Wally, Gender: Male, Height: 5.7
Name: Katrina, Gender: Female, Height: 5.4
Objects were written to C:Java9LanguageFeaturespersonext.ser
Listing 7-28.
Serializing PersonExt Objects That Implement the Externalizable Interface
// PersonExtDeserializationTest.java
package com.jdojo.io;
import java.io.File;
import java.io.FileInputStream;
import java.io.FileNotFoundException;
import java.io.IOException;
import java.io.ObjectInputStream;
public class PersonExtDeserializationTest {
public static void main(String[] args) {
// The input file
File fileObject = new File("personext.ser");
try (ObjectInputStream ois
= new ObjectInputStream(new FileInputStream(fileObject))) {
// Read (or deserialize) the three objects
PersonExt john = (PersonExt) ois.readObject();
PersonExt wally = (PersonExt) ois.readObject();
PersonExt katrina = (PersonExt) ois.readObject();
// Let's display the objects that are read
System.out.println(john);
System.out.println(wally);
System.out.println(katrina);
// Print the input path
System.out.println("Objects were read from "
+ fileObject.getAbsolutePath());
} catch (FileNotFoundException e) {
FileUtil.printFileNotFoundMsg(fileObject.getPath());
} catch (ClassNotFoundException | IOException e) {
e.printStackTrace();
}
}
}
Name: John, Gender: Male, Height: NaN
Name: Wally, Gender: Male, Height: NaN
Name: Katrina, Gender: Female, Height: NaN
Objects were read from C:Java9LanguageFeaturespersonext.ser
Listing 7-29.
Deserializing PersonExt Objects That Implement the Externalizable Interface
The output of Listing 7-29 demonstrates that the value of the height field is the default value (Double.NaN) after you deserialize a PersonExt object. Here are the steps to take to serialize and deserialize an object using
Externalizable interface
:
- 1.When you call the writeObject() method to write an Externalizable object, Java writes the identity of the object to the output stream, and calls the writeExternal() method of its class. You write the data related to the object to the output stream in the writeExternal() method. You have full control over what object-related data you write to the stream in this method. If you want to store some sensitive data, you may want to encrypt it before you write it to the stream and decrypt the data when you read it from the stream.
- 2.When you call the readObject() method to read an Externalizable object, Java reads the identity of the object from the stream. Note that for an Externalizable object, Java writes only the object’s identity to the output stream, not any details about its class definition. It uses the object class’s no-args constructor to create the object. This is the reason that you must provide a no-args constructor for an Externalizable object. It calls the object’s readExternal() method, so you can populate object’s fields values.
For a Serializable object, the JVM serializes only instance variables that are not declared as transient. I discuss serializing transient variables in the next section. For an Externalizable object, you have full control over what pieces of data are serialized.
Serializing transient Fields
The keyword transient is used to declare a class’s field. As the literal meaning of the word “transient” implies, a transient field of a Serializable object is not serialized. The following code for an Employee class declares the ssn and salary fields as transient:
public class Employee implements Serializable {
private String name;
private String gender;
private transient String ssn;
private transient double salary;
}
The transient fields of a Serializable object are not serialized when you use the writeObject() method of the ObjectOutputStream class.
Note that if your object is Externalizable, not Serializable, declaring a field transient has no effect because you control what fields are serialized in the writeExternal() method. If you want transient fields of your class to be serialized, you need to declare the class Externalizable and write the transient fields to the output stream in the writeExternal() method of your class. I don’t cover any examples of serializing transient fields because the logic is the same as shown in Listing 7-27, except that you declare some instance variables as transient and write them to the output stream in the writeExternal() method
.
Advanced Object Serialization
The following sections discuss advanced serialization techniques. They are designed for experienced developers. If you are a beginner or an intermediate level developer, you may skip the following sections; you should, however, revisit them after you gain more experience with Java I/O.
Writing an Object Multiple Times to a Stream
The JVM keeps track of object references it writes to the object output stream using the writeObject() method. Suppose you have a PersonMutable object named john and you use an ObjectOutputStream object oos to write it to a file as follows:
PersonMutable john = new PersonMutable("John", "Male", 6.7);
oos.writeObject(john);
At this time, Java makes a note that the object john has been written to the stream. You may want to change some attributes of the john object and write it to the stream again as follows:
john.setName("John Jacobs");
john.setHeight(5.9);
oos.writeObject(john);
At this time, Java does not write the john object to the stream. Rather, the JVM back references it to the john object that you wrote the first time. That is, all changes made to the name and height fields are not written to the stream separately. Both writes for the john object share the same object in the written stream. When you read the objects back, both objects will have the same name, gender, and height.
An object is not written more than once to a stream to keep the size of the serialized objects smaller. Listing 7-30 shows this process. The MultipleSerialization class as shown in Listing 7-31, in its serialize() method, writes an object, changes object’s attributes and serializes the same object again. It reads the objects in its deserialize() method. The output shows that Java did not write the changes made to the object when it wrote the object the second time.
// MutablePerson.java
package com.jdojo.io;
import java.io.Serializable;
public class MutablePerson implements Serializable {
private String name = "Unknown";
private String gender = "Unknown";
private double height = Double.NaN;
public MutablePerson(String name, String gender, double height) {
this.name = name;
this.gender = gender;
this.height = height;
}
public void setName(String name) {
this.name = name;
}
public String getName() {
return name
;
}
public void setHeight(double height) {
this.height = height;
}
public double getHeight() {
return height;
}
@Override
public String toString() {
return "Name: " + this.name + ", Gender: " + this.gender
+ ", Height: " + this.height;
}
}
Listing 7-30.
A MutablePerson Class Whose Name and Height Can Be Changed
// MultipleSerialization.java
package com.jdojo.io;
import java.io.File;
import java.io.FileInputStream;
import java.io.FileOutputStream;
import java.io.IOException;
import java.io.ObjectInputStream;
import java.io.ObjectOutputStream;
public class MultipleSerialization {
public static void main(String[] args) {
String fileName = "mutableperson.ser";
// Write the same object twice to the stream
serialize(fileName);
System.out.println("--------------------------------------");
// Read the two objects back
deserialize(fileName);
}
public static void serialize(String fileName) {
// Create a MutablePerson objects
MutablePerson john = new MutablePerson("John", "Male", 6.7);
File fileObject = new File(fileName);
try (ObjectOutputStream oos
= new ObjectOutputStream(new FileOutputStream(fileObject))) {
// Let's display the objects we have serialized on the console
System.out.println("Objects are written to "
+ fileObject.getAbsolutePath());
// Write the john object first time to the stream
oos.writeObject(john);
System.out.println(john); // Display what we wrote
// Change john object's name and height
john.setName("John Jacobs");
john.setHeight(6.9);
// Write john object again with changed name and height
oos.writeObject(john);
System.out.println(john); // display what we wrote again
} catch (IOException e1) {
e1.printStackTrace();
}
}
public static void deserialize(String fileName) {
// personmutable.ser file must exist in the current directory
File fileObject = new File(fileName);
try (ObjectInputStream ois
= new ObjectInputStream(new FileInputStream(fileObject))) {
// Read the two objects that were written in the serialize() method
MutablePerson john1 = (MutablePerson) ois.readObject();
MutablePerson john2 = (MutablePerson) ois.readObject();
// Display the objects
System.out.println("Objects are read from "
+ fileObject.getAbsolutePath());
System.out.println(john1);
System.out.println(john2);
} catch (IOException | ClassNotFoundException e) {
e.printStackTrace();
}
}
}
Objects are written to C:Java9LanguageFeaturesmutableperson.ser
Name: John, Gender: Male, Height: 6.7
Name: John Jacobs, Gender: Male, Height: 6.9
--------------------------------------
Objects are read from C:Java9LanguageFeaturesmutableperson.ser
Name: John, Gender: Male, Height: 6.7
Name: John, Gender: Male, Height: 6.7
Listing 7-31.
Writing an Object Multiple Times to the Same Output Stream
If you do not want Java to share an object reference, use the writeUnshared() method instead of the writeObject() method of the ObjectOutputStream class to serialize an object. An object written using the writeUnshared() method is not shared or back referenced by any subsequent call to the writeObject() method or the writeUnshared() method on the same object. You should read the object that was written using the writeUnshared() or the readUnshared() methods of the ObjectInputStream class. If you replace the call to writeObject() with writeUnshared() and the call to readObject() with readUnshared() in the
MutipleSerialization class
, you get the changed state of the object back when you read the object the second time.
You can control the serialization of a Serializable object in another way by defining a field named serialPersistentFields, which is an array of ObjectStreamField objects. This field must be declared private, static, and final. This field declares that all the fields mentioned in the array are serializable. Note that this is just the opposite of using the transient keyword with a field. When you use the transient keyword, you state that this field is not serializable, whereas by declaring a serialPersistentFields array, you state that these fields are serializable. The declaration of serialPersistentFields takes precedence over the declaration of transient fields in a class. For example, if you declare a field transient and include that field in the serialPersistentFields field, that field will be serialized. The following snippet of code shows how to declare a
serialPersistentFields field
in a Person class:
public class Person implements Serializable {
private String name;
private String gender;
private double height;
// Declare that only name and height fields are serializable
private static final ObjectStreamField[] serialPersistentFields
= {new ObjectStreamField("name", String.class),
new ObjectStreamField("height", double.class)};
}
Class Evolution and Object Serialization
Your class may evolve (or change) over time. For example, you may remove an existing field or a method from a class. You may add new fields or methods to a class. During an object serialization, Java uses a number that is unique for the class of the object you serialize. This unique number is called the
serial version unique ID (SUID)
. Java computes this number by computing the hash code of the class definition. If you change the class definition such as by adding new fields, the SUID for the class will change. When you serialize an object, Java also saves the class information to the stream. When you deserialize the object, Java computes the SUID for the class of the object being deserialized by reading the class definition from the stream. It compares the SUID computed from the stream with the SUID of the class loaded into the JVM.
If you change the definition of the class after you serialize an object of that class, the two numbers will not match and you will get a java.io.InvalidClassException during the deserialization process. If you never serialize the objects of your class or you never change your class definition after you serialize the objects and before you deserialize them, you do not need to worry about the SUID of your class. What should you do to make your objects deserialize properly, even if you change your class definition, after serializing objects of your class? You should declare a private, static, and final instance variable in your class that must be of the long type and named serialVersionUID.
public class MyClass {
// Declare the SUID field.
private static final long serialVersionUID = 801890L;
// More code goes here
}
The MyClass uses 801890 as the value for serialVersionUID. This number was chosen arbitrarily. It does not matter what number you choose for this field. The JDK ships with a serialver tool that you can use to generate the value for the serialVersionUID field of your class. You can use this tool at the command prompt as follows:
serialver -classpath <class-path> <your-class-name>
When you run this tool with your class name, it prints the declaration of the serialVersionUID field for your class with the generated SUID for it. You just need to copy and paste that declaration into your class declaration.
Tip
Suppose you have a class that does not contain a serialVersionUID field and you have serialized its object. If you change your class and try to deserialize the object, the Java runtime will print an error message with the expected serialVersionUID. You need to add the serialVersionUID field in your class with the same value and try deserializing the objects.
Stopping Serialization
How do you stop the serialization of objects of your class? Not implementing the Serializable interface in your class seems to be an obvious answer. However, it is not a valid answer in all situations. For example, if you inherit your class from an existing class that implements the Serializable interface, your class implements the Serializable interface implicitly. This makes your class automatically serializable. To stop objects of your class from being serialized all the time, you can add the writeObject() and readObject() methods in your class. These methods should simply throw an exception.
Listing 7-32 contains partial code for a class named NotSerializable. The class implements the Serializable interface and still it is not serializable because it throws an exception in the readObject() and writeObject() methods.
// NotSerializable.java
package com.jdojo.io;
import java.io.IOException;
import java.io.ObjectInputStream;
import java.io.ObjectOutputStream;
import java.io.Serializable;
public class NotSerializable implements Serializable {
// Instance variables go here
private void readObject(ObjectInputStream ois)
throws IOException, ClassNotFoundException {
// Throw an exception
throw new IOException("Not meant for serialization!!!");
}
private void writeObject(ObjectOutputStream os) throws IOException {
// Throw an exception
throw new IOException("Not meant for serialization!!!");
}
// Other code for the class goes here
}
Listing 7-32.
Stopping a Class from Serializing
Readers and Writers
Input and output streams are byte-based streams. In this section, I discuss readers and writers, which are character-based streams
. A reader is used to read character-based data from a data source. A writer is used to write character-based data to a data sink.
Figure 7-8 and Figure 7-9 show some classes, and the relationship between them, for the Reader and Writer stream families. Recall that the input and output stream class names end with the words “InputStream” and “OutputStream,” respectively. The Reader and Writer class names end with the words “Reader” and “Writer,” respectively.
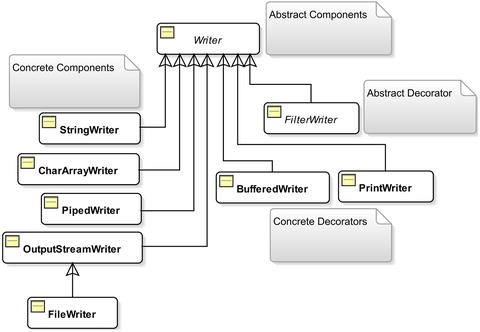
Figure 7-8.
Commonly used classes
for Reader streams compared with the decorator pattern
Figure 7-9.
Commonly used classes
for Writer streams compared with the decorator pattern
Table 7-4 and Table 7-5 compare classes in byte-based and character-based input/output streams
.
Table 7-4.
Comparing Classes in Byte-based and Character-based Input Streams
Byte-Based Input Stream Class | Character-Based Input Stream Class
|
|---|---|
InputStream
|
Reader
|
ByteArrayInputStream
|
CharArrayReader
|
StringBufferInputStream
|
StringReader
|
PipedInputStream
|
PipedReader
|
FileInputStream
|
FileReader
|
No corresponding class |
InputStreamReader
|
FilterInputStream
|
FilterReader
|
BufferedInputStream
|
BufferedReader
|
PushbackInputStream
|
PushbackReader
|
DataInputStream
| No corresponding class |
ObjectInputStream
| No corresponding class |
Table 7-5.
Comparing Classes from Byte-Based Output Streams and Character-Based Output Streams
Byte-Based Output Stream Class | Character-Based Output Stream Class |
|---|---|
OutputStream
|
Writer
|
ByteArrayOutputStream
|
CharArrayWriter
|
No corresponding class |
StringWriter
|
PipedOutputStream
|
PipedWriter
|
FileOutputStream
|
FileWriter
|
No corresponding class |
OutputStreamWriter
|
FilterOutputStream
|
FilterWriter
|
BufferedOutputStream
|
BufferedWriter
|
DataOutputStream
| No corresponding class |
ObjectOutputStream
| No corresponding class |
PrintStream
|
PrintWriter
|
Some classes in the byte-based input/output streams do not have the corresponding character-based classes and vice versa. For example, reading and writing primitive data and objects are always byte-based; therefore, you do not have any classes in the reader/writer class family corresponding to the data/object input/output streams.
I discussed how to use the byte-based input/output classes
in detail in the previous sections. You will find the classes in the reader/writer and the input/output categories similar. They are also based on the decorator pattern.
In the reader class hierarchy,
BufferedReader
, which is a concrete decorator, is directly inherited from the Reader class instead of the abstract decorator
FilterReader class
. In the writer class hierarchy, all concrete decorators have been inherited from the Writer class instead of the FilterWriter. No concrete decorator inherits the FilterWriter class.
The two classes,
InputStreamReader
and
OutputStreamWriter
, in the reader/writer class family provide the bridge between the byte-based and character-based streams. If you have an instance of InputStream and you want to get a Reader from it, you can get that by using the InputStreamReader class. That is, you need to use the InputStreamReader class if you have a stream that supplies bytes and you want to read characters by getting those bytes decoded into characters for you. For example, if you have an InputStream object called iso, and you want to get a Reader object instance, you can do so as follows:
// Create a Reader object from an InputStream object using the platform default encoding
Reader reader = new InputStreamReader(iso);
If you know the encoding used in the byte-based stream, you can specify it while creating a Reader object as follows:
// Create a Reader object from an InputStream using the "US-ASCII" encoding
Reader reader = new InputStreamReader(iso, "US-ASCII");
Similarly, you can create a Writer object to spit out characters from a bytes-based output stream as follows, assuming that oso is an OutputStream object:
// Create a Writer object from OutputStream using the platform default encoding
Writer writer = new OutputStreamWriter(oso);
// Create a Writer object from OutputStream using the "US-ASCII" encoding
Writer writer = new OutputStreamWriter(oso, "US-ASCII");
You do not have to write only a character at a time or a character array when using a writer. It has methods that let you write a String and a CharSequence object.
Let’s write another stanza from the poem Lucy by William Wordsworth to a file and read it back into the program. This time, you will use a
BufferedWriter
to write the text and a
BufferedReader
to read the text back. Here are the four lines of text in the stanza:
And now we reach'd the orchard-plot;
And, as we climb'd the hill,
The sinking moon to Lucy's cot
Came near and nearer still.
The text is saved in a luci4.txt file in the current directory. Listing 7-33 illustrates how to use a Writer object to write the text to this file. You may get different output when you run the program because it prints the path of the output file, which depends on the current working directory.
// FileWritingWithWriter.java
package com.jdojo.io;
import java.io.BufferedWriter;
import java.io.File;
import java.io.FileNotFoundException;
import java.io.FileWriter;
import java.io.IOException;
public class FileWritingWithWriter {
public static void main(String[] args) {
// The output file
String destFile = "luci4.txt";
try (BufferedWriter bw = new BufferedWriter(new FileWriter(destFile))) {
// Write the text to the writer
bw.append("And now we reach'd the orchard-plot;");
bw.newLine();
bw.append("And, as we climb'd the hill,");
bw.newLine();
bw.append("The sinking moon to Lucy's cot");
bw.newLine();
bw.append("Came near and nearer still.");
// Flush the written text
bw.flush();
System.out.println("Text was written to "
+ (new File(destFile)).getAbsolutePath());
} catch (FileNotFoundException e1) {
FileUtil.printFileNotFoundMsg(destFile);
} catch (IOException e2) {
e2.printStackTrace();
}
}
}
Text was written to C:Java9LanguageFeaturesluci4.txt
Listing 7-33.
Using a Writer Object
to Write Text to a File
If you compare the code in this listing to any other listings that write data to a stream, you will not find any basic differences. The differences lie only in using classes to construct the output stream. In this case, you used the BufferedWriter and FileWriter classes to construct a Writer object. You used the
append() method
of the Writer class to write the strings to the file. You can use the write() method or the append() method to write a string using a Writer object. However, the append() method supports writing any CharSequence object to the stream, whereas the write() method supports writing only characters or a string. The BufferedWriter class provides a newLine() method to write a platform-specific new line to the output stream.
How would you read the text written to the file luci4.txt using a Reader object? It’s simple. Create a BufferedReader object by wrapping a FileReader object and read one line of text at a time using its readLine() method. The
readLine() method
considers a linefeed ('
'), a carriage return ('
'), and a carriage return immediately followed by a linefeed as a line terminator. It returns the text of the line excluding the line terminator. It returns null when the end of the stream is reached. The following is the snippet of code to read the text from the luci4.txt file. You can write the full program as an exercise.
String srcFile = "luci4.txt";
BufferedReader br = new BufferedReader(new FileReader(srcFile));
String text = null;
while ((text = br.readLine()) != null) {
System.out.println(text);
}
br.close();
Converting a byte-based stream to a character-based stream is straightforward. If you have an InputStream object, you can get a Reader object by wrapping it inside an InputStreamReader object, like so:
InputStream is = /* Create your InputStream object here */
Reader reader = new InputStreamReader(is);
If you want to construct a
BufferedReader object
from an InputStream object, you can do that as follows:
InputStream is = /* Create your InputStream object here */
BufferedReader br = new BufferedReader(new InputStreamReader(is));
You can construct a Writer object from an
OutputStream object
as follows:
OutputStream os = /* Create your OutputStream object here */
Writer writer = new OutputStreamWriter(os);
Custom Input/Output Streams
Can you have your own I/O classes? The answer is yes. How difficult is it to have your own I/O classes? It is not that difficult if you understand the decorator pattern. Having your own I/O class is just a matter of adding a concrete decorator class in the I/O class hierarchy. In this section, you add a new reader class named
LowerCaseReader
. It will read characters from a character-based stream and convert all characters to lowercase.
The LowerCaseReader class is a concrete decorator class in the Reader class family. It should inherit from the FilterReader class. It needs to provide a constructor that will accept a Reader object
.
public class LowerCaseReader extends FilterReader {
public LowerCaseReader(Reader in) {
// Code for the constructor goes here
}
// More code goes here
}
There are two versions of the read() method in the FilterReader class to read characters from a character-based stream. You need to override just one version of the read() method as follows. All other versions of the read() method delegate the reading job to this one.
public class LowerCaseReader extends FilterReader {
public LowerCaseReader(Reader in) {
// Code for the constructor goes here
}
@Override
public int read(char[] cbuf, int off, int len) throws IOException {
// Code goes here
}
}
That is all it takes to have your own reader class. You can provide additional methods in your class, if needed. For example, you may want to have a readLine() method that will read a line in lowercase. Alternatively, you can also use the readLine() method of the BufferedReader class by wrapping an object of LowerCaseReader in a BufferedReader object. Using the new class is the same as using any other reader class. You can wrap a concrete reader component such as a FileReader or a concrete decorator such as a BufferedReader inside a LowerCaseReader object. Alternatively, you can wrap a LowerCaseReader object inside any other concrete reader decorator such as a BufferedReader. Listing 7-34 contains the complete code for the LowerCaseReader class.
// LowerCaseReader.java
package com.jdojo.io;
import java.io.Reader;
import java.io.FilterReader;
import java.io.IOException;
public class LowerCaseReader extends FilterReader {
public LowerCaseReader(Reader in) {
super(in);
}
@Override
public int read(char[] cbuf, int off, int len) throws IOException {
int count = super.read(cbuf, off, len);
if (count != -1) {
// Convert all read characters to lowercase
int limit = off + count;
for (int i = off; i < limit; i++) {
cbuf[i] = Character.toLowerCase(cbuf[i]);
}
}
return count;
}
}
Listing 7-34.
A Custom Java I/O Reader Class Named LowerCaseReader
Listing 7-35 shows how to use your new class. It reads from the file
luci4.txt. It reads the file twice: the first time by using a LowerCaseReader object and the second time by wrapping a LowerCaseReader object inside a BufferedReader object. Note that while reading the licu4.txt file the second time, you are taking advantage of the readLine() method of the BufferedReader class. The luci4.txt file should exist in your current working directory. Otherwise, you will get an error when you run the test program.
// LowerCaseReaderTest.java
package com.jdojo.io;
import java.io.FileReader;
import java.io.BufferedReader;
import java.io.FileNotFoundException;
import java.io.IOException;
public class LowerCaseReaderTest {
public static void main(String[] args) {
String fileName = "luci4.txt";
try (LowerCaseReader lcr
= new LowerCaseReader(new FileReader(fileName))) {
System.out.println("Reading luci4.txt using LowerCaseReader:");
int c;
while ((c = lcr.read()) != -1) {
System.out.print((char) c);
}
} catch (FileNotFoundException e) {
FileUtil.printFileNotFoundMsg(fileName);
} catch (IOException e) {
e.printStackTrace();
}
try (BufferedReader br = new BufferedReader(
new LowerCaseReader(new FileReader(fileName)))) {
System.out.println("
Reading luci4.txt using "
+ "LowerCaseReader and BufferedReader:");
String str;
while ((str = br.readLine()) != null) {
System.out.println(str);
}
} catch (FileNotFoundException e) {
FileUtil.printFileNotFoundMsg(fileName);
} catch (IOException e) {
e.printStackTrace();
}
}
}
Reading luci4.txt using LowerCaseReader
:
And now we reach'd the orchard-plot;
And, as we climb'd the hill,
The sinking moon to Lucy's cot
Came near and nearer still.
Reading luci4.txt using LowerCaseReader and BufferedReader:
and now we reach'd the orchard-plot;
and, as we climb'd the hill,
the sinking moon to lucy's cot
came near and nearer still.
Listing 7-35.
Testing the Custom Reader Class, LowerCaseReader
Random Access Files
A FileInputStream lets you read data from a file, whereas a FileOutputStream lets you write data to a file. A random access file is a combination of both. Using a random access file, you can read from a file as well as write to the file. Reading and writing using the file input and output streams are sequential processes. Using a random access file, you can read or write at any position within the file, hence the name random access.
An object of the RandomAccessFile class facilitates the random file access. It lets you read/write bytes and all primitive types values from/to a file. It also lets you work with strings using its readUTF() and writeUTF() methods. The RandomAccessFile class is not in the class hierarchy of the InputStream and OutputStream classes.
A random access file can be created in four different access modes. You need to provide one of the access modes in its constructor. The access mode value is a string. They are listed as follows:
- "r": The file is opened in a read-only mode. You will receive an IOException if you attempt to write to the file in this mode.
- "rw": The file is opened in a read-write mode. The file is created if it does not exist.
- "rws": The same as the "rw" mode, except that any modifications to the file’s content and its metadata are written to the storage device immediately.
- "rwd": The same as the "rw" mode, except that any modifications to the file’s content are written to the storage device immediately.
You create an instance of the RandomAccessFile class by specifying the file name and the access mode as shown:
RandomAccessFile raf = new RandomAccessFile("randomtest.txt", "rw");
A random access file has a file pointer that is advanced when you read data from it or write data to it. The file pointer is a kind of cursor where your next read or write will start. Its value indicates the distance of the cursor from the beginning of the file in byes. You can get the value of file pointer by using its getFilePointer() method. When you create an object of the RandomAccessFile class, the file pointer is set to zero, which indicates the beginning of the file. You can set the file pointer at a specific location in the file using the seek() method.
The length() method of a RandomAccessFile returns the current length of the file. You can extend or truncate a file by using its setLength() method. If you extend a file using this method, the contents of the extended portion of the file are not defined.
Reading from and writing to a random access file is performed the same way you have been reading/writing from/to any input and output streams. Listing 7-36 demonstrates the use of a random access file. When you run this program, it writes two things to a file: the file read counter, which keeps track of how many times a file has been read using this program, and a text message of "Hello World!". The program increments the counter value in the file every time it reads the file. The counter value keeps incrementing when you run this program repeatedly. You may get different output every time you run this program
// RandomAccessFileReadWrite.java
package com.jdojo.io;
import java.io.File;
import java.io.IOException;
import java.io.RandomAccessFile;
public class RandomAccessFileReadWrite {
public static void main(String[] args) throws IOException {
String fileName = "randomaccessfile.txt";
File fileObject = new File(fileName);
if (!fileObject.exists()) {
initialWrite(fileName);
}
// Read the file twice
readFile(fileName);
readFile(fileName);
}
public static void readFile(String fileName) throws IOException {
// Open the file in read-write mode
try (RandomAccessFile raf = new RandomAccessFile(fileName, "rw")) {
int counter = raf.readInt();
String msg = raf.readUTF();
System.out.println("File Read Counter: " + counter);
System.out.println("File Text: " + msg);
System.out.println("----------------------------");
// Increment the file read counter by 1
incrementReadCounter(raf);
}
}
public static void incrementReadCounter(RandomAccessFile raf) throws IOException {
// Read the current file pointer position so that we can restore it at the end
long currentPosition = raf.getFilePointer();
// Set the file pointer in the beginning
raf.seek(0);
// Read the counter and increment it by 1
int counter = raf.readInt();
counter++;
// Set the file pointer to zero again to overwrite the value of the counter
raf.seek(0);
raf.writeInt(counter);
// Restore the file pointer
raf.seek(currentPosition);
}
public static void initialWrite(String fileName) throws IOException {
// Write the file read counter as zero. Open the file in read-write mode.
try (RandomAccessFile raf = new RandomAccessFile(fileName, "rw")) {
// Write the file read counter as zero
raf.writeInt(0);
// Write a message
raf.writeUTF("Hello world!");
}
}
}
File Read Counter: 0
File Text: Hello world!
----------------------------
File Read Counter: 1
File Text: Hello world!
----------------------------
Listing 7-36.
Reading and Writing Files Using a RandomAccessFile Object
Copying the Contents of a File
After you learn about input and output streams, it is simple to write code that copies the contents of a file to another file. You need to use the byte-based input and output streams (InputStream and OutputStream objects) so that your file copy program will work on all kinds of files. The main logic in copying a file is to keep reading from the input stream until the end of file and keep writing to the output stream as data is read from the input stream. The following snippet of code shows this file-copy logic:
// Copy the contents of a file
int count = -1;
byte[] buffer = new byte[1024];
while ((count = in.read(buffer)) != -1) {
out.write(buffer, 0, count);
}
Starting from JDK9, you can copy the contents of a file to another file using the transferTo(OutputStream out) method of the InputStream class. The following snippet of code copies the contents of the luci1.txt file to the luci1_copy.txt file. The exception handling logic is not shown.
FileInputStream fis = new FileInputStream("luci1.txt");
FileOutputStream fos = new FileOutputStream("luci1_copy.txt");
fis.transferTo(fos);
fos.close();
fis.close();
Tip
The file-copy logic copies only the file's contents. You will have to write logic to copy a file's attributes. The NIO 2.0 API, covered in Chapter 10, provides a copy() method in the java.nio.file.Files class to copy the contents and attributes of a file to another file. Use the Files.copy() method to copy a file.
Standard Input/Output/Error Streams
A standard input device is a device defined and controlled by the operating system from where your Java program may receive inputs. Similarly, the standard output and error are other operating system-defined (and controlled) devices where your program can send outputs. Typically, a keyboard is a standard input device, and a monitor acts as a standard output and a standard error device. Figure 7-10 depicts the interaction between the standard input, output, and error devices, and a Java program
.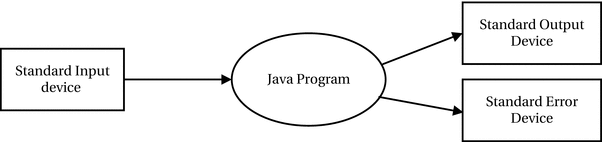
Figure 7-10.
Interaction
between a Java program and standard input, output, and error devices
What happens when you use the following statement to print a message?
System.out.println("This message goes to the standard output device!");
Typically, your message is printed on the console. In this case, the monitor is the standard output device and the Java program lets you send some data to the standard output device using a high-level println() method call. You saw a similar kind of println() method call in the previous section when you used the
PrintStream class
that is a concrete decorator class in the OutputStream class family. Java makes interacting with a standard output device on a computer easier. It creates an object of the PrintStream class and gives you access to it through a public static variable named
out in the System class. Look at the code for the System class; it declares three public static variables (one for each device: standard input, output, and error) as follows:
public class System {
public static PrintStream out; // the standard output
public static InputStream in; // the standard input
public static PrintStream err; // the standard error
// More code for the System class goes here
}
The JVM initializes the three variables to appropriate values. You can use the System.out and System.err object references wherever you can use an OutputStream object. You can use the System.in object wherever you can use an InputStream object.
Java lets you use these three objects in the System class in one more way. If you do not want the three objects to represent the standard input, output, and error devices, you can supply your own devices; Java will redirect the data flow to/from these objects to your devices.
Suppose, whenever you call the System.out.println() method to print a message on the console, you want to send all messages to a file instead. You can do so very easily. After all, System.out is just a PrintStream object and you know how to create a
PrintStream
object using a FileOutputStream object (refer to Listing 7-20) to write to a file. The System class provides three static setter methods, setOut(), setIn(), and setErr(), to replace these three standard devices with your own devices. To redirect all standard output to a file, you need to call the setOut() method by passing a PrintStream object that represents your file. If you want to redirect the output to a file named stdout.txt in your current directory, you do so by executing the following piece of code:
// Redirect all standard outputs to the stdout.txt file
PrintStream ps = new PrintStream(new FileOutputStream("stdout.txt"));
System.setOut(ps);
Listing 7-37 demonstrates how to redirect the standard output to a file. You may get different output on the console. After you run this program, you will see the following two messages in the stdout.txt file in your current working directory:
Hello world!
Java I/O is cool!
You may get different output when you run the program, as it prints the path to the stdout.txt file using your current working directory.
// CustomStdOut.java
package com.jdojo.io;
import java.io.PrintStream;
import java.io.FileOutputStream;
import java.io.File;
public class CustomStdOut {
public static void main(String[] args) throws Exception {
// Create a PrintStream for file stdout.txt
File outFile = new File("stdout.txt");
PrintStream ps = new PrintStream(new FileOutputStream(outFile));
//Print a message on console
System.out.println("Messages will be redirected to "
+ outFile.getAbsolutePath());
// Set the standard out to the file
System.setOut(ps);
// The following messages will be sent to the stdout.txt file
System.out.println("Hello world!");
System.out.println("Java I/O is cool!");
}
}
Messages will be redirected to C:Java9LanguageFeaturesstdout.txt
Listing 7-37.
Redirecting
Standard Outputs to a File
Generally, you use System.out.println() calls to log debugging messages. Suppose you have been using this statement all over your application and it is time to deploy your application to production. If you do not take out the debugging code from your program, it will keep printing messages on the user’s console. You do not have time to go through all your code to remove the debugging code. Can you think of an easy solution? There is a simple solution to swallow all your debugging messages. You can redirect your debugging messages to a file as you did in Listing 7-37. Another solution is to create your own concrete component class in the OutputStream class family. Let’s call the new class
DummyStandardOutput
, as shown in Listing 7-38.
// DummyStandardOutput.java
package com.jdojo.io;
import java.io.OutputStream;
import java.io.IOException;
public class DummyStandardOutput extends OutputStream {
@Override
public void write(int b) throws IOException {
// Do not do anything. Swallow whatever is written
}
}
Listing 7-38.
A Dummy Output Stream Class That Will Swallow All Written Data
You need to inherit the DummyStandardOutput class from the OutputStream class. The only code you have to write is to override the write(int b) method and do not do anything in this method. Then, create a PrintStream object by wrapping an object of the new class and set it as the standard output using the System.setOut() method shown in Listing 7-39. If you do not want to go for a new class, you can use an anonymous class to achieve the same result, as follows:
System.setOut(new PrintStream(new OutputStream() {
@Override
public void write(int b) {
// Do nothing
}
}));
// SwallowOutput.java
package com.jdojo.io;
import java.io.PrintStream;
public class SwallowOutput {
public static void main(String[] args) {
PrintStream ps = new PrintStream(new DummyStandardOutput());
// Set the dummy standard output
System.setOut(ps);
// The following messages are not going anywhere
System.out.println("Hello world!");
System.out.println("Is someone listening?");
System.out.println("No. We are all taking a nap!!!");
}
}
(No output will be printed.)
Listing 7-39.
Swallowing All Data
Sent to the Standard Output
You can use the System.in object
to read data from a standard input device (usually a keyboard). You can also set the System.in object to read from any other InputStream object of your choice, such as a file. You can use the read() method of the InputStream class to read bytes from this stream. System.in.read() reads a byte at a time from the keyboard. Note that the read() method of the InputStream class blocks until data is available for reading. When a user enters data and presses the Enter key, the entered data becomes available, and the read() method returns one byte of data at a time. The last byte read will represent a new line character. When you read a new line character from the input device, you should stop further reading or the read() call will block until the user enters more data and presses the Enter key again. Listing 7-40 illustrates how to read data entered using the keyboard.
// EchoStdin.java
package com.jdojo.io;
import java.io.IOException;
public class EchoStdin {
public static void main(String[] args) throws IOException {
// Prompt the user to type a message
System.out.print("Please type a message and press enter: ");
// Display whatever user types in
int c;
while ((c = System.in.read()) != '
') {
System.out.print((char) c);
}
}
}
Listing 7-40.
Reading
from the Standard Input Device
Since System.in is an instance of InputStream, you can use any concrete decorator to read data from the keyboard; for example, you can create a BufferedReader object and read data from the keyboard one line at a time as a string. Listing 7-41 illustrates how to use the System.in object with a BufferedReader. Note that this is the kind of situation when you will need to use the InputStreamReader class to get a character-based stream (BufferedReader) from a byte-based stream (System.in). The program keeps prompting the user to enter some text until the user enters Q or q to quit the program.
// EchoBufferedStdin.java
package com.jdojo.io;
import java.io.BufferedReader;
import java.io.InputStreamReader;
import java.io.IOException;
public class EchoBufferedStdin {
public static void main(String[] args) throws IOException {
// Get a BufferedReader, which wraps the System.in object. Note the use
// of InputStreamReader, the bridge class between the byte-based and
// the character-based stream
BufferedReader br = new BufferedReader(new InputStreamReader(System.in));
String text;
while (true) {
// Prompt user to type some text
System.out.print("Please type a message (Q/q to quit) "
+ "and press enter: ");
// Read the text
text = br.readLine();
if (text.equalsIgnoreCase("q")) {
System.out.println("You have decided to exit the program");
break;
} else {
System.out.println("You typed: " + text);
}
}
}
}
Listing 7-41.
Using System.in with a BufferedReader
If you want your standard input to come from a file, you have to create an input stream object to represent that file and set that object using the System.setIn() method as follows:
FileInputStream fis = new FileInputStream("stdin.txt");
System.setIn(fis); // Now System.in.read() will read from stdin.txt file
The standard error device (generally the console) is used to display error messages. Its use in your program is the same as a standard output device. Instead of System.out for a standard output device, Java provides another PrintStream object called System.err. You use it as follows:
System.err.println("This is an error message.");
Console and Scanner Classes
Although Java gives you three objects to represent the standard input, output, and error devices, it is not easy to use them for reading numbers from the standard input. The purpose of the
Console class
is to make the interaction between a Java program and the console easier. I discuss the Console class in this section. I also discuss the Scanner class used for parsing the text read from the console.
The Console class is a utility class in the java.io package that gives access to the system console, if any, associated with the JVM. The console is not guaranteed to be accessible in a Java program on all machines. For example, if your Java program runs as a service, no console will be associated to the JVM and you will not have access to it either. You get the instance of the Console class by using the static console() method of the System class as follows:
Console console = System.console();
if (console != null) {
console.printf("Console is available.");
}
The Console class contains a printf() method that displays formatted string on the console. You also have a printf() method in the PrintStream class to write the formatted data. Refer to Chapter 17 of the first volume of this series for more details on using the printf() method and how to use the Formatter class to format text, numbers, and dates.
Listing 7-42 illustrates how to use the Console class. If the console is not available, it prints a message and exits. If you run this program using an IDE such as NetBeans, the console may not be available. Try to run this program using a command prompt. The program prompts the user to enter a user name and a password. If the user enters password letmein, the program prints a message. Otherwise, it prints that the password is not valid. The program uses the readLine() method to read a line of text from the console and the readPassword() method to read the password. When the user enters a password, it is not visible; the program receives it in a character array.
// ConsoleLogin.java
package com.jdojo.io;
import java.io.Console;
public class ConsoleLogin {
public static void main(String[] args) {
Console console = System.console();
if (console != null) {
console.printf("Console is available.%n");
} else {
System.out.println("Console is not available.%n");
return; // A console is not available
}
String userName = console.readLine("User Name: ");
char[] passChars = console.readPassword("Password: ");
String passString = new String(passChars);
if (passString.equals("letmein")) {
console.printf("Hello %s", userName);
} else {
console.printf("Invalid password");
}
}
}
Listing 7-42.
Using the Console Class to Enter a User Name and Password
If you want to read numbers from the standard input, you have to read it as a string and parse it to a number. The Scanner class in java.util package reads and parses text, based on a pattern, into primitive types and strings. The text source can be an InputStream, a file, a String object, or a Readable object. You can use a Scanner to read primitive type values from the standard input System.in. It contains many methods, which are named liked hasNextXxx() and nextXxx(), where Xxx is a data type, such as int, double, etc. The hasNextXxx() method checks if the next token from the source can be interpreted as a value of the Xxx type. The nextXxx() method returns a value of a particular data type.
Listing 7-43 illustrates how to use the
Scanner class
by building a trivial calculator to perform addition, subtraction, multiplication, and division.
// Calculator.java
package com.jdojo.io;
import java.util.Scanner;
public class Calculator {
public static void main(String[] args) {
// Read three tokens from the console: operand-1 operation operand-2
String msg = "You can evaluate an arithmetic expression.
"
+ "Expression must be in the form: a op b
"
+ "a and b are two numbers and op is +, -, * or /."
+ "
Please enter an expression and press Enter: ";
System.out.print(msg);
// Build a scanner for the standard input
Scanner scanner = new Scanner(System.in);
try {
double n1 = scanner.nextDouble();
String operation = scanner.next();
double n2 = scanner.nextDouble();
double result = calculate(n1, n2, operation);
System.out.printf("%s %s %s = %.2f%n", n1,
operation, n2, result);
} catch (Exception e) {
System.out.println("An invalid expression.");
}
}
public static double calculate(double op1, double op2, String operation) {
switch (operation) {
case "+":
return op1 + op2;
case "-":
return op1 - op2;
case "*":
return op1 * op2;
case "/":
return op1 / op2;
}
return Double.NaN;
}
}
You can evaluate an arithmetic expression
.
Expression must be in the form: a op b
a and b are two numbers and op is +, -, * or /.
Please enter an expression and press Enter: 10 + 19
10.0 + 19.0 = 29.00
Listing 7-43.
Using the Scanner Class to Read Inputs from the Standard Input
StringTokenizer and StreamTokenizer
Java has some utility classes that let you break a string into parts called tokens. A token in this context is a part of the string. You define the sequence of characters that are considered tokens by defining delimiter characters. Suppose you have a string “This is a test, which is simple”. If you define a space as a delimiter, this string contains seven tokens:
- This
- is
- a
- test,
- which
- is
- simple
If you define a comma as a delimiter, the same string contains two tokens:
- This is a test
- which is simple
The
StringTokenizer class
is in the java.util package. The StreamTokenizer class is in the java.io package. A StringTokenizer lets you break a string into tokens, whereas a
StreamTokenizer
gives you access to the tokens in a character-based stream.
A StringTokenizer object lets you break a string into tokens based on your definition of delimiters. It returns one token at a time. You also have the ability to change the delimiter anytime. You can create a StringTokenizer by specifying the string and accepting the default delimiters, which are a space, a tab, a new line, a carriage return, and a line-feed character ("
f") as follows:
// Create a string tokenizer
StringTokenizer st = new StringTokenizer("here is my string");
You can specify your own delimiters when you create a StringTokenizer as follows:
// Have a space, a comma, and a semi-colon as delimiters
String delimiters = " ,;";
StringTokenizer st = new StringTokenizer("my text...", delimiters);
You can use the hasMoreTokens() method to check if you have more tokens and the nextToken() method to get the next token from the string.
You can also use the split() method of the String class to split a string into tokens based on delimiters. The split() method accepts a regular expression as a delimiter. Listing 7-44 illustrates how to use the StringTokenizer and the split() method of the String class.
// StringTokens.java
package com.jdojo.io;
import java.util.StringTokenizer;
public class StringTokens {
public static void main(String[] args) {
String str = "This is a test, which is simple";
String delimiters = " ,"; // a space and a comma
StringTokenizer st = new StringTokenizer(str, delimiters);
System.out.println("Tokens using a StringTokenizer:");
while (st.hasMoreTokens()) {
String token = st.nextToken();
System.out.println(token);
}
// Split the same string using String.split() method
System.out.println("
Tokens using the String.split() method:");
String regex = "[ ,]+"; // a space or a comma
String[] s = str.split(regex);
for (String item : s) {
System.out.println(item);
}
}
}
Tokens using a StringTokenizer:
This
is
a
test
which
is
simple
Tokens using the String.split() method:
This
is
a
test
which
is
simple
Listing 7-44.
Breaking a String into Tokens Using a StringTokenizer and the String.split() Method
The
StringTokenizer
and the split() method of the String class return each token as a string. Sometimes you may want to distinguish between tokens based on their types; your string may contain comments. You can have these sophisticated features while breaking a character-based stream into tokens using the
StreamTokenizer
class. Listing 7-45 illustrates how to use a
StreamTokenizer
.
// StreamTokenTest.java
package com.jdojo.io;
import java.io.StreamTokenizer;
import static java.io.StreamTokenizer.*;
import java.io.StringReader;
import java.io.IOException;
public class StreamTokenTest {
public static void main(String[] args) throws Exception {
String str = "This is a test, 200.89 which is simple 50";
StringReader sr = new StringReader(str);
StreamTokenizer st = new StreamTokenizer(sr);
try {
while (st.nextToken() != TT_EOF) {
switch (st.ttype) {
case TT_WORD:
/* a word has been read */
System.out.println("String value: "
+ st.sval);
break;
case TT_NUMBER:
/* a number has been read */
System.out.println("Number value: "
+ st.nval);
break;
}
}
} catch (IOException e) {
e.printStackTrace();
}
}
}
String value: This
String value: is
String value: a
String value: test
Number value: 200.89
String value: which
String value: is
String value: simple
Number value: 50.0
Listing 7-45.
Reading Tokens from a Character-Based Stream
The program uses a StringReader object as the data source. You can use a FileReader object or any other Reader object as the data source. The syntax to get the tokens is not easy to use. The nextToken() method of StreamTokenizer is called repeatedly. It populates three fields of the StreamTokenizer object: ttype, sval, and nval. The ttype field indicates the type of the token that was read. The following are the four possible values for the ttype field:
- TT_EOF: End of the stream has been reached.
- TT_EOL: End of line has been reached.
- TT_WORD: A word (a string) has been read as a token from the stream.
- TT_NUMBER: A number has been read as a token from the stream.
If ttype is equal to TT_WORD, the string value is stored in the field sval field. If ttype is TT_NUMBER, the number value is stored in the nval field.
StreamTokenizer is a powerful class to break a stream into tokens. It creates tokens based on a predefined syntax. You can reset the entire syntax by using its resetSyntax() method. You can specify your own set of characters that can make up a word by using its wordChars() method. You can specify your custom whitespace characters using its whitespaceChars() method.
Summary
Reading data from a data source and writing data to a data sink is called input/output. A stream represents a data source or data sink for serial reading or writing. The Java I/O API contains several classes to support input and output streams. Java I/O classes are in the java.io and java.nio packages. The input/output stream classes in Java are based on the decorator pattern.
You refer to a file in your computer by its pathname. A file’s pathname is a sequence of characters by which you can identify it uniquely in a file system. A pathname consists of a file name and its unique location in the file system. An object of the File class is an abstract representation of a pathname of a file or directory in a platform-independent manner. The pathname represented by a File object may or may not exist in the file system. The File class provides several methods to work with files and directories.
Java I/O supports two types of streams: byte-based streams and character-based streams. Byte-based streams are inherited from the InputStream or OutputStream classes. Character-based stream classes are inherited from the Reader or Writer classes.
The process of converting an object in memory to a sequence of bytes and storing the sequence of bytes in a storage medium such as a file is called object serialization. The process of reading the sequence of bytes produced by a serialization process and restoring the object back in memory is called object deserialization. Java supports serialization and deserialization of object through the ObjectInputStream and ObjectOutputStream classes. An object must implement the Serializable interface to be serialized.
The Java I/O API provides the Console and Scanner classes to interact with the console.
You can use the StringTokenizer and StreamTokenizer classes to split text into tokens based on delimiters. The String class contains a convenience split() method to split a string into tokens based on a regular expression.
Questions and Exercises
- 1.What does an instance of the File class represent?
- 2.Explain the effect of the following statement:File file = new File("test.txt");Will this statement create a file named test.txt in the current directory if the file does not already exist?
- 3.What is the difference in using the delete() and deleteOnExit() methods of the File class?
- 4.What is the difference in using the mkdir() and mkdirs() methods of the File class?
- 5.Complete the code for the following method named isExistentDirectory(). It accepts a pathname as a parameter. It returns true if the specified pathname represents an existing directory and returns false otherwise.public static boolean isExistentDirectory(String pathname) {/* your code goes here */}
- 6.What classes in the java.io package would you use if you need to read and write values of primitive data types such as int and float?
- 7.What classes in the java.io package would you use if you need to serialize and deserialize objects to a file?
- 8.In the context of object serialization, what is the difference between implementing the Serializable and Externalizable interfaces in a class?
- 9.In the context of object serialization, what is the significance of declaring instance variables in a class as transient?
- 10.Is there a way to serialize transient instance variables while serializing objects?
- 11.How will you stop the objects of your class from being serialized?
- 12.What is serialVersionUID in the context of object serialization?
- 13.Suppose you have an existing text file named test.txt in your current directory. Write the code to append "Hello" to this file.
- 14.Which class in the java.io package would you if you need to read from and write to a file at the same time?
- 15.What is the difference between the InputStream and Reader classes while performing I/O?
- 16.Write a program using the Console and Scanner classes. The program prompts the user for an integer. When the user enters an integer, the program prints whether the integer is odd or even and the program prompts the user for another integer. The user can enter Q or q to exit the program any time.
- 17.Write a program that will read the contents of a file and it will print the number of times all vowels (a, e, i, o, and u) occurs in the file. Count should be case-insensitive. That is, both 'A' and 'a' are counted as 'a'. You need to prompt the user to specify the pathname to the file. Include error handling in your code such as for the case when the specified file does not exist.