
1-14. Creating and Working with Tables
Problem
You want to display items in a UI table control similar to Java Swing’s JTable component.
Solution
Create an application using JavaFX’s javafx.scene.control.TableView class. The TableView control provides the equivalent functionality similar to Swing’s JTable component.
To exercise the TableView control you will be creating an application that will display bosses and employees. On the left you will implement a ListView control containing bosses, and employees (subordinates) will be displayed in a TableView control on the right.
Shown here is the source code of a simple domain (Person) class to represent a boss or an employee to be displayed in a ListView or TableView control:
package javafx2introbyexample.chapter1.recipe1_14;


import javafx.beans.property.SimpleStringProperty;

import javafx.beans.property.StringProperty;

import javafx.collections.FXCollections;

import javafx.collections.ObservableList;


/**

 *

 * @author cdea

 */

public class Person {


    private StringProperty aliasName;

    private StringProperty firstName;

    private StringProperty lastName;

    private ObservableList<Person> employees = FXCollections.observableArrayList();


    public final void setAliasName(String value) {

        aliasNameProperty().set(value);

    }


    public final String getAliasName() {

        return aliasNameProperty().get();

    }


    public StringProperty aliasNameProperty() {

        if (aliasName == null) {

            aliasName = new SimpleStringProperty();

        }

        return aliasName;

    }
    public final void setFirstName(String value) {

        firstNameProperty().set(value);

    }


    public final String getFirstName() {

        return firstNameProperty().get();

    }


    public StringProperty firstNameProperty() {

        if (firstName == null) {

            firstName = new SimpleStringProperty();

        }

        return firstName;

    }


    public final void setLastName(String value) {

        lastNameProperty().set(value);

    }


    public final String getLastName() {

        return lastNameProperty().get();

    }


    public StringProperty lastNameProperty() {

        if (lastName == null) {

            lastName = new SimpleStringProperty();

        }

        return lastName;

    }


    public ObservableList<Person> employeesProperty() {

        return employees;

    }


    public Person(String alias, String firstName, String lastName) {

        setAliasName(alias);

        setFirstName(firstName);

        setLastName(lastName);

    }


}
The following is our main application code that displays a list view component on the left containing bosses and a table view control on the right containing employees:
        primaryStage.setTitle("Chapter 1-14 Working with Tables");

        Group root = new Group();

        Scene scene = new Scene(root, 500, 250, Color.WHITE);


        // create a grid pane
        GridPane gridpane = new GridPane();

        gridpane.setPadding(new Insets(5));

        gridpane.setHgap(10);

        gridpane.setVgap(10);


        // candidates label

        Label candidatesLbl = new Label("Boss");

        GridPane.setHalignment(candidatesLbl, HPos.CENTER);

        gridpane.add(candidatesLbl, 0, 0);


        // List of leaders

        ObservableList<Person> leaders = getPeople();

        final ListView<Person> leaderListView = new ListView<>(leaders);

        leaderListView.setPrefWidth(150);

        leaderListView.setPrefHeight(150);


        // display first and last name with tooltip using alias

        leaderListView.setCellFactory(new Callback<ListView<Person>, ListCell<Person>>() {


            public ListCell<Person> call(ListView<Person> param) {

                final Label leadLbl = new Label();

                final Tooltip tooltip = new Tooltip();

                    final ListCell<Person> cell = new ListCell<Person>() {

                        @Override

                        public void updateItem(Person item, boolean empty) {

                                super.updateItem(item, empty);

                                if (item != null) {

                                    leadLbl.setText(item.getAliasName());

                                    setText(item.getFirstName() + " " + item.getLastName());

                                    tooltip.setText(item.getAliasName());

                                    setTooltip(tooltip);

                                }

                        }

                    }; // ListCell

                    return cell;


            }

        }); // setCellFactory


        gridpane.add(leaderListView, 0, 1);


        Label emplLbl = new Label("Employees");

        gridpane.add(emplLbl, 2, 0);

        GridPane.setHalignment(emplLbl, HPos.CENTER);


        final TableView<Person> employeeTableView = new TableView<>();

        employeeTableView.setPrefWidth(300);

        final ObservableList<Person> teamMembers = FXCollections.observableArrayList();

        employeeTableView.setItems(teamMembers);


        TableColumn<Person, String> aliasNameCol = new TableColumn<>("Alias");

        aliasNameCol.setEditable(true);
        aliasNameCol.setCellValueFactory(new PropertyValueFactory("aliasName"));

        aliasNameCol.setPrefWidth(employeeTableView.getPrefWidth() / 3);


        TableColumn<Person, String> firstNameCol = new TableColumn<>("First Name");

        firstNameCol.setCellValueFactory(new PropertyValueFactory("firstName"));

        firstNameCol.setPrefWidth(employeeTableView.getPrefWidth() / 3);


        TableColumn<Person, String> lastNameCol = new TableColumn<>("Last Name");

        lastNameCol.setCellValueFactory(new PropertyValueFactory("lastName"));

        lastNameCol.setPrefWidth(employeeTableView.getPrefWidth() / 3);


        employeeTableView.getColumns().setAll(aliasNameCol, firstNameCol, lastNameCol);

        gridpane.add(employeeTableView, 2, 1);


        // selection listening

        leaderListView.getSelectionModel().selectedItemProperty().addListener(new ChangeListener<Person>() {

            public void changed(ObservableValue<? extends Person> observable, Person oldValue,

Person newValue) {

                if (observable != null && observable.getValue() != null) {

                    teamMembers.clear();

                    teamMembers.addAll(observable.getValue().employeesProperty());

                }

            }

        });


        root.getChildren().add(gridpane);


        primaryStage.setScene(scene);

        primaryStage.show();
The following code is the getPeople() method contained in the WorkingWithTables main application class. This method helps to populate the UI TableView control shown previously:
    private ObservableList<Person> getPeople() {

        ObservableList<Person> people = FXCollections.<Person>observableArrayList();

        Person docX = new Person("Professor X", "Charles", "Xavier");

        docX.employeesProperty().add(new Person("Wolverine", "James", "Howlett"));

        docX.employeesProperty().add(new Person("Cyclops", "Scott", "Summers"));

        docX.employeesProperty().add(new Person("Storm", "Ororo", "Munroe"));


        Person magneto = new Person("Magneto", "Max", "Eisenhardt");

        magneto.employeesProperty().add(new Person("Juggernaut", "Cain", "Marko"));

        magneto.employeesProperty().add(new Person("Mystique", "Raven", "Darkhölme"));

        magneto.employeesProperty().add(new Person("Sabretooth", "Victor", "Creed"));


        Person biker = new Person("Mountain Biker", "Jonathan", "Gennick");

        biker.employeesProperty().add(new Person("Josh", "Joshua", "Juneau"));

        biker.employeesProperty().add(new Person("Freddy", "Freddy", "Guime"));

        biker.employeesProperty().add(new Person("Mark", "Mark", "Beaty"));

        biker.employeesProperty().add(new Person("John", "John", "O'Conner"));
        biker.employeesProperty().add(new Person("D-Man", "Carl", "Dea"));


        people.add(docX);

        people.add(magneto);

        people.add(biker);


        return people;

    }
Figure 1-20 displays our application that demonstrates JavaFX’s TableView control.
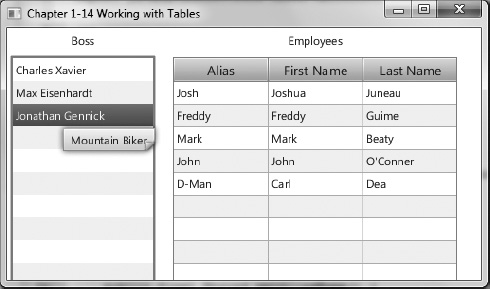
Figure 1-20. Working with tables
How It Works
Just for fun I created a simple GUI to display employees and their bosses. You notice in Figure 1-20 on the left is a list of people (Boss). When users click and select a boss, their employees will be shown to in the TableView area to the right. You’ll also notice the tooltip when you hover over the selected boss.
Before we begin to discuss the TableView control I want to explain about the ListView that is responsible for updating the TableView. In model view fashion we first create an ObservableList containing all the bosses for the ListView control’s constructor. In my code I was politically correct by calling bosses leaders. The following code creates a ListView control:
// List of leaders

ObservableList<Person> leaders = getPeople();

final ListView<Person> leaderListView = new ListView<Person>(leaders);
Next, we create a cell factory to properly display the person’s name in the ListView control. Because each item is a Person object, the ListView does not know how to render each row in the ListView control. We simply create a javafx.util.Callback generic type object by specifying the ListView<Person> and a ListCell<Person> data types. With your trusty NetBeans IDE, it will pregenerate things such as the implementing method call(). Next is the variable cell of type ListCell<Person> (within the call() method), in which we create an anonymous inner class. The inner class must implement an updateItem() method. To implement the updateItem() method you will obtain the person information and update the Label control (leadLbl). Hopefully, you’re still with me. The last thing is our tooltip, which is set.
Finally, we get to create a TableView control to display the employee base on the selected boss from the ListView. When creating a TableView we first create the column headers. Use this to create a table column:
TableColumn<String> firstNameCol = new TableColumn<String>("First Name");

firstNameCol.setProperty("firstName");
Once you have created a column, you’ll notice the setProperty() method, which is responsible for calling the Person bean’s property. So when the list of employees is put into the TableView, it will know how to pull the properties to be placed in each cell in the table.
Last is the implementation of the selection listener on the ListViewer in JavaFX called a selection item property (selectionItemProperty()). We simply create and add a ChangeListener to listen to selection events. When a user selects a boss, the TableView is cleared and populated with the boss’ employees. Actually it is the magic of the ObservableList that notifies the TableView of changes. To populate the TableView via the teamMembers (ObservableList) variable:
teamMembers.clear();

teamMembers.addAll(observable.getValue().employeesProperty());