
2-5. Enhancing with CSS
Problem
You want to change the Look ‘N’ Feel of the GUI interface.
Solution
Use JavaFX’s CSS styling to be applied on graph nodes. The following code demonstrates using CSS styling on graph nodes. The code creates four themes: Caspian, Control Style 1, Control Style 2, and Sky. Each theme is defined using CSS and affects the Look ‘N’ Feel of a dialog box. Following the code, you can see the two different renditions of the dialog box:
package javafx2introbyexample.chapter2.recipe2_05;


import javafx.application.Application;

import javafx.collections.FXCollections;

import javafx.collections.ObservableList;

import javafx.event.ActionEvent;

import javafx.event.EventHandler;

import javafx.scene.Group;

import javafx.scene.Scene;

import javafx.scene.control.Menu;

import javafx.scene.control.MenuBar;

import javafx.scene.control.MenuItem;

import javafx.scene.control.SplitPane;

import javafx.scene.layout.GridPane;

import javafx.scene.layout.HBox;

import javafx.scene.layout.VBox;

import javafx.scene.paint.Color;

import javafx.stage.Stage;


/**

 * Enhancing with CSS

 * @author cdea

 */

public class EnhancingWithCss extends Application {
    /**

     * @param args the command line arguments

     */

    public static void main(String[] args) {

        Application.launch(args);

    }


    @Override

    public void start(Stage primaryStage) {


            primaryStage.setTitle("Chapter 2-5 Enhancing with CSS ");

            Group root = new Group();

            final Scene scene = new Scene(root, 640, 480, Color.BLACK);


            MenuBar menuBar = new MenuBar();

            Menu menu = new Menu("Look 'N' Feel");


            // default caspian look n feel

            ObservableList<String> caspian = FXCollections.observableArrayList();

            caspian.addAll(scene.getStylesheets());

            MenuItem caspianLnf = new MenuItem("Caspian");

            caspianLnf.setOnAction(skinForm(caspian, scene));

            menu.getItems().add(caspianLnf);


            menu.getItems().add(createMenuItem("Control Style 1", "controlStyle9781430242574.css",

scene));

            menu.getItems().add(createMenuItem("Control Style 2", "controlStyle9781430242574.css",

scene));

            menu.getItems().add(createMenuItem("Sky", "sky.css", scene));


menuBar.getMenus().add(menu);

            // stretch menu

menuBar.prefWidthProperty().bind(primaryStage.widthProperty());


            // Left and right split pane

            SplitPane splitPane = new SplitPane();

            splitPane.prefWidthProperty().bind(scene.widthProperty());

            splitPane.prefHeightProperty().bind(scene.heightProperty());


            // Form on the right

            GridPane rightGridPane = new MyForm();


            GridPane leftGridPane = new GridPaneControlPanel(rightGridPane);

            VBox leftArea = new VBox(10);

            leftArea.getChildren().add(leftGridPane);


            HBox hbox = new HBox();

            hbox.getChildren().add(splitPane);

            VBox vbox = new VBox();

            vbox.getChildren().add(menuBar);

            vbox.getChildren().add(hbox);
            root.getChildren().add(vbox);

            splitPane.getItems().addAll(leftArea, rightGridPane);


            primaryStage.setScene(scene);


            primaryStage.show();


    }


    protected final MenuItem createMenuItem(String label, String css, final Scene scene){

        MenuItem menuItem = new MenuItem(label);

        ObservableList<String> cssStyle = loadSkin(css);

        menuItem.setOnAction(skinForm(cssStyle, scene));

        return menuItem;

    }


    protected final ObservableList<String> loadSkin(String cssFileName) {

        ObservableList<String> cssStyle = FXCollections.observableArrayList();

        cssStyle.addAll(getClass().getResource(cssFileName).toExternalForm());

        return cssStyle;

    }


    protected final EventHandler<ActionEvent> skinForm(final ObservableList<String> cssStyle, final Scene scene) {

        return new EventHandler<ActionEvent>(){

            public void handle(ActionEvent event) {

                scene.getStylesheets().clear();

                scene.getStylesheets().addAll(cssStyle);

            }

        };

    }


}
Figure 2-10 depicts the standard JavaFX Caspian Look ‘n’ Feel (theme).
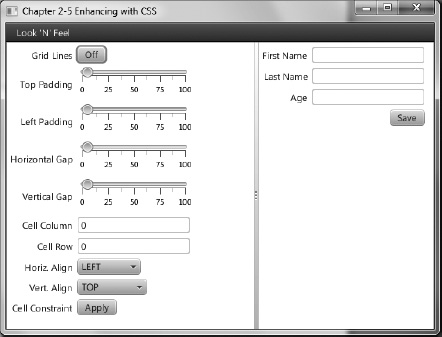
Figure 2-10. Caspian Look ‘N’ Feel
Figure 2-11 depicts the Sky Look ‘N’ Feel (theme).
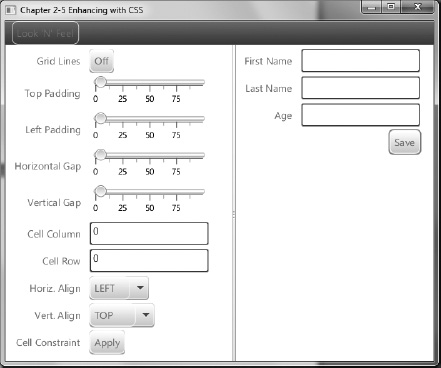
Figure 2-11. Sky Look ‘N’ Feel
How It Works
JavaFX has the capability to apply CSS styles onto the Scene graph and its nodes very much like browsers applying CSS styles onto elements in an HTML document object model (DOM). In this recipe you will be skinning a user interface using JavaFX styling attributes. I basically used the recipe’s UI to apply the various Look ‘n’ Feels. To showcase the available skins, a menu selection allows the user to choose the Look ‘N’ Feel to apply to the UI.
Before discussing CSS styling properties, I want to show you how to load the CSS styles to be applied to a JavaFX application. You will first need to create menu items to allow the user to choose the preferred Look ‘N’ Feel. When creating a menu item you will create a convenience method to build a menu item that would load the specified CSS and an EventHandler action to apply the chosen CSS style onto the current UI. To add the Caspian theme as a menu item you will notice that no resources are needed to be loaded because it is JavaFX’s current Look ‘n’ Feel. Shown here is adding a menu item containing the Caspian Look ‘N’ Feel CSS style that can be applied to the current UI:
MenuItem caspianLnf = new MenuItem("Caspian");

caspianLnf.setOnAction(skinForm(caspian, scene));
Shown here is adding a menu item containing the sky Look ‘N’ Feel CSS style ready to be applied to the current UI:
MenuBar menuBar = new MenuBar();

Menu menu = new Menu("Look 'N' Feel");

menu.getItems().add(createMenuItem("Sky", "sky.css", scene));
Calling the createMenuItem() method will also call another convenience method to load the CSS file called loadSkin(). It will also set the menu items onAction attribute with an appropriate EventHandler by calling the skinForm() method. To recap, the loadSkin is responsible for loading the CSS file, and the skinForm() method’s job is to apply the skin onto the UI application. Shown here are the convenience methods to build menu items that apply CSS styles onto a UI application:
    protected final MenuItem createMenuItem(String label, String css, final Scene scene){

        MenuItem menuItem = new MenuItem(label);

        ObservableList<String> cssStyle = loadSkin(css);

        menuItem.setOnAction(skinForm(cssStyle, scene));

        return menuItem;

    }


    protected final ObservableList<String> loadSkin(String cssFileName) {

        ObservableList<String> cssStyle = FXCollections.observableArrayList();

        cssStyle.addAll(getClass().getResource(cssFileName).toExternalForm());

        return cssStyle;

    }


    protected final EventHandler<ActionEvent> skinForm(final ObservableList<String> cssStyle,

final Scene scene) {

        return new EventHandler<ActionEvent>(){

            public void handle(ActionEvent event) {
                scene.getStylesheets().clear();

                scene.getStylesheets().addAll(cssStyle);

            }

        };

    }
![]() Note To run this recipe example, make sure the CSS files are located in the compiled classes area. Resource files can be loaded easily when placed in the same directory (package) as the compiled class file that is loading them. The CSS files are co-located with this code example file. In NetBeans, you can select Clean and build project or you can copy files to your classes build area.
Note To run this recipe example, make sure the CSS files are located in the compiled classes area. Resource files can be loaded easily when placed in the same directory (package) as the compiled class file that is loading them. The CSS files are co-located with this code example file. In NetBeans, you can select Clean and build project or you can copy files to your classes build area.
Now, that you know how to load CSS styles, let’s talk about the JavaFX CSS selectors and styling properties. Like CSS style sheets, there are selectors or style classes associated with Node objects in the Scene graph. All Scene graph nodes have a method called setStyle() to apply styling properties that could potentially change the node’s background color, border, stroke, and so on. Because all graph nodes extend from the Node class, derived classes will be able to inherit the same styling properties. Knowing the inheritance hierarchy of node types is very important because the type of node will determine the types of styling properties you can affect. For instance a Rectangle extends from Shape, which extends from Node. The inheritance does not include -fx-border-style, which is the part of nodes that extends from Region. Based on the type of node there are limitations to what styles you are able to set. To see a full listing of all style selectors refer to the JavaFX CSS Reference Guide: http://download.oracle.com/docs/cd/E17802_01/javafx/javafx/1.3/docs/api/javafx.scene/doc-files/cssref.html.
All JavaFX styling properties will be prefixed with -fx-. For example, all Nodes have the styling property to affect its opacity the attribute used is -fx-opacity. Following are selectors to style JavaFX javafx.scene.control.Labels and javafx.scene.control.Buttons:
.label {

    -fx-text-fill: rgba(17, 145, 213);

    -fx-border-color: rgba(255, 255, 255, .80);

    -fx-border-radius: 8;

    -fx-padding: 6 6 6 6;

    -fx-font: bold italic 20pt "LucidaBrightDemiBold";


}

.button{

    -fx-text-fill: rgba(17, 145, 213);

    -fx-border-color: rgba(255, 255, 255, .80);

    -fx-border-radius: 8;

    -fx-padding: 6 6 6 6;

    -fx-font: bold italic 20pt "LucidaBrightDemiBold";


}