
Chapter 15
JavaScript Forms and Data
Key Skills & Concepts
• Accessing Forms
• Using the Properties and Methods of the Form Object
• Ensuring the Accessibility of Forms
• Validating Forms
• HTML5 and Forms
• AJAX and JSON
When you use JavaScript to access forms, you can create new scripts for your Web pages. This chapter begins by explaining how to access a form with JavaScript. Then you’ll learn about the various properties and methods to use with forms and form elements. You’ll also learn about forms and accessibility, how to validate form elements, and how to use <select></select> elements as navigational tools.
Accessing Forms
Each time you add a set of <form> and </form> tags to an HTML document, a form object is created. To access one of the forms using JavaScript, you can use any one of the following options:
• Use the forms array of the document object
• Name the form in the opening form tag and use that name to access the form
• Give the form an id in the opening form tag and access it using the document.getElementById() method
Using the forms Array
The forms array allows you to access a form using an index in the array. Each set of <form> and </form> tags on the page will create an additional item in the forms array, in the order in which they appear in the document. Thus, you can reference the first form in a document like this:
document.forms[0]
As you will recall, arrays begin counting at 0, so the previous example will access the first form in the document. If you want to access the second form, you could use the following:
document.forms[1]
This will work for the rest of the forms on the page in the same way. Just remember to begin counting at 0 rather than 1 to access the correct form.
Accessing the form doesn’t do anything on its own. The form that you access is an object. To use it, you need a property or method of the object. The properties and methods of the form object are listed in a later section, “Using the Properties and Methods of the Form Object,” but for now, take a look at the length property to see what it does.
A Property Value
The examples in this section use the form object’s length property. This property allows you to find out how many elements exist (such as input boxes, select boxes, radio buttons, and others) in an HTML form. For example, take a look at this code:

The code creates a short form that contains three elements: two text boxes and the submit button. Because it’s the only form on the page, it will be the first form, allowing you to access it using document.forms[0]. To use the length property, add it to the end like this:
document.forms[0].length
Using the preceding code, you can create a short script to tell the viewer how many elements are in the form. The code that follows will write the information on the page after the form:

This code informs the viewer that the form has three elements. Figure 15-1 shows this script’s results when using the example HTML code shown previously.

Figure 15-1 The number of elements in the form is displayed to the viewer.
Covering Two Length Properties
If you want to try to show the number of elements in the forms on a page when there is more than one form, you can use a more complex script that prints a message for each form on the page. Recall that because there is a forms array, you can find its length.
The length of the forms array is the number of forms on the page (similarly, the length property of a particular form is the number of elements in the form). To find the number of forms on the page rather than the length of a form, you can use the following code:
document.forms.length
This syntax finds the number of forms on the page. Thus, you need to remember these points:
• document.forms.length finds the number of forms on the page.
• document.forms[x].length finds the number of elements in a specific form on the page, where x is the index of the form to be accessed.
This syntax might look a bit confusing, but just remember that one length property is for the forms in general, while the other length property is used on a specific form.
CAUTION
Remember the difference between document.forms.length and document.forms[x].length. The former finds the number of forms on the page, while the latter finds the number of elements in a specific form (by replacing x with a number).
The following script uses both of the length properties and a loop to cycle through each form. The code displays the number of elements in each form on the page. First, the HTML code (save as lengths.html):


Next, the JavaScript code (save as lengths.js):
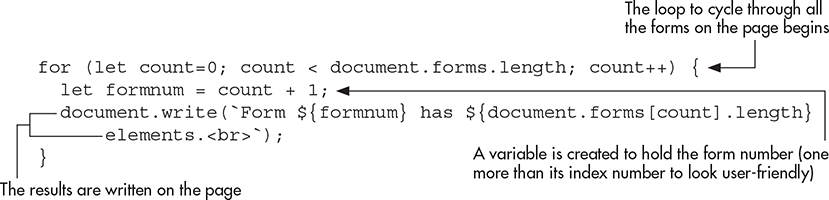
The code creates two forms in the HTML document. The script then opens a loop beginning at 0 (where arrays begin counting) and ending before it gets to the value of document.forms.length, which is the number of forms on the page. Because there are two forms (which will make 2 the value of document.forms.length), the count runs from 0 to 1 and then stops. The count allows you to access the forms array at indexes 0 and 1, which will turn out to be Form 1 and Form 2 in the HTML code.
The formnum variable has the value of the position number in the array plus one, which is the number of the form as seen in the HTML code. The script then writes the number of elements in each form on the page using the document.write() statements.
The forms array is used with the value of the count variable as the index number, which finds the number of elements in the specified form each time through the loop. Figure 15-2 shows the results of this code when run in a browser.
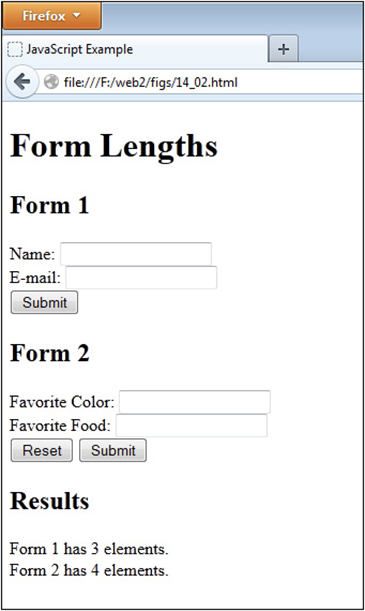
Figure 15-2 The number of elements in each form is displayed.
Using an ID
The third way to access a form is to use an id attribute and to then use document.getElementById(). This is often the clearest way to access a form and its elements, because you can access each element by using its individual id, whereas the previous two access methods require you to know which array index the form is at or the form name and the element’s name.
NOTE
If you need a refresher on accessing elements using getElementById(), you can refer to Chapter 9.
If you wanted to write the script from the previous section using the id method, you could use the following HTML code:

Next, the JavaScript code:

Since you are familiar with using document.getElementById() from previous chapters, this should be a straightforward method for you.
The method you use to access a form and its elements will depend on the types of scripts you are writing. If you are using multiple forms on a page, then the forms array can be a handy way to cycle through each form. On the other hand, trying to validate in XHTML 1.0 Strict will require you to use an id to name each form element, so using the id method would be more appropriate in that case. You will see more on how to access elements in a form as you move through this chapter.
Using the Properties and Methods of the Form Object
The JavaScript form object will help you when you need to access certain elements or attributes of the form in a script. The form object has only a few properties and methods. The properties are described first.
Properties
The form object’s properties provide information you might need when working with forms in your scripts. Table 15-1 lists the properties of the form object and their values.

Table 15-1 Properties of the Form Object
Most of these properties just hold values corresponding to the various attributes in an HTML form tag. A few of them have different types of values, though, as explained next.
The action Property
This property allows you to access the value of the action=“url” attribute in the opening form tag. This attribute is used to send the form to a server-side script for processing (such as a Node.js or PHP script). The following example shows how to access the property with a named form. First, the HTML code:

Next, the JavaScript code:
document.write("The form goes to " + document.info_form.action);
This script writes the URL on the page given in the action attribute. Figure 15-3 shows the result of this script when run in a browser.

Figure 15-3 The value of the action attribute in the form is printed on the page.
The elements Property (Array)
The elements property is an array that allows you to access each element within a specific form in the same order it appears in the code, starting from 0. It works much like the forms array but has an entry for each element in a given form.
To use the elements array to access an element in a form, use the index number for the element you want to access. For instance, the following form has two elements:

To access the first element (the text box), you can use the syntax shown here:
document.info_form.elements[0]
Alternatively, if you want to use the forms array (assume this is the first form on the page), you could use this syntax:
document.forms[0].elements[0]
Yet another option to access the text box is to name it (as with the form) and access it using its name. You can do this with each element, as well as the form itself; you can choose which method is best for accessing a form and its elements in each situation.
The following code gives the form and the text box a name, and allows you to access them using those names:

In this case, you could access the text box using the form name and the text box name, as in the syntax shown here:
document.info_form.yourname
Also, you can of course use the id method:

Then, you can access the input element using document.getElementById():
document.getElementByID("yourname");
The encoding and enctype Properties
These properties both contain the value of the enctype attribute of a form tag, which is the type of encoding used for the data that is sent to the server from the form. The default is “application/x-www-form-urlencoded.”
The length Property
The length property holds the number of elements in a given form on a page. This chapter has already covered this property pretty extensively, so there’s no need to discuss it again here.
The method Property
This property holds the value contained in the method attribute of a form tag. Thus, if you’re sending the form to the server to be processed, you might use something similar to the following code:

The value of the method property for this form would be post because it’s within the method attribute of the form.
The name Property
This property holds the value of the form’s name, which is given to it in the name attribute of the form tag. You might have some code like this:

Here, the value of the name property is cool_form, because it’s the value inside the name attribute of the form.
The noValidate Property
This property contains the Boolean value of the novalidate attribute in a form tag (added in HTML5). If true, the form is not supposed to be validated when submitted. For more on HTML5 validation, see “HTML5 and Forms” later in this chapter.
The target Property
This property holds the value given in the target attribute in a form tag. For instance, you might have the following code:

Here, the value of the target property is _top, because it’s the value inside the target attribute of the form.
Methods
Now take a look at the form object’s methods. Selected methods will be discussed following Table 15-2.
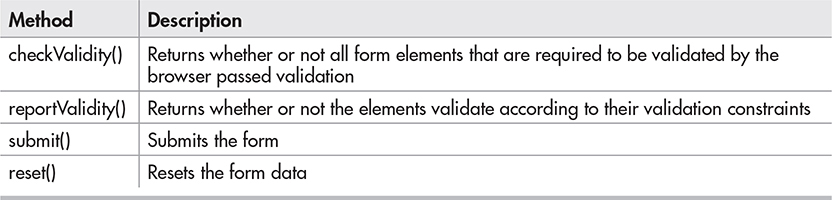
Table 15-2 The Methods of the Form Object
The checkValidity() Method
In HTML5, you can have the browser check whether a field contains data or validates against a pattern, which does not require JavaScript. You may wish to perform further actions; however, depending on whether or not all of the fields that require validation pass their respective tests. The checkValidity() function returns true if all elements that have validation requirements pass, or returns false if any of these elements fail validation. More information on how HTML5 affects forms can be found later in this chapter in the “HTML5 and Forms” section.
The reset() Method
This method enables you to reset a form from your script, which will clear any data entered by the user. For example, you could use the following code to reset a form once you have completed processing previously entered data:
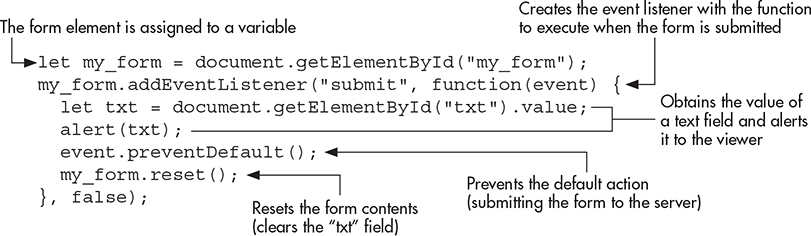
Here, the form is reset after performing a simple operation (an alert) with the data input into a text field.
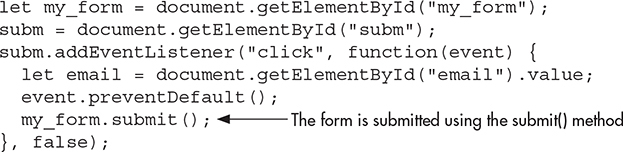
The submit() Method
This method allows you to submit a form without the viewer clicking the submit button. This can be useful if you need to provide an alternate way (aside from the submit input element) to submit the form. The following code shows an example of this. First, the HTML code:

Next, the JavaScript code:
Ensuring the Accessibility of Forms
Ensuring that your forms are accessible to viewers can be somewhat challenging because your preferred layout might not be interpreted properly by an assistive technology (such as Jaws or Voice Over). There are several things you can do to help ensure that most of your viewers can access and use your forms. You can place elements and their labels in the expected order, use <label></label> tags, or use <fieldset></fieldset> tags, and be sure not to assume the user has client-side scripting (such as JavaScript) enabled.
Using Proper Element and Label Order
In your HTML code, the order of your label text and form elements can help assistive technology in reading the form. For instance, consider the following input fields:
![]()
Here, an assistive technology looks for label text to appear before the form element. Since the first input element does not have any label text before it, the viewer is simply prompted for input, with no indication of what information to enter. Afterward, the label text “Name” is associated with the zip_code text box, which can cause the viewer to enter unexpected input.
To correct this, you can simply move the label text and place it before the form element, as in the following code:
![]()
Now, the assistive technology likely will pick up the form label and allow the user to enter the expected information. Using both the name and id attributes also helps, because various assistive technologies will pick these up as well.
This works for text boxes, text areas, and select boxes as well. However, when dealing with check boxes and radio buttons, many assistive technologies expect the element first, followed by the descriptive label. Thus, these should be switched around when being used.
When dealing with buttons (such as submit, reset, or created buttons), be sure to use the value attribute to describe what the button does, as that is what assistive technologies will likely expect.
Using <label></label> Tags
Using label tags helps you to further specify which label text belongs with which form element. Here is an example:
![]()
Here, since the label is in its expected position, you can simply apply the label tag. If you need to be more specific and point directly to the id of a form element, you can add the for attribute, as in the following code:
![]()
Here, you assign the for attribute of the opening label tag the value of the id attribute for the form element that will use the label text contained within the <label> and </label> tags. In the preceding example, the for attribute contains yourname, which links the text to the element with the id of yourname in the HTML code.
Using <fieldset></fieldset> Tags
Using a fieldset can be helpful when dealing with radio buttons and check boxes in order to group them together into a logical set. Using a legend tag to label the options to choose from allows the user to know what is expected to be selected. The following code uses a fieldset to group together a group of radio buttons used to select a type of fruit:

Here, you group all of the radio buttons within the <fieldset> and </fieldset> tags and use a legend tag after the opening fieldset tag to give the group a label. Then, each element is labeled normally within the fieldset (also using the label tags).
Not Assuming Client-Side Scripting
When coding a form initially, it’s best not to assume JavaScript or another client-side technology will be available. If JavaScript is required to make the form usable, then a number of users will not be able to use it because they will have JavaScript disabled for any number of reasons, such as security.
The best practice is to allow the form to be sent to the server side (which will handle the form and provide the most important validation routines) even if JavaScript is unavailable. Code like the following wouldn’t be usable for those without JavaScript:
<input type="button" onclick="this.form.submit();" value="Submit Form">
In this case, a JavaScript event handler and method are required to submit the form. It would be better to use the traditional submit input element to create a submit button.
If you are using some JavaScript validation, you could use code such as the following:

This allows you to run JavaScript if it is available (by creating an event listener for the submit event). Otherwise, the JavaScript submit event will be ignored and the form will be submitted to the server-side script for validation and handling. If JavaScript is available, the client-side validation routine can save a trip to the server side. If not, the server-side script will need to do the work, but the user will still be able to use the form as expected.
Also, checking the form layout with CSS turned off is a good idea, as you will want this to be in a usable state as well. Screen readers will follow this layout, so the order of your elements and labels will need to flow in a way that is still accessible and usable for those with screen readers.
Validation
Validating JavaScript forms is extremely useful. For example, you can validate input before it is submitted, to help reduce the number of forms with incomplete or inaccurate information. Validation of form data prior to submission to, say, a Common Gateway Interface (CGI) script, PHP script, or a Java servlet can save time and reduce load on the server.
Simple Validation
In a previous chapter (Try This 13-1), you performed some simple validation on form input by using the submit event to execute a function when the form is submitted and testing the input for particular characters (the @ and . in an e-mail address). You also learned about regular expressions, which can also be helpful when validating form input.
For an example, suppose you had this HTML code for a form:

If you use addEventListener() to handle the submit event, you can validate the entered name and allow the default action to occur (submitting the form content to the server), or you can prevent the default action and send an error message if the name does not validate according to your specified rules. Here is an example of this:


As you can see, this uses a regular expression (see Chapter 13) to limit the type and number of characters that are allowed in the name field. It uses the letter ranges A–Z and a–z to allow all letters, ’ to allow apostrophes (for names such as O’Neil), - to allow hyphens (the hyphen is escaped to avoid being confused with a new range), and a blank space to allow for spaces. It then uses {2,50} to ensure that there are at least two characters in the name and no more than 50 characters. The ^ and $ are used to match the string from beginning to end, rather than stopping after the first valid character. If the name does not validate, the form is not submitted (event.preventDefault() stops the submission) and the user is sent an alert. Otherwise, the form is submitted normally to the server for server-side processing.
Techniques
For the most part, validation can be as simple or as complex as you need it to be for your purposes. All you need to do is create your own custom functions to validate the form fields of your choice based on the information needed.
For instance, you could check whether a field contains five digits for a typical Zip code by using a regular expression. If it does not, then you can send an alert telling the viewer the Zip code is invalid and asking for it to be reentered. The following code shows a way to do this. First, the HTML code:

Next, the JavaScript code:
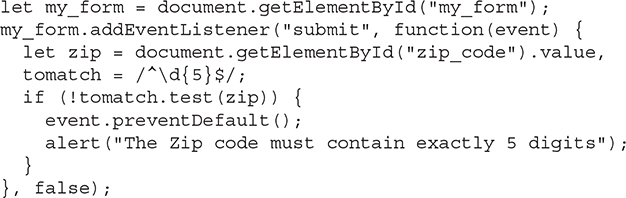
The code uses the regular expression to check for five digits. If anything other than five digits is entered, then the function will return false. You can, of course, expand this to allow for the extra four digits that are sometimes used to designate more precisely a specific area within a Zip code. To do so, add another input field and require that it have four digits if a value is entered in that second field.
You can make the validation as strict or as loose as you need it in your JavaScript. Keep in mind, though, that at the application layer (your server-side script or program), you will need to take extra care with your validation routines to ensure that bad and/or malicious data cannot be submitted to your application.
TIP
One way to find validation scripts is to try checking some JavaScript sites on the Web. A number of them have special functions that are made to validate different types of data. This can save you some work if you can find a function to suit your purposes.
Check Boxes and Radio Buttons
When using check boxes and radio buttons, you may simply want to know if they have been “checked” by the user. For example, you could have the following form:

In this case, you want to be sure the user checks the “agree” box before the form can be submitted for the user to sign up. To check for this in JavaScript, you can use the checked property for the checkbox element, which returns true if the element is checked and false if it is not. The following code shows an example of this:
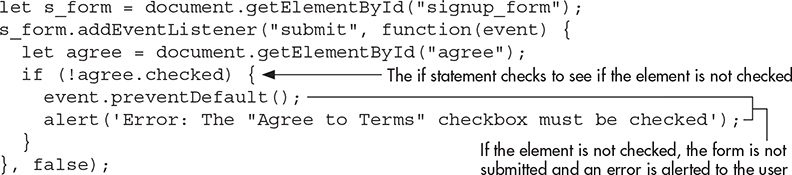
Here, if the “agree” checkbox is not checked, the form will not be submitted. The user will receive the alert saying that the “Agree to Terms” checkbox must be checked.
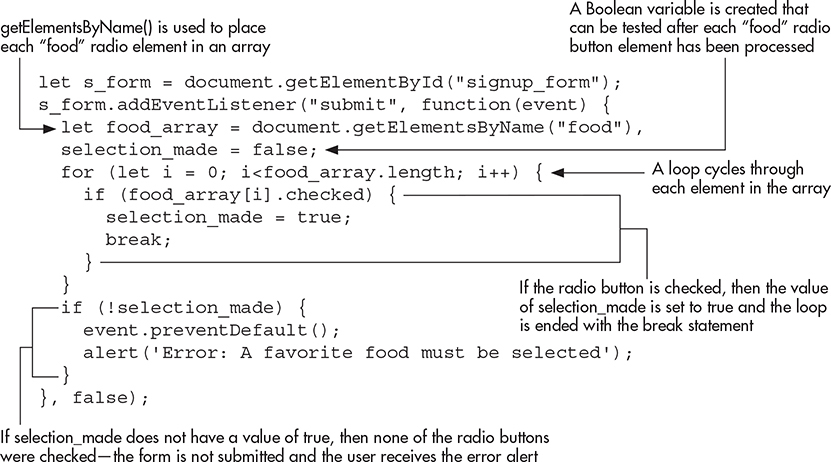
If you are working with a set of radio buttons and just want to ensure that one of the options has been checked, you can combine the document.getElementsByName() method (see Chapter 9) and the checked property to determine if this is the case. For example, suppose you had the following form:

The name attribute for each radio button of the same category will be the same (here it is “food”) so that only one option can be selected. In order to ensure that one of the options was indeed selected, you could use the following code:
One more thing to mention here is that validation should be done on both the client side and the server side. While client-side validation is helpful and can save strain on your server, it should not replace server-side validation. Since client-side validation can be bypassed fairly easily, it can be a very big security risk if no server-side validation is in place! Since the data entered by the user could be malicious (or could even unintentionally break something), it is best to always validate data entered by the user on the server side to help avoid security issues like SQL injection and cross-site scripting. You will see more about these issues in Chapter 16.
Here, each of the radio button elements that has “food” as the value of its name attribute is placed into food_array. This allows you to use a loop to cycle through each of the radio buttons to see if it has been checked. A Boolean variable named selection_made is set to false initially. Within the loop, if the script finds that a radio button has been checked, it will set selection_made to true and exit the loop using the break statement. You can do this since only one radio button can be checked—you won’t need to continue checking after a positive result is found. If selection_made remains false after running the loop, then the form submission is canceled and the user receives the error alert instead.
Try This 15-1Request a Number
pr14_1.htmlprjs14_1.js
In this project, you create a script for basic validation of a phone number entered by the viewer, such as 222-222-2222.
Step by Step
1. Create an HTML page with a form and a text box with the label text “Phone Number (XXX-XXX-XXXX):” and an id of “phone”. Make sure the form has a submit button. Insert the necessary script tags after the form to call an external JavaScript file named prjs14_1.js. Save the HTML file as pr14_1.html. When complete, the HTML code should look like this:
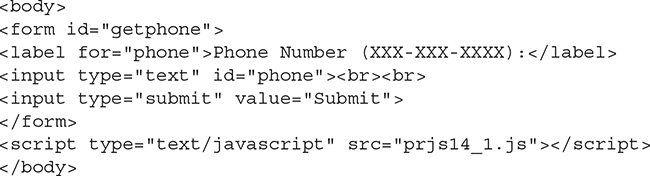
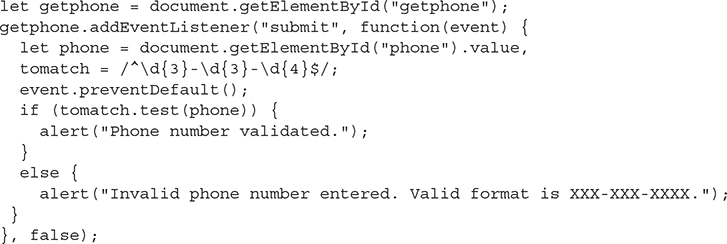
2. Create an external JavaScript file and save it as prjs14_1.js. Use it for step 3.
3. Use a regular expression to ensure that the data entered into the text box is in the format XXX-XXX-XXXX. If it is, send an alert saying “Phone number validated.” Otherwise, send an alert saying “Invalid phone number entered. Valid format is XXX-XXX-XXXX.” When complete, the JavaScript code should look like this:
4. Save the JavaScript file and open the HTML file in your browser. See if it works by typing various values into the text box and submitting the form.
Try This Summary
In this project, you used your knowledge of JavaScript and forms to create a script to validate a form. The script validates a time entry by the viewer to see if it is a valid phone number by a particular set of standards.
HTML5 and Forms
HTML5 provides several new elements, as well as a number of new input types and attributes. It also provides a way for the browser to perform validation on fields on the client side, easing the burden on JavaScript in browsers that support the new features.
New Elements
The new form-related elements in HTML5 are listed in Table 15-3.

Table 15-3 New Form-Related Elements in HTML5
These elements allow you to provide additional information to the viewer or to perform other helpful tasks. You will look at the meter and progress elements in this section, but for more details on any of these elements, including which browsers support each one, see wufoo.com/html5/.
The meter Element
The meter element is used to display a value based on a scale you define. For example, if you decided to use a scale of 0–100, you would give the min attribute a value of 0 and the max attribute a value of 100. The actual value to be displayed on that scale is provided in the value attribute. For example, to show 55 on a scale of 0–100, you could use the following code:
<meter min="0" max="100" value="55"></meter>
This will display a meter bar in browsers that support it, showing the bar filled to 55 out of the 100 units available. Figure 15-4 shows how this looks in a supported version of Google Chrome.
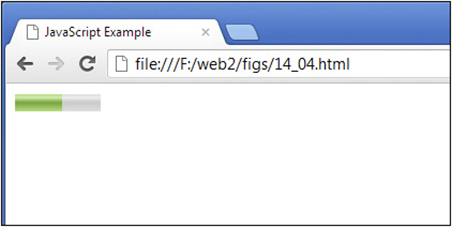
Figure 15-4 A meter bar is displayed.
For browsers that do not support the element, you can provide default text to be displayed by inserting the text within the opening and closing tags, as in the following code:
<meter min="0" max="100" value="55">55</meter>
This will simply display 55 on the page where the meter would have appeared.
This can be used in combination with JavaScript to display helpful information to the user, such as how many questions have been correctly answered in a quiz. For example, suppose you had the following HTML code:
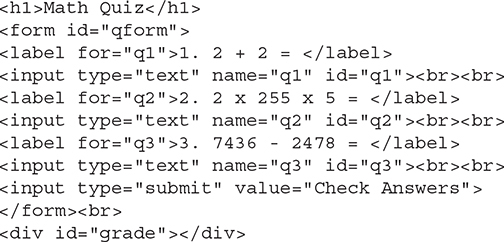
Here, a form is created for a quick math quiz, allowing the viewer to enter the answers into text boxes and then submit the answers to be checked. An empty div with an id of grade will be used to display the answer via JavaScript. The following code shows how the meter tag could be used as a visual aid in displaying the number of correct answers:

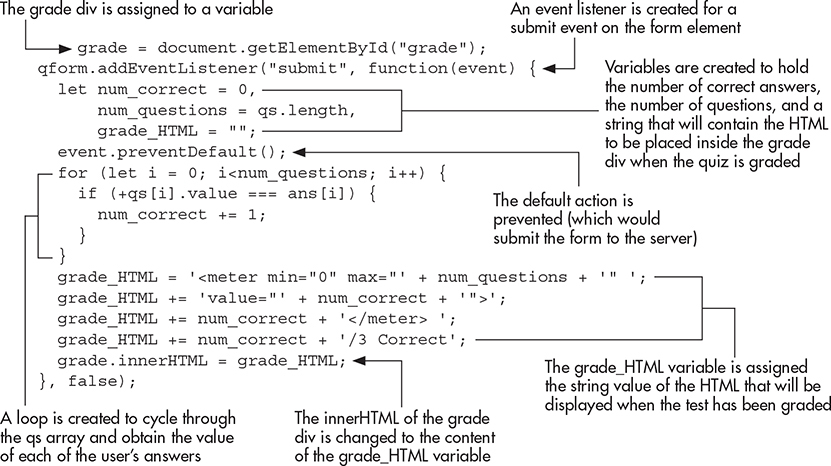
Here, the test is graded when the form is submitted. A variable named num_correct is created with an initial value of zero, a variable named num_questions obtains the number of questions in the quiz by grabbing the length of the qs array, which contains each text box input element, and a variable name grade_HTML is assigned an empty string that will be filled in with the meter tag and other text to display the results.
A loop is created to iterate over the qs array, get each value, and determine if it is equal to its corresponding correct answer in the ans array. Notice that the unary + operator is used to attempt to coerce the user’s entry into a number before comparing it to the correct answer, since each text box will return a string by default. If the answer is correct, the one is added to the num_correct variable.
The next lines of code create the HTML string that will eventually be placed within the grade div. Notice how the max attribute of the meter tag is assigned the value of the num_questions variable, and how the value attribute is assigned the value of the num_correct variable. An additional message is displayed after the meter element to show the user what type of results the meter is displaying (for example, if two answers were correct, the message “2/3 Correct”).
In this case, if the user does not get all the answers correct, the entries can be edited and submitted to be checked again until a 3/3 is obtained. Figure 15-5 shows the result of this script when two of the answers are correct.

Figure 15-5 The meter is displayed to show how many questions were answered correctly.
The progress Element
The progress element is similar to meter, but displays a percentage rather than a scalar value. For example, to show 25 percent out of 100 percent on a progress bar, you could use the following code:
<progress max="100" value="25">25%</progress>
As with meter, you can use the max attribute to set the maximum and the value attribute to set the percentage value within a range if zero up to the max value. You could edit the previous meter JavaScript code to use a progress bar to display a percentage grade for the quiz if desired, using the following code:
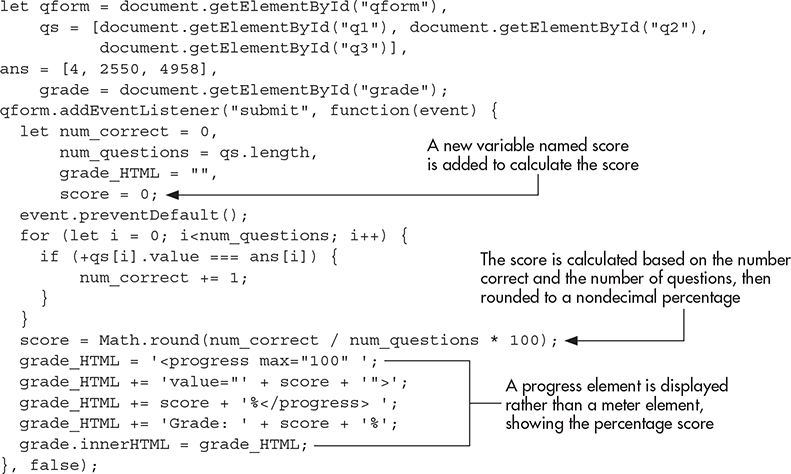
Here, some changes are made to calculate the percentage score that will be used in the progress element. The progress element is then generated based on the percentage score. Figure 15-6 shows the result of this script when two out of three answers are correct.

Figure 15-6 The result is displayed as a percentage using the progress element.
New Input Types
In addition to new elements, HTML5 adds a number of new input types that can be used for the input element. Table 15-4 lists the new additions.

Table 15-4 New Input Types in HTML5
You will notice that some of these input types allow for the use of a tool by the user, such as the color input type. Browsers may implement these in different ways, but those that support one or more of the new input types often make it easier for the user to enter each specific type of value and/or make the value entered easier to validate. An example of using the new color type is shown in this code:
<input type="color" name="mycolor" id="mycolor">
As you can see, you can plug in the specific type inside the type attribute to make use of it. Since these fields ask for specific types of values, the browser is able to perform its own validation on the fields, which is helpful when it is supported. Figure 15-7 shows an example of an input field with the color type. The validation will be discussed further in the “HTML5 Form Validation” section later in this chapter.
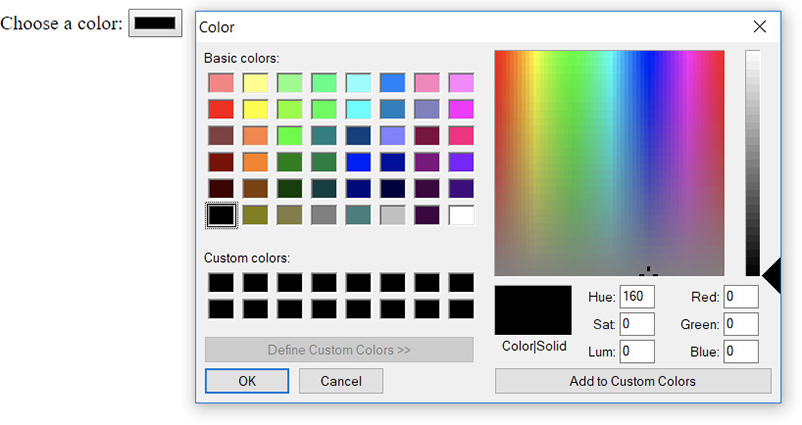
Figure 15-7 A color picker is shown when the color input type is used.
New Attributes
HTML5 also brings new attributes that can be used with forms and/or form elements. These are listed in Table 15-5.

Table 15-5 New Attributes in HTML5 Forms/Form Fields
Many of these allow you to override attributes in the main form element using the submit element. There are also some attributes such as required, novalidate, and pattern that assist with form validation, which is discussed in the next section.
HTML5 Form Validation
HTML5 allows the browser to validate various input types automatically. This can be overridden by using the novalidate attribute in the form tag to disable browser input validation for all of a form’s fields or by using it in individual form fields so that they are not validated. Note that novalidate is not relevant to custom validations that you do yourself using the onsubmit event to capture the form submission.
If you decide to allow the browser to validate fields, the new input types will have certain validation methods used on them to ensure that the expected type of information is entered. Each field is optional by default, though you can make it required by adding the required attribute to each field that needs to be completed. For example, the browser will validate the following form and will require that the URL field be completed:

Figure 15-8 shows what happens when the required field is not completed in a supported browser. Figure 15-9 shows the result of entering an invalid URL in the URL field in a supported browser.

Figure 15-8 The field must be completed to validate.

Figure 15-9 The field must contain a valid URL to validate.
You can also use the pattern field so that the browser will validate a field according to a regular expression. For example, if you want the name field from the previous form to contain only letters and spaces, you could use the following code:
![]()
The only drawback is browser support. If you need to validate the input on the client side in browsers that do not support the particular input types or validations used in HTML5, then you will need to write some JavaScript as a backup. For example, suppose you had the following form:

If a browser does not support the pattern attribute and you still want to make sure the field contains only letters and spaces, then you will need to write a script to ensure that the field is still validated. In this case, you could simply use the following code to validate the name field when the submit button is clicked.

This simply uses the desired pattern as a regular expression in JavaScript and runs the test method to see if the input matches the pattern. If not, an alert is sent to the viewer so that the name can be corrected.
HTML5 provides numerous new and helpful features to forms. At the time of this writing, JavaScript backups may be necessary for client-side validation. As more users move to newer browsers and browser support for all of the new features is increased, these new tools will become even more helpful to you as a developer.
NOTE
For more details on any of the HTML5 form improvements, including which browsers support each one, see wufoo.com/html5/.
Try This 15-2Validate a Phone Number with HTML5 or JavaScript
In this project, you will build on the previous project by creating a form that will validate a phone number using the new HTML5 pattern attribute. If the browser does not support HTML5, a backup JavaScript validation is run instead.
Step by Step
1. Create an HTML document and add script tags so that the HTML file will call an external JavaScript file named prjs14_2.js. Create a form with an id of “getphone”, and add a text box with an id of “phone” to obtain a phone number. The text box should use the pattern attribute with a regular expression that will validate the phone number if the format is XXX-XXX-XXXX. It will also be a required field. Make sure the form contains a submit button. Save the HTML file as pr14_2.html. When complete, the HTML code should look like this:

2. Create a JavaScript file and save it as prjs14_2.js. Use it for step 3.
3. Create a script that will back up the HTML5 validation when the form is submitted. If the field does not validate, send an alert saying “Invalid phone number entered. Valid format is XXX-XXX-XXXX.” Otherwise, allow the form to be submitted. When complete, the JavaScript code should look like this:

4. Save the JavaScript file and open the HTML file in your browser. Check to see whether the validation system works.
Try This Summary
In this project, you used your knowledge of JavaScript and HTML5 forms to create a validation system that checks for a valid phone number in HTML5 and backs up the validation with JavaScript code.
AJAX and JSON
AJAX provides a method of obtaining data from a server-side script using the XMLHttpRequest object. The data obtained can be returned as a usable JavaScript value such as an array or object by using JSON. Both of these are explained in more detail in the following sections.
AJAX
AJAX stands for Asynchronous JavaScript and XML, which is a way JavaScript can obtain data from a server-side file or application without the need to reload a page. For example, a synchronous request to the Web server requires that the current page be reloaded to use the new information. An asynchronous request allows the information to be obtained and used without the need to wait for the entire page to reload.
The data obtained from the server can be any number of things (for example, a text file, an XML file, the result of running a server-side script). The value returned does not actually need to be in XML format, in spite of the AJAX terminology. This gives you a lot of flexibility as to how you can retrieve the data you need.
This type of scripting is useful in progressive enhancement, as it allows applications to enhance the user experience for those with JavaScript enabled in modern browsers. Instead of waiting for a page to load again, the information can be obtained and used on-the-fly.
The XMLHttpRequest Object
In JavaScript, an XMLHttpRequest object is created, which can then be used to make HTTP requests to the server in the background and allow the user to continue using the application without interruption. This object is often referred to as XHR in text as a shorthand for the full object name (XMLHttpRequest).
To create an XHR object, you simply use its constructor, as shown in the following code:
let xhr = new XMLHttpRequest();
This object is available in most modern browsers. In Internet Explorer versions before version 7, you would need to create an ActiveX object. Workarounds for earlier versions of Internet Explorer can be found on the Web, such as the one at github.com/ilinsky/xmlhttprequest. If you do not need the functionality in older browsers, you can use the standard constructor.
The open() and send() Methods
The open() method allows you to prepare a request to be sent to the server. It takes three arguments: the request method (for example, “get” or “post”), the URL to open, and a Boolean value (true if the request is to be asynchronous and false if the request is to be synchronous). So, to use the “get” method to open a PHP script named get_info.php as an asynchronous request, you could use the following code:
![]()
Now that the request is prepared, you can send it using the send() method. The send() method takes one argument, which is data to be sent as part of the request. If you are using a “get” request, you can simply use null as the argument, as in the following code:

This will send the request to the server. Once the request has been sent, you will need to wait for a status to be returned and for the data to be received to complete transmission.
The status Property, the readystatechange Event, and the responseText Property
The first thing you will need to know when trying to retrieve data from the server is whether or not the request received a valid response from the server. This can be determined using the status property. Basically, any status code in the 200 range is a successful response. Also, a status code of 304 is successful, since data will be available from the browser cache.
To see what data is returned, you can use the responseText property (or, if using a response MIME type of “text/xml” or “application/xml”, the responseXML property can be used). If the get_info.php PHP script is expected to return a string of data, then that data will be available in the responseText property.
Finally, for an asynchronous request, you will want to be able to determine when the data you are trying to retrieve is available for use. This is done using the readystatechange event. This event is fired whenever an update occurs to the readyState property of your XHR object. The readyState property can have the following values:
• 0 – Uninitialized. The open() method has not been called.
• 1 – Open. The open() method has been called.
• 2 – Sent. The send() method has been called.
• 3 – Receiving. Data has been received, but is still not complete.
• 4 – Complete. All of the data has been received and can be used.
For most applications, you only need to worry about whether the response code is 4, since you won’t do anything until you have all of the data.
To send a request and receive data, you need to put all of this together. The request needs to be open and sent, a good response status is needed, and you need to know when the value of readyState is equal to 4 by using the onreadystatechange event. This can be accomplished using the following code:
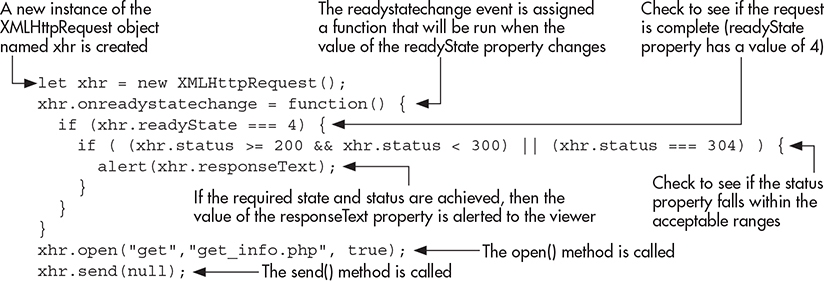
A couple of notes on this code: due to browser compatibility issues, the DOM 0 method of handling the readystatechange event is used, and the open() and send() methods are called after the function that handles the readystatechange event. These two things help to minimize the risk of unexpected errors occurring in various browsers. If the response passes all of the tests, then the user receives an alert with the text received from the PHP script.
The text received in the responseText property can be anything from a simple value to a complex string of data. Whether the script returns “John” or “x=34&y=25&z=50”, that value will be placed in the responseText property.
Note that since this is a beginner’s guide, you will use “get” requests to retrieve data and won’t change the HTTP headers. For additional details on these features of AJAX, see the “Further Reading” section later in this chapter.
An Example AJAX Script
The best way to show how the response data is created is to apply an example. Suppose you had the following HTML to create a simple poll:

In this case, the form action will be a separate PHP script that will run if JavaScript is not available. If JavaScript is available, you will call a script named get_winner.php in your AJAX code.
The get_winner.php will be a server-side application that returns data. This could be results from a database query, a calculation, or any other task a server-side application can perform. In this case, the script is going to add your vote to a database and query the database for the person who has the most votes, declaring that person the current winner of the poll. Since server-side programming is beyond the scope of this book, the get_winner.php script will be shortened to describe its purpose. Here is the script:

Here, a function is run to determine the value of the $winner variable from the database. The echo command sends a string of text as a response. If this were run as a standalone script, the string would simply be written in the browser window. When responding to an XHR request, however, this string is returned to the JavaScript application as the value of the responseText property. You can now make use of this data returned from the server-side application in JavaScript!
NOTE
When you’re using a server-side application to return data, it does not need to be written in PHP. Any server-side language (for example, Perl, ASP, Python, Java, Node.js) can be used based on your background and server setup.
With this in mind, the bulk of the remaining work is performed in your JavaScript code. Since you want to display the current winner, the value returned for the responseText property will give you the data you need. Here is the JavaScript code to retrieve and use the information from the get_winner.php script:
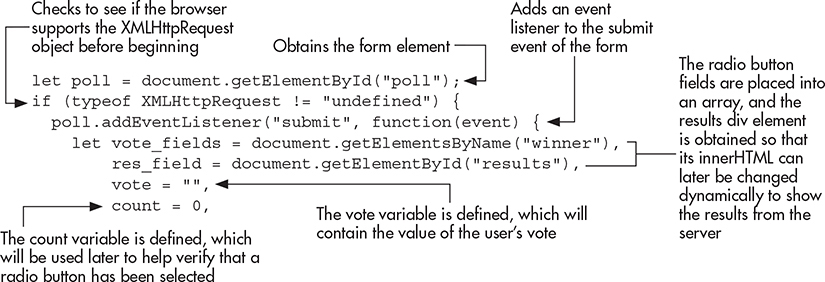

This looks like quite a long process, but most of it is preparing the user’s vote to be sent (checking that a selection was made before submitting, and so on). This obtains the user’s vote, which is stored in the vote variable. This variable is then used as part of a query string that will be added to the URL when get_winner.php is called. For example, if the user voted for “Paul”, then the URL sent to the server in this case would be “get_winner.php?vote=Paul”. Notice that the encodeURIComponent() method is used on the vote variable, which ensures that the value can be part of a valid URL. This will give the PHP script the data it needs to add that vote to the database. The remainder of the script uses what you learned in this chapter to obtain the data (the current winner of the poll). Since the data is already in the desired format, the results div innerHTML is updated to show the current poll winner. Figure 15-10 shows how the HTML page appears initially, while Figure 15-11 shows how the page appears when the result is displayed.
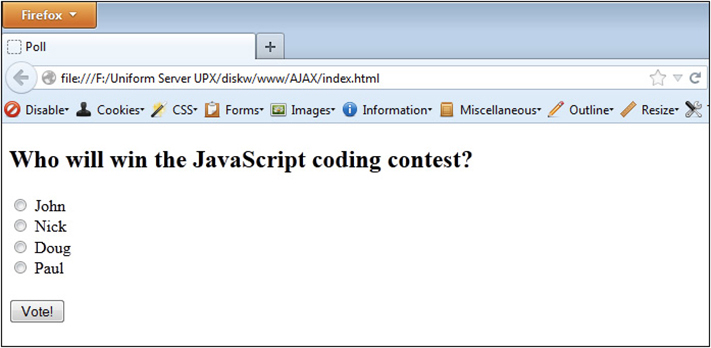
Figure 15-10 The initial HTML page
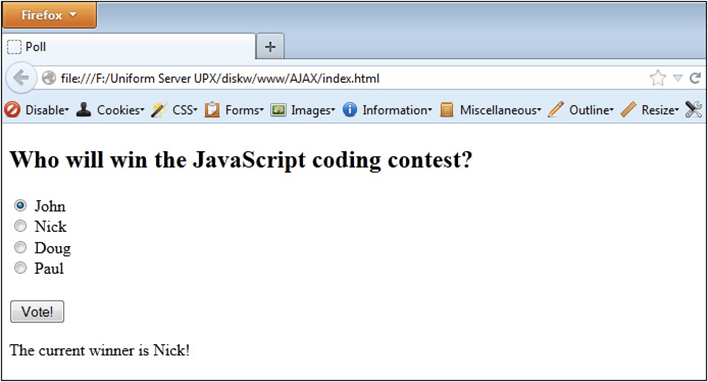
Figure 15-11 The page after retrieving the data
This script conveniently returned a simple text string, but you may wish to have more data returned that you could use to display more detailed results. Returning this data could result in a string that you have to break apart to get the values (for example, “John=2&Nick=34&Doug=32&Paul=25”). This can be used, but it would be even better if this data could be returned in a format that JavaScript could use more easily. JSON makes this possible, and is discussed in more detail shortly.
Further Reading
More information on AJAX and how to use it in your applications can be found at the following Web sites:
• https://developer.mozilla.org/en-US/docs/Web/Guide/AJAX
• https://www.w3schools.com/js/js_ajax_intro.asp
JSON
JSON stands for JavaScript Object Notation. It is a data format that can be used in numerous programming languages, which makes it a perfect companion when making use of AJAX. If you send JSON data to a server-side application, most of these languages have JSON parsers that can take the information and place it in a usable form in that language—be it a value, array, object, and so on. When sending JSON data back to JavaScript, it can easily be used either via the JSON object (newer browsers) or with a JavaScript JSON parser (older browsers).
JSON Object or JSON Parser?
Most modern browsers support the JSON object: Firefox 3.5+, Internet Explorer 8+, Chrome, and others. If you need to use JSON data in JavaScript in older browsers, you can get a parser written by Douglas Crockford at github.com/douglascrockford/JSON-js.
JSON Formatting
Often, you will send or receive an array or object containing data. JSON formatting simply takes the array literal and object literal notation from JavaScript. For example, an array in JSON format could look like this:
[2, 5, "Cool"]
Notice that this is not assigned to a variable; it is simply the data itself that is passed along in JSON format. The JSON object or JSON parser will convert the data to the desired format for the language that makes use of the information.
For objects, JSON also requires double quotes around all strings, including property names. For example, a JavaScript object could look like this:
let info = { num: 77, color: "red" }
In JSON format, the property names would also need to be quoted, as in the following code:
{ "num": 77, "color": "red" }
Notice that the property names are also quoted in this case. So, if you need to write or parse JSON data, keep these rules in mind to avoid errors sending or receiving the data.
Using the JSON Object
The JSON object has two methods: stringify() to send JSON data to another application and parse() to turn JSON data into JavaScript values. For example, if you were going to send data from JavaScript to another application, you could convert it into JSON format easily using JSON.stringify(), as in the following code:
![]()
The j_data variable could then be sent via the send() method once you have an XHR object. Note that if you covert the data to JSON format, you will have to use post and set xhr.setRequestHeader("Content-Type", "application/json"); as well.
When receiving JSON data, you would use the JSON.parse() method to convert the data from JSON format into usable JavaScript values. For example, suppose you are receiving the following JSON data in JavaScript:
{ "num": 77, "color": "red" }
If this JSON data were read into the responseText of an XHR object named xhr, you could convert this data into a usable JavaScript object, as in the following code:
let info = JSON.parse(xhr.responseText);
The info object would now be created, which would be the same as if you had written this code:
let info = { num: 77, color: "red" };
With this ability to quickly convert data into a usable JavaScript value, JSON can make data collection and use much easier for your AJAX scripts.
AJAX and JSON Example
Suppose you wanted to change your AJAX script from earlier in the chapter, which displayed the current winner of the poll. Instead of just displaying the current winner, you would like to show all of the current results. Recall that without JSON, you would need to send back and parse a string of names/values or an XML document from the server-side application. With JSON, you could simply send back the data in JSON format, where you could then quickly use the parse() method to make it usable JavaScript.
Here, you will use the same HTML code, a PHP script named get_results.php, and will alter your JavaScript code to make use of JSON data.
First, the PHP script: It will add your vote to the database, then retrieve the current results from the database, then send those results back to JavaScript in JSON format. Here is the example:

In summary, this will send back a string of JSON data to your JavaScript application (here the JSON string is built, but PHP has methods for converting PHP objects to JSON as well), which could look like the following:
{ "John": 2, "Nick": 35, "Doug": 32, "Paul": 25 }
You can now alter your JavaScript code to show the names and vote totals for each of the people in the poll. Here is the updated JavaScript code:


Here, you are able to simply parse the responseText to obtain a usable JavaScript object named results. A for-in loop cycles through each of the object’s properties, which are the names of each person in the poll. The property names and values are then added to a variable named res_HTML, which is then displayed as the innerHTML of the results div on the HTML page.
With the ability to easily use data obtained from a server-side application, you can enhance your scripts to provide your users more options without the need to reload the entire page to get results.
Further Reading
More information on JSON is available from the following Web sites:
• https://developer.mozilla.org/en-US/docs/Glossary/JSON
 Chapter 15 Self Test
1. Each time you add a set of <form> and </form> tags to an HTML document, a(n) _______object is created.
2. The forms __________ allows you to access a form using an index number.
3. Which of the following would access the fourth form on a page?
A. document.forms[4]
B. document.forms[3]
C. document.forms(4)
D. document.forms(3)
4. Which of the following would find the number of elements in the third form on a page?
A. document.forms[2].length
B. document.forms[3].length
C. document.forms.length
D. document.forms(3).length
5. Which of the following holds the value of the number of forms in a document?
A. document.forms[0].length
B. document.form.length
C. document.forms.length
D. document.forms[1].length
6. Using form __________ or __________ allows you to name the forms on the page that you want to access later.
7. Which of the following accesses the value of an element named e1 in a form named f1?
A. document.f1.e1.value
B. document.e1.f1.value
C. document.f1.e2.value
D. document.forms1.e1.value
8. The __________ property allows you to access the value of the action=“url” attribute in the opening form tag.
9. The __________ property is an array that allows you to access each element in a specific form.
10. The __________ attribute in HTML5 allows you to give a form field a regular expression it must validate.
11. The __________ method allows you to reset a form using your script.
12. Which of the following would add a valid meter tag to the document to show 8 on a scale of 0 to 10?
A. <meter min=“0” max=“10” value=“7”>8</meter>
B. <meter min=“4” value=“8”>8</meter>
C. <meter min=“0” max=“10” value=“8”>8</meter>
D. <meter min=“0” max=“100” value=“8”>8</meter>
13. One way to help with form accessibility is to use the __________ tags to identify what field a piece of text is describing.
14. The __________ method allows you to submit a form without the viewer clicking the submit button.
15. Which of the following HTML5 form attributes is used for fields that must be filled in by the user to validate?
A. obligatory
B. needed
C. required
D. compulsory
16. What object allows you to get data from the server in JavaScript?
A. XMLServerRequest
B. XMLHttpRequest
C. JSONRequest
D. XMLFileGet
17. _________ stands for Asynchronous JavaScript and XML.
18. JavaScript can retrieve data from the server other than an XML document.
A. True
B. False
19. The acronym for JavaScript Object Notation is __________.