
Chapter 16
Further Browser-Based JavaScript
Key Skills & Concepts
• Using jQuery
• Debugging Scripts
• JavaScript and Accessibility
• JavaScript Security
• JavaScript and APIs from HTML
• Node.js App Completion
• Further Reading
This chapter introduces a number of advanced techniques you may wish to pursue further once you have finished this book. First, you will be introduced to jQuery, which is a good JavaScript library for creating DOM-related scripts that work cross-browser. You will also learn about JavaScript accessibility and security, how JavaScript is incorporated into HTML5, and then finish your basic Node.js app using what you learned in previous chapters.
Using jQuery
One of the reasons to learn JavaScript is so that you can more easily work with jQuery. The jQuery library has become a very popular tool for easily creating dynamic effects that work cross-browser while avoiding many of the issues you may face trying to do so, such as dealing with the differences in how to handle events in each browser. At the time of this writing, jQuery had support for Internet Explorer 6.0+, Firefox 10+, Safari 5.0+, Opera, and Chrome.
Obtaining jQuery
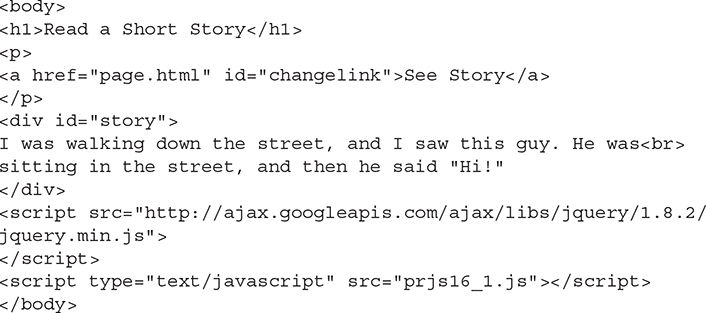
The first thing you will need to do is grab a copy of jQuery or use a remote copy. If you want to use a local copy, you can download the latest version from jquery.com. Once you have it, you call it using a <script> tag as you would any other external JavaScript file, as in this code:
![]()
If you decide to use a remote copy, such as one from the official jQuery site (which can be helpful because the user might already have the file cached, which will speed up load time), here is an example:
<script src="https://code.jquery.com/jquery-3.4.1.min.js"></script>
You can choose the method that works best for you. Once you have the code included in your HTML, you are ready to make use of what jQuery has to offer.
NOTE
When including JavaScript from external sites, you need to consider security concerns. For more on this, see www.securitee.org/files/jsinclusions_ccs2012.pdf.
Getting Started: document.ready()
The first thing jQuery needs is to be sure that all DOM elements are available for scripting. The document.ready() method determines when the DOM structure is loaded and then runs the code within, usually a function, as in this code:

This is placed in your regular JavaScript code (for example, your .js file). Notice the $ at the beginning of the code. This is the jQuery selector and is used when you invoke jQuery in your JavaScript code.
Using Selectors
In jQuery, you can select elements via CSS syntax rather than using a typical JavaScript method such as document.getElementById() or document.getElementsByClassName(). For example, suppose you have the following code:

This simply changes a couple of CSS style properties, but it takes several lines of code to do so. In jQuery, this code can be shortened like this:

First, you will notice that the “story” div is selected using CSS syntax (“#story”) rather than document.getElementById(“story”). This makes the selection of the element a little shorter. Also, you will see that event handling is simply attached to the event name (“click” in this case), followed by the function to execute when the event occurs. This keeps you from needing to write cross-browser event-handling code. Next, you are able to alter the CSS of the element by using the css() method on the story element. The css() method accepts an object as a parameter, and it contains each property to change along with its new value (all quoted much like JSON syntax). In this way, you do not need to code a separate statement for each CSS property change you want to make.
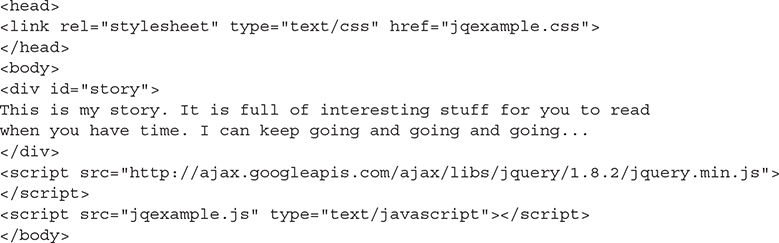
To see this example in action, you will need to create an HTML page with a “story” div, as in the following code:

If you are using a local copy of jQuery, you can call that in place of the Google copy here. You can save this HTML page as jqexample.html. Next, you will want to create a JavaScript file, which you will save as jqexample.js. Here is the code:

Once you have the code in place, open jqexample.html in your browser and click the div element. The text should become larger and turn blue. Figure 16-1 shows the page before the changes, while Figure 16-2 shows the page after the changes.

Figure 16-1 The original page

Figure 16-2 The page after the div element is clicked
There are a number of selectors available in jQuery to help you select the element(s) you need in your scripts. Here are some of the most common:
• (*) Selects all of the elements in the document
• (.class_name) Selects all elements with the provided class name
• (#id) Selects the element with the provided id
• (element_name) Selects all element_name elements
• (element_name.class_name) Selects all element_name elements with the class_name class
• (element_name[attribute=“value”]) Selects all element_name elements that have the provided attribute with the provided value
Further selection options are available, if needed, at api.jquery.com/category/selectors.
NOTE
In vanilla JavaScript, document.querySelectorAll() works similarly to the jQuery selector function.
Altering Classes
The addClass() and removeClass() functions make it very easy to change the style of elements in jQuery. If you already have classes coded in your CSS, you can use these methods to add or remove them at any time. For example, suppose you had the same HTML page (jqexample.html) and altered it to include a CSS file named jqexample.css. You could then write CSS classes that could be added or removed from the “story” div. Here is the updated HTML code:
The next step is to create jqexample.css and include some CSS declarations:

This gives three possible styles. Each can now be easily applied to an element or taken away, as needed. To add a class, simply call addClass() with the class name as the argument, as in the following code:
$("#story").addClass("style2");
If you later decide to remove it, you can do the same thing with removeClass():
$("#story").removeClass("style2");
You can also add more than one class to an element at a time by separating each class name with a space, as in the following code:
$("#story").addClass("style2 style3");
This will not only make the text larger and blue, but will also make it italic. You can make use of this along with the existing code in order to add or remove classes on a click.
If you decide you want to toggle one or more classes, you can use the toggleClass() method. This will add a class if the element does not already have it and will remove a class if the element already has it. Here, you will update your jqexample.js code to toggle the style2 and style3 classes when the div is clicked. The updated script is shown in the following code:

With this code, each click will add or remove both the style2 and style3 classes, depending on the current style of the element.
If you want to check whether or not an element has a class before adding or removing it, you can use the hasClass() method. The method returns true if the element has the class applied to it, and false if not. For example, the following code would make sure the “story” div does not already have the style3 class before adding it:
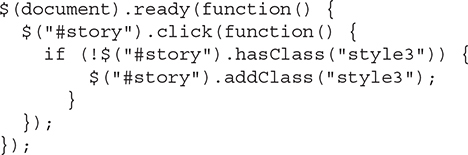
As you can see here, the JavaScript if statement and the logical NOT operator (!) are used along with the jQuery code. jQuery is a JavaScript library, so all the code is still JavaScript code. Since this is the case, you can use any JavaScript code you need as well—operators, statements, arrays, functions, and more. Figure 16-3 shows what the initial page looks like, while Figure 16-4 shows how the page looks after the link is clicked.

Figure 16-3 The initial page

Figure 16-4 After the link is clicked, the class is added.
Methods for Effects
The jQuery library has a number of methods that make creating specific dynamic effects easier. Table 16-1 lists some of the most commonly used jQuery effects.

Table 16-1 Common Methods Used for Effects in jQuery
Each of these methods can take two arguments: the amount of time to take to perform the effect and an optional callback function (discussed later in this section). For example, calling the show() method will reveal an element immediately if no arguments are used, as in the following code:
$("#story").show();
If you want to show the element over time, you can send the number of milliseconds to the show method as an argument:
$("#story").show(1000);
When this argument is provided, the element will fade in while increasing in width and height during the specified span of time. Here, the “story” element would fade in and increase in size over a period of 1000 milliseconds (1 second). Alternatively, you can use the preset value “fast” or “slow” in place of a specific time, as in the following code:
![]()
The other methods work the same way, but perform different animations: slideDown() shows an element by sliding it down into position, slideUp() hides an element by sliding it up and out of sight, fadeIn() shows an element by gradually fading it in, while fadeOut() hides an element by gradually fading it out.
If desired, you can provide a second argument to any of these methods, which is a callback function that will be executed as soon as the effect completes execution. This can be useful to string two or more effects together, executing each one after the previous one has been completed. For instance, the following code will show the “story” element over 500 milliseconds, then fade it out over 2000 milliseconds:
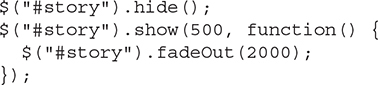
You could continue the process by using a callback function as the second argument of the fadeOut() method and then continue adding callback functions as needed until your desired effects have all been completed.
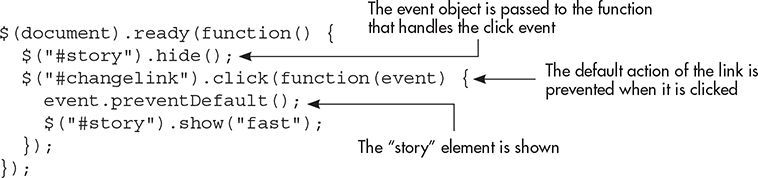
Finally, if you need to prevent the default action when an event occurs on an element (such as when you need a link to not be followed), you can use the jQuery event registration while still passing in the event object. This allows you to call event.preventDefault(), as in the following code:
The jQuery library can prove to be a very useful tool if you need to get scripts working across a larger number of browsers. Since it helps with element selection, event handling, and display/animation methods, it allows you to do less work when you need cross-browser code. The next section gives you some resources to look at if you want to delve further into the jQuery library.
Further Reading
You can read more about jQuery and how to use it with the following resources:
• jQuery: A Beginner’s Guide (McGraw-Hill, 2014)
Try This 16-1Use jQuery to Create Effects
pr16_1.htmlprjs16_1.js
You have a link and a div element with some text that you would like to have initially hidden but then displayed when the link is clicked. Once it displays, you want the div element to slowly fade out. You want to use jQuery to accomplish the task.
Step by Step
1. Create an HTML document named pr16_1.html and use the following HTML code for the body section:
2. Create a JavaScript file named prjs16_1.js. In this file, you need to wait until the document is ready, then immediately hide the “story” element. Next, register the click event for the “changelink” link, prevent its default action, and then show the “story” element using a “slide down” animation over 3000 milliseconds. The “story” element should then fade out over 10,000 milliseconds. When complete, your JavaScript code should look like this:
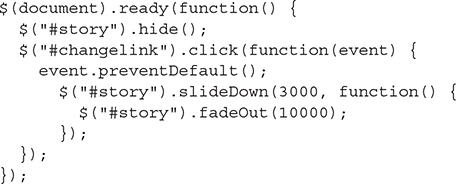
3. Save the HTML and JavaScript files and then open the HTML file in your browser. Click the link to view the story. It should slide down, then fade out over time.
Try This Summary
In this project, you used your knowledge of JavaScript and jQuery to create animations in response to a user event. The jQuery made it easier to write the code and have it work cross-browser at the same time.
Debugging Scripts
Even though JavaScript is fun, sometimes it can also be quite frustrating. One error in the code can cause an entire script to run incorrectly or not run at all. Debugging a script can be a time-consuming and arduous process, but there are a few techniques you can use that may help save some time while looking over the code. The first step in debugging a script is to figure out what type of error is likely to be causing the problem.
Types of Errors
The two main types of errors are syntax errors and logical errors. A syntax error occurs when the coder forgets to add a semicolon, forgets a quotation mark, misspells a word, and so on. A logical error occurs when the code is implemented incorrectly.
For example, a while loop could go on infinitely if the condition for executing the loop never becomes false. While it may be coded with the correct syntax, the results won’t be what the programmer expected.
Finding Syntax Errors
A syntax error could be as simple as leaving out a necessary semicolon. For example, the following code is missing a semicolon between statements:
let greet = function() { say_hi() say_welcome(); };
In this case, the semicolon is very important because the two statements are on the same line. To fix this, you just need to add the needed semicolon, as shown here:
let greet = function() { say_hi(); say_welcome(); };
Syntax errors often cause the browser to display an error message so that you can debug the script. For example, you might see a message like the one in Figure 16-5.
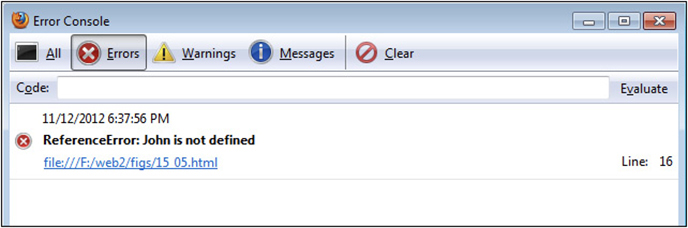
Figure 16-5 A JavaScript error message
NOTE
Most modern browsers hide these error messages by default or place them in the console, but you can enable them if you want to view them.
These messages can help you figure out what’s causing the problem. The line number shown in the error message often tells you where the error is. For instance, if the message says the error is on line 15, you would start at the 15th line from the top of your document and see what’s there. The rest of the message might tell you what’s missing or what has been placed improperly.
However, sometimes the line stated in the message is not the line where the actual problem is located. It could be on the preceding line, a few lines away, or even somewhere else entirely. You may need to do a little searching to figure out where the problem started.
Scanning the Script If the error message doesn’t help you locate the problem, you can try scanning the script for errors on your own. This solution can be more tedious, but it may help you find the problem if the error message isn’t helpful. Table 16-2 shows some items you should try to find.
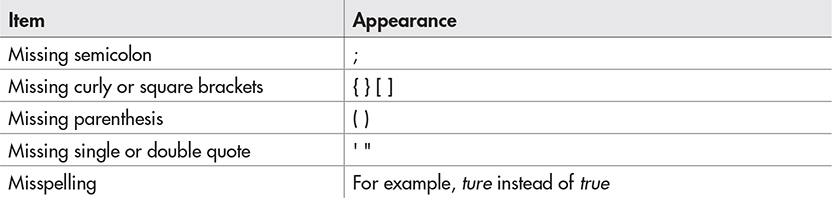
Table 16-2 Items to Look for when Scanning a Script for Errors
The following code is riddled with errors; see how many of them you can find:


The code is missing a number of necessary items. Following is the list of items you should have found:
• Between lines 3 and 4 The function is missing its opening curly bracket.
• Line 4 The word alert is misspelled as alery; the double quotation mark is missing after the word like; the mycar variable is misspelled as mynar.
• Line 5 The alert method is missing a closing parenthesis.
• Line 7 The word new is misspelled as neq.
• Line 9 The array index number is missing its opening square bracket.
• Line 10 The opening parenthesis for the loop is missing.
• Line 11 The index number for somearray[0] is missing its closing square bracket.
• Between lines 11 and 12 The closing curly bracket to end the loop is missing.
You probably won’t make that many errors, but the example provides a nice way to see how to catch them while you’re scanning a script. After you become more experienced with locating these small errors, you’ll be able to find them quickly when you have a problem in a script.
Finding Logical Errors
Logical errors are often tougher to find because the syntax of the code is correct. You will be trying to find a mistake in how the code was implemented. For example, look at the following code (but do not run it!):
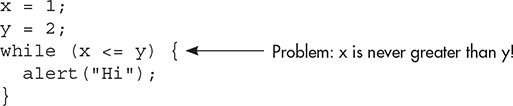
The code has no syntax errors. All the semicolons and quotation marks are where they should be. The problem here is that the variable x is never greater than the variable y. This situation would cause an infinite loop, possibly crashing the browser.
You can fix the code by adding a line inside the loop to increase the value of x, decrease the value of y, or both increase x and decrease y. The important point is that something must be done to make the condition false. The following code shows a possible fix for this problem:

Using the Console
If there are values that don’t seem to be correct, they can be quickly checked at any point in the script by sending them to the console. For example, suppose you have the following code:

When this code is run, the alert will display “Infinity,” which probably is not the intended result. With additional code between the initial variable definitions and the assignment of the calculation (x/y) to the z variable, it may be difficult to see that a division by zero is taking place while you’re scanning the code. To find out where the error is, you could place a console.log() in the code prior to the calculation of the z variable to see if it can help you see what is happening, as in the following example:

When the console shows that the calculation will be “2/0,” you can see that the y variable having a value of zero is causing the issue. Knowing that, you can look for any line of code that assigns a value to the y variable to see if it results in y being given a value of zero. In this case, this happens on the second line of the code and can be corrected by assigning a different value to y.
The console.log() method allows you to place a message in the console, which modern browsers use to track errors, warnings, or other messages that occur when the HTML, CSS, and JavaScript code is read by the browser.
NOTE
It is best to remove your testing code when you are finished debugging, as it is best not to have a bunch of console messages meant for debugging in production code.
You can typically display the console in a browser by right-clicking the page and selecting “Inspect” (or something similar to this). This should open the browser’s developer tools, where you may need to click to the “Console” tab.
In addition to console.log(), you can use console.warn() or console.error() to display warnings or errors for test and/or production code. These can be helpful when debugging during testing to discover what conditions could cause the script to have issues. For example, having a console.error() message when the browser is unable to retrieve information from an XMLHttpRequest can help you debug what might cause the information to not load (unavailable, bad parameters, and so on).
Using a Lint Tool
Thanks to some expert Web developers, there are tools available that can assist you in finding JavaScript errors while also encouraging the use of best practices in your JavaScript code. A lint tool (a tool that looks at the code for anything that might not be correct) can be very useful in tracking down any problems (or potential problems) in your code.
Here are two popular lint tools for JavaScript:
• JSLint (www.jslint.com)
• JSHint (www.jshint.com)
Both tools allow you to paste your JavaScript code into a text area and have it checked. The tools will check for various issues, such as the following:
• Variables defined without the var, let, or const statement (making them global)
• Missing semicolons
• Use of eval()
• == vs. ===
• Other issues
For example, suppose you have the following code:

There are some problems with this code that will give you unexpected results when the code is run. Running the code through JSLint, for example, will give you a number of errors. Included in the following list are some important notes to assist you in fixing the code:
• Line 1: Expected ';' and instead saw 'let'.
The end of Line 1 is missing a semicolon to complete the first let statement. Since these could be combined, the best practice would be to use a comma between the two variable definitions and remove the second let keyword, as in this code:
![]()
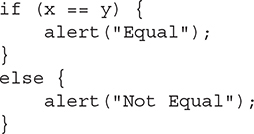
• Line 4: Expected '===' and instead saw '=='.
The comparison (x == y) could give an unexpected result here due to type coercion being performed. With x = 1 and y = “1”, JavaScript will evaluate x == y to be true. If you intended to ensure both values were in fact the numeric value of 1, you would not want this to be the case. Using === is safer and avoids any potentially odd results:
if (x === y)
• Line 5: Expected '{' and instead saw 'alert'.
To avoid any potential pitfalls and make the purpose of the code easier to read, it is best to place brackets around if and else statements, even if they only contain one line of code (allowing the shortcut of not adding the brackets). This error is picked up for both the if and else statements, and can be fixed by adding the brackets to both:
As you can see, a lint tool can pick up on potential problems before you run your code, keeping any remaining debugging tasks to a minimum. By following the suggestions of the tool for this code, you can avoid the number 1 being equal to the string 1, and you also allow the if and else statements to have additional lines of code added within each block without causing problems later (forcing you to figure out what happened and then add the brackets at that time).
Many modern code editors now help out with this. For example, IDEs such as Visual Studio Code will integrate with a linter and make it easier to find your issues.
Browser Developer Tools
Most of the major modern browsers have a set of developer tools available either natively or via an add-on. These tools can prove helpful in debugging JavaScript as well. Here are some links to tutorials on how to access/acquire and use some of these tools:
• Chrome Debugger https://developers.google.com/web/tools/chrome-devtools/
• Edge Debugger https://docs.microsoft.com/en-us/microsoft-edge/devtools-guide
JavaScript and Accessibility
One topic you have seen many times in this book is how a script or HTML code for the script relates to accessibility. In some cases, a state or federal law (such as the Americans with Disabilities Act) might require that a Web site be accessible to viewers with disabilities. Even if it is not a legal issue for your Web site, it is still a usability issue: you will want as many visitors as possible to be able to use your site and access the information you have for them.
The general theme for accessibility is that content needs to be made accessible to all browsers and other software that may access a Web site. This means that your content should be readable not only by various Web browsers, but also by assistive technologies like screen-reading software (for example, JAWS from Freedom Scientific) or Web browsing software on portable devices like cellular phones.
Separate Content from Presentation
Typically, the first step in making your Web site content accessible is to build the accessibility into your HTML/XHTML code, but you’ll also need to tweak your JavaScript code. As you may already know, when coding your HTML, you can use Cascading Style Sheets (CSS) for presentation of the content (how many columns are displayed, the font style, the width of various divisions, and so forth) while using HTML to simply mark up the content itself (such as dividing it into sections with <div></div> tags or inserting objects such as images). This takes care of issues dealing with plain HTML content because the use of a style sheet rather than HTML markup for presentation ensures that you can offer different CSS styles for different types of browsers, or that those not using browsers with CSS capabilities will still get the structural markup of the plain text (for example, there won’t be columns or font colors, and so on), which allows them to still view the content of the page.
With JavaScript, making the content accessible often means making sure that the content you use in your script is already displayed on the page or is available through a link or other means. One thing that may help is to move all JavaScript code (or as much as possible) into external JavaScript files while leaving as little JavaScript code in the HTML code as possible.
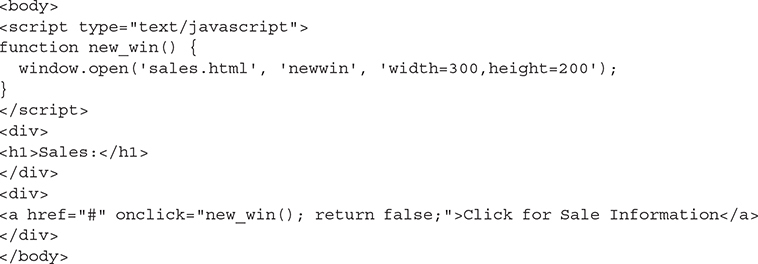
For example, you might have a Web page that uses the following code:

This code will function just fine for those with JavaScript. However, having the script in the HTML code makes for a lot of extra scrolling through the file when you need to update the HTML code (especially if you have a long script). Thus, the first move you may want to make is to move the script to an external file, as shown in the following code samples. First, the new HTML code:

Next, the myscript.js JavaScript file:

This makes the HTML file shorter and easier to read because the JavaScript functionality is placed in its own file and out of the way of the HTML code.
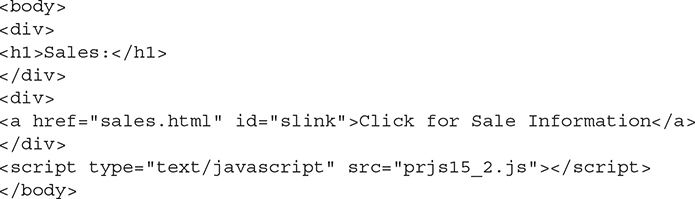
The next move you may want to make is to change the use of the onclick event handler in the HTML tag. Though valid, it becomes troublesome if you decide to use a function with a different name or decide to make it a normal link without JavaScript, because you will need to update each HTML file to accommodate the change cleanly (you can simply change the script to have the new function use this function name or just do nothing when called, but this could be confusing for those who may need to update the code later). To get this onclick event handler out of the HTML code, you could rewrite the JavaScript slightly and give the anchor tag an id (much like what you have done earlier in this book). First, the updated HTML code:

Next, the myscript.js JavaScript file:

Now the HTML code has no JavaScript commands sprinkled in with it—just a call at the end to the external script. The anchor tag is given an id of sale, which can be used by the JavaScript code to capture the click event on that element. The JavaScript code now uses document.getElementById() to grab the anchor element and then assigns it a function to run when clicked.
The final note here is that the link simply does nothing for those without JavaScript. Since the content of the alert is something you need the visitor to know (so that they will know there is a sale), you will want to be sure that even those visitors without JavaScript can get this message. You can either display it elsewhere on the page, use a set of <noscript></noscript> tags to display the message inline, or code the link so that it leads to an HTML page with the message, as in the following code:

Then, you can place your message in a file named sale_alert.html:

This ensures that all users can access the message with or without JavaScript.
Enhancing Content
One technique for ensuring wide accessibility that has become widely used is one that provides the content for the viewer first, then uses JavaScript to make the experience more appealing for those who can run it. This is typically called “progressive enhancement” and allows all viewers to use the site while providing a richer experience for those with modern browsers.
This is what you did (on a small scale) with the script in the previous section. By offering the “sale” message when the link is clicked, you made it accessible to all viewers. However, those with JavaScript were able to view the alert without leaving the page and needing to go back, thus enhancing their experience somewhat.
This process can be simple, as in the previous example, or it can be as complex as adding a lot of JavaScript code to work with various browsers and/or adding server-side scripting to aid those without JavaScript. You can learn more about progressive enhancement at https://maqentaer.com/devopera-static-backup/http/dev.opera.com/articles/view/progressive-enhancement-and-the-yahoo-u/index.html. Yahoo! has a very detailed and organized system of progressive enhancement that allows the JavaScript code to work with as many browsers as possible, but also provides server-side scripts or HTML content for those without JavaScript.
TIP
For information on accessibility with JavaScript and forms, refer to Chapter 15, which discusses this topic and the use of forms with JavaScript.
Try This 16-2Make This Code Accessible
pr15_2.htmlsales.htmlprjs15_2.js
To practice making JavaScript more accessible, you will take an HTML page and work with it to separate the JavaScript and HTML code as much as possible. You’ll also use code that ensures that those without JavaScript can also obtain any additional content.
Step by Step
1. Create an HTML document named pr15_2.html and use the following HTML code for the body section:
2. Create an HTML document named sales.html and use the following HTML code for the body section:

3. Make the code accessible and usable for those without JavaScript by making any necessary adjustments and moving as much JavaScript code as possible to a JavaScript file named prjs15_2.js.
4. One possible solution is shown in the following HTML code (for pr15_2.html) and the JavaScript code (for prjs15_2.js).
HTML Code:
JavaScript Code:

5. Save the HTML and JavaScript files and open the HTML file in your browser. The content should now be accessible in any browser with which you choose to open the page.
Try This Summary
In this project, you used your knowledge of accessibility to make a document and script more accessible for the viewer.
JavaScript Security
You may have noticed that when you try to use the window.close() method on the main browser window, a confirmation box appears asking if you really want to allow the window to be closed. This situation is one of the issues of JavaScript security. The browser does not want a site to close a window that the viewer opened without permission from the viewer. If that were allowed, the programmer would have some control of the viewer’s computer, which could be a problem.
Another aspect of security is the mistaken belief that you can “protect” Web pages with passwords or keep the source code of the page from being viewed by a user.
Yet another aspect of security is protecting against cross-site scripting—the use of JavaScript to grab information from a server-side application that didn’t properly filter user input.
Page Protection
Many scripts attempt to keep viewers out in some way, such as by using password protection or by using a “no right-click” script to keep the source code of the page from being viewed.
However, these security strategies are largely ineffective because these “password” and “no right-click” scripts can often be bypassed by turning off JavaScript or by doing a little extra work.
Passwords
Some password systems are better than others, but none really seems to offer true Web page security. If you don’t want someone to view a page, much better methods exist than using a JavaScript system, such as using server-side languages or using certain setups on your Web server.
If you are on a free Web-hosting service, the better methods may or may not be available. However, keep in mind that a JavaScript password system is not foolproof and that you should not protect anything important with such a system.
Hiding Web Page Source Code
Many people would love to hide the source code of a Web page. However, JavaScript isn’t going to do the trick. A number of scripts try various means of disabling the right-click. Basically, these strategies don’t work because they can be bypassed in a couple of ways:
• If the right-click is disabled, you can always try selecting View | View Source.
• If the preceding method does not work, you can always turn off JavaScript or look in your cache folder on your computer. The browser must have the code to display the page, so a copy of it goes into the browser’s cache.
In the long run, these scripts just make viewing the source code more difficult (and they can be annoying).
Cross-Site Scripting
Cross-site scripting (often shortened to XSS) uses JavaScript code (or other types of code) in a malicious way to obtain information from users of various Web sites with vulnerable applications. With this information, a person can use someone else’s cookie or session information and access the Web site as though they were the user from whom they obtained the information. This, of course, can lead to big trouble, especially if that user is an administrator in that application or if the application deals with money (such as a banking or shopping application).
While JavaScript is one of the ways used to perform such an attack, the vulnerable application is usually one that is server-side and displays user input on the page. If the user input is not sanitized (validated) in the server-side application, then any number of possible malicious scripts could be entered instead of the expected input.
For example, you might have a form that uses a server-side script to allow people to send comments. The script displays the user-submitted comment back to the user as a confirmation. If the input is not sanitized, it is possible to enter something like this into the comments field: <script>alert(“You’ve been had!”);</script>. If someone submits this and sees an alert on the response page, the person will know there is a potential vulnerability and could simply direct a subsequent user to a malicious URL where the user’s cookie or session information can be taken. Figure 16-6 shows how a vulnerable application would display such an alert (this one also included some comment text to help disguise the intent of the person submitting the form).
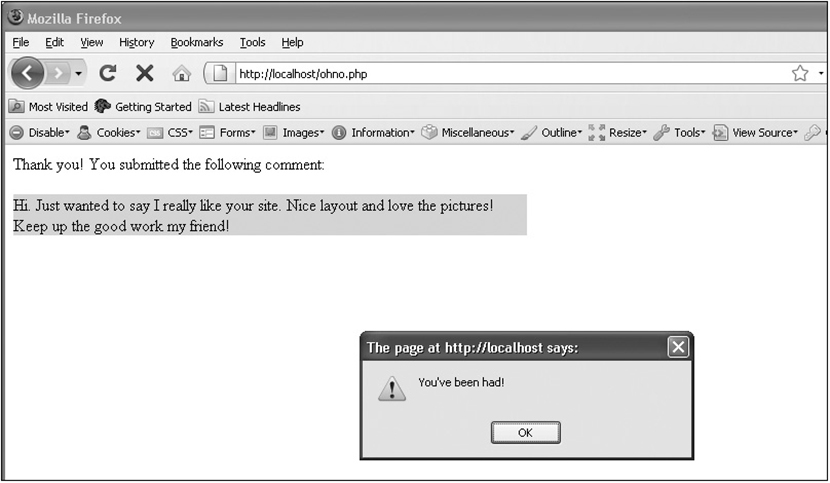
Figure 16-6 Oh no! This would not be good for users of this Web site!
Cross-site scripting has evolved over the years. In the beginning, it was that a bad Web site could load a good Web site in a frame (or in a pop-up browser window) and then access the text boxes, cookies, and other data (user id and password) using JavaScript—thus the name “cross-site.” It should be noted that modern browsers, within the past four or five years, don’t allow this type of cross-site scripting. One domain cannot access the contents of a different domain. Most of the modern cross-site scripting attacks are injection attacks like the example here (though often much more complex).
This introduction just scratches the surface of this type of security issue. The main thing to remember is that when you are using server-side applications, you must sanitize any user input to be sure that you receive the type of input you expect. For more information on this topic, go to www.owasp.org/index.php/Cross_site_scripting.
JavaScript and APIs from HTML
HTML5 provides an API (application programming interface) for a number of elements and markup that allow you to create more dynamic Web pages or application. Some of these include dynamic drawing via the <canvas> element, local storage, and the dragging and dropping of elements. These are possible in browsers that support HTML5 and the corresponding JavaScript interfaces. To begin, you will look at the HTML5 <canvas> element.
The <canvas> Element
The <canvas> element allows you to create graphics with JavaScript as the page is rendered. When a <canvas> element is placed on the page, it creates a rectangular area (based on its width and height attributes) where graphics can be drawn. For example, the following code will create a drawing area of 400×400 pixels:
<canvas width="400" height="400" id="graphic"></canvas>
Anything inside the opening and closing tags will be displayed in browsers that do not support the <canvas> element, as in the following code:
<canvas width="400" height="400" id="graphic">My fabulous drawing!</canvas>
To begin working with the <canvas> element in JavaScript, you will need to get the element by its id, and then use the getContext() method to create a drawing context. The getContext() method takes one argument, which is the type of context being created. Most modern browsers support a 2D context. A 3D (three-dimensional) context is in the works. Here is an example that opens a 2D context for the <canvas> element you have been using:
![]()
Once you have the context, you can begin using it to draw lines, shapes, text, and more.
Rectangles
Rectangles can be drawn in a context by using the fillRect() or strokeRect() method. The fillRect() method will create a rectangle that is filled in with color, while strokeRect() will create a rectangle that is outlined but has no fill color. Both methods take four arguments: the x-coordinate of the top-left corner, the y-coordinate of the top-left corner, the width, and the height. For example, the following code will draw a filled rectangle beginning at (70, 70) that is 50 pixels wide and 30 pixels tall:

Figure 16-7 shows how this would look in a browser. Notice that the canvas is not outlined. If you want to outline it, you can use CSS to add a visible border.
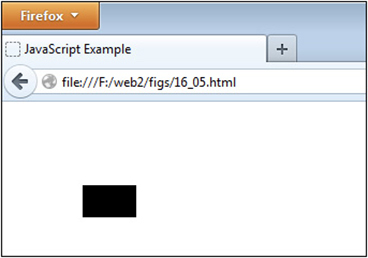
Figure 16-7 A canvas with a filled rectangle
The origin on a canvas is the top-left corner, so a higher x-coordinate will move the point further to the right, while a higher y-coordinate will move the point further down. Figure 16-8 shows how the canvas grid is laid out when the example rectangle is drawn.

Figure 16-8 The example showing the canvas layout
If you decide you would rather have an outlined rectangle that is not filled with color, you can use strokeRect() instead, as in the following code:

If you need to clear a rectangular area on the canvas, you can use the clearRect() method. It uses the same four arguments as fillRect() but clears (makes transparent) the area that it affects. For example, you could clear out a rectangle within a filled rectangle using the following code:

Figure 16-9 shows the result of this code. Notice how the filled rectangle now has an area cleared inside of it.
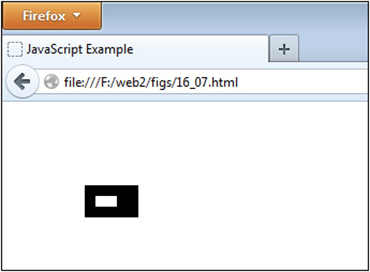
Figure 16-9 The rectangle now has an empty rectangular area within it.
Using fillStyle and strokeStyle
The default color of a shape or outline is black (#000000). To use different colors, you can set these using the fillStyle property for fill color and strokeStyle property for the color of a stroke (outline or line). For example, consider this code:

Here, fillStyle is set to #FF0000 (red), and any shapes after this assignment will use red for the fill color. This can always be changed as you go to use shapes with different colors, as in the following code:

If you have particular settings such as fillStyle and strokeStyle that you want to save for later, you can use the save() method. You can then restore those settings using the restore() method, as in the following code:

You can use strokeStyle in the same way as fillStyle to set the color of a shape outline or a drawn line (path). For example, the following code will create a rectangle with a red outline:

Using Paths
The canvas context also allows you to draw lines and curves (paths), which gives you the opportunity to create more complex drawings. You begin a path by calling the beginPath() method, and then end a path by calling one of several methods. In between, you can use a number of methods to draw lines, curves, and more. Table 16-3 lists the methods that can be used within a path.

Table 16-3 Methods for Drawing Paths
Once you have completed drawing a path, you can end the path in several ways. Table 16-4 lists the available methods.

Table 16-4 Methods to End a Path
As an example, suppose you decide to draw a path using lines and arcs and then want to stroke the path. You could use the following code:
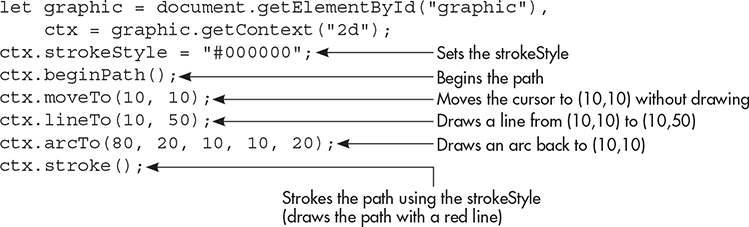
Figure 16-10 shows the result of this code. It draws a half-oval on the canvas.

Figure 16-10 A stroked path on the canvas
Adding Text
The canvas API provides two methods for adding text to the context: fillText() and strokeText(). Both take the same arguments: the text string, x, y, and an optional argument to set a maximum width (which will attempt to condense the text string if it is longer than the set width). For example, the following code will draw the text string “I am some text on a canvas” beginning at (10,10) with a maximum width of 200 pixels:

There are also three properties you can use to style text:
• font Sets the font properties using CSS format (for example, “bold 1em Verdana”).
• textBaseLine Sets the text baseline. Possible values are “alphabetic”, “bottom”, “hanging”, “ideographic”, “middle”, and “top”.
• textAlign Sets the alignment of the text. Possible values are “center”, “end”, “left”, “right”, and “start”.
Thus, if you wanted to change the font and align the text, you could set font and fontAlign, as in the following code:

The text will now be a bold Verdana font with “end” alignment. Figure 16-11 shows the result of this code when run in a browser.

Figure 16-11 The font is now a bold Verdana with “end” alignment.
Further Reading
The basics of using canvas have been covered, but there are even more things you can do. You can learn more about using canvas at the following sites:
• https://developer.mozilla.org/en-US/docs/Web/API/Canvas_API/Tutorial
• www.html5canvastutorials.com/
Drag and Drop
HTML5 provides native drag-and-drop capabilities to the browser with the help of JavaScript. Some elements, such as links, images, and selected text, are draggable by default. If you want to make another element draggable, or if you want to ensure an element is not draggable, you can use the draggable attribute in its HTML tag, as in the following examples:

The next thing you will need is a valid drop target. To set this, you will need to get the element in JavaScript and ensure that its dragover, dragenter, and drop events prevent the default action, which is to not allow dropping. To do this, you can simply add event listeners to each event for the element, as in the following code:


Doing this will allow items to be dropped into the dropdiv element.
The Drag-and-Drop Events
Seven events are involved in the drag-and-drop process, and each is described in Table 16-5.
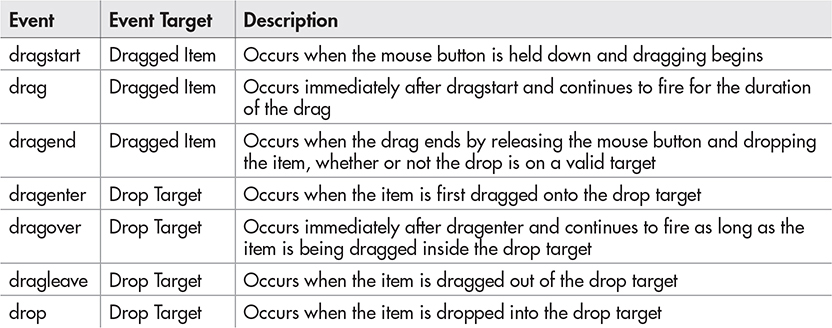
Table 16-5 The Drag-and-Drop Events
Each of these can have event listeners added in order to perform further scripting. Depending on what you need to do, you may use any number of these events when creating a drag-and-drop script.
The dataTransfer Object
While you can currently drag an item and drop it with what you have so far, you will probably want to be able to access data stored within the item being dragged so that it can be used when it is dropped. This is where the dataTransfer object can be used.
The dataTransfer object is part of the event object and has two methods for setting and retrieving data from the dragged item: setData() and getData().
The setData() method can be used to set custom data, but it’s also called by default when selected text, an image, or a link is dragged. For selected text, it will store the dragged text; for an image, it will store the image URL; and for a link, it will store the link URL. If you need to store custom data rather than using these defaults (or if you are dragging a different type of element), you can store either text or a URL using the following code:
![]()
Note that you can store both “text” and “URL” types in a single dataTransfer object, but you cannot have more than one of either type. HTML5 extends this to allow for any MIME type to be passed (“text” and “URL” are still valid and are the same as using the “text/plain” and “text/uri-list” MIME types, respectively). Just remember that only one piece of data from each MIME type can be stored in a dataTransfer object.
The getData() method is used to retrieve any data stored in a dataTransfer object. Due to browser compatibility issues, it is best to use the following example code when retrieving text or URL information from the dataTransfer object:

Notice the capital “T” when retrieving text, which allows older versions of Firefox to get the text value while still working for other browsers. Also, note the method for getting the URL tests first for the “URL” and then for the MIME type “text/uri-list” in order to help with older versions of Internet Explorer.
A Quick Drag-and-Drop Script
As an example to put all of this together, you will create a script to drag a link into a div element in order to display the link URL. First, begin with the following HTML code:

Since links are draggable by default, the draggable=“true” attribute is not necessary here. The div element is given a border so that the user can see where to drag the link. Next, you will need the following JavaScript code:

You will notice that since you are dragging a link, you do not need to call setData() to store the URL in the dataTransfer object (if you needed to do this, for example, to store text, you would also need to get the link element by its id, add an event listener for the dragstart event, and then use setData() within that function). The action here occurs on the drop event for the target div element. When the link is dropped inside the target div, the URL that was stored in the dataTransfer object is displayed in that div using innerHTML. Figure 16-12 shows the page before the item is dragged and dropped, and Figure 16-13 shows the page afterward.

Figure 16-12 The original page

Figure 16-13 The page after the item has been dragged and dropped
Further Reading
While this book introduces drag and drop, you may decide to delve deeper into the topic to create more advanced drag-and-drop scripts. The following resources will provide you with more information on using the drag-and-drop capabilities of HTML5.
• http://html5doctor.com/native-drag-and-drop/
• dev.opera.com/articles/view/accessible-drag-and-drop/
Try This 16-3Drag and Drop
pr16_2.htmlprjs16_2.js
This project will update the drag-and-drop example script so that it stores descriptive text about the link. This will be displayed when the link is dropped in the target div rather than the link URL.
Step by Step
1. Create an HTML document named pr16_2.html and use the following HTML code for the body section:

2. Create a JavaScript file named prjs16_2.js and begin with the code from the drag-and-drop example from this chapter. Alter the code so that the text “This links goes to my Web Site!” is stored in the dataTransfer object when the link is dragged and then is displayed in the drop target div when the link is dropped inside it. When complete, the code should look like this:

3. Save the JavaScript file and then open the HTML file in a browser that supports HTML5 drag and drop (the latest Firefox or Chrome browser should work). Drag the link into the div to display the link’s description.
Try This Summary
In this project, you updated your drag-and-drop script so that it stores and retrieves text from the dataTransfer object. This text is then displayed when the link is dragged and dropped into the target div element.
Node.js App Completion
With your work on AJAX in Chapter 15, you can now complete your Node.js web app by simply retrieving the bowler information using XMLHttpRequest. This will require some changes to both the Node.js code and the front-end code so that you can complete the display of the bowler information.
Update the Node.js Code
Since you now want to be able to send the information to the front end when an XMLHttpRequest is used, you will replace your old getBowlerData() function with a new route handler that will return the results of the database query along with a couple of additions you will make before sending the final data to the front end.
First, update your server.js file to use the following code:
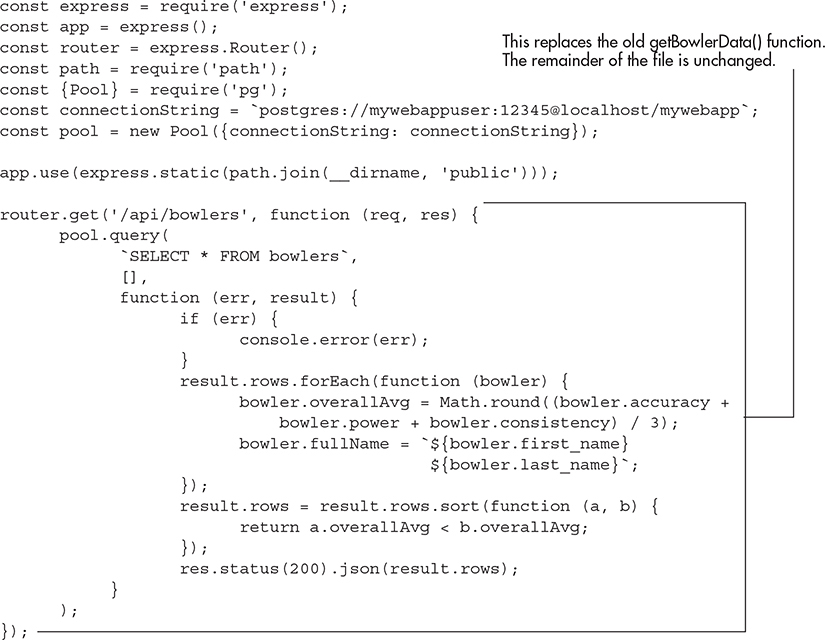

Note that you will need to make sure the connection string uses the correct information for your installation (you should have this from older examples you have completed).
Notice that the old getBowlerData() function is replaced with a new route. Much like you handled the default route ‘/’, you now have the ‘/api/bowlers’ public route. If you have the server running and type http://localhost:3000/api/bowlers into the address bar, the browser will show the JSON data that results from retrieving the bowler information from the database. When you alter the front-end code, the browser will use an AJAX request to get this information.
Notice that within the route-handling function, you do much of what you did to get the bowler information before. The database is queried and then you are able to use the result of the query. Here, you use the opportunity to perform some concatenation to get bowler full names, calculate the bowler ratings, and sort the results from highest to lowest bowler rating. The result is then sent as JSON to the front end using the following line of code:
res.status(200).json(result.rows);
The status(200) portion sets the http status code that will be returned, while json(result.rows) provides the content to be returned and puts it into JSON format.
Notice also the following line of code that hasn’t been looked at in detail yet:
app.use(express.static(path.join(__dirname, 'public')));
This line provides a folder where the front-end code can access public assets such as CSS and JavaScript files that will be needed for the front end. In this case, it sets the location of these files to a folder named “public” within your main project folder. You will create this folder and add some files to it in the next section.
With this in place, you can now move on to updating the front-end code to be able to use this new route and get the information.
Update the Front-End Code
On the front end, you will want to add a “public” folder inside your main project folder (where you are keeping the server.js and index.html files). You will place a JavaScript and CSS file inside this folder after the index.html file is updated.
First, update your index.html file to use the following code:
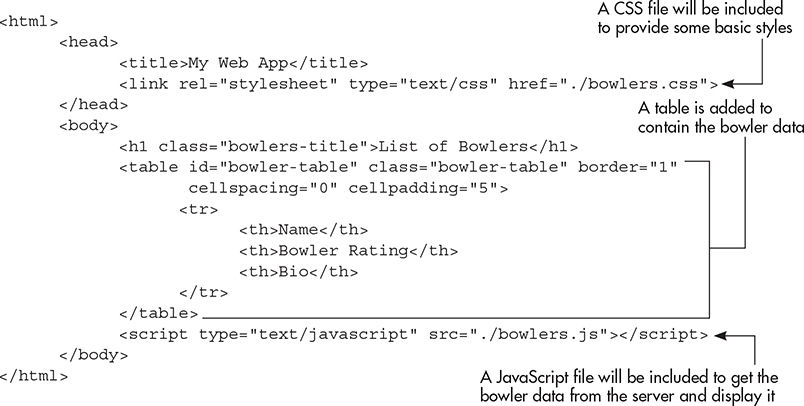
The updated HTML includes an external CSS and external JavaScript file, and it creates the beginning of a table that will be used to display the bowler data. You will use JavaScript to append a new table row for each bowler after the header row that is already in place.
Next, create a CSS file named bowlers.css with the following code and save it inside the “public” folder you created:

This provides some basic styles for the page and the table that will display. You can expand on this as you like to create a more interesting layout!
Next, create a JavaScript file named bowlers.js with the following code and save it inside the “public” folder you created:

Here you will see that an “outer” object named bowlerApp is created. This helps keep the majority of the code out of the global space where variable or function names could get crossed up with those of other libraries if you were to use them. Instead, your app code is contained inside your own “bowlerApp” namespace.
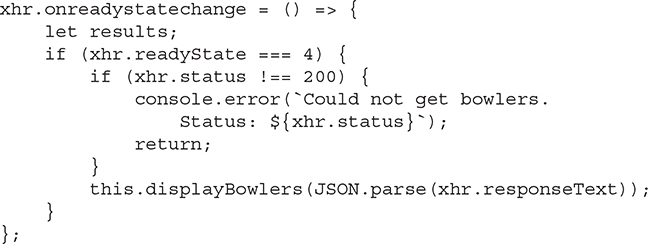
You are familiar with the AJAX call from using it in Chapter 15. This simply gets the data from the API route you created on your Node.js server and then calls the displayBowlers method, which will then create the table elements needed, insert the data retrieved into those elements, and add those elements to the DOM within the table you created in your HTML code.
One thing you may notice here is that at the end of the onreadystatechange function is a .bind(this). This addition ensures that the “this” you refer to within the onreadystatechange function is the “this” for the “bowlerApp” object. By default, the onreadystatechange function (as well as many others) use their own “this” context. This behavior can make using properties or methods of the object fail unexpectedly, saying they are undefined. By providing the proper context for the object, you can again use the “this” keyword to access the properties and methods of the object like you intended. Note that if you will not use any of the bowlerApp properties or methods within the onreadystatechange function, then the bind is not necessary and the default “this” context won’t affect anything.
Another option is to make use of the newer arrow functions you have learned about earlier in this book. The following code shows an example of using arrow functions instead:
With all the new code in place, start your Node.js server (node server.js from the command line) and then open http://localhost:3000 in your browser. The bowler information should display in a table, as shown in Figure 16-14!
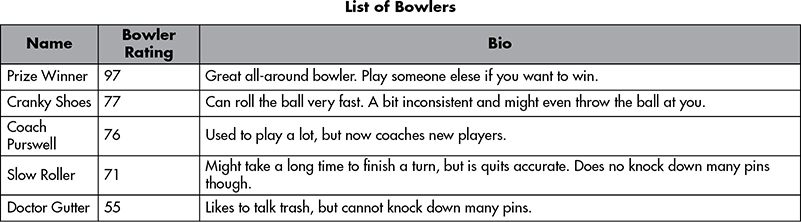
Figure 16-14 The bowler information is displayed in the browser.
With this basic app in place, you can go back and expand on it any number of ways. You could add more data to the database and retrieve that, add more interactivity by allowing users to add or remove bowlers from this list, or any number of other ideas. Have a little fun with it!
Need Help?
If you find that you are stuck and need help, feel free to get online and visit me.
If you would like to contact me, you can find me on the following platforms:
• Twitter @ScripttheWeb
• LinkedIn https://www.linkedin.com/in/john-pollock-82a2b074
• GitHub https://github.com/JohnPollock
 Chapter 16 Self Test
1. Which of the following is used to see if a document is ready in jQuery?
A. docReadyState()
B. $documentReady()
C. $(document).ready()
D. $(document).done()
2. Which of the following lines would hide an element with an id of “story” using jQuery?
A. $(getElementById(“story”)).hide();
B. $(“#story”).hide();
C. $#story.hide();
D. $(“story”.hide)();
3. __________ syntax is used to select elements in jQuery.
4. The jQuery library makes it easier to write code that is __________.
5. The __________ element allows you to use JavaScript to draw on a defined area of the page.
6. When drawing on a canvas, you can use the fillCircle() method to draw a circle.
A. True
B. False
7. The __________ attribute of an element defines whether or not the element can be dragged.
8. JavaScript __________ may make some advanced coding tasks easier by making the code easier to write.
9. By default, all elements are draggable.
A. True
B. False
10. The __________ event occurs when an element begins being dragged.
11. Which object can be used to store or retrieve data during the drag-and-drop process?
A. event.dataStorage
B. event.dataTransfer
C. event.data
D. event.dataMove
12. Which method is used to get data stored during a drag and drop?
A. retrieveData()
B. getInfo()
C. getItems()
D. getData()
13. Is JavaScript fun?
A. Yes!
B. Maybe for you!
C. I was forced to learn this by my boss, so it can never be fun!
D. I guess it’s OK.