Chapter 13
Creating a Wish List Program
The JavaScript genie came to us and told us that we can have not three, but unlimited, wishes if we just use arrays and functions to build a Wish List application. It seemed like quite a deal to us, until the genie reminded us that wishing doesn’t make it true. There’s always a catch! In this chapter, we show you how you can build a Wish List application.
Introducing the Wish List Program
The Wish List application uses an HTML form to accept input from a user, which it adds to an array and to an HTML list. A Print button allows a user to create a nicely formatted and sorted list that she can print out and deliver to the genie of her choice.
Viewing the finished program
To get an idea of how the finished Wish List program will look and function, follow these steps:
- Open our Public Dashboard in JSFiddle.net by going to
http://jsfiddle.net/user/forkids/fiddles. -
Find the program named “Chapter 13 – Wish List – Finished” and click the title to open it.
You should see the finished Wish List program, as shown in Figure 13-1.
-
Enter something into the HTML input field — World Peace, for example — and click the Add It button.
The item you entered will be added as a list item and removed from the input field.
-
Add a few more items to your list.
When you get to about five or six items, move on to the next step.
-
Click the Print Your List button.
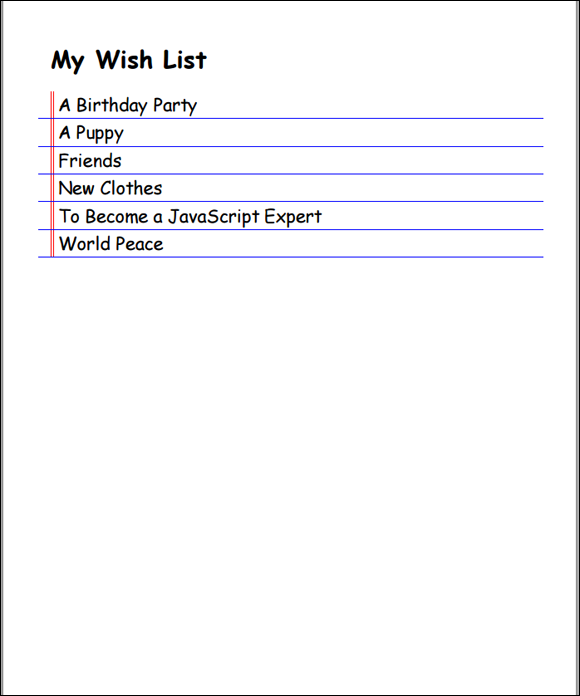
A nicely formatted list appears, sorted in alphabetical order, as shown in Figure 13-2.

Figure 13-1: The finished Wish List program.
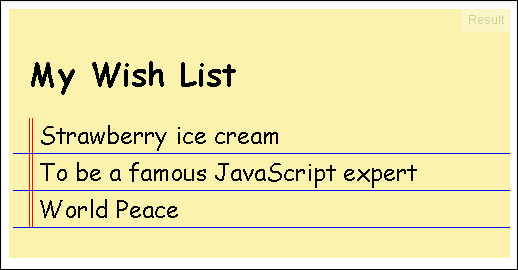
Figure 13-2: The printable wish list.
Forking the Code
Let’s get started! To start building the Wish List program, follow these steps:
-
Go to our Public Dashboard in JSFiddle.net, locate the program called “Chapter 13 – Wish List – Start” and click its title to open it.
The starting point for building the Wish List application will open, as shown in Figure 13-3.
- Click the Fork link in the top menu bar to create your own copy of the program.
- Give your copy a new name by clicking the Fiddle Options menu item on the left.
- Click Update, and then click Set as base to save your work.
Figure 13-3: The starting point for the Wish List program.
The starting point for this application is a bare-bones HTML document, some CSS styles, and some instructions and an outline for the JavaScript that needs to be written.
 If you want a challenge, try writing the program using only the instructions found in the comments, how you saw the finished version of the program working, and what you’ve learned elsewhere in this book. Go ahead and try it out before reading on! We’ll still be here, and we’ll give you detailed instructions for building this app when you return.
Writing the HTML
As with the other programs you’ve written, the first step in building the Wish List program is to create the structure using HTML. The first line of the HTML is the beginning tag of the <div> element that will surround everything else in the program.
<div id="listPage">
We’ve already written this tag for you, so there’s no need to add it. Follow these steps to complete the HTML:
Use an <h1> element to give the page a header.
<h1>My Wish List</h1>Notice that the beginning section, containing the form we’ll use to input our wishes into, is already included in the HTML pane. It looks like this:
<div id="formArea">Within the section containing the form, put the text input field, where users will enter list items. We’ll surround it with a <label> element that puts the words “What I want:” to the left of it.
<label>What I want:<input type="text" id="iWant" /></label>-
Next, type the first button element (labeled “Add It!”) onto the next line.
<button type="button" id="addIt">Add It!</button>This element puts a button on the same line as the input field.
Write the Print Your List button on the next line.
<button type="button" id="printable">Print Your List</button>In order to have the Print Your List button show up underneath your Add It button, type two <br /> elements after the first button and before the next one:
<br /><br />Next, create an empty <div> element with an ID of "wishList".
<ul id="wishList"></ul>Finally, close the <div> element that you opened back in Step 1 , that encloses all the program’s HTML.
</div>-
Click the Update button to save your work and to see the HTML in the Result pane.
It should look like Figure 13-4.

Figure 13-4: The Wish List program with the HTML finished.
If you haven’t already, you can remove the HTML comments that were in the code as placeholders, or you can change them to anything you want that will help you to remember what the different sections of the page are.
The finished HTML is shown in Listing 13-1.
 Even if you entered everything correctly, your markup may not look exactly like ours due to differences in spacing. Click the TidyUp link in the top toolbar to make JSFiddle clean everything up a bit.
Listing 13-1 The HTML for the Wish List Program
<div id="listPage">
<h1>My Wish List</h1>
<div id="formArea">
<label>What I want:
<input type="text" id="iWant" />
</label>
<button type="button" id="addIt">Add It!</button>
<br /><br />
<button type="button" id="printable">Print Your List</button>
</div>
<ul id="wishList"></ul>
</div>
Writing the JavaScript Code
We’re done with the HTML pane now, and we’re going to shift our focus to the JavaScript pane. You may want to resize your JavaScript pane to give yourself more room to work, as shown in Figure 13-5.
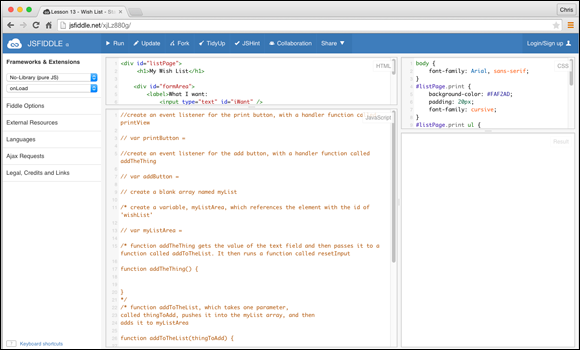
Figure 13-5: Make the JavaScript pane larger.
All the functions and JavaScript code for the Wish List program are described in the JavaScript pane. Take a moment to read through these comments.
In this section, we look at these comments one by one and replace them with functioning JavaScript code.
Creating the event listeners
The Wish List program has two buttons. In this section, we create event listeners to wait for and respond to click events on each of these buttons:
Find the JavaScript comment that shows how to start the event listener for the print button. It looks like this:
// var printButton =Uncomment this line (remove the two slashes from the beginning of the line) to create a variable declaration. Create a reference to the Print button element and store it in the new variable, like this:
var printButton = document.getElementById("printable");Finish the event listener, using the addEventListener method.
printButton.addEventListener("click",printView);Find the JavaScript comment that shows how to start writing the event listener for the Add It button. It looks like this:
// var addButton =Uncomment this line to create a variable declaration. Create a reference to the addIt button element and store it in the new addButton variable, like this:
var addButton = document.getElementById("addIt");-
Finish the event listener by using the addEventListener method.
addButton.addEventListener("click",addTheThing);You now have both event listeners in place. You can remove the comments telling you how to create them, if you’d like. Excellent! Your first four statements should now look like Listing 13-2.
Listing 13-2 The Event Listeners
var printButton = document.getElementById("printable");
printButton.addEventListener("click", printView);
var addButton = document.getElementById("addIt");
addButton.addEventListener("click", addTheThing);
Declaring global variables
With the listeners in place, let’s move on to create a couple of variables that will be used throughout the program.
When you create a variable in your JavaScript code, but not inside of a function, it’s called a global variable. Global variables can be used anywhere within a JavaScript program.
Variables that you declare inside of functions can only be used inside of the functions in which they’re declared. These variables are called local variables.
Follow these steps to create the global variables for the Wish List program:
-
Find the comment that says to create a blank array named myList and replace it with the following array declaration:
var myList = [];When you assign empty square brackets to a variable, it creates an array with no elements. It will then be ready for you to add elements as needed.
-
Find the next comment that says to create a variable called myListArea.
Underneath this comment is another one that starts the variable declaration for you.
- Uncomment the myListArea variable declaration and finish the statement as follows:
var myListArea = document.getElementById("wishList");
Now you have the global variables in place. The finished part of your JavaScript code should look like Listing 13-3.
Listing 13-3 The Event Listeners and Global Variables
var printButton = document.getElementById("printable");
printButton.addEventListener("click", printView);
var addButton = document.getElementById("addIt");
addButton.addEventListener("click", addTheThing);
var myList = [];
var myListArea = document.getElementById("wishList");
Writing the functions
The rest of the program consists of functions that handle the actions of the program, such as adding items to the list, clearing out the input field so that you can add more items, and creating the printable list.
We’ll start with the function that runs when you click the Add It button, addTheThing(). The addTheThing() function creates a reference to the input field when the Add It button is clicked and then passes it as an argument to the two other functions in the program.
Follow these steps to write addTheThing():
-
Create a variable called theThing and assign to it the input field element:
var theThing = document.getElementById("iWant");An important thing to keep in mind here is that this statement doesn’t actually get the value of the input field — it just stores a reference to the element, which we can use later to get the value.
-
Pass theThing as an argument to the function addToTheList():
addToTheList(theThing);This function gets the value and adds it to the list, addToTheList().
- Pass theThing as an argument to the function that resets the value of the input field to blank, resetInput().
resetInput(theThing);
These three statements are all that you need for the addTheThing() function. When it’s done, the function should look like Listing 13-4.
Listing 13-4 The Finished addTheThing( ) Function
function addTheThing() {
var theThing = document.getElementById("iWant");
addToTheList(theThing);
resetInput(theThing);
}
This might be a good time to click the Update button to save your work.
Let’s test out the program now and see what happens. What do you think will happen when you test it? If you guess nothing, you’re partially right.
When you try to run the program in its current form, as it is now, you get an error.
Open the JavaScript Console in your browser (by selecting it from the Chrome ⇒ More Tools ⇒ JavaScript Console) and see what happens when you click Update or Run. The resulting error is shown in Figure 13-6.
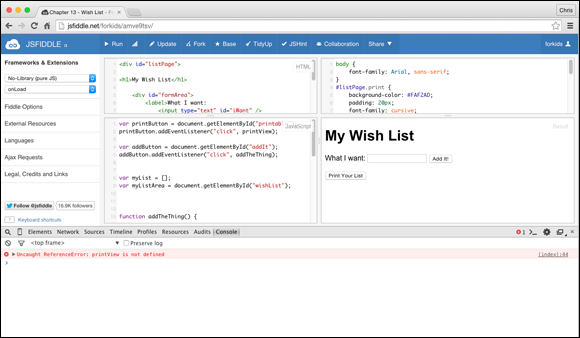
Figure 13-6: Running the Wish List with incomplete functions returns an error.
The error indicates that the printView function, which one of our event listeners references, doesn’t exist.
We’re not quite ready to write the printView function yet, but let’s remove this error by creating an empty function called printView.
-
In the JavaScript pane of JSFiddle, find the comment that holds a placeholder for the printView function.
It looks like this:
/*function printView, which outputs a nicely formattedview of the listfunction printView() {}*/ -
Remove the comment from before the function, and the ending comment characters from after the function.
It should now look like this:
function printView() {}The printView function is now a perfectly valid function, although its body is empty and it won’t do anything at all when it’s run.
- In your JavaScript Console, click the Clear Console Log button (which looks like a circle with a line through it) to clear all the previous messages from the console.
-
Click Update to see whether the error is now resolved in the JavaScript Console.
If you’ve done everything correctly so far, you shouldn’t see any errors, as shown in Figure 13-7.
-
With the JavaScript Console still open, type something into the input field and click the Add It button.
You’ll see a new error in the console, as shown in Figure 13-8.

Figure 13-7: The Wish List program doesn’t return any errors when run.

Figure 13-8: The addToTheList function is missing.
Let’s resolve this error now, by creating the addToTheList function.
The purpose of addToTheList is to accept an argument, add it to an array, and then add it to an unordered list in the browser window. Follow these steps to create the function:
-
Find the comment that describes the addToTheList function and remove the comment before it and the ending comment characters from the end.
The empty function should now look like this:
function addToTheList(thingToAdd) {} -
Write the first line inside the function body.
myList.push(thingToAdd.value);This statement uses the push() array method to add the current value of the input field to the myList array.
The push() array method adds values to the end of an array. -
Write the next statement, which creates a new <li> element.
var newListItem = document.createElement("li");The createElement() method causes a new element to be created in the current browser window. It’s not displayed anywhere just yet; it’s just an empty <li> element, which we’ve stored inside a new variable called newListItem.
-
The next statement changes the innerHTML property of the new element to put the current value of the input field into it.
newListItem.innerHTML = myList[myList.length - 1];Take a close look at the statement you just entered. Remember that each variable inside it is a stand-in for something else. Let’s walk through it, starting with the value between the square brackets of the myList array:
myList.length - 1This expression returns the length of the myList array, and then subtracts 1 from it. What we want to find out here is the index number of the last element of the array (the element we just added). We subtract 1 from the length of the array, because arrays start counting at 0.
If we have only one thing on our list, what the program is really saying when we say myList[myList.length - 1], is myList[0], which contains the value of the single item on our list.
If you entered World Peace into the input field, this whole statement could now be rewritten as:
newListItem.innerHTML = "World Peace";This looks a lot more familiar now. Recall that setting the value of an element’s innerHTML property changes everything between its starting and ending tags.
Since newListItem contains a reference to a new <li> element, this whole statement creates the following element if you entered World Peace into the form field:
<li>World Peace</li>This element doesn’t exist anywhere in the HTML document yet. To make it display, we need to write another statement in our addToTheList() function.
-
On the next line, type the following:
myListArea.appendChild(newListItem);This statement uses another new method, appendChild to add our brand-new <li> element to the end of the contents of the element referenced by the myListArea variable.
If you look back in the code, you’ll see that we created the myListArea global variable to hold a reference to the <ul> element with an ID attribute of "wishList".
What this statement does is add a new list item to the <ul> element, which displays the new item in the browser window.
-
Click the Update button to save your work.
The finished addToTheList() function is shown in Listing 13-5.
-
Enter something in the input field now, and click the Add It button.
The new item will be added to a list below the input field.
- Add a few more items and see how each item gets added to the end of the list, as shown in Figure 13-9.

Figure 13-9: New items get added to the end of the list.
Listing 13-5 The Finished addToTheList() Function
function addToTheList(thingToAdd) {
myList.push(thingToAdd.value);
var newListItem = document.createElement("li");
newListItem.innerHTML = myList[myList.length - 1];
myListArea.appendChild(newListItem);
}
The form doesn’t work quite right yet. Each time you add a new value to the list, your old value stays in the form field.
To fix this problem, we’ll write a new function, called resetInput(). The resetInput() function is called by the addTheThing() function after each item is added to the list. The purpose of resetInput() is simply to clear out the value of the input field for you to enter your next item.
Follow these steps to write the resetInput() function.
-
Find the commented-out resetInput() function in the JavaScript pane.
It looks like this:
/* function resetInput, which resets the value of theinput field to blank ("")function resetInput(inputToReset) {}*/ -
Uncomment the empty function.
It should look like this:
function resetInput(inputToReset) {} -
Enter the following between the curly braces:
inputToReset.value = "";The resetInput() function contains only one statement here. This statement changes the value property of the element referenced by the inputToReset variable (the input field) to an empty string. The result is that the text in the input field empties out.
-
Click the Update link to save your work.
The finished resetInput() function is shown in Listing 13-6.
- Test out your program by entering several items into the text field and pressing the Add It button.
Listing 13-6 The Finished resetInput() Function
function resetInput(inputToReset) {
inputToReset.value = "";
}
The basic functionality of the Wish List program is done now. You can enter items into the text field and those items are added to the HTML list and to the array.
The final function we need to create is the handler for the Print Your List button. The purpose of the printView() function is to hide the form and to display each of the elements in the myList array in a nice format that can be printed and given to your genie!
Follow these steps to write the body of the printView() function. Find the empty printView() function in the JavaScript pane. It should look like this:
function printView() {
}
Create a new variable to hold a reference to the entire page.
var listPage = document.getElementById("listPage");Create a new variable to hold a reference to the form area of the page.
var formArea = document.getElementById("formArea");Hide the form by changing the value of the CSS display property to "none".
formArea.style.display = "none";-
Add a new class attribute to the listPage element, with a value of "print".
listPage.className = "print";What this statement does is to modify the first div element in the document from this:
<div id="listPage">to this:
<div id="listPage" class="print">The print class is used in the CSS to style the page differently. In other words, when the print class is assigned to the listPage div, it changes the way elements in the document are styled, using the style properties set for print in the CSS.
Clear all the items from the list with this statement:
myListArea.innerHTML = "";-
Sort the array, using the sort() array method, using this statement:
myList.sort();This statement sorts the items on your list alphabetically.
-
Next, we use a loop to print out each value in the array. Type this statement:
for (var i = 0; i < myList.length; i++) {We cover loops in detail in Chapter 17. What this statement does is to run the statements between its curly braces one time for every item in the array.
-
Type the following to write the statement to print out the array element:
wishList.innerHTML += "<li>" + myList[i] + "</li>";This statement adds a list item to the wishList and displays it in the browser window.
Close the loop by typing a final closing curly brace on the next line.
}-
Save your work by clicking the Update button.
The finished printView() function is shown in Listing 13-7.
-
Add several items to your wish list, and then click the Print Your List button.
You see a nicely formatted printable list, as shown in Figure 13-10.
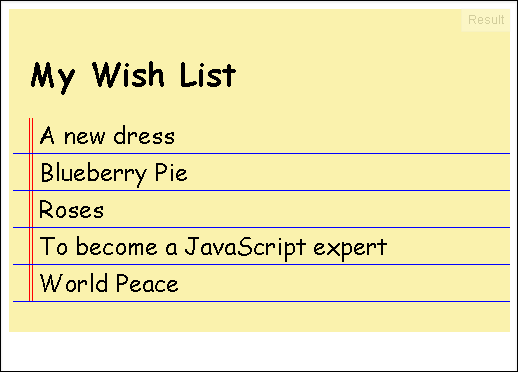
Figure 13-10: The finished printable list.
Listing 13-7 The Finished printView() Function
function printView() {
var listPage = document.getElementById("listPage");
var formArea = document.getElementById("formArea");
formArea.style.display = "none";
listPage.className = "print";
myListArea.innerHTML = "";
myList.sort();
for (var i = 0; i < myList.length; i++) {
wishList.innerHTML += "<li>" + myList[i] + "</li>";
}
}
Opening the Print dialog box
Now that our list is formatted nicely, let’s create the command that will cause the program to automatically open your browser’s Print dialog box when you click the Print Your List button.
Follow these steps to enable the automatic printing:
-
After the loop in the printView() function, insert the following statement:
window.print();This statement runs a built-in method, called print(), which belongs to the window object. The purpose of the print() method is to tell the browser to open the Print dialog box with the default settings.
The window object represents the current browser window within JavaScript. - Click Update to save your changes.
-
Add as many items as you’d like to your wish list and then click Print Your List to generate the printable view.
Your browser’s Print dialog box appears, as shown in Figure 13-11.
- If you have a printer connected to your computer, try printing out your wish list.
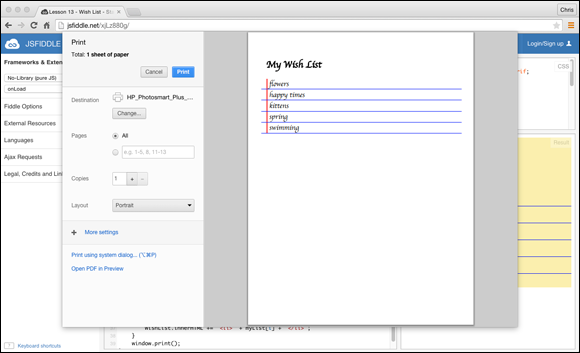
Figure 13-11: The browser Print dialog box.
Enhancing the Wish List
We designed the application using functions and an array in order to make it super-customizable and expandable. Future enhancements could include the following:
- Adding an input field for a link, and storing the link in a second array
- Saving the list items to the user’s computer so they can come back and view it later
- The ability to email the list to someone else
Can you think of other enhancements that you might want to add?