Chapter 4
Fiddling with Web Applications
In Chapter 1, we explain and demonstrate the JavaScript Console. In Chapters 2 and 3, we show you how to put multiple statements together to form a program. In this chapter, we kick things up a notch and introduce you to our favorite JavaScript playground: JSFiddle. Instead of swings and slides, you’ll be playing with JavaScript statements, HTML tags, and CSS styles.
JSFiddle lets you write and experiment with JavaScript code from within your web browser. You can use it to try out code, get feedback on your code, share your code, and even work on programs with your friends! You’ll learn how to use JSFiddle to view, modify, save, and share JavaScript web applications, too.
You may be wondering what we mean by web application. A web application (or web app) is software that runs in a browser and is usually powered by JavaScript. Google Earth, for example, is a popular web app you may be familiar with. It can look up and show you nearly any place on Earth in high-resolution photos. Google Earth is also a website because you can access it using a web address, or URL. Do you think JSFiddle is a web app, a website, or both? It’s actually both. In fact, every web application is a website. Not all websites are web applications, however.
In this chapter, you use JSFiddle to experiment with some animations. In the end, you have a JavaScript bubble machine that you can customize as much as you want! It’s called JSFiddle because you can use it to “fiddle” with JavaScript. So, let the fiddling begin!
Introducing JSFiddle
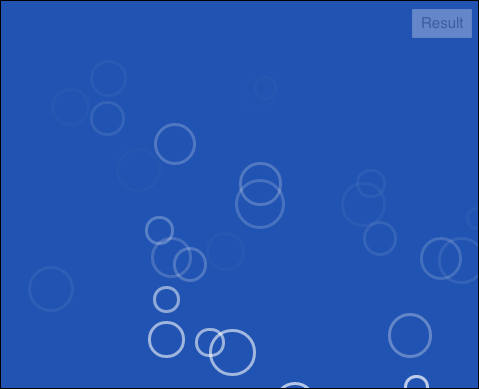
To get started with JSFiddle, open your web browser and type http://jsfiddle.net into the address bar. You’ll see the JSFiddle website, shown in Figure 4-1.

Figure 4-1: JSFiddle’s clean and compartmentalized user interface.
JSFiddle’s user interface window consists of three panes where you can enter different types of code including HTML, CSS, and JavaScript. You see the results of what you type inside these boxes in the Result pane. The toolbar on the left lets you configure additional options, and the top toolbar has buttons for running, saving, and cleaning up your code.
 You can resize any of the panes in JSFiddle by clicking and dragging the border that separates them.
For now, we’re mostly concerned with the JavaScript pane. The JavaScript pane works in much the same way as the JavaScript Console. With JSFiddle, the code you enter won’t execute until you tell it to run.
Follow these steps to run your first JSFiddle program:
- Click inside the JavaScript pane.
Type the following JavaScript statement:
alert("Hi, everyone!");-
Click the Run button on the top toolbar.
A pop-up window containing the message “Hi, everyone!” appears.
- Close the pop-up window by clicking OK.
There’s nothing surprising in the behavior of that simple JavaScript program. If you’ve read the first three chapters of this book, you’re already familiar with how the alert statement works.
Running JavaScript isn’t the only great thing JSFiddle can do. With JSFiddle, you can also use the HTML and CSS panes to run code that works together with your JavaScript code! In the next few sections, we cover each of these panes in more detail and demonstrate their use. But first, we give a quick demonstration of what JSFiddle is capable of.
Viewing our fiddles
We’re going to let you in on a secret. Every program in this book is available for you to view, run, copy, and play around with at http://jsfiddle.net/user/forkids/fiddles. That’s right! We’ve done your homework! We’ve formatted it nicely for you and tested it out.
This is our own JSFiddle public dashboard. The public dashboard is where any JSFiddle user can share programs (known as “fiddles” in JSFiddle) with the world.
 Although we’ve typed up every project for you already, it’s important that you go through each step of every project for yourself so that you really understand. To get the most out of this book, feel free to copy, modify, completely change, and rewrite our code to see what it does and make it your own! Keep on fiddlin’!
Playing with fiddles
Before you get too carried away with viewing all the cool projects from other parts and chapters, take a look at some programs that aren’t part of this book. JSFiddle lets anyone create an account and share their programs in a public dashboard — and many excellent and very experienced JavaScript programmers do!
 When programmers share their programs on JSFiddle, they agree that anyone who wants to can make a copy of their work, change it, and republish it. However, it’s always polite to give the original author credit when you borrow code. We’ve made copies of each of the programs below so that we can be sure that they’ll be the same when you view them. If you want to find out who the original author of a program is, open Fiddle Options from the left navigation bar.
Follow these steps to view and run some of the programs in our list of amazing JSFiddle demos:
-
Go to our public dashboard at
http://jsfiddle.net/user/forkids/fiddles.You see a list of all the examples and projects from the entire book.
You may need to use the page navigation at the bottom of the list to see additional pages of results. -
Find a demo that sounds interesting to you and open it.
When the program opens, it will automatically start running.
If you find a program that you like, try figuring out how it works! Change some values to see what happens.
Anything that you do to a program in JSFiddle won’t overwrite the original. You can try changing things all you want, and no harm will come of it. The worst that can happen is that the program won’t run.
Fiddling with CSS
The CSS pane in JSFiddle is located in the upper-right corner. Besides working with JavaScript in JSFiddle, we can also fiddle with the Cascading Style Sheets (CSS) in our web application. CSS allows you to change how elements such as text and graphics appear. If you want to change the color of the text on your page, you use CSS.
We cover CSS in much more detail in Chapter 6. For now, follow these steps to try out changes to one of our programs:
-
Go to
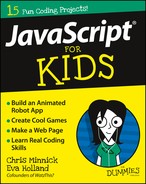
http://jsfiddle.net/forkids/vaj023L5.You see the Bubbles demo, shown in Figure 4-2.
-
Take a closer look at each of the four main areas of the screen.
Three of them have some code, and the fourth is displaying the bubble animation. Can you figure out just by reading the code what any of this might do?
-
Look at the CSS pane (in the upper right).
You see three lines of code.
- Find the code that reads border: 3px solid #FFFFFF; and change it to border: 8px solid #FFFFFF;.
-
Click the Run button in the top toolbar to start the animation over.
You’ll notice that the walls of the bubbles have gotten much thicker, as shown in Figure 4-3.
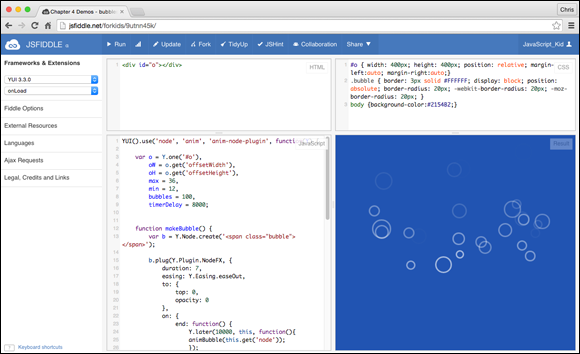
Figure 4-2: The Bubbles demo.

Figure 4-3: The bubble walls have gotten thick!
Based on the change that you just made and the effect that it had on the output of the program, what do you think the part of the statement that says solid does? To find out, try the following steps:
-
In the CSS pane, change the first value after border: to a smaller number (such as 2 or 3) and click Run.
The walls of the circles get thin again.
- Change the second value after border: to one of the following words:
- dotted
- dashed
- double
- groove
- ridge
- inset
- outset
-
Click Run to see what it does.
This value tells the browser what the style of the border should be. Figure 4-4 shows the bubbles with the border style set to dotted.

Figure 4-4: Bubbles with a dotted bubble style.
Now take a look at the third value after border:, which is currently set to #FFFFFF. This string of characters represents the border color property of the bubbles.
Color in CSS is usually written using a special code called hexadecimal notation, which uses three sets of values ranging from 00 to FF to tell the browser how much red, green, and blue to put in.
We cover CSS colors in detail in Chapter 6. You can also use many of the standard color names that you know. A list of the most common color names that web browsers understand is shown in Table 4-1.
Table 4-1 Standard HTML Color Names
|
Color Name |
Hexadecimal Value |
Color Swatch |
Aqua |
#00FFFF |
|
Black |
#000000 |
|
Blue |
#0000FF |
|
Fuchsia |
#FF00FF |
|
Gray |
#808080 |
|
Green |
#008000 |
|
Lime |
#00FF00 |
|
Maroon |
#800000 |
|
Navy |
#000080 |
|
Olive |
#808000 |
|
Orange |
#FFA500 |
|
Purple |
#800080 |
|
Red |
#FF0000 |
|
Silver |
#C0C0C0 |
|
Teal |
#008080 |
|
White |
#FFFFFF |
|
Yellow |
#FFFF00 |
|


Follow these steps to change the color of the bubbles:
- Choose a color name or its hexadecimal code from Table 4-1.
- Replace the color value (#FFFFFF) in the CSS pane with your new value.
-
Click Run.
Your new color appears in the Result pane.
Fiddling with HTML
Now take a look at the HTML pane, in the upper-left corner. Compared to the CSS and JavaScript panes, this one doesn’t have much going on in it at all!
HTML, which we cover in Chapter 5, creates structure for web pages and containers for JavaScript programs to do their things in. In the case of the Bubbles demo, the HTML just makes a place on the page for the bubbles to go into.
But you can do much more with HTML! To make some changes to the HTML for the Bubbles demo, try the following:
-
Put your cursor after </div> and type the following:
<h1>I love bubbles!</h1>Your HTML pane should now have the following HTML code:
<div id="o"></div><h1>I love bubbles!</h1> HTML code is actually called HTML markup for reasons that we explain in Chapter 5. -
Press Run to see your changes in the Result pane.
The bubbles now have a special message below them, as shown in Figure 4-5.

Figure 4-5: Colorful bubbles, now with a special message.
In HTML, <h1> and </h1> are known as tags. Tags around text tell the browser that the text represents something special. In this case, <h1> represents a first-level header, the largest and most important header on the page.
Another very useful HTML tag is the <p> tag, which marks paragraphs. To insert a <p> tag, follow these steps:
- After the </h1> tag, press Return (Mac) or Enter (Windows) to move to the next line.
- Type <p> and then type anything at all that you want to say. When you’re done, end the paragraph by typing </p>.
- Click Run to see your changes in the Result pane.
Fiddling with JavaScript
The JavaScript pane, in the lower-left part of the JSFiddle interface, is where the really interesting things happen.
- In the JavaScript pane, find the line that reads max = 36 and change it to max = 80.
-
Click Run.
Many of the bubbles, but not all of them, are now larger than they were before.
Based on the behavior of the bubbles when you changed the value of max, do you have a guess as to what will happen if you change the line that reads min = 12? Try it out and see if you’re right!
If you guessed that max controls the maximum bubble size and min controls the minimum bubble size, you’re absolutely correct. Figure 4-6 shows the Result pane with max set to 80 and min set to 20.

Figure 4-6: Changing the values of min and max changes the size of the bubbles.
The next two lines in the JavaScript pane are bubbles = 100 and timerDelay = 8000. You can change these values using the steps you’ve used several times now:
- Change the value.
- Click Run to see the results of the change.
Try changing both of these values to see what happens. By playing around with these values (or maybe just by guessing), you’ll discover that the value of bubbles tells how many bubbles should be created and timerDelay has something to do with the speed of the bubbles.
Can you figure out exactly what the bubbles and timerDelay values do by experimenting with them? Hint: The value of timerDelay is a number of milliseconds (or thousandths of a second). So, 8,000 milliseconds equals 8 seconds. Change the value to 10000, click Run, and then time the action on the screen. Then change the value to 1000, click Run, and time it again.
If you guessed that bubbles controls how many bubbles will be created and timerDelay controls how quickly those bubbles appear, you’re correct!
Creating a JSFiddle Account
Creating a JSFiddle account isn’t required in order to proceed with the book, but it will make viewing and sharing your work later on easier.
Follow these steps to create a JSFiddle account:
-
Click the Fork button in the top menu.
When you create your own version of a program that’s based on someone else’s code, it’s called forking their code.
- Select the URL of your program in the browser address bar and copy it, or just write it down somewhere so you can use it after you create an account.
-
Click the Login/Sign Up link in the upper-right corner of the screen.
The Log In page appears, as shown in Figure 4-7.
-
Click the Sign Up link under the login form.
The Create an Account page appears.
-
Fill out the Create an Account form and click Create an Account.
The Edit Your Profile page appears, as shown in Figure 4-8. If you like, you can make changes here and save them, but that isn’t required.
-
Click the Editor link at the top of the screen.
The main JSFiddle screen appears with your new username in the upper-right corner of the screen.
-
Paste or type the URL that you saved in Step 2 into the browser address bar and press Return or Enter.
You’re brought back to your version of the Bubbles demo.
-
Click Fork again to bring your version of the program into your new JSFiddle account.
Notice that the URL in the browser address bar now contains your JSFiddle username!
Figure 4-7: The JSFiddle Log In page.

Figure 4-8: The Edit Your Profile page.
Sharing Your Fiddle
Now that you’ve created your own personalized version of the Bubbles demo, it’s time to show your friends!
-
Click the Share button in the top toolbar.
You’ll see the option to copy the address for your Bubbles demo, to view the program in full-screen mode, and to share your program on Facebook or Twitter.
If you want to share your programs on Facebook or Twitter, remember to tag us (@watzthisco on Twitter or www.facebook.com/watzthisco), and we’ll check out your creations! - Highlight the full-screen URL in the Share menu, as shown in Figure 4-9, and copy it by pressing
 +C (Mac) or Ctrl+C (Windows) or by choosing Edit ⇒ Copy in your browser.
 -
Open a new browser window tab (by pressing
+T [Mac] or Ctrl+T [Windows]) and paste the full-screen address into the address bar.The bubbles display onscreen without the code panes.
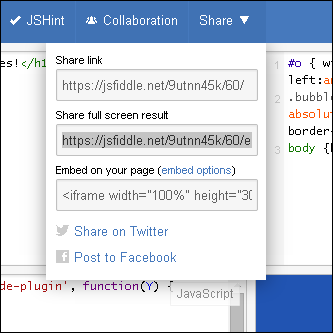
Figure 4-9: Highlighting the full-screen URL.
If the Bubbles demo doesn’t work for you in full-screen mode, try changing the https in the browser address bar to http and press Return or Enter.
If you want to return to the original Bubbles program, you can do so by going back to our public dashboard at https://jsfiddle.net/user/forkids/fiddles.
But what if you want to have your own dashboard where you can create and save your own collection of JSFiddle programs? Read on!
Saving Your App
Now that you have your own account, you can create your own public dashboard.
To create your own public dashboard on JSFiddle follow these steps:
-
With your latest version of the Bubbles app on your screen, click Fiddle Options in the left navigation bar.
The Fiddle Options menu opens.
-
Type a name for your Bubbles program.
This can be anything you like, but we recommend including the word bubbles in the name so that you remember what it is later!
- Click Update in the top toolbar.
-
Click Set as Base in the top toolbar.
JSFiddle creates a new version of your program each time you save it. The Set as Base button makes the currently displayed version of your program the version that displays when someone links to your program from your public dashboard.
-
Click your username in the upper-right corner of the screen and select Public Dashboard.
Your public dashboard appears, complete with your version of the Bubbles program listed. Your dashboard should resemble Figure 4-10.

Figure 4-10: Your very own public dashboard on JSFiddle!