Sufyan bin Uzayr1, Nicholas Cloud2 and Tim Ambler3
(1)
Al Manama, United Arab Emirates
(2)
Florissant, MO, USA
(3)
Nashville, TN, USA
An organization’s ability to learn, and translate that learning into action rapidly, is the ultimate competitive advantage.
—Jack Welch
As development platforms go, Node is no longer the new kid on the block. But as many well-known and respected organizations will attest, the benefits afforded by JavaScript as a server-side language have already had a tremendous impact on the manner in which they develop and deploy software. Among the many accolades for Node, Michael Yormark, Project Manager at Dow Jones, has proclaimed “The simple truth is Node has reinvented the way we create websites. Developers build critical functionality in days, not weeks.” (www.joyent.com/blog/the-node-firm-and-joyent-offer-node-js-training)
Kiran Prasad, Director of Mobile Engineering at LinkedIn, has stated “On the server side, our entire mobile software stack is completely built in Node. One reason was scale. The second is Node showed us huge performance gains.”
(https://nodejs.org/download/docs/v0.6.7/)
Node is certainly generating some rather large waves in the development community. All that said, however, let’s be clear: the platform is far from perfect. JavaScript is beautifully expressive and flexible, but it’s also flexible in a way that is easily abused. While Node-based projects enjoy rapid development cycles and impressive performance gains, they frequently suffer at the hands of an overall lack of convention both within the language itself and throughout the development community as a whole. While this problem may not be obvious within small, centralized development teams, it can quickly rear its head as teams grow in size and distribution—just ask Jeff Harrell, Director of Engineering at PayPal (www.paypal-engineering.com/2013/11/):
We especially liked the ubiquity of Express, but found it didn’t scale well in multiple development teams. Express is non-prescriptive and allows you to set up a server in whatever way you see fit. This is great for flexibility, but bad for consistency in large teams… Over time we saw patterns emerge as more teams picked up node.js and turned those into Kraken.js; it’s not a framework in itself, but a convention layer on top of express that allows it to scale to larger development organizations. We wanted our engineers to focus on building their applications and not just focus on setting up their environments.
This chapter will introduce you to Kraken, a secure and scalable layer for Express-based applications brought to you by the developers at PayPal. Topics covered within this chapter include
Environment-aware configuration
Configuration-based middleware registration
Structured route registration
The Dust template engine
Internationalization and localization
Enhanced security techniques
Note
Kraken builds on the already firm foundation of Express, the minimalist web framework for Node whose API has become the de facto standard for frameworks in this category. As a result, this chapter assumes the reader already has a basic, working familiarity with Express. Portions of this chapter also discuss concepts covered in this book’s chapters on Grunt, Yeoman, and Knex/Bookshelf. If you are unfamiliar with these subjects, you may wish to read those chapters before you continue.
Environment-Aware Configuration
As applications are developed, tested, staged, and deployed, they naturally progress through a series of corresponding environments, each requiring its own unique set of configuration rules. For example, consider Figure 8-1, which illustrates the process by which an application moves through a continuous integration and delivery deployment pipeline.
Figure 8-1
Application that requires unique settings based on its environment
As the application in Figure 8-1 progresses through each environment, the settings that tell it how to connect to the various external services on which it relies must change accordingly. Kraken’s confit library provides developers with a standard convention for accomplishing this goal by offering a simple, environment-aware configuration layer for Node applications.
Confit operates by loading a default JSON configuration file (typically named config.json). Confit then attempts to load an additional configuration file based on the value of the NODE_ENV environment variable. If an environment-specific configuration file is found, any settings it specifies are recursively merged with those defined within the default configuration.
This chapter’s confit-simple project provides a simple application that relies on confit for determining its configuration. Listing 8-1 demonstrates the process by which confit is initialized, while Listing 8-2 shows the contents of the project’s /config folder, from which confit is instructed to search for configuration files.
Before continuing, notice that our project’s default configuration file provides connection settings for an e-mail server under the email property, while neither of the project’s environment-specific configuration files provides such information. In contrast, the default configuration provides connection settings for a Redis cache server under the nested cache:redis property, while both of the environment-specific configurations provide overriding information for this property.
Notice also that the default configuration file includes a comment above the email property. Comments, which are not part of the JSON specification, would normally result in an error being thrown if we attempted to use Node’s require() method to parse the contents of this file. Confit, however, will strip out such comments before attempting to parse the file, allowing us to embed comments within our configuration as needed.
Listing 8-3 shows the output that is logged to the console when the project is run with the NODE_ENV environment variable set to development.
Running the confit-simple Project in development Mode
Note
In Listing 8-3, $ export NODE_ENV=development is run from the terminal to set the value of the NODE_ENV environment variable. This command applies only to Unix and Unix-like systems (including OS X). Windows users will instead need to run $ set NODE_ENV=development. It’s also important to remember that if the NODE_ENV environment variable is not set, confit will assume the application is running in the development environment.
As you can see in Listing 8-3, confit compiled our project’s configuration object by merging the contents of the config/development.json environment configuration file with the default config/config.json file, giving priority to any settings specified in development.json. As a result, our configuration object inherited the email settings that only exist in config.json, along with the cache and database settings defined within the configuration file for the development environment. In Listing 8-1, these settings are accessed through the use of the configuration object’s get() method.
Note
In addition to accessing top-level configuration settings (e.g., database, as shown in Listing 8-1), our configuration object’s get() method can also be used to access deeply nested configuration settings using : as a delimiter. For example, we could have referenced the project’s postgresql settings directly with config.get('database:postgresql').
In Listing 8-4, we run the confit-simple project again, only this time we set the NODE_ENV environment variable with a value of production. As expected, the output shows that our configuration object inherited the email property from config.json while also inheriting the cache and database properties from production.json.
Running the confit-simple Project in production Mode
Shortstop Handlers
Confit is designed for processing JSON configuration files, as previous examples have shown. As a configuration format, JSON is easy to work with, but it can occasionally leave a bit to be desired in terms of flexibility. Confit helpfully makes up for this shortcoming with support for plugins that it refers to as “shortstop handlers.” By way of an example, consider Listing 8-5, in which the two shortstop handlers included within confit's core library, import and config, are used.
// confit-shortstop/config/config.json
{
// The `import` handler allows us to set a property's value to the contents
// of the specified JSON configuration file.
"app": "import:./app",
// The `config` handler allows us to set a property's value to that of the
// referenced property. Note the use of the `.` character as a delimiter,
// in this instance.
"something_else": "config:app.base_url"
}
// confit-shortstop/config/app.json
{
// The title of the application
"title": "My Demo Application",
// The base URL at which the web client can be reached
"base_url": "https://myapp.com",
// The base URL at which the API can be reached
"base_api_url": https://api.myapp.com
}
Listing 8-5
Demonstrating the Use of the import and config Shortstop Handlers
Listing 8-6 shows the output that is printed to the console when this chapter’s confit-shortstop project is run. In this example, the import shortstop handler has allowed us to populate the app property with the contents of a separate JSON file, making it possible for us to break down particularly large configuration files into smaller and more easily manageable components. The config handler has allowed us to set a configuration value by referencing a preexisting value in another section.
$ node index.js
app:
title: My Demo Application
base_url: https://myapp.com
base_api_url: https://api.myapp.com
something_else: https://myapp.com
Listing 8-6
Output of This Chapter’s confit-shortstop Project
While confit itself only includes support for the two shortstop handlers that we’ve just covered (import and config), several additional handlers that are quite useful can be found in the shortstop-handlers module. Let’s take a look at four examples.
The main script (index.js) from this chapter’s confit-shortstop-extras project is shown in Listing 8-7. This script largely mirrors the one we’ve already seen in Listing 8-1, with a few minor differences. In this example, additional handlers are imported from the shortstop-handlers module. Also, instead of instantiating confit by passing the path to our project’s config folder (basedir), we pass an object of options. Within this object, we continue to specify a value for basedir, but we also pass a protocols object, providing confit with references to the additional shortstop handlers we’d like to use.
// confit-shortstop-extras/index.js
var confit = require('confit');
var handlers = require('shortstop-handlers');
var path = require('path');
var basedir = path.join(__dirname, 'config');
var prettyjson = require('prettyjson');
confit({
'basedir': basedir,
'protocols': {
// The `file` handler allows us to set a property's value to the contents
// of an external (non-JSON) file. By default, the contents of the file
// will be loaded as a Buffer.
'file': handlers.file(basedir /* Folder from which paths should be resolved */, {
'encoding': 'utf8' // Convert Buffers to UTF-8 strings
}),
// The `require` handler allows us to set a property's value to that
// exported from a module.
'require': handlers.require(basedir),
// The `glob` handler allows us to set a property's value to an array
// containing files whose names match a specified pattern
'glob': handlers.glob(basedir),
// The path handler allows us to resolve relative file paths
In this example, four additional shortstop handlers (imported from the shortstop-handlers module) are used:
file: Sets a property using the contents of a specified file
require: Sets a property using the exported value of a Node module (particularly useful for dynamic values that can only be determined at runtime)
glob: Sets a property to an array containing files whose names match a specified pattern
path: Sets a property to the absolute path of a referenced file
Listing 8-8 shows the default configuration file for this project. Finally, Listing 8-9 shows the output that is printed to the console when this project is run.
Express processes incoming HTTP requests by pushing them through a series of configurable “middleware” functions, as shown in Figure 8-2.
Figure 8-2
Series of Express middleware calls
At each step of this process, the active middleware function has the ability to
Modify the incoming request object
Modify the outgoing response object
Execute additional code
Close the request-response cycle
Call the next middleware function in the series
By way of an example, consider Listing 8-10, which shows a simple Express application that relies on three middleware modules: morgan, cookie-parser, and ratelimit-middleware. As this application processes incoming HTTP requests, the following steps occur:
1.
The morgan module logs the request to the console.
2.
The cookie-parser module parses data from the request’s Cookie header and assigns it to the request object’s cookies property.
3.
The ratelimit-middleware module rate-limits clients that attempt to access the application too frequently.
4.
Finally, the appropriate route handler is called.
// middleware1/index.js
var express = require('express');
// Logs incoming requests
var morgan = require('morgan');
// Populates `req.cookies` with data parsed from the `Cookie` header
Express Application That Relies on Three Middleware Modules
This approach provides developers with a considerable degree of flexibility, allowing them to execute their own logic at any point during the request-response cycle. It also allows Express to maintain a relatively small footprint by delegating responsibility for performing nonessential tasks to third-party middleware modules. But as flexible as this approach is, it can also prove troublesome to manage as applications and the teams that develop them grow in size and complexity.
Kraken’s meddleware module simplifies middleware management by providing a configuration-based middleware registration process for Express applications. In doing so, it provides developers with a standardized approach for specifying which middleware modules an Express application should rely on, in what order they should be loaded, and the options that should be passed to each. Listing 8-11 shows an updated version of the previous example, in which the meddleware module manages the registration of all middleware functions.
// Specifies the order in which middleware should be registered
"priority": 10,
"module": {
// The name of an installed module (or path to a module file)
"name": "morgan",
// Arguments to be passed to the module's factory function
"arguments": ["combined"]
}
},
"cookieParser": {
"enabled": true,
"priority": 20,
"module": {
"name": "cookie-parser"
}
},
"rateLimit": {
"enabled": true,
"priority": 30,
"module": {
"name": "ratelimit-middleware",
"arguments": [{
"burst": 10,
"rate": 0.5,
"ip": true
}]
}
}
}
}
Listing 8-11
Configuration-Based Middleware Registration with the meddleware Module
With the help of Kraken’s meddleware module, all aspects of third-party middleware management within this application have been moved from code to standardized configuration files. The result is an application that is not only more organized but also easier to understand and modify.
Event Notifications
As middleware functions are registered with Express via the meddleware module, corresponding events are emitted by the application, providing developers with an easy method for determining what middleware functions are being loaded and in what order (see Listing 8-12).
Events Are Emitted As Middleware Registered via the meddleware Module
Structured Route Registration
In the previous section, you learned how Kraken’s meddleware module can simplify middleware function registration by moving the logic required for loading and configuring those functions into standardized JSON configuration files. In much the same way, Kraken’s enrouten module applies the same concept to bring structure where there often is none to be found—Express routes.
Simple Express applications with a small number of routes can often make do with a single module in which every available route is defined. However, as applications gradually grow in depth and complexity, such an organizational structure (or lack thereof) can quickly become unwieldy. Enrouten solves this problem by providing three approaches with which Express routes can be defined in a consistent, structured fashion.
Index Configuration
Using enrouten’s index configuration option, the path to a single module can be specified. This module will then be loaded and passed an Express Router instance that has been mounted to the root path. This option provides developers with the simplest method for defining routes, as it does not enforce any specific type of organizational structure. While this option provides a good starting point for new applications, care must be taken not to abuse it. This option is often used in combination with enrouten’s directory and routes configuration options, which we will cover shortly.
Listing 8-13 shows a simple Express application whose routes are configured with the help of confit, meddleware, and enrouten, along with the accompanying confit configuration file. Listing 8-14 shows the contents of the module that is passed to enrouten’s index option. Subsequent examples within this section will build on this example.
// enrouten-index/index.js
var express = require('express');
var confit = require('confit');
var handlers = require('shortstop-handlers');
var meddleware = require('meddleware');
var path = require('path');
var configDir = path.join(__dirname, 'config');
var app = express();
confit({
'basedir': configDir,
'protocols': {
'path': handlers.path(configDir),
'require': handlers.require(configDir)
}
}).create(function(err, config) {
app.use(meddleware(config.get('middleware')));
app.listen(7000);
console.log('App is available at: http://localhost:7000');
});
// enrouten-index/config/config.json
{
"middleware": {
"morgan": {
"enabled": true,
"priority": 10,
"module": {
"name": "morgan",
"arguments": ["combined"]
}
},
"enrouten": {
"enabled": true,
"priority": 30,
"module": {
"name": "express-enrouten",
"arguments": [
{
"index": "path:../routes/index"
}
]
}
}
}
}
Listing 8-13
Express Application Configured with confit, meddleware, and enrouten
// enrouten-index/routes/index.js
module.exports = function(router) {
router.route('/')
.get(function(req, res, next) {
res.send('Hello, world.');
});
router.route('/api/v1/colors')
.get(function(req, res, next) {
res.send([
'blue', 'green', 'red', 'orange', 'white'
]);
});
};
Listing 8-14
Contents of the Module Passed to Enrouten’s index Option
Directory Configuration
Listing 8-15 demonstrates the use of enrouten’s directory configuration option. When set, enrouten will recursively scan the contents of the specified folder, searching for modules that export a function accepting a single argument. For each module it finds, enrouten will pass an Express Router instance that has been mounted to a path predetermined by that module’s location within the directory structure—a “convention over configuration” approach.
// enrouten-directory/config/config.json
{
"middleware": {
"enrouten": {
"enabled": true,
"priority": 10,
"module": {
"name": "express-enrouten",
"arguments": [{ "directory": "path:../routes" }]
}
}
}
}
Listing 8-15
Setting Enrouten’s directory Configuration Option
Figure 8-3 shows the structure of this project’s /routes folder, while Listing 8-16 shows the contents of the /routes/api/v1/accounts/index.js module. Based on this module’s location within the /routes folder, the URLs for each route that it defines will be prefixed with /api/v1/accounts.
var accounts = require(path.join(APPROOT, 'models', 'accounts'));
/**
* @route /api/v1/accounts
*/
router.route('/')
.get(function(req, res, next) {
res.send(accounts);
});
/**
* @route /api/v1/accounts/:account_id
*/
router.route('/:account_id')
.get(function(req, res, next) {
var account = _.findWhere(accounts, {
'id': parseInt(req.params.account_id, 10)
});
if (!account) return next(new Error('Account not found'));
res.send(account);
});
};
Listing 8-16
The /api/v1/accounts Controller
Routes Configuration
Enrouten’s directory configuration option provides an approach that favors “convention over configuration” by automatically determining the structure of an application’s API based on the layout of a specified folder. This approach provides a quick and easy method for structuring Express routes in an organized and consistent way. However, complex applications may eventually come to find this approach to be rather confining.
Applications with APIs that feature a number of complex, deeply nested routes will likely find greater benefit from enrouten’s routes configuration option, which allows developers to create completely separate modules for each of the application’s routes. API endpoints, methods, handlers, and route-specific middleware are then specified within configuration files—an organized approach that allows for the greatest degree of flexibility, at the expense of being slightly more verbose.
Listing 8-17 shows an excerpt from the configuration file for this chapter’s enrouten-routes project. Here we pass an array of objects to enrouten’s routes configuration option, the entries of which describe the various routes to be made available by Express. Note that in addition to specifying a route, HTTP method, and handler, each entry also has the option of specifying an array of route-specific middleware functions. As a result, this application is able to apply a middleware function responsible for authorizing incoming requests on a route-by-route basis. As shown in Listing 8-17, the auth middleware function is not applied to the route at which users initially sign in, allowing them to sign in before making subsequent requests.
Specifying Individual Routes via Enrouten’s routes Configuration Option
Listing 8-18 shows the contents of the module responsible for handling incoming GET requests to this application’s /api/v1/users route. The module exports a single function, which accepts the standard req, res, next Express route handler signature.
var models = require('../../../../lib/models');
module.exports = function(req, res, next) {
models.User.fetchAll()
.then(function(users) {
res.send(users);
})
.catch(next);
};
Listing 8-18
The /routes/api/v1/users/list Route Handler
Dust Templates
Many popular JavaScript template engines (e.g., Mustache and Handlebars) tout themselves as being “logic-less”—an attribute that describes their ability to help developers maintain a clear separation of concerns between an application’s business logic and its presentation layer. When properly maintained, this separation makes it possible for significant changes to occur within the interface that users are presented with while requiring minimal (if any) accompanying changes behind the scenes (and vice versa).
So-called “logic-less” template engines accomplish this goal by enforcing a strict set of rules that prevents developers from creating what is often referred to as “spaghetti code,” a tangled mess that combines code with presentation in a way that is hard to grasp and even harder to unravel. Anyone who has ever had to deal with a PHP script resembling that shown in Listing 8-19 will immediately grasp the importance of maintaining a layer of separation between these two concerns.
<?php
print "<!DOCTYPE html><head><title>";
$result = mysql_query("SELECT * FROM settings") or die(mysql_error());
Logic-less template engines attempt to prevent developers from creating spaghetti code by banning the use of logic within an application’s views. Such templates are typically capable of referencing values within a provided payload of information, iterating through arrays, and toggling specific portions of their content on and off based on simple boolean logic.
Unfortunately, this rather heavy-handed approach often brings about the very problems it hoped to prevent, albeit in an unexpected way. Although logic-less template engines such as Handlebars prevent the use of logic within templates themselves, they do not negate the need for that logic to exist in the first place. The logic required for preparing data for template use must exist somewhere, and more often than not, the use of logic-less template engines results in presentation-related logic spilling over into the business layer.
Dust, which is the JavaScript template engine favored by Kraken, seeks to solve this problem by taking an approach that is better thought of as “less-logic” rather than strictly “logic-less.” By allowing developers to embed slightly more advanced logic within their templates in the form of “helpers,” Dust allows presentation logic to remain where it belongs, in the presentation layer, rather than the business layer.
Context and References
When using Dust templates, two primary components come into play: the template itself and an (optional) object literal containing any data to be referenced from within the template. In Listing 8-20, this process is demonstrated by an Express application that has specified Dust as its rendering engine. Note the use of the adaro module in this example. The adaro module serves as a convenient wrapper for Dust, abstracting away some additional setup that would otherwise be necessary to integrate Dust with Express. It also includes some convenient helper functions by default that we will be covering later in the chapter.
// dust-simple/index.js
var express = require('express');
var adaro = require('adaro');
var app = express();
/**
* By default, Dust will cache the contents of an application's templates as they are
* loaded. In a production environment, this is usually the preferred behavior.
* This behavior will be disabled in this chapter's examples, allowing you to modify
* templates and see the result without having to restart Express.
Express Application Using Dust As Its Rendering Engine
In Listing 8-20, an object literal containing an array of North American countries (referred to by Dust as a “context”) is passed to a Dust template, the content of which is shown in Listing 8-21. Within this template, data is referenced by wrapping the desired key within a single pair of curly brackets. Nested properties can also be referenced through the use of dot notation ({misc.total_population}).
As Dust goes about its rendering process, it fetches referenced data by applying one or more “contexts” to the template in question. The simplest templates have a single context that references the outermost level of the JSON object that was passed. For example, consider the template shown in Listing 8-21, in which two references are used, {report_name} and {misc.total_population}. Dust processes these references by searching for matching properties (starting at the outermost level) within the object shown in Listing 8-20.
Dust sections provide a convenient method by which additional contexts can be created, allowing a template to access nested properties without requiring references that start at the outermost level. For example, consider Listing 8-22, in which a new context, {#misc}...{/misc}, is created, allowing nested properties to be accessed using a shorter syntax.
// Template
<h1>{report_name}</h1>
{#misc}
<p>Total Population: {total_population}</p>
{/misc}
// Rendered Output
<h1>Information About North America</h1>
<p>Total Population: 565000000</p>
Listing 8-22
Creating a New Dust Section
Iteration
In the previous example, a new Dust section (and corresponding context) was created. As a result, the contents of the new section received direct access to the properties of the object literal that was referenced. In much the same way, Dust sections can also be used to iterate through the entries of an array. Listing 8-23 demonstrates this process by creating a new section that references the countries array. Unlike the section from the previous example, which was applied only once, the {#countries} ... {/countries} section will be applied multiple times, once for each entry within the array that it references.
// Template
{#countries}
{! The current position within the iteration can be referenced at `$idx` !}
{! The size of the object through which we are looping can be referenced at `$len` !}
<tr>
<td>{name}</td>
<td>{population}</td>
<td>{capital.name}</td>
<td>{capital.population}</td>
</tr>
{/countries}
// Rendered Output
<tr>
<td>United States</td>
<td>319999999</td>
<td>Washington D.C.</td>
<td>660000</td>
</tr>
<tr>
<td>Mexico</td>
<td>118000000</td>
<td>Mexico City</td>
<td>9000000</td>
</tr>
<tr>
<td>Canada</td>
<td>35000000</td>
<td>Ottawa</td>
<td>880000</td>
</tr>
Listing 8-23
Iterating Through an Array with Sections
Listing 8-24 demonstrates the process by which a template can loop through an array whose entries are primitive data types (i.e., not objects). For each iteration, the value itself can be directly referenced via the {.} syntax.
// Template
<ul>
{#languages}<li>{.}</li>{/languages}
</ul>
// Rendered Output
<ul>
<li>English</li>
<li>Spanish</li>
</ul>
Listing 8-24
Iterating Through an Array Containing Primitive Data Types
Conditionality
Dust provides built-in support for conditionally rendering content, based on whether a simple truth test is passed. The template shown in Listing 8-25 demonstrates this concept by rendering the text “Yes” or “No” based on whether each country’s english property references a “truthy” value.
// Template
{#countries}
<tr>
<td>{name}</td>
<td>{?english}Yes{:else}No{/english}</td>
{!
The opposite logic can be applied as shown below:
<td>{^english}No{:else}Yes{/english}</td>
!}
</tr>
{/countries}
// Rendered Output
<tr>
<td>United States</td>
<td>Yes</td>
</tr>
<tr>
<td>Mexico</td>
<td>No</td>
</tr>
<tr>
<td>Canada</td>
<td>Yes</td>
</tr>
Listing 8-25
Applying Conditionality Within a Dust Template
Note
When applying conditionality within a template, it is important to understand the rules that Dust will apply as it determines the “truthiness” of a property. Empty strings, boolean false, empty arrays, null, and undefined are all considered to be false. The number 0, empty objects, and string-based representations for “0,” “null,” “undefined,” and “false” are all considered to be true.
Partials
One of Dust’s most powerful features, partials, allows developers to include templates within other templates. As a result, complex documents can be broken down into smaller components (i.e., “partials”) that are easier to manage and reuse. A simple example that demonstrates this process is shown in Listing 8-26.
// Main Template
<h1>{report_name}</h1>
<p>Total Population: {misc.total_population}</p>
{>"countries"/}
{!
In this example, an external template - `countries` - is included by a parent
template which references it by name (using a string literal that is specified
within the template itself). Alternatively, the name of the external template
could have been derived from a value held within the template's context, using
Dust's support for "dynamic" partials. To do so, we would have wrapped the
`countries` string in a pair of curly brackets, as shown here:
{>"{countries}"/}
!}
// "countries" template
{#countries}
<tr>
<td>{name}</td>
<td>{population}</td>
<td>{capital.name}</td>
<td>{capital.population}</td>
</tr>
{/countries}
// Rendered Output
<h1>Information About North America</h1>
<p>Total Population: 565000000</p>
<tr>
<td>United States</td>
<td>Yes</td>
</tr>
<tr>
<td>Mexico</td>
<td>No</td>
</tr>
<tr>
<td>Canada</td>
<td>Yes</td>
</tr>
Listing 8-26
Dust Template That References an External Template (i.e., “Partial”)
Blocks
Consider a commonly encountered scenario in which a complex web application consisting of multiple pages is created. Each of these pages displays a unique set of content while at the same time sharing common elements, such as headers and footers, with the other pages. With the help of Dust blocks, developers can define these shared elements in a single location. Afterward, templates that wish to inherit from them can, while also retaining the ability to overwrite their content when necessary.
Let’s take a look at an example that should help to clarify this point. Listing 8-27 shows the content of a Dust template that defines the overall layout of a site. In this instance, a default page title is specified, {+title}App{/title}, along with an empty placeholder for body content.
Listing 8-28 shows the content of a Dust template that inherits from the example presented in Listing 8-27. It does so by first embedding the parent template within itself as a partial ({>"shared/base"/}). Next, it injects content into the {+bodyContent/} placeholder that was defined, {<bodyContent}...{/bodyContent}. In this instance, our template chooses not to overwrite the default page title that was specified in our parent template.
// dust-blocks/views/main.dust
{>"shared/base"/}
{<bodyContent}
<p>Hello, world!</p>
{/bodyContent}
Listing 8-28
Dust Template Inheriting from a Block
Filters
Dust includes several built-in filters that allow a template to modify a value before it is rendered. By way of an example, consider the fact that Dust will automatically HTML escape any values referenced within a template. In other words, if a context were to contain a content key with a value matching that shown here:
<script>doBadThings();</script>
Dust would automatically render this value as
<script>doBadThings()</script>
While the behavior that we see here is typically desired, it is not uncommon to run into situations in which this behavior needs to be disabled. This can be accomplished through the use of a filter:
{content|s}
In this example, the |s filter disables auto-escaping for the referenced value. Table 8-1 contains a list of the built-in filters provided by Dust.
Table 8-1
List of Built-in Filters Provided by Dust
Filter
Description
s
Disables HTML escaping
h
Forces HTML escaping
j
Forces JavaScript escaping
u
Encodes with encodeURI()
uc
Encodes with encodeURIComponent()
js
Stringifies a JSON literal
jp
Parses a JSON string
Creating Custom Filters
In addition to providing several core filters, Dust also makes it easy for developers to extend this behavior by creating their own custom filters, such as that shown in Listing 8-29. In this example, a custom formatTS filter is created. When applied, this filter will convert a referenced timestamp to a human-readable format (e.g., Jul. 4, 1776).
// dust-filters/index.js
var express = require('express');
var adaro = require('adaro');
var app = express();
var moment = require('moment');
app.engine('dust', adaro.dust({
'cache': false,
'helpers': [
function(dust) {
dust.filters.formatTS = function(ts) {
return moment(ts, 'X').format('MMM. D, YYYY');
};
}
]
}));
app.set('view engine', 'dust');
app.use('/', express.static('./public'));
app.get('/', function(req, res, next) {
res.render('main', {
'events': [
{ 'label': 'Moon Landing', 'ts': -14558400 },
{ 'label': 'Fall of Berlin Wall', 'ts': 626616000 },
{ 'label': 'First Episode of Who's the Boss', 'ts': 464529600 }
]
});
});
// dust-filters/views/main.dist (excerpt)
<tbody>
{#events}
<tr>
<td>{label}</td>
<td>{ts|formatTS}</td>
</tr>
{/events}
</tbody>
Listing 8-29
Defining a Custom Dust Filter
Context Helpers
In addition to storing data, Dust contexts are also capable of storing functions (referred to as “context helpers”), the output of which can later be referenced by the templates to which they are passed. In this way, a Dust context can be thought of as more than a simple payload of raw information, but rather as a view model, a mediator between an application’s business logic and its views, capable of formatting information in the most appropriate manner along the way.
This feature is demonstrated by the example shown in Listing 8-30, in which an application presents the user with a table of servers. Each entry displays a name, along with a message indicating whether each server is online. A header displays the overall health of the system, which is generated by the systemStatus() context helper. Note that the template is able to reference our context helper just as it would any other type of value (e.g., object literals, arrays, numbers, strings).
As shown in this example, every Dust context helper receives four arguments: chunk, context, bodies, and params. Let’s take a look at a few examples that demonstrate their usage.
chunk
A context helper’s chunk argument provides it with access to the current portion of the template being rendered—referred to by Dust as a “chunk.” By way of an example, consider Listing 8-31, in which a context helper is paired with default content that is defined within the template. In this example, the systemStatus() context helper can choose to override the chunk’s default content, “Unknown,” with its own value by calling the chunk.write() method. The helper can indicate that it has chosen to do so by returning chunk as its value.
The context argument provides context helpers with convenient access to the active section of the context, as determined by the template. The template shown in Listing 8-32 demonstrates this by referencing the isOnline() context helper once for every server it has been passed. Each time, the isOnline() helper fetches the value of the active section’s online property via context.get().
The context Argument Provides Context Helpers with Access to the Active Section
bodies
Imagine a scenario in which large portions of a template’s content are determined by one or more context helpers. Instead of forcing developers to concatenate strings in an unwieldy fashion, Dust allows such content to remain where it belongs—in the template—available as options from which a context helper can choose to render.
Listing 8-33 demonstrates this by passing four different bodies of content to the description() context helper. The helper’s bodies argument provides it with references to this content, which it can then choose to render by passing the appropriate value to chunk.render().
A database server fetches remotely stored information.
{:email}
An email server sends and receives messages.
{:else}
-
{/description}
</td>
</tr>
{/servers}
</tbody>
</table>
Listing 8-33
Selectively Rendering Portions of a Template via the bodies Argument
params
In addition to referencing properties of the context in which it is called (via context.get()), a context helper can also access parameters that have been passed to it by a template. The example shown in Listing 8-34 demonstrates this by passing each server’s uptime property to the formatUptime() context helper. In this example, the helper converts the provided value, params.value, into a more easily readable form before writing it out to the chunk.
Context Helpers Can Receive Parameters via the params Argument
In Listing 8-35, we see a slightly more complex demonstration of context helper parameters at work. In this example, the parseLocation() helper receives a string in which context properties are referenced: value="{name} lives in {location}". In order for these references to be correctly interpreted, the parameter must first be evaluated with the help of Dust’s helpers.tap() method.
var content = dust.helpers.tap(params.value, chunk, context);
return chunk.write(content.toUpperCase());
}
});
});
app.listen(8000);
// dust-context-helpers6/views/main.dust
{#people}
<li>{#parseLocation value="{name} lives in {location}" /}</li>
{/people}
Listing 8-35
Parameters That Reference Context Properties Must Be Evaluated
Asynchronous Context Helpers
Helper functions provide Dust with much of its power and flexibility. They allow a context object to serve as a view model—an intelligent bridge between an application’s business logic and its user interface, capable of fetching information and formatting it appropriately for a specific use case before passing it along to one or more views for rendering. But as useful as this is, we’ve really only begun to scratch the surface in terms of how these helper functions can be applied to powerful effect.
In addition to returning data directly, Dust helper functions are also capable of returning data asynchronously, a process that is demonstrated by the example shown in Listing 8-36. Here we create two context helpers, cars() and trucks(). The former returns an array, while the latter returns a promise that resolves to an array. From the template’s perspective, both of these functions are consumed identically.
Dust also provides a convenient method for conditionally displaying content, in the event that a promise is rejected. This process is demonstrated by Listing 8-37.
An error occurred. We were unable to get a list of trucks.
{/trucks}</ul>
Listing 8-37
Handling Rejected Promises
Having the ability to feed information to a template in the form of promises is useful for a number of reasons, but things begin to get much more interesting when this functionality is paired with Dust’s streaming interface. To better understand this, consider Listing 8-38, which largely mirrors our previous example. In this instance, however, we take advantage of Dust’s streaming interface to push portions of our template down to the client as they are rendered, rather than waiting for the entire process to complete.
Streaming a Template to the Client As Data Becomes Available
Depending on the complexity of the template in question, the impact this approach can have on user experience can often be dramatic. Rather than forcing users to wait for an entire page to load before they can proceed, this approach allows us to push content down to the client as it becomes available. As a result, the delay that users perceive when accessing an application can often be reduced significantly.
Dust Helpers
In the previous section, we explored how context objects can be extended to include logic that is relevant to a specific view through the use of context helpers. In a similar manner, Dust allows helper functions to be defined at a global level, making them available to all templates without being explicitly defined within their contexts. Dust comes packaged with a number of such helpers. By taking advantage of them, developers can more easily solve many of the challenges that are often encountered when working with stricter, logic-less template solutions.
Listing 8-39 shows an excerpt of the JSON data that will be referenced by the rest of this section’s examples.
Excerpt of the JSON Data Passed to a Dust Template
Logic Helpers
Listing 8-40 demonstrates the usage of a Dust logic helper, @eq, with which we can perform a strict comparison between two specified values, key and value. In this example, the first value, job_title, references a property within the current context. The second value, "Chef", is defined as a literal value from within the template.
// dust-logic1/views/main.dust (excerpt)
{#people}
{@eq key=job_title value="Chef"}
<p>{name} is a chef. This person definitely knows how to cook.</p>
{:else}
<p>{name} is not a chef. This person may or may not know how to cook.</p>
{/eq}
{/people}
Listing 8-40
Using a Dust Logic Helper to Conditionally Display Content
Knowing this, imagine a scenario in which we want to perform a strict equality check between two numbers, one of which is referenced as a context property, while the other is specified as a literal from within the template. In order to do so, we must cast our literal value to the appropriate type, as shown in Listing 8-41.
{#people}
{@eq key=age value="27" type="number"}
<p>{name} is 27 years old.</p>
{/eq}
{/people}
Listing 8-41
Casting a Literal Value to the Desired Type
Dust provides a number of logic helpers with which simple comparisons can be made. Their names and descriptions are listed in Table 8-2.
Table 8-2
Logic Helpers Provided by Dust
Logic Helper
Description
@eq
Strictly equal to
@ne
Not strictly equal to
@gt
Greater than
@lt
Less than
@gte
Greater than or equal to
@lte
Less than or equal to
Switch Statements
The frequently used @select helper provides a method by which we can mimic switch (...) statements, making it possible for a template to specify multiple variations of content based on a specified value (see Listing 8-42).
{@gte key=age value=retirement_age}
<p>{name} has reached retirement age.</p>
{:else}
<p>
{@select key=job_title}
{@eq value="Chef"}Probably went to culinary school, too.{/eq}
{@eq value="Professor"}Smarty pants.{/eq}
{@eq value="Accountant"}Good with numbers.{/eq}
{@eq value="Astronaut"}Not afraid of heights.{/eq}
{@eq value="Pilot"}Travels frequently.{/eq}
{@eq value="Stunt Double"}Fearless.{/eq}
{! @none serves as a `default` case !}
{@none}Not sure what I think.{/none}
{/select}
</p>
{/gte}
Listing 8-42
Mimicking a switch Statement with the @select Helper
Iteration Helpers
Dust provides three useful helpers for tackling problems that are frequently encountered when dealing with iteration. For example, Listing 8-43 demonstrates the use of the @sep helper, with which we can define content that will be rendered for every iteration except the last.
// dust-logic1/views/main.dust (excerpt)
{#people}{name}{@sep}, {/sep}{/people}
// output
Joe, Mary, Wilson, Steve, Laura, Tim, Katie, Craig, Ryan
Listing 8-43
Ignoring Content During a Loop’s Last Iteration with @sep
Dust provides a total of three helpers for tackling iteration challenges. These are listed in Table 8-3.
Table 8-3
Iteration Helpers
Iteration Helper
Description
@sep
Renders content for every iteration, except the last
@first
Renders content only for the first iteration
@last
Renders content only for the last iteration
Mathematical Expressions
Using Dust’s @math helper, templates can adjust their content based on the result of a mathematical expression. Such adjustments can take place in one of two ways. The first is demonstrated in Listing 8-44, in which the result of a mathematical expression is referenced directly within a template. The second is demonstrated in Listing 8-45, in which content is conditionally rendered based on the result of a call to the @math helper.
{@lte value=10}{name} will reach retirement age fairly soon.{/lte}
{@lte value=20}{name} has quite a ways to go before they can retire.{/lte}
{@default}{name} shouldn't even think about retiring.{/default}
{/math}
{/lt}
{/people}
Listing 8-45
Conditionally Rendering Content Based on the Result of a Call to the @math Helper
The various “methods” supported by Dust’s @math helper include add, subtract, multiply, divide, mod, abs, floor, and ceil.
Context Dump
Useful during development, Dust’s @contextDump helper allows you to quickly render the current context object (in JSON format), providing insight into the values Dust sees within the section in which it is called. An example of its usage is shown here:
{#people}<pre>{@contextDump /}</pre>{/people}
Custom Helpers
Earlier in the chapter, you learned how to create context helpers with which context objects can be extended to include custom functionality. In the same way, custom Dust helpers can also be created at the global level. Listing 8-46 provides a demonstration of how this can be applied.
if (params.key >= params.lower && params.key <= params.upper) {
return chunk.render(bodies.block, context);
} else {
return chunk;
}
}
// dust-logic1/views/main.dust (excerpt)
{#people}
{@gte key=age value=20}
{@lte key=age value=29}<p>This person is in their 20's.</p>{/lte}
{/gte}
{@inRange key=age lower=20 upper=29}<p>This person is in their 20's.</p>{/inRange}
{/people}
Listing 8-46
Creating and Using a Custom Dust Helper
In this example’s template, a loop is created in which we iterate through each person defined within the context. For each person, a message is displayed if they happen to fall within the 20-something age bracket. First, this message is displayed using a combination of preexisting logic helpers, @gte and @lt. Next, the message is displayed again, using a custom @inRange helper that has been defined at the global level.
Now that you are familiar with many of the fundamental components that Kraken relies on, let’s move forward with creating our first real Kraken application.
Let’s Get Kraken
In this book’s first section on development tools, we covered four useful utilities that help manage many of the tasks associated with web development—among them: Bower, Grunt, and Yeoman. Kraken relies on each of these tools, along with a Yeoman generator that will assist us in building out the initial structure of our project. If you have not already done so, you should install these modules globally via npm, as shown here:
$ npm install -g yo generator-kraken bower grunt-cli
Creating a new Kraken project with Yeoman is an interactive process. In this example, we pass the generator a name for our new project (app), at which point it begins to prompt us with questions. Figure 8-4 shows the steps that were taken to create this chapter’s app project.
Figure 8-4
Creating a Kraken application using the Yeoman generator
Once you have answered these questions, the generator will create the project’s initial file structure and begin installing the necessary dependencies. Afterward, you should find a new app folder containing the contents of the project, which should resemble that shown in Figure 8-5.
Figure 8-5
Initial file structure for the app project
Kraken’s Yeoman generator has automated the process of creating a new Express application that is organized using modules that were previously covered in this chapter. We can immediately launch the project in its current state as shown in Listing 8-47. Afterward, the project can be accessed at a local address (see Figure 8-6).
Viewing the project in the browser for the first time
As you can see, our project has been preconfigured (with the help of confit and meddleware) to use a number of helpful middleware modules (e.g., cookieParser, session, etc.). For some additional insight into how all of this comes together, Listing 8-48 shows the contents of the project’s index.js script.
// app/index.js
var express = require('express');
var kraken = require('kraken-js');
var options, app;
/*
* Create and configure application. Also exports application instance for use by tests.
* See https://github.com/krakenjs/kraken-js#options for additional configuration options.
*/
options = {
onconfig: function (config, next) {
/*
* Add any additional config setup or overrides here. `config` is an initialized
The kraken-js module, which we see here, is nothing more than a standard Express middleware library. However, instead of simply augmenting Express with some small bit of additional functionality, Kraken takes responsibility for configuring a complete Express application. It will do so with the help of many other modules, including those that have already been covered in this chapter: confit, meddleware, enrouten, and adaro.
As shown in Listing 8-48, Kraken is passed a configuration object containing an onconfig() callback function, which will be called after Kraken has taken care of initializing confit for us. Here we can provide any last-minute overrides that we may not want to define directly within the project’s JSON configuration files. In this example, no such overrides are made.
Controllers, Models, and Tests
In this chapter’s “Structured Route Registration” section, we discovered how enrouten can help bring order to the often haphazard manner in which Express routes are defined. By default, a new Kraken project is set up to use enrouten’s directory configuration option, allowing it to recursively scan the contents of a specified folder, searching for modules that export a function accepting a single argument (i.e., router). For each module it finds (referred to as a “controller”), enrouten will pass an Express Router instance that has been mounted to a path predetermined by that module’s location within the directory structure. We can see this process in action by looking at the default controller that Kraken has created for our project, shown in Listing 8-49.
// app/controllers/index.js
var IndexModel = require('../models/index');
module.exports = function (router) {
var model = new IndexModel();
/**
* The default route served for us when we access the app at: http://localhost:8000
*/
router.get('/', function (req, res) {
res.render('index', model);
});
};
Listing 8-49
Our Project’s Default Controller
In addition to creating a default controller for our project, Kraken has also taken care of creating a corresponding model, IndexModel, which you can see referenced in Listing 8-49. We will discuss Kraken’s relationship with models shortly, but first, let’s walk through the process of creating a new controller of our own.
Chapter 2, which covered Yeoman, demonstrated that generators have the ability to provide subcommands capable of providing developers with functionality whose usefulness extends well beyond the initial creation of a project. Kraken’s Yeoman generator takes advantage of this by providing a controller subcommand, with which new controllers can quickly be created. By way of an example, let’s create a new controller that will be responsible for managing a collection of RSS feeds:
$ yo kraken:controller feeds
After specifying our desired path, feeds, to the generator’s controller subcommand, five new files are automatically created for us:
For the moment, let’s place our focus on the first three files listed here, starting with the model. We’ll take a look at the accompanying Dust template and internalization settings file in the next section.
The Model
Listing 8-50 shows the initial state of our project’s new feeds model. If you were expecting something sophisticated, you will likely be disappointed. As you can see, this file serves as little more than a generic stub that we are expected to replace with our own persistence layer.
// models/feeds.js
module.exports = function FeedsModel() {
return {
name: 'feeds'
};
};
Listing 8-50
Initial Contents of the feeds Model
Unlike many other “full-stack” frameworks that attempt to provide developers with tools that address every conceivable need (including data persistence), Kraken takes a minimalistic approach that does not attempt to reinvent the wheel. This approach recognizes that developers already have access to a wide variety of well-supported libraries for managing data persistence, two of which are covered by this book: Knex/Bookshelf and Mongoose.
By way of an example, let’s update this module so that it exports a Bookshelf model capable of fetching and storing information within a feeds table stored in a SQLite database. Listing 8-51 shows the updated contents of the feeds model.
// models/feeds.js
var bookshelf = require('../lib/bookshelf');
var Promise = require('bluebird');
var feedRead = require('feed-read');
var Feed = bookshelf.Model.extend({
'tableName': 'feeds',
'getArticles': function() {
var self = this;
return Promise.fromNode(function(callback) {
feedRead(self.get('url'), callback);
});
}
});
module.exports = Feed;
Listing 8-51
Updated feeds Model That Uses Knex/Bookshelf
Note
The updated model shown in Listing 8-51 assumes that you are already familiar with the Knex and Bookshelf libraries, along with the steps necessary to configure them. If that is not the case, you may want to read Chapter 10. Regardless, this chapter’s app project provides a fully functioning demonstration of the code shown here.
The Controller
Listing 8-52 shows the initial contents of our project’s new feedscontroller. As with the original controller that accompanied our project, this controller references a corresponding model that Kraken has conveniently created for us, which we have already seen.
// controllers/feeds.js
var FeedsModel = require('../models/feeds');
/**
* @url http://localhost:8000/feeds
*/
module.exports = function (router) {
var model = new FeedsModel();
router.get('/', function (req, res) {
});
};
Listing 8-52
Initial Contents of the feeds Controller
In its default state, the feeds controller accomplishes very little. Let’s update this controller to include a few additional routes that will allow clients to interact with our application’s Feed model. The updated version of the feeds controller is shown in Listing 8-53.
With these updates in place, clients now have the ability to
List feeds
Fetch information regarding a specific feed
Fetch articles from a specific feed
In the next section, we will take a look at the test suite that Kraken has created for this portion of our application. With this test suite, we can verify that the routes we have defined work as expected.
The Test Suite
Listing 8-54 shows the initial contents of the test suite that Kraken has created for our new controller. Here we see a single test, which is defined with the help of SuperTest, which is an extension of SuperAgent, a simple library for making HTTP requests.
// test/feeds.js
var kraken = require('kraken-js');
var express = require('express');
var request = require('supertest');
describe('/feeds', function() {
var app, mock;
beforeEach(function(done) {
app = express();
app.on('start', done);
app.use(kraken({
'basedir': process.cwd()
}));
mock = app.listen(1337);
});
afterEach(function (done) {
mock.close(done);
});
it('should say "hello"', function(done) {
request(mock)
.get('/feeds')
.expect(200)
.expect('Content-Type', /html/)
.expect(/"name": "index"/)
.end(function (err, res) {
done(err);
});
});
});
Listing 8-54
Test Suite for the feeds Controller
In this example, a GET request is made to our application’s /feeds endpoint, and the following assertions are made:
The server should respond with an HTTP status code of 200.
The server should respond with a Content-Type header containing the string html.
The body of the response should contain the string "name": "index".
Given the recent updates that we have made to our new controller, these assertions no longer apply. Let’s replace them with a few tests that are relevant. Listing 8-55 shows the updated contents of the test suite.
// test/feeds/index.js
var assert = require('assert');
var kraken = require('kraken-js');
var express = require('express');
var request = require('supertest');
describe('/feeds', function() {
var app, mock;
beforeEach(function(done) {
app = express();
app.on('start', done);
app.use(kraken({'basedir': process.cwd()}));
mock = app.listen(1337);
});
afterEach(function(done) {
mock.close(done);
});
it('should return a collection of feeds', function(done) {
request(mock)
.get('/feeds')
.expect('Content-Type', /json/)
.expect(200)
.end(function(err, res) {
if (err) return done(err);
assert(res.body instanceof Array, 'Expected an array');
done();
});
});
it('should return a single feed', function(done) {
request(mock)
.get('/feeds/1')
.expect('Content-Type', /json/)
.expect(200)
.end(function(err, res) {
if (err) return done(err);
assert.equal(typeof res.body.id, 'number',
'Expected a numeric `id` property');
done();
});
});
it('should return articles for a specific feed', function(done) {
request(mock)
.get('/feeds/1/articles')
.expect('Content-Type', /json/)
.expect(200)
.end(function(err, res) {
if (err) return done(err);
assert(res.body instanceof Array, 'Expected an array');
done();
});
});
});
Listing 8-55
Updated Contents of the feedsTest Suite
Our updated test suite now contains three tests designed to verify that each of our new controller’s routes are functioning correctly. Consider the first test, for instance, which will make a GET request to our application’s /feeds endpoint and make the following assertions:
The server should respond with an HTTP status code of 200.
The server should respond with a Content-Type header containing the string json.
The server should return one or more results in the form of an array.
Note
Recall that our application’s Feed model was created with the help of the Knex and Bookshelf libraries. The data that you see referenced in this project originates from a Knex “seed” file (seeds/developments/00-feeds.js) with which we can populate our database with sample data. At any point, this project’s SQLite database can be reset to its initial state by running $ grunt reset-db from the command line. If these concepts are unfamiliar to you, you may want to read Chapter 10.
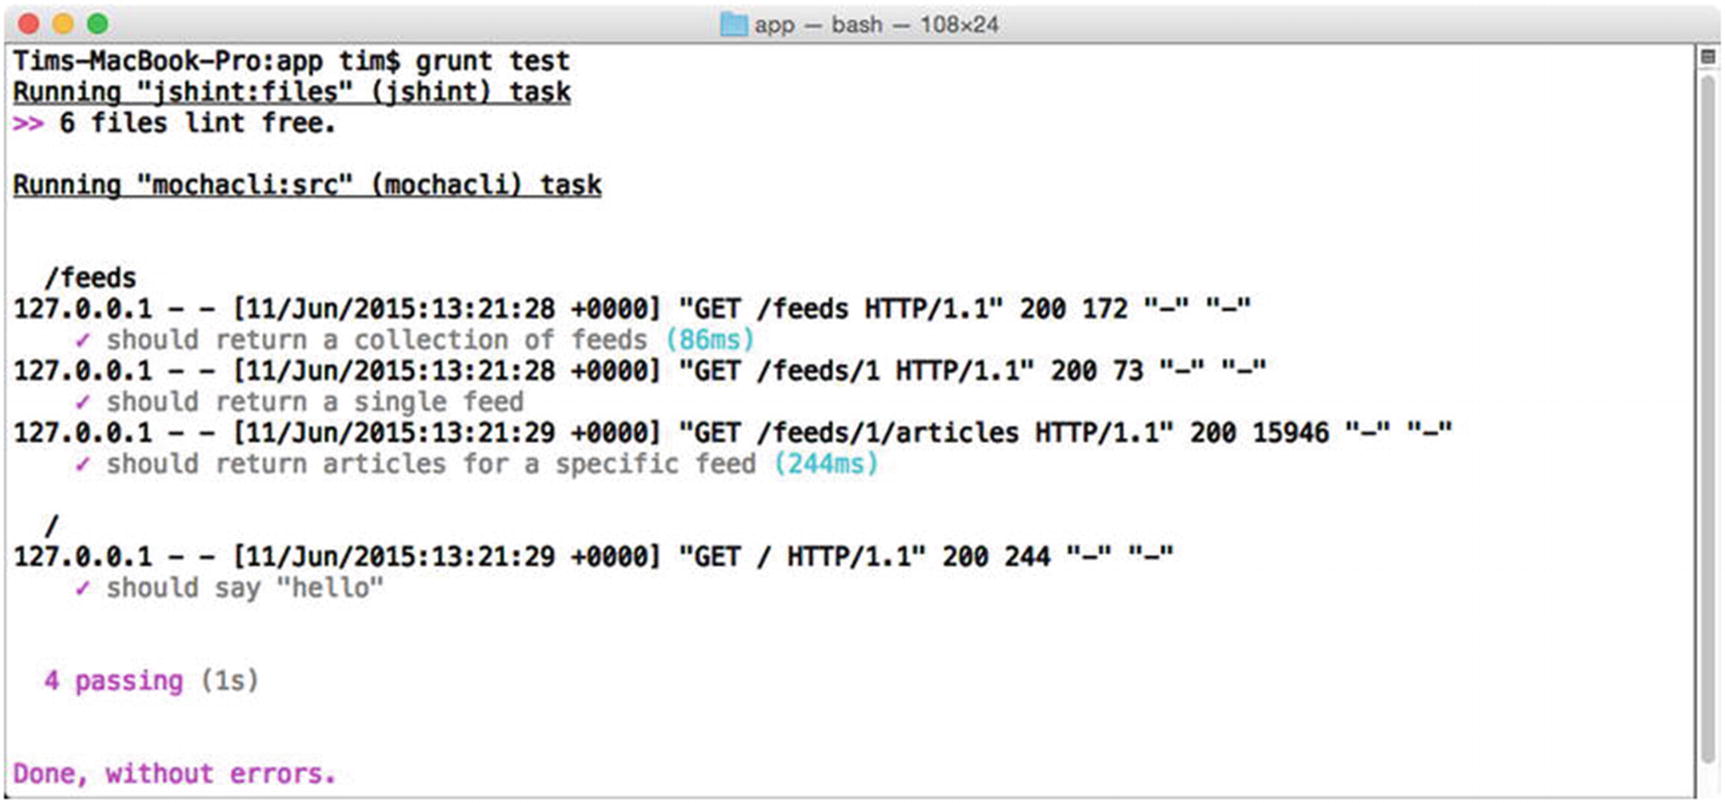
Figure 8-7 shows the output that is printed to the console when our project’s test Grunt task is called.
Figure 8-7
Running the test suite
Internationalization and Localization
Kraken provides built-in support for creating applications that are capable of adapting themselves to meet the unique needs of multiple languages and regions, an important requirement for most products that hope to see widespread use across multiple, diverse markets. In this section we’ll take a look at the two steps by which this is accomplished, internationalization and localization, and how they can be applied within the context of a Kraken application whose templates are generated on the server.
Internationalization (frequently shortened to i18n) refers to the act of developing applications that are capable of supporting multiple regions and dialects. In practice, this is accomplished by avoiding the direct use of locale-specific words, phrases, and symbols (e.g., currency symbols) within an application’s templates. Placeholders are instead used, which are later populated at the moment a template is requested, based on the location or settings of the user who is making the request. By way of an example, consider the Dust template that is shown in Listing 8-56, which is responsible for rendering the home page of this chapter’s app project.
The basic semantics at work here should be familiar, based on material that was previously covered in this chapter’s section on Dust. As you can see, instead of directly embedding content, this template relies on a special Dust helper provided by Kraken, @pre, with which we can reference content that is stored in separate, locale-specific content files. The corresponding content files for this particular template are shown in Listing 8-57.
// app/locales/US/en/index.properties
# Comments are supported
greeting=Welcome to Feed Reader
submit=Submit
email_address=Email Address
password=Password
// app/locales/ES/es/index.properties
greeting=Bienvenida al Feed Reader
submit=Presentar
email_address=Correo Electrónico
password=Contraseña
Listing 8-57
Corresponding Content Files for the Dust Template Shown in Listing 8-56
Note
Take note of the location of this example’s template, public/templates/index.dust, and the location of its corresponding content property files, locales/US/en/index.properties and locales/ES/es/index.properties. Kraken is configured to pair Dust templates with content property files such as these on a one-to-one basis, by matching them based on their paths and file names.
In contrast to internationalization (i18n), which is primarily concerned with the creation of applications that are capable of supporting the injection of localized content, localization (l10n) refers to the process by which locale- and dialect-specific content files, such as those shown in this example, are created. The controller shown in Listing 8-58 demonstrates how Kraken helps developers bring these concepts together to provide users with content that is tailored to meet their specific needs.
// app/controllers/index.js
module.exports = function (router) {
/**
* The default route served for us when we access the app
Serving a Locale-Specific Version of the Home Page
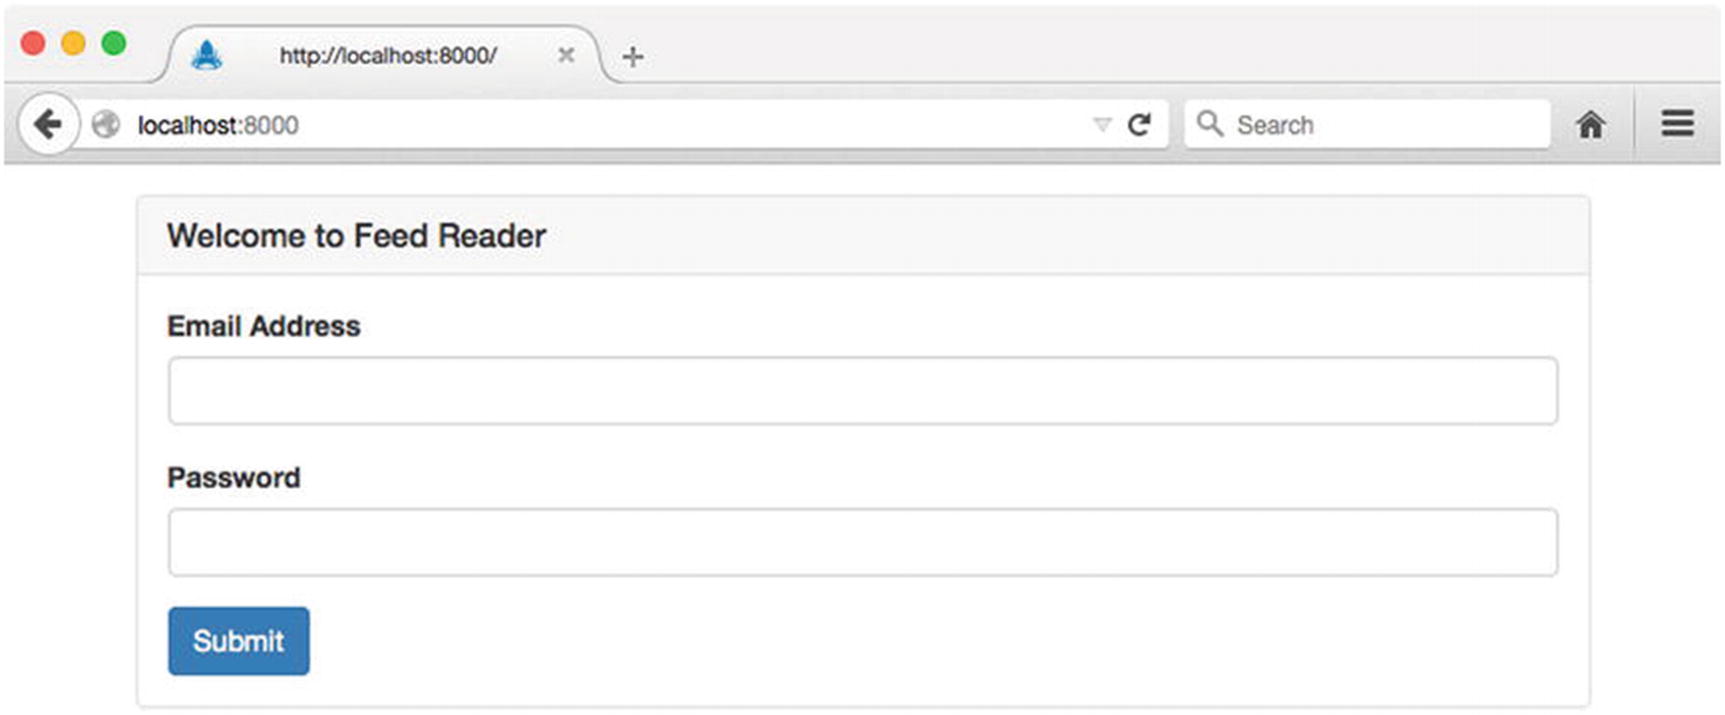
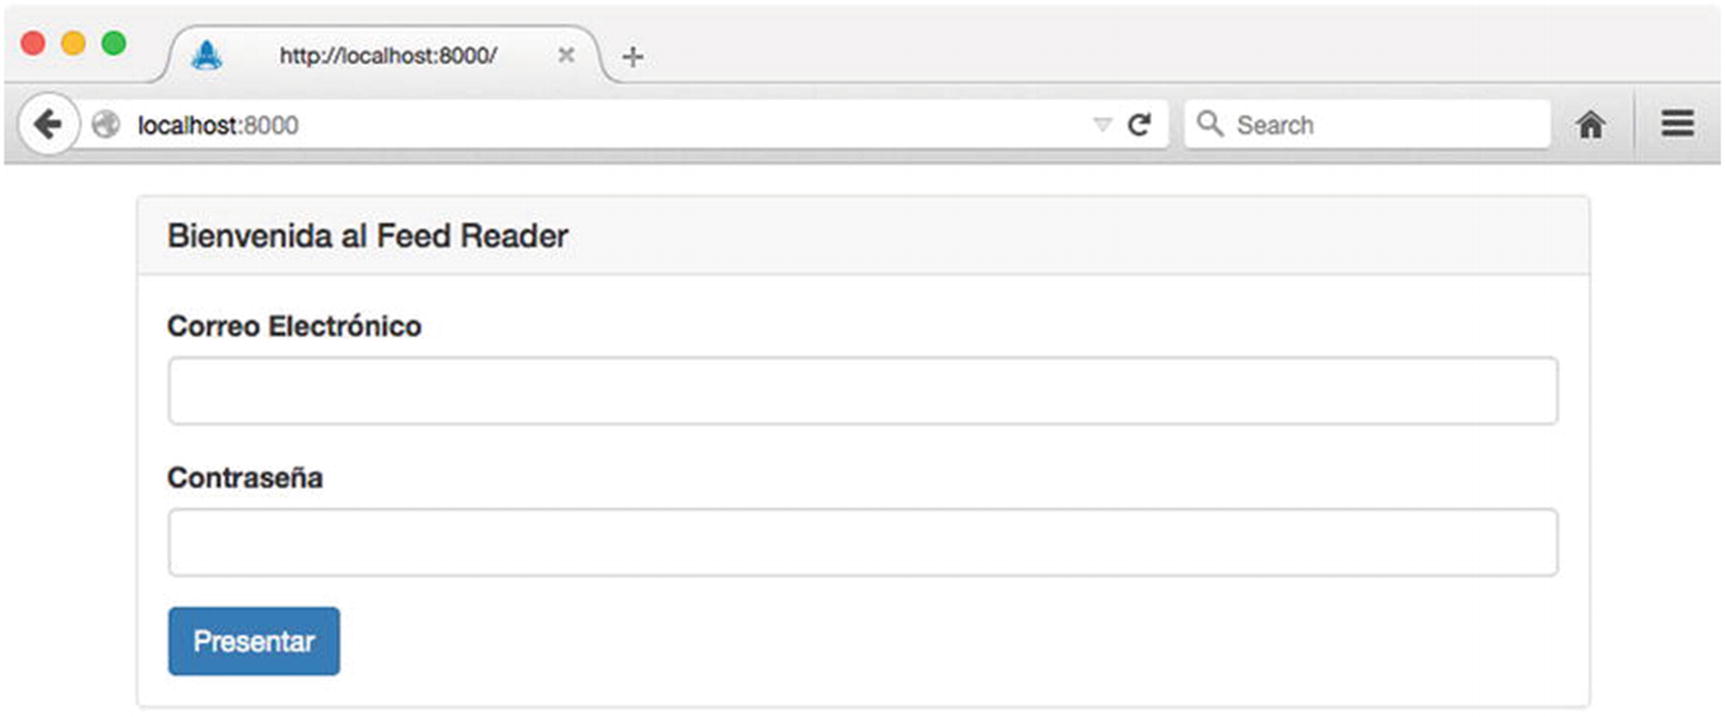
This example is an updated version of the controller that we originally saw in Listing 8-49, which is responsible for rendering our application’s home page. Here we specify the country and language to be used for locating content files by assigning them to the locals.context property of the incoming Express response object. If no such value is specified, Kraken’s default behavior is to use US English. The English and Spanish versions of the rendered template are shown in Figure 8-8 and Figure 8-9, respectively.
Figure 8-8
English version of the application’s home page
Figure 8-9
Spanish version of the application’s home page
Detecting Locality
The example shown in Listing 8-58 demonstrates the process by which specific regional settings can be manually assigned to an incoming request. What it does not demonstrate, however, is the process by which a user’s desired localization settings can be automatically detected.
Listing 8-59 demonstrates a simple method for determining locality based on the value of the accept-language HTTP request header. In this example, we have removed the logic for determining a user’s locality from our route and placed it in a more appropriate location—a middleware function that will be called for every incoming request.
// app/lib/middleware/locale.js
var acceptLanguage = require('accept-language');
/**
* Express middleware function that automatically determines locality based on the value
* of the `accept-language` header.
*/
module.exports = function() {
return function(req, res, next) {
var locale = acceptLanguage.parse(req.headers['accept-language']);
Detecting Locality Based on the Value of the accept-language HTTP Request Header
Note
While helpful, the accept-language HTTP request header does not always reflect the desired localization settings of the user making the request. Always be sure to provide users with a method for manually specifying such settings on their own (e.g., as part of a “Settings” page).
Security
Given Kraken’s origins at PayPal, a worldwide online payments processor, it should come as no surprise that the framework focuses heavily on security. Kraken does so with the help of Lusca, a library that extends Express with a number of enhanced security techniques, as suggested by the Open Web Application Security Project (OWASP). These extensions are provided in the form of multiple, independently configurable middleware modules. In this section, we will briefly examine two ways in which Kraken can help secure Express against commonly encountered attacks.
Note
This material should by no means be considered exhaustive. It is merely intended to serve as a starting point for implementing security within the context of a Kraken/Express application. Readers with a hand in implementing security on the Web are highly encouraged to delve further into this topic by reading a few of the many great books that are devoted entirely to this subject.
Defending Against Cross-Site Request Forgery Attacks
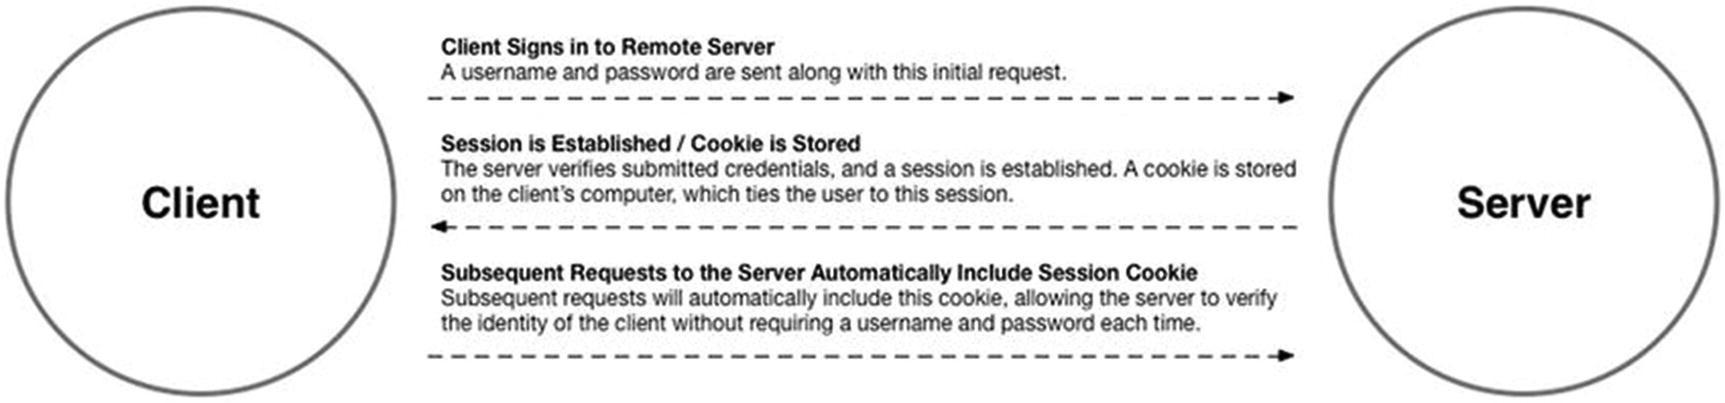
To understand the basic premise behind cross-site request forgery (CSRF) attacks, it is important to understand the method by which most web applications authenticate their users: cookie-based authentication. This process is illustrated in Figure 8-10.
Figure 8-10
Cookie-based authentication
In a typical scenario, a user will submit their credentials to a web application, which will then compare them with those it has on file. Assuming the credentials are valid, the server will then create a new session—essentially, a record representing the user’s successful sign-in attempt. A unique identifier belonging to this session is then transmitted to the user in the form of a cookie, which is automatically stored by the user’s browser. Subsequent requests to the application made by the browser will automatically attach the information stored in this cookie, allowing the application to look up the matching session record. As a result, the application has the ability to verify the user’s identity without requiring the user to resubmit their username and password along with every request.
A CSRF attack takes advantage of the trusted relationship (i.e., session) that exists between an application and a user’s browser, by tricking that user into submitting an unintended request to the application. Let’s take a look at an example that should help explain how this works. Figure 8-11 illustrates the process by which a user signs into a trusted application—in this case, the csrf-server project that is included with this chapter’s source code.
Figure 8-11
Signing into a trusted application
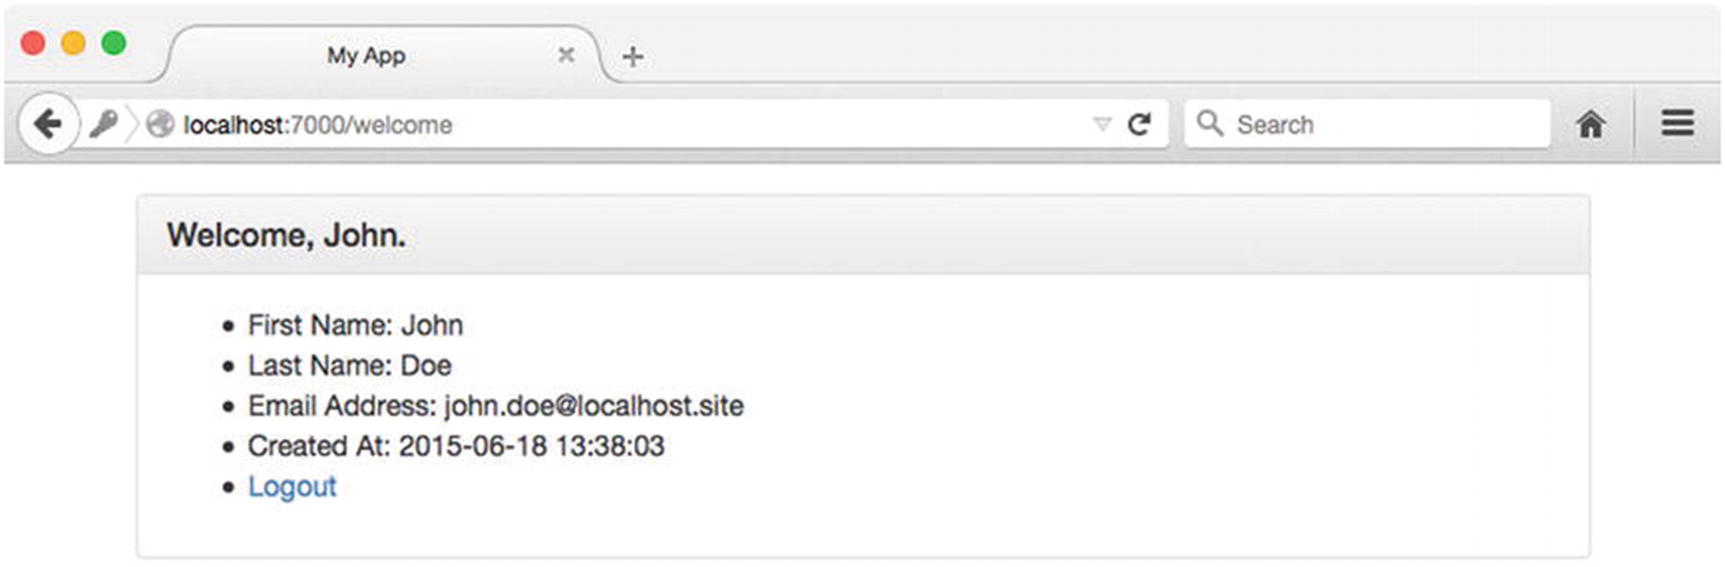
Figure 8-12 shows the welcome screen that the user is presented with after successfully signing into the application. Here we see some basic information about the user, including their name and when their account was created.
Figure 8-12
Successful sign-in attempt
At this point, imagine a scenario in which the user leaves the application (without signing out) and visits another site, which, unbeknownst to the user, has malicious intent (see Figure 8-13). A copy of this malicious site can be found in this chapter’s csrf-attack project. In this example, the malicious site lures the user into clicking a button with the tempting promise of free candy and butterflies.
Figure 8-13
Malicious web site attempting to convince the user to click a button
Listing 8-60 shows an excerpt from the HTML for this malicious site, which should help explain what is going to happen when the user clicks this button. As you can see, clicking the button will trigger the creation of a POST request to the original application’s /transfer-funds route.
After clicking the button, instead of receiving the free candy and butterflies that they were promised, the user is greeted with a message indicating that all of the funds have been transferred out of their account, as shown in Figure 8-14.
Figure 8-14
Successful CSRF attack
Several different steps can be taken to defend against attacks of this nature. The method by which Kraken defends against them is referred to as the “synchronizer token pattern.” In this approach, a random string is generated for each incoming request, which the client can subsequently access as part of a template’s context or via a response header. Importantly, this string is not stored as a cookie. The next POST, PUT, PATCH, or DELETE request made by the client must include this string, which the server will then compare with the one it previously generated. The request will only be allowed to proceed if a match is made.
Let’s take a look at how this works in practice. Figure 8-15 shows the sign-in page for this chapter’s app project. Refer back to Listing 8-56 to see the underlying HTML for this page.
Figure 8-15
Sign-in page for this chapter’s app project
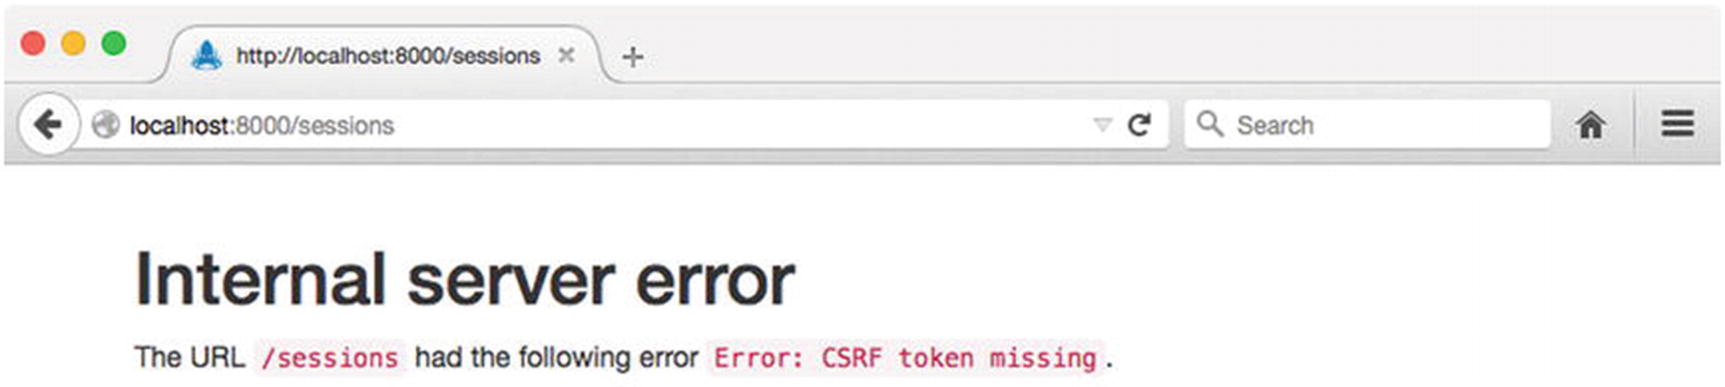
In its current state, any attempt to sign in using this form will result in the error shown in Figure 8-16. Here we see an error message from Kraken warning us of a missing “CSRF token.”
Figure 8-16
Kraken’s “CSRF token missing” error
This error can be resolved with the addition of a single, hidden input to our application’s login form. Listing 8-61 shows an excerpt from our application’s updated Dust template, along with an excerpt from the rendered output.
Inserting a Hidden _csrf Field into the Sign-In Form
Here we create a hidden input with the name _csrf, the value for which Lusca has automatically passed to our template’s context under a property with the same name. The value that we see rendered in this example, OERRGi9AGNPEYnNWj8skkfL9f0JIWJp3uKK8g=, is a random hash that Lusca has generated for us (i.e., the “synchronizer token”). When we submit this form, Lusca will verify that this value matches the one it previously gave us. If they match, the request is allowed to proceed. Otherwise, an error is thrown. This approach allows applications to defend against CSRF attacks by requiring additional, identifying information that is not stored as part of a cookie, making it much more difficult for attackers to trick users into performing unintended actions.
Configuring Content Security Policy Headers
Lusca provides developers with a convenient mechanism for configuring an application’s Content Security Policy (CSP). These rules provide instructions to supporting browsers regarding the locations from which various resources (e.g., scripts, stylesheets, images, etc.) can be loaded. When defined, these rules are conveyed to browsers in the form of the Content-Security-Policy response header.
By way of an example, see Listing 8-62, in which Lusca’s csp middleware module is provided with a configuration object specifying that only images may be loaded from any domain. All other resources must originate from the application’s domain.
app.use(lusca({
'csp': {
'default-src': ''self",
'img-src': '*'
}
});
Listing 8-62
Configuring an Application’s Content Security Policy
Note
For a full list of the various options that can be configured via the Content-Security-Policy header, visit the Open Web Application Security Project (OWASP) at https://owasp.org.
Summary
The Node community is heavily influenced by the so-called “Unix philosophy,” which promotes (among other things) the creation of small, tightly focused modules that are designed to do one thing well. This approach has allowed Node to thrive as a development platform by fostering a large ecosystem of open source modules. PayPal has taken this philosophy to heart by structuring Kraken not as a single, monolithic framework, but rather as a collection of modules that extends and provides structure to Express-based applications. By taking this approach, PayPal has managed to contribute several modules to the Node ecosystem from which developers can benefit, regardless of whether they choose to use Kraken as a whole.