© Sufyan bin Uzayr, Nicholas Cloud, Tim Ambler 2019
S. bin Uzayr et al.JavaScript Frameworks for Modern Web Developmenthttps://doi.org/10.1007/978-1-4842-4995-6_3

3. PM2

Sufyan bin Uzayr1 , Nicholas Cloud2 and Tim Ambler3
(1)
Al Manama, United Arab Emirates
(2)
Florissant, MO, USA
(3)
Nashville, TN, USA
 

Do not wait; the time will never be “just right.” Start where you stand, and work with whatever tools you may have at your command, and better tools will be found as you go along.

—George Herbert

The previous chapters within this section have covered a variety of useful web development tools, with our primary focus placed on client-side development. In this chapter, we will round out our coverage of development tools by shifting our focus to the server. We will be exploring PM2, a command-line utility that simplifies many of the tasks associated with running Node applications, monitoring their status, and efficiently scaling them to meet increasing demand. Topics covered include
  • Working with processes

  • Monitoring logs

  • Monitoring resource usage

  • Advanced process management

  • Load balancing across multiple processors

  • Zero downtime deployments

Installation

PM2’s command-line utility, pm2, is available via npm. If you have not already installed PM2, you should do so before you continue, as shown in Listing 3-1.
$ npm install -g pm2
$ pm2 --version
3.2.9
Listing 3-1

Installing the pm2 Command-Line Utility via npm

Note

Node’s package manager (npm) allows users to install packages in one of two contexts: locally or globally. In this example, pm2 is installed within the global context, which is typically reserved for command-line utilities.

Working with Processes

Listing 3-2 shows the contents of a simple Node application that will form the basis of our first several interactions with PM2. When accessed, it does nothing more than display the message “Hello, world.” to users.
// my-app/index.js
var express = require('express');
var morgan = require('morgan');
var app = express();
app.use(morgan('combined'));
app.get('/', function(req, res, next) {
    res.send('Hello, world. ');
});
app.listen(8000);
Listing 3-2

Simple Express Application

Figure 3-1 demonstrates the process by which we can launch this application with the help of the pm2 command-line utility. In this example, we instruct PM2 to start our application by executing its index.js script. We also provide PM2 with an optional name for our application (my-app), making it easier for us to reference it at a later time. Before doing so, be sure you install the project’s dependencies by running $ npm install.
../images/333189_2_En_3_Chapter/333189_2_En_3_Fig1_HTML.jpg
Figure 3-1

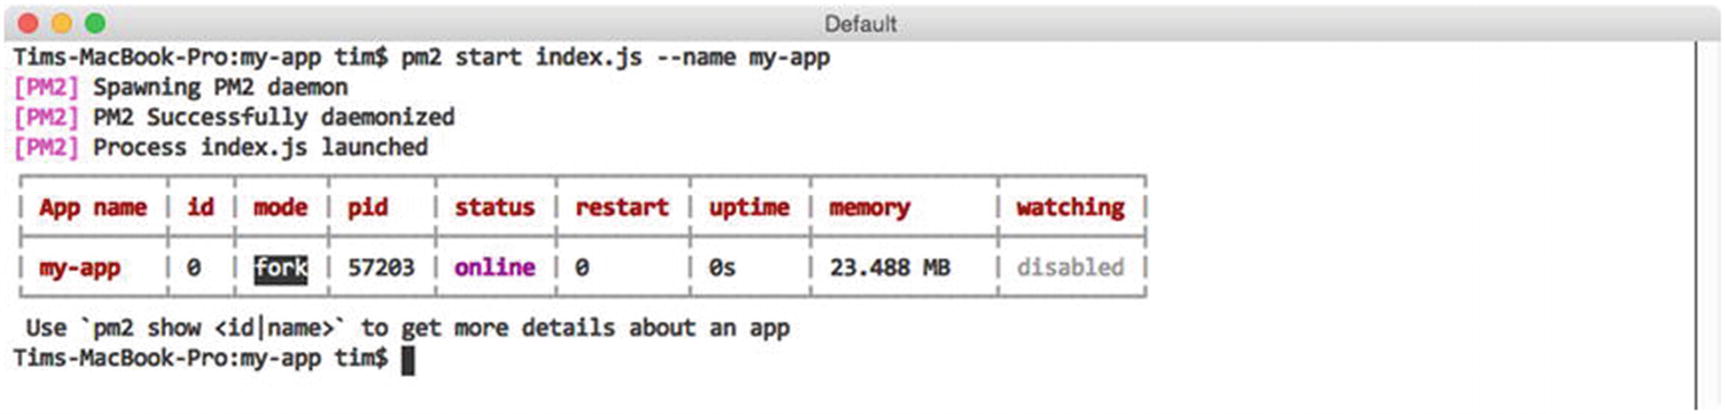
Launching the application shown in Listing 3-2 with PM2

After calling PM2’s start command, PM2 helpfully displays a table containing information about every Node application it is currently aware of before returning us to the command prompt. The meaning of the columns that we see in this example is summarized in Table 3-1.
Table 3-1

Summary of Columns Shown in Figure 3-1

Heading

Description

App name

The name of the process. Defaults to the name of the script that was executed.

id

A unique ID assigned to the process by PM2. Processes can be referenced by name or ID.

mode

The method of execution (fork or cluster). Defaults to fork. Explored in more detail later in the chapter.

pid

A unique number assigned by the operating system to the process.

status

The current status of the process (e.g., online, stopped, etc.).

restart

The number of times the process has been restarted by PM2.

uptime

The length of time the process has been running since last being restarted.

memory

The amount of memory consumed by the process.

watching

Indicates whether PM2 will automatically restart the process when it detects changes within a project’s file structure. Particularly useful during development. Defaults to disabled.

As indicated by the output provided by PM2 in Listing 3-3, our application is now online and ready for use. We can verify this by calling our application’s sole route using the curl command-line utility, as shown in Figure 3-2.
../images/333189_2_En_3_Chapter/333189_2_En_3_Fig2_HTML.jpg
Figure 3-2

Accessing the sole route defined by our Express application

Note

Figure 3-2 assumes the existence of the curl command-line utility within your environment. If you happen to be working in an environment where this utility is not available, you could also verify the status of this application by opening it directly within your web browser.

In addition to the start command, PM2 also provides a number of useful commands for interacting with processes that PM2 is already aware of, the most common of which are shown in Table 3-2.
Table 3-2

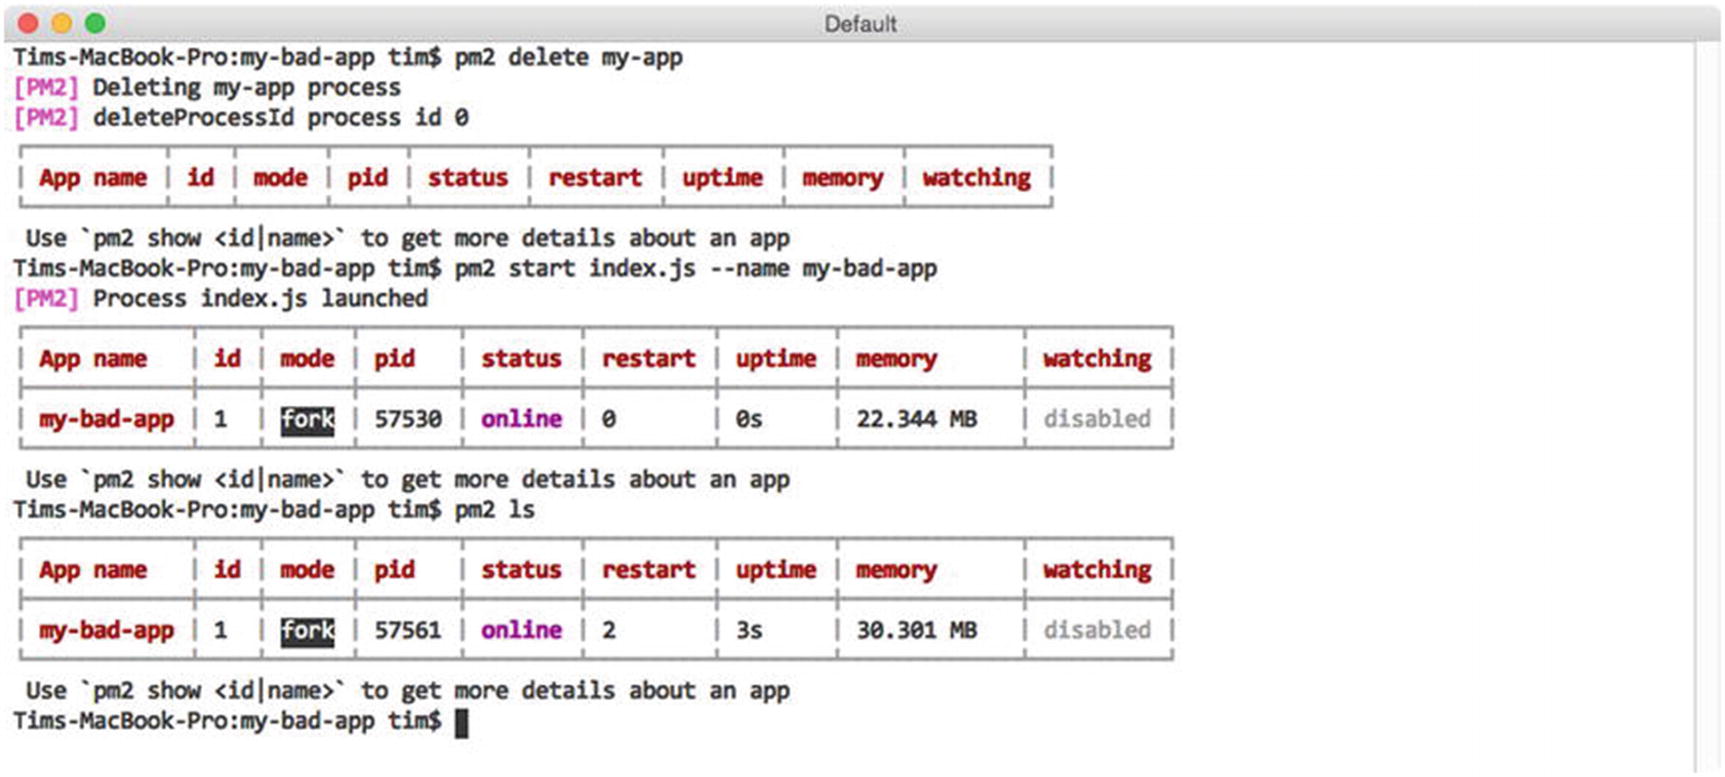
Frequently Used Commands for Interacting with PM2 Processes

Command

Description

list

Displays an up-to-date version of the table shown in Listing 3-4

stop

Stops the process, without removing it from PM2’s list

restart

Restarts the process

delete

Stops the process and removes it from PM2’s list

show

Displays details regarding the specified process

Simple commands such as stop, start, and delete require no additional commentary. Figure 3-3, on the other hand, shows the information you can expect to receive when requesting information about a specific PM2 process via the show command.
../images/333189_2_En_3_Chapter/333189_2_En_3_Fig3_HTML.jpg
Figure 3-3

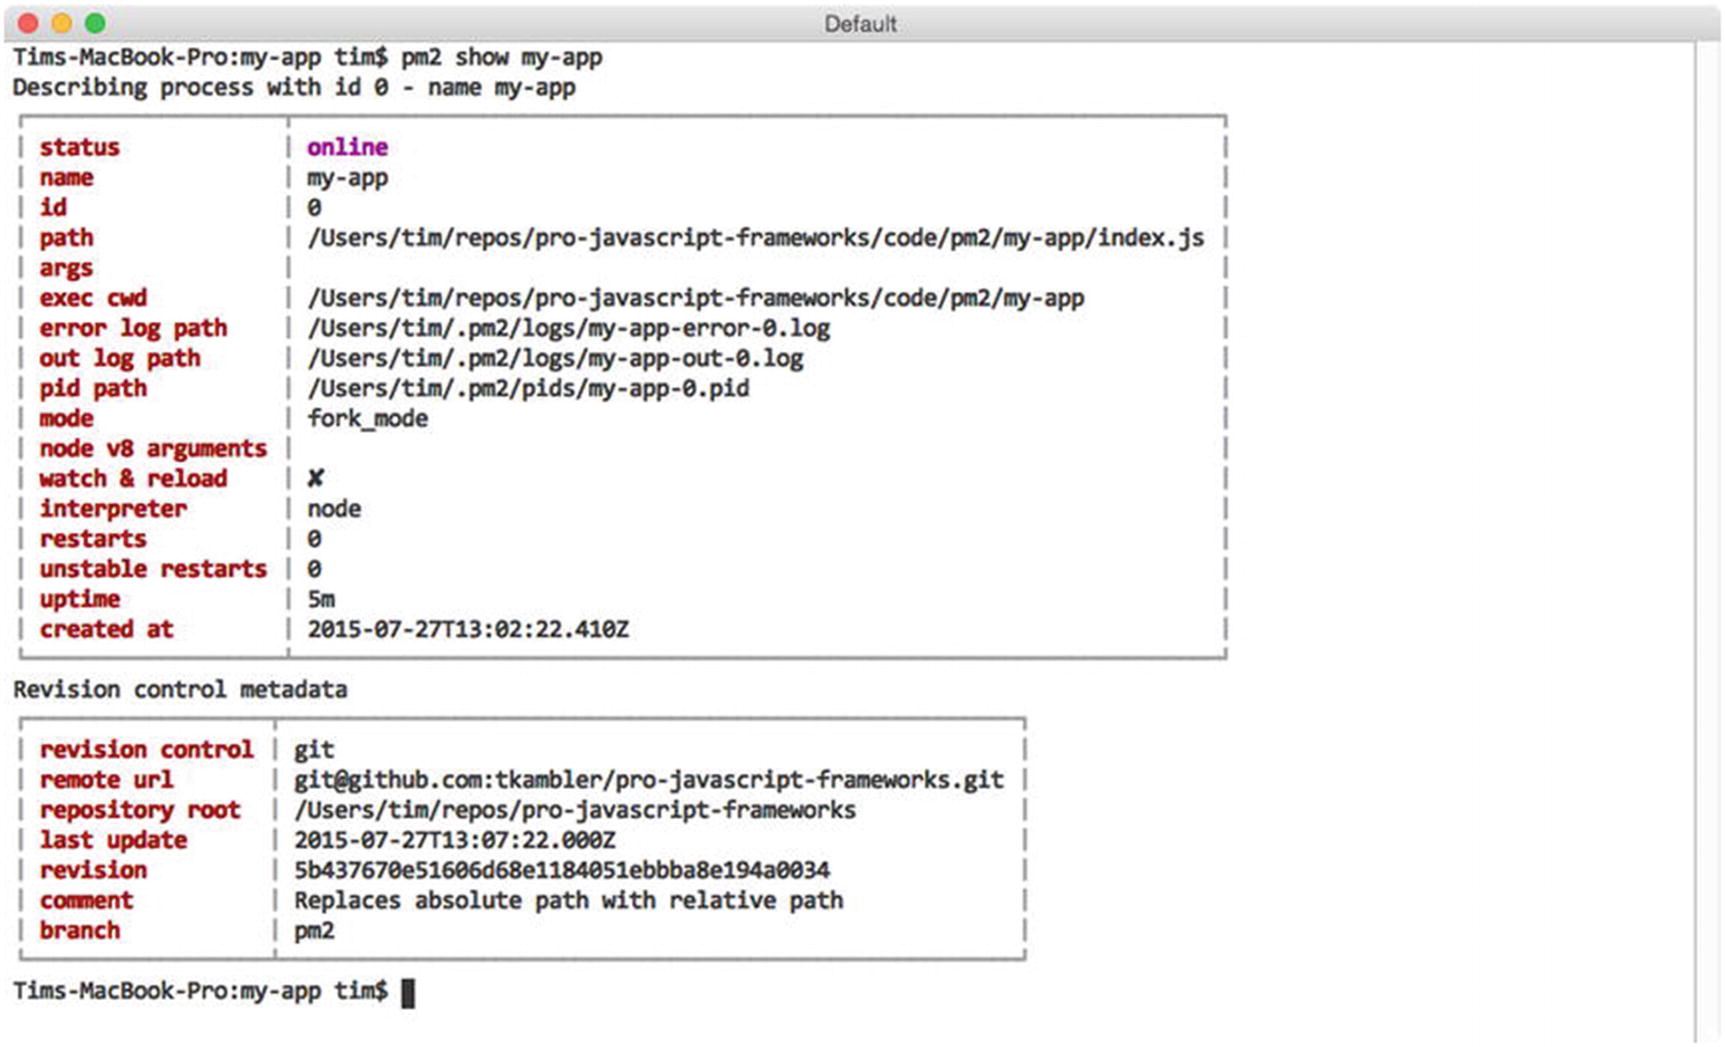
Viewing details for a specific PM2 process

Recovering from Errors

At this point, you are now familiar with some of the basic steps involved in interacting with PM2. You’ve learned how to create new processes with the help of PM2’s start command. You’ve also discovered how you can subsequently manage running processes with the help of commands such as list, stop, restart, delete, and show. We’ve yet to discuss, however, much of the real value that PM2 brings to the table in regard to managing Node processes. We’ll begin that discussion by discovering how PM2 can assist Node applications in automatically recovering from fatal errors.

Listing 3-3 shows a modified version of the application we originally saw in Listing 3-2. In this version, however, an uncaught exception is thrown at a regular interval.
// my-bad-app/index.js
var express = require('express');
var morgan = require('morgan');
var app = express();
app.use(morgan('combined'));
app.get('/', function(req, res, next) {
    res.send('Hello, world. ');
});
setInterval(function() {
    throw new Error('Uh oh.');
}, 4000);
app.listen(8000);
Listing 3-3

Modified Version of Our Original Application That Throws an Uncaught Exception Every 4 Seconds

If we were to start this application without the help of PM2 by passing it directly to the node executable, we would quickly find ourselves out of luck the moment our first error was thrown. Node would simply print the error message to the console before dumping us back to the command prompt, as shown in Figure 3-4.
../images/333189_2_En_3_Chapter/333189_2_En_3_Fig4_HTML.jpg
Figure 3-4

Output provided by Node after crashing from the error shown in Listing 3-3

Such behavior won’t get us very far in a real usage scenario. Ideally, an application that has been released to a production environment should be thoroughly tested and devoid from such uncaught exceptions. However, in the event of such a crash, an application should at the very least be able to bring itself back online without requiring manual intervention. PM2 can help us accomplish this goal.

In Figure 3-5, we remove our existing process from PM2’s list via the delete command and create a new instance of the poorly written application shown in Listing 3-3. Afterward, we wait several seconds before requesting an up-to-date process list from PM2.
../images/333189_2_En_3_Chapter/333189_2_En_3_Fig5_HTML.jpg
Figure 3-5

PM2 helps Node applications recover from fatal errors

Notice anything interesting here? Based on the values within the status, restart, and uptime columns, we can see that our application has crashed three times already. Each time, PM2 has helpfully stepped in and restarted it for us. The most recent process has been running for a total of 2 seconds, which means we can expect another crash (and automatic restart) 2 seconds from now.

PM2’s ability to assist applications in recovering from fatal errors in a production environment, while useful, is just one of several useful features the utility provides. PM2 is also equally useful within development environments, as we’ll soon see.

Responding to File Changes

Imagine a scenario in which you’ve recently begun work on a new Node project. Let’s assume it’s a web API built with Express. Without the help of additional tools, you must manually restart the related Node process in order to see the effects of your ongoing work—a frustrating chore that quickly grows old. PM2 can assist you in this situation by automatically monitoring the file structure of your project. As changes are detected, PM2 can automatically restart your application for you, if you instruct it to do so.

Figure 3-6 demonstrates this process. In this example, we first remove our currently running instance of my-bad-app. Next, we create a new instance of the application that was shown in our original example (see Listing 3-2). This time, however, we pass an additional flag, --watch, which instructs PM2 to monitor our project for changes and to respond accordingly.
../images/333189_2_En_3_Chapter/333189_2_En_3_Fig6_HTML.jpg
Figure 3-6

Creating a new PM2 process that will automatically restart itself as changes are detected

As changes are saved to this project’s files, subsequent calls to PM2’s list command will indicate how many times PM2 has restarted the application, as seen in a previous example.

Monitoring Logs

Refer back to Listing 3-2 and note this application’s use of morgan, a module for logging incoming HTTP requests. In this example, morgan is configured to print such information to the console. We can see the result by running our application directly via the node executable, as shown in Figure 3-7.
../images/333189_2_En_3_Chapter/333189_2_En_3_Fig7_HTML.jpg
Figure 3-7

Logging incoming requests to Express with morgan

We recently explored how to allow PM2 to manage the execution of this application for us via the start command (see Figure 3-1). Doing so provides us with several benefits, but it also causes us to lose immediate insight into the output being generated by our application to the console. Fortunately, PM2 provides us with a simple mechanism for monitoring such output.

In Figure 3-3, we requested information from PM2 regarding a specific process under its control via the show command. Contained within the provided information were paths to two log files that PM2 automatically created for this process—one labeled “out log path” and one labeled “error log path”—to which PM2 will save this process’s standard output and error messages, respectively. We could view these files directly, but PM2 provides a much more convenient method for interacting with them, as shown in Figure 3-8.
../images/333189_2_En_3_Chapter/333189_2_En_3_Fig8_HTML.jpg
Figure 3-8

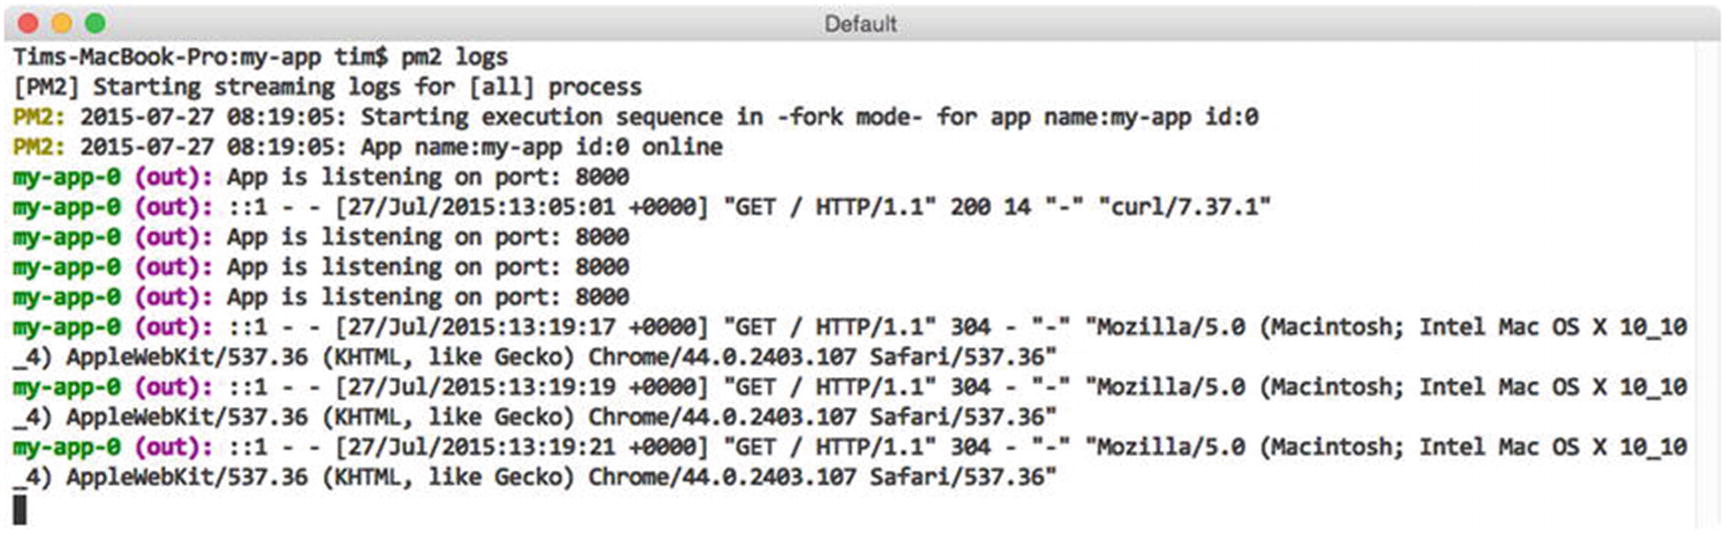
Monitoring the output from processes under PM2’s control

Here we see how the output from processes under PM2’s control can be monitored as needed via the logs command. In this example, we monitor the output from all processes under PM2’s control. Notice how PM2 helpfully prefixes each entry with information regarding the process from which each line of output originated. This information is particularly useful when using PM2 to manage multiple processes, which we will begin doing in the upcoming section. Alternatively, we can also monitor the output from a specific process by passing the name (or ID) for that process to the logs command (see Figure 3-9).
../images/333189_2_En_3_Chapter/333189_2_En_3_Fig9_HTML.jpg
Figure 3-9

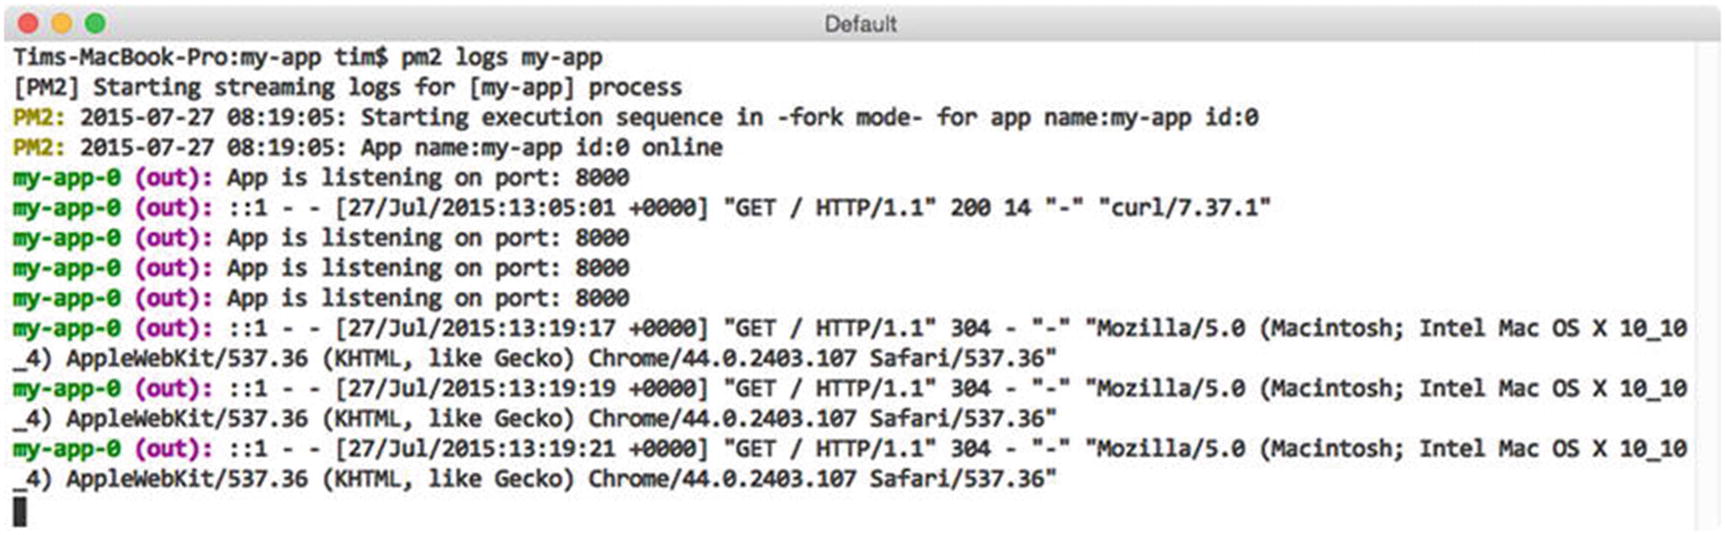
Monitoring the output from a specific process under PM2’s control

Should you wish to clear out the content of log files generated by PM2 at any point, you can quickly do so by calling PM2’s flush command. The behavior of the utility’s logs command can also be tweaked slightly with the use of two optional arguments, which are listed in Table 3-3.
Table 3-3

Arguments Accepted by PM2’s logs Command

Argument

Description

–raw

Displays the raw content of log files, stripping prefixed process identifiers in the process

–lines <N>

Instructs PM2 to display the last N lines, instead of the default of 20

Monitoring Resource Usage

In the previous section, you learned how PM2 can assist you in monitoring the standard output and errors being generated by processes under its control. In much the same way, PM2 also provides easy-to-use tools for monitoring the health of those processes, as well as for monitoring the overall health of the server on which they are running.

Monitoring Local Resources

Figure 3-10 demonstrates the output that is generated when PM2’s monit command is called. Here we see a continuously updated view that allows us to track the amount of CPU processing power as well as the amount of RAM consumed by each process being managed by PM2.
../images/333189_2_En_3_Chapter/333189_2_En_3_Fig10_HTML.jpg
Figure 3-10

Monitoring CPU and memory usage via PM2’s monit command

Monitoring Remote Resources

The information provided by PM2’s monit command provides us with a quick and easy method for monitoring the health of its processes. This functionality is particularly helpful during development, when our primary focus is on the resources being consumed within our own environment. It’s less helpful, however, as an application moves into a remote, production environment that could easily consist of multiple servers, each running its own instance of PM2.

PM2 takes this into account by also providing a built-in JSON API that can be accessed over the Web on port 9615. Disabled by default, the process for enabling it is shown in Figure 3-11.
../images/333189_2_En_3_Chapter/333189_2_En_3_Fig11_HTML.jpg
Figure 3-11

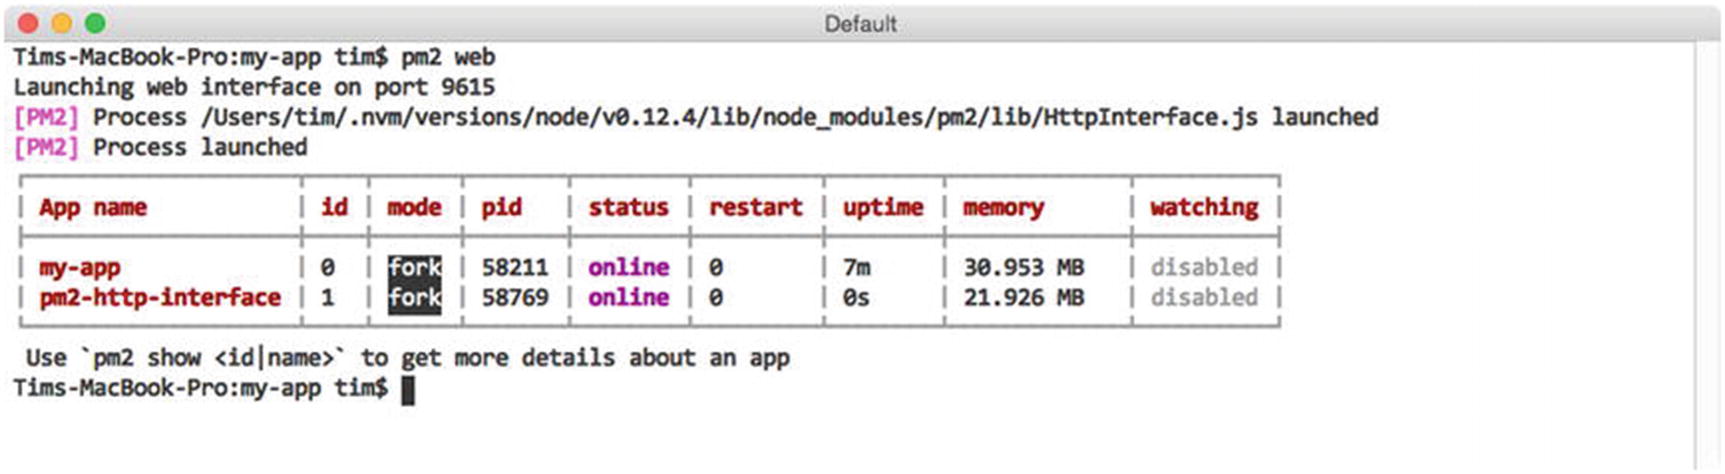
Enabling PM2’s JSON web API

In this example, we enable PM2’s web-accessible JSON API by calling the utility’s web command. PM2 implements this functionality as part of a separate application that runs independently of PM2 itself. As a result, we can see that a new process, pm2-http-interface, is now under PM2’s control. Should we ever wish to disable PM2’s JSON API, we can do so by removing this process as we would any other, by passing its name (or ID) to the delete (or stop) commands.

Listing 3-4 shows an excerpt of the output that is provided when a GET request is made to the server running PM2 over port 9615. As you can see, PM2 provides us with a number of details regarding each of the processes currently under its control, as well as the system on which it is running.
{
    "system_info": {
        "hostname": "iMac.local",
        "uptime": 2186
    },
    "monit": {
        "loadavg": [1.39794921875],
        "total_mem": 8589934592,
        "free_mem": 2832281600,
        "cpu": [{
            "model": "Intel(R) Core(TM) i5-4590 CPU @ 3.30GHz",
            "speed": 3300,
            "times": {
                "user": 121680,
                "nice": 0,
                "sys": 176220,
                "idle": 1888430,
                "irq": 0
            }
        }],
        "interfaces": {
            "lo0": [{
                "address": "::1",
                "netmask": "ffff:ffff:ffff:ffff:ffff:ffff:ffff:ffff",
                "family": "IPv6",
                "mac": "00:00:00:00:00:00",
                "scopeid": 0,
                "internal": true
            }],
            "en0": [{
                "address": "10.0.1.49",
                "netmask": "255.255.255.0",
                "family": "IPv4",
                "mac": "ac:87:a3:35:9c:72",
                "internal": false
            }]
        }
    },
    "processes": [{
        "pid": 1163,
        "name": "my-app",
        "pm2_env": {
            "name": "my-app",
            "vizion": true,
            "autorestart": true,
            "exec_mode": "fork_mode",
            "exec_interpreter": "node",
            "pm_exec_path": "/opt/my-app/index.js",
            "env": {
                "_": "/usr/local/opt/nvm/versions/node/v0.12.4/bin/pm2",
                "NVM_IOJS_ORG_MIRROR": "https://iojs.org/dist",
                "NVM_BIN": "/usr/local/opt/nvm/versions/node/v0.12.4/bin",
                "LOGNAME": "user",
                "ITERM_SESSION_ID": "w0t0p0",
                "HOME": "/Users/user",
                "COLORFGBG": "7;0",
                "SHLVL": "1",
                "XPC_SERVICE_NAME": "0",
                "XPC_FLAGS": "0x0",
                "ITERM_PROFILE": "Default",
                "LANG": "en_US.UTF-8",
                "PWD": "/opt/my-app",
                "NVM_NODEJS_ORG_MIRROR": "https://nodejs.org/dist",
                "PATH": "/usr/local/opt/nvm/versions/node/v0.12.4/bin",
                "__CF_USER_TEXT_ENCODING": "0x1F5:0x0:0x0",
                "SSH_AUTH_SOCK": "/private/tmp/com.apple.launchd.kEqu8iouDS/Listeners",
                "USER": "user",
                "NVM_DIR": "/usr/local/opt/nvm",
                "NVM_PATH": "/usr/local/opt/nvm/versions/node/v0.12.4/lib/node",
                "TMPDIR": "/var/folders/y3/2fphz1fd6rg9l4cg2t8t7g840000gn/T/",
                "TERM": "xterm",
                "SHELL": "/bin/bash",
                "TERM_PROGRAM": "iTerm.app",
                "NVM_IOJS_ORG_VERSION_LISTING": "https://iojs.org/dist/index.tab",
                "pm_cwd": "/opt/my-app"
            },
            "versioning": {
                "type": "git",
                "url": "[email protected]:tkambler/pro-javascript-frameworks.git",
                "revision": "18104d13d14673652ee7a522095fc06dcf87f8ba",
                "update_time": "2015-05-25T20:53:50.000Z",
                "comment": "Merge pull request #28 from tkambler/ordered-build",
                "unstaged": true,
                "branch": "pm2",
                "remotes": ["origin"],
                "remote": "origin",
                "branch_exists_on_remote": false,
                "ahead": false,
                "next_rev": null,
                "prev_rev": "b0e486adab79821d3093c6522eb8a24455bfb051",
                "repo_path": "/Users/user/repos/pro-javascript-frameworks"
            }
        },
        "pm_id": 0,
        "monit": {
            "memory": 32141312,
            "cpu": 0
        }
    }]
}
Listing 3-4

Excerpt of the Information Provided by PM2’s JSON API

Advanced Process Management

Most of this chapter’s focus so far has revolved around interactions with PM2 that occur primarily via the command line. On their own, commands such as start, stop, restart, and delete provide us with simple mechanisms for managing processes in a quick, one-off fashion. But what about more complex scenarios? Perhaps an application requires that additional parameters be specified at runtime, or perhaps it expects that one or more environment variables be set.

JSON Application Declarations

To meet these needs, additional configuration is needed, and the best way to accomplish this is with the help of what PM2 refers to as “JSON application configuration” files. An example configuration file that demonstrates most of the various options that are available is shown in Listing 3-5.
{
    "name"              : "my-app",
    "cwd"               : "/opt/my-app",
    "args"              : ["--argument1=value", "--flag", "value"],
    "script"            : "index.js",
    "node_args"         : ["--harmony"],
    "log_date_format"   : "YYYY-MM-DD HH:mm Z",
    "error_file"        : "/var/log/my-app/err.log",
    "out_file"          : "/var/log/my-app/out.log",
    "pid_file"          : "pids/my-app.pid",
    "instances"         : 1, // or 0 => 'max'
    "max_restarts"      : 10, // defaults to 15
    "max_memory_restart": "1M", // 1 megabytes, e.g.: "2G", "10M", "100K"
    "cron_restart"      : "1 0 * * *",
    "watch"             : false,
    "ignore_watch"      : ["node_modules"],
    "merge_logs"        : true,
    "exec_mode"         : "fork",
    "autorestart"       : false,
    "env": {
        "NODE_ENV": "production"
    }
}
Listing 3-5

Sample of the Various Options Available Within a JSON Application Configuration File

JSON application configuration files provide us with a standard format for passing advanced settings to PM2 in a way that is easily repeatable and that can be shared with others. Several of the options that you see here should be familiar, based on previous examples (e.g., name, out_file, error_file, watch, etc.). Others will be touched on later in the chapter. Descriptions for each are provided in Table 3-4.
Table 3-4

Descriptions of the Various Configuration Settings Shown in Listing 3-5

Setting

Description

name

Name of the application.

cwd

Directory from which the application will be launched.

args

Command-line arguments to be passed to the application.

script

Path to the script with which PM2 will launch the application (relative to cwd).

node_args

Command-line arguments to be passed to the node executable.

log_date_format

Format with which log timestamps will be generated.

error_file

Path to which standard error messages will be logged.

out_file

Path to which standout output messages will be logged.

pid_file

Path to which the application’s PID (process identifier) will be logged.

instances

The number of instances of the application to launch. Discussed in further detail in the next section.

max_restarts

The maximum number of times PM2 will attempt to restart (consecutively) a failed application before giving up.

max_memory_restart

PM2 will automatically restart the application if the amount of memory it consumes crosses this threshold.

cron_restart

PM2 will automatically restart the application on a specified schedule.

watch

Whether or not PM2 should automatically restart the application as changes to its file structure are detected. Defaults to false.

ignore_watch

An array of locations for which PM2 should ignore file changes, if watching is enabled.

merge_logs

If multiple instances of a single application are created, PM2 should use a single output and error log file for all of them.

exec_mode

Method of execution. Defaults to fork. Discussed in further detail in the next section.

autorestart

Automatically restarts a crashed or exited application. Defaults to true.

vizon

If enabled, PM2 will attempt to read metadata from the application’s version control files, if they exist. Defaults to true.

env

Object containing environment variable keys/values to pass to the application.

Included with this chapter is a microservices project that provides a working demonstration of JSON configuration files in action. Contained within this project are two applications: a weather application with an API that returns random temperature information for a specified postal code and a main application that generates a request to the API every 2 seconds and prints the result to the console. The main script for each of these applications is shown in Listing 3-6.
// microservices/main/index.js
var request = require('request');
if (!process.env.WEATHER_API_URL) {
    throw new Error('The `WEATHER_API_URL` environment variable must be set.');
}
setInterval(function() {
    request({
        'url': process.env.WEATHER_API_URL + '/api/weather/37204',
        'json': true,
        'method': 'GET'
    }, function(err, res, result) {
        if (err) throw new Error(err);
        console.log('The temperature is: %s', result.temperature.fahrenheit);
    });
}, 2000);
// microservices/weather/index.js
if (!process.env.PORT) {
    throw new Error('The `PORT` environment variable must be set.');
}
var express = require('express');
var morgan = require('morgan');
var app = express();
app.use(morgan('combined'));
var random = function(min, max) {
    return Math.floor(Math.random() * (max - min + 1) + min);
};
app.get('/api/weather/:postal_code', function(req, res, next) {
    var fahr = random(70, 110);
    res.send({
        'temperature': {
            'fahrenheit': fahr,
            'celsius': (fahr - 32) * (5/9)
        }
    });
});
app.listen(process.env.PORT);
Listing 3-6

Source Code for the main and weather Applications

A single JSON application configuration file is also included with the microservices project, the content of which is shown in Listing 3-7.
[
    {
        "name"              : "main",
        "cwd"               : "../microservices",
        "script"            : "main/index.js",
        "max_memory_restart": "60M",
        "watch"             : true,
        "env": {
            "NODE_ENV": "development",
            "WEATHER_API_URL": "http://localhost:7010"
        }
    },
    {
        "name"              : "weather-api",
        "cwd"               : "../microservices",
        "script"            : "weather/index.js",
        "max_memory_restart": "60M",
        "watch"             : true,
        "env": {
            "NODE_ENV": "development",
            "PORT": 7010
        }
    }
]
Listing 3-7

JSON Application Configuration File for This Chapter’s microservices Project microservices/pm2/development.json

The application configuration file shown here provides PM2 with instructions on how to launch each of the applications included within this project. In this example, PM2 is instructed to restart each application if changes are detected to either’s file structure, or if they begin to consume more than 60MB of memory. The file also provides PM2 with separate environment variables to be passed to each process.

Note

Before running this example, you will need to adjust the values for the cwd settings within this file so that they reference the absolute path to the microservices folder on your computer. After making the appropriate adjustments, launch both applications with a single call to PM2, as shown in Figure 3-12.

../images/333189_2_En_3_Chapter/333189_2_En_3_Fig12_HTML.jpg
Figure 3-12

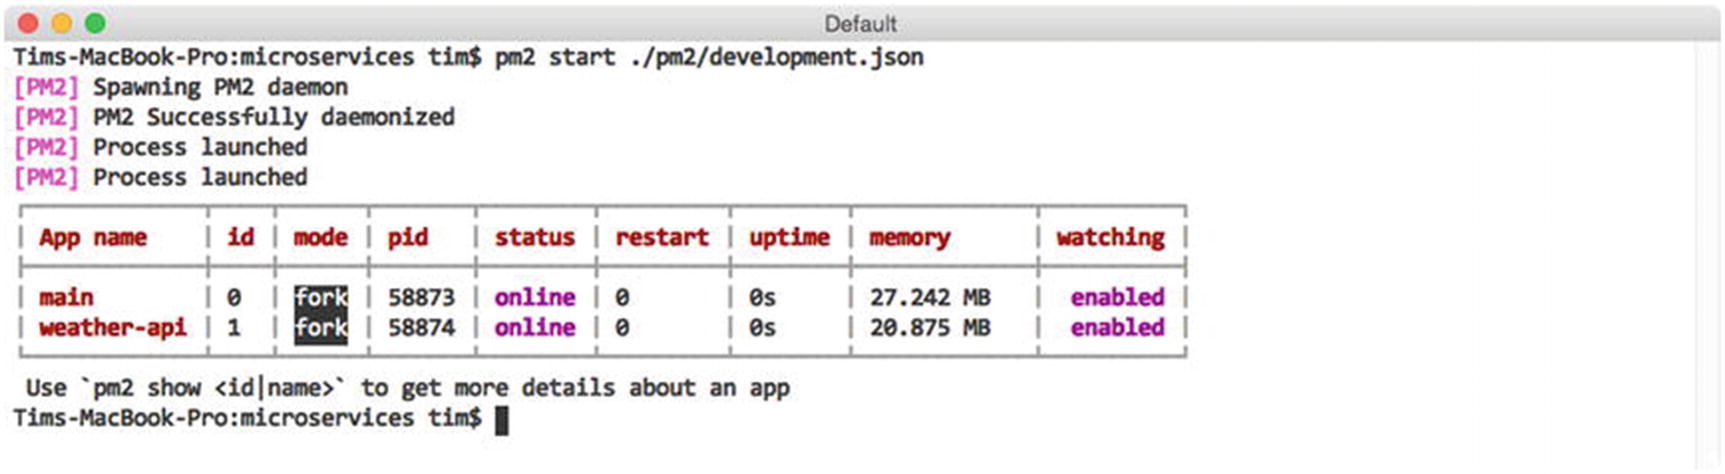
Launching the main and weather-api applications with PM2

As expected, PM2 has created two instances for us, one for each of the applications referenced within our configuration file. As in previous examples, we can monitor the output that is generated with the help of PM2’s logs command (see Figure 3-13).
../images/333189_2_En_3_Chapter/333189_2_En_3_Fig13_HTML.jpg
Figure 3-13

Excerpt of the output generated by PM2’s logs command

Load Balancing Across Multiple Processors

The single-threaded, nonblocking nature of Node’s I/O model makes it possible for developers to create applications capable of handling thousands of concurrent connections with relative ease. While impressive, the efficiency with which Node is capable of processing incoming requests comes with one major expense: an inability to spread computation across multiple CPUs. Thankfully, Node’s core cluster module provides a method for addressing this limitation. With it, developers can write applications capable of creating their own child processes—each running on a separate processor, and each capable of sharing the use of ports with other child processes and the parent process that launched it.

Before we close out this chapter, let’s take a look at a convenient abstraction of Node’s cluster module that is provided by PM2. With this functionality, applications that were not originally written to take advantage of Node’s cluster module can be launched in a way that allows them to take full advantage of multiprocessor environments. As a result, developers can quickly scale up their applications to meet increasing demand without immediately being forced to bring additional servers to bear.

Listing 3-8 shows the source code for a simple Express application that we will be scaling across multiple processors with the help of PM2, while Listing 3-9 shows the accompanying JSON application configuration file.
// multicore/index.js
if (!process.env.port) throw new Error('The port environment variable must be set');
var express = require('express');
var morgan = require('morgan');
var app = express();
app.use(morgan('combined'));
app.route('/')
    .get(function(req, res, next) {
        res.send('Hello, world.');
    });
app.listen(process.env.port);
Listing 3-8

Express Application to Be Scaled Across Multiple CPUs

// multicore/pm2/development.json
{
    "name": "multicore",
    "cwd": "../multicore",
    "max_memory_restart": "60M",
    "watch": false,
    "script": "index.js",
    "instances": 0, // max
    "exec_mode": "cluster",
    "autorestart": true,
    "merge_logs": true,
    "env": {
        "port": 9000
    }
}
Listing 3-9

JSON Application Configuration File with Which Our Application Will Be Launched

The application configuration file shown in Listing 3-9 contains two key items of interest. The first is the instances property . In this example, we specify a value of 0, which instructs PM2 to launch a separate process for every CPU that it finds. The second is the exec_mode property. By specifying a value of cluster, we instruct PM2 to launch its own parent process, which will in turn launch separate child processes for our application with the help of Node’s cluster module.

In Figure 3-14, we launch the application by passing the path to our application configuration file to PM2’s start command. Afterward, PM2 displays a listing of every known process, as in previous examples. In this instance, we see that PM2 has launched a separate process for each of the eight CPUs available within our environment. We can verify this by monitoring CPU usage for each of these new processes using the monit command , as shown in Figure 3-15.
../images/333189_2_En_3_Chapter/333189_2_En_3_Fig14_HTML.jpg
Figure 3-14

Launching the application on cluster mode with PM2

Note

When launching applications in cluster mode, PM2 will print a message to the console warning that this functionality is still a beta feature. According to the lead developer of PM2, however, this functionality is stable enough for production environments, so long as Node v0.12.0 or higher is being used.

../images/333189_2_En_3_Chapter/333189_2_En_3_Fig15_HTML.jpg
Figure 3-15

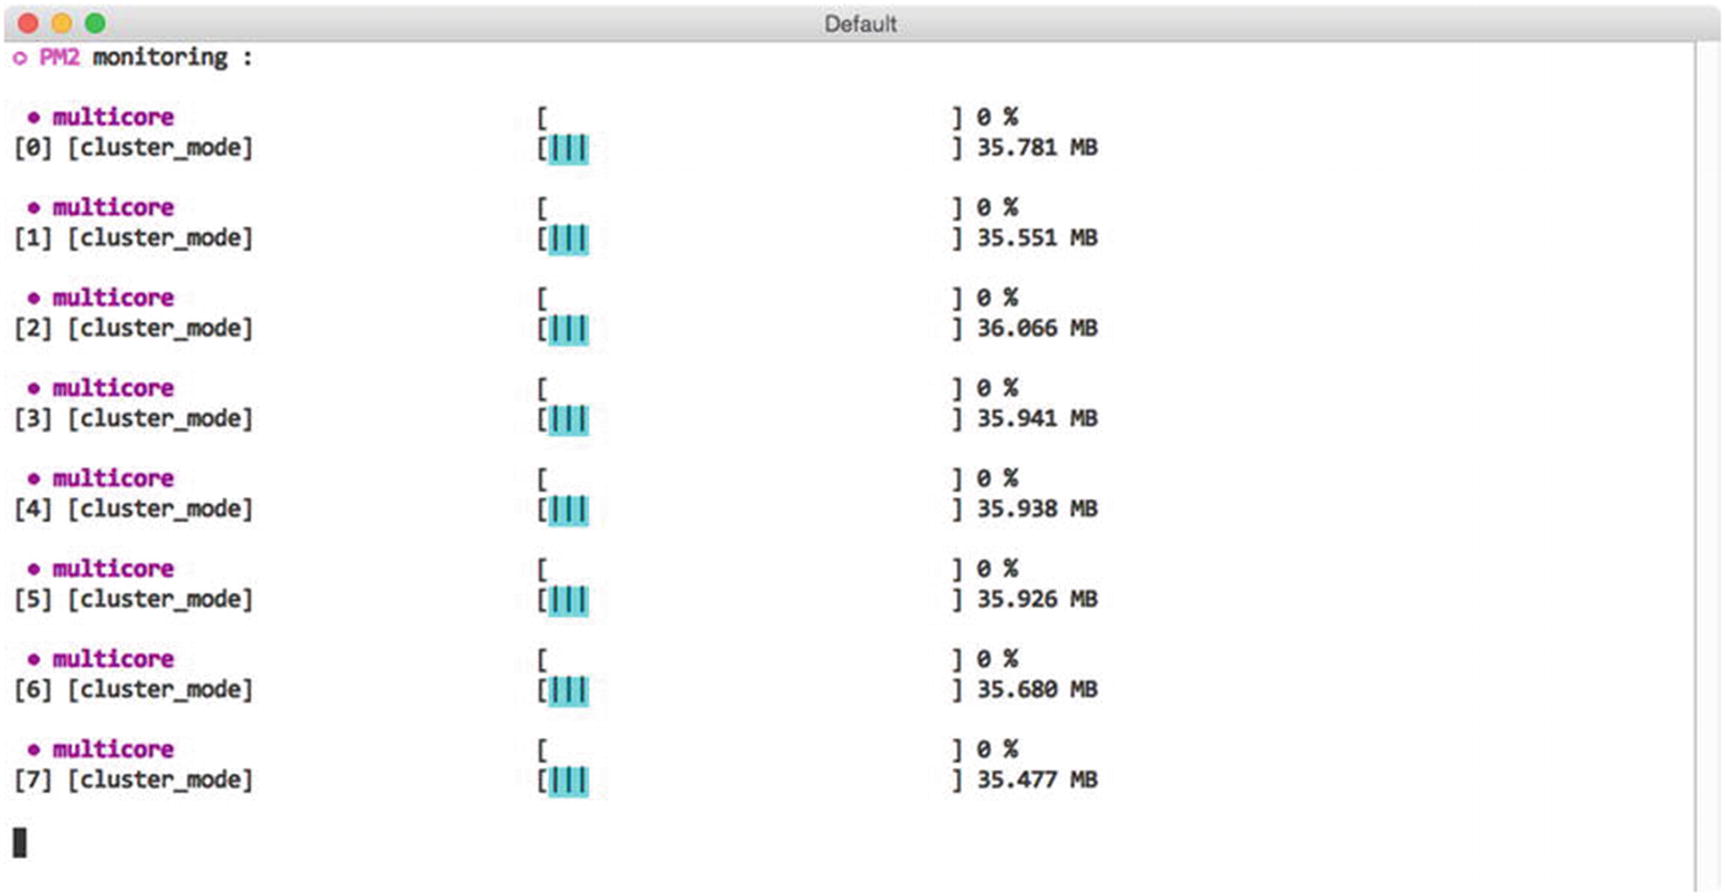
Monitoring CPU usage with PM2’s monit command

Before you continue, you can quickly remove each of the eight processes launched by this example by running $ pm2 delete multicore.

Zero Downtime Deployments

After launching an application in cluster mode, PM2 will begin forwarding incoming requests in a round-robin fashion to each of the eight processes under its control—providing us with an enormous increase in performance. As an added benefit, having our application distributed across multiple processors also allows us to release updates without incurring any downtime, as we will see in a moment.

Imagine a scenario in which an application under PM2’s control is running on one or more servers. As updates to this application become available, releasing them to the public will involve two critical steps:
  • Copying the updated source code to the appropriate server(s)

  • Restarting each of the processes under PM2’s control

As these steps take place, a brief period of downtime will be introduced, during which incoming requests to the application will be rejected—unless special precautions are taken. Fortunately, launching applications with PM2 in cluster mode provides us with the tools we need to take those precautions.

To avoid any downtime when relaunching the application we previously saw in Listing 3-8, we will first need to make a minor adjustment to our application’s source code and application configuration files. The updated versions are shown in Listing 3-10.
// graceful/index.js
if (!process.env.port) throw new Error('The port environment variable must be set');
var server;
var express = require('express');
var morgan = require('morgan');
var app = express();
app.use(morgan('combined'));
app.route('/')
    .get(function(req, res, next) {
        res.send('Hello, world.');
    });
process.on('message', function(msg) {
    switch (msg) {
        case 'shutdown':
            server.close();
        break;
    }
});
server = app.listen(process.env.port, function() {
    console.log('App is listening on port: %s', process.env.port);
});
// graceful/pm2/production.json
{
    "name": "graceful",
    "cwd": "../graceful",
    "max_memory_restart": "60M",
    "watch": false,
    "script": "index.js",
    "instances": 0, // max
    "exec_mode": "cluster",
    "autorestart": true,
    "merge_logs": false,
    "env": {
        "port": 9000,
        "PM2_GRACEFUL_TIMEOUT": 10000
    }
}
Listing 3-10

Application Designed to Take Advantage of PM2’s gracefulReload Command

Previous examples have demonstrated the use of PM2’s restart command, which immediately stops and starts a specified process. While this behavior is typically not a problem within nonproduction environments, issues begin to surface when we consider the impact it would have on any active requests that our application may be processing at the moment this command is issued. When stability is of the utmost importance, PM2’s gracefulReload command serves as a more appropriate alternative.

When called, gracefulReload first sends a shutdown message to each of the processes under its control, providing them with the opportunity to take any necessary precautions to ensure that any active connections are not disturbed. Only after a configurable period of time has passed (specified via the PM2_GRACEFUL_TIMEOUT environment variable) will PM2 then move forward with restarting the process.

In this example, after receiving the shutdown message, our application responds by calling the close() method on the HTTP server that was created for us by Express. This method instructs our server to stop accepting new connections, but allows those that have already been established to complete. Only after 10 seconds have passed (as specified via PM2_GRACEFUL_TIMEOUT) will PM2 restart the process, at which point any connections managed by this process should already have been completed.

Figure 3-16 demonstrates the process by which this application can be started and subsequently restarted through the use of the gracefulReload command. By doing so, we are able to release updates without interrupting our application’s users.
../images/333189_2_En_3_Chapter/333189_2_En_3_Fig16_HTML.jpg
Figure 3-16

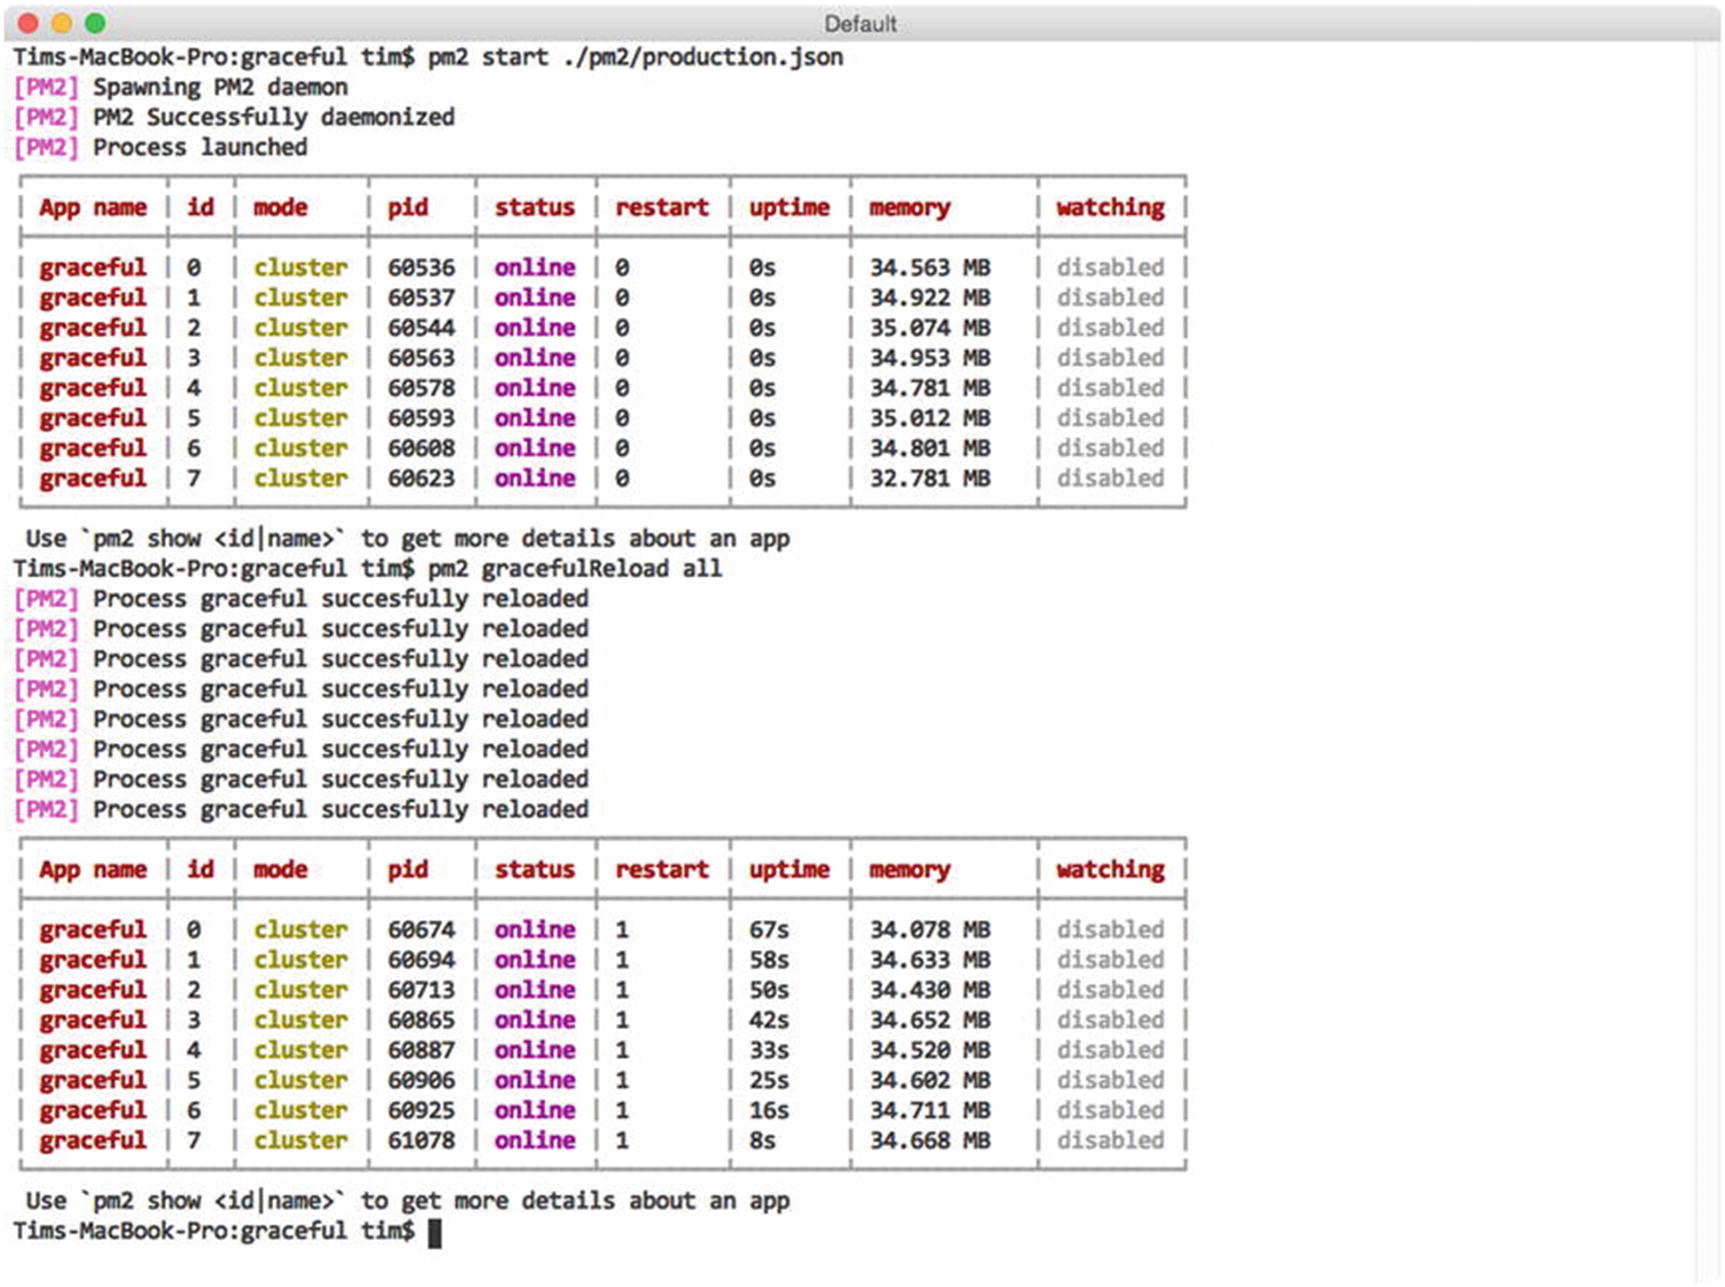
Gracefully reloading each of the processes under PM2’s control

Summary

PM2 provides developers with a powerful utility for managing Node applications that is equally at home in both production and nonproduction environments. Simple aspects, such as the utility’s ability to automatically restart processes under its control as source code changes occur, serve as convenient timesavers during development. More advanced features, such as the ability to load balance applications across multiple processors and to gracefully restart those applications in a way that does not negatively impact users, also provide critical functionality for using Node in a significant capacity.

Related Resources

..................Content has been hidden....................

You can't read the all page of ebook, please click here login for view all page.
Reset
18.223.114.142