School websites tend to be medium to large in size. One of the defining characteristics of Joomla is that it is very powerful and flexible, but can be quite time-intensive to set up. This chapter is an extensive guide to creating and setting up a school website using the Joomla Content management System (CMS).
In this chapter
Why do we need a school website?
What features do we need on a school site?
Where can we get a school template from?
What is the best way to organize the content structure for a school website?
What is the relationship between sections and categories and our menu?
How can I best use the Front Page component?
What extra functionality can be easily added to the default Joomla installation?
I actually started my Internet career as a teacher and the technology coordinator for a small school in Vermont almost ten years ago. One of the things I was responsible for, of course, was the school website. When I think of the time and effort that could have been saved had a CMS like Joomla been available back then, it makes me realize how lucky schools are today. I wonder how many realize that such an astonishingly powerful tool to build a website is available virtually free.
A school perhaps is the perfect organization suited for having a comprehensive website. As I have mentioned elsewhere, twentieth-century websites were about one-way communication between the website and the readers. In the twenty-first-century Web 2.0 world, websites need to be about interaction and two-way communication. What makes a school website interesting is that there are very clearly defined stakeholder groups, each with their own needs with respect to this communication.
What is unusual perhaps about a school website is that there is a clearly defined body of content and also different groups you need to get to it. The key to a successful school website is having different paths to this information based on the user group. Let’s look at these groups and their needs.
Sometimes students are relegated to a lesser user on a school website. This is a critical mistake, not only because students are the group most invested in the school (it’s their education after all), but they also are the group most likely to adopt web technology.
Student’s lives frequently revolve around three areas: academics, athletics, and activities. Students need easy access to these areas of the site. There should also be key information that the school wishes to make sure is easy to find, such as guidance help or graduation requirements.
Students are probably primarily consumers of information on the website. As just mentioned, a healthy website should also have mechanisms for interaction.
A school website can make a huge difference in the way a teacher can communicate and educate. The list is endless. For example, publishing course notes, homework, events, and for the more adventurous (with appropriate security), class grades.
The biggest challenge for teachers is that adding the Web to their toolbox can be overwhelming. Always busy, they need time and help from the IT staff to help them successfully use it. There will be early adopters and those who will probably always struggle, but critical to implementing a successful school website will be a commitment to professional development for the teaching staff.
The third leg of this stool is the parents. A brief look through research on the topic will tell you that the school that is able to engage the parents into its community is one where the students are more successful. To that end, a website can be a powerful tool.
The initial goal should be to make a website as sticky and useful as possible for the parents. Principal’s blog, e-mail news, calendars of events, and student work are only examples of many things that would keep parents coming back to the site. Ultimately the goal is to have parents contributing to the site, initially focusing on early adopters and those already involved, such as parent associations.
With over 2000 extensions available on the official Joomla extension site, it’s very easy to add everything and the kitchen sink. There are even specialized components for lunch menus! However, a key consideration for a school website is security, but some components are not 100% secure, and care should be taken with which ones are chosen.
What follows is a discussion of potential solutions for common features for a school website. Please bear in mind that this list is not a guarantee of security. School webmasters that are using Joomla should subscribe to the security boards at the official Joomla forum:
In no particular order, a brainstorm of common functionality/extensions might include
User Registration
Event Calendar
Downloadable Documents
Polls
Staff Directory
Email Newsletter
RSS
Random Images
Sitemap
We look at each of these in turn at the end of the chapter, consider options, and then briefly explain a possible solution for each.
Before we get too far ahead of ourselves, let’s create a fresh Joomla installation with no sample content. The first step will be to install a template.
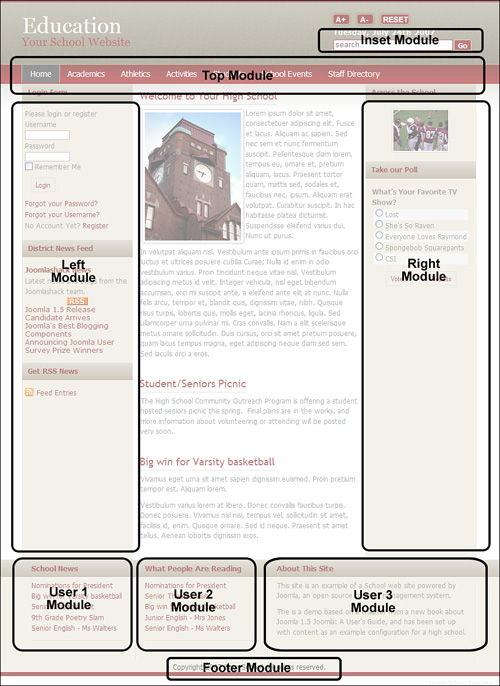
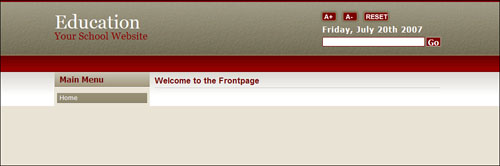
At www.joomlashack.com, you can grab a free template that we’ll be using in this chapter. It’s called Education. It’s a relatively simple template with a horizontal drop-down menu, three collapsible columns, and then three equal-height module blocks at the bottom, as shown in Figure 10.1.
You can grab the template from either joomlashack.com or compassdesigns.net.
Got it? Great. You should now have a template zip file that we need to install into Joomla. Go to Extensions > Install/Uninstall to get to the Extension Manager. We looked at how extensions are installed and managed in Chapter 6, “Extending Joomla.”
We next need to browse to the template zip file and click the Upload File and Install button. We get a message that says, “Install Template: Success.” We then need to make this template our default template. This is done through the Template Manager.
Go to Extensions > Template Manager and select the new JS_education template and click the Default button to make it the default template. Viewed in the frontend, our site (empty of content) should look like the screen shown in Figure 10.2.
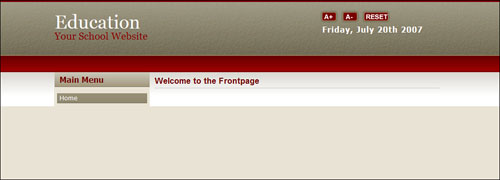
This particular template has three main features, along with the usual functionality such as collapsible columns.
The logo/header is actually text (where it says Education—Your School Website). The test for this can be easily changed by editing the index.php template file. It can be found at /templates/js_education/index.php.
The date is automatically shown in the header.
The template has font size changer buttons built in. Schools are often concerned with accessibility, and this is a simple first step toward making a site more accessible.
The Education template has eight available module positions. In looking at this template, we can see that to position the modules (for example, main menu, login, syndicate, polls, and so on) in the various template positions, we set the Position parameter in each module. Figure 10.1 showed the available positions on this template.
inset: reserved for search module
top: reserved for horizontal menu
left: left vertical column, not reserved
right: right vertical column, not reserved
user1: left column between main content and footer
user2: middle column between main content and footer
user3: right column between main content and footer
footer: footer
Most of these are pretty generic in their potential use. Two, however, were placed with specific locations in mind. The inset module location is really intended for a search box. The top module location is intended for a horizontal navigation.
If we will use the text search module on our template (and for a school site we really should be), we need to create a module to go into the inset position on the site.
Go to Extensions > Module Manager > New. Find the module titled “Search,” select it, and click Next.
Give the module a title but make sure the title parameter is set to not show. From the Position parameter drop-down menu, select “inset.” In the Module Class Suffix parameter, type a hyphen (or dash) followed by the word “search” so it looks like this “-search” without the quote marks. Also enable a search button and use “Go” as the button text. The Module Edit screen for the search module is shown in Figure 10.3.
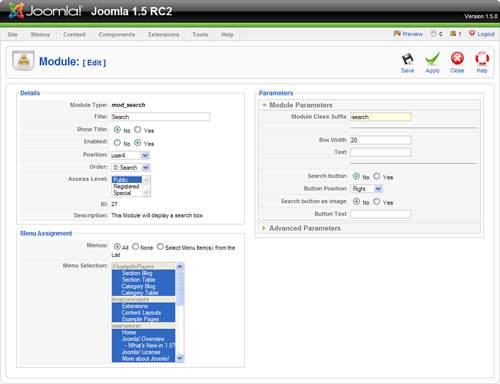
We add a module suffix to be able to use some specific Cascading Style Sheet (CSS) styles that are targeted at that module suffix.
Save your changes.
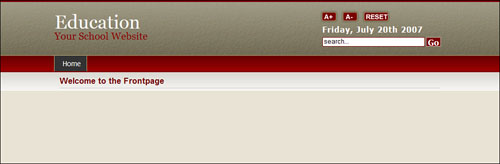
The page should now look like the screenshot in Figure 10.4.
A website for a large organization such as a school is likely to have many sections, categories, and content articles. This makes it an ideal candidate for drop-down navigation. It’s a simple effect where rolling over a link shows sub-navigation, shown here in Figure 10.5.
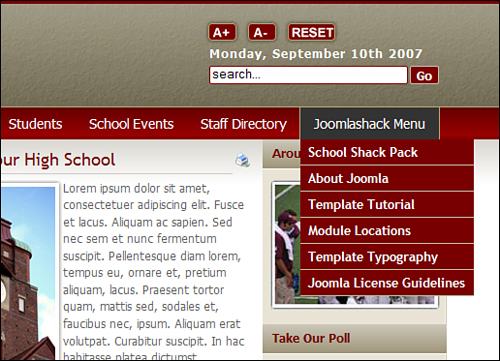
Many options exist to achieve this effect using JavaScript. However, there are big problems with this approach. JavaScript links are more difficult to navigate if you are not using a browser or have JavaScript turned off. This has big implications for a website’s accessibility (viewers using screen readers for example) and for search engine optimization (SEO)/search engine spiders.
It might not seem as if a school website needs to worry about SEO, but they do. Schools would want their content to be well indexed by search engines so that people seeking information can find it easily.
The solution to JavaScript is to use pure CSS to get the same effect. On a screen reader or with JavaScript turned off, these links will look like a simple flat list:
Academics
Science
Mathematics
Foreign Language
History/Social Studies (SS)
Fine Arts
English
The Least You Need to Know
A pure CSS drop-down menu, sometimes called a Suckerfish menu, is a highly accessible and SEO-friendly way to organize complex navigation.
When Joomla is installed, it starts with the mainmenu and a single home link as shown in Figure 10.4. However, the default location given for it is left, so we need to move that module into the correct spot for a horizontal menu as determined by the Education template. In this case it’s top.
Go to Extensions > Module Manager > Main Menu and change the position to top. While here, we need to set some parameters for our drop-down to work correctly.
In the Module Parameters, set the Always Show Submenu Items to Yes.
Set Show Title to No.
In the Advanced Parameters, make sure the Menu Class Suffix and the Module Class Suffix are both blank.
Configuring the menu as outlined now moves it to the horizontal position and prepares it for drop-downs, as seen in Figure 10.6.
Let’s now take a detailed look at perhaps the most important part of setting up a complex site like this, how to set up the site structure—or in terms of Joomla, the sections, categories, and navigation.
It is important that you understand some of the basics of how Joomla organizes its content and the structure it uses. If you haven’t already, make sure you read through Chapter 4 “Content is King: Organizing Your Content.”.
As previously mentioned the different groups (students, parents, and teachers) represent paths to the same core content of Academics, Athletics, and Activities to a certain extent. There will be much more going on in each user group’s area, so this structure will form the core of our school website.
As we think about our site design, we try and use the following principle, which has as its goal to effectively manage a large site with a large number of contributors:
Each group/person should have a single main page on the site that is his. So whether it’s Mr. Hardy’s English class, the Guidance Counselor, or the varsity basketball team, we try to have a one-to-one relationship between people and pages.
One of the main reasons to do this is to distribute content generation. This solves two problems: If more people are involved in the content of the site, more people will use the site. Additionally it means that one person, usually the Technology Coordinator or Webmaster, is not responsible for generating huge amounts of content. So these roles become gatekeepers, as they should be, rather than whole-site creators/maintainers.
Using the English Department as an example, let’s examine how we can set up a page. Our goal is to have a departmental page that shows the various classes/courses, has a link to that departmental page, and shows some news about the department.
In the drill-down, we want to make sure each course has its own page. This enables teachers to have meaningful input into what is on pages that relate to them. Thus, the site organization here is
Section = Academics
Category = English
Page 1 = Freshman English—Mr Hardy
Page 2 = Sophomore English—Mr Stevenson
(and so on...)
Let’s set up this single section, category, and the two articles:
Go to Content > Section Manager > New.
Create a section called Academics.
Go to Content > Category Manager > New.
Create a category called English.
Go to Content > Article Manager > New.
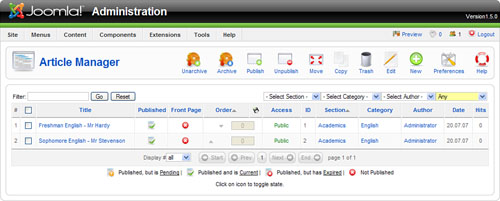
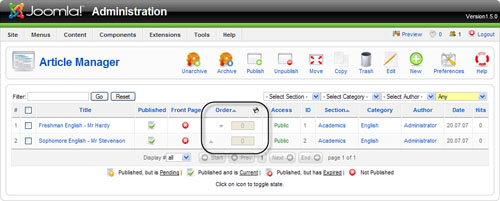
Create an article called Freshman English—Mr Hardy and another called Sophomore English—Mr Stevenson. The Article Manager should look like Figure 10.7 (note the section and category columns).
It should be easy to see how this structure can be extended to other parts of the site. Here are two more examples—Athletics and Administration:
Section = Athletics
Category = Basketball
Page 1 = Ninth Grade Girls
Page 2 = Tenth Grade Boys
(and so on...)
Section = Administration
Category = High School Team
Page 1 = Mrs P Rincipal
Page 2 = Mr V Ice Principal
(and so on...)
Note
The articles have to be created in a specific order. The one you want to appear at the top of the page needs to be created first. So for example, for an academic subject you would create first ninth grade then through twelfth. This is important to have the news function properly later.
Let’s set up the rest of the content sections and categories. Use Table 10.1 and make sure you select the correct section when you create the categories.
Table 10.1. Section/Category content hierarchy
Sections | Categories | Articles |
|---|---|---|
Academics | Science | |
Mathematics | ||
Foreign Language | ||
History/SS | ||
Fine Arts | ||
English | Freshman English—Mr Hardy | |
Sophomore English—Mr Stevenson | ||
Athletics | Football | |
Volleyball | ||
Track and Field | ||
Hockey | ||
Basketball | ||
Activities | Community Outreach | |
Band | ||
Student Council | ||
Yearbook | ||
Chess club | ||
Students | Administration | |
Teachers | ||
General Info | ||
Guidance | ||
FAQs |
This is a complex organization but one that allows a big site like a school to organize its articles. Key to this example is that we have chosen to make a single article be the responsibility of a single individual, whether a teacher or coach.
The Least You Need to Know
There is always more than one way to organize content. It often helps to decide what the articles will be and then build backwards into categories and sections.
After we have set up all of our sections and categories, the Category Manager should look like Figure 10.8.
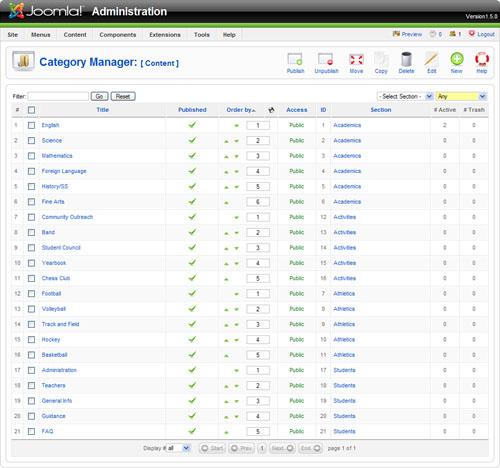
Some of the placement of categories might not look immediately obvious, such as the Teachers category in the Students section. I did this because I am considering who wants to find the information. I could have created a section called Staff, but from a navigation point of view, teachers don’t need to find out about themselves—they know who they are! They might want to have that information available for another stakeholder, however. In this case I chose Students.
This organizational structure was developed based on two things:
We now need to go and create the rest of the horizontal main menu.
Our main horizontal navigation menu has links to the sections along the top level and then links to the categories as drop-downs. Let’s work through an example to see how to set this up.
Going back to our English department, let’s create a link to the Academics section. Go to Menus > Main Menu > New.
Create a menu item that links to the Academics sections and call it Academics. This menu item should be a standard section layout and link to a page that has a list of all the categories in that section.
The Least You Need to Know
When creating larger, more complex sites, it’s sometimes easiest if the navigation mirrors the sections and categories.
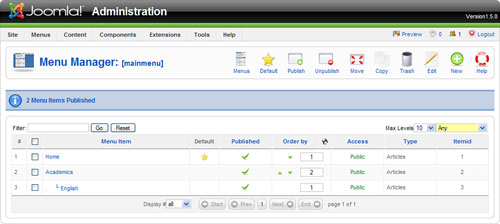
Create a menu item that links to the English category and call it English. This link should be a category blog layout. When we create this second link, we need to make sure that its parent item is the Academics menu item we just created.
This shows all the content articles in the English category as a blog, that is, with the introductory text shown and a link to read more. Our mainmenu should now look like Figure 10.9.
It’s important that in our link parameters, we have some key settings, shown in Figure 10.10.
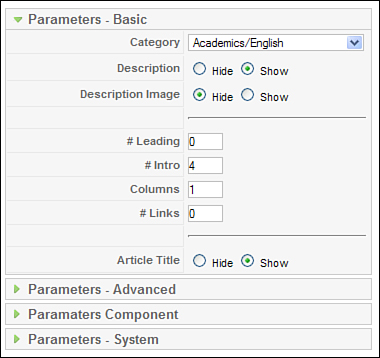
Here we have # Intro set to 4. This means that there will be four articles with the introduction text shown. In our case, for four years of English—the number of classes/courses.
Though we could change it, we only have one column and no articles shown as links. The order is set as oldest first in the Advanced Parameters (shown in Figure 10.11).
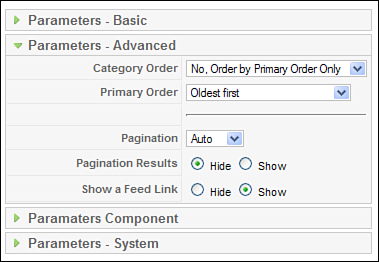
This means that that the oldest articles appear first in the blog. To take advantage of this, we need to plan ahead a little and create the articles in the order we want them to appear.
If we wanted to have finer control of the order or the articles, we could set the primary order to Ordering and then arrange the articles as we choose in the order column in the Article Manager. The ordering column is circled in Figure 10.12.
The English category page is shown completed in Figure 10.13.
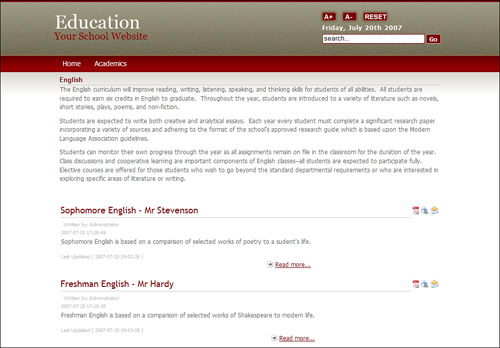
The first area of text under the department header, English, is the category description. We are using this so we have content on the page before the course descriptions. This could be as long or as short as needed. This is created by editing the category itself: Content > Category Manager > English in this example. An additional step is also required to show it. We need to go to the menu link for this page: Menu > mainmenu > English and set Description to Show.
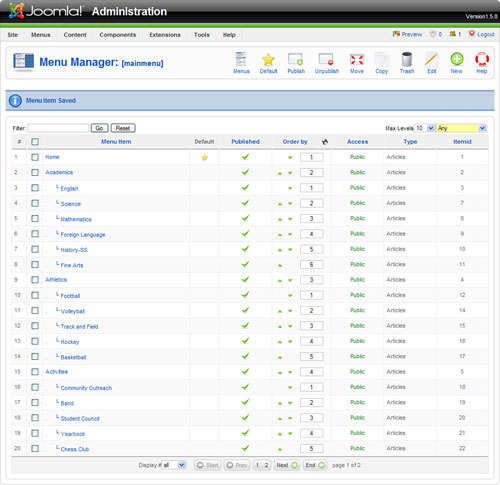
In the same way, we can create menu items that link to each of our sections as standard section layouts and then menu items (with the section as parent) that link to our categories as blog category layouts. After we have done this, our mainmenu should look like Figure 10.14.
Now that we have our sections and categories and links to them in the main menu, we need to start adding some content for our articles.
We’ll be making use of that standby of web designer’s everywhere, Lorem Ipsum! You have probably seen this text before; it reads something like
Lorem ipsum dolor sit amet, consectetuer adipiscing elit. Aenean mollis, erat nec ultrices lacinia, tellus lectus lobortis sapien, vel vehicula lacus dolor feugiat magna. Duis sollicitudin malesuada enim. Suspendisse bibendum odio in ante. Mauris mollis auctor enim. Aliquam cursus. Fusce aliquam nonummy dui.
The point of using Lorem Ipsum is that it has a more-or-less normal distribution of letters, as opposed to using “Content here, content here,” making it look like readable English. You can generate chunks of this filler text at sites such as www.lipsum.com. From our perspective it means we can quickly create articles with text to build out structure and then go back in to edit it to be more meaningful.
The Least You Need to Know
Using Lorem Ipsum is a useful technique to create articles that will form the structure of a Joomla site so you can check the navigation for it as you go along. The pages/articles can be edited later.
For each category, create an article and add some Lorem Ipsum as the text.
A site such as a school will have many articles, and we should have plenty of pathways for site visitors to drill down to that content. To achieve this we use the left-hand column to place some links of increasing specificity down the page.
The concept is to have the most general links at the top; these would be ones that link to other categories in the current section.
Looking at the basic page again, in this example of the English department, we’ve actually carefully chosen what is in the left column, shown here in Figure 10.15.
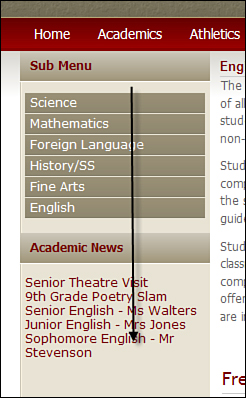
The top menu, “Academics,” contains links to all the departments.
The next module shows links to articles that are new in the Academics section. This means from a hierarchical point of view, these links are the next level down from the Academics menu.
The effect of this for the site visitor is seeing a continuum of information starting from a broad level and going down to a narrow one (as shown by the arrow). Studies that track eye movement on websites have shown that a visitor will tend to start in the top left, so the movement of the eye down the page matches a changing organization from broad and narrow. A technique like this is important for usability.
Let’s look at each of those modules in turn.
As shown in Figure 10.15, the goal is to have a submenu at the top of the left column that shows links to all the other categories that are in that section. For each section you are in, the submenu should change to reflect that.
Fortunately, this is easier than it sounds. All we have to do is create a copy of the mainmenu and then set it to show sublevels only (as we just defined a few paragraphs earlier). Joomla figures out which section we are in and automatically shows the correct categories.
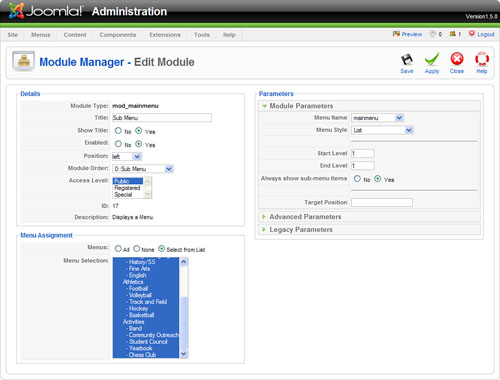
First let’s make a copy of the Main Menu. In the Module Manager (Extensions > Module Manager), select the checkbox for the mainmenu module and then click Copy. Then open the module we just created to edit it.
We now need to change the name (to Sub Menu).
Set the Start Level and End Level to “1” in the module parameters. This will show only the sublevel menu items. Make sure it’s published in the left location.
Select only the menu assignment for the pages we want the module to appear on (in this case everything but the home page). To do this, we click the Select From List radio button and we are able to click the menu selection list.
The edited module should look like Figure 10.16.
The result on the frontend of the site can be seen if we navigate to the English department, shown in Figure 10.17.
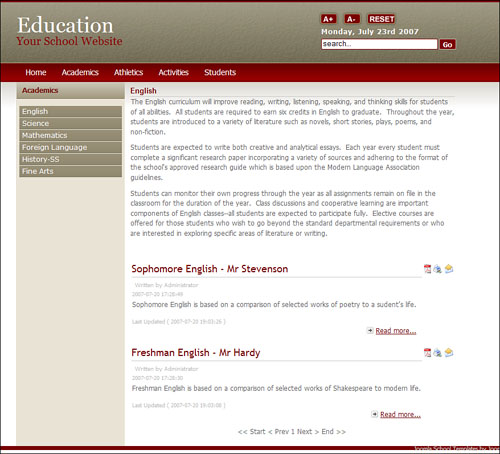
Notice how the left column automatically appears and the main column shrinks when we put content there.
Our next step in setting up the left column is to create News links to that section. There are a couple ways to do this depending on the effect we want.
We could have a News category for academics (and then for each subject)—somewhere all teachers can post news articles about their classes. This is easily achieved by creating a new category in Academics called Academic News and then linking our latest news module to that. Stories that are submitted are automatically shown dynamically with no effort from the Webmaster.
The trouble with this approach is that it creates several extra categories. A more elegant way to do it will work as long as we created our articles in the correct order.
You can set a menu item to show items in a blog layout in date order. As long as we created the articles in the order we wanted them to appear, as was noted when we described setting up the English example previously, we can set the menu item to show the oldest articles first. This means that teachers can add news articles to their categories without fear of messing up the main department page. The articles are hidden because we are only showing four.
We could then set up a latest news module that simply points to the Academics section. Then the most recently created or modified article would appear in the list.
Create a latest news module for the Academics section (Extensions > Module Manager > New > Latest News), shown in Figure 10.18.
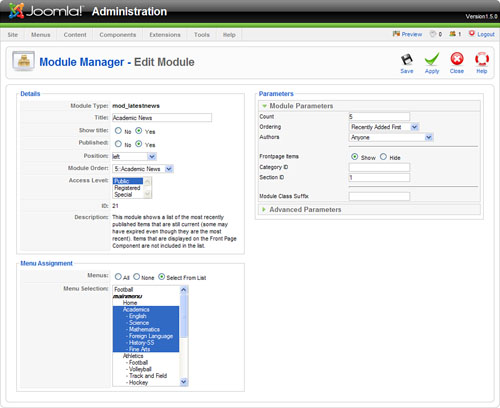
Make sure the module is assigned only to that section.
Create latest news modules for each other section. Note that I called my latest news module for the students section Academic News. I could imagine that global school news might appear here. When we create this module let’s also add the home page to its menu assignment so it appears there.
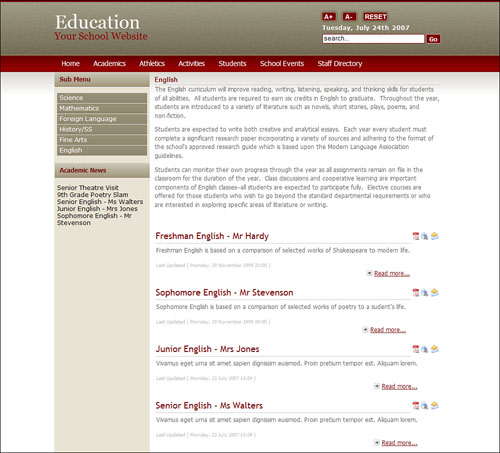
The English department page would now look like Figure 10.19.
The Least You Need to Know
Deep sites with many content articles need to provide several opportunities (subnavigation and links) for site visitors to find that content.
This particular template has three locations, user1, user2, and user3 at the bottom of the page for extra modules and then a footer module location.
Earlier we placed some latest news modules in the left column on specific pages. It would probably be a good idea to have a global latest news module for all content that is being added. We do this by simply creating another latest news module but not specifying a section or category ID. The module will then use all site content. Let’s put that module in user1.
Another useful module is the Most Read. This shows the most popular content (based on page views) as links. We can place this in the user2 location.
Go to Extensions > Module Manager > New > Most Read.
Place the module in the user2 location and publish it. I called mine School News.
In the last location, user3, we will add some custom content, explaining a little about the site. The module to do this is the Custom HTML module. Anything can be placed in here, even code from other web applications.
Go to Extensions > Module Manager > New > Custom HTML.
Add some text into the editor and publish the module to the user3 location. I called mine What People Are Reading.
Next we need to add a footer. This is simply just another Custom HTML module with relevant content, this time published in the footer module location.
Go to Extensions > Module Manager > New > Custom HTML.
Add some text into the editor and publish the module to the user3 location. I called mine Footer Copyright. Note that we are not showing the title for this module.
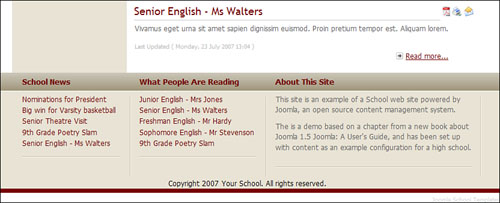
The bottom part of our page should now look like Figure 10.20.
So now we have a site that has a robust content organization and a rich network of links to find that content. Let’s move on and do a little more with our home page...it’s a bit blank.
The home page for a school site should follow a portal type concept. As previously mentioned, there are various stakeholder groups in a school, so the home page needs to have a little something for everyone.
A school site, as an example of a large organization, is an ideal candidate for using the FrontPage component. As we saw in Chapter 5 “Creating Menus and Navigation,” the Front Page component allows the Webmaster to select articles from anywhere on the site and post them to the home page, which allows him to take the role of content manager rather than content producer.
Tip
Even though the Front Page Manager does the work, an organization should still develop a policy of how content will be created and published to the home page.
First, let’s create an uncategorized article that will be the first article shown on the home page. Go to Content > Article Manager > New.
Create an article suitable for the home page and make it uncategorized for its section and category (we can also add an image, as we’ve done here). Also make sure it is published to the Frontpage.
Now if we go to our Article Manager, we can pick out a couple articles to appear on the home page along with our main welcome article.
Go to Content > Article Manager. Publish a couple of the articles to the Front Page by clicking on the icons in the Front Page column in the Article Manager.
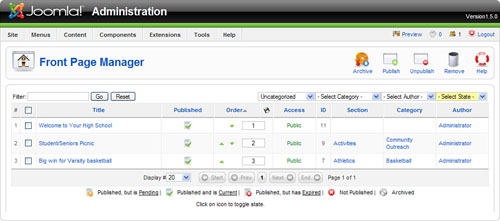
We now need to make sure the articles are in the order in which we want them to appear. We can adjust this in the Front Page Manager.
Go to Content > Front Page Manager. Adjust the order using the up/down arrows until the Welcome to Your High School article (the uncategorized one) is listed first. The Front Page Manager should look like Figure 10.21.
Last, we want to modify the menu item parameters. Go to Menus > mainmenu > Home. In the Basic Parameters, we should set the following:
# Leading = 0
# Intro = 4
Columns = 1
# Links = 10
In the Advanced Parameters, the Category Order should be set to Ordering and Pagination to Hide.
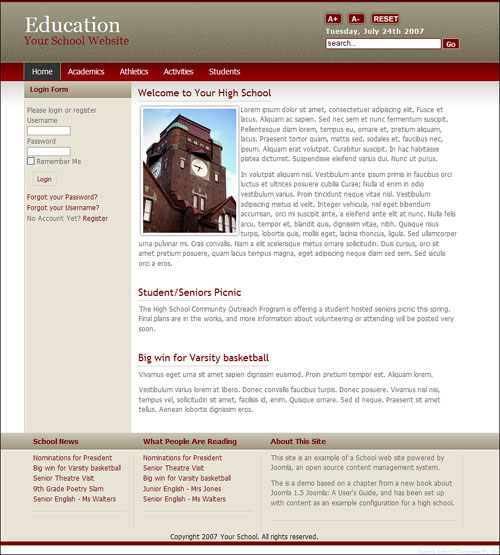
In the Component Parameters we set the Author name, Created date, and the email/PDF/print icons to Hide. In the system parameters we also set the title to Hide. The home page should now look like Figure 10.22.
Depending on our needs, we could leave the home page as it is. We will be adding some useful modules to the left and right columns as we look at how we can add functionality to the site through core Joomla extensions and third-party add-ons.
At the beginning of this chapter, we brainstormed a list of possible functionality we would like our site to have. At the time of writing, the 1.5 version of Joomla is still in Beta, so many third-party developers are still working to update their extensions from 1.0.X to 1.5. For the purposes of considering our school website, we will look at resources for 1.0.X. Where possible, I’ll give more than one alternative so you can use whichever you need based on their update timeline to 1.5.
Let’s examine each one in turn and see what options are available.
One of the most powerful features of Joomla is that it allows several layers of permission. At the most basic, these are
Guests
Users
Administrators
When setting up a school website, we need to think a little about the needs and size of the school and how we want these user groups to interact with the site. Let’s look at a few examples.
If we have a few people responsible for adding content and don’t want much student interactivity, we might use the following structure:
Guests = Parents and Students
Users = Teachers
Administrators = Webmaster
This structure allows information to be made available only to the teachers. It would also allow them to easily submit content that could then be approved by the Webmaster.
If we want to get more involvement from students in the site, we might move them up a level:
Guests = Parents
Users = Teachers and Students
Administrators = Webmaster
This structure allows more involvement and interaction between the teachers and students behind a private, registered security wall. For example, teachers and students could collaborate on assignments and then submit content that could then be approved by the Webmaster.
If we want to have significant involvement from all stakeholders in the school community, we might use
Guests = Public
Users = Students, Teachers, Parents
Administrators = Webmaster
This structure is one that intends to leverage the website to increase communication between all the groups. It opens the door for projects such as a student digital portfolio that can be shared privately online with parents, teachers, and peers.
Note that to illustrate the differences, I have used the size of the school as a delineator. We could just as easily replace this with “Desire to adopt web technology.”
As you can see there is a philosophical decision here as well as a technical one. For now let’s add a login module to the home page.
Go to Extensions > Module Manager > New > Login. Create a login module and set it to be assigned to the Home menu item only.
JCal Pro (developed by Anything-Digital.com) is an excellent choice for a calendar. You can download it at extensions.joomla.org/component/option,com_mtree/task,viewlink/link_id,1401/Itemid,35/ or from the developer website.
Figure 10.23 is from a demo of the 1.0.X version of Joomla.
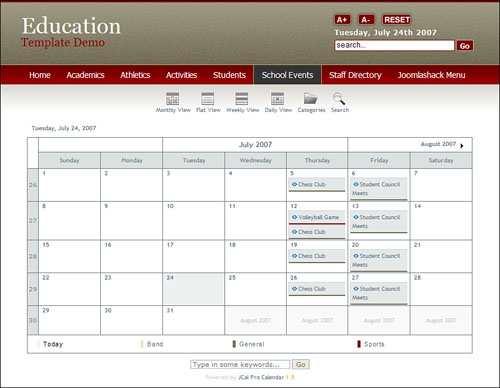
Once the component is installed, we can add a link to it in the mainmenu (Menus > mainmenu > New > Component), which leads to a full-page calendar, shown in Figure 10.23.
A school website is likely to have many documents that might be in PDF form available for easy downloading. Examples might include:
Course descriptions
Meeting minutes
Hard copy of newsletter
Hard copy of forms
Student work (digital portfolio perhaps)
An excellent extension for Joomla that gives the potential for document management is ReMOSistory, which Martin Brampton (et al) developed. You can download ReMOSistory at extensions.joomla.org/component/option,com_mtree/task,viewlink/link_id,83/Itemid,35/ or from the developer website, www.remository.com/.
Basic poll functionality is built into the default installation of Joomla. There is nothing more to do here than craft the questions and post the poll to the pages you want it to be on through the module settings.
Remember that you can make multiple polls so that each area can have its own.
Let’s create a new poll and publish the module for it to the home page in the right-hand column. Go to Components > Polls and enter the title and some questions. Next we need to create a module to collect the votes. Go to Module Manager > New > Poll.
Publish the module to the home page right–hand column and select the poll you just created in the module parameters.
For medium-sized to small schools, this is probably most easily achieved through the core Joomla contacts component. First we need to create contacts and associate them with users.
Go to Components > Contacts > Categories > New. Create a category called Staff.
To do the next step, it’s easiest if we have already asked the staff to register on the site. We need to create contacts, and for each one, associate him/her with the appropriate registered user.
We can then create a menu item that will link to our contacts component.
Go to Menus > mainmenu > New > Contacts > Contact Category Layout.
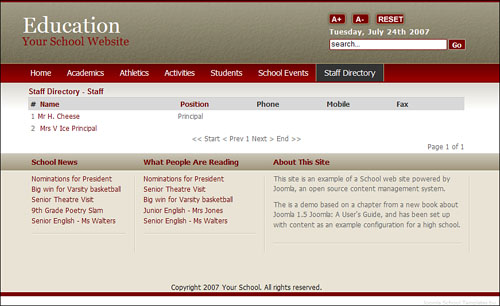
This creates a link to the category we just created, forming an instant staff directory (shown in Figure 10.24). It is possible to create a content article to hold this information. But doing it this way has the advantage that the task of creating/editing the content is passed onto the staff themselves, reducing the burden on the Webmaster to type everyone’s name in.
For larger schools, you might want to consider using a more complete directory component. There are a few available; my recommendation would be Mosets Tree available at www.mosets.com. It’s priced (at time of writing) at $99.
An email newsletter is a very important part of the school website. Schools often push out newsletters to stakeholder groups, students, teachers, or parents. Being able to migrate this traditional paper-based communication to electronic e-mail can mean big cost savings for the school.
Two basic Joomla email components are Acajoom or YaNC. If we need to do lots of segmentation (for example, because we have several lists based on athletics or clubs), we might need something with robust segmenting, like J!Contact.
YaNC (developed by Adam van Dongen). Download from extensions.joomla.org/component/option,com_mtree/task,viewlink/link_id,172/Itemid,35/ or the developer website joomla-addons.org.
Acajoom (developed by Joobi). Download from extensions.joomla.org/component/option,com_mtree/task,viewlink/link_id,964/Itemid,35/ or the developer website acajoom.com.
J!Contact (developed by joomlashack.com). Download from the developer website.
Once a suitable newsletter has been installed, we can publish a module containing the signup to our home page (and on any other pages we want it to appear).
Another tremendously useful feature of Joomla is its ability to work with Real Simple Syndication (RSS).
Joomla has two main functions. One is that it can provide an RSS from content from the website; second, it can display RSS feeds from other places.
In the demo, we have the Syndication button on the home page in the left column. In Joomla, RSS syndication comes from content that is in the page that is published. To provide content from other categories deeper in the site, a third-party component has to be used. For our purposes, the target audience is probably site visitors that want to use RSS to get the latest news. For that, syndication of the home page only is adequate.
Let’s create an RSS syndication module. Go to Extensions > Module Manager > New > Syndicate.
Give the module a name and publish it to the left column with a Home menu item assignment.
Displaying an RSS feed provides interesting possibilities for a school site. Imagine a scenario of a school district with perhaps half a dozen schools in it. Each school and the school district itself could have a website, maybe even powered by Joomla, and each site could provide RSS feeds to be published on the others. So an example of what this might look like would be a school website showing news from the district’s website—all automatically without any extra effort needed.
On our demo site, we show the feed capability not with the RSS feed that loads in the main column, but a small module feed that loads in the left column. To demonstrate how it loads links, I have linked the feed to Joomlashack.com. The module then appears as shown in Figure 10.25.
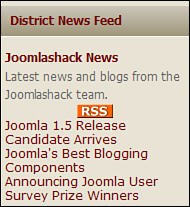
These links are all generated dynamically. If the news changes on the other website, these links are automatically updated.
A school is likely to have many images generated by its community, from photos to student art work. A great way to share these is with Joomla’s random image module. The module randomly displays an image taken from a designated directory.
Go to Extensions > Module Manager > New > Random Image. Give the module a name and publish it to the right-hand column and assign it to the Home menu item.
A sitemap is a very important part of the website, especially a larger one like a school. Usually it contains links to all pages that are in the website.
To generate this by hand would be monstrously time-consuming, but again this is where the dynamic nature of a CMS like Joomla saves the day. An excellent third-party sitemap is available as an extension: Joomap.
Joomap was developed by Daniel Grothe, and you can download it from /extensions.joomla.org/component/option,com_mtree/task,viewlink/link_id,202/Itemid,35/ or from the developer website http://www.koder.de/joomap.html.
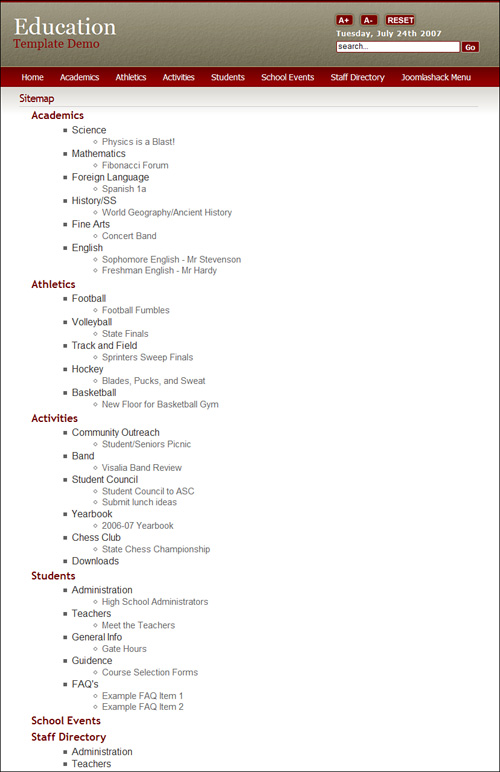
As shown in Figure 10.26, Joomap produces a sitemap. (Figure 10.26 is from a demo of the 1.0.X version of Joomla.)
A menu item needs to be added to link to the sitemap.
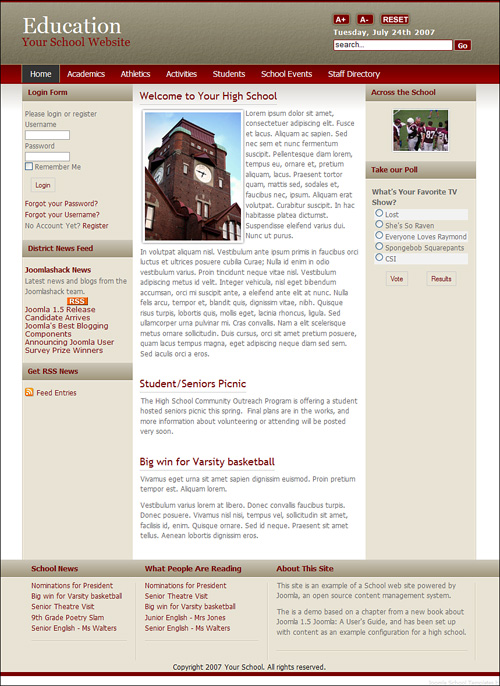
Now that we have extended some of the basic functionality, our home page is now a much richer experience for the site visitor, as shown in Figure 10.27.
If you want to extend your Joomla-powered school website, we have set up a forum at joomlashack.com especially for school Webmasters to meet and swap ideas and get help with problems.
Registration is free, and you can find it at http://www.joomlashack.com/community/index.php/board,74.0.html. There are also some specific Joomla extensions especially for schools at the Joomla extension site (extensions.joomla.org/component/option,com_mtree/task,listcats/cat_id,1852/Itemid,35/), such as the following:
Joomla LMS
E-Portfolio component for Joomla
School Lunch Menu Component
In this chapter we looked at using Joomla to develop a large site that would have several contributors, like a school, and that needs to organize its content and extensions to produce a site that meets multiple needs. We saw that
A website for a large organization, such as a school, will need to meet the needs of diverse groups. This can make organizing its content and functions a challenge.
A pure CSS drop-down menu, sometimes called a Suckerfish menu, is a highly accessible and SEO-friendly way to organize complex navigation.
There is always more than one way to organize your content. It often helps to decide what the articles would be and then build backwards into categories and sections.
When creating larger, more complex sites, it’s sometimes easiest if the navigation mirrors the sections and categories.
Using Lorem Ipsum is a useful technique to create articles that will form the structure of a Joomla site so you can check the navigation for it as you go along. The pages/articles can be edited later.
Deep sites that have several content articles need to provide many opportunities (subnavigation and links) for site visitors to find that content.
The Joomla Front Page component is an excellent way for a site to manage its home page content when there are several individual contributors.
Even a site heavily based on content has to have interactive functionality to make the visitor’s experience richer. Without this, the visitors have little motivation to return.