
Chapter 1: Vue.js: the Basics
Since Facebook introduced React in 2013, component-based UI frameworks have become increasingly popular. They allow you to build your applications as collections of self-contained, reusable components that can manage their own state and can be declaratively composed into more complex interfaces.
The second generation of Google’s Angular framework is based around the component paradigm, and a number of smaller, light-weight libraries such as HyperApp have cropped up in recent years.
Amidst this seemingly ever-growing collection of frameworks and libraries came Vue.js (referred to simply as Vue, from here on). Released in 2014, Vue was created by a Google engineer called Evan You, who was inspired to create it after having worked with AngularJS.
Vue has seen a meteoric rise in popularity and is now considered one of the main front-end frameworks, and not without good reason. It was designed to be flexible and easy to adopt, making it just as easy to integrate into projects and use alongside non-Vue code as it is to build complex client-side applications.
Why Choose Vue?
If you’re reading this, you’ve already decided that Vue is worth a look, but there are plenty of good reasons to choose it for your next project.
It’s easy to “sprinkle onto” an existing site. You can start using Vue on existing websites without having to implement a build step and introduce a new setup and tooling to your workflow. In fact, Vue is the perfect go-to tool for many situations where you’d previously have reached for jQuery!
Vue’s component-based architecture. Of course, Vue is also more than capable of building modern single page applications (SPAs), allowing you to develop your apps as modular, reusable components.
Its comprehensive ecosystem. Pre-built components for almost every conceivable use are available from Vue’s large community of developers. On top of that, popular libraries exist to provide common functionality such as client-side routing, state management, and server-side rendering! Many of these are also maintained by the official Vue team, in contrast to React, where there aren’t always official solutions available.
It’s widely used. Vue is being used by a diverse range of businesses, from GitLab to the Chinese giant Alibaba. It’s also been adopted by the PHP framework Laravel as its default library for building client-side apps. It’s safe to say that these organizations consider Vue to be a sensible choice with good future prospects. Its popularity also means that it’s easy to get help with your problems on various support sites and forums.
Getting Started
In order to get to know Vue and see how it works, let’s walk through the basics. To get a feel for what we can do with the framework, we’re going to start with a static HTML page and add in some basic interactivity with Vue.
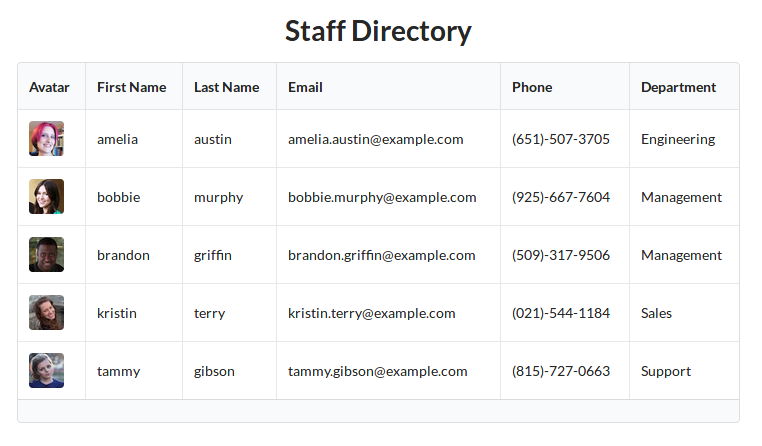
As an example, we’re going to use this fictional employee directory, which you can find online as a CodeSandbox.
The Vue Instance
Let’s start by loading the Vue library from a CDN. For simple use cases, like adding some interactivity to existing websites, this will get us up and running quickly without having to introduce a build step:
<script src="https://cdn.jsdelivr.net/npm/[email protected]/dist/vue.js"></script>
Development vs Production
We’re including the development version, which outputs helpful warnings in the console to help you avoid common pitfalls, and integrates with the Vue devtools (which we’ll cover later). In production, you’ll want to switch to the minimized version vue.min.js, which is ~30KB gzipped.
Next, we need to create a new Vue instance:
new Vue({
  el: "#main"
});
So far, all we’ve done is told Vue that we want this instance to manage an area of the DOM defined by the selector #main. It will use this area of the page as a template.
It will parse this chunk of HTML, looking for expressions that are part of the template language (which we’ll look at shortly) and binding them to our instance data where applicable.
Reactive Data
To be able to do something useful with our Vue instance, we need to give it some data. We do this by defining a key called data whose property is an object containing all the data we want Vue to work with.
Any values that are assigned to the data object (including nested objects and arrays) become reactive, meaning that Vue will observe them and automatically re-render the UI when they change.
Let’s add some example data to our instance:
new Vue({
  el: "#main",
  data: {
    heading: "Staff Directory",
    employees: [
      {
        "firstName": "amelia",
        "lastName": "austin",
        "photoUrl": "https://randomuser.me/api/portraits/thumb/women/9.jpg",
        "email": "[email protected]",
        "phone": "(651)-507-3705",
        "department": "Engineering"
      },
      {
        "firstName": "bobbie",
        "lastName": "murphy",
        "photoUrl": "https://randomuser.me/api/portraits/thumb/women/79.jpg",
        "email": "[email protected]",
        "phone": "(925)-667-7604",
        "department": "Management"
      }
    ]
  }
});
Always Declare Your Data Properties
It may be that some of the data you want to work with won’t be available to your instance when you initialize it (for example, if it’s loaded via an Ajax request). Vue requires you to declare all root-level keys up front, as they can’t be added dynamically later on.
It’s good practice to declare default values anyway, as you won’t run into errors trying to access non-existent properties, and it helps to document the data structure of your instance (or component, as we’ll see later).
At this stage, our instance has all the data it needs, but it won’t be able to render anything without a template. Let’s look at how to create one next.
Template Syntax
So now we have our Vue instance, we’ve given it some data, and we’ve told it which part of the page it should be looking at for its template. How do we render our data?
Interpolations
To output primitive values from our instance data, such as numbers and strings, we use the curly brace syntax (aka the Mustache syntax):
<h1 class="ui center aligned header">{{ heading }}</h1>
You can also use any valid JavaScript statement between double braces, which Vue will evaluate before rendering.
Code
<div id="app">
  <p>The price is: {{ price * 1.20 }} (inc. VAT)</p>
</div>
<script>
  new Vue({
    el: '#app',
    data: {
      price: 25
    }
  });
</script>
Output
The price is: £30 (inc. VAT)
In this example, we’re performing a calculation with the data price before outputting it. The calculation is just a normal JavaScript expression.
Directives
Of course, to build any sort of interesting UI, we need to do more than just display simple values. Vue’s template syntax includes directives for looping and conditional display logic, as well as binding HTML attributes to reactive data properties. Directives are attributes you add to DOM elements and components (very similar to AngularJS’s ng-* directives).
v-for
Thinking back to our example instance data, you probably already wondered how we go about looping over collections of data such as arrays. The v-for directive allows us to tell Vue that we want a section of our template to be rendered for every item in a collection (which can be an array or an object):
<tbody>
  <tr v-for="employee in employees">
    <td>
      <img src="https://randomuser.me/api/portraits/thumb/women/9.jpg"
              class="ui mini rounded image" />
    </td>
    <td>{{ employee.firstName }}</td>
    <td>{{ employee.lastName }}</td>
    <td>{{ employee.email }}</td>
    <td>{{ employee.phone }}</td>
    <td>{{ employee.department }}</td>
  </tr>
</tbody>
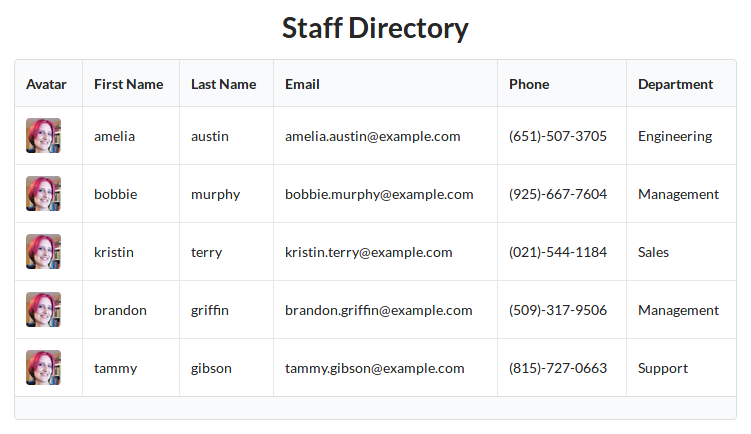
Here, the tr element with the v-for directive, and all its child elements, will be repeated for each employee in the array. You might be wondering why the image src is hard-coded here. We have to use a different method for binding data to attributes, as we’ll see shortly.
As with React, when rendering a list in Vue it’s strongly recommended that you give the repeated elements a unique value as a key. This helps Vue to optimize rendering when adding and removing elements from the collection. You can specify a key using the special :key directive on the element that is to be repeated:
<tr v-for="user in users" :key="user.id>
Using an Array Index as a Key
If the data you’re looping over doesn’t have a suitable unique value to use as a key, you can access the array index:
<tr v-for="(employee, index) in employees" :key="index">..</tr>
When iterating over objects, this syntax will give you the item’s property name.
v-if
Another common piece of UI logic is rendering elements conditionally. Using the v-if directive will cause Vue to render the element only if the data property or expression evaluates as truthy:
<tbody>
  <tr v-for="employee in employees">
    ...
  </tr>
  <tr v-if="employees.length === 0">
    <td colspan="6">No employees found</td>
  </tr>
</tbody>
The code above will display a fallback message if the employees array is empty. This is useful for code where the data is being loaded dynamically (that is, from an API).
As you might expect, there’s also a v-else counterpart, as well as v-else-if, to allow you to handle more complex conditions:
<tbody>
  <tr v-for="employee in employees"> ... </tr>
  <tr v-if="isLoadingData">
    <td colspan="6"><img src="spinner.gif" /></td>
  </tr>
  <tr v-else-if="employees.length === 0">
    <td colspan="6">No employees found</td>
  </tr>
</tbody>
Here, v-if and v-else-if are used in conjunction to display a loading spinner if the isLoading property is true, or a fallback message if isLoading is false and there are no employees.
v-bind
Often you’ll want to take data from your instance and pass it as an attribute to an HTML element—for example, using a URL string as an href or src attribute.
Going back to our example, we’ll bind each employee’s profile photo to the img element using the v-bind directive:
<img v-bind:src="employee.photoUrl" class="ui mini rounded image" />
By doing this, Vue knows to update the attribute any time the bound property changes.
Vue allows you to use a shorthand for binding attributes, prefixing them with : rather than the more verbose v-bind:.
<img :src="employee.photoUrl" class="ui mini rounded image" />
We’ll be using this shorter syntax throughout the rest of the book.
v-model
Vue also includes two-way binding for use with form inputs. This allows changes to the input to update the data property:
<div id="app">
  <input v-model="text" placeholder="edit me">
  <p>Text is: {{ text }}</p>
</div>

<script>
new Vue({
  el: '#app',
  data: {
    text: 'Good golly, Miss Molly'
  }
});
</script>
Take It for a Spin
You can try out this example at CodeSandbox.
In the example above, the v-model directive is being used to bind the text property to the <input> element. When Vue initially renders the template, the input will be pre-filled with the content of text. Changing the input field will cause the text property to be updated and the output inside the <p> element to be re-rendered.
v-on
We can use the v-on:<event> syntax for attaching listeners to events that are emitted by elements and components:
<button v-on:click="heading = 'Hello World!'">Click Me</button>
In the example above, the heading property on our instance data would be set to “Hello, World!” when the button is clicked. As with interpolations, the values you pass to directives can include any valid JavaScript expression, and can directly reference instance data properties as if they were local variables.
Vue allows you to use a shorthand for binding event handlers, prefixing them with @ rather than the more verbose v-on:. We’ll be using this shorter syntax throughout the rest of the book.
As well as modifying data properties, you can also call custom methods on your Vue instance. The method will receive the event object as the first argument.
JavaScript
new Vue({
  el: "#main",
  data: {
    status: ""
  },
  methods: {
    updateStatus(event) {
      const buttons = ['left', 'middle', 'right'];
      this.status = `You clicked the ${buttons[event.button]} button.`;
    }
  }
});
Template
<div id="main">
  <button @mousedown="updateStatus" @contextmenu.prevent="">Toggle Me!</button>
  <p>{{ status }}</p>
</div>
Check Out a Demo
You can see a working example of this at CodeSandbox.
In the example above, we attach a handler to the button’s mousedown event. Within the handler, we inspect the event object to find out which mouse button was clicked and display it to the user.
There’s a second handler listening in to the contextmenu event, as we want to prevent the browser’s context menu from appearing when right-clicking. We don’t actually need a handler function here, as Vue has some built-in modifiers we can chain on to events for common use cases.
Some of the most common ones are:
- .stop. This stops propagation of the event (like calling
event.stopPropagation()). - .prevent. This prevents the default action from being fired (like calling
event.preventDefault()). - .capture. Use event capturing when listening.
- .once. This attaches the handler to listen for the first firing of the event only.
There are quite a few others available, so I recommend checking them out in the Vue documentation.
Methods
Defining your own methods helps keep your UI logic together and out of your template. This helps keep the templates clean and readable and makes your logic easier to test.
As we briefly saw in the previous section, you can define custom methods on your Vue instance by adding them to an object under the methods property:
methods: {
  updateStatus(event) {
    const buttons = ['left', 'middle', 'right'];
    this.status = `You clicked the ${buttons[event.button]} button.`;
  }
}
Vue binds these methods to the instance so that other methods and data are available as properties of this, meaning we can easily access all of our instance data and call other methods.
As with data properties, methods are available directly in the template scope.
Template Scope
Vue templates have access to all the data and methods defined on the instance they’re rendered from. They don’t have access to built-in browser APIs (such as console.log), so you’ll need to wrap these in an instance method in order to call them from the template.
Computed Properties
There are often times when you’ll want to use a custom method to compute some derived data to use in your template. The problem is that you want to avoid computationally expensive methods being called more often than necessary. Vue’s solution to this is “computed properties”.
A computed property is actually a function whose output is cached and returned on subsequent calls (similar to a memoized function). If the function depends on an item of reactive data, and that data changes, the function will be re-run and the output re-cached.
However, if something else changes in the Vue instance (such as another property that’s independent of the computed property being updated), the cached result will be returned and we’ll be spared running the (potentially expensive) function.
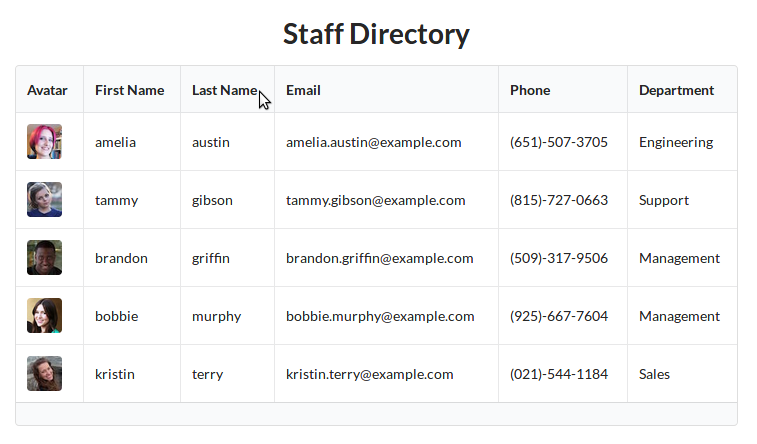
To see this in practice, along with some of the other concepts presented in this chapter, let’s add some basic functionality to our staff directory.
It would be nice to sort the table according to which column header is clicked by the user. Let’s start by adding a sortBy property to our instance data, and give it a default value:
data: {
  heading: "Staff Directory",
  sortBy: "firstName"
  employees: [
    ...
  ]
}
Next, we’ll need to add event handlers to our column headers to change the sortBy value when clicked:
<tr>
  <th>Avatar</th>
  <th @click="sortBy = 'firstName'">First Name</th>
  <th @click="sortBy = 'lastName'">Last Name</th>
  <th @click="sortBy = 'email'">Email</th>
  <th @click="sortBy = 'phone'">Phone</th>
  <th @click="sortBy = 'department'">Department</th>
</tr>
Finally, let’s create a computed property that returns an array of employees sorted according to our sortBy property:
computed: {
  sortedEmployees() {
    return this.employees.sort((a, b) => a[this.sortBy].localeCompare(b[this.
    ➥sortBy]))
  }
}
All we need to do now is swap out the reference to employees in our template’s v-for loop for our new sortedEmployees computed property!
<tr v-for="(employee, index) in sortedEmployees" :key="index">
  ...
</tr>
Note that we reference computed properties as if they were normal reactive data properties, rather than functions.
Thanks to Vue’s internal magic, the output value of sortedEmployees is cached and will only be recomputed if the sortBy property changes, or if the employees array is modified.
Live Demos
Check out the live demo of our code so far at CodeSandbox.
As an added bonus, here’s another version that includes an input field to filter the staff by last name.
Summary
Now that we’ve come to the end of the first chapter, you should have a clear idea of why Vue is a good choice for projects of all sizes and complexity.
We looked through what makes up a simple Vue application, seeing how we can give Vue data to observe and render to the screen, and using directives to create templates that are dynamically updated as the data changes.
We also looked at how to create methods that can be called from within a Vue template, and how computed properties can be used to efficiently compute items of derived state.
Lastly, we took the basic HTML staff directory table and rebuilt it in Vue, to get comfortable with using some of its features and giving us a nice example we can build on in later chapters.