
Chapter 7: Tying It All Together
In this last chapter, I’d like to put what we learned from the previous chapter (and indeed the rest of the book) into practice by building out an example universal web app.
My intention is to create a basic application by building upon some of the examples we’ve looked at throughout the book. Following along and coding the demo yourself will help to reinforce what you’ve learned so far and give you confidence in applying these tools and techniques in your own projects.
The app we’ll create will fetch data from a remote API and display it in a custom component on the home page. Clicking one of the items should take the user through to a detail page with more information.
The Completed App Code
The full code for the app we’re creating in this chapter is available on GitHub.
Creating a Nuxt App
Let’s start off by creating a fresh project with the Nuxt installer:
npx create-nuxt-app staff-manager
When the installer starts prompting you for input, go with the defaults for all options except for “Use axios module”, to which you should answer yes. axios is the request library we’ll be using to make calls to a third-party API, and Nuxt’s axios module makes it seamlessly available throughout the framework.
Once the installer finishes, let’s change into the new project and commit the skeleton project to the empty Git repository that’s been set up:
cd staff-manager
git add .
git commit -m "Initial commit"
Now that we have a good base to build on, let’s customize the default layout. At this stage, you might want to start the development server by running npm run dev, in order to see the changes as we go along.
Setting Up the Layout
We’re going to add the basic navbar menu that we saw in Chapter 5, as we want this to appear on every page of our app.
Open the default layout file from the layouts folder, and replace the contents with the following.
layouts/default.vue
<template>
  <div>
    <div class="ui fixed inverted menu">
      <div class="ui container">
        <a
          href="#"
          class="header item"
        >
          <img
            class="logo"
            src="~assets/logo.png"
          >
          Staff Manager
        </a>
        <nuxt-link
          class="item"
          to="/"
          exact
        >Home</nuxt-link>
        <nuxt-link
          class="item"
          to="/users"
        >Users</nuxt-link>
      </div>
    </div>
    <nuxt/>
  </div>
</template>

<style>
body {
  background-color: #ffffff;
}
.ui.menu .item img.logo {
  margin-right: 1.5em;
}
.main.container {
  margin-top: 7em;
}
</style>
The only real difference here from before is that we’re using the <nuxt-link> components for our menu links. Note that the logo comes from the default Vue CLI project, but you can grab a copy from the GitHub repo I mentioned earlier.
In order to load the Semantic UI styles for our app, we’ll have to edit the Nuxt config.
nuxt.config.js
// ...
head: {
  title: pkg.name,
  meta: [
    { charset: 'utf-8' },
    { name: 'viewport', content: 'width=device-width, initial-scale=1' },
    { hid: 'description', name: 'description', content: pkg.description }
  ],
  link: [
    { rel: 'icon', type: 'image/x-icon', href: '/favicon.ico' },
    {
      rel: 'stylesheet',
      type: 'text/css',
      href:
        'https://cdnjs.cloudflare.com/ajax/libs/semantic-ui/2.3.1/semantic.min.css'
    }
  ]
},
// ...
Here we’re telling Nuxt about the CDN link that we want to be included in our global <head> section.
Specifying <head> Content
In addition to setting app-wide head content via the configuration file, it’s also possible to do so on a per-layout and per-page-component basis, by adding a <head> property.
Initializing a Vuex Store
We’re going to set up a basic Vuex store to centralize the handling of the employee data.
Let’s create the file index.js inside the store folder.
store/index.js
import Vuex from 'vuex';

const createStore = () => {
  return new Vuex.Store({
    state: () => ({
      employees: []
    }),

    getters: {},

    mutations: {},

    actions: {}
  })
};

export default createStore;
Our initial state consists of the key employees, which we’re initializing as an empty array.
We need to add an action to retrieve the list of employees from our API:
actions: {
  async getEmployees({ commit }) {
    const { results } = await this.$axios.$get(
      'https://randomuser.me/api/?nat=gb,us,au&results=10&seed=abc'
    );
    commit('setEmployees', { employees: results });
  }
}
You might notice that we’re using axios here without having to import it. One of the benefits that the Nuxt axios module gives us is being able to access the library as this.$axios within our store actions.
We also need to add a mutation to add the returned data to our state:
mutations: {
  setEmployees(state, { employees }) {
    state.employees = employees
  }
},
We need to be able to access the list of employees, and rather than just read from the state directly from within our components, we’re going to add a getter:
getters: {
  employeeList(state) {
    return state.employees.map(member => ({
      id: member.login.uuid,
      firstName: member.name.first,
      lastName: member.name.last,
      email: member.email,
      phone: member.phone,
      nationality: member.nat,
      avatar: member.picture.thumbnail
    }));
  }
},
The reason for using a getter is that we can now map the employee records into a simpler format, with just the properties that we’re going to need.
A Reminder about Vuex Concepts
Getters are essentially a Vuex store’s computed properties. They allow you to create derived state that can be shared between different components.
Mutations are what we use to update the store state in some way. Components never change (or “mutate”) the state directly.
Actions are functions that delegate to mutations after performing some logic (often asynchronous).
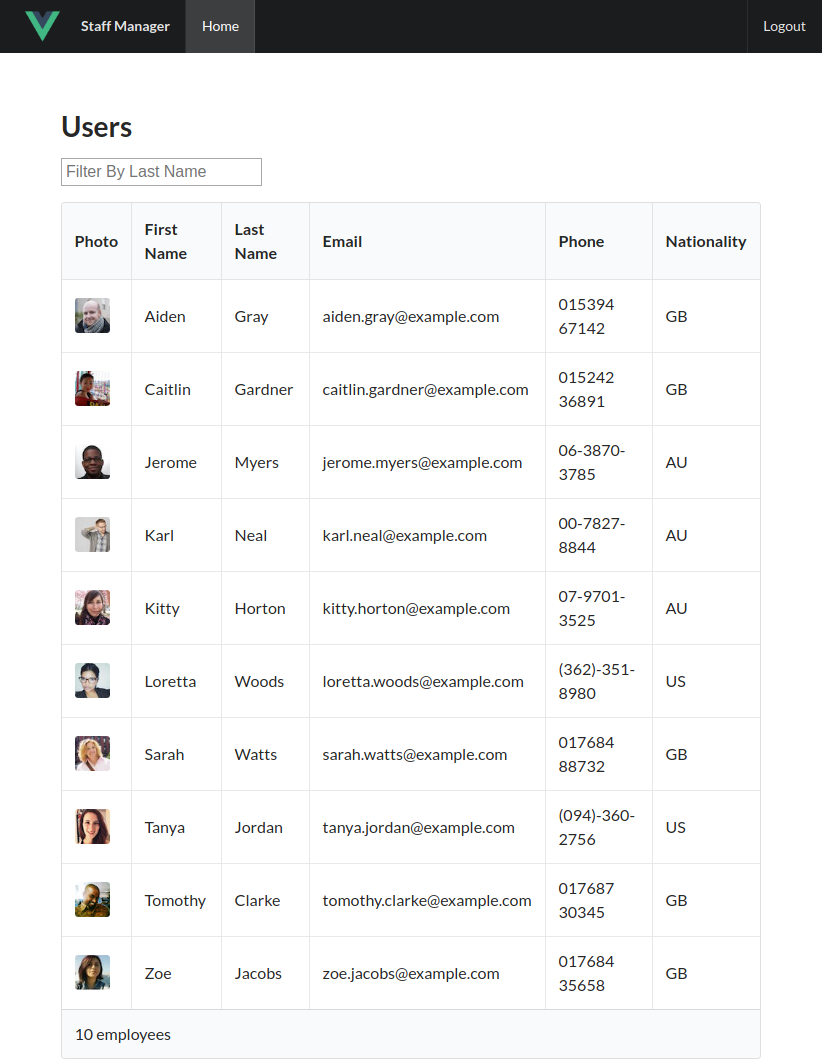
Adding the Users Page
The Users page is going to reuse the <StaffDirectory> component we built in Chapter 3 to display the list of employees.
We’re going to modify the component slightly, so let’s do that first by creating the file StaffDirectory.vue within the components folder.
components/StaffDirectory.vue
<template>
  <div class="ui container">
    <input
      v-model="filterBy"
      placeholder="Filter By Last Name"
    >
    <table class="ui celled table">
      <thead>
        <tr>
          <th>Photo</th>
          <th @click="sortBy = 'firstName'">First Name</th>
          <th @click="sortBy = 'lastName'">Last Name</th>
          <th @click="sortBy = 'email'">Email</th>
          <th @click="sortBy = 'phone'">Phone</th>
          <th @click="sortBy = 'nationality'">Nationality</th>
        </tr>
      </thead>
      <tbody>
        <tr
          v-for="(employee, index) in sortedEmployees"
          :key="index"
          @click="$emit('select', employee)"
        >
          <td>
            <img
              :src="employee.avatar"
              class="ui mini rounded image"
            >
          </td>
          <td class="capitalize">{{ employee.firstName }}</td>
          <td class="capitalize">{{ employee.lastName }}</td>
          <td>{{ employee.email }}</td>
          <td>{{ employee.phone }}</td>
          <td>{{ employee.nationality }}</td>
        </tr>
      </tbody>
      <tfoot>
        <tr>
          <th colspan="6">{{ sortedEmployees.length }} employees</th>
        </tr>
      </tfoot>
    </table>
  </div>
</template>

<script>
export default {
  name: 'StaffDirectory',
  props: {
    employees: {
      type: Array,
      default: () => []
    }
  },
  data() {
    return {
      sortBy: 'firstName',
      filterBy: ''
    };
  },
  computed: {
    sortedEmployees() {
      return this.employees
        .filter(employee => employee.lastName.includes(this.filterBy))
        .sort((a, b) => a[this.sortBy].localeCompare(b[this.sortBy]));
    }
  }
}
</script>

<style scoped>
h1.ui.center.header {
  margin-top: 3em;
}
th:not(:first-child):hover,
tbody tr {
  cursor: pointer;
}
input {
  padding: 3px;
}
.capitalize {
  text-transform: capitalize;
}
</style>
The main difference here from the version in Chapter 3 is that this component accepts an array of employees as a prop. It also fires a selected event when a row is clicked, passing the employee object as the payload.
Next, we’ll create the home page, where we’ll display the staff directory. Create a folder, users, within the pages folder, and add the file index.vue inside it. This will correspond to the route /users/.
pages/users/index.vue
<template>
  <div class="ui main text container">
    <h1 class="ui header">Users</h1>
    <StaffDirectory
      :employees="employeeList"
      @select="showDetail"
    />
  </div>
</template>

<script>
import { mapGetters } from 'vuex'
import StaffDirectory from '~/components/StaffDirectory'

export default {
  components: { StaffDirectory },
  fetch: ({ store }) => {
    return store.dispatch('getEmployees');
  },
  computed: {
    ...mapGetters(['employeeList'])
  },
  methods: {
    showDetail(employee) {
      this.$router.push({
        name: 'users-id',
        params: { id: employee.id }
      });
    }
  }
}
</script>
We’re using the Nuxt-specific fetch() method here to dispatch our getEmployees action when the page is navigated to. As we saw in the previous chapter, this method is called before the page component is loaded, and gives us the opportunity to dispatch actions to our store.
Once the action has completed, the component receives the array of employees from the store via the getter we defined previously, and passes it to the <StaffDirectory> component as a prop.
In addition, we’re listening on the directory component for the select event. When this fires, the page’s showDetail method will programmatically change the route to an individual employee’s detail view.
Let’s create that view next.
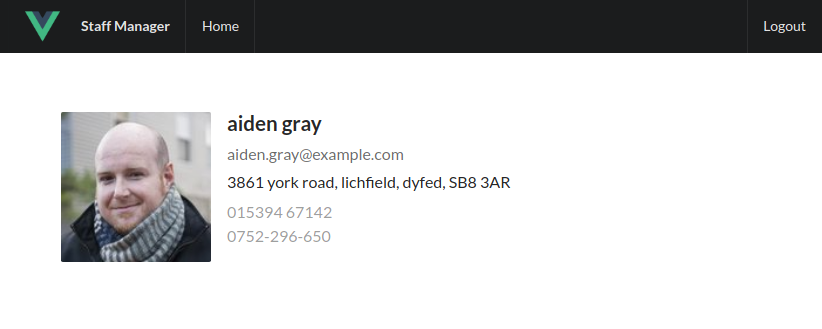
The Employee Detail View
Our detail view needs to get the ID from the route parameters, and dispatch an action to the store to select the chosen employee.
First, let’s add this action to the store, to select the chosen employee record.
store/index.js
state: () => ({
  employees: [],
  selectedEmployee: null
}),
To start with, we need to initialize a property in the store’s state:
actions: {
  async getEmployees({ commit }) { ... },

  async getEmployee({ commit, dispatch, state }, { id }) {
    if (state.employees.length === 0) {
      await dispatch('getEmployees');
    }

    const employee = state.employees.find(user => user.login.uuid === id);
    commit('setSelectedEmployee', { employee });
  }
}
Commonly, you’d probably be fetching more information about a given entity from a separate API endpoint, but we’re just going to pull out the relevant employee object from the same data we use to populate the staff directory.
If a user is coming directly to a detail page, the list of employees won’t yet be loaded, so we check the state and dispatch the getEmployees action if necessary.
We also need to add the mutation:
mutations: {
  // ...
  setSelectedEmployee(state, { employee }) {
    state.selectedEmployee = employee
  }
},
Within the pages/users folder, add the file _id.vue. Remember that beginning the name with an underscore lets Nuxt know this segment of the route will be dynamic.
pages/users/_id.vue
<template>
  <div
    v-if="selectedEmployee"
    class="ui main text container"
  >
    <div class="ui items">
      <div class="item">
        <div class="image">
          <img :src="selectedEmployee.picture.large">
        </div>
        <div class="content">
          <a class="header">{{ fullName }}</a>
          <div class="meta">
            <span>{{ selectedEmployee.email }}</span>
          </div>
          <div class="description">
            <p>
              {{ selectedEmployee.location.street }},
              {{ selectedEmployee.location.city }},
              {{ selectedEmployee.location.state }},
              {{ selectedEmployee.location.postcode }}
            </p>
          </div>
          <div class="extra">
            {{ selectedEmployee.phone }}<br>
            {{ selectedEmployee.cell }}
          </div>
        </div>
      </div>
    </div>
  </div>
</template>

<script>
import { mapState } from 'vuex'

export default {
  fetch({ store, params }) {
    return store.dispatch('getEmployee', { id: params.id });
  },
  computed: {
    ...mapState(['selectedEmployee']),
    fullName() {
      return `${this.selectedEmployee.name.first} ${
        this.selectedEmployee.name.last
      }`;
    }
  }
}
</script>
The fetch() method gets the ID from the route parameters and dispatches the getEmployee action. As soon as the selectedEmployee state property is mutated, this change flows down to our page component and is rendered to the screen.
Creating the App Home Page
For the sake of completeness, we need to display something for the base route (/) of the app. Let’s add a simple home screen.
pages/index.vue
<template>
  <div class="ui main text container">
    <h1 class="ui header">Chapter 7: Tying it all Together</h1>
    <p>This example builds upon everything we've covered in the book. It uses
    what we've learned to create a Nuxt.js app with a Vuex store and authentication,
    that fetches data from a remote API and displays it in a custom component,
    linking to a detail page for each item.</p>
    <p>Go to the <nuxt-link to="/users">Users page</nuxt-link>.</p>
  </div>
</template>
If you’re editing the index.vue page generated by the Nuxt installer, be sure to delete the script and style blocks. They’re no longer needed, and the CSS rules will conflict with our app styling.
By this point, you should have a functional application that loads a collection of employees’ data from a remote API, and renders it using the StaffDirectory component. Clicking an employee should open a detail page with more information.
Adding Authentication
Now that we have a basic Nuxt app up and running, let’s take a look at how we might go about adding authentication.
Perhaps we want our basic staff directory to be available to all users, but to view the individual employee pages we’ll require the user to log in.
The Nuxt community has developed a lot of third-party modules that add useful functionality to the framework quickly and easily. One such module is the Nuxt Auth module, and we’ll use this to add authentication to our app.
Installing and Configuring the Auth Module
Installing the module is pretty straightforward via npm:
npm install @nuxtjs/auth
Once it’s downloaded, we just need to tell Nuxt about it by editing the config file.
nuxt.config.js
// ...
modules: [
  '@nuxtjs/axios',
  '@nuxtjs/auth'
],
//...
The module provides us with some nice functionality that we’d otherwise have to spend time writing ourselves.
Once we provide some configuration regarding the authentication system we’re using, it will handle logging in and out, provide convenience methods for checking the login state, and supply a middleware we can use to easily require authentication for pages and/or layouts.
As we’re focused on the Nuxt side of things, we won’t go into writing an authentication API here. Instead, we’ll borrow the one that the Nuxt Auth module provides for its example.
Building an Authentication Back End
If you’re interested in writing your own auth server to use with a Nuxt app (or any kind of front-end JS app), SitePoint’s article on user authentication with the MEAN stack provides a solid starting point.
Create a new folder called api and copy the auth.js file from the Nuxt community’s auth-module GitHub repo into it.
We’ll also need to install a couple of npm modules that this code depends on:
npm i cookie-parser express-jwt
The file sets up some Express-based API endpoints for logging in and out, and will authenticate any login with a non-empty username and a password of “123”.
We need to tell Nuxt to include and run this file for us, by adding it to a serverMiddleware key in the config file:
serverMiddleware: ['~/api/auth'],
Also, we need to add some configuration to the file to tell the Auth module what strategy we want to use to authenticate:
auth: {
  strategies: {
    local: {
      endpoints: {
        login: { propertyName: 'token.accessToken' }
      }
    }
  }
},
As with Nuxt itself, the Auth module comes with sensible conventions (which are also easy to change if you need to), so that’s all we need to do here.
Authentication Strategies
The Auth module provides a lot of flexibility to configure it to work with different authentications systems. The local strategy supports cookie and JWT systems.
There’s also an OAuth strategy, and the module comes with several preconfigured “providers” for Google, Facebook, and GitHub authentication, among others. You can find out more in the Auth Module’s Reference section.
Adding the Login Page and Altering the Layout
One thing the module doesn’t provide us with is a login page, so that’s our next step. Create a component called login.vue inside the pages folder.
pages/login.vue
<template>
  <div class="ui main text container">
    <div class="ui middle aligned center aligned grid">
      <div class="column">
        <h2 class="ui green image header">
          <div class="content">
            Log in to your account
          </div>
        </h2>
        <form
          :class="{ error }"
          class="ui large form"
          @submit.prevent="onSubmit"
        >
          <div class="ui segment">
            <div class="field">
              <div class="ui left icon input">
                <i class="user icon" />
                <input
                  v-model="username"
                  type="text"
                  placeholder="Username"
                >
              </div>
            </div>
            <div class="field">
              <div class="ui left icon input">
                <i class="lock icon" />
                <input
                  v-model="password"
                  type="password"
                  placeholder="Password"
                >
              </div>
            </div>
            <button
              type="submit"
              class="ui fluid large green submit button"
            >Login</button>
          </div>

          <div class="ui error message">Oops, we couldn't log you in!</div>

        </form>

      </div>
    </div>
  </div>
</template>

<script>
export default {
  data: () => ({
    username: '',
    password: '',
    error: null
  }),
  methods: {
    onSubmit() {
      this.$auth
        .loginWith('local', {
          data: {
            username: this.username,
            password: this.password
          }
        })
        .catch(e => {
          this.error = true
        });
    }
  }
}
</script>
This is almost identical to the login component we built previously, the main difference being in the onSubmit() method.
We take the username and password from the form, and pass them to the login() method of the Auth module, which is available inside our components as this.$auth.

Let’s also edit our layout template, to include a login/logout button, depending on the user’s authentication status.
layouts/default.vue
<template>
  <div>
    <div class="ui fixed inverted menu">
      <div class="ui container">
        <a
          href="#"
          class="header item"
        >
          <img
            class="logo"
            src="~assets/logo.png"
          >
          Staff Manager
        </a>
        <nuxt-link
          class="item"
          to="/"
          exact
        >Home</nuxt-link>
        <nuxt-link
          class="item"
          to="/users"
        >Users</nuxt-link>
      </div>
      <div class="right menu">
        <a
          v-if="$auth.loggedIn"
          class="item"
          @click="$auth.logout()"
        >
          Logout
        </a>
        <nuxt-link
          v-else
          class="item"
          to="/login"
        >
          Login
        </nuxt-link>
      </div>
    </div>
    <nuxt/>
  </div>
</template>
The Auth module provides us with a nice loggedIn property to check if the current user has been authenticated, and a logout() method which will redirect the user back to the main route (/) by default.
The last thing we need to do is specify which pages require authentication to visit. We do this via a piece of middleware that the module provides for us.
Let’s open up the employee detail page (_id.vue) and add it.
pages/users/_id.vue
export default {
  middleware: ['auth'],
  // ...
}
And with that, we should now have a authentication working for our app!
Summary
Hopefully this chapter has helped to cement the things we learned about Nuxt. The example app we made built upon concepts from almost every other chapter of the book.
We started by creating a new project with the Nuxt installer and setting up a Vuex store—utilizing knowledge of getters, mutations, and actions from Chapter 5.
After building our own custom layout with the help of the Semantic UI CSS framework, we created pages to display a staff directory and employee details. Once the project was functional, we added in authentication with the help of the Auth module.