Chapter 6: Step Entering and Editing MIDI
Obviously, not everybody is a good keyboard player. Even if you are, there may be musical parts you want to create that would be better served being programmed rather than played in. This process is called step entering and you can do it in a number of ways and then edit it to your heart's content. While you can step enter in any MIDI editor, the Piano Roll editor is the most user friendly and popular choice.
Specifically, this chapter covers the following topics:
- Step entering in the Piano Roll editor
- Using the Step Input Keyboard
- Entering MIDI controller steps in the Piano Roll editor
- A brief look at the Step Editor
Step entering in the Piano Roll Editor
Logic comes with a dazzling array of software instruments. Yes, there are lots of great third-party software instruments as well, but I suggest you become conversant with the Logic content before you reach for your wallet.
I will use a Harp for this task:
- Open a new project with an empty Software Instrument with Open Library checked, and then go to Orchestral | Harp and click on it to load it.
- Press P to open the Piano Roll editor and, not surprisingly, it's blank because there is no MIDI region with content yet.
- If you drag the mouse over the keyboard you see on the side, you will hear the notes.
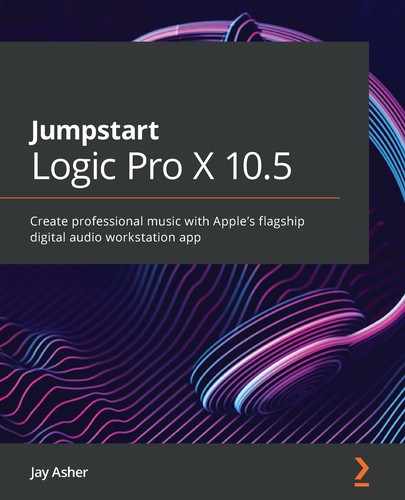
Let's begin with a simple arpeggiated phrase. Notice that the Command Tool defaults to the Pencil Tool, which is what we want.
With the Command key held down, click on the grid to the right of C2, and a note is created. If you hold the mouse down on it, the help tag tells you that it is 0 0 1 0, a sixteenth note. But for this exercise, let's change it to an eighth note:
- Position the Pointer Tool at the end of the note and it changes to the Resize Tool.
- Drag it to the right until the Help tag shows 0 0 2 0, an eighth note. The Pencil Tool will now default to creating eighth notes.
- Now create three more, E2, G2, and C3. Now we want to create two quarter notes, G2, and E2.
- Pencil in another G2 and again, drag it to the right, this time until the Help tag shows 0 1 0 0, a quarter note. The Pencil Tool will now default to creating quarter notes.
- Pencil in another E2.
- Play and listen. Very nice:

Figure 6.1 – Step entered notes in the Piano Roll
We can continue entering notes this way, but there is a shortcut:
- Select all the notes in the Piano Roll by pressing Command + A or rubber-banding (dragging the mouse) over them.
- In the local Edit menu, scroll to Repeat | Once, or press the Command key.
- We may want to change the E2s to F2s and the G2s to A2s on the repeat. Select the E2s in bar 2 and hold the Option key and press the up arrow on your computer keyboard, and they transpose up a half-step.
- Select the G2s in bar 2, hold the Option key, and press the up arrow on your computer keyboard twice, and they transpose up a whole step.
- Select all the notes in the Piano Roll by pressing Command + A or rubber-banding over them.
- In the local Edit menu, scroll to Repeat | Once, or press the Command key.
- Bar 3 is just like bar 1, and that's fine, but let's change bar to D2 G2 B2 D3 B2 and make the G2 a half note.
- Select the first note in bar 4 and, using the Command key, make it a D2.
- Press the right arrow to advance to the next note and change it to an G2, then the next note to a B2, followed by a D3, and another B2.
- Select the last note and delete it.
- Select what is now the last note, position the Pointer Tool at the end of the note, and drag it to the right, this time until the Help tag shows 0 2 0 0,
a half note.
Pretty good, but maybe the entire part should be an octave higher?
- With all the notes selected, press both the Option and the Shift key with the up arrow and they transpose the entire part up an octave.
That sounds better, but pretty mechanical. Let's fix that. Press D on your computer keyboard to open the List Editors area, choose the Event List, and the problems are clearly visible:
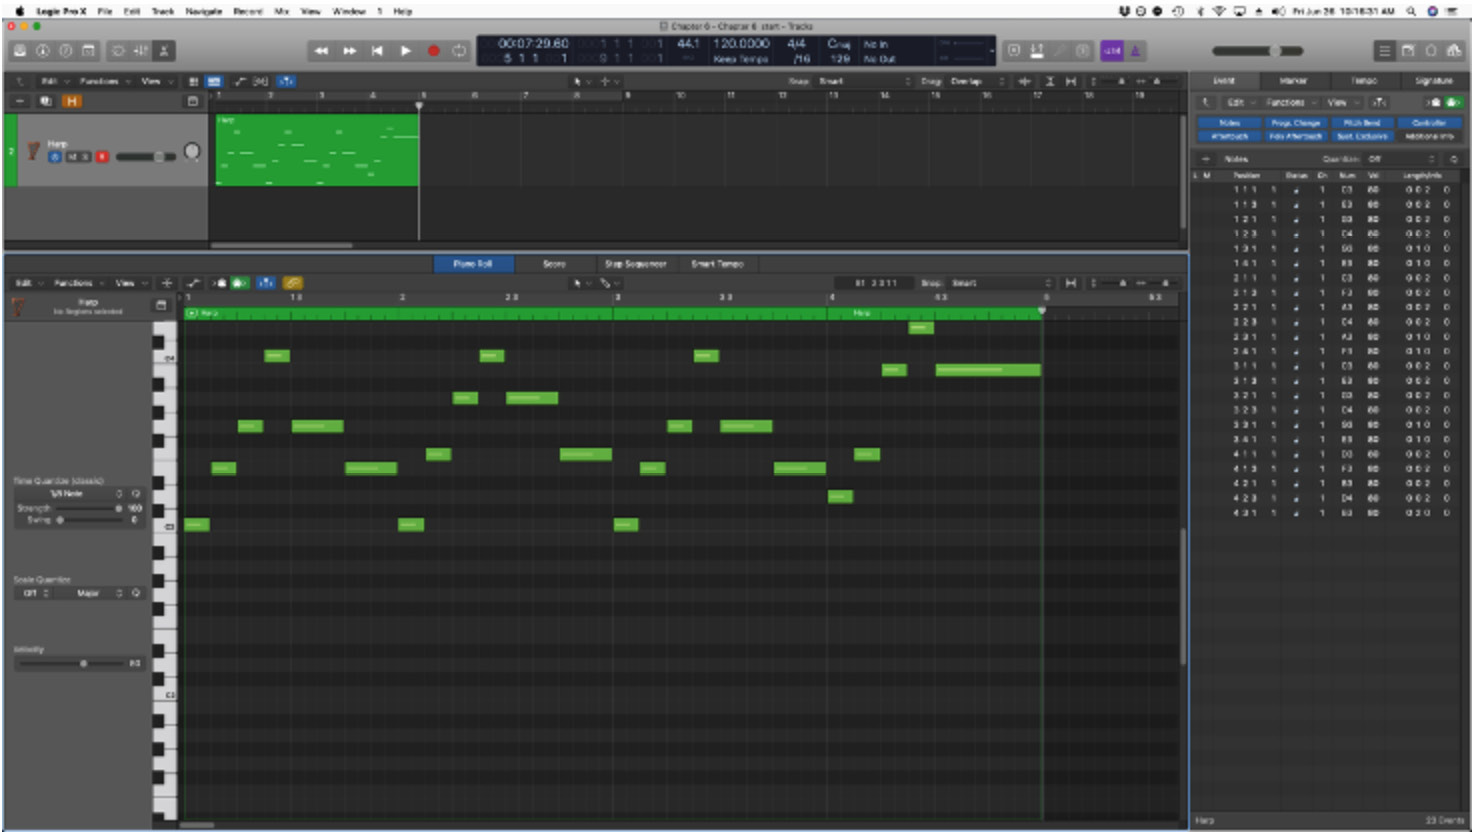
Figure 6.2 – Mechanical sounding step entered notes in the Piano Roll and Event List
For starters, they are all the same velocity. I want the first note in each bar to be a little louder. I can Shift-select the C3 and D3 on the Piano Roll keyboard for this purpose.
Because this is Logic Pro, there are a few ways to adjust this.
The Velocity slider
If you don't see the Velocity slider and the other items in the local Inspector, go to the local View menu and Show Local Inspector. You should see this:
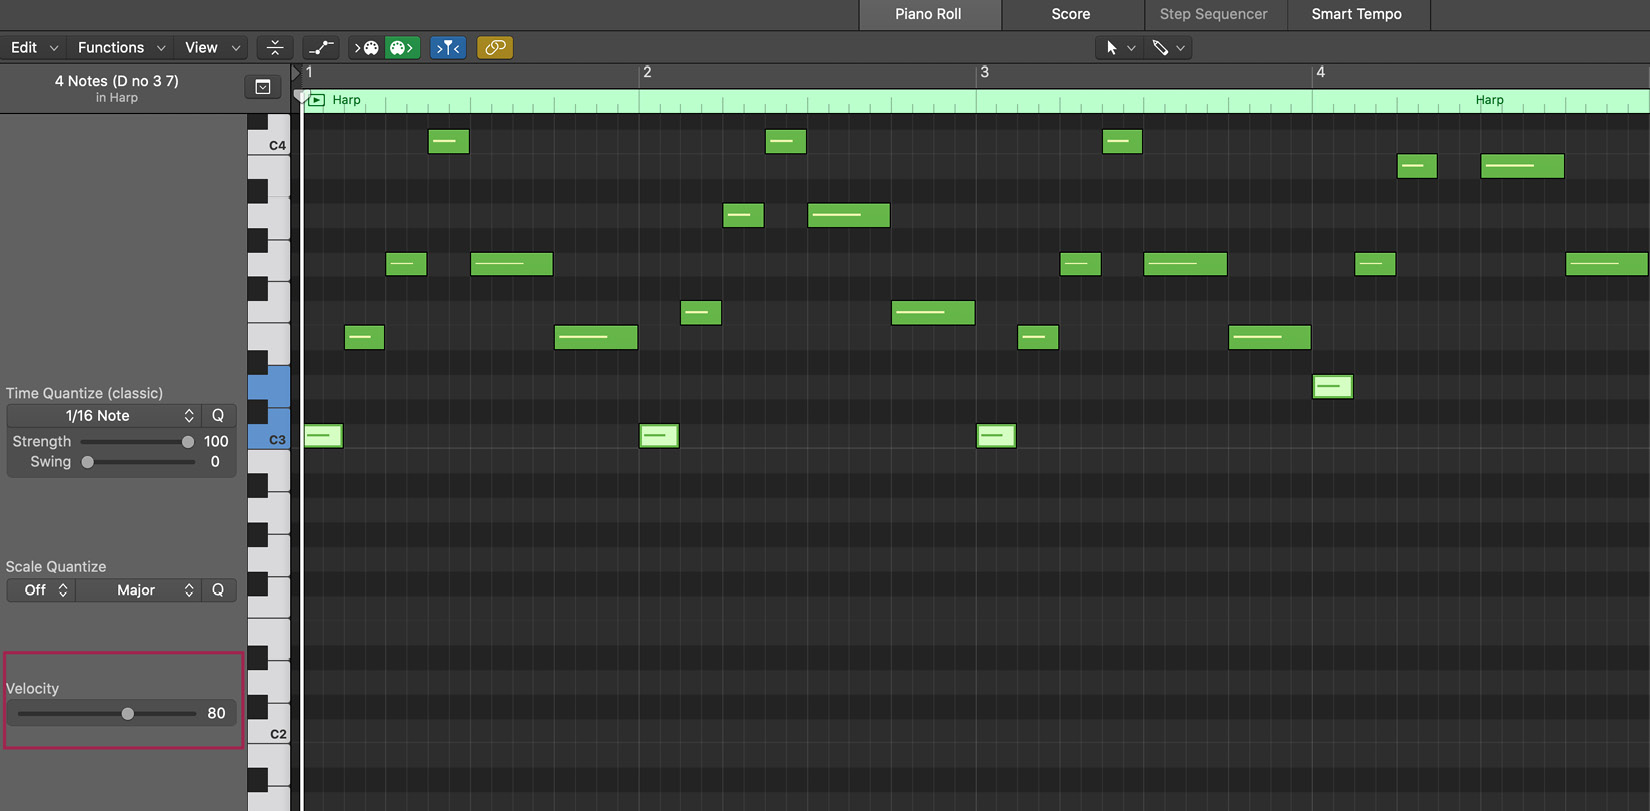
Figure 6.3: The Velocity slider in the local Inspector
If you drag it to the right, we will see the velocity increase and the color change to become more red.
The Velocity Tool
Let's change the Command Tool to the Velocity Tool by clicking on the Pencil Tool and pressing V or scrolling down to the Velocity Tool. Now let's make the last two notes of each bar a bit louder with the Velocity Tool:
- Shift + select the last two quarter notes in bar 1.
- In the local Edit menu, go to Select | Same Subposition or press Shift + P, and now the last two notes in every bar are selected.
- Hold the Command key and drag upward on any of the notes, and they all increase their velocity and change color. Dragging down makes them softer.
Continuing in this fashion, you can make them more human-sounding, as you can see here:
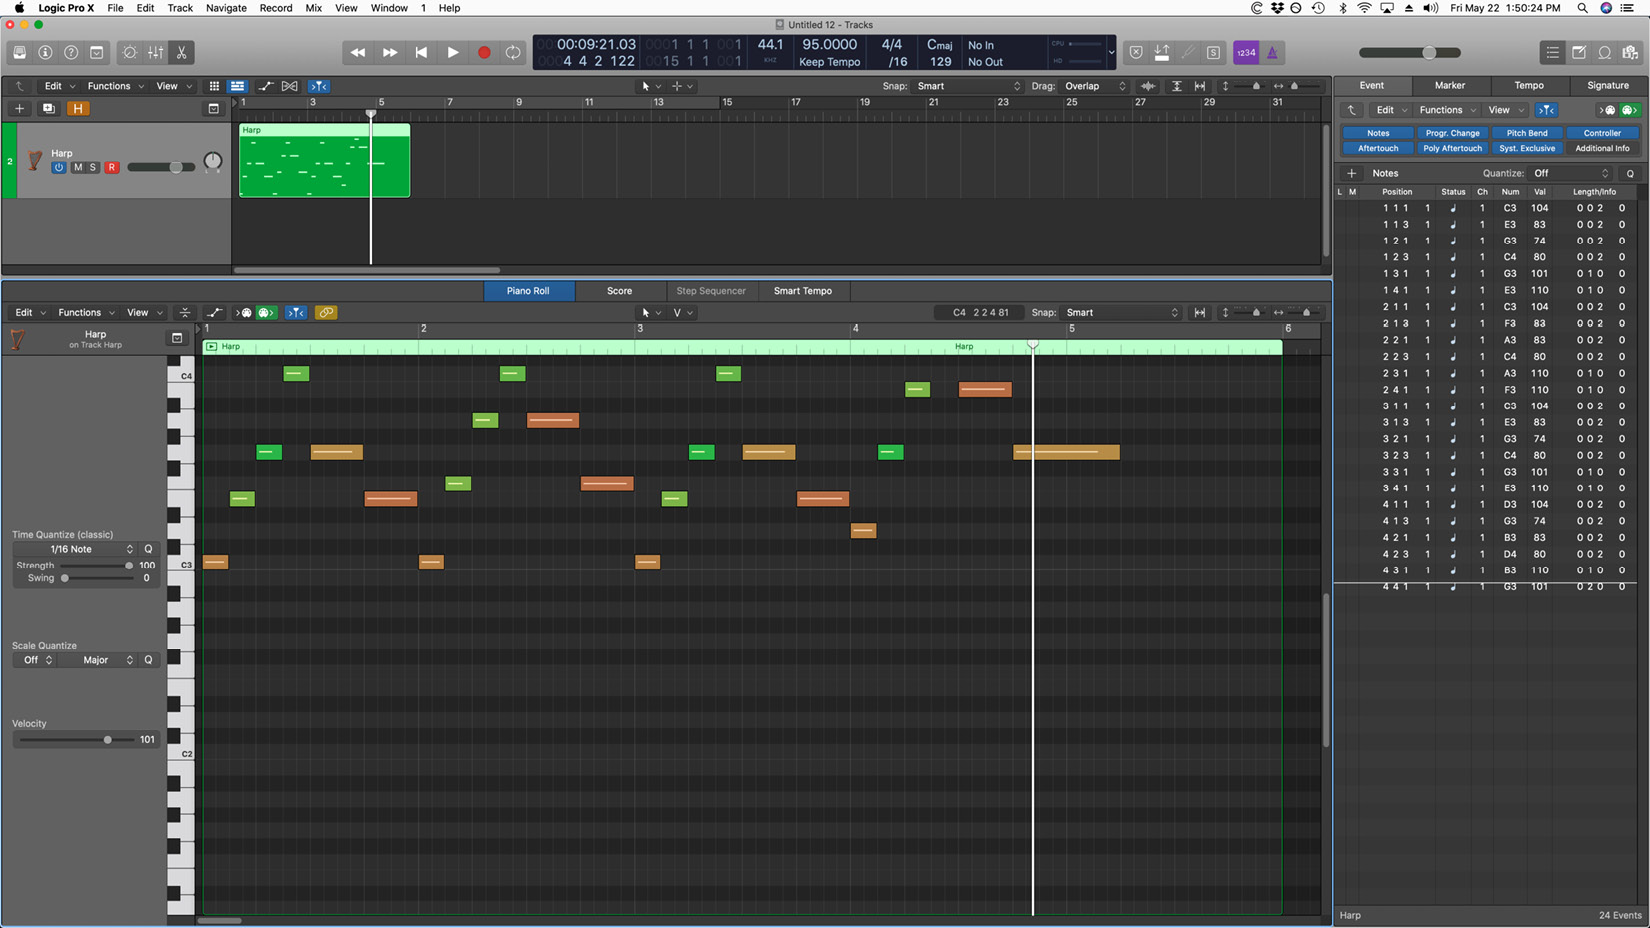
Figure 6.4 – Adjusted velocities
Scale Quantize
This does just what you think it does. I will quantize the pitches of selected notes to conform to scales and modes:
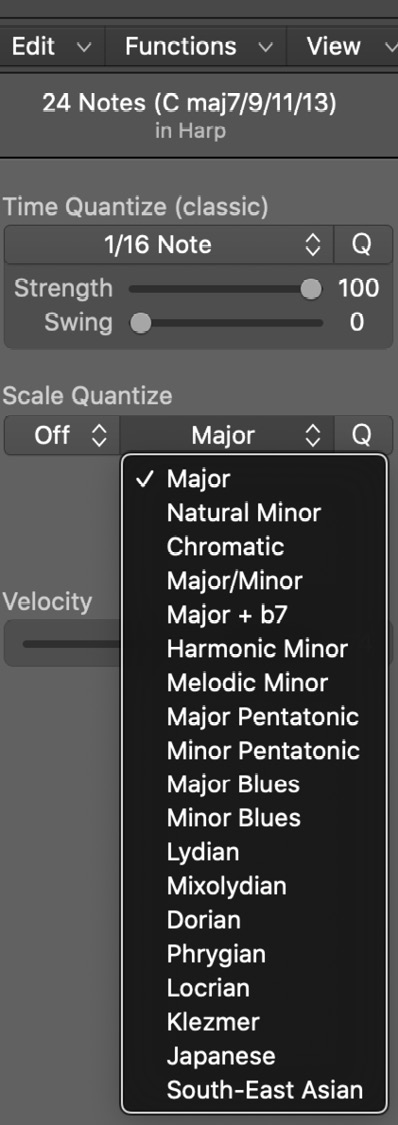
Figure 6.5 – Scale and mode choices for Scale Quantize
I rarely use it, but you should experiment with it, as you may love using it:
- Choose a scale.
- Select the notes you wish to Scale Quantize.
- Press the Q button and the notes conform to the selected scale or mode.
Time Quantize
You can also quantize the time on any notes you select in the Piano Roll's local Inspector by making your duration choice, adjusting the Strength and Swing if you so desire, and pressing Q. Notice that it says (classic):
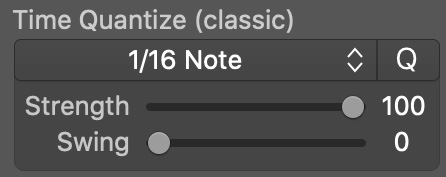
Figure 6.6 – Time Quantize in the Piano Roll
Something I did not yet show you with Quantize in the Region Inspector parameters is named Smart Quantize:
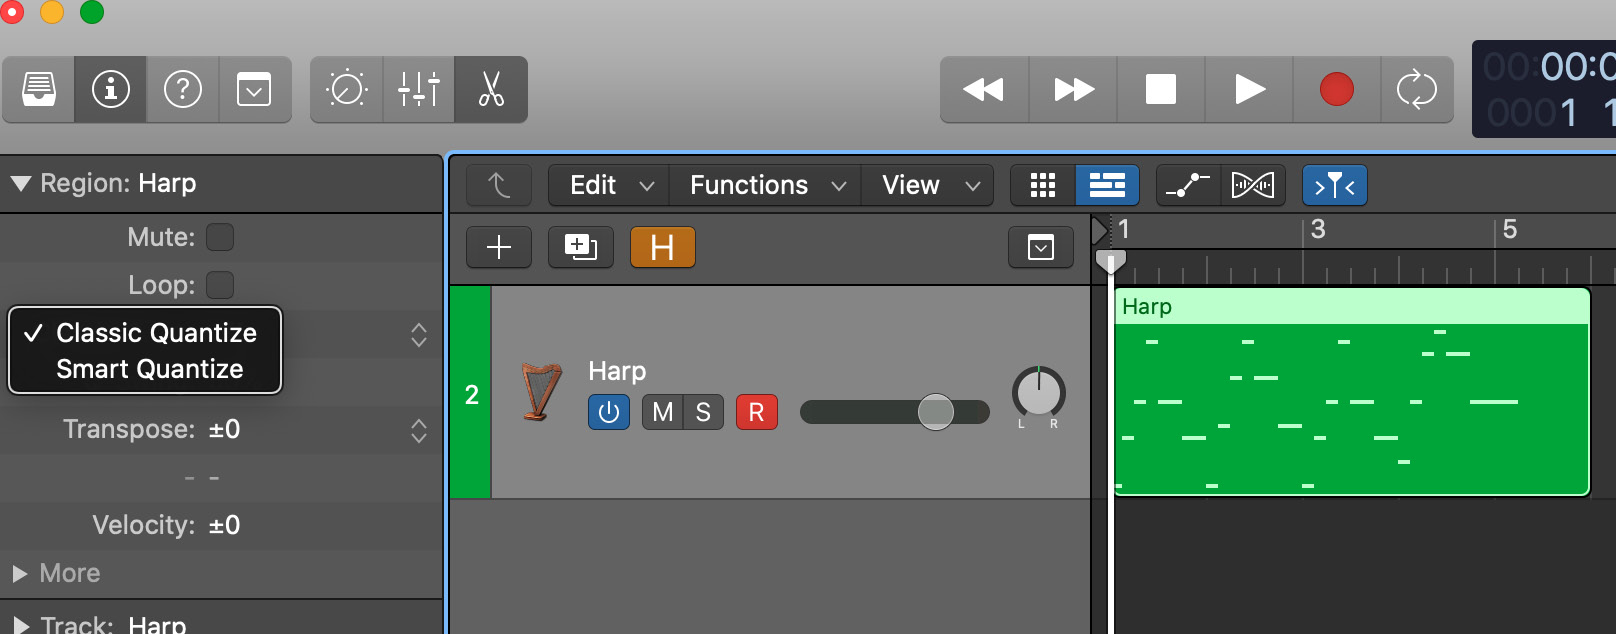
Figure 6.7 – Smart Quantize in the Region Inspector parameters
You may find that you don't need to bother with the Advanced Quantize settings, that just switching from Classic to Smart makes it human enough. If you change it in the Region parameters, it also changes in the Piano Roll local Inspector, which gives you the option of performing it on chosen notes rather than the whole region.
I have a talented friend who never quantizes at the region level, only in the Piano Roll, while I usually do. Horses for courses, as they say.
In this example, however, no quantization is necessary because it was step entered, not played. In fact, if anything, I want this to be more human.
Using the Step Input Keyboard
The Step Input Keyboard is often overlooked, but it is a gem. If you go to the Window menu and scroll down, you will see that you can open it:

Figure 6.8 – The Step Input Keyboard
Notice that you can choose the note duration you wish to enter on the fly, including dotted notes and triplets, chords, and you can choose the dynamics as well. This is perfect for our next task, which is to create a glissando at 5 3 1 1, culminating in a whole note chord:
- Use the Go To Position command key, which is the forward slash next to the right Shift key, and type in 5, then press the spacebar, then 3, and press Enter or return to move the Playhead to 5 3 1 1 (The Go To Position key command is my favorite.).
- Select the 64th note at mezzo piano (mp).
- Starting with C4, play a chromatic scale up to B4.
- Select the Chord and Whole Note buttons, and forte (f).
- Play C5, then E5, then G5, then B5, to create a major 7th chord that lasts four beats.
- Shift + select the notes in the chord and press the button that has both a rest and a right arrow, and the chord now is a two-bar chord. (If no notes are selected, it advances the Playhead to create a rest for the last duration you entered.)
Here is another nice feature. If you double-click on the MIDI in button, next to the green MIDI out button, you can now change a note pitch from your MIDI controller, and if it is velocity sensitive, it will also change the velocity:

Figure 6.9 – MIDI in/out buttons in the Piano Roll
We have come a long way, but a look at either the Piano Roll editor or the Event List reveals that the timing is still robotic.
Logic Pro has a set of presets in the MIDI Transformer that can help, which we will now examine.
MIDI Transform
In the Functions menu in any of the MIDI editors, you will find MIDI Transform. We will begin with the one named Humanize:
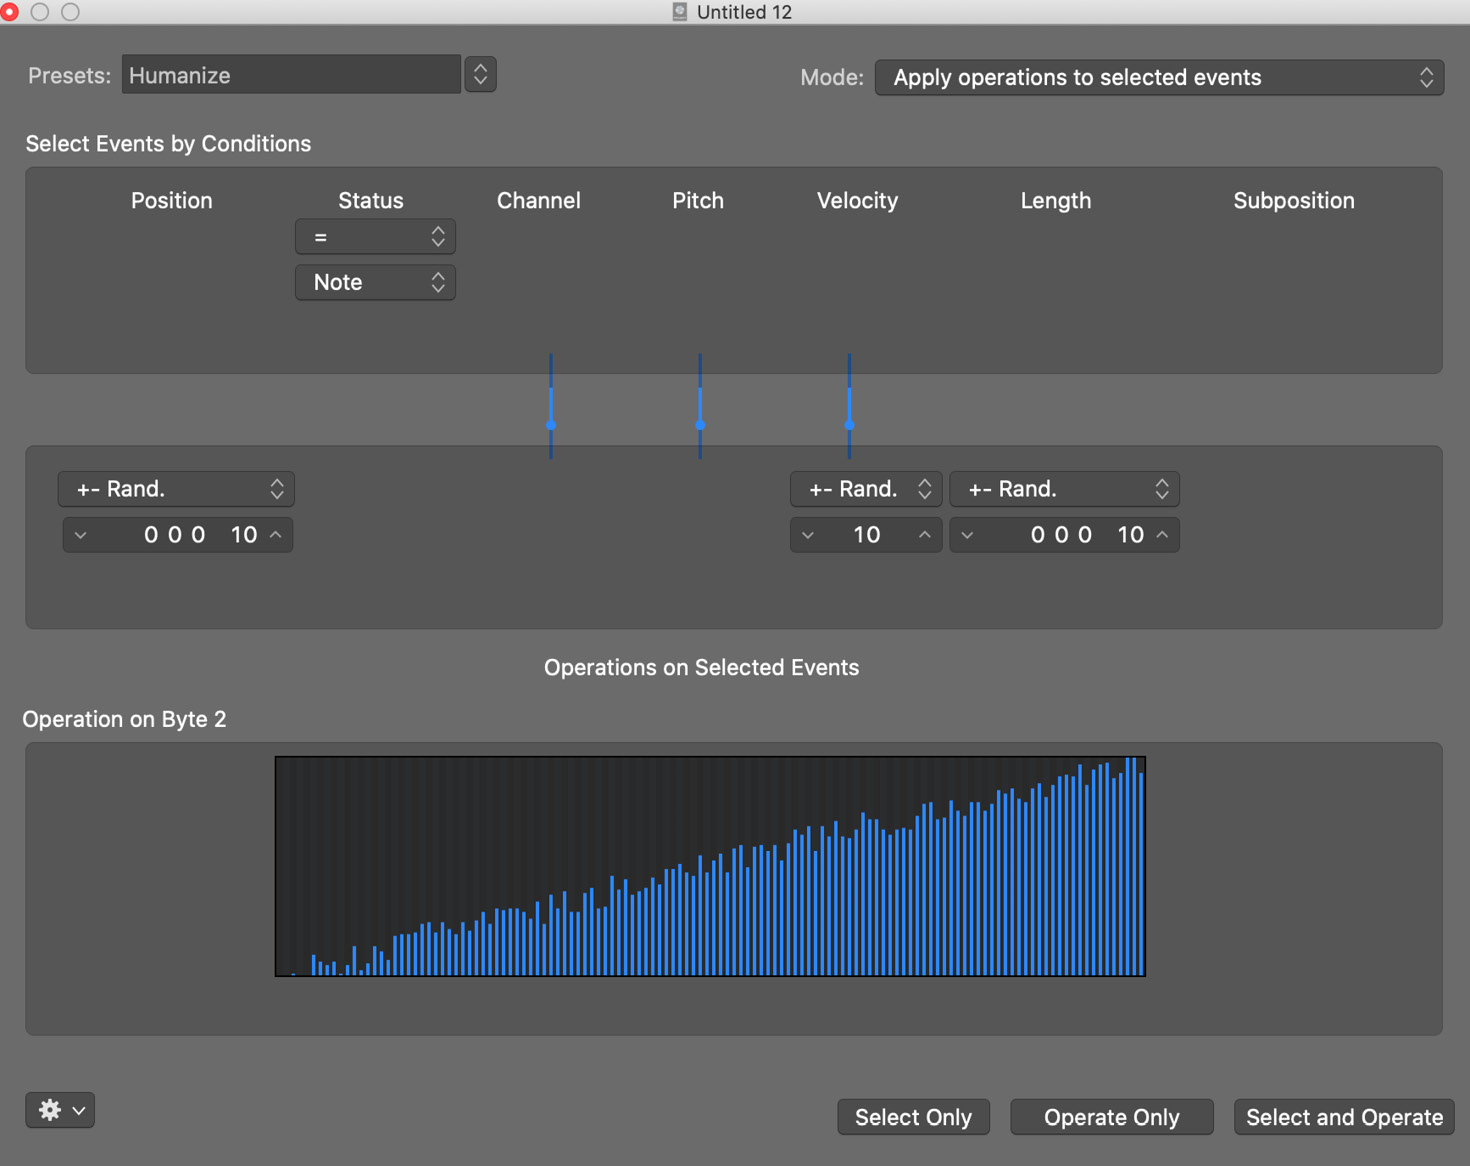
Figure 6.10 – MIDI Transform's Humanize preset
OK, that looks a little scary!
Let's figure it out. Select Events by Conditions is where we tell it which kind of MIDI events we want and if we want ones that are equal to it. Clearly, this preset is already designed for MIDI notes. For the Position, we can affect it in a number of ways that you will see in the pulldown menu, but + or- Randomization is indeed what we want. It defaults to 10 ticks either way, which is not a lot, since you hopefully remember that are 240 ticks for each sixteenth note. If you want fewer or more, you can pull down on the 10 and adjust it or double-click, but make sure you only have the 10 selected, not all the numbers in the field.
Notice you can also randomize the velocity, but I already adjusted velocities in the Piano Roll and think unintended musical consequences can happen with that, so I hold down the mouse on that field and go up to select Thru and it disappears, like magic:
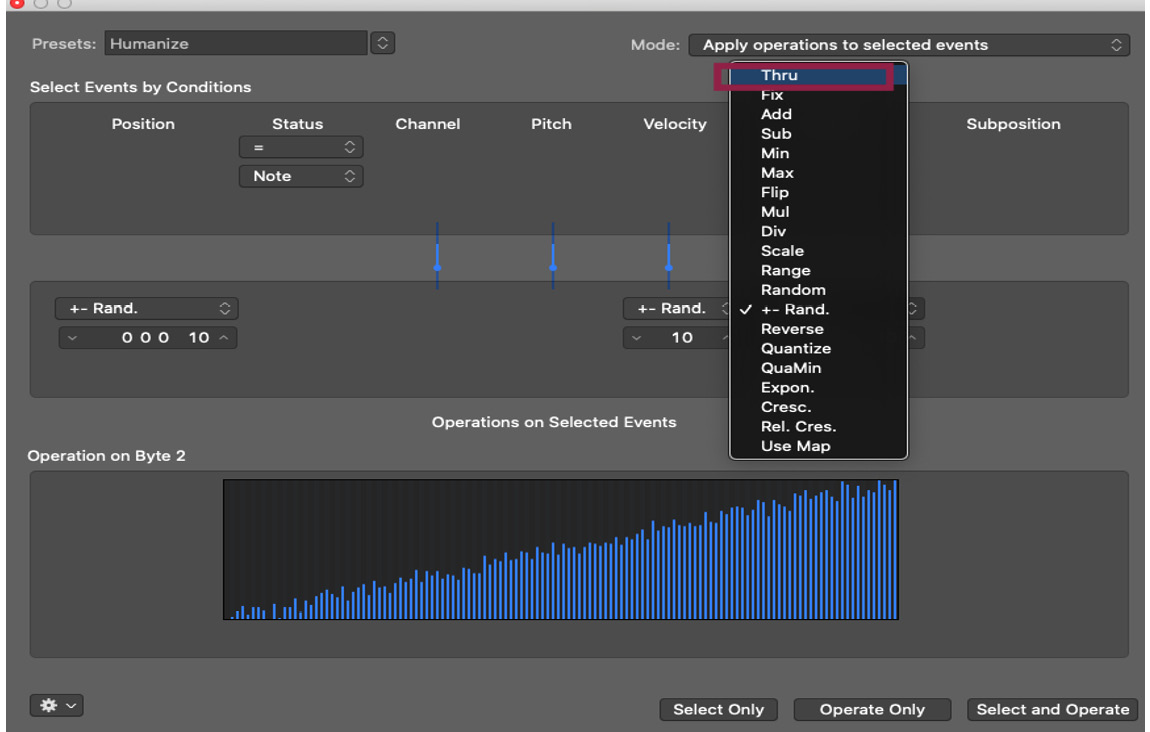
Figure 6.11 – MIDI Transform's Humanize with Length set to Thru
I feel the same way about the note length, although I doubt you would hear a ten-tick adjustment, so I do it with that field as well.
Now we need to choose from the options to Select Only, Operate Only, and Select and Operate. If the region is not at 1 1 1 1, Select and Operate is fine, but if it is, you have to be careful not to select the first note or it could be moved to before the beginning of the project and you won't hear it. Select Only could be fine, but in this instance, I don't want to mess with the glissando, which contains very short notes. So, in the Piano Roll, I select all the notes I want to affect and press Operate Only and voila, it has indeed made it more human sounding by randomizing the positions a little. I can even press Operate Only a second time and it does it more.
Let's solve another problem with a different feature. The glissando is 64th notes, but I think they and the chord should have been twice as fast.
Time Handles
In the Functions menu, select Time Handles. Nothing appears to happen until you drag over some notes, but once you do, you see them appear, all in blue:
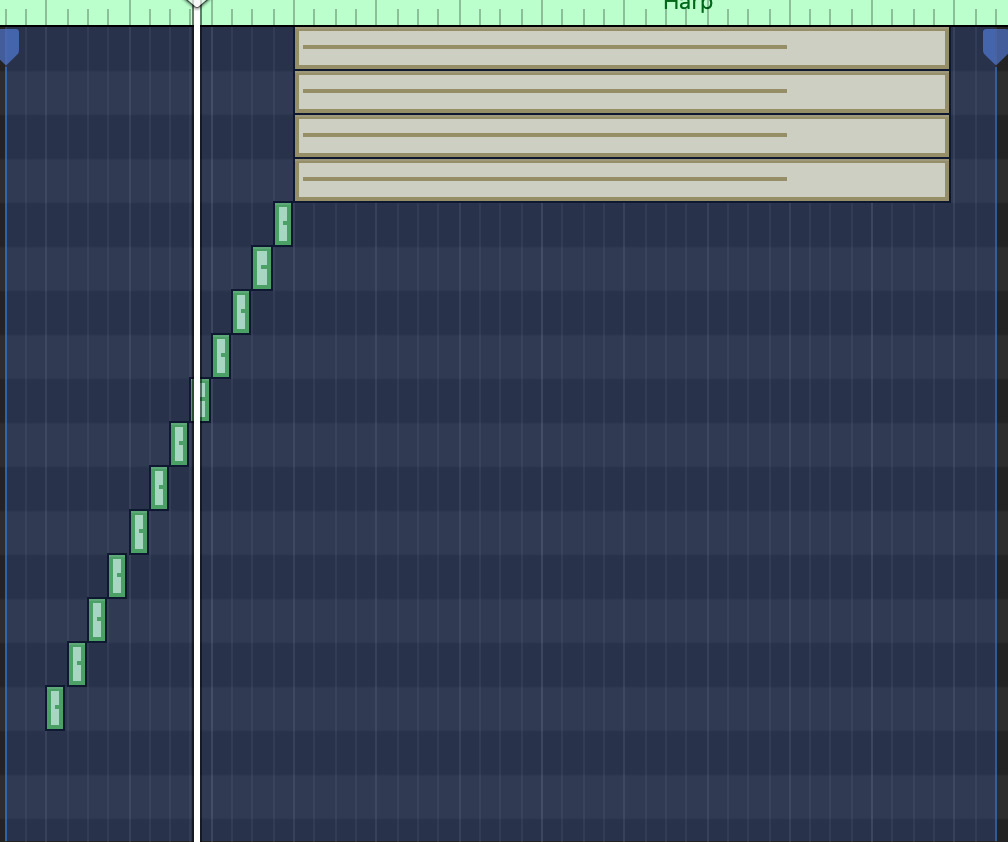
Figure 6.12 – Time Handles
Grab the right Time Handle and drag it significantly to the left, and now the notes play a lot faster! Press Command + T to toggle the Time Handles off, and it does not undo what you did with them.
This sounds pretty good, and I don't think you would know that it was step entered and not played live.
Entering MIDI controller steps in the Piano Roll Editor
I think it would be cool for the glissando to crescendo. We can do this in the Piano Roll editor with velocities.
Creating a crescendo by MIDI velocity
Press the Automation button to the left of the MIDI in button or press A. By default, unless you have been editing another MIDI Continuous Controller (CC), it will show the velocities of the notes.
If you hold the mouse down in the bottom of the editor just before the first note in the glissando and drag up diagonally to the velocity of the chord, you will create a crescendo:
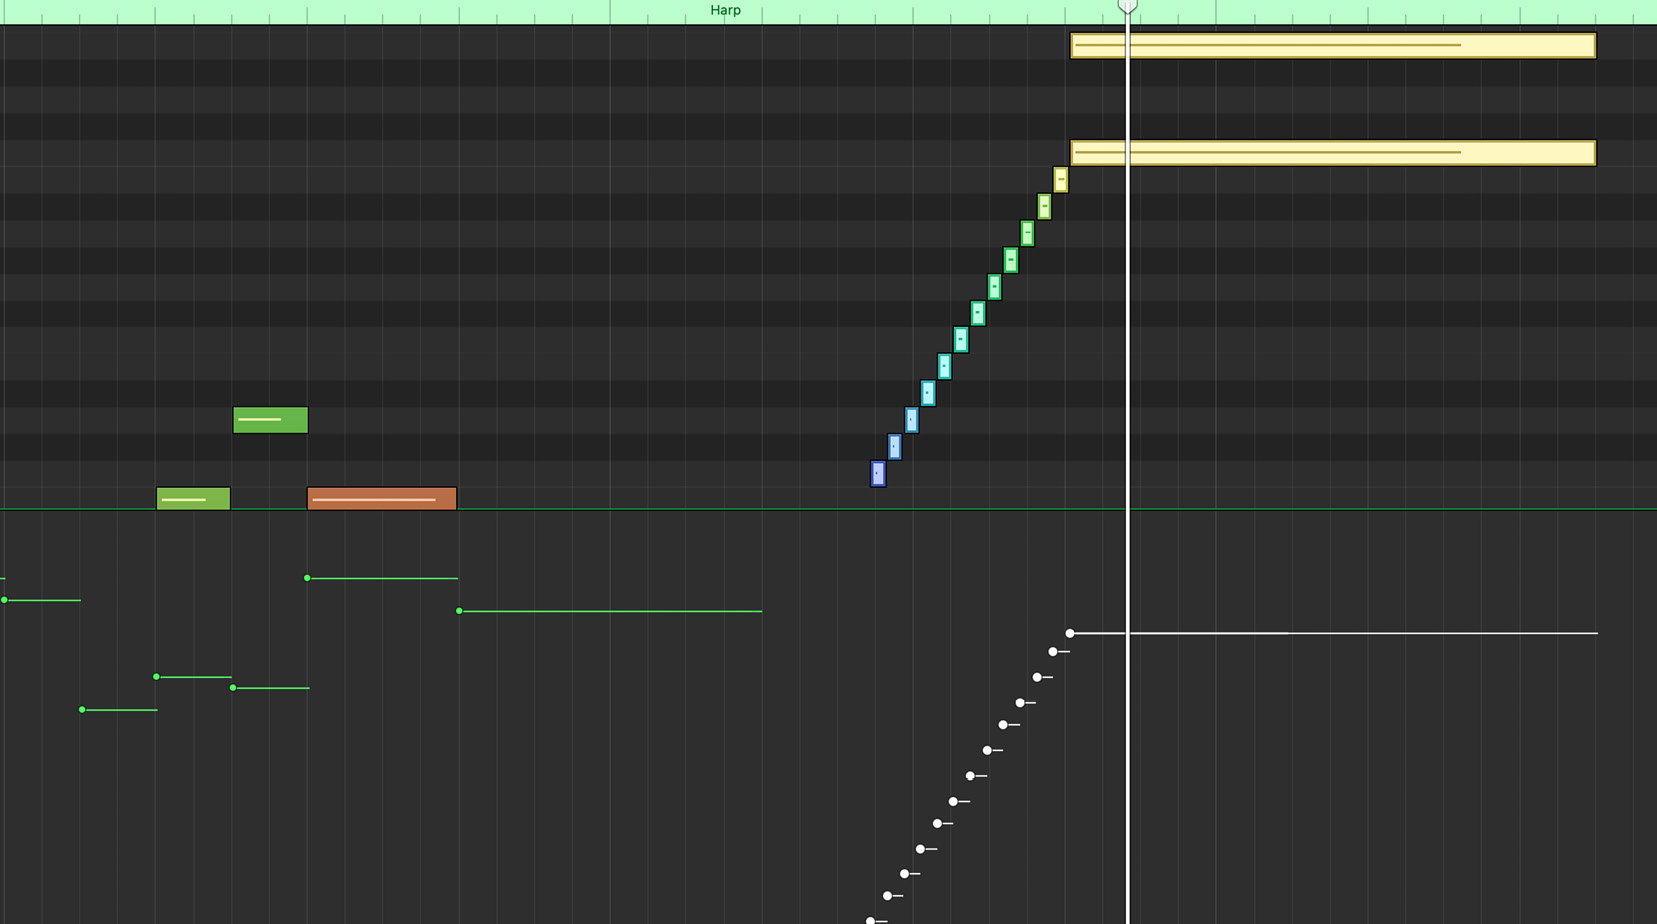
Figure 6.13 – Note velocities
To raise or lower them after the fact, select the notes in the Piano Roll, and use the Velocity slider.
Creating vibrato with modulation
The harp sound is not going to be affected much by vibrato, so let's use the Library to change it to a sound that will be. Open the Library by pressing Y, and navigate to Synthesizers | Classics | 80's Wave Synth.
In the Automation/MIDI field, change from Note Velocity to Modulation, which is MIDI CC:
- Drag the mouse down to the bottom of the window, right at the beginning of the region so that it says 0.
- Just before the first quarter note at beat 3, click the line to create a control point.
- Right next to it, click again to create another control point.
- Drag the second control point up to 110. Play and listen to the effect the modulation has on the sound.
- Just before bar 2, add two more control points close together and drag the second one back to 0.
We have now created the following MIDI Region modulation automation by adding control points:
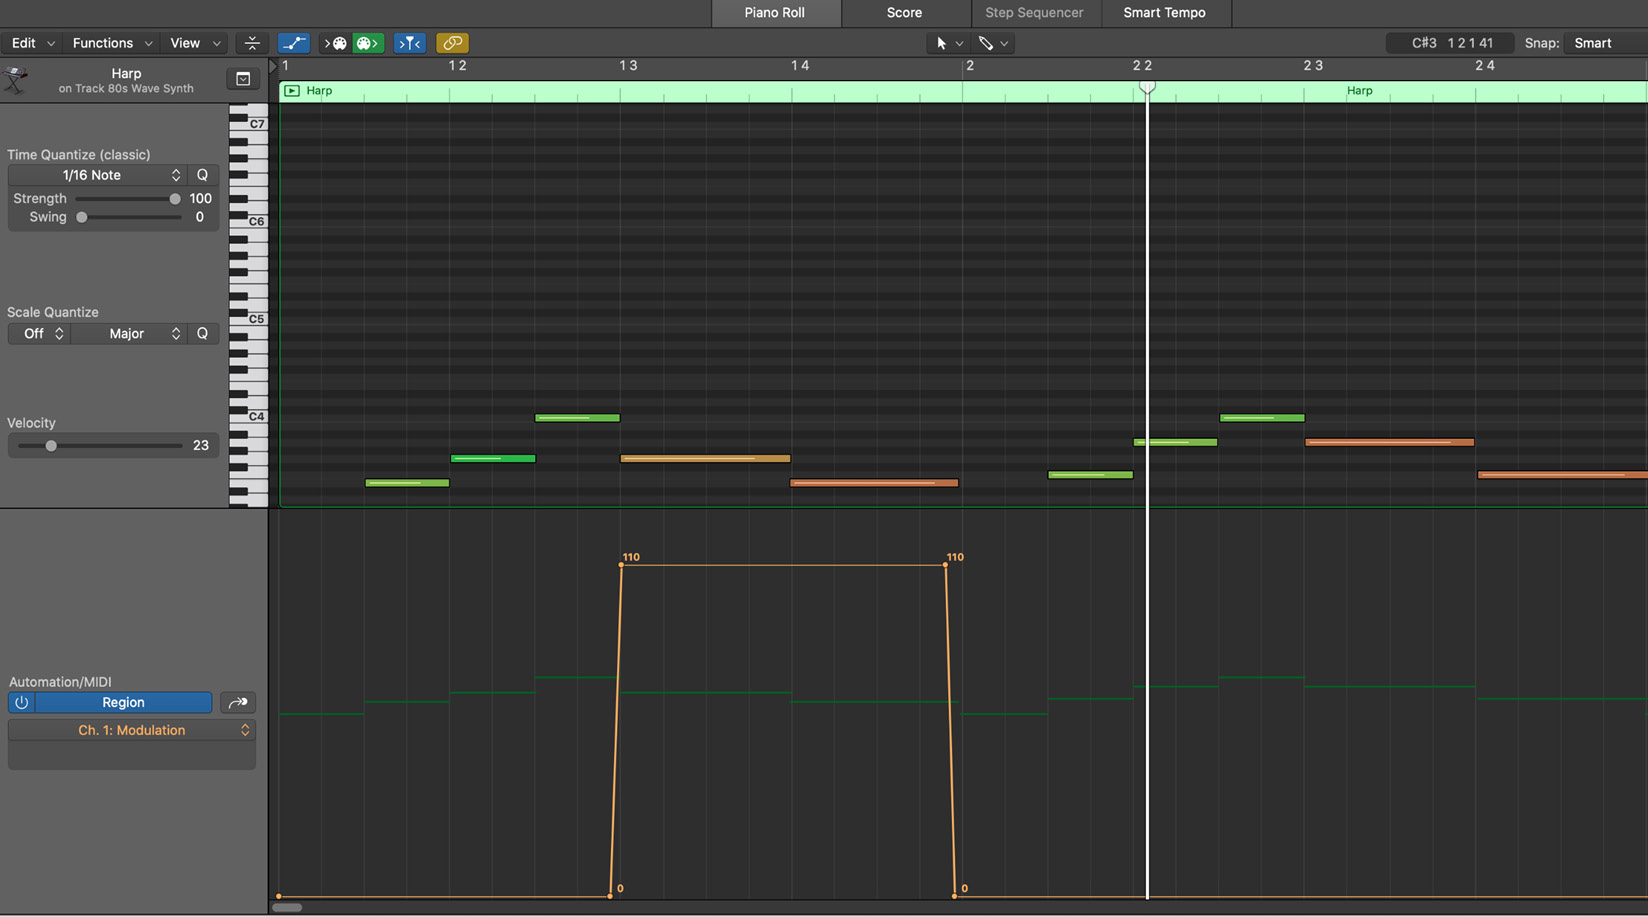
Figure 6.14 – Modulation control points
Great! You want to do the same thing at bar 2 3 1 1, but do you have to go through all that again? No, you do not.
- Shift + select the four control points.
- Hold the mouse down on the first control point.
- Hold the Option key and drag it to the desired position to copy it. Remember to release the mouse before you release the Option key.
That's all there is to it. You can proceed in this fashion for pitch bend or any MIDI CC you wish to automate.
A brief look at the Step Editor
One of the most common complaints I hear from Logic users is that we cannot see multiple automation lanes in the Piano Roll editor. Logic Pro X has another editor that does allow it, but for reasons I cannot understand, people have not taken to it.
In earlier versions, before 10.5., you would have seen it where you now see the Step Sequencer tab, but it has been devalued and now you must find it by going to the Window menu:
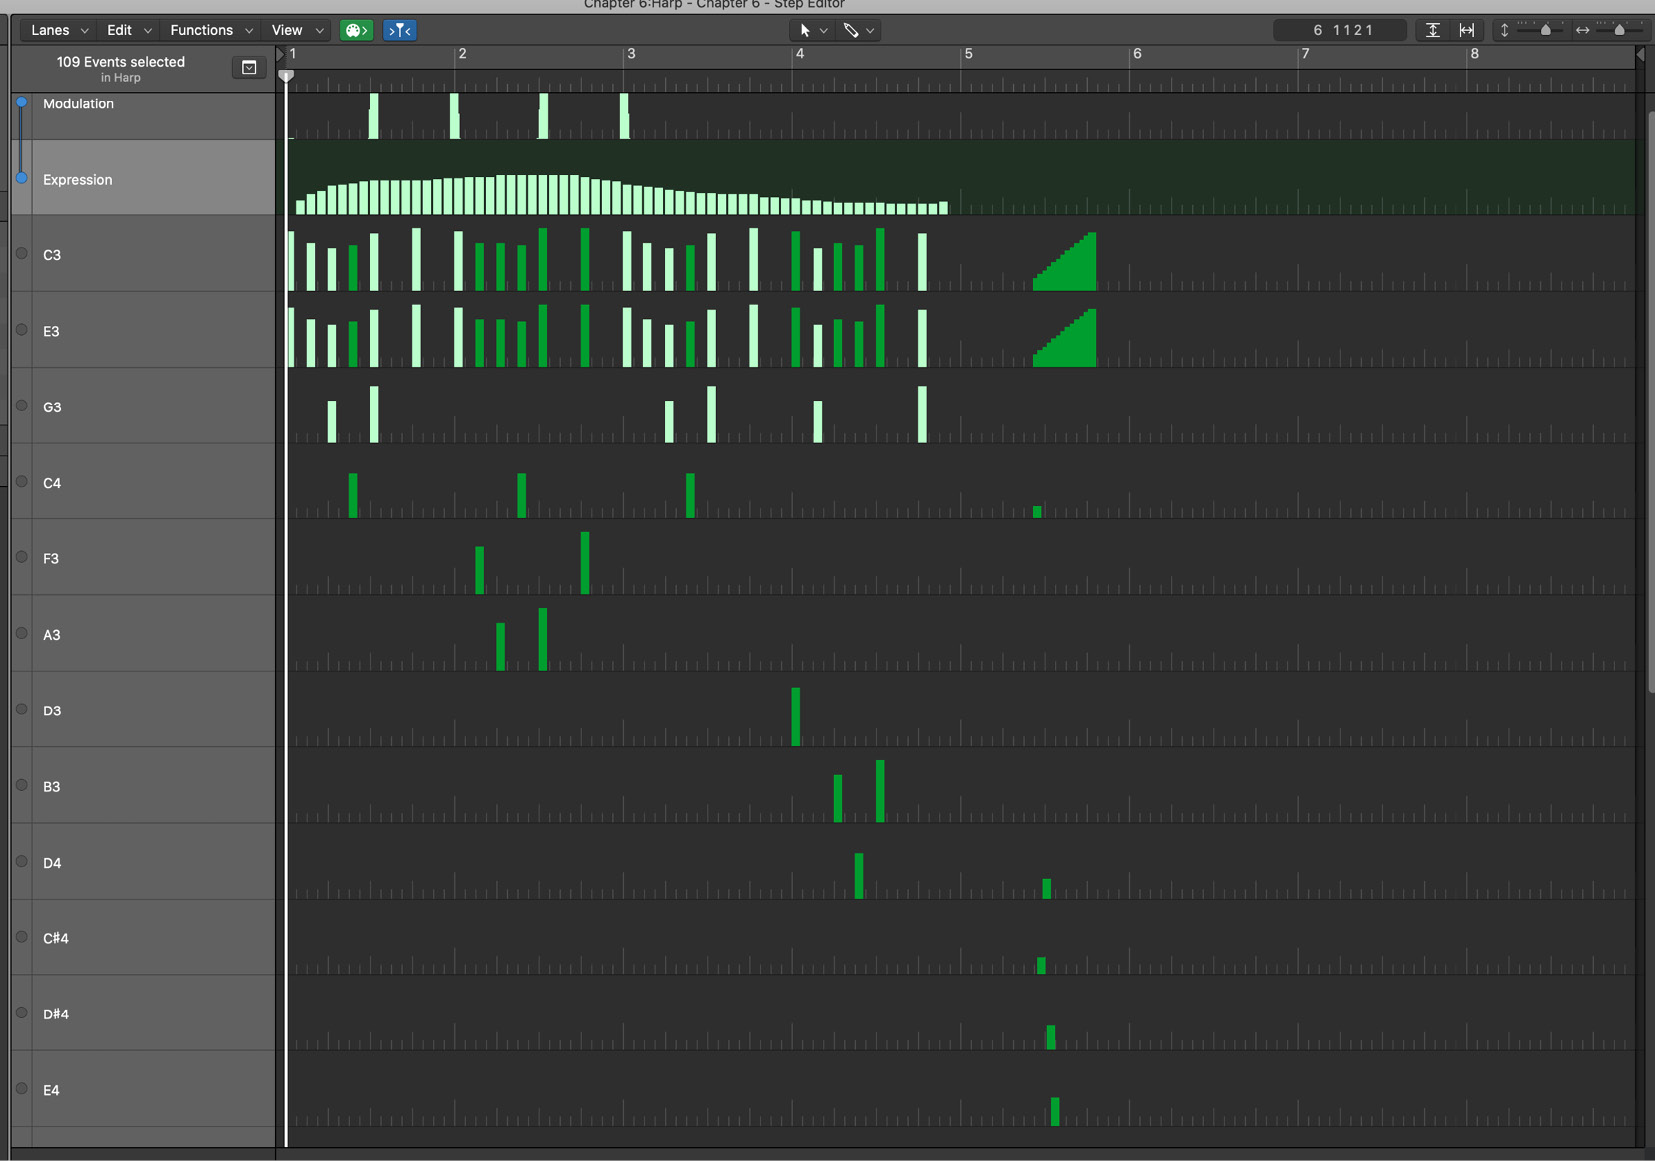
Figure 6.15 – The Step Editor
If it intrigues you, then it is well explained in the manual.
Summary
You have now been introduced to step entering in the Piano Roll editor and editing you can do in the Piano Roll's local Inspector. You now are familiar with just how valuable the Step Input Keyboard is for these tasks, either alone or in conjunction with your MIDI keyboard. You can enter MIDI Continuous Controllers in the Piano Roll editor, and you know how they affect the sound. While it is not widely used or appreciated, you now know about the Step Editor and why you may want to consider using it.
In the next chapter, we will become familiar with Logic Pro X's Drummer, its newly revamped Drum Machine Designer, Percussionist, as well as the new Drum Synth and Drummer loops, all designed to get you the realistic drums or drum machine style arrangements you want for your project.