Chapter 5: Recording MIDI
As previously explained in Chapter 1, Beginning with Logic Pro X 10.5, MIDI is simply a set of instructions that can be utilized by a keyboard, tone module, drum machine, or Software Instrument that is capable of understanding the messages and responding to them.
We will be focusing on Software Instruments, and Logic Pro X comes with a great array of them.
This chapter will cover the following main topics:
- Recording MIDI parts with Logic Pro X's many Software Instruments
- Logic's MIDI editors
- Correcting timing with quantization
- Creating interesting layered sounds with Summing Stacks
- Making one track follow the feel of another
Logic Pro X's Software Instruments
As you can see in the following screenshot, Logic comes with a dazzling array of Software Instruments. Yes, there are lots of great third-party Software Instruments as well, but I suggest you become conversant with the Logic content before you reach for your wallet:
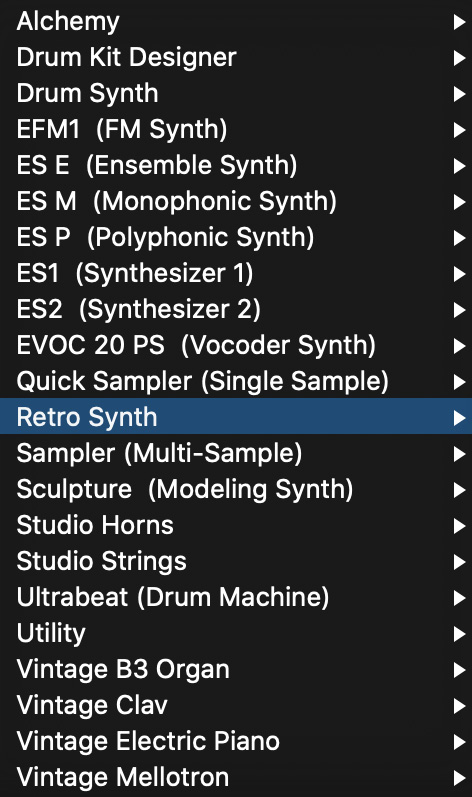
Figure 5.1 – Logic Pro's Software Instruments
Logic Pro X's built-in help
Logic comes with built-in manuals that you can access under the Help menu. One that you will find very helpful specifically deals with Logic's Software Instruments.
Important Note
If you would like a downloadable version, you can go to the website and click on the ones that say web link: https://support.apple.com/en-gb/logic-pro.
GarageBand versus Logic Pro instruments
Follow these steps to get started with Logic Pro instruments:
- Open a new Logic empty project and create an empty Software Instrument track.
- Press O to open the Loop Browser and drag any Green Apple Loop into the workspace. I have chosen 12 String Dream 02.
- With the region selected, press U to create a Cycle and play it.
You will see in the Inspector that Logic has loaded a Software Instrument named Guitar with three FX plugins. When you look at the picture of the Software Instruments, you do not see guitar.
Guitar is actually a simplified version of Logic's sampler that comes with GarageBand. If you click on it to open it, you will see this Graphical User Interface (GUI):
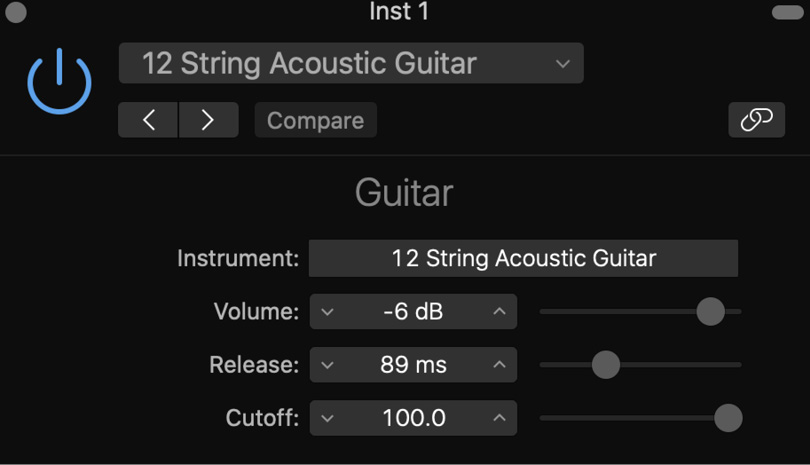
Figure 5.2 – A GarageBand sampler instrument
Hold the mouse down on the Guitar instrument in the Inspector and scroll to Sampler (multi-sample) stereo and now you will see the Logic version:

Figure 5.3 – The Logic Pro equivalent of the GarageBand sampler instrument
Of course, the question is, does it sound different? Maybe a little, because the Logic version has more filters, but not like night and day.
Next, let's take a look at the MIDI editors.
Viewing a MIDI region in the Logic Pro MIDI editors
With the region selected, press P to open Piano Roll. The Piano Roll editor is by far the most utilized editor among Logic users. Here, you will see the MIDI notes' positions, pitches, lengths, and velocity, indicated by color. The bluer it is, the softer the velocity; the more reddish, the louder the velocity. All of this is, of course, editable, which we will do in the next chapter.
Now, press N to open the Score Editor, where you will see the notes as musical notation. It's a very deep editor because it allows you to make the MIDI sound one way while appearing as another, and you can print out parts and entire scores. It is so deep that I wrote an entire book on it. We won't be spending much time on it in this book for that reason.
Note
Notice that when I open the Score Editor, Piano Roll disappears, and vice versa. Under the Window menu are standalone windows for each that you can open so that you can see them both, screen real estate permitting.
If you press D, you open the List editors. The Event List editor is the one we want to explore:

Figure 5.4 – The List editors in Logic Pro
This is perhaps the most over-looked MIDI editor, and for me, it is essential to my workflow. Because it is a List editor, as you can see, I can have both Piano Roll and the Event List open.
So, what are we seeing here? At the top are buttons to filter in/out different kinds of MIDI events. If you click on Notes, it grays out, and now the Event List is empty because, in this Apple Loop, the only included MIDI events are notes.
The first column is Position. This tells you where in the project the event occurs. The first note is at 1 1 1 3. What does that mean?
The first number is the bar; the second number is the beat, which is a quarter note in 4/4 time; the third number in the sixteenth note within the beat; and the last number is the tick. A tick is the smallest unit of timing resolution in a MIDI sequencer. Logic has 240 ticks per sixteenth note, so the three you see here are, therefore, just a teensy bit of the very beginning of the project.
The next column is called Status, and we see a Note symbol on each. As you will see later in the chapter, not all MIDI events will have that symbol.
Ch is short for MIDI channel. With hardware synths and samplers, this can choose specific sounds, but with Logic, it mostly has to do with how it appears in the Score Editor unless you are working with multi-timbral instruments, which we will not be dealing with in this book.
Clearly, Num is a list of the pitches. By default, C3 is middle C in Logic, which is the Yamaha convention. Roland says its C4, which on an 88-note keyboard it is, but more users have smaller keyboards. If you feel the need to change it, you can in Preferences | Display | General.
Val is the velocity of the note. In MIDI, all measurements can range from 1 to 127.
Length is just that, the length of the note, and the numbers work the same way as they do with Position.
MIDI continuous controllers
There are 127 MIDI Continous Controllers (CCs, as they are commonly known). The ones most often employed are CC1-Modwheel, CC7-MIDI volume, CC11-Expression, and CC 64-Sustain. With third-party Software Instrument libraries, how they control them is all over the map. With Logic Pro, they are more consistent. CC1 will usually control vibrato, CC7 and CC11 will control volume, and CC64 will control sustain. You can generate them from a keyboard controller or device, and you can step enter them.
Recording MIDI with Merge
We already visited this window when we set our recording preferences for audio, but since we may want to make different choices when recording MIDI we should return to it now. Go to Preferences | Recording. For now, let's have Merge as the option for both non-Cycle and Cycle recording.
Merge means that we will add material to existing material when we record again.
Press Shift + Command + N to create a new empty project, and create a Software Instrument channel strip with the default patch, which is a Vintage Electric Piano (it's a Fender Rhodes, but Apple can't tell you that or they would have to pay Fender).
If you have a MIDI keyboard controller connected to your Mac, play it now, and you will hear the sound. As you play, in your control bar, which we customized earlier, you will see the notes or chords as you play them.
If you do not have a physical MIDI keyboard controller connected to your computer, press Command + K and the Musical Typing keyboard appears. Notice that you can either play the notes from the virtual keys or from the keys on your computer keyboard.
Let's get started!
Make sure that your metronome is set to click while you are recording:
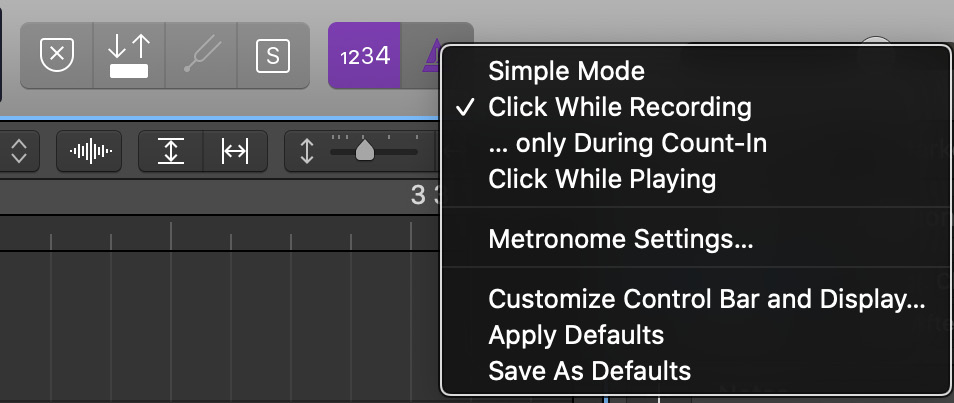
Figure 5.5 – Metronome settings
Play a 4-bar quarter note bass pattern.
Note
If you don't hear the first note, it is because you played it before the beginning of the project at 1111. In any MIDI editor, simply move it by selecting the note and pressing the semicolon key.
If you don't like it, simply press Command + Z to undo it and try again. Now play and record some chords. I am doing eighth notes.
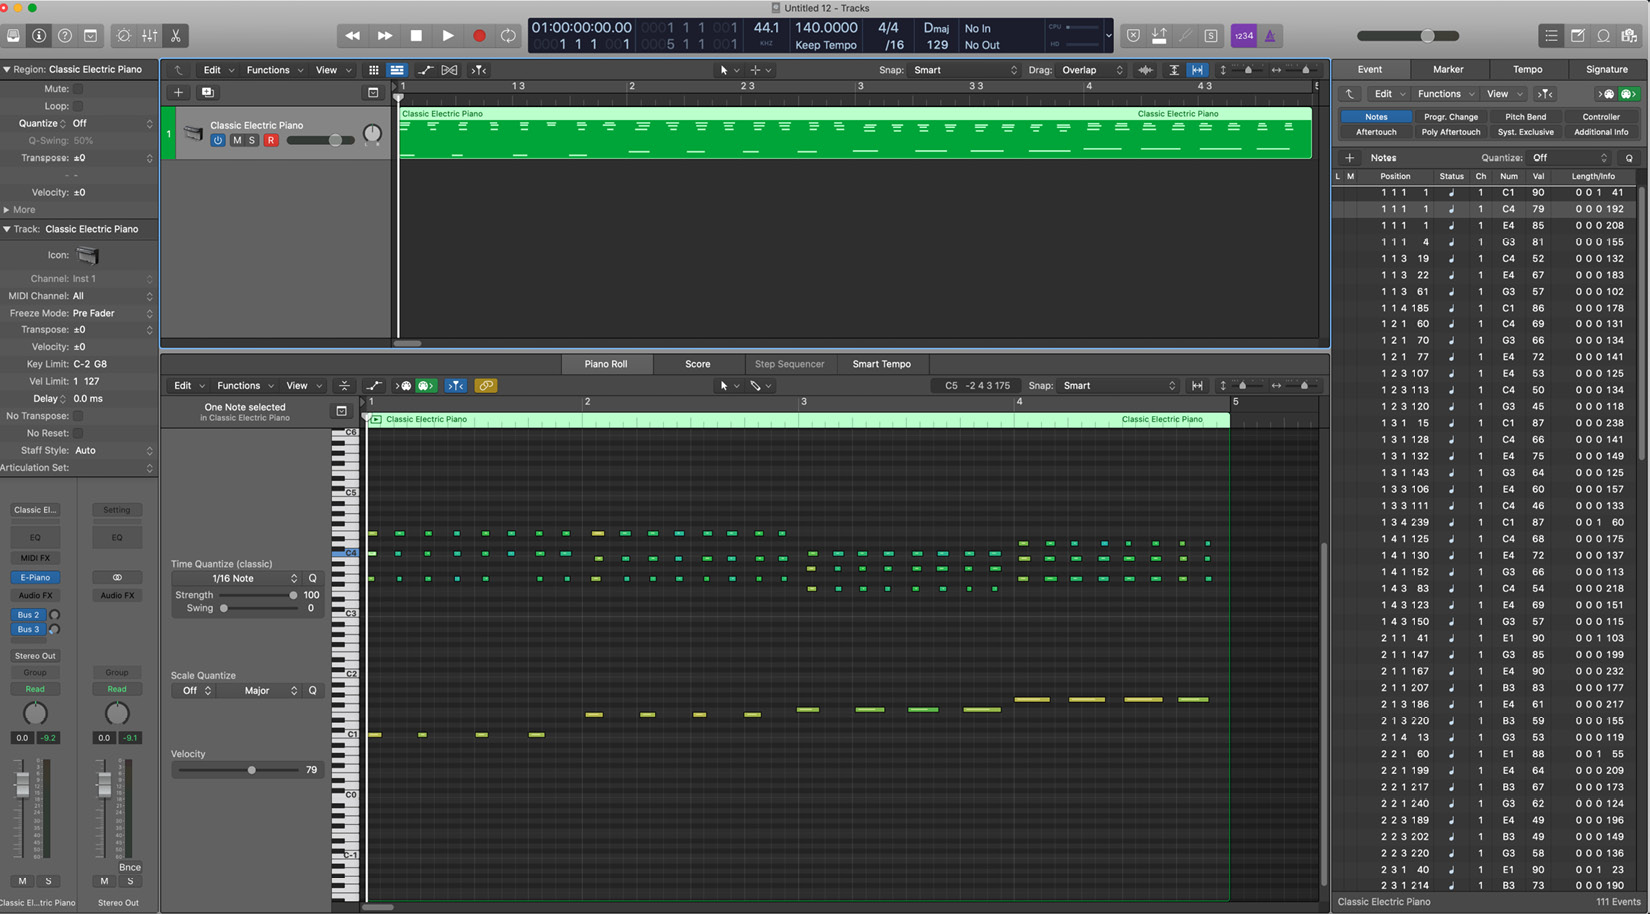
Figure 5.6 – A MIDI recording with flawed timing
Man, I did a lousy job; my timing was terrible! At least I didn't hit any wrong notes. Had I done so, I could simply select the offending notes and hit Delete, or if I wanted them but they were on the wrong note, drag them to the correct note in the Piano Roll editor.
If you look at either the Piano Roll editor or the Event List, you can see just how off the grid my timing was. We need to fix this by snapping the notes to the grid. In Logic Pro, we call this quantizing. All MIDI quantizing is non-destructive because again, MIDI is just a set of instructions. We will learn how to quantize regions in the next section.
Quantizing regions
In the Region inspector, you can quantize as many regions at one time as you like; in this case, just one. I played quarter notes in the bass part and eighth note chords, so my smallest value was an eighth note. I set it to 1/8 Note and sure enough, it is now smack on the grid. But it sounds like a robot now. This is sometimes referred to as hard quantizing.
Am I really stuck with living with bad timing, moving a bunch of notes around in a MIDI editor, or sounding robotic?
No, of course not. We can utilize advanced quantize parameters to achieve a more natural sound.
Advanced Quantize parameters
If you click the More disclosure triangle, you will see that more choices become available, including Q-Flam, Q- Range, and Q-Strength. Q-Flam, while helpful to add a bit of variance to quantized chords, is not something I find very useful.
But Q-Strength certainly is. If I double-click on the field where I see 100 %, or pull down on it with the mouse, I can set it to a less Draconian value. In this instance, I will try 92 %.
It is obvious in the editors, especially Event List, that it is no longer hard quantized, and when I play it back, it sounds both in time and human.
Q-Range can refine it even more. If I set it to -8 ticks, I am telling Logic, if it is 8 or fewer ticks off the grid, leave it alone, but if it is more than that, move it 92% to the grid.
There is no magic formula for this – it depends on your performance – but skillful use of these settings is the key to getting parts that feel both tight and human.
Setting a default quantization setting
Personally, I don't care about doing this, but many users do. If you know that in the next part you will be playing eighth notes and you want to default to that quantization, make sure you have no region selected, and in the Region inspector, set it to 1/8 note, and that will be the default.
We have now already recorded MIDI with Merge and done some timing correction. Let's learn about some other methods to record MIDI.
Other techniques for recording MIDI
While merging might well be the way you want to record MIDI most often, there are other ways to do it that in specific situations you may prefer:
- Recording MIDI with Replace
- Recording MIDI with Cycle and Merge
- Recording MIDI with Cycle and Create Tracks
- Recording MIDI with Cycle and Take Folders
We will also discuss recording MIDI CCs, such as modwheel and expression
Recording MIDI with Replace
Replace means that we will replace material with existing material when we record again.
If in the control bar, click on the X button, which turns orange, and now you are in Replace mode. But here are a number of ways it can behave, depending on what you choose in Recording Preferences:
- Region Erase: Erases MIDI regions from the Tracks area from the start of the recording until the end of the recording, even if nothing is played.
- Region Punch: Erases MIDI regions only where MIDI events have been recorded.
- Content Erase: Does not erase MIDI regions but the MIDI content inside of them, from the start of the recording until the end of the recording, even if nothing is played.
- Content Punch: Does not erase MIDI regions but the MIDI content inside of them, only where MIDI events have been recorded.
I am mostly a Region Erase guy.
I create a new Software Instrument either by clicking the + sign at the top of the track list or by doing the following:
- Open the Library by pressing Y.
- Navigate to the Bass instruments, and load Fingerstyle Bass.
- Then, play a simple bass part. Not bad, but we can do better.
- Click the X button to enable Replace mode and play the part again.
Much better this time, and if need be, you can fix notes and quantize accordingly.
Recording MIDI with Cycle and Merge
This is another option that is good for drum parts, and it mimics old drum machine methodology. It's a very user-friendly way of creating parts with a flow and one you are already familiar with if you have ever played into a drum machine:
- Create a new Software Instrument and open the Library by pressing Y.
- Navigate to the Drums instruments, and load East Bay.
- Set a 4-bar cycle, either by drawing it in the bar ruler or by selecting one of the existing 4-bar regions and pressing U.
- Click the X button to disable Replace mode.
- Now play, without stopping, the kick drum, then the snare, then the high hats, and then a tom fill.
In Piano Roll, to the right of the View menu is the Collapse button. By clicking I, Piano Roll only shows me the notes I played, and it shows me the kit piece names.
Now it just so happens that quantizing to a sixteenth note with some Q-Strength works perfectly on the whole region. But I will now show you another way of doing this that gives you more control.
Recording MIDI with Cycle and Create Tracks
Back in Recording Preferences, I change the Cycle recording behavior to Create Tracks. Now, doing the exact same procedure with the drums, instead of one track I have four tracks flowing through the same channel strip, and each region can be given its own quantization settings.
After, if I want them to be on one track in one region, I can merge them together with the Glue tool, or by pressing Command + J to merge them.
Recording MIDI with Cycle and Create Track Alternatives
Again, back to Recording Preferences. This time, I will change the Cycle recording behavior to Create Track Alternatives.
By now, you are well familiar with the steps for creating a new Software Instrument and loading a patch from the Library, so I will just tell you that I am using the patch named Clean Guitar.
Now, following the exact same procedure as with the drums, I will play three different parts. Next to the name, in the Track Header, I see the letter C, with an up and down arrow. This means I have created three track alternatives: A, B, and C.
Holding the mouse down on C brings up this menu:
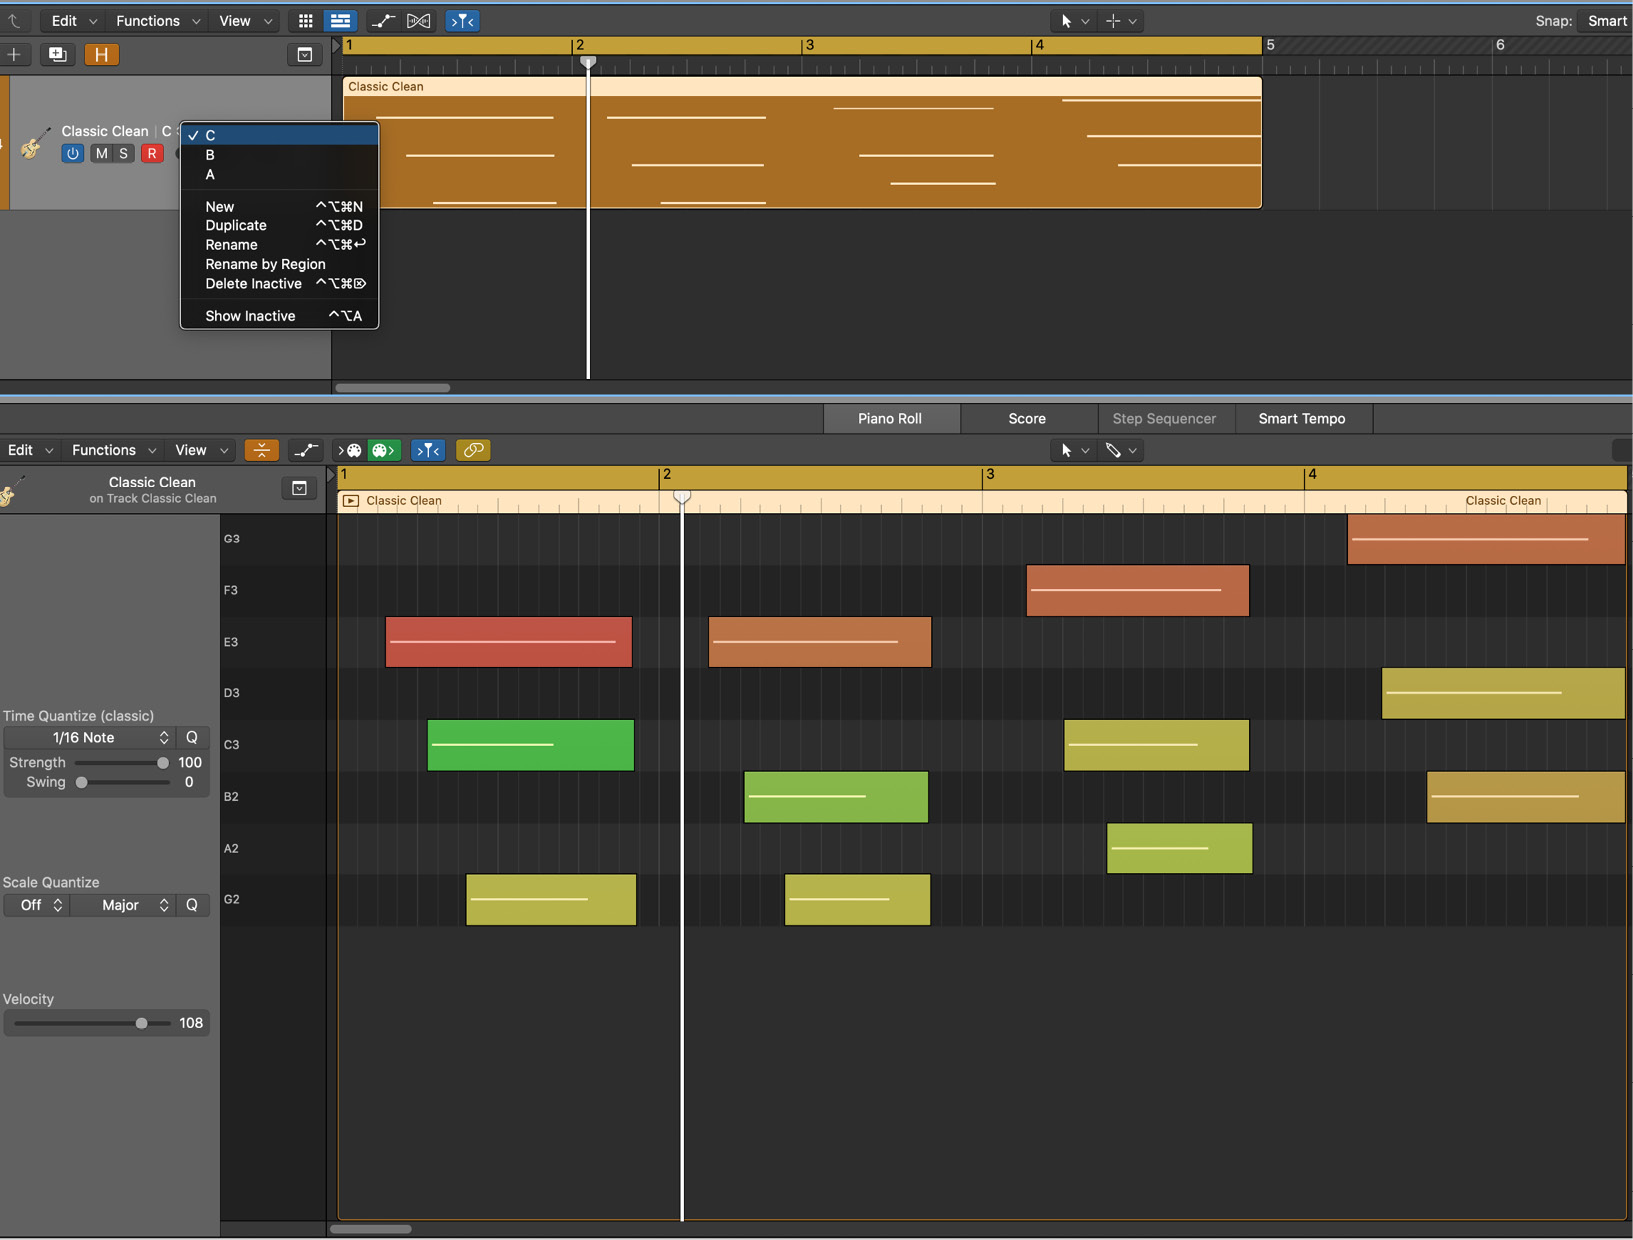
Figure 5.7 – Track alternatives
I can now audition each one to see which one I like best, and when I re-select the region, Piano Roll updates to reflect that track alternative.
Selecting Show Inactive, or by pressing Ctrl + option + A, shows me all three, with two muted, and each has a power button to turn it on instead of the chosen one, and an arrow to move it to the top. I can then either hide or delete the inactive track alternatives.
I love this workflow for MIDI, personally.
Hey, Jay, speaking of audio, what about that nifty Cycle Recording with Take Folders that we employed to record audio?
Recording MIDI with Cycle and Take Folders
Again, back to Recording Preferences. This time, I change the Cycle recording behavior to Change the Preference to this.
The good news is, you already know how to do this, and it works the same way, except…there is no Quick Swipe Comping the MIDI.
For me, this makes it my least favorite choice. If you disagree, then go back to Recording Audio in Chapter 3, Recording Audio, and review it.
Note
Remember to keep track of changes to your Recording Preferences, because they will affect every project, new, present, or older.
Recording MIDI with CCs
In addition to playing in notes, you can play in MIDI CCs either at the same time or in additional passes.
Some of what you can do is the following:
- Record CC 1 - Modwheel, by manipulating the mod wheel on your keyboard controller, if it has one. Usually, but not always, it will increase/decrease vibrato.
- Record CC 11 - Expression, by raising and lowering a connected expression pedal, if you have one plugged in on your keyboard controller. Usually, but not always, it will increase/decrease the volume and sometimes brighten or darken the timbre, but this varies greatly from instrument to instrument.
- Record CC 64 - Sustain, by pressing down and releasing a connected sustain (damper) pedal, if you have one plugged in on your keyboard controller. When pressed down, it will sustain the sound when you take your hands off the keys, and end the sound when you release it.
The Arpeggiator MIDI FX plugin
While an arpeggiator can be used with any Software Instrument, traditionally we think of them as being associated with hardware synthesizers, as almost all of them have one built-in. Well, Logic has a MIDI plugin for this purpose, and it is nifty!
- Create a new empty Software Instrument and with Open Library checked, and go to Synthesizers | Classics | Dream Dancer.
- This loads a patch in Logic Pro X's most sophisticated synthesizer, the ES2, with some plugins, and it sounds really good.
- On its channel strip fader in the Inspector, you will find MIDI FX. Hold the mouse down and go to Logic | Arpeggiator, and it opens:
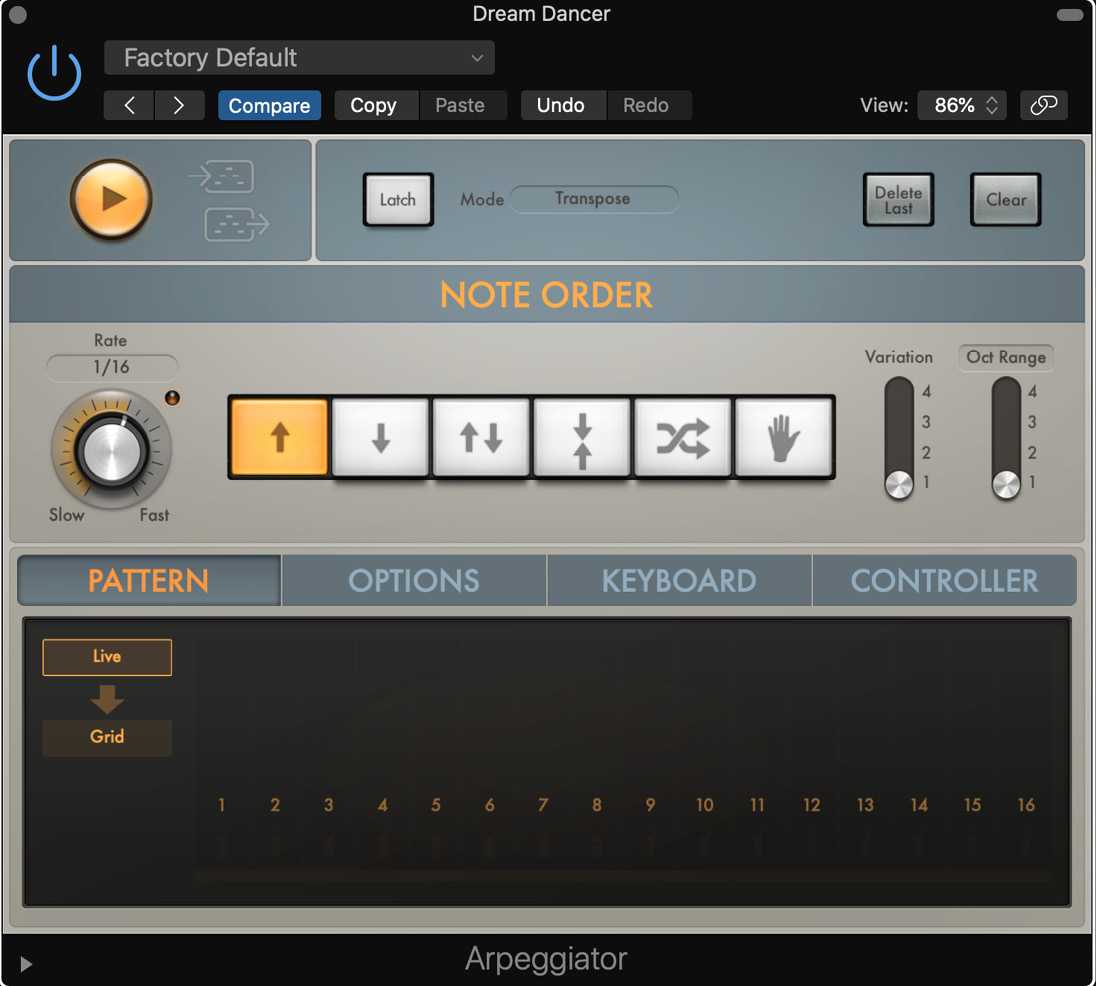
Figure 5.8 – The Arpeggiator
Play single notes or chords, and listen to the default preset in Live mode.
While playing, drag the knob left to Slow or right to Fast and listen to how it changes the rate. You can also hold the mouse down on the rate filed to change it.
To the right of the Rate knob are a series of buttons.
The functions of the buttons are described in the manual, which can be accessed in the Help menu:
- Up: Plays from the lowest to the highest note in consecutive order and restarts when all the keys are played.
- Down: Plays from the highest to the lowest note in consecutive order and restarts when all the keys are played.
- Up and down: Plays from the lowest to the highest note in consecutive order, then plays from the highest to the lowest note, and restarts when all the keys are played.
- Outside: Plays the highest note, then the lowest note, then plays the second-highest, and then the second-lowest note, and so on. The arpeggio restarts when all the keys are played.
- Random: The played note order is randomly generated and can include duplicate notes.
- As Played: Plays all notes in the order they were played, then restarts.
Notice that each one has 4 variations and that it can play a range of 1–4 octaves.
With the Latch button disengaged, you hear the arpeggiator as long as you are holding down the keys. With Latch engaged, it keeps playing until you strike other keys.
In the Pattern tab, if you scroll down to Grid, or in the preset menu at the top of the plugin, you will see tons of patterns. You can also draw in your own steps in Grid.
One of my favorite features in Live mode only becomes visible if you click the disclosure triangle at the bottom, and that is Silent Capture. Check it and play some chords, and you have quickly created your own pattern.
The Options tab gives you additional controls that are really useful, especially for note length, for me.
The Keyboard tab allows you to choose to snap to keys and scales, while the keyboard split allows you to set ranges of your keyboard controller that generate arpeggiation and those that do not.
The Controller tab allows you to map MIDI CCs for your performance.
In my view, Arpeggiator is just great, giving you all kinds of creative options. If you compose techno or EDM, I suggest you spend a lot of time with it.
Creating patches
You can easily create very interesting sounds with Software Instruments and even save them in the Library. Summing Stacks is the key.
Creating a layered patch with Summing Stacks
Summing Stacks give us the power to create complex patches with multiple Software Instruments and save them in the Library to be used with any project.
I want to create a classic grand piano with a Rhodes Electric Piano patch. It's easier than you might think:
- Create two empty Software Instrument tracks with Open Library checked.
- In the first one, load a piano of your choice.
- In the second one, load an electric piano of your choice.
- Arm the two and play and listen to the sound. Cool, I know that sound!
- Shift-select the two Track Headers.
- Under the Track menu, go to Create Track Stack, or press Shift + Command + D.
It will ask you whether you want to create a Folder Stack or Summing Stack. If you click the Details disclosure triangle, you will see descriptions of each. Clearly, we want the Summing Stack.
You now have a Summing Stack for a playable layered instrument that you can save in the Library, but before you do, you might want to consider some more adjustments:
- Adjust the relative volumes with the volume sliders on the individual instruments.
- Adjust the panning of the two instruments, one panned a bit to the left, the other a bit to the right, to make the sound wider.
- Next, Ctrl + click the icon to give it a more suitable icon.
In the Library window, click on Save and name it. There will now be a User Patches folder in your Library, and you can load this patch into any Software Instrument track in any project.
Creating a split layered patch with Summing Stacks
This is a variation that can be a lot of fun. Let's say that I want to be able to play a vibraphone with my right hand and an upright bass at the same time. No problem, the steps are the same as what we just did:
- In the first channel strip in my Summing Stack, I chose Mallet | Vibraphone.
- In the second channel strip in my Summing Stack, I chose Bass | Upright Studio Bass.
Now, when I play the Summing Stack, I hear both throughout the range, which is not what I want.
In the Inspector, the second section is the Track inspector. Changes here affect the entire track, not just a region.
In here, I can adjust the key range that this instrument plays.
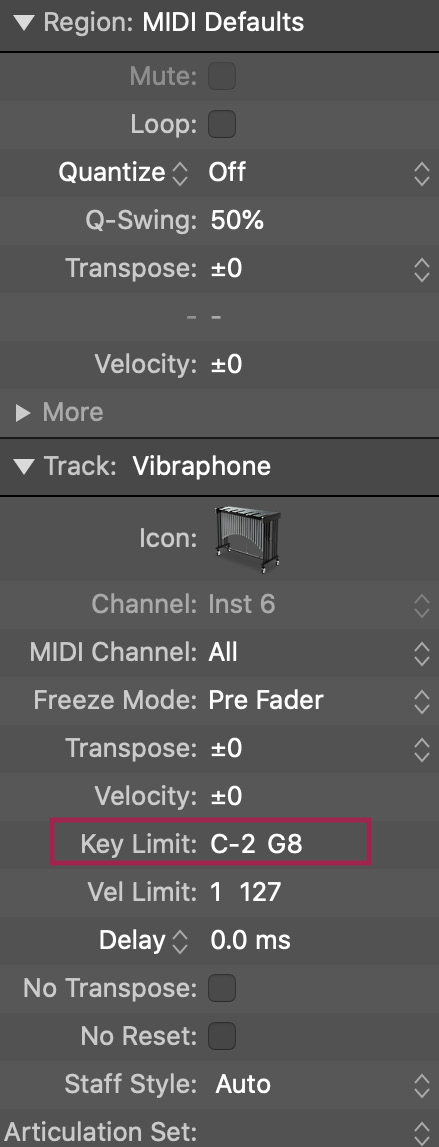
Figure 5.9 – The Key Limit range
I want this vibraphone to play from C3 to G8, so I double-click on the field and, making sure that I am only selecting C-2, I type in C3.
Moving to the upright bass, I do just the opposite, naming the top note in the key range B2, and the note just below C3.
Now, when I play my Summing Stack, I have it split just where I want it, and can save it in the Library.
Very cool!
Stevie Wonder said "just because a record has a groove don't make it in the groove," and he was right. Groove Tracks will help you make your parts feel great together.
Groove Tracks
Groove Tracks is a way of making your regions groove together that works with either audio or MIDI regions. I am going to demonstrate it to you with MIDI because that is where I personally find it most useful.
I have played in a fretless bass part that has some Quantize settings that are pretty specific, and it feels great. Then I played a kick drum part and it is close in feel to the bass, but not quite. This is where Groove Tracks really shines.
If you Ctrl + click on Track Header Components, you can scroll down to add Groove Track to the Track Header:
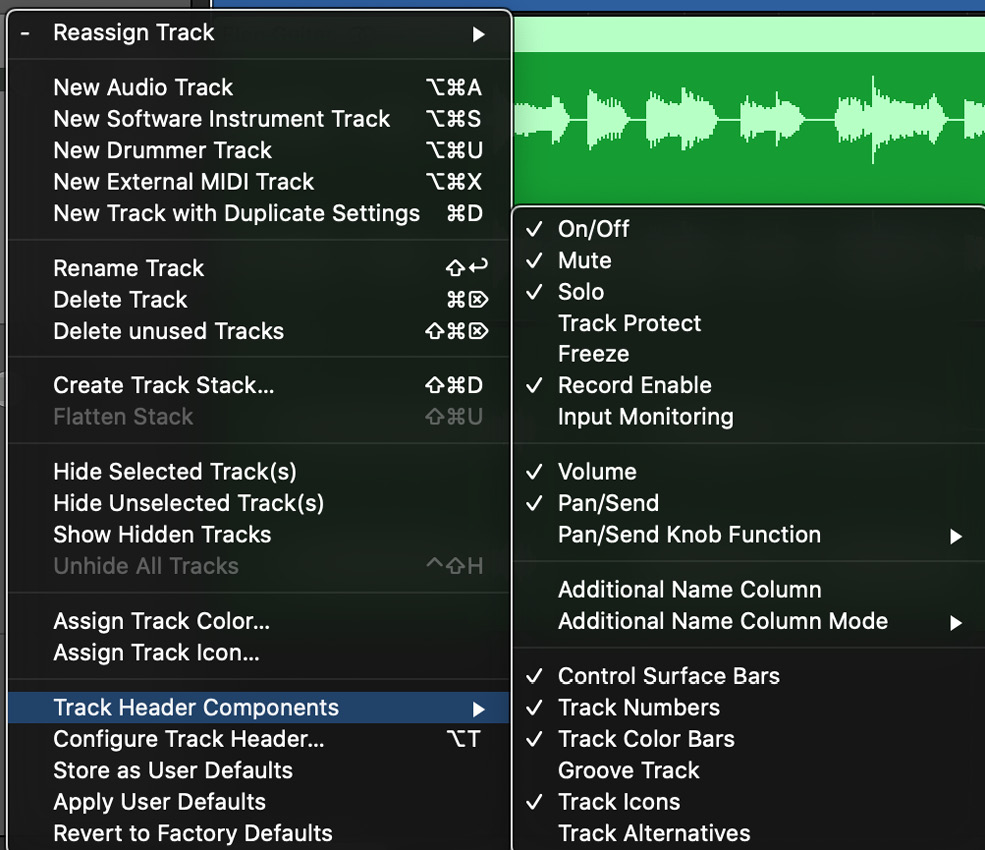
Figure 5.10 – Adding Groove Track to the Track Header
Since the bass is to be the guide, in the bass' Track Header, I will move the mouse to the left and see that there is a yellow star that I can check.
After I do that, a blank checkbox appears on all other tracks. In this example, I only have the drum kit. When I check that checkbox, I am telling the drums to follow the feel of the bass, which is what I want. Works like a charm!
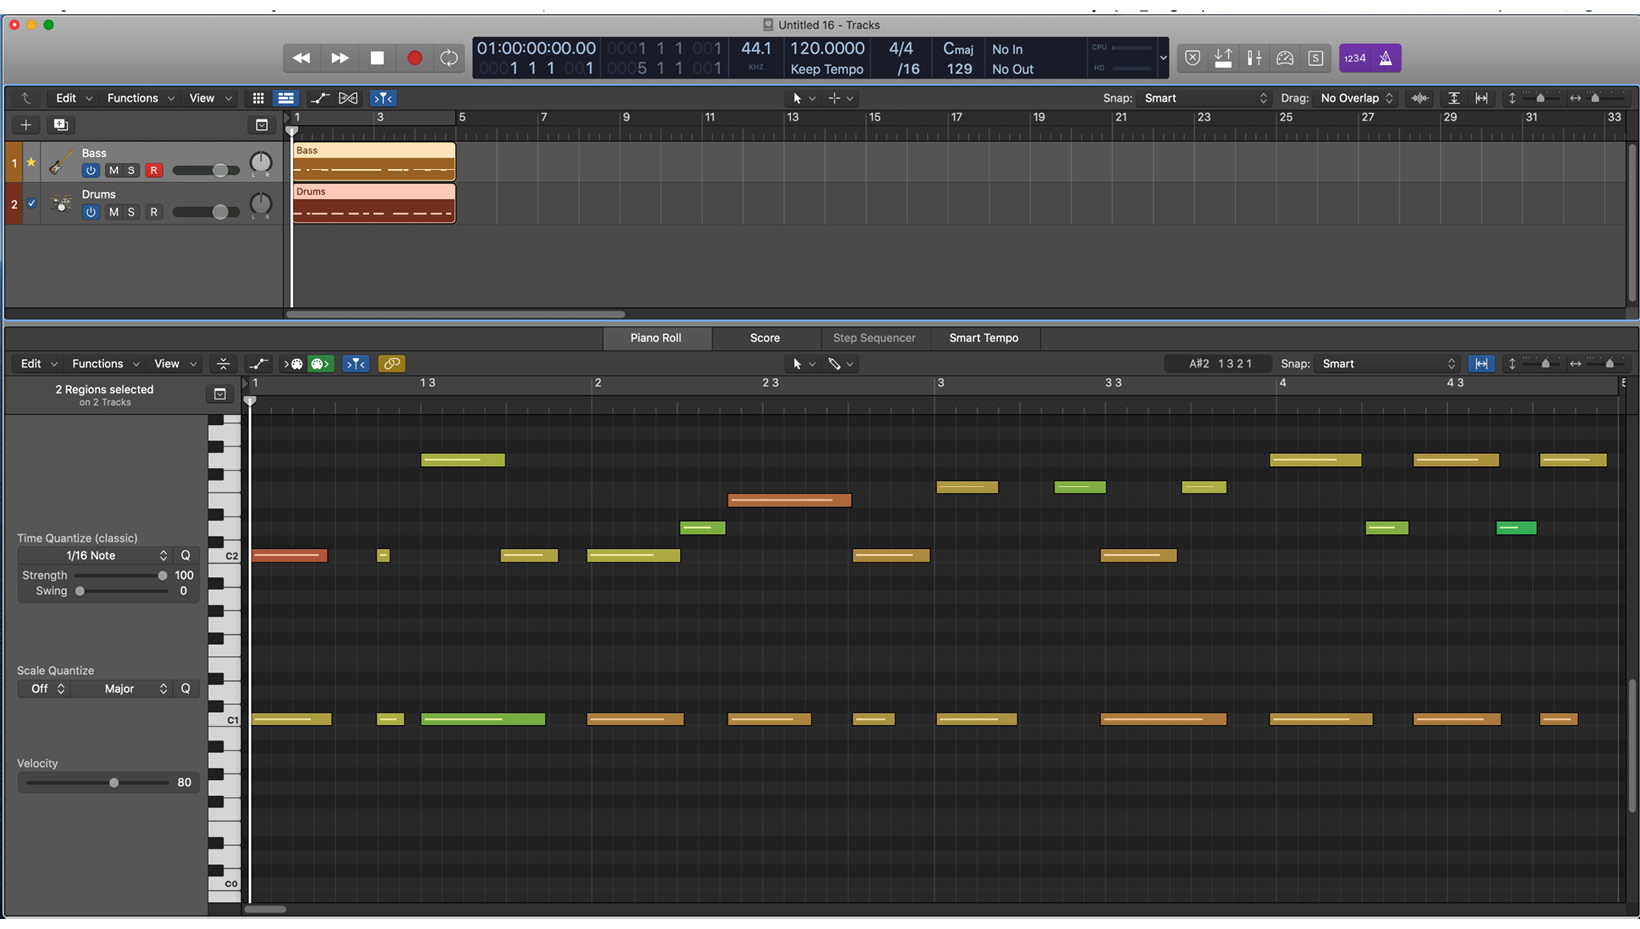
Figure 5.11 – Groove Tracks applied
Summary
You have now been introduced to Logic Pro X's array of Software Instruments and have seen the various MIDI editors.
The importance of MIDI Recording Preferences and how they behave with non-Cycle and Cycle recording has been explained. You now can record MIDI in a number of different ways and correct its timing by quantizing. As you have learned, MIDI is not just notes but CCs as well, which you will want to record frequently.
The Arpeggiator adds that classic synthesizer touch, while you can individualize your sound by created layered and split patches in the Library with Summing Stacks.
Groove Tracks gives your music a tight feel that you will love.
In the next chapter, we will become familiar with step entering in the Piano Roll editor when you don't want to play live. This includes how to change notes pitch, length, velocity, scale, and quantization in the Piano Roll editor. We'll add MIDI CCs in the Piano Roll editor and take a brief look at the Step Editor.