
Another popular authentication strategy is OpenID connect tokens. Delegating the identity verification to OAuth2 providers, is a convenient way to manage users. To enable the feature, two required flags have to be set to the API server: --oidc-issuer-url, which indicates the issuer URL that allows the API server to discover public signing keys, and --oidc-client-id, which is the client ID of your app to associate with your issuer. For full information, please refer to the official documentation https://kubernetes.io/docs/admin/authentication/#configuring-the-api-server. The following is an example of how we set Google OpenID authentication with our minikube cluster. The following steps can be programmed easily for authentication usage.
To start, we'll have to request a set consisting of the client ID, client secret, and redirect URL from Google. The following are the steps for requesting and downloading the secret from Google:
- In GCP console, go to APIs & Services | Credentials | Create credentials | OAuth client ID.
- Choose Other in application type and click Create.
- Download the JSON file.
After this, the credential is successfully created. We can take a look at the JSON file. The following is the file we got from our example project kubernetes-cookbook:
# cat client_secret_140285873781-f9h7d7bmi6ec1qa0892mk52t3o874j5d.apps.googleusercontent.com.json
{
    "installed":{
        "client_id":"140285873781
f9h7d7bmi6ec1qa0892mk52t3o874j5d.apps.googleusercontent.com",
        "project_id":"kubernetes-cookbook",
        "auth_uri":"https://accounts.google.com/o/oauth2/auth",
        "token_uri":"https://accounts.google.com/o/oauth2/token",
        "auth_provider_x509_cert_url":"https://www.googleapis.com/oauth2/v1/certs",
        "client_secret":"Ez0m1L7436mlJQErhalp3Gda",
        "redirect_uris":[
            "urn:ietf:wg:oauth:2.0:oob",
            "http://localhost"
        ]
    }
}
Now, we should be able to start our cluster. Don't forget the OIDC flags have to be passed on. In minikube, this is done via the --extra-config parameter:
// start minikube cluster and passing oidc parameters.
# minikube start --extra-config=apiserver.Authorization.Mode=RBAC --extra-config=apiserver.Authentication.OIDC.IssuerURL=https://accounts.google.com --extra-config=apiserver.Authentication.OIDC.UsernameClaim=email --extra-config=apiserver.Authentication.OIDC.ClientID="140285873781-f9h7d7bmi6ec1qa0892mk52t3o874j5d.apps.googleusercontent.com"
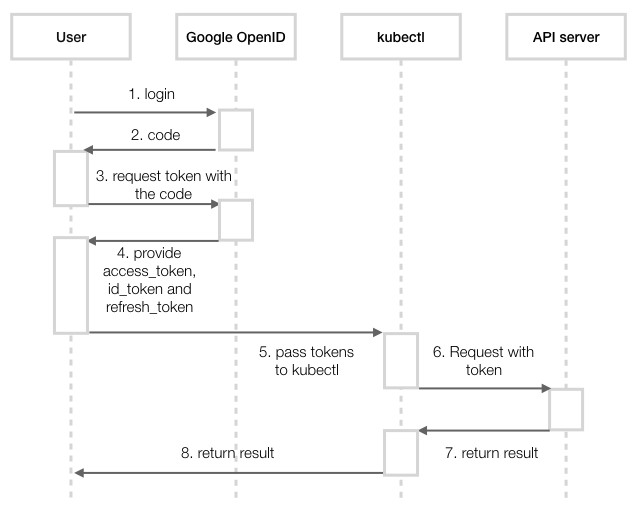
After the cluster is started, the user has to log in to the identity provider in order to get access_token, id_token, and refresh_token. In Google, you'll get a code after login, and you pass the code with the request to get the tokens. Then we pass the token to the request to the API server via kubectl. The following is the sequence diagram for this:
To request the code, your app should send the HTTP request in the following format:
// https://accounts.google.com/o/oauth2/v2/auth?client_id=<client_id>&response_type=code&scope=openid%20email&redirect_uri=urn:ietf:wg:oauth:2.0:oob
# https://accounts.google.com/o/oauth2/v2/auth?client_id=140285873781-f9h7d7bmi6ec1qa0892mk52t3o874j5d.apps.googleusercontent.com&response_type=code&scope=openid%20email&redirect_uri=urn:ietf:wg:oauth:2.0:oob
Then, a browser window will pop out to ask for sign in to Google. After signing in, the code will be shown in the console:

Next, we pass the code for requesting the token to https://www.googleapis.com/oauth2/v4/token. Then, we should be able to get access_token, refresh_token, and id_token from the response:
// curl -d "grant_type=authorization_code&client_id=<client_id>&client_secret=<client_secret>&redirect_uri=urn:ietf:wg:oauth:2.0:oob&code=<code>" -X POST https://www.googleapis.com/oauth2/v4/token
# curl -d "grant_type=authorization_code&client_id=140285873781-f9h7d7bmi6ec1qa0892mk52t3o874j5d.apps.googleusercontent.com&client_secret=Ez0m1L7436mlJQErhalp3Gda&redirect_uri=urn:ietf:wg:oauth:2.0:oob&code=4/AAAd5nqWFkpKmxo0b_HZGlcAh57zbJzggKmoOG0BH9gJhfgvQK0iu9w" -X POST https://www.googleapis.com/oauth2/v4/token
{
 "access_token": "ya29.GluJBQIhJy34vqJl7V6lPF9YSXmKauvvctjUJHwx72gKDDJikiKzQed9iUnmqEv8gLYg43H6zTSYn1qohkNce1Q3fMl6wbrGMCuXfRlipTcPtZnFt1jNalqMMTCm",
 "token_type": "Bearer",
 "expires_in": 3600,
 "refresh_token": "1/72xFflvdTRdqhjn70Bcar3qyWDiFw-8KoNm6LdFPorQ",
 "id_token": "eyJhbGc...mapQ"
}
Assume we'll have the user [email protected] to associate with this Google account. Let's create it in our cluster. We can append user information into our kubeconfig. The default location of the file is $HOME/.kube/config:
// append to kubeconfig file.
- name: [email protected]
  user:
    auth-provider:
      config:
        client-id: 140285873781-f9h7d7bmi6ec1qa0892mk52t3o874j5d.apps.googleusercontent.com
        client-secret: Ez0m1L7436mlJQErhalp3Gda
        id-token: eyJhbGc...mapQ
        idp-issuer-url: https://accounts.google.com
        refresh-token: 1/72xFflvdTRdqhjn70Bcar3qyWDiFw-8KoNm6LdFPorQ
      name: oidc
After that, let's use the user to list nodes and see if it can pass the authentication:
# kubectl [email protected] get nodes
Error from server (Forbidden): nodes is forbidden: User "[email protected]" cannot list nodes at the cluster scope
We encounter an authorization error! After verifying the identity, the next step will be checking if the user has sufficient rights to perform the request.