Chapter 2. Creating a Kubernetes Cluster
In this chapter we discuss multiple ways to set up a full-blown Kubernetes cluster. We cover low-level, standardized tooling (kubeadm) that also serves as the basis for other installers and show you where to find the relevant binaries for the control plane, as well as for worker nodes. We discuss a containerized Kubernetes setup with hyperkube, demonstrate how to write systemd unit files to supervise Kubernetes components, and finally show how to set up clusters in Google Cloud and on Azure.
2.1 Installing kubeadm to Create a Kubernetes Cluster
Solution
Download the kubeadm CLI tool from the Kubernetes package repository.
You will need kubeadm installed on all the servers that will be part of your Kubernetes cluster—not only the master, but also all the nodes.
For example, if you are using Ubuntu-based hosts, on each host do the following as root to set up the Kubernetes package repository:
# apt-get update && apt-get install -y apt-transport-https

# curl -s https://packages.cloud.google.com/apt/doc/apt-key.gpg | apt-key add -

# cat <<EOF >/etc/apt/sources.list.d/kubernetes.list
  deb http://apt.kubernetes.io/ kubernetes-xenial main
  EOF

# apt-get update
Now you can install the Docker engine and the various Kubernetes tools. You will need the following:
-
The
kubeletbinary -
The
kubeadmCLI -
The
kubectlclient -
kubernetes-cni, the Container Networking Interface (CNI) plug-in
Install them with:
# apt-get install -y docker.io
# apt-get install -y kubelet kubeadm kubectl kubernetes-cni
Discussion
Once all the binaries and tools are installed, you are ready to start bootstrapping your Kubernetes cluster. On your master node, initialize the cluster with:
# kubeadm init
[kubeadm] WARNING: kubeadm is in beta, please do not use it for production
clusters.
[init] Using Kubernetes version: v1.7.8
[init] Using Authorization modes: [Node RBAC]
[preflight] Running pre-flight checks
...
At the end of the initialization, you will be given a command to execute on all your worker nodes (see Recipe 2.2). This command uses a token autogenerated by the initialization process.
See Also
2.2 Bootstrapping a Kubernetes Cluster Using kubeadm
Problem
You have initialized your Kubernetes master node (see Recipe 2.1) and now need to add worker nodes to your cluster.
Solution
With the Kubernetes package repository configured and kubeadm installed as shown in Recipe 2.1, run the join command using the token given to you when running the init step on the master node:
$ kubeadm join --token <token>
Head back to your master terminal session and you will see your nodes join:
$ kubectl get nodes
Discussion
The final step is to create a network that satisfies the Kubernetes networking requirements—especially the single IP address per pod. You can use any of the network add-ons.1 Weave Net,2 for example, can be installed on Kubernetes clusters v1.6.0 and above with a single kubectl command, like so:
$ export kubever=$(kubectl version | base64 | tr -d '
')
$ kubectl apply -f "https://cloud.weave.works/k8s/net?k8s-version=$kubever"
This command will create daemon sets (see Recipe 7.3) running on all nodes in the cluster. These daemon sets use the host network and a CNI plug-in to configure the local node network. Once the network is in place, your cluster nodes will enter the READY state.
For other networking add-ons that you can use to create a pod network during the bootstrapping process with kubeadm, see the documentation.
See Also
-
Documentation on creating a cluster with
kubeadm
2.3 Downloading a Kubernetes Release from GitHub
Solution
You can follow a manual process and go to the GitHub releases page. Choose the release, or potentially prerelease that you want to download. Then choose the source bundle you will need to compile, or download the kubernetes.tar.gz file.
Alternatively, you can check the latest release tags using the GitHub API, as shown here:
$ curl -s https://api.github.com/repos/kubernetes/kubernetes/releases |
          jq -r .[].assets[].browser_download_url
https://github.com/kubernetes/kubernetes/releases/download/v1.9.0/
        kubernetes.tar.gz
https://github.com/kubernetes/kubernetes/releases/download/v1.9.0-beta.2/
        kubernetes.tar.gz
https://github.com/kubernetes/kubernetes/releases/download/v1.8.5/
        kubernetes.tar.gz
https://github.com/kubernetes/kubernetes/releases/download/v1.9.0-beta.1/
        kubernetes.tar.gz
https://github.com/kubernetes/kubernetes/releases/download/v1.7.11/
        kubernetes.tar.gz
...
Then download the kubernetes.tar.gz release package of your choice. For example, to get v1.7.11, do:
$ wget https://github.com/kubernetes/kubernetes/releases/download/
       v1.7.11/kubernetes.tar.gz
If you want to compile Kubernetes from source, see Recipe 13.1.
Warning
Do not forget to verify the secure hash of the kubernetes.tar.gz archive. The SHA256 hash is listed on the GitHub release page. After downloading the archive locally, generate the hash and compare it. Even though the release is not signed with GPG, verifying the hash will check the integrity of the archive.
2.4 Downloading Client and Server Binaries
Problem
You have downloaded a release archive (see Recipe 2.3), but it does not contain the actual binaries.
Solution
To keep the size of the release archive small, it does not contain the release binaries. You need to download them separately. To do so, run the get-kube-binaries.sh script as shown here:
$ tar -xvf kubernetes.tar.gz
$ cd kubernetes/cluster
$ ./get-kube-binaries.sh
Once complete, you will have the client binaries in client/bin:
$ tree ./client/bin
./client/bin
├── kubectl
└── kubefed
and the server binaries in server/kubernetes/server/bin:
$ tree server/kubernetes/server/bin
server/kubernetes/server/bin
├── cloud-controller-manager
├── kube-apiserver
...
Tip
If you want to skip downloading the release and quickly download the client and/or server binaries, you can get them directly from https://dl.k8s.io. For example, to get the v1.7.11 binaries for Linux, do:
$ wget https://dl.k8s.io/v1.7.11/
  kubernetes-client-linux-amd64.tar.gz

$ wget https://dl.k8s.io/v1.7.11/
  kubernetes-server-linux-amd64.tar.gz
2.5 Using a hyperkube Image to Run a Kubernetes Master Node with Docker
Solution
You can use the hyperkube binary plus an etcd container. hyperkube is an all-in-one binary available as a Docker image. You can use it to start all the Kubernetes processes.
To create a Kubernetes cluster, you need a storage solution to keep the cluster state. In Kubernetes, this solution is a distributed key/value store called etcd; therefore, first you need to start an etcd instance. You can run it like this:
$ docker run -d
         --name=k8s
         -p 8080:8080
         gcr.io/google_containers/etcd:3.1.10
         etcd --data-dir /var/lib/data
Then you will start the API server using a so-called hyperkube image, which contains the API server binary. This image is available from the Google Container Registry (GCR) at gcr.io/google_containers/hyperkube:v1.7.11. We use a few settings to serve the API insecurely on a local port. Replace v1.7.11 with the latest version or the one you want to run:
$ docker run -d
         --net=container:k8s
         gcr.io/google_containers/hyperkube:v1.7.11/
         apiserver --etcd-servers=http://127.0.0.1:2379
         --service-cluster-ip-range=10.0.0.1/24
         --insecure-bind-address=0.0.0.0
         --insecure-port=8080
         --admission-control=AlwaysAdmit
Finally, you can start the admission controller, which points to the API server:
$ docker run -d
         --net=container:k8s
         gcr.io/google_containers/hyperkube:v1.7.11/
         controller-manager --master=127.0.0.1:8080
Notice that since etcd, the API server, and the controller-manager share the same network namespace, they can reach each other on 127.0.0.1 even though they are running in different containers.
To test that you have a working setup, use etcdctl in the etcd container and list what is in the /registry directory:
$dockerexec-tik8s/bin/sh#export ETCDCTL_API=3#etcdctl get "/registry/api" --prefix=true
You can also reach your Kubernetes API server and start exploring the API:
$curl-scurlhttp://127.0.0.1:8080/api/v1|more{"kind":"APIResourceList","groupVersion":"v1","resources":[{"name":"bindings","singularName":"","namespaced":true,"kind":"Binding","verbs":["create"]},...
So far, you have not started the scheduler, nor have you set up nodes with the kubelet and the kube-proxy. This just shows you how you can run the Kubernetes API server by starting three local containers.
Tip
It is sometimes helpful to use the hyperkube Docker image to verify some of the configuration options of one of the Kubernetes binaries. For example, to check the help for the main /apiserver command, try:
$ docker run --rm -ti
         gcr.io/google_containers/hyperkube:v1.7.11
         /apiserver --help
Discussion
Though this is a very useful way to start exploring the various Kubernetes components locally, it is not recommended for a production setup.
See Also
2.6 Writing a systemd Unit File to Run Kubernetes Components
Problem
You have used Minikube (see Recipe 1.3) for learning and know how to bootstrap a Kubernetes cluster using kubeadm (see Recipe 2.2), but you would like to install a cluster from scratch. To do so, you need to run the Kubernetes components using systemd unit files. You are only looking for a basic examples to run the kubelet via systemd.
Solution
systemd3 is a system and services manager, sometimes referred to as an init system. It is now the default services manager on Ubuntu 16.04 and CentOS 7.
Checking how kubeadm does it is a very good way to figure out how to do it on your own. If you look closely at the kubeadm configuration, you will see that the kubelet running on every node in your cluster, including the master node, is managed by systemd.
Here is an example, which you can reproduce by logging into any nodes in a cluster built with kubeadm (see Recipe 2.2):
# systemctl status kubelet
● kubelet.service - kubelet: The Kubernetes Node Agent
   Loaded: loaded (/lib/systemd/system/kubelet.service; enabled; vendor preset:
           enabled)
  Drop-In: /etc/systemd/system/kubelet.service.d
           └─10-kubeadm.conf
   Active: active (running) since Tue 2017-06-13 08:29:33 UTC; 2 days ago
     Docs: http://kubernetes.io/docs/
 Main PID: 4205 (kubelet)
    Tasks: 17
   Memory: 47.9M
      CPU: 2h 2min 47.666s
   CGroup: /system.slice/kubelet.service
           ├─4205 /usr/bin/kubelet --kubeconfig=/etc/kubernetes/kubelet.conf
           |                       --require-kubeconfig=true
           |                       --pod-manifest-path=/etc/kubernetes/manifests
           |                       --allow-privileged=true
           |                       --network-plugin=cni
           |                       --cni-conf
           └─4247 journalctl -k -f
This gives you a link to the systemd unit file in /lib/systemd/system/kubelet.service and its configuration in /etc/systemd/system/kubelet.service.d/10-kubeadm.conf.
The unit file is straightforward—it points to the kubelet binary installed in /usr/bin:
[Unit]Description=kubelet: The Kubernetes Node AgentDocumentation=http://kubernetes.io/docs/[Service]ExecStart=/usr/bin/kubeletRestart=alwaysStartLimitInterval=0RestartSec=10[Install]WantedBy=multi-user.target
The configuration file tells you how the kubelet binary is started:
[Service]Environment="KUBELET_KUBECONFIG_ARGS=--kubeconfig=/etc/kubernetes/kubelet.conf--require-kubeconfig=true"Environment="KUBELET_SYSTEM_PODS_ARGS=--pod-manifest-path=/etc/kubernetes/manifests --allow-privileged=true"Environment="KUBELET_NETWORK_ARGS=--network-plugin=cni--cni-conf-dir=/etc/cni/net.d --cni-bin-dir=/opt/cni/bin"Environment="KUBELET_DNS_ARGS=--cluster-dns=10.96.0.10--cluster-domain=cluster.local"Environment="KUBELET_AUTHZ_ARGS=--authorization-mode=Webhook--client-ca-file=/etc/kubernetes/pki/ca.crt"ExecStart=ExecStart=/usr/bin/kubelet$KUBELET_KUBECONFIG_ARGS$KUBELET_SYSTEM_PODS_ARGS$KUBELET_NETWORK_ARGS$KUBELET_DNS_ARGS$KUBELET_AUTHZ_ARGS$KUBELET_EXTRA_ARGS
All the options specified, such as --kubeconfig, defined by the environment variable $KUBELET_CONFIG_ARGS, are startup options of the kubelet binary.
Discussion
The unit file just shown only deals with the kubelet. You can write your own unit files for all the other components of a Kubernetes cluster (i.e., API server, controller-manager, scheduler, proxy). Kubernetes the Hard Way has examples of unit files for each component.4
However, you only need to run the kubelet. Indeed, the configuration option --pod-manifest-path allows you to pass a directory where the kubelet will look for manifests that it will automatically start. With kubeadm, this directory is used to pass the manifests of the API server, scheduler, etcd, and controller-manager. Hence, Kubernetes manages itself and the only thing managed by systemd is the kubelet process.
To illustrate this, you can list the contents of the /etc/kubernetes/manifests directory in your kubeadm-based cluster:
# ls -l /etc/kubernetes/manifests
total 16
-rw------- 1 root root 1071 Jun 13 08:29 etcd.yaml
-rw------- 1 root root 2086 Jun 13 08:29 kube-apiserver.yaml
-rw------- 1 root root 1437 Jun 13 08:29 kube-controller-manager.yaml
-rw------- 1 root root  857 Jun 13 08:29 kube-scheduler.yaml
Looking at the details of the etcd.yaml manifest, you can see that it is a Pod with a single container that runs etcd:
# cat /etc/kubernetes/manifests/etcd.yaml
apiVersion:v1kind:Podmetadata:creationTimestamp:nulllabels:component:etcdtier:control-planename:etcdnamespace:kube-systemspec:containers:-command:-etcd---listen-client-urls=http://127.0.0.1:2379---advertise-client-urls=http://127.0.0.1:2379---data-dir=/var/lib/etcdimage:gcr.io/google_containers/etcd-amd64:3.0.17...
See Also
2.7 Creating a Kubernetes Cluster on Google Kubernetes Engine (GKE)
Solution
Using the gcloud command-line interface, create a Kubernetes cluster with the container clusters create command, like so:
$ gcloud container clusters create oreilly
By default this will create a Kubernetes cluster with three worker nodes. The master node is being managed by the GKE service and cannot be accessed.
Discussion
To use GKE, you will first need to do a few things:
-
Create an account on the Google Cloud Platform with billing enabled.
-
Create a project and enable the GKE service in it.
-
Install the
gcloudCLI on your machine.
To speed up the setup of gcloud, you can make use of the Google Cloud Shell, a pure online browser-based solution.
Once your cluster is created, you can list it as shown here:
$ gcloud container clusters list
NAME     ZONE            MASTER_VERSION  MASTER_IP     ...  STATUS
oreilly  europe-west1-b  1.7.8-gke.0     35.187.80.94  ...  RUNNING
Note
The gcloud CLI allows you to resize your cluster, update it, and upgrade it:
...
COMMANDS
...
     resize
        Resizes an existing cluster for running containers.
     update
        Update cluster settings for an existing container cluster.
     upgrade
        Upgrade the Kubernetes version of an existing container
        cluster.
Once you are done using your cluster, do not forget to delete it to avoid being charged:
$ gcloud container clusters delete oreilly
See Also
-
GKE Quickstart
-
Google Cloud Shell Quickstart
2.8 Creating a Kubernetes Cluster on Azure Container Service (ACS)
Solution
To carry out the following steps, you will need to sign up for a (free) Azure account and install the Azure CLI (az) version 2.0.
First, make sure that you have the correct az CLI version installed and then log in:
$ az --version | grep ^azure-cli
azure-cli (2.0.13)

$ az login
To sign in, use a web browser to open the page https://aka.ms/devicelogin and
enter the code XXXXXXXXX to authenticate.
[
  {
    "cloudName": "AzureCloud",
    "id": "****************************",
    "isDefault": true,
    "name": "Free Trial",
    "state": "Enabled",
    "tenantId": "*****************************",
    "user": {
      "name": "******@hotmail.com",
      "type": "user"
    }
  }
]
As preparation, create an Azure resource group (the equivalent of a project in Google Cloud) called k8s. This resource group will hold all your resources, such as VMs and networking components, and makes it easy to clean up and tear down later on:
$ az group create --name k8s --location northeurope
{
  "id": "/subscriptions/************************/resourceGroups/k8s",
  "location": "northeurope",
  "managedBy": null,
  "name": "k8s",
  "properties": {
    "provisioningState": "Succeeded"
  },
  "tags": null
}
Tip
If you’re unsure what region to use for the --location argument, execute az account list-locations and pick one near you.
Now that you have the resource group k8s set up, you can create the cluster with one worker node (agent in Azure terminology), like so:
$ az acs create --orchestrator-type kubernetes
                --resource-group k8s
                --name k8scb
                --agent-count 1
                --generate-ssh-keys
waiting for AAD role to propagate.done
{
...
"provisioningState": "Succeeded",
"template": null,
"templateLink": null,
"timestamp": "2017-08-13T19:02:58.149409+00:00"
},
"resourceGroup": "k8s"
}
Note that the az acs create command might take up to 10 minutes to complete.
Warning
With the Azure free account you don’t have enough quota to create a default (three-agent) Kubernetes cluster, so you will see something like the following if you try it:
Operation results in exceeding quota limits of Core.
Maximum allowed: 4, Current in use: 0, Additional
requested: 8.
To work around this, either create a smaller cluster (for example, with --agent-count 1) or use a paid subscription instead.
As a result, in the Azure portal you should now see something like Figure 2-1. Start by finding the k8s resource group and then navigate your way through the Deployments tab.
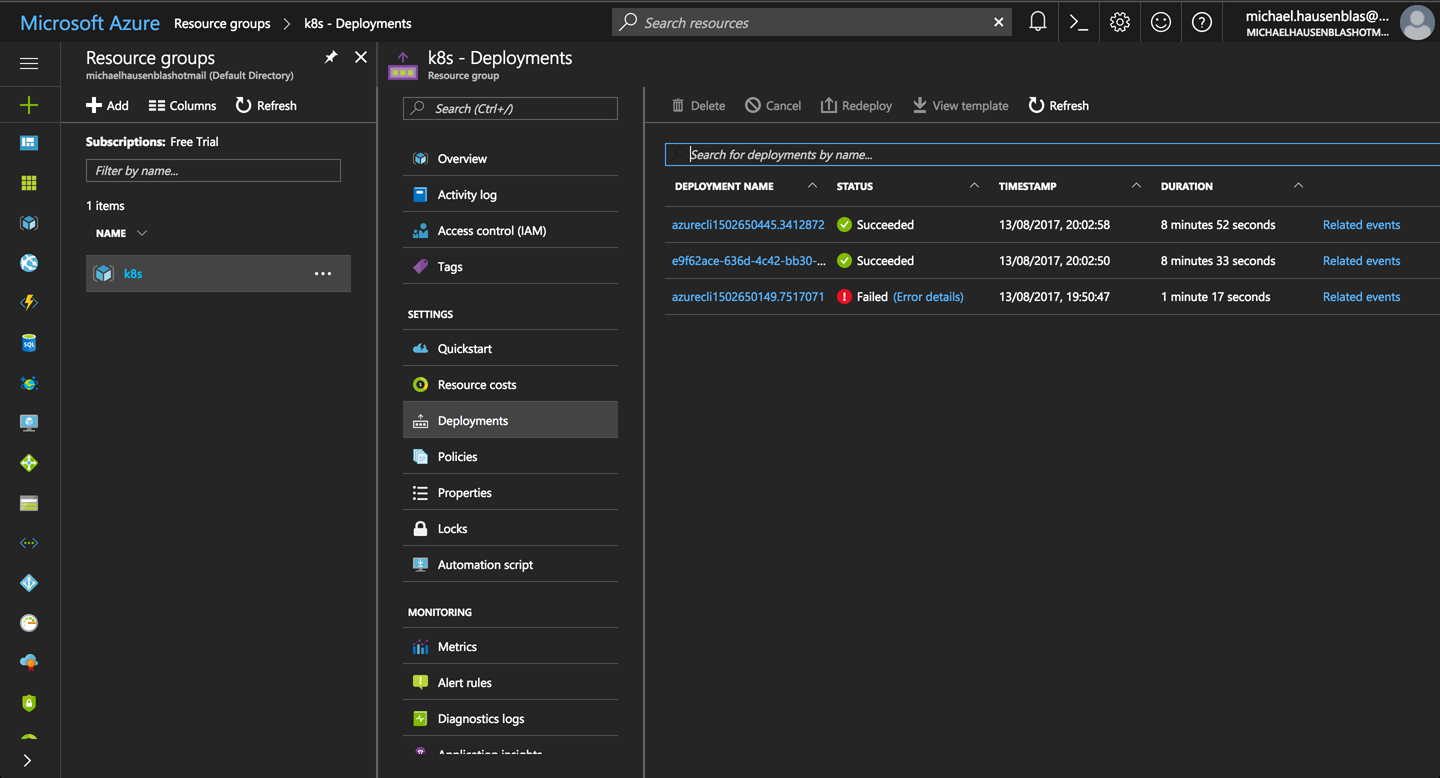
Figure 2-1. Screenshot of the Azure Portal, showing ACS deployments in the k8s resource group
You’re now in a position to connect to the cluster:
$ az acs kubernetes get-credentials --resource-group=k8s --name=k8scb
You can now poke around in the environment and verify the setup:
$ kubectl cluster-info
Kubernetes master is running at https://k8scb-k8s-143f1emgmt.northeurope.cloudapp
  .azure.com
Heapster is running at https://k8scb-k8s-143f1emgmt.northeurope.cloudapp.azure
  .com/api/v1/namespaces/kube-system/services/heapster/proxy
KubeDNS is running at https://k8scb-k8s-143f1emgmt.northeurope.cloudapp.azure
  .com/api/v1/namespaces/kube-system/services/kube-dns/proxy
kubernetes-dashboard is running at https://k8scb-k8s-143f1emgmt.northeurope
  .cloudapp.azure.com/api/v1/namespaces/kube-system/services/kubernetes-dashboard
  /proxy
tiller-deploy is running at https://k8scb-k8s-143f1emgmt.northeurope.cloudapp
  .azure.com/api/v1/namespaces/kube-system/services/tiller-deploy/proxy

To further debug and diagnose cluster problems, use 'kubectl cluster-info dump'.

$ kubectl get nodes
NAME                    STATUS                     AGE       VERSION
k8s-agent-1a7972f2-0    Ready                      7m        v1.7.8
k8s-master-1a7972f2-0   Ready,SchedulingDisabled   7m        v1.7.8
And indeed, as you can see from the output that there is one agent (worker) node and one master node.
When you’re done discovering ACS, don’t forget to shut down the cluster and remove all the resources by deleting the resource group k8s:
$ az group delete --name k8s --yes --no-wait
Although the az group delete command returns immediately, it can take up to 10 minutes for all the resources—such as VMs, virtual networks, or disks—to be removed and the resource group actually destroyed. You might want to check in the Azure portal to make sure everything went according to plan.
Tip
If you don’t want to or cannot install the Azure CLI, you can use the Azure Cloud Shell from within your browser instead to carry out the preceding steps to install the Kubernetes cluster.
See Also
-
“Deploy Kubernetes cluster for Linux containers” in the Microsoft Azure documentation
1 Kubernetes, “Installing Addons”.
2 Weaveworks, “Integrating Kubernetes via the Addon”.
4 Kubernetes the Hard Way, “Bootstrapping the Kubernetes Control Plane”.