Chapter 6. Running Containers Securely
Now that you know how to build container images in a secure manner from Chapter 5, we move on to the topic of running those images as containers in Kubernetes. In order to run containers securely in Kubernetes, we aim to do the following:
-
Use least privilege to carry out the task at hand.
-
Do only the minimal host mounts necessary.
-
Limit communication between applications, and to and from the outside world, to a defined and deterministic set of connections.
Before we discuss the security boundaries in Kubernetes and the features that you have at your disposal to enforce policies, let’s have a quick look at two topics essential for you to appreciate the rest of the chapter: why you should not run containers as root (unless you have to) and how the API server deals with enforcing policies.
Say No to Root
As “Mr. SELinux” Dan Walsh pointed out in “Just Say No to Root (in Containers),” there’s little need to run containers as root. Some exceptions are as follows:
-
Your container needs to modify the host system; for example, modifying the kernel’s configuration.
-
The container needs to bind to privileged ports on the node (below 1024—for example, nginx serving on port 80). In practice, this can be by-and-large avoided through port mappings and the service abstraction in Kubernetes.
-
Installing software into a container at runtime: traditional package management systems might require root to function or store files in a certain location with a different user ID than the user executing the program. This approach is generally considered bad practice since any code installed at runtime has not been scanned for vulnerabilities or other policy requirements (see Chapter 5).
If your container does not fall into one of the preceding categories, then according to the principle of least privilege, it would make sense to run it as a nonroot user. You can do this by including a USER command in the Dockerfile, defining a user identity that the code should run under.
The advocacy site canihaznonprivilegedcontainers.info has more background resources on this topic, and Liz explored it in her “Running with Scissors” keynote at KubeCon Copenhagen in 2018. However, general awareness around this topic is sadly still low, and most images on Docker Hub are built to run as the root user by default (having no USER command).
Let’s move on and see how the API server enforces policies.
Admission Control
When a client submits a request to the API server and that request has been authenticated (Chapter 3) and the client is authorized (Chapter 4) to carry out the operation, there is one more step the API server performs before persisting the resource in etcd: admission control. A whole slew of admission controllers are included in the API server, that you, as a cluster admin, can configure. The official docs list explains the more than 30 controllers in great detail; some relevant ones in the context of running containers securely are as follows:
AlwaysPullImages-
Modifies every new pod to force the image pull policy to
Always, overwriting the default specification. This can be important (especially in a multitenant environment) since the default behavior is that when an image is pulled to a node, it is stored locally and can be accessed by other pods on the node without them needing to pull it again. These other pods would therefore bypass the registry credentials check when pulling an image to ensure that they are entitled to access that image. DenyEscalatingExec-
Denies
execandattachcommands to pods that run with escalated privileges, allowing host access. Prevents attackers from launching interactive shells into privileged containers, so this is recommended. PodSecurityPolicy-
Acts on creation and modification of the pod and determines whether it should be admitted based on the requested security context and the available policies. See also “Policies”.
LimitRangeandResourceQuota-
Observes the incoming request and ensures that it does not violate any of the constraints enumerated in the
LimitRangeandResourceQuotaobject in each namespace, respectively, which helps to combat denial-of-service attacks. NodeRestriction-
Limits the permissions of each kubelet, as discussed in Chapter 2.
Now that you’re equipped with the basics of policy enforcement in Kubernetes, let’s focus on the main topic of this chapter: security boundaries and how to realize them.
Security Boundaries
We introduced some security principles in Chapter 1, and one of those principles is defense in depth. Kubernetes gives you a set of first-class mechanisms to realize defense in depth. To better understand what that means, have a look at Figure 6-1, which shows the security boundaries present by default.
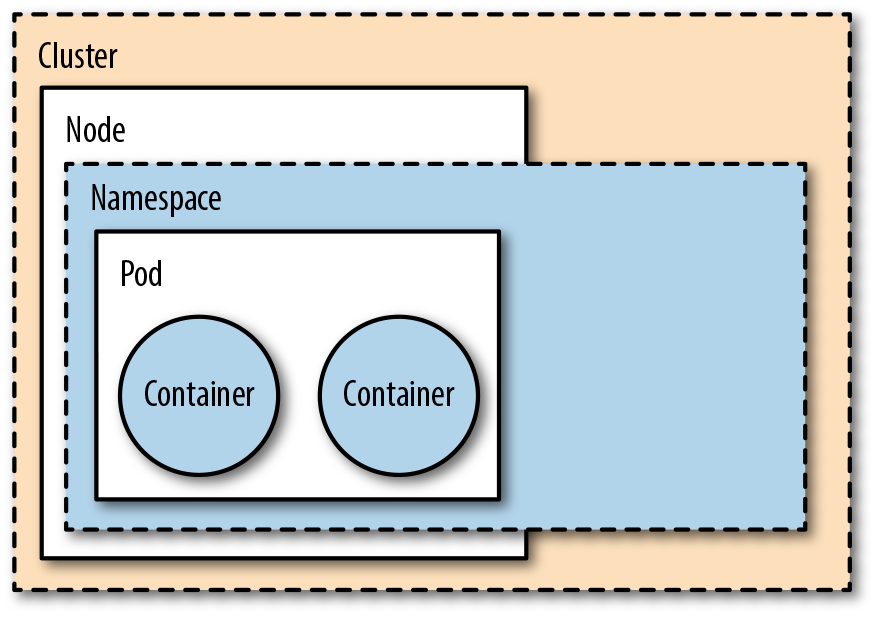
Figure 6-1. Security boundaries
By security boundary, we mean a set of controls to prevent a process from affecting other processes and/or accessing data from other users. From the most outer to the most inner layers of isolation, these boundaries are as follows:
- Cluster
-
Comprises all nodes as well as control-plane components, providing network isolation, and forms the top-level unit (modulo federation, not in scope here). You might prefer different clusters for each team and/or stage (for example, development, staging, production) to implement multitenancy over, say, namespace-level or node-level isolation.
- Node
-
A virtual or bare-metal machine in the cluster hosting multiple pods and system components such as the kubelet or kube-proxy, typically labeled with system properties. Those nodes are restricted to exactly access the resources necessary to carry out their tasks; for example, when a pod is scheduled on that node. You can separate sensitive workloads by assigning pods to certain nodes either using the
nodeSelectoror, even better, using node or pod affinity. The node authorizer discussed in “Authorization Modes” allows you to minimize the blast radius, effectively helping to confine an attack to a single node. - Namespace
-
A sort of virtual cluster, containing multiple resources such as services and pods. Namespaces are the basic unit for authorization (see “Access Control with RBAC”). With certain admission controllers, as shown in “Admission Control”, you can restrict resource depletion and with that help combat; for example, denial-of-service attacks.
- Pod
-
A management unit Kubernetes uses to group containers with the guarantee that all containers in the pod are scheduled on the same node. It offers a certain level of isolation: you can define a security context and enforce it (discussed in “Security Context and Policies”) as well as specify network-level isolation (see “Network Policies”).
- Container
-
A container is essentially a combination of cgroups, namespaces, and copy-on-write filesystems that manages the application-level dependencies. By configuring the Quality of Service of your pods, you can influence the runtime behavior, but unless you’re using advanced runtime sandboxing techniques as discussed in “Sandboxing and Runtime Protection”, containers typically do not provide strong isolation guarantees beyond the kernel-level security ones.
Remember that maximizing the defense here requires a joint effort by developers and cluster or namespace admins since some of the responsibilities (such as creating a container image) fall into the realm of the former, and others (like managing nodes or namespaces) fall into the realm of the latter.
Tip
The layout and composition of the security boundaries shown here were based on and motivated by an excellent blog post by the Google Cloud Platform team. You can read more here: “Exploring Container Security: Isolation at Different Layers of the Kubernetes Stack.”
Now that you know about the security boundaries, let’s see what mechanisms you have available to establish and enforce them.
Policies
Kubernetes offers two pod-level security-policy mechanisms allowing you to restrict what processes can do within a pod (as described in the next section) and how pods are allowed to communicate (as laid out in “Network Policies”).
Security Context and Policies
A security context defines privilege and access control settings on either the pod or container level. The supported settings are as follows:
- Implement discretionary access control
-
Set permissions to access operating system objects, such as files, based on user or group ID as well as running as an (un)privileged process.
- Capabilities
-
Rather than giving someone root access, you can use capabilities to split the (unrestricted) root access into a set of separate permissions such as
CHOWNorNET_RAW. - Apply profiles
-
Configure seccomp by filtering system calls for processes or configure AppArmor to restrict the capabilities of processes.
- Implementing mandatory access control
-
Through configuring SELinux, by assigning security labels to operating system objects.
Using a security context is straightforward: use the securityContext field on either the pod level or on the level of a particular container. For example, imagine you want to define the following:
-
All containers in the pod must run under user
1001, through therunAsUsersetting. -
In the
webservercontainer, preventsetuidbinaries from changing the effective user ID as well as prevent files from enabling extra capabilities by settingallowPrivilegeEscalationtofalse.
This translates into the following pod specification we store under secconpod.yaml:
apiVersion:v1kind:Podmetadata:name:securepodspec:securityContext:runAsUser:1001containers:-name:webserverimage:quay.io/mhausenblas/pingsvc:2securityContext:allowPrivilegeEscalation:false-name:shellimage:centos:7command:-"bin/bash"-"-c"-"sleep10000"
Now you can launch the pod and check the user that the respective container is running under:
$kubectl apply -f secconpod.yaml pod"securepod"created$kubectlexec-it securepod --container=webserver -- iduid=1001gid=0(root)groups=0(root)$kubectlexec-it securepod --container=shell -- iduid=1001gid=0(root)groups=0(root)
So that works great; we can make sure that, for example, a container in a pod doesn’t run as root. But how can you make sure, as a cluster or namespace admin, that your developers use appropriate security contexts?
Enter pod security policies. A pod security policy is a cluster-wide resource that allows you to enforce the usage of security contexts. The API server automatically enforces those policies for you, using admission controllers, as described in “Admission Control”. If a pod’s specification doesn’t meet the requirements of the pod security policy, it won’t be run (although note that for pod security policies to take effect, the PodSecurityPolicy admission plugin must be enabled, and permission must be granted to use that policy for the appropriate users).
PodSecurityPolicy allows us to define securityContext context settings, along with other security-related settings such as the seccomp and AppArmor profiles.
Note
A word on seccomp and AppArmor profiles: by default, containers running under Docker use a seccomp and AppArmor profile that prevent some system calls that most containerized applications have no business trying to run. Docker is used to provide the runtime layer for many Kubernetes installations, and it would be easy—but sadly incorrect, at least at the time of writing—to assume that the same profiles would be used by default in Kubernetes as well.
To enable the default Docker seccomp profile, include the following annotations set in your pod security policies:
annotations:
  seccomp.security.alpha.kubernetes.io/allowedProfileNames:
    'docker/default'
  seccomp.security.alpha.kubernetes.io/defaultProfileName:
    'docker/default'
Let’s see how we can enforce the “must run as nonroot user” scenario, along with Docker’s default seccomp and AppArmor profiles, using the following policy:
apiVersion: policy/v1beta1
kind: PodSecurityPolicy
metadata:
  name: nonroot
  annotations:
    seccomp.security.alpha.kubernetes.io/allowedProfileNames:
      'docker/default'
    apparmor.security.beta.kubernetes.io/allowedProfileNames:
      'runtime/default'
    seccomp.security.alpha.kubernetes.io/defaultProfileName:
      'docker/default'
    apparmor.security.beta.kubernetes.io/defaultProfileName:
      'runtime/default'
spec:
  privileged: false
  allowPrivilegeEscalation: false
  runAsUser:
    rule: MustRunAsNonRoot
  seLinux:
    rule: RunAsAny
  supplementalGroups:
    rule: MustRunAs
    ranges:
      - min: 1000
        max: 1500
  fsGroup:
    rule: MustRunAs
    ranges:
      - min: 1000
        max: 1500
Least privilege security settings
We have already discussed why it’s preferable to limit the container to running as nonroot, and that it’s a good idea to use seccomp and AppArmor profiles. Other settings in securityContext and PodSecurityPolicy are worth considering to restrict a pod to its least privileges:
- Use a read-only root filesystem
-
A common attack pattern in a compromised container is for attackers to write an executable file that they will then run. If your application code doesn’t need to be able to write into the filesystem inside the container, the
readOnlyRootFilesystemsetting prevents that approach. - Limiting host volume mounts
-
As discussed in “Running with Scissors”, certain sensitive directories should not be mounted from the host into a container without very good reason, as a compromised container (or just buggy code) could lead to undesired changes on the host. The
allowedHostPathsparameter inPodSecurityPolicyallows you to limit what can be mounted and therefore made accessible to the container. - Disallow privileged access
-
Unless your container has a particular need for privileged Linux capabilities,
privilegedandallowPrivilegeEscalationshould befalse. Privileged access within a container is effectively the same as root access on the host.
The reference documentation on PodSecurityPolicy is worth examining in detail if you want to carefully restrict the permissions granted to container code.
With that, we’ve covered the basics of pod-level policies and move on to communication between pods.
Network Policies
Limiting the traffic that can flow between pods adds a good layer of security:
-
Even if an external attacker is able to reach the cluster network, network policy can stop that attacker from sending traffic that reaches application code running inside pods.
-
If a container somehow becomes compromised, an attacker will typically try to explore the network to move laterally to other containers or hosts. By restricting the addresses, ports, and pods that can be contacted, the attacker’s ability to reach other parts of the deployment is curtailed.
Applications running in Kubernetes can potentially communicate with outside clients (north-south traffic) as well as with other applications running within the Kubernetes cluster (east-west traffic).
By default, all kinds of ingress (incoming) and egress (outgoing) traffic are allowed, but you can control how pods are allowed to communicate by using a Kubernetes feature called network policies. From version 1.7 onward, this feature is considered stable and hence ready for use in production.
Note
Not all Kubernetes networking solutions support network policy! If your networking add-on doesn’t implement a controller for NetworkPolicy resources, defining them will have no effect.
Different Kubernetes distributions support network policies to different degrees. Popular network policy providers include Calico, Weave Net, OpenShift SDN, and Cilium. The latter is a BPF-based (Berkeley Packet Filter) implementation with a promising future.
Example Network Policy
Let’s look at an example network policy preventing all ingress traffic to and egress traffic from all pods in the namespace lockeddown:
apiVersion:networking.k8s.io/v1kind:NetworkPolicymetadata:name:nonetworkionamespace:lockeddownspec:podSelector:{}policyTypes:-Ingress-Egress
A network policy applies to the set of pods that match the podSelector defined in the spec. Typically, a label selector is used to match a subset of pods; an empty podSelector as in the preceding example matches all pods.
If a pod is not matched by any network policies, all traffic is allowed to and from that pod.
The Kubernetes documentation includes example network policies that you might use to limit traffic to and from all pods by default.
Effective Network Policies
For network policies to be at their most effective, we want to ensure that traffic can flow only where it is needed, and nowhere else. To achieve this, you will typically start with a DenyAll default policy that matches all pods with an empty podSelector, just as in the preceding lockeddown example. Then take a structured approach to adding network policies that allows traffic between application pods as necessary.
Suppose we have an application called my-app that stores data in a Postgres database. The following example defines a policy that allows traffic from my-app to my-postgres on the default port for Postgres:
apiVersion:networking.k8s.io/v1kind:NetworkPolicymetadata:name:allow-myapp-mypostgresnamespace:lockeddownspec:podSelector:matchLabels:app:my-postgresingress:-from:-podSelector:matchLabels:app:my-appports:-protocol:TCPport:5432
We then likely want to allow traffic from the internet to access my-app, which we can achieve with another network policy like this:
kind:NetworkPolicyapiVersion:networking.k8s.io/v1metadata:name:allow-externalnamespace:lockeddownspec:podSelector:matchLabels:app:my-appingress:-from:[]
The combination of these three network policies allows the application traffic to flow as desired from external users to the application pods, and from the application pods to the database, but traffic is not permitted anywhere else in this lockeddown namespace.
Ahmet Alp Balkan has put together a set of useful network policy recipes as well as a good post on the topic of “Securing Kubernetes Cluster Networking”. Another helpful backgrounder is “Kubernetes Security Context, Security Policy, and Network Policy” by Mateo Burillo.
Going forward, service meshes will also play a role in this area. See “Service Meshes” for more on this topic.
Metadata API in cloud platforms
Platforms such as AWS, Microsoft Azure, and Google Cloud Platform pass configuration information to nodes through a Metadata API. This can be the source of serious escalations; for example, as disclosed in a bug bounty at Shopify. This can include critical information including the node’s kubelet credentials, so it is important to restrict access to these APIs.
This can be achieved through network policies that block traffic to the Metadata API for all pods that don’t explicitly need access. Azure and AWS both use the IP address 169.254.169.254, and Google uses the domain name metadata.google.internal.
Resource quotas and networking
Resource quotas are used to limit the resources available to a namespace. We discuss this more generally in “Multitenancy”, but they are worth also considering here while we are thinking about restricting network access.
Resource quotas can be used to limit the number of service resources—and more specifically, the number of NodePort- or LoadBalancer-type services. Setting a limit of 0 can prevent a user from creating an application that is accessible from outside the cluster.
Reaching the end of this chapter, you now know how to create images in a secure way and subsequently use those images to run containers securely in Kubernetes by using the built-in features such as namespaces, RBAC, and policies on the pod and network level. With that as a solid foundation, we next look at how to manage sensitive data in Kubernetes.