
Chapter 10: Operating and Maintaining Efficient Kubernetes Clusters
In previous chapters, we learned about production best practices for automating Kubernetes and its infrastructure components. We discussed challenges with provisioning stateless workloads in our clusters, including getting persistent storage up and running, choosing container images, and deployment strategies. We also learned about important observability tools in the ecosystem and building monitoring and logging stacks in our cluster to provide a solid base for our troubleshooting needs. Once we have a production-ready cluster and have started to serve workloads, it is vital to have efficient operations to oversee the cluster maintenance, availability, and other service-level objectives (SLOs).
In this chapter, we will focus on Kubernetes operation best practices and cover topics related to cluster maintenance, such as upgrades and rotation, backups, disaster recovery and avoidance, cluster and troubleshooting failures of the cluster control plane, workers, and applications. Finally, we will learn about the solutions available to validate and improve our cluster's quality.
In this chapter, we're going to cover the following main topics:
- Learning about cluster maintenance and upgrades
- Preparing for backups and disaster recovery
- Validating cluster quality
Technical requirements
You should have the following tools installed from previous chapters:
- AWS CLI v2
- AWS IAM authenticator
- kubectl
- Terraform
- Helm 3
- metrics-server
- MinIO instance (optional as an S3 target for backups)
You need to have an up-and-running Kubernetes cluster as per the instructions in Chapter 3, Provisioning Kubernetes Clusters Using AWS and Terraform.
The code for this chapter is located at https://github.com/PacktPublishing/Kubernetes-in-Production-Best-Practices/tree/master/Chapter10.
Check out the following link to see the Code in Action video:
Learning about cluster maintenance and upgrades
In this section, we will learn about upgrading our Kubernetes clusters in production. Generally, a new major Kubernetes version is announced quarterly, and every minor version is supported around 12 months after its initial release date. Following the rule of thumb for software upgrades, it is not common to upgrade to a new version immediately after its release unless it is a severe time-sensitive security patch. Cloud providers also follow the same practice and run their conformance tests before releasing a new image to the public. Therefore, cloud providers' Kubernetes releases usually follow a couple of versions behind the upstream release of Kubernetes. If you'd like to read about the latest releases, you can find the Kubernetes release notes on the official Kubernetes documentation site at https://kubernetes.io/docs/setup/release/notes/.
In Chapter 3, Provisioning Kubernetes Clusters Using AWS and Terraform, we learned about cluster deployment and rollout strategies. We also learned that cluster deployment is not a one-time task. It is a continuous process that affects the cluster's quality, stability, and operations, as well as the products and services on top of it. In previous chapters, we established a solid infrastructure deployment strategy, and now we will follow it with production-grade upgrade best practices in this chapter.
In Chapter 3, Provisioning Kubernetes Clusters Using AWS and Terraform, we automated our cluster deployment using Terraform. Let's use the same cluster and upgrade it to a newer Kubernetes release.
Upgrading kubectl
First, we will upgrade kubectl to the latest version. Your kubectl version should be at least equal to or greater than the Kubernetes version you are planning to upgrade to:
- Download the latest kubectl binary and copy it to the bin directory:
$ curl -LO https://storage.googleapis.com/kubernetes-release/release/$(curl -s https://storage.googleapis.com/kubernetes-release/release/stable.txt)/bin/linux/amd64/kubectl
$ chmod +x ./kubectl && sudo mv ./kubectl /usr/local/bin/kubectl
- Confirm that the kubectl binary is updated to the newer version by executing the following command:
$ kubectl version --short Client Version: v1.20.1
Server Version: v1.15.12-eks-31566f
- Now, check your node status and version by executing the following command:
$ kubectl get nodes
The output of the preceding command should look as follows:
Figure 10.1 – The kubectl command showing the node status and its version
Here, we have updated kubectl to the latest version. Let's move on to the next step and upgrade our cluster version.
Upgrading the Kubernetes control plane
AWS EKS clusters can be upgraded one version at a time. This means that if we are on version 1.15, we can upgrade to 1.16, then to 1.17, and so on.
Important note
You can find the complete source code at https://github.com/PacktPublishing/Kubernetes-in-Production-Best-Practices/tree/master/Chapter10/terraform.
Let's upgrade our controller nodes using the Terraform scripts we also used in Chapter 3, Provisioning Kubernetes Clusters Using AWS and Terraform, to deploy our clusters:
- Edit the terraform.tfvars file under the Chapter10/terraform/packtclusters directory and increase the cluster_version value to the next release version number. In our example, we have increased the version from 1.15 to 1.16:
aws_region = "us-east-1"
private_subnet_ids = [
"subnet-0b3abc8b7d5c91487",
"subnet-0e692b14dbcd957ac",
"subnet-088c5e6489d27194e",
]
public_subnet_ids = [
"subnet-0c2d82443c6f5c122",
"subnet-0b1233cf80533aeaa",
"subnet-0b86e5663ed927962",
]
vpc_id = "vpc-0565ee349f15a8ed1"
clusters_name_prefix = "packtclusters"
cluster_version = "1.16" #Upgrade from 1.15
workers_instance_type = "t3.medium"
workers_number_min = 2
workers_number_max = 3
- Run the terraform plan command to validate the planned changes before applying them:
$ cd chapter-10/terraform/packtclusters
$ terraform plan
You will get the following output after the terraform plan command completes successfully. There is one resource to change. We are only changing the cluster version:

Figure 10.2 – The terraform plan command output
- Execute the terraform apply command. Enter yes when you get a prompt to approve the in-place update:
$ terraform apply
While an upgrade is in progress, we can track the progress both from the command line or in the AWS console. The cluster status in the AWS console will look similar to the following screenshot:
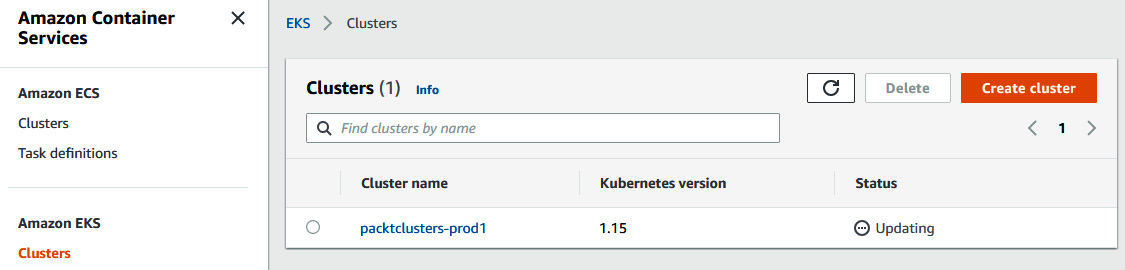
Figure 10.3 – AWS console output showing the cluster status as Updating
You will get the following result after the terraform apply command completes successfully. By then, Terraform has successfully changed one AWS resource:
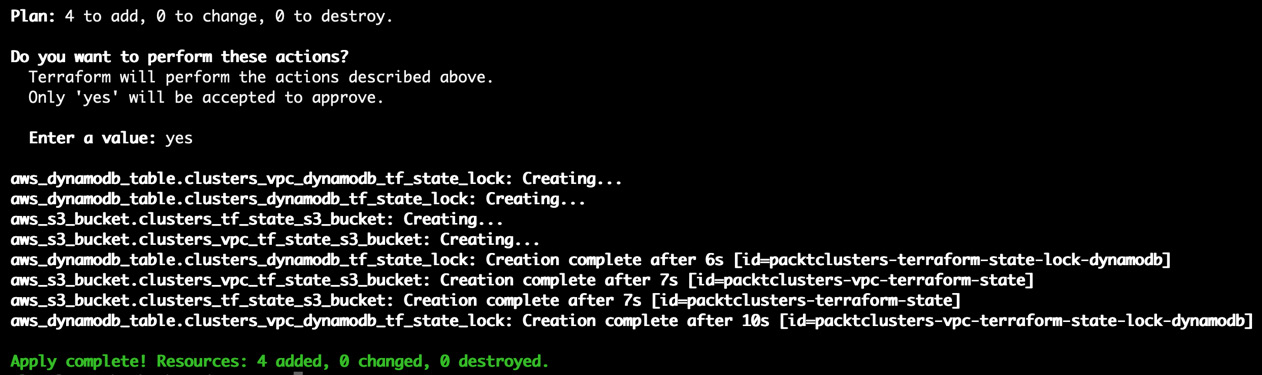
Figure 10.4 – The terraform apply command output
Here, we have updated our Kubernetes control plane to the next version available. Let's move on to the next step and upgrade our node groups.
Upgrading Kubernetes components
Upgrading the Kubernetes control plane doesn't upgrade the worker nodes or our Kubernetes add-ons, such as kube-proxy, CoreDNS, and the Amazon VPC CNI plugin. Therefore, after upgrading the control plane, we need to carefully upgrade each and every component to a supported version if needed. You can read more about the supported component versions and Kubernetes upgrade prerequisites on the Amazon EKS documentation site at https://docs.aws.amazon.com/eks/latest/userguide/update-cluster.html. The following figure shows an example support matrix table for the upgrade path we will follow in our example:
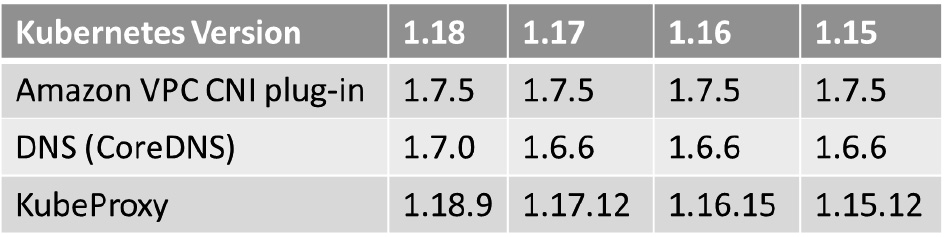
Figure 10.5 – An example of a Kubernetes component support matrix
Some version upgrades may also require changes in your application's YAML manifest to reference the new APIs. It is highly recommended to test your application behavior using a continuous integration workflow.
Now that our EKS control plane is upgraded, let's upgrade kube-proxy:
- Get the current version of the kube-proxy component by executing the following command:
$ kubectl get daemonset kube-proxy --namespace kube-system -o=jsonpath='{$.spec.template.spec.containers[:1].image}'
The output of the preceding command should look as follows. Note that your account ID and region will be different:
123412345678.dkr.ecr.us-east-1.amazonaws.com/eks/kube-proxy:v1.15.11-eksbuild.1
- Now, upgrade the kube-proxy image to the supported version from Figure 10.5 by using the output of the previous command:
$ kubectl set image daemonset.apps/kube-proxy
-n kube-system
kube-proxy=123412345678.dkr.ecr.us-west-2.amazonaws.com/eks/kube-proxy:v1.16.15-eksbuild.1
- Run the command from step 1 to confirm the version change. This time, the output of the preceding command should look as follows:
123412345678.dkr.ecr.us-east-1.amazonaws.com/eks/kube-proxy:v1.16.15-eksbuild.1
- Let's learn how we can upgrade coredns when needed. Note that only an upgrade from 1.17 to 1.18 requires the coredns version to be at 1.7.0. Confirm that your cluster uses coredns as the DNS provider by executing the following command:
$ kubectl get pod -n kube-system -l k8s-app=kube-dns
The output of the preceding command should look as follows:

Figure 10.6 – CoreDNS pods running on the Kubernetes cluster
- Get the current version of the coredns component by executing the following command:
$ kubectl get deployment coredns --namespace kube-system -o=jsonpath='{$.spec.template.spec.containers[:1].image}'
The output of the preceding command should look as follows. Note that your account ID and region will be different:
123412345678.dkr.ecr.us-east-1.amazonaws.com/eks/ coredns:v1.6.6-eksbuild.1
- Now, upgrade the coredns image to the supported version from Figure 10.5 by using the output of the previous command:
$ kubectl set image deployment.apps/coredns
-n kube-system
coredns=123412345678.dkr.ecr.us-west-2.amazonaws.com/eks/coredns:v1.7.0-eksbuild.1
- Run the command from step 1 to confirm the version change. This time, the output of the preceding command should look as follows:
123412345678.dkr.ecr.us-east-1.amazonaws.com/eks/coredns:v1.7.0-eksbuild.1
Here, we have updated our Kubernetes components to the next version available. Let's move on to the next step and upgrade our worker nodes.
Upgrading Kubernetes worker nodes
After upgrading AWS EKS controllers, we will follow with adding new worker nodes using updated AMI images. We will drain the old nodes and help Kubernetes to migrate workloads to the newly created nodes.
Let's upgrade our worker nodes:
- Edit the config.tf file under the Chapter03/terraform/packtclusters directory and change the name of the workers AMI ID increased version from 1.15 to 1.16:
terraform {
backend "s3" {
bucket = "packtclusters-terraform-state"
key = "packtclusters.tfstate"
region = "us-east-1"
dynamodb_table = "packtclusters-terraform-state-lock-dynamodb"
}
required_version = "~> 0.12.24"
required_providers {
aws = "~> 2.54"
}
}
provider "aws" {
region = var.aws_region
version = "~> 2.54.0"
}
data "aws_ssm_parameter" "workers_ami_id" {
name = "/aws/service/eks/optimized-ami/1.16/amazon-linux-2/recommended/image_id"
with_decryption = false
}
- Edit the terraform.tfvars file under the Chapter03/terraform/packtclusters directory and increase workers_number_min if you like:
aws_region = "us-east-1"
private_subnet_ids = [
"subnet-0b3abc8b7d5c91487",
"subnet-0e692b14dbcd957ac",
"subnet-088c5e6489d27194e",
]
public_subnet_ids = [
"subnet-0c2d82443c6f5c122",
"subnet-0b1233cf80533aeaa",
"subnet-0b86e5663ed927962",
]
vpc_id = "vpc-0565ee349f15a8ed1"
clusters_name_prefix = "packtclusters"
cluster_version = "1.16"
workers_instance_type = "t3.medium"
workers_number_min = 2
workers_number_max = 5
workers_storage_size = 10
- Run the terraform plan command to validate the planned changes before applying them:
$ cd chapter-10/terraform/packtclusters
$ terraform plan
You will get the following output after the terraform plan command completes successfully. There is one resource to change. We are only changing the cluster version:

Figure 10.7 – The terraform plan command output
- Execute the terraform apply command. Enter yes when you get a prompt to approve the in-place update:
$ terraform apply
You will get the following output after the terraform apply command completes successfully. By then, Terraform has successfully changed one AWS resource:
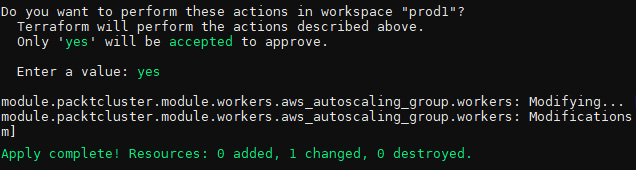
Figure 10.8 – The Terraform command output after changes are applied
- Execute the kubectl get nodes command to get the name of your old nodes. You will get the following output and as we can see, two out of three nodes in our cluster are still on v1.15.12:

Figure 10.9 – The kubectl output showing node names and version
- Now that we've confirmed one new node is added to our cluster, we need to move our pods from the old nodes to the new nodes. First, one by one, taint the old nodes and drain them:
$ kubectl taint nodes ip-10-40-102-5.ec2.internal key=value:NoSchedule
node/ip-10-40-102-5.ec2.internal tainted
$ kubectl drain ip-10-40-102-5.ec2.internal --ignore-daemonsets --delete-emptydir-data
- Then, remove the old nodes from your cluster. New nodes will be automatically created and added to our cluster. Let's confirm all nodes are upgraded by executing the kubectl get nodes command. The output of the command should look as follows:

Figure 10.10 – The kubectl output showing updated node version
We have now learned how to upgrade the Kubernetes control plane and workers using Terraform. It is a production best practice to have a regular backup of persistent data and applications from our clusters. In the next section, we will focus on taking a backup of applications and preparing our clusters for disaster recovery.
Preparing for backups and disaster recovery
In this section, we will be taking a complete, instant, or scheduled backup of the applications running in our cluster. Not every application requires or can even take advantage of regular backups. Stateless application configuration is usually stored in a Git repository and can be easily deployed as part of the Continuous Integration and Continuous Delivery (CI/CD) pipelines when needed. Of course, this is not the case for stateful applications such as databases, user data, and content. Our business running online services can be challenged to meet legal requirements and industry-specific regulations and retain copies of data for a certain time.
For reasons external or internal to our clusters, we can lose applications or the whole cluster and may need to recover services as quickly as possible. In that case, for disaster recovery use cases, we will learn how to use our backup data stored in an S3 target location to restore services.
In this section, we will use the open source Velero project as our backup solution. We will learn how to install Velero to take a scheduled backup of our data and restore it.
Installing Velero on Kubernetes
Traditional backup solutions and similar services offered by cloud vendors focus on protecting node resources. In Kubernetes, an application running on nodes can dynamically move across nodes, therefore taking a backup of node resources does not fulfill the requirements of a container orchestration platform. Cloud-native applications require a granular, application-aware backup solution. This is exactly the kind of solution cloud-native backup solutions such as Velero focus on. Velero is an open source project to back up and restore Kubernetes resources and their persistent volumes. Velero can be used to perform migration operations and disaster recovery on Kubernetes resources. You can read more about Velero and its concepts on the official Velero documentation site at https://velero.io/docs/main/.
Information
You can find the complete source code at https://github.com/PacktPublishing/Kubernetes-in-Production-Best-Practices/tree/master/Chapter10/velero.
Now, let's install Velero using its latest version and prepare our cluster to start taking a backup of our resources:
- Let's get the latest release version tag of velero and keep it in a variable called VELEROVERSION:
$ VELEROVERSION=$(curl –silent "https://api.github.com/repos/vmware-tanzu/velero/releases/latest" | grep '"tag_name":' |
sed -E 's/.*"v([^"]+)".*/1/')
- Now, download the latest velero release binary and install by executing the following command:
$ curl --silent --location "https://github.com/vmware-tanzu/velero/releases/download/v${VELEROVERSION}/velero-v${VELEROVERSION}-linux-amd64.tar.gz" | tar xz -C /tmp
$ sudo mv /tmp/velero-v${VELEROVERSION}-linux-amd64/velero /usr/local/bin
- Confirm that the velero command can execute:
$ velero version
Client:
Version: v1.5.2
Git commit: e115e5a191b1fdb5d379b62a35916115e77124a4
<error getting server version: no matches for kind "ServerStatusRequest" in version "velero.io/v1">
- Create the credentials file for Velero to access your S3 target in this chapter10/velero/credentials-velero path. Replace aws_access_key_id and aws_secret_access_key with your AWS ID and access key and save the file:
[default]
aws_access_key_id = MY_KEY
aws_secret_access_key = MY_ACCESS_KEY
- Before you run the following command, update s3Url with your AWS S3 bucket address or S3-compatible object storage, such as a MinIO object storage server address. Install the Velero server components by executing the following command:
$ velero install
--provider aws
--plugins velero/velero-plugin-for-aws:v1.0.0
--bucket velero
--secret-file ./credentials-velero
--use-restic
--backup-location-config region=minio,s3ForcePathStyle="true",s3Url=http://abcd123456789-1234567891.us-east-1.elb.amazonaws.com:9000
The output of the preceding command should look as follows:

Figure 10.11 – Velero installer output showing successful installation
- Confirm that the Velero server components are successfully installed by executing the following command:
$ kubectl get deployments -l component=velero -n velero
The output of the preceding command should look as follows:
Figure 10.12 – Velero deployments status showing ready
Now we have Velero installed and configured to take a backup of resources to an S3 target. Next, we will learn how to take a bundled backup of Kubernetes resources.
Taking a backup of specific resources using Velero
Let's follow the steps here to get a backup of Kubernetes resources we would like to protect. For this example, we will need a stateful application. We will deploy a MinIO object storage workload, upload some files on it, and take a backup of all resources to demonstrate the backup and restoration capabilities. You can apply the same steps to any application you wish:
Information
You can find the complete source code at https://github.com/PacktPublishing/Kubernetes-in-Production-Best-Practices/tree/master/Chapter10/velero/backup.
- If you already have a stateful application with persistent volumes to protect, you can skip to step 4. Otherwise, execute the following command to deploy a MinIO instance to continue with the scenario:
$ kubectl apply -f https://raw.githubusercontent.com/PacktPublishing/Kubernetes-Infrastructure-Best-Practices/master/Chapter10/velero/backup/deployment-minio.yaml
- Verify that MinIO pods, service, and persistent volumes are created by executing the following command:
$ kubectl get pods,svc,pvc -nminio-demo
The output of the preceding command should look as follows:

Figure 10.13 – Status of the MinIO pods, service, and persistent volume
- Now, we will create a backup for all resources that have the label app=minio. Make sure to match the selector if you are using different labels. Execute the following command to create a backup:
$ velero backup create minio-backup --selector app=minio
Important note
To create scheduled backups, you can add a schedule parameter to the backup using a cron expression. For example, to create a daily backup, you can use either the --schedule="0 1 * * *" or --schedule="@daily" parameters. Later, you can get a list of scheduled backup jobs using the velero schedule get command.
- Run the following command to verify that the backup job is completed:
$ velero backup describe minio-backup
- As an alternative, we can back up resources in an entire namespace. Let's make another backup, this time using a namespace, by executing the following command:
$ velero backup create minio-backup-ns --include-namespaces minio-demo
Now, we have learned how to create a backup of our first resource group and namespace in Kubernetes. Let's simulate a disaster scenario and test recovering our application.
Restoring an application resource from its backup using Velero
Let's follow these steps to completely remove resources in a namespace and restore the previous backup to recover them. You can apply the same steps on any application to migrate from one cluster to another. This method can also serve as a cluster upgrade strategy to reduce upgrade time:
- Delete all resources in a namespace of your application by executing the following command:
$ kubectl delete ns minio-demo
- Create a new namespace and execute the following command to restore the application and its resources from its backup:
$ kubectl create ns minio-demo
$ velero restore create –from-backup minio-backup
- Wait for a couple of second for resources to be restored and verify that your MinIO pods, service, and persistent volume are restored by executing the following command:
$ kubectl get pods,svc,pvc -nminio-demo
- The output of the preceding command should look as follows:
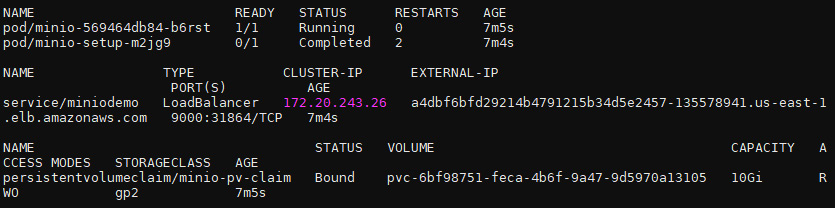
Figure 10.14 – Status of the MinIO pods, service, and persistent volume
Now we have learned how to restore a resource group backup of the service in our production Kubernetes clusters. Let's take a look at how we can improve by continuously validating the quality of our clusters and troubleshooting issues.
Validating cluster quality
In this section, we will learn about some of the best practices and tools in the ecosystem to improve different aspects of our Kubernetes clusters. Continuous improvement is a wide-ranging concept that encompasses everything from providing a smooth platform to services on Kubernetes and setting a particular Quality of Service (QoS) for resources, to making sure resources are evenly distributed and unused resources are released to reduce the pressure on cluster resources and the overall cost of providing services. The definition of improvement itself is gradually getting more granular, and it is not limited to the practices that we will discuss here. Before we learn about the conformance and cost management tools, let's learn about a few common-sense quality best practices we should consider:
- Generate state-of-cluster reports: Although it is expected that Kubernetes clusters should behave the same whether it's a managed Kubernetes service provided by a public cloud provider, a distribution provided by a specific vendor, or a self-managed cluster based on upstream Kubernetes, the reality is there may be limitations and configuration differences that we should validate. Conformance testing is a great way to ensure that the clusters we support are properly configured and conform to official Kubernetes specifications.
- Define QoS for pods: Unless configured correctly, pods scheduled on Kubernetes clusters can consume all the resources available to them. When Kubernetes schedules a pod, it also assigns a QoS class. These classes can be either Guaranteed, Burstable, or BestEffort.
- Reduce latency to closer to users' location: There is a reason why cloud providers offer clusters in different geographic locations. It is common to start locally and observe end user latencies and traffic before spinning clusters in different geographies. Observe issues and bottlenecks, and expand to additional regions closer to users when needed.
- Define storage classes with different QoSes: In a Kubernetes cluster, the CPU, memory, and also to a degree, the network, QoS can be managed by Kubernetes. Storage QoS is expected to be handled by storage providers. Storage can be provided by the external storage of the cluster or hyper-converged Container Attached Storage (CAS) outside. A best practice is to abstract data management from specific storage vendors to provide vendor-agnostic service flexibility with storage classes. Different storage classes can be used to provide cold storage, SSD, or NVMe-backed storage depending on the application's needs. We learned about tuning Kubernetes storage and choosing the storage solution in Chapter 7, Managing Storage and Stateful Applications.
- Optimize container images: It is recommended to continuously monitor your cluster resources' top consumers, improve their consumption, and look for ways to optimize their consumption. Optimizing container images can have a significant impact on resource utilization and performance. You can read more about the challenges and best practices of improving container images in Chapter 8, Deploying Seamless and Reliable Applications.
- Optimize cluster resource spend: In theory, the only limit on the cloud provider's resources is your budget. It is recommended to monitor the cost of resources and project allocation to get the full cost of running a product.
Now we have learned the best practices for improving the quality of our cluster; we have touched on some of the topics in previous chapters. Let's look into the remaining areas that we haven't covered yet, including how we can validate cluster resources in a non-destructive manner and monitoring the cost of resources.
Generating compliance reports
There are many ways and tools to get a Kubernetes cluster up and running. It is an administrative challenge to maintain a proper configuration. Fortunately, there are tools to validate reports and detect configuration problems. Sonobuoy is one of the popular open source tools available to run Kubernetes conformance tests and validate our cluster's health. Sonobuoy is cluster-agnostic and can generate reports of our cluster's characteristics. These reports are used to ensure the best practices applied by eliminating distribution-specific issues and conforming clusters can be ported into our clusters. You can read more about custom data collection capabilities using plugins and integrated end-to-end (e2e) testing at Sonobuoy's official documentation site, https://sonobuoy.io/docs/v0.20.0/. Now, let's install the latest version of Sonobuoy and validate our cluster by running a Kubernetes conformance test:
- Let's get the latest release version tag of Sonobuoy and keep it in a variable called SONOBUOYVERSION:
$ SONOBUOYVERSION=$(curl –silent "https://api.github.com/repos/vmware-tanzu/sonobuoy/releases/latest" | grep '"tag_name":' |
sed -E 's/.*"v([^"]+)".*/1/')
- Now, download the latest sonobuoy release binary and install by executing the following command (https://github.com/vmware-tanzu/sonobuoy/releases/download/v0.20.0/sonobuoy_0.20.0_linux_amd64.tar.gz):
$ curl --silent --location "https://github.com/vmware-tanzu/sonobuoy/releases/download/v${SONOBUOYVERSION}/sonobuoy_${SONOBUOYVERSION}_linux_amd64.tar.gz" | tar xz -C /tmp
$ sudo mv /tmp/sonobuoy /usr/local/bin
- Confirm that Sonobuoy is installed, and the command can execute:
$ sonobuoy version
Sonobuoy Version: v0.20.0
MinimumKubeVersion: 1.17.0
MaximumKubeVersion: 1.99.99
GitSHA: f6e19140201d6bf2f1274bf6567087bc25154210
- Make sure that the cluster has enough resources to execute all the tests. You can find a specific suggestion for every provider on Sonobuoy's source repository at https://github.com/cncf/k8s-conformance/tree/master/v1.16. For EKS, the suggested cluster size is 10 c5.xlarge worker instances. Start the conformance tests on your EKS cluster by executing the following command:
$ sonobuoy run --wait
--sonobuoy-image projects.registry.vmware.com/sonobuoy/sonobuoy:v0.20.0
- To shorten testing and validate the configuration rather than full certified conformance, we can run the test with the --mode quick option:
$ sonobuoy run --wait --mode quick
- Validation will take up to an hour to complete depending on the tests executed on the cluster. Once finished, execute the following command to get the plugins' results and inspect the results for failures. For a detailed list of options to inspect results, see the documentation at https://sonobuoy.io/docs/v0.20.0/results/:
$ results=$(sonobuoy retrieve) $ sonobuoy results $results
The output of the preceding command should look as follows:

Figure 10.15 – Sonobuoy validation results
- Delete the Sonobuoy components from the cluster and clean up the resources:
$ sonobuoy delete --wait
Now we have learned how to validate our Kubernetes cluster configuration. Let's look into how we can detect overprovisioned, idle resources and optimize our cluster's total cost.
Managing and improving the cost of cluster resources
Monitoring project cost and team chargeback and managing total cluster spending are some of the big challenges of managing Kubernetes on public cloud providers. Since we have a theoretically unlimited scale available through cloud vendors, utilization fees can quickly go up and become a problem if not managed. Kubecost helps you monitor and continuously improve the cost of Kubernetes clusters. You can read more about the cost and capacity management capabilities of Kubecost at Kubecost's official documentation site: https://docs.kubecost.com/.
Now, let's install Kubecost using Helm and start analyzing cost allocation in our cluster:
- Create a namespace called kubecost:
$ kubectl create ns kubecost
- Add the cost-analyzer Helm Chart repository to your local repository list:
$ helm repo add kubecost
https://kubecost.github.io/cost-analyzer/
- Update the Helm Chart repositories:
$ helm repo update
- Install cost-analyzer from its Helm repository:
$ helm install kubecost kubecost/cost-analyzer --namespace kubecost --set kubecostToken="bXVyYXRAbWF5YWRhdGEuaW8=xm343yadf98"
- Verify successful installation by executing the following command:
$ kubectl get pods -n kubecost
The output of the preceding command should look as follows:

Figure 10.16 – List of the pods deployed by Kubecost after successful installation
Important note
Kubecost installs Prometheus, Grafana, and kube-state-metrics in the kubecost namespace. Your existing Prometheus and Grafana instance deployment of the node-exporter pod can get stuck in the pending state due to a port number conflict with the existing instances. You can resolve this issue by changing port number instances deployed with the Kubecost chart.
- Now we have cost-analyzer installed. Let's access the Kubecost dashboard. Create port forwarding to access the Kubecost interface locally:
$ kubectl port-forward --namespace kubecost deployment/kubecost-cost-analyzer 9090
Important note
Instead of port forwarding Prometheus and Grafana service IPs, you can choose to expose service IPs externally through your cloud provider's load balancer options, changing the service type from NodePort to LoadBalancer.
- Open a browser window and visit http://localhost:9090, which is forwarded to the kubecost-cost-analyzer service running in the cluster. The dashboard will immediately show the running monthly cost of your cluster, similar to the following:
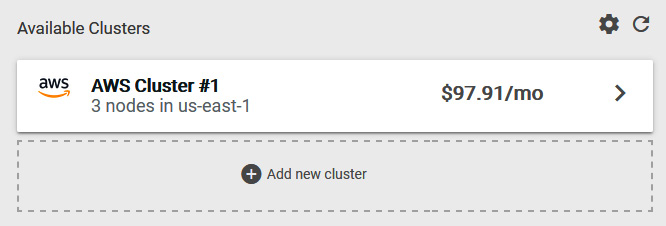
Figure 10.17 – Kubecost Available Clusters screen
- Click on your cluster from the list and access the Kubecost dashboard. The top part of the dashboard will show a summary of the total cost and any potential identified savings, similar to that in the following screenshot:
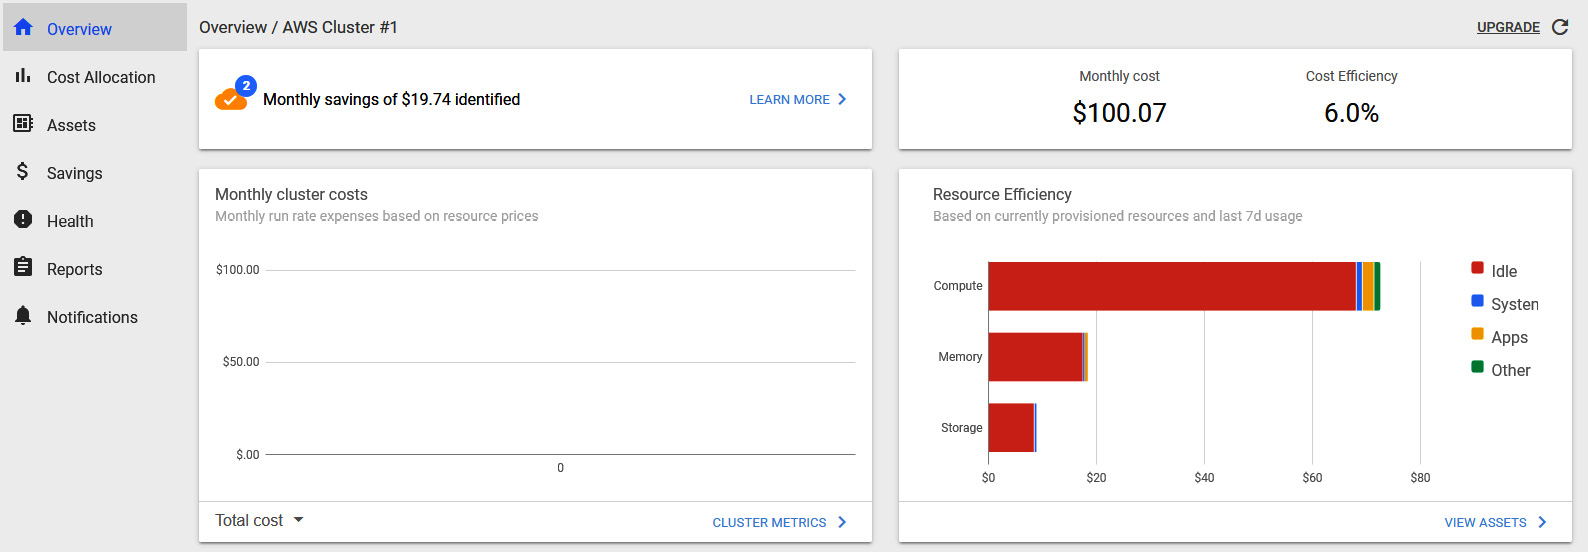
Figure 10.18 – Kubecost dashboard
- Let's scroll down the dashboard screen to find a summary of the controller component and service allocation. At the bottom of the dashboard, we will see the health scores. A health score is an assessment of infrastructure reliability and performance risks:

Figure 10.19 – Kubecost dashboard showing the cluster health assessment score
- The most important quick summary pages on the dashboard are the health assessment and estimated saving detail pages. Let's click on each to get to the areas where you can improve your cluster's cost and performance. In the following screenshot, we can see an example of a significant saving suggestion from Kubecost after analyzing our cluster:
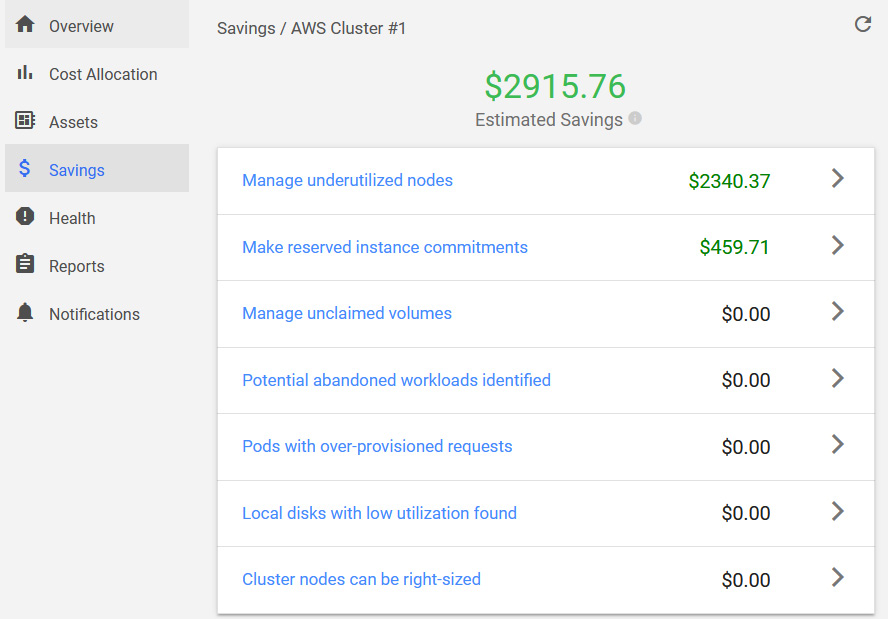
Figure 10.20 – Kubecost estimated savings dashboard
- Click on the arrow button next to one of the saving categories and review the recommendations to optimize your cluster cost.
Now we have learned how to identify monthly cluster costs, resource efficiency, cost allocation, and potential savings by optimizing request sizes, cleaning up abandoned workloads, and using many other ways to manage underutilized nodes in our cluster.
Summary
In this chapter, we explored Kubernetes operation best practices and covered cluster maintenance topics such as upgrades, backups, and disaster recovery. We learned how to validate our cluster configuration to avoid cluster and application problems. Finally, we learned ways to detect and improve resource allocation and the cost of our cluster resources.
By completing this last chapter in the book, we now have the complete knowledge to build and manage production-grade Kubernetes infrastructure following the industry best practices and well-proven techniques learned from early technology adopters and real-life, large-scale Kubernetes deployments. Kubernetes offers a very active user and partner ecosystem. In this book, we focused on the best practices known today. Although principles will not change quickly, as with every new technology, there will be new solutions and new approaches to solving the same problems. Please let us know how we can improve this book in the future by reaching out to us via the methods mentioned in the Preface section.
Further reading
You can refer to the following links for more information on the topics covered in this chapter:
- Amazon EKS Kubernetes release calendar: https://docs.aws.amazon.com/eks/latest/userguide/kubernetes-versions.html#kubernetes-release-calendar
- Disaster recovery for multi-region Kafka at Uber: https://eng.uber.com/kafka/
- Disaster Recovery Preparedness for Your Kubernetes Clusters: https://rancher.com/blog/2020/disaster-recovery-preparedness-kubernetes-clusters
- The official website of the Velero project: https://velero.io/
- The official website of the Sonobuoy project: https://sonobuoy.io/
- KubeDR, an alternative open source Kubernetes cluster backup solution: https://github.com/catalogicsoftware/kubedr
- Kasten, an alternative Kubernetes backup, disaster recovery, and mobility solution: https://www.kasten.io/