Chapter 2. Fundamental Kubernetes Topics
In this chapter, we provide an introduction to the basic foundations of Kubernetes. We begin with an overview of the Kubernetes architecture and its deployment models. Next, we describe a few options for running Kubernetes and describe a variety of deployment environments. We then describe and provide examples of several fundamental Kubernetes concepts including Pods, labels, annotations, ReplicaSets, and Deployments.
Kubernetes Architecture
Kubernetes architecture at a high level is relatively straightforward. It is composed of a master node and a set of worker nodes. The nodes can be either physical servers or virtual machines (VMs). Users of the Kubernetes environment interact with the master node using either a command-line interface (kubectl), an application programming interface (API), or a graphical user interface (GUI). The master node is responsible for scheduling work across the worker nodes. In Kubernetes, the unit of work that is scheduled is called a Pod, and a Pod can hold one or more container. The primary components that exist on the master node are the kube-apiserver, kube-scheduler, etcd, and the kube-controller-manager:
- kube-apiserver
The kube-apiserver makes available the Kubernetes API that is used to operate the Kubernetes environment.
- kube-scheduler
The kube-scheduler component is responsible for selecting the nodes on which Pods should be created.
- kube-controller-manager
Kubernetes provides several high-level abstractions for supporting replicas of Pods, managing nodes, and so on. Each of these is implemented with a controller component, which we describe later in this chapter. The kube-controller-manager is responsible for managing and running controller components.
- etcd
The etcd component is a distributed key–value store and is the primary communication substrate used by master and worker nodes. This component stores and replicates the critical information state of your Kubernetes environment. Kubernetes outstanding performance and scalability characteristics are dependent on etcd being a highly efficient communication mechanism.
The worker nodes are responsible for running the Pods that are scheduled on them. The primary Kubernetes components that exist on worker nodes are the kubelet, kube-proxy, and the container runtime:
- kubelet
The kubelet is responsible for making sure that the containers in each Pod are created and stay up and running. The kubelet will restart containers upon recognizing that they have terminated unexpectedly.
- kube-proxy
One of Kubernetes key strengths is the networking support it provides for containers. The kube-proxy component provides networking support in the form of connection forwarding, load balancing, and the mapping of a single IP address to a Pod.
- Container runtime
The container runtime component is responsible for actually running the containers that exist in each Pod. Kubernetes supports several container runtime environment options including Docker, rkt, and containerd.
Figure 2-1 shows a graphical representation of the Kubernetes architecture encompassing a master node and two worker nodes.
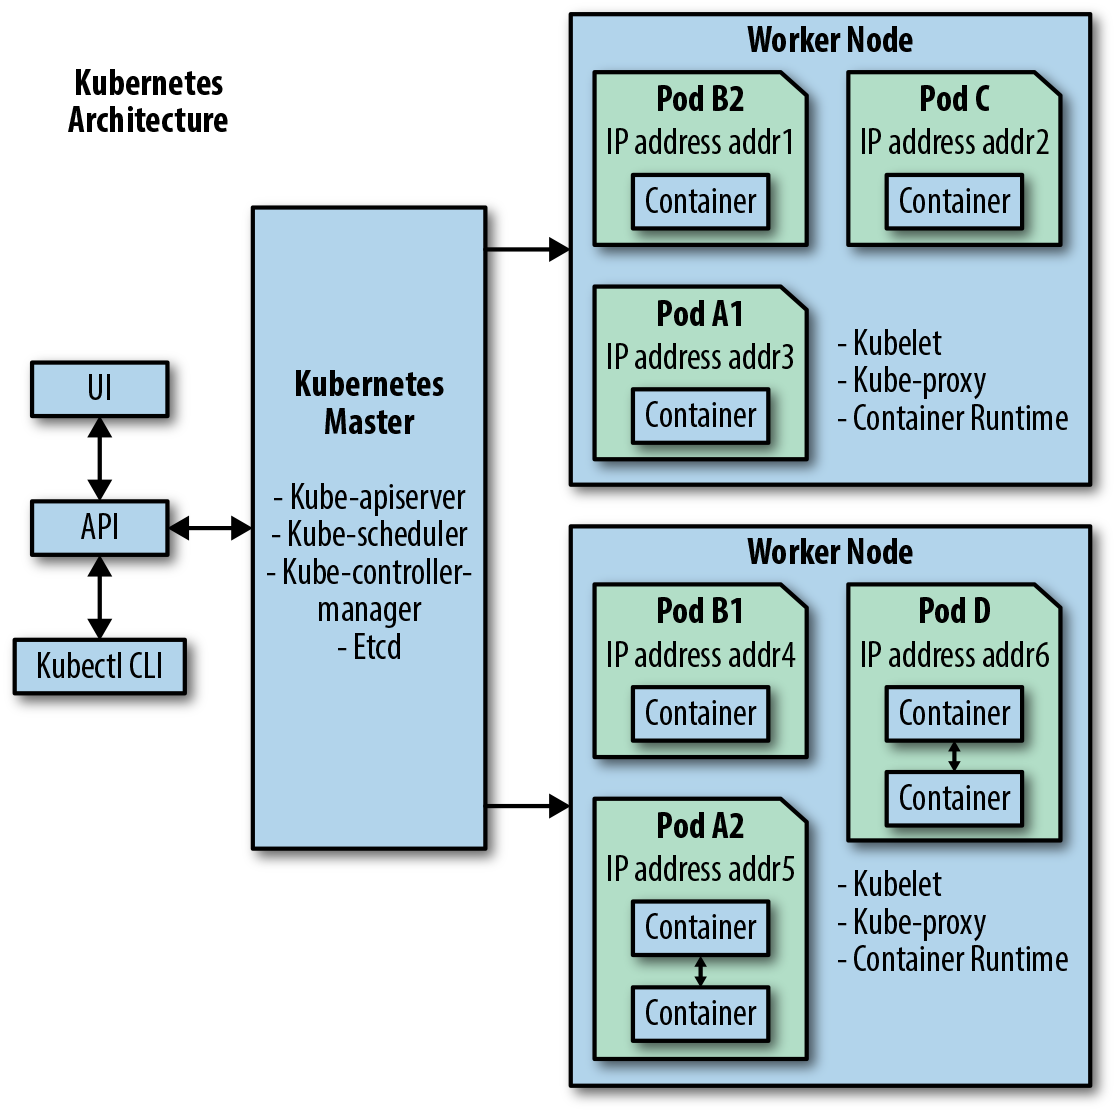
Figure 2-1. Graphical representation of the Kubernetes architecture
As shown in Figure 2-1, users interact with the Kubernetes master node using either a GUI or by command-line interface (kubectl CLI). Both of these use the Kubernetes exposed API to interact with the Kubernetes master node. The Kubernetes master node schedules Pods to run on different worker nodes. Each Pod contains one or more containers, and each Pod is assigned its own IP address. In many real-world applications, Kubernetes deploys multiple replica copies of the same Pod to improve scalability and ensure high availability. Pods A1 and A2 are Pod replicas that differ only in the IP address they are allocated. In a similar fashion Pods B1 and B2 are also replica copies of the same Pod. The containers located in the same Pod are permitted to communicate with one another using standard interprocess communication (IPC) mechanisms.
In the next section, we expand our understanding of the Kubernetes architecture by learning about several ways to run Kubernetes.
Let’s Run Kubernetes: Deployment Options
Kubernetes has a reached such an incredible level of popularity that there are now numerous public cloud and on-premises cloud Kubernetes deployments available. The list of deployment options is too large to include here. In the following subsection, we summarize a few Kubernetes options that are representative of the types of deployments currently available. We will discuss the Katacoda Kubernetes Playground, Minikube, IBM Cloud Private, and the IBM Cloud Kubernetes Service.
Katacoda Kubernetes Playground
The Katacoda Kubernetes Playground provides online access to a two-node Kubernetes environment. The environment provides two terminal windows that allow you to interact with this small Kubernetes cluster. The cluster is available for only 10 minutes—then you need to refresh the web page, and the entire environment disappears. The 10-minute playground session is long enough to try all of the Kubernetes examples that are presented in the next section of this chapter. Just remember that the environment lasts only 10 minutes, so avoid taking a long coffee break when using it.
Minikube
Minikube is a tool that enables you to run a single-node Kubernetes cluster within a VM locally on your laptop. Minikube is well suited for trying many of the basic Kubernetes examples that are presented in the next section of this chapter, and you can also use it as a development environment. In addition, Minikube supports a variety of VMs and container runtimes.
IBM Cloud Private
IBM Cloud Private is a Kubernetes-based private cloud platform for running cloud-native or existing applications. IBM Cloud Private provides an integrated environment that enables you to design, develop, deploy, and manage on-premises containerized cloud applications on your own infrastructure, either in a datacenter or on public cloud infrastructure that you source from a cloud vendor. IBM Cloud Private is a software form factor of Kubernetes that focuses on keeping a pure open source distribution complemented with the capabilities you would typically have to build around it, including the operational logging, health metrics, audit practices, identity and access management, management console, and ongoing updates for each component. IBM Cloud Private also provides a rich catalog of IBM and open source middleware to enable you to quickly deploy complete stacks for data, caching, messaging, and microservices development. The Community Edition is available at no charge and quickly enables you to stand up an enterprise-ready Kubernetes platform.
See Appendix A for instructions on configuring an IBM Cloud Private cluster.
IBM Cloud Kubernetes Service
The IBM Cloud Kubernetes Service is a managed Kubernetes offering that delivers powerful tools, an intuitive user experience, and built-in security for rapid delivery of container applications that you can bind to cloud services related to IBM Watson, Internet of Things (IoT), DevOps, and data analytics. The IBM Cloud Kubernetes Service provides intelligent scheduling, self-healing, horizontal scaling, service discovery and load balancing, automated rollouts and rollbacks, and secret and configuration management. The Kubernetes service also has advanced capabilities around simplified cluster management, container security and isolation policies, the ability to design your own cluster, and integrated operational tools for consistency in deployment.
See Appendix A for instructions on configuring an IBM Cloud Kubernetes Service cluster.
Running the Samples Using kubectl
After covering some core concepts in Kubernetes, the next sections provide several examples in the form of YAML files. For all of the aforementioned environments, you can run the samples provided by using the standard Kubernetes command-line tool known as kubectl. They also describe how you can install kubectl. After you have your Kubernetes environment up and running and kubectl installed, you can run all of the following YAML file samples in the next sections by first saving the YAML to a file (e.g., kubesample1.yaml) and then by running the following kubectl command:
$ kubectl apply -f kubesample1.yaml
The kubectl command provides a large number of options beyond just creating an environment based on a YAML file.
Kubernetes Core Concepts
Kubernetes has several concepts that are specific to its model for the orchestration and management of containers. These include Pods, labels, annotations, ReplicaSets, and Deployments.
What’s a Pod?
Because Kubernetes provides support for the management and orchestration of containers, you would assume that the smallest deployable unit supported by Kubernetes would be a container. However, the designers of Kubernetes learned from experience1 that it was more optimal to have the smallest deployable unit be something that could hold multiple containers. In Kubernetes, this smallest deployable unit is called a Pod. A Pod can hold one or more application containers. The application containers that are in the same Pod have the following benefits:
They share an IP address and port space
They share the same hostname
They can communicate with each other using native interprocess communication (IPC)
In contrast, application containers that run in separate Pods are guaranteed to have different IP addresses and have different hostnames. Essentially, containers in different Pods should be viewed as running on different servers even if they ended up on the same node.
Kubernetes provides a robust list of features that make Pods easy to use:
- Easy-to-use Pod management API
Kubernetes provides the kubectl command-line interface, which supports a variety of operations on Pods. The list of operations includes the creating, viewing, deleting, updating, interacting, and scaling of Pods.
- File copy support
Kubernetes makes it very easy to copy files back and forth between your local host machine and your Pods running in the cluster.
- Connectivity from your local machine to your Pod
In many cases, you will want to have network connectivity from your local host machine to your Pods running in the cluster. Kubernetes provides port forwarding whereby a network port on your local host machine is connected via a secure tunnel to a port of your Pod that is running in the cluster.
- Volume storage support
Kubernetes Pods support the attachment of remote network storage volumes to enable the containers in Pods to access persistent storage that remains long after the lifetime of the Pods and the containers that initially utilized it.
- Probe-based health-check support
Kubernetes provides health checks in the form of probes to ensure the main processes of your containers are still running. In addition, Kubernetes also provides liveness checks that ensure the containers are actually functioning and capable of doing real work. With this health check support, Kubernetes can recognize when your containers have crashed or become non-functional and restart them on your behalf.
How Do I Describe What’s in My Pod?
Pods and all other resources managed by Kubernetes are described by using a YAML file. The following is a simple YAML file that describes a rudimentary Pod resource:
apiVersion: v1
kind: Pod
metadata:
  name: nginx
spec:
  containers:
  - name: nginx
    image: nginx:1.7.9
    ports:
    - containerPort: 80
This YAML file contains the following fields and sections:
apiVersionThis field is used to declare which version of the Kubernetes API schema is being used. Kubernetes continues to experience a rapid growth in features and functionality. It manages the complexity that results from its growth in capabilities by supporting multiple versions of its API. By setting the
apiVersionfield, you can control the API version that your resource uses.kindYou use the
kindfield to identify the type of resource the YAML file is describing. In the preceding example, the YAML file declares that it is describing aPodobject.metadataThe
metadatasection contains information about the resource that the YAML is defining. In the preceding example, the metadata contains anamefield that declares the name of this Pod. Themetadatasection can contain other types of identifying information such as labels and annotations. We describe these in the next section.specThe
specsection provides a specification for what is the desired state for this resource. As shown in the example, the desired state for this Pod is to have a container with a name ofnginxthat is built from the Docker image that is identified asnginx:1.7.9.The container shares the IP address of the Pod it is contained in and thecontainerPortfield is used to allocate this container a network port (in this case, 80) that it can use to send and receive network traffic.
To run the previous example, save the file as pod.yaml. You can now run it by doing the following:
$ kubectl apply -f pod.yaml
After running this command, you should see the following output:
pod "nginx" created
To confirm that your Pod is actually running, use the kubectl get pods command to verify:
$ kubectl get pods
After running this command, you should see output similar to the following:
NAME  READY STATUS   RESTARTS  AGE
nginx 1/1   Running  0         21s
If you need to debug your running container, you can create an interactive shell that runs within the container by using the following command:
$ kubectl exec -it nginx -- bash
This command instructs Kubernetes to run an interactive shell for the container that runs in the Pod named nginx. Because this Pod has only one container, Kubernetes knows which container you want to connect to without you specifying the container name as well. Typically, accessing the container interactively to modify it at runtime is considered a bad practice. However, interactive shells can be useful as you are learning or debugging applications before deploying to production. After you run the preceding command, you can interact with the container’s runtime environment, as shown here:
root@nginx:/# ls
bin  boot  dev  etc  home  lib  lib64  media  mnt  opt  proc
root  run  sbin
selinux  srv  sys  tmp  usr  var
root@nginx:/# exit
If your Pod had multiple containers within it, you would need to include the container name as well in your kubectl exec command. To do this, you would use the -c option and include the container name in addition to the Pod name. Here is an example:
$ kubectl exec -it nginx -c nginx  -- bash
root@nginx:/# exit
exit
To delete the Pod that you just created, run the following command:
$ kubectl delete pod nginx
You should see the following confirmation that the Pod has been deleted:
pod "nginx" deleted
When using Kubernetes you can expect to have large numbers of Pods running in a cluster. In the next section, we describe how labels and annotations are used to help you keep track of and identify your Pods.
Labels and Annotations
Kubernetes supports the ability to add key–value data pairs to its Pods and also to the other Kubernetes resources such as ReplicaSets and Deployments, which we describe later in this chapter. There are two forms of these key–value pairs, labels and annotations. Labels are added to Pods to give extra attribute fields that other resources can then use to identify and select the desired Pods in which they are interested. Annotations are used to add extra attribute information to Pods as well. However, unlike labels, annotations are not used in query operations to identify Pods. Instead, annotations provide extra information that can be helpful to users of the Pods or automation tools. The following example takes the previous YAML file describing your Pod and adds labels and annotations:
apiVersion: v1
kind: Pod
metadata:
  name: nginx
  labels:
    app: webserver
  annotations:
    kubernetes.io/change-cause:  "Update nginx to 1.7.9"
spec:
  containers:
  - name: nginx
    image: nginx:1.7.9
    ports:
    - containerPort: 80
In this example, we have added a label with app as the key and webserver as the value. Other Kubernetes constructs can then do searches that match on this value to find this Pod. If there is a group of Pods with this label, they can all be found. This simple and elegant approach of identifying Pods is used heavily by several higher-level Kubernetes abstractions that are described later in this chapter.
Similarly, the previous example also demonstrates that we have added an annotation. In this case, the annotation has kubernetes.io/change-cause as the key and Update nginx to 1.7.9 as its value. The purpose of this annotation is to provide information to users or tools; it is not meant to be used as a way to query and identify desired Kubernetes resources.
In the next section, we introduce ReplicaSets, which is one of Kubernetes higher-level abstractions that uses labels to identify a group of Pods to manage.
ReplicaSets
Kubernetes provides a high-level abstraction called a ReplicaSet that is used to manage a group of Pod replicas across a cluster. The key advantage of a ReplicaSet is that you get to declare the number of Pod replicas that you desire to run concurrently. Kubernetes will monitor your Pods and will always strive to ensure that the number of copies running is the number you selected. If some of your Pods terminate unexpectedly, Kubernetes will instantiate new versions of them to take their place. For cloud application operators accustomed to being contacted in the middle of the night to restart a crashed application, having Kubernetes instead automatically handle this situation on its own is a much better alternative.
To create a ReplicaSet, you provide a specification that is similar to the Pod specification shown in “How Do I Describe What’s in My Pod?”. The ReplicaSet adds new information to the specification to declare the number of Pod replicas that should be running and also provide matching information that identifies which Pods the ReplicaSet is managing. Here is an example YAML specification for a ReplicaSet:
apiVersion: apps/v1
kind: ReplicaSet
metadata:
  name: nginx
  labels:
    app: webserver
  annotations:
    kubernetes.io/change-cause:  "Update nginx to 1.7.9"
spec:
  replicas: 3
  selector:
    matchLabels:
      app: webserver
  template:
    metadata:
      labels:
        app: webserver
    spec:
      containers:
      - name: nginx
        image: nginx:1.7.9
        ports:
        - containerPort: 80
In this specification, the kind field is set to ReplicaSet, denoting this specification is for a ReplicaSet resource. Similar to the previous Pod example, the ReplicaSet YAML has a metadata section for name, labels, and annotation fields. The real differences between ReplicaSets and Pods occurs in the spec section, which has a replicas field that is used to denote the number of Pod replicas that should run concurrently. In this example, we are declaring that Kubernetes should strive to always have three copies of the replicated Pods running. It is worth noting that if you change this value and use the kubectl apply command to update the ReplicaSet specification, Kubernetes will then either increase or decrease the number of Pods to satisfy the new replicas value you requested.
The spec section has a selector field that is used to provide the labels that this ReplicaSet will use to identify its Pod replicas. As shown in this example, the selector for this ReplicaSet states this ReplicaSet is managing Pod replicas that have a label with app as the key and webserver as its associated value.
The template section is the next section of this specification. It provides a template that describes what the Pod replicas that are managed by the ReplicaSet will look like. Note that the template section must be able to describe everything that a standalone Pod YAML could describe. Because of this, the template section itself contains a metadata section and a spec section.
The metadata section, similar to previous examples, contains labels. In the preceding example, the metadata section declares a label with app as the key and webserver as its associated value. Not surprisingly, this is the exact label that the ReplicaSet selector field is using to identify the Pod replicas it manages.
Additionally, the template section contains its own spec section. This spec section describes the containers that comprise the Pod replicas the ReplicaSet will manage, and in the example, you can see that fields such as name, images, and ports that are found in Pod YAMLs are also repeated here. As result of this structure, ReplicaSet can thus have multiple spec sections, and these sections are nested inside one another which can look complex and intimidating. However, after you understand that a ReplicaSet needs to specify not only itself but also the Pod replicas it manages, the nested spec structure is less bewildering.
To run the previous example, save the example as the file replicaset.yaml. You can now run the example by doing the following:
$ kubectl apply -f replicaset.yaml
After running this command, you should see the following output:
replicaset.apps "nginx" created
To confirm that your Pod replicas are actually running, use the kubectl get pods command to verify:
$ kubectl get pods
After running this command, you should see output similar to the following:
NAME          READY     STATUS    RESTARTS   AGE
nginx-fvtzq   1/1       Running   0          23s
nginx-jfxdn   1/1       Running   0          23s
nginx-v7kqq   1/1       Running   0          23s
To demonstrate the capabilities of the ReplicaSet, let’s purposely delete one of its pods:
$ kubectl delete pod nginx-v7kqq
pod "nginx-v7kqq" deleted
If we run kubectl get pods quickly enough, we see that the pod we deleted is being terminated. The ReplicaSet realizes that it lost one of its Pods. Because its YAML specification declares that its desired state is three Pod replicas, the ReplicaSet starts a new instance of the nginx container. Here’s the output of this command:
$ kubectl get pods
NAME          READY     STATUS        RESTARTS   AGE
nginx-fvtzq   1/1       Running       0          1m
nginx-jfxdn   1/1       Running       0          1m
nginx-kfgxk   1/1       Running       0          5s
nginx-v7kqq   0/1       Terminating   0          1m
After a short amount of time, if you run kubectl get pods again, you’ll notice just the two original Pod replicas and the newly created substitute Pod replica are present:
$ kubectl get pods
NAME          READY     STATUS    RESTARTS   AGE
nginx-fvtzq   1/1       Running   0          1m
nginx-jfxdn   1/1       Running   0          1m
nginx-kfgxk   1/1       Running   0          23s
To delete the ReplicaSet that you just created, run the following command:
$ kubectl delete replicaset nginx
You should see the following confirmation that the ReplicaSet has been deleted:
replicaset.extensions "nginx" deleted
Although ReplicaSets provide very powerful Pod replica capabilities, they provide no support to help you manage the release of new versions of your Pod ReplicaSets. ReplicaSets would be more powerful if they supported the ability to roll out new versions of the Pod replicas and provide flexible control on how quickly the Pod replicas were replaced with new versions. Fortunately, Kubernetes provides another high-level abstraction, called Deployments, that provides this type of functionality. The next section describes the capabilities provided by Deployments.
Deployments
Deployments are a high-level Kubernetes abstraction that not only allow you to control the number of Pod replicas that are instantiated, but also provide support for rolling out new versions of the Pods. Deployments rely upon the previously described ReplicaSet resource to manage Pod replicas and then add Pod version management support on top of this capability. Deployments also enable newly rolled out versions of Pods to be rolled back to previous versions if there is something wrong with the new version of the Pods. Furthermore, Deployments support two options for upgrading Pods, Recreate and RollingUpdate:
- Recreate
The Recreate Pod upgrade option is very straightforward. In this approach the Deployment resource modifies its associated ReplicaSet to point to the new version of the Pod. It then proceeds to terminate all of the Pods. The ReplicaSet then notices that all of the Pods have been terminated and thus spawns new Pods to ensure that the number of desired replicas are up and running. The Recreate approach will typically result in your Pod application not being accessible for a period of time and thus it is not recommended for applications that need to always be available.
- RollingUpdate
The Kubernetes Deployment resource also provides a RollingUpdate option. With this option, your Pods are replaced with the newer version incrementally over time. This approach results in there being a mixture of both the old version of the Pod and the new version of the Pod running simultaneously and thus avoids having your Pod application unavailable during this maintenance period.
The following is an example YAML specification for a Deployment that uses the RollingUpdate option:
apiVersion: extensions/v1beta1
kind: Deployment
metadata:
  name: nginx
  labels:
    app: webserver
  annotations:
    deployment.kubernetes.io/revision:  "1"
spec:
  replicas: 3
  selector:
    matchLabels:
      app: webserver
  strategy:
     rollingUpdate:
       maxSurge: 1
       maxUnavailable: 1
     type:  RollingUpdate
  template:
    metadata:
      labels:
        app: webserver
    spec:
      containers:
      - name: nginx
        image: nginx:1.7.9
        ports:
        - containerPort: 80
This Deployment example encompasses many of the characteristics that we have seen in ReplicaSets and Pods. In its metadata are labels and annotations. For the Deployment, an annotation with deployment.kubernetes.io/revision as the key and 1 as its value provides information that this is the first revision of the contents in this Deployment. Similar to ReplicaSets, the Deployment declares the number of replicas it provides and uses a matchLabels field to declare what labels it uses to identify the Pods it manages. Also similar to ReplicaSets, the Deployment has both a spec section for the Deployment and a nested spec section within a template that is used to describes the containers that comprise the Pod replicas managed by this Deployment.
The fields that are new and specific to a Deployment resource are the strategy field and its subfields of type and rollingUpdate. The type field is used to declare the Deployment strategy being utilized; currently, you can set this to Recreate or RollingUpdate.
If you choose the RollingUpdate option, you need to set the subfields of maxSurge and maxUnavailable as well. You use the options as follows:
maxSurgeThe
maxSurgeRollingUpdateoption enables extra resources to be allocated during a rollout. You can set the value of this option to a number or a percentage. As a simple example, assume a Deployment is supporting three replicas andmaxSurgeis set to2. In this scenario, there will be a total of five replicas available during the RollingUpdate.At the peak of the deployment, there will be three replicas with the old version of the Pods running and two with the new version of the Pods running. At this point, one of the old version Pod replicas will need to be terminated and another replica of the new Pod version can then be created. At this point, there would be a total of five replicas, three of which have the new revision, and two have the old version of the Pods. Finally, having reached a point of having the correct number of Pod replicas available with the new version, the two Pods with the old version can now be terminated.
maxUnavailableYou use this RollingUpdate option to declare the number of the Deployment replica Pods that can be unavailable during the update. You can set this to either a number or a percentage.
The following YAML example shows a Deployment that has been updated to initiate a rollout. Note that a new annotation label with a key of kubernetes.op/change-cause has been added with a value that denotes an update to the version of nginx running in the container has occurred. Also note that the name of the image used by the container in the spec section has changed to nginx:1.13.10. This declaration is what actually drives the Pod replicas managed by the Deployment to now have a new version of the container images when the upgrade occurs. Let’s take a look at the code:
apiVersion: extensions/v1beta1
kind: Deployment
metadata:
  name: nginx
  labels:
    app: webserver
  annotations:
    kubernetes.io/change-cause:  "Update nginx to 1.13.10"
spec:
  replicas: 3
  selector:
    matchLabels:
      app: webserver
  strategy:
     rollingUpdate:
       maxSurge: 1
       maxUnavailable: 1
     type:  RollingUpdate
  template:
    metadata:
      labels:
        app: webserver
    spec:
      containers:
      - name: nginx
        image: nginx:1.13.10
        ports:
        - containerPort: 80
To demonstrate the capabilities of Deployments, let’s run the two previous examples. Save the first Deployment example as deploymentset.yaml and the second example as deploymentset2.yaml. You can now run the first deployment example by doing the following:
$ kubectl apply -f deploymentset.yaml
After running this command, you should see the following output:
deployment.extensions "nginx" created
To confirm that your Pod replicas managed by the Deployment are actually running, use the kubectl get pods command to verify, as shown here:
$ kubectl get pods
After running this command, you should see output similar to the following:
NAME                    READY STATUS             RESTARTS AGE
nginx-7bbd56b666-5x7fl  0/1   ContainerCreating  0        10s
nginx-7bbd56b666-cm7fn  0/1   ContainerCreating  0        10s
nginx-7bbd56b666-ddtt7  0/1   ContainerCreating  0        10s
With Deployments, there is a new command called kubectl get deployments that provides the status on the Deployments as they update their images. You run this command as follows:
$ kubectl get deployments
After running this command, you should see output similar to the following:
NAME      DESIRED   CURRENT   UP-TO-DATE   AVAILABLE   AGE
nginx     3         3         3            3           2m
Now to make things interesting, let’s update the image in the Deployment by applying the second Deployment example that you saved in deploymentset2.yaml. Note that you could have just updated your original YAML that you saved in deploymentset.yaml instead of using two separate files. Begin the update by doing the following:
$ kubectl apply -f deploymentset2.yaml
After running this command, you should see the following output:
deployment.extensions "nginx" configured
Now, when you rerun the kubectl get deployments command, you see a much more interesting result:
$ kubectl get deployments
NAME      DESIRED   CURRENT   UP-TO-DATE   AVAILABLE   AGE
nginx     3         4         2            2           4m
As shown in this output, the Deployment currently has four Pod replicas running. Two of the Pod replicas are up to date, which means they are now running the updated nginx image, two of the Pod replicas are available, and currently there are four Pod replicas in total. After some amount of time, when the rolling image update is complete, we reach the desired state of having three updated Pod replicas available. You can confirm this by rerunning the kubectl get deployments command and viewing that the output now matches your desired state:
$ kubectl get deployments
NAME      DESIRED   CURRENT   UP-TO-DATE   AVAILABLE   AGE
nginx     3         3         3            3           4m
To delete the Deployment that you just created, run the following command:
$ kubectl delete deployment nginx
You should see the following confirmation that the Deployment has been deleted:
deployment.extensions "nginx" deleted
Deployments also provide commands for pausing rollouts, resuming rollouts, and for rolling back the update of an image. The commands are quite helpful if you have some concerns about the new image being rolled out that merits investigation, or if you determine that the updated image being rolled out is problematic and needs to be rolled back to a previous version.
Note
For more information on how to use these deployment capabilities, go to Kubernetes docs.
Although Deployments provide support for managing Pod replicas and their versioning life cycle, they do not provide a load balancer for distributing requests across the Pod replicas. In Chapter 3, we introduce the Kubernetes Service Object, which provides this capability and also discuss several other advanced Kubernetes topics.
1 Brendan Burns et al. (2016). “Borg, Omega, and Kubernetes: Lessons Learned from Three Container-Management Systems over a Decade”. ACM Queue 14: 70–93.