

Fun for Everyone
Encouraging imaginative play and ways to use LEGO with everyday items, the builds in this chapter range from functional to fun, from photo frames to airplanes, and even builds that involve your smartphone. You may need a few more bricks for the constructions in this chapter, but you’ll have great fun building these with your kids because they also offer loads of interaction once built. You’ll also find some great architectural pieces, such as an airport control tower and a railway station, which your kids will remember building for years to come.

Photo Frame
Specialty pieces needed:
- Special photo or drawing
- Decorative embellishments
Thanks to smartphones we all may be taking more photos than ever, while at the same time printing fewer photos than ever. Why make the effort to print an image when we can carry it with us on our phones? Because we can put the prints of those special family moments into LEGO photo frames! What better gift than a favorite snap of a special family moment surrounded by a frame your child built? Displaying your family photos in something you’ve built together makes them even more special.
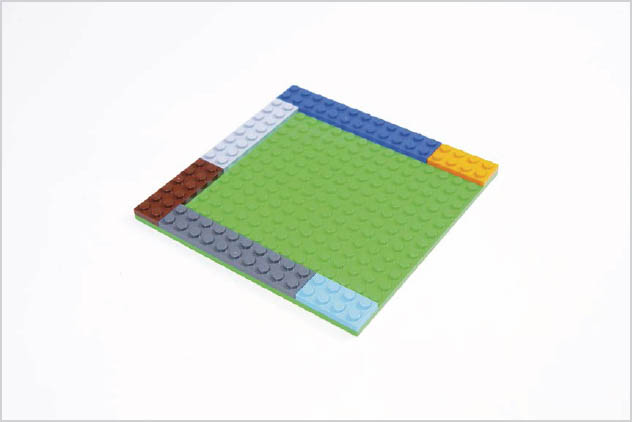
STEP 1
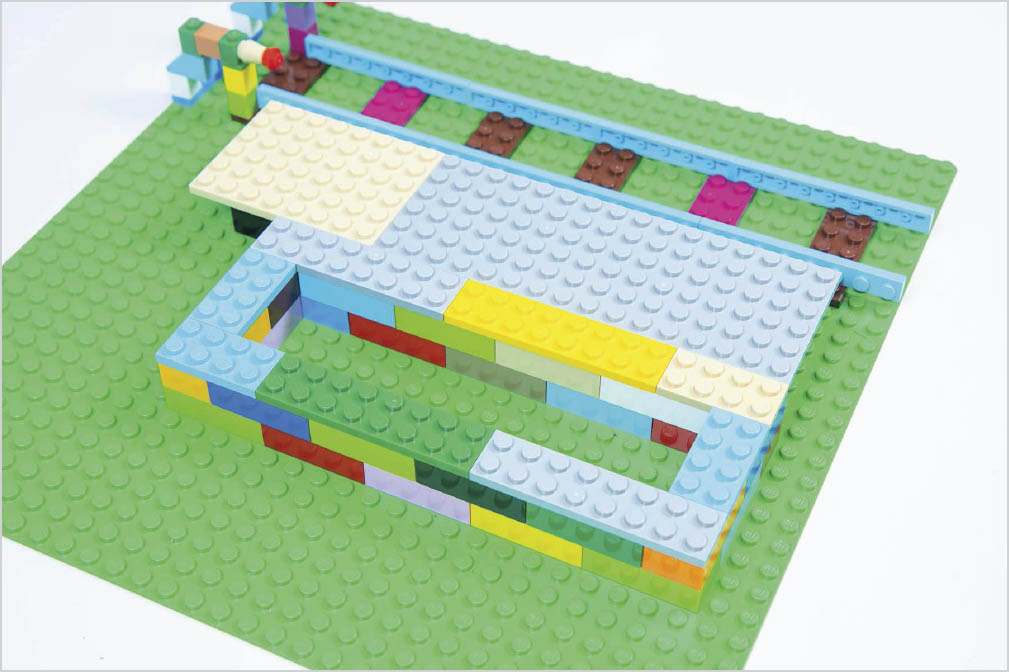
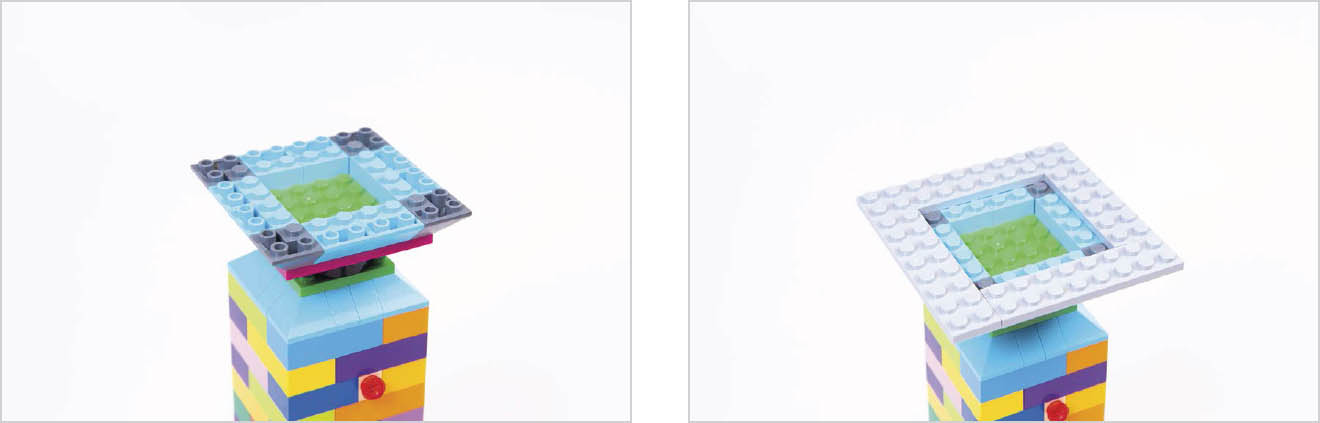
Find a baseplate that’s big enough to fit your favorite photograph. Make sure your baseplate is two studs wider than your photo in both directions. Then lay plate bricks that are 2 studs wide along three of the four edges of the baseplate.

STEP 2
On the edge that has no plate bricks, lay a couple of regular bricks across from the end of one plate brick to the other, insetting the regular bricks by 1 stud. You just created the slot to slide your photograph through.

STEP 3
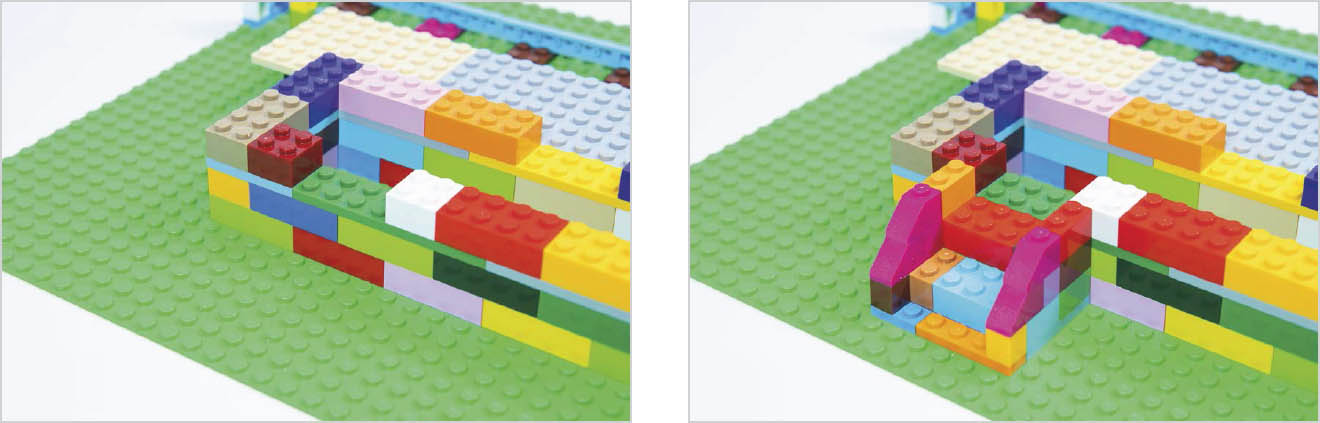
Attach regular bricks on top of the rest of the plate bricks along the other edges of your photo frame. Again, inset these bricks by 1 so they will extend over the frame opening and help hold your photo in place.

STEP 4
Flip your frame over, and place a couple of regular bricks on the back near what will be the bottom edge to act as a support, so the photo frame can stand up.

STEP 5
Now the fun part: Decorate your photo frame. Your kids can let their imaginations go wild with all kinds of decorative LEGO pieces. Use bricks that reflect the recipient’s favorite color or interests for a gift, or create decorations that match the content of the photo. You could even make the frame an ever-changing art exhibit with your children’s drawings inside the frame they built. Maybe when your son’s drawing is inside the frame, his sister gets to add some decorations to the frame’s outside. Then when it’s your daughter’s turn to have her drawing in the frame, he gets to add some more decorations.
Shadow Puppet Theatre
Specialty pieces needed:
- Sheet of paper
- Smartphone
- Props for shadows
I was first inspired to build a shadow puppet theatre with my son when he used to play with DUPLO. Since then, we’ve perfected the same build using LEGO and a smartphone to provide the light source.
The shadow puppet theatre is fun to build and sparks kids’ imaginations and story-telling abilities. It’s a great excuse to think up all kinds of funny stories, and then act them out using LEGO props and people. You could even record your shadow puppet shows to send to friends and family.
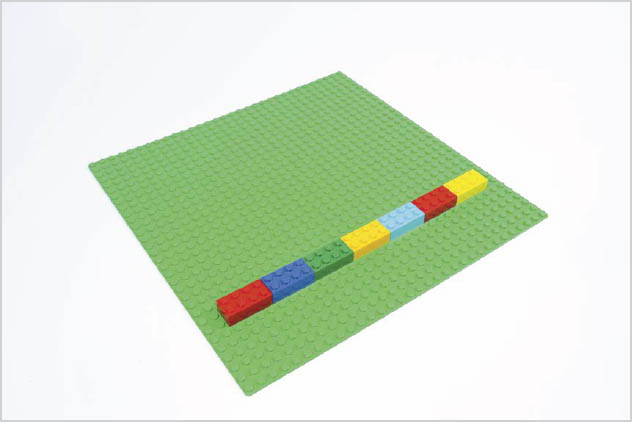
STEP 1
Find a 32x32 large baseplate, and then add a row of seven 2x4 basic LEGO bricks about an inch from the front edge (as shown). These will form the base at the front of your shadow puppet theatre.
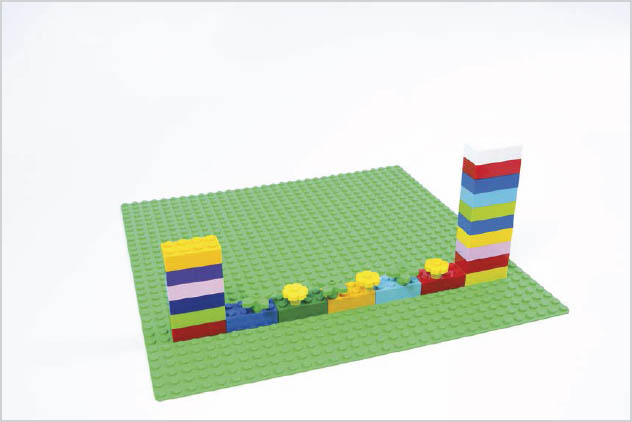
STEP 2
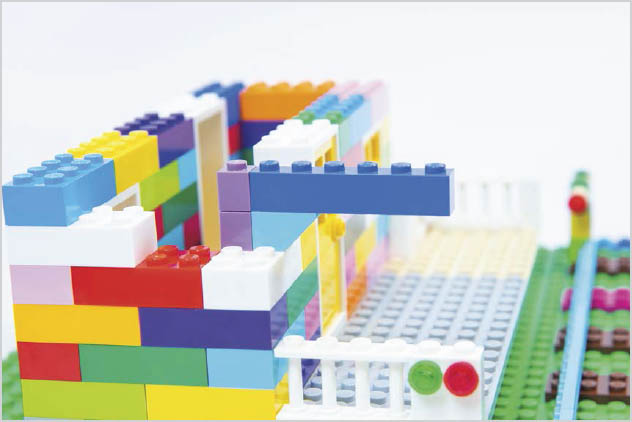
Add some decorative LEGO pieces to the front brick row, then build a column on either side of it for the sides of your theatre. Each column is 16 bricks high.
STEP 3
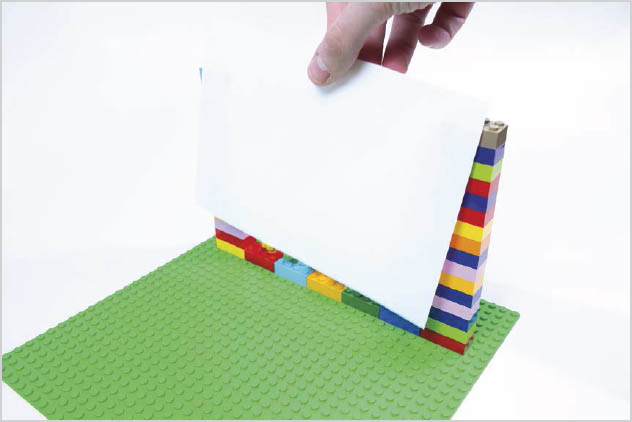
Rest an 8.5x5.5-inch (or A5) sheet of paper horizontally against the back of the columns. Remember, you can cut an 8.5x11-inch (or A4) sheet of paper in half to make it the correct size.
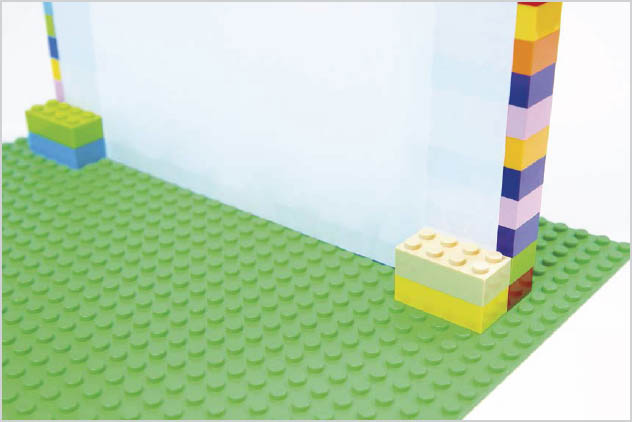
STEP 4
With the paper in place, build a couple of basic LEGO bricks up against the two columns with the paper in between so the paper doesn’t move.

STEP 5
Attach a couple of 4x1x1 bow bricks to the toprear of the columns to fix the paper in place at the top. Add some 4x1 plate bricks to the top-front of the columns to level them off, then decorate them if you like.

STEP 6
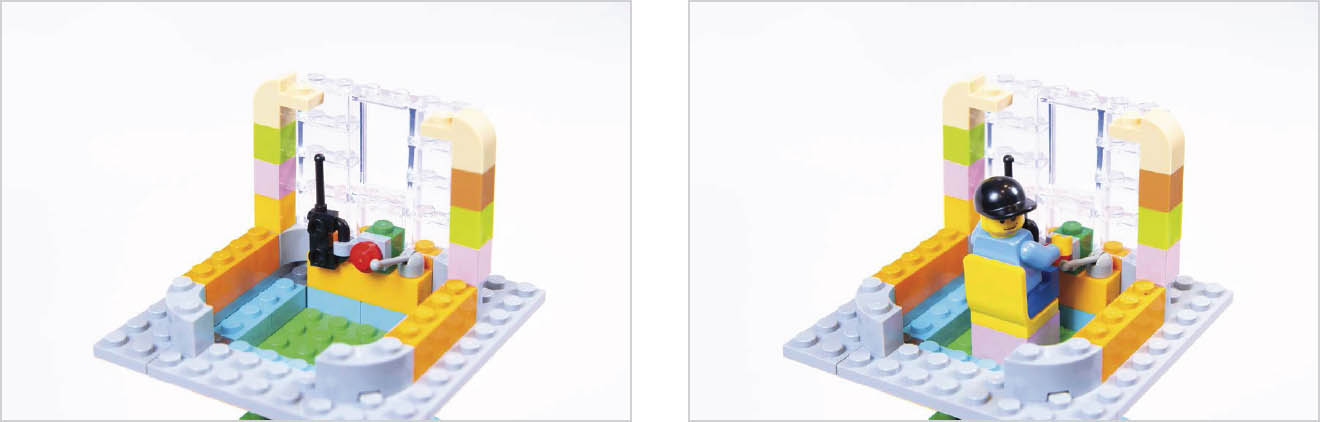
Start to build a stage behind the sheet of paper by attaching some basic LEGO bricks to act as supports for a platform.
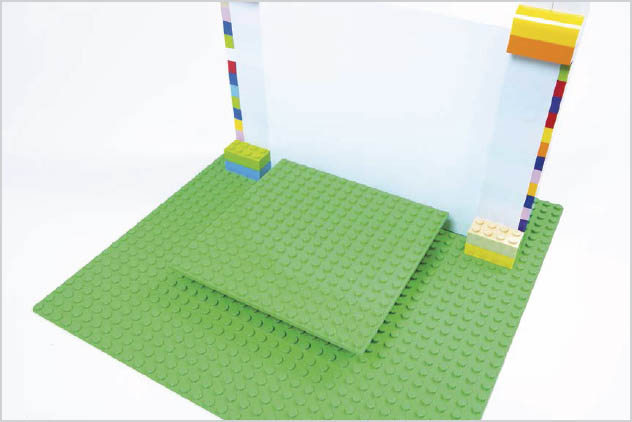
STEP 7
Add a 16x16 baseplate on top of these supports. This baseplate is the stage from where the props and actors will cast shadows onto the paper.
STEP 8
Behind the stage, build another platform designed to hold a smartphone steady on its side so it can shine its flashlight at the paper.
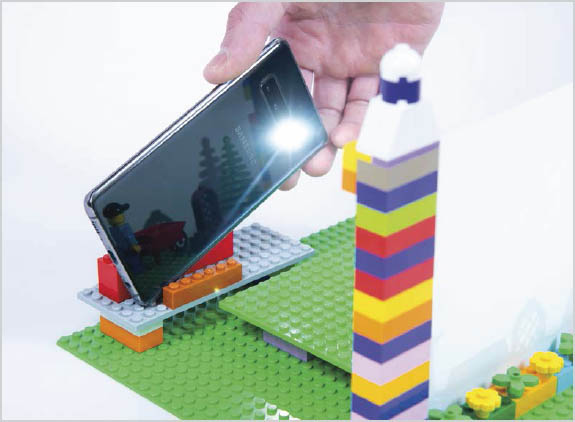
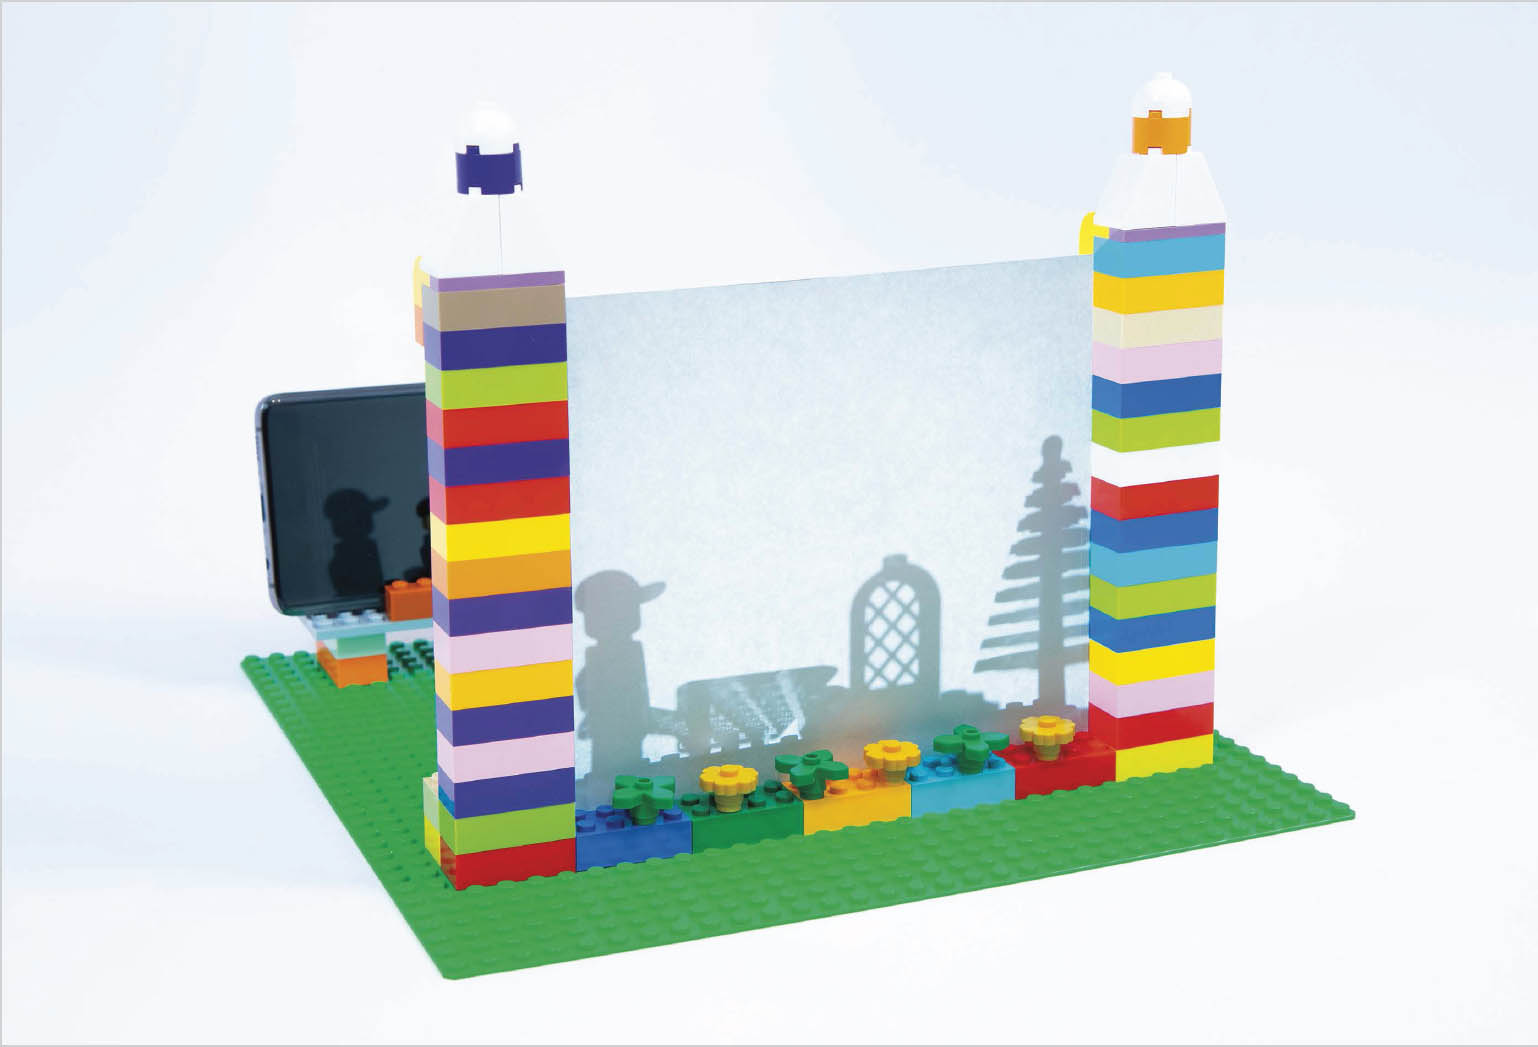
STEP 9
Turn the smartphone’s light on, and then rest the phone in the platform. Ensure it casts light onto the sheet of paper at the correct angle so light passes past anything that stands on the stage.

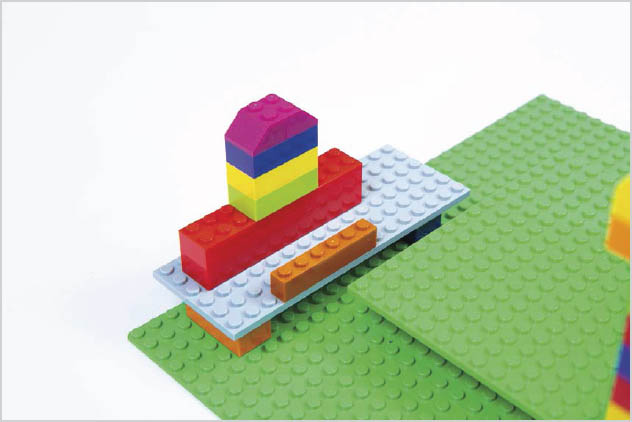
STEP 10
Now the shadow theatre is ready to put on your family’s first show! Build a selection of LEGO props and use them to create a cool shadow puppet story.
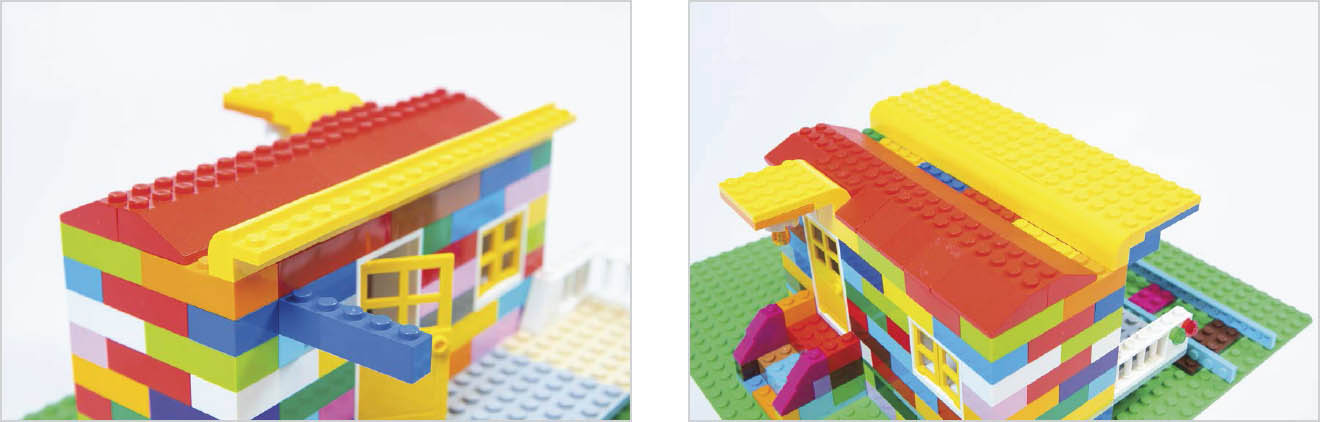
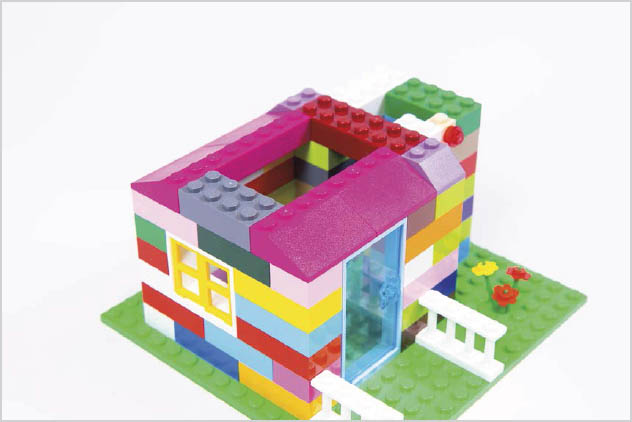
House with a Pitched Roof
Specialty pieces needed:
- Bracket brick
- Additional roof tile bricks
- Additional fence bricks
- Tree
- Flowers
- Doors and windows
When I was younger and stuck for ideas for things to build, my parents generally suggested a house. Although this was fun to build the first few times, it started to get boring, so I decided that each time I built a house I would make it more special. If you’re looking for inspiration and ways to make your own house unique, just look out your front window to see what features your neighbors’ houses have. Or, you and the kids could go on a scavenger hunt for new house ideas by taking a walk or bike ride together. Spot an interesting chimney, roofline, or porch? Snap a photo or add it to a list of ideas.
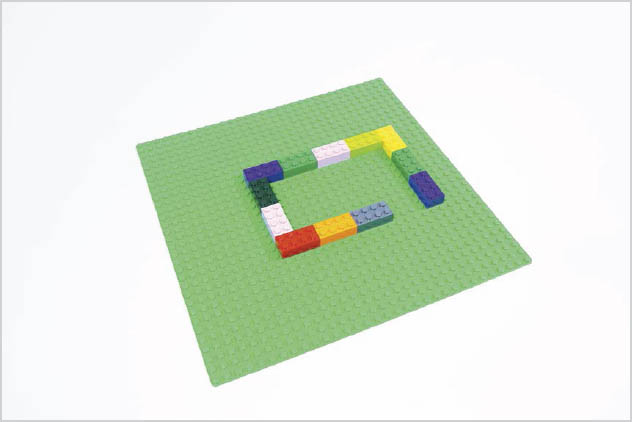
STEP 1
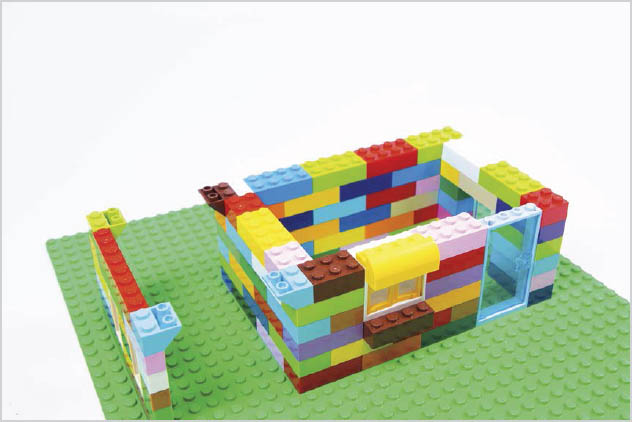
Start with a large green baseplate and begin laying basic LEGO bricks for the base of your house. (I made mine four and a half bricks by three.) Be sure to leave room for a door and some space to the left for a carport that you’ll build later.
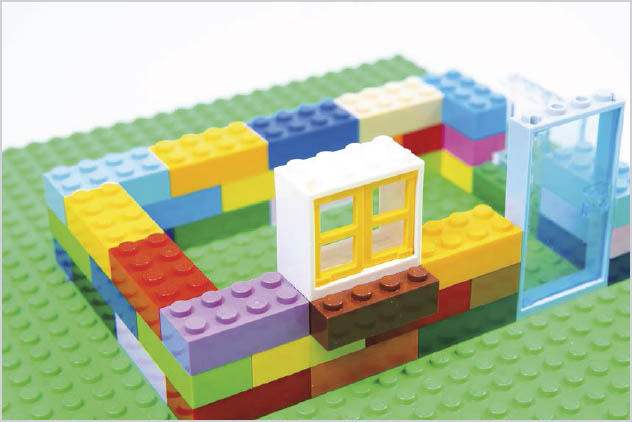
STEP 2
Continue adding additional layers of bricks to the walls of your house along with a door and window ledge for the front window.

STEP 3
Once the walls of your house reach the top of the window and door, add a 4x1x1 bow brick to the top of the window. Also add two inverted roof tile bricks to the left-side corners of the house (as shown). In a few steps, you’ll attach the carport to these.

STEP 4
Begin building the sidewall of your carport, incorporating a couple of small windows too. Ensure this wall is built in a position that you can attach it to the main structure of the house with a medium (16x16) baseplate brick.
STEP 5
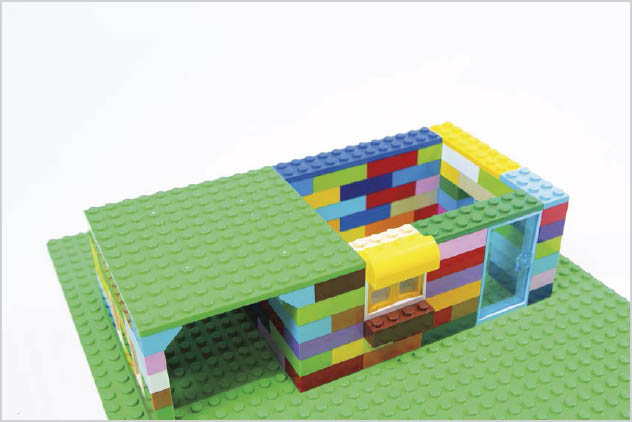
When the carport wall is one brick lower than the height of the house wall, add another couple of inverted tile bricks to its front and back as attach points. Level off the wall with a brick between these.
STEP 6
Use a medium-sized baseplate brick to attach the carport wall to the house. This will also act as the floor of your balcony. Also place a layer of x2 wide plate bricks around the top of the house wall to ensure it’s all level with the balcony.
STEP 7
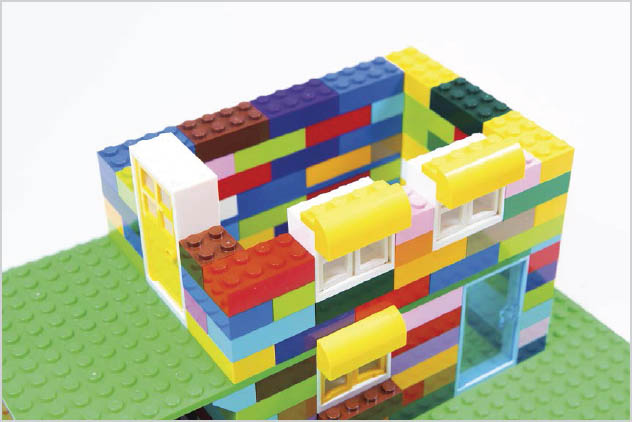
Continue to add bricks to make the second story, including a couple more windows (with 4x1x1 bow bricks on top) and a door leading out to the balcony. Then continue to build the second story wall up to the top of the balcony doorframe.

STEP 8
Why not add a couple of special details too? You can include an antenna on the side of the house using a couple of knob bricks and an antenna piece. You can also try adding an outside light like the one shown in Chapter 2. Use a LEGO bracket with some light bricks attached.

STEP 9
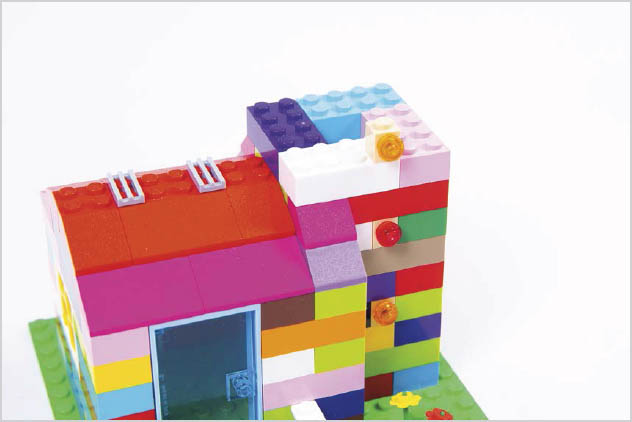
With the walls finished, it’s time to start building the roof of the house. Simply begin layering up roof tile bricks starting from the left and right side. Also use basic bricks for a ridgeline for the front and back, to close up the gaps.

STEP 10
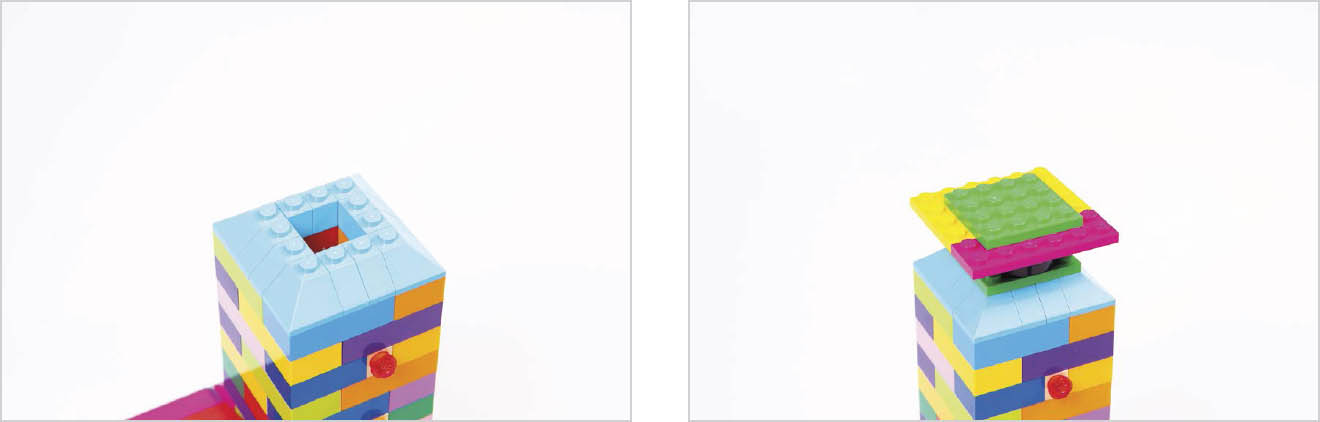
Once the roof tiles join in the middle, leave some space at the back of the roof to build a chimney. I also included some mini windows in the ridgeline for an attic room.

STEP 11
Use some basic LEGO bricks to build the chimney, and finish the top off with a 2x2 circle brick and a round brick on top of that.

STEP 12
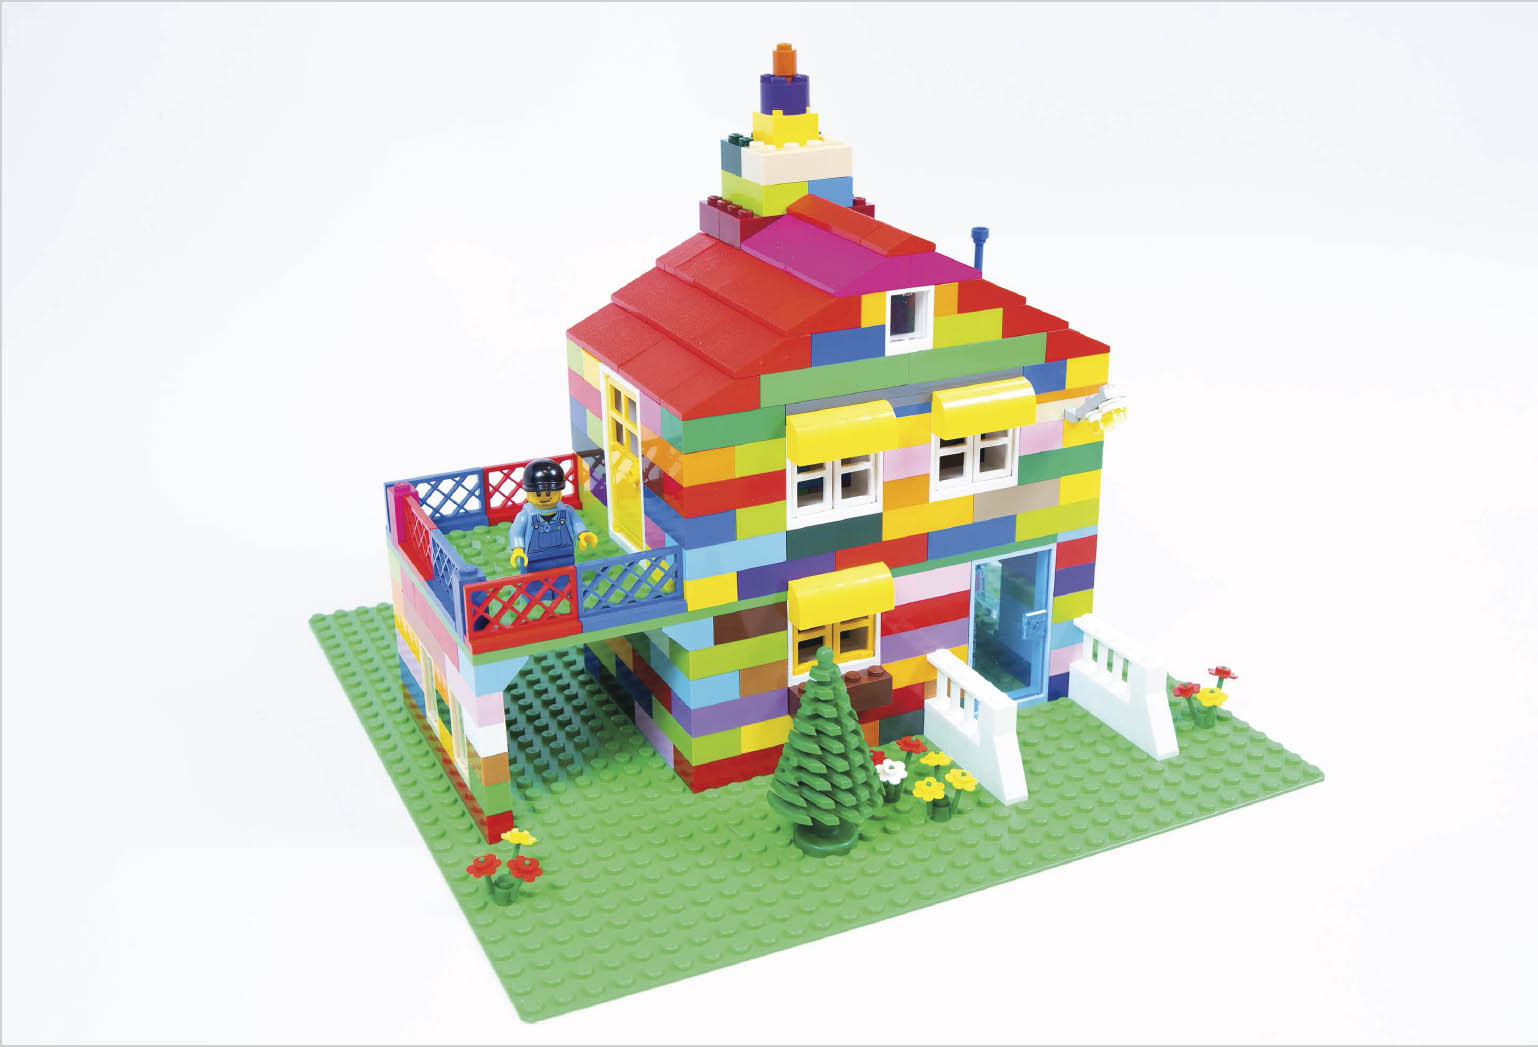
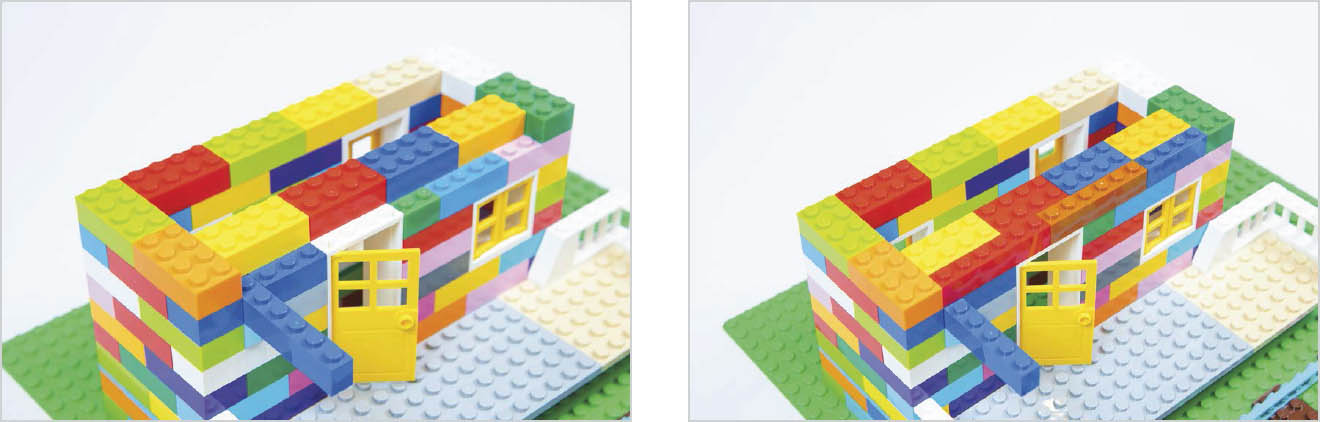
For finishing touches, be sure to add a railing around your balcony. I used some gate bricks, and I added embellishments on either side of the front door.

STEP 13
Finally, plant plenty of flower bricks and a tree to make your house nice and welcoming.

Car Trailer
Specialty pieces needed:
- Tow bar socket
LEGO cars are great fun, but you can make them even more exciting by building a trailer to attach to the back. You can start by building the car in Chapter 3 and adapting it with a tow bar to attach a trailer.
Depending on how high you make the sides, you can also convert this trailer into a camper. It’s a great build that can be adapted in lots of different ways, depending on what you want the trailer to carry. Whether you’re towing bricks, a LEGO tree, or even another car, finding ways to adapt the trailer depending on its purpose makes it brilliant for problem solving.
STEP 1
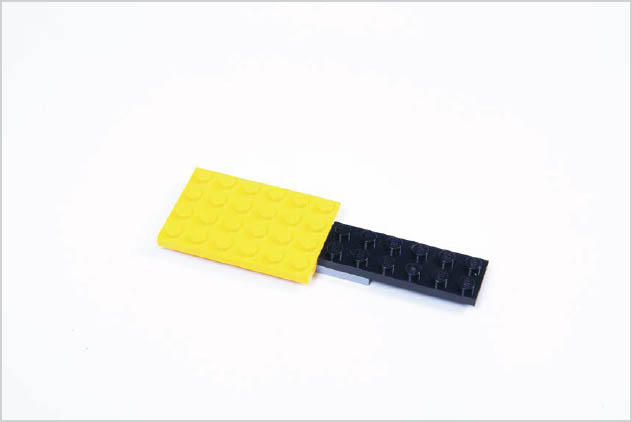
Start by building the car project in Chapter 3 (or one of your own designs), and add a tow bar brick to the back. Secure it into place using plate bricks as shown.
STEP 2
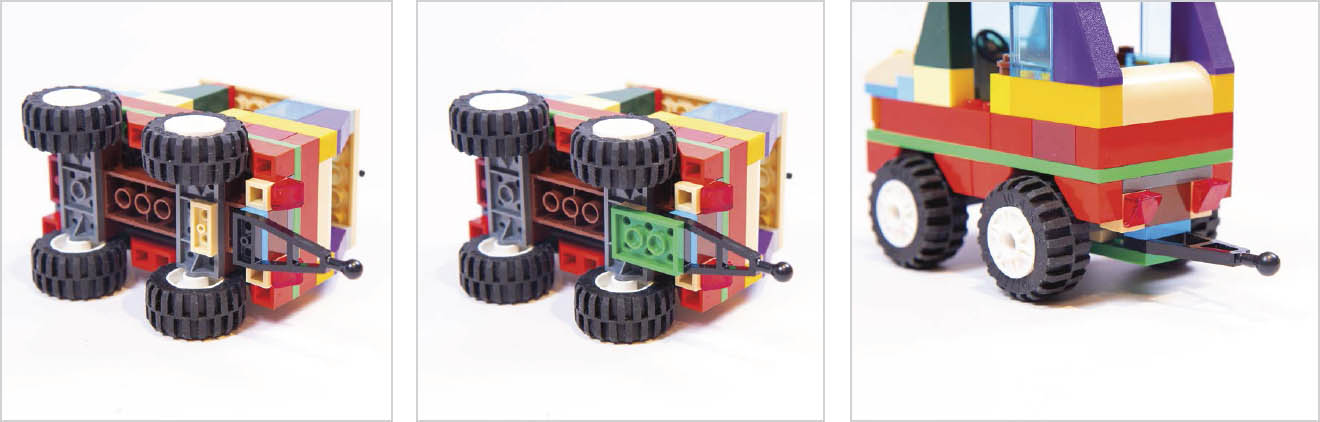
Find a small baseplate to become the base for your trailer. I chose the same size one as the one I used for my car, but if you need to haul larger gear, feel free to make yours bigger. Add a row of simple LEGO bricks along the middle of the baseplate; you’ll attach the wheels to these later. Leave a gap at the end for a tow bar socket.
STEP 3
In the gap, attach a tow bar socket piece. This is what will connect the trailer to your car. Use additional plate bricks when attaching the tow bar socket to ensure the trailer is level with the car when attached. If you built the car in Chapter 3, you’ll need to attach the tow bar to one plate brick on the underside of the car. Then you’ll need to attach the tow bar socket piece to two plate bricks on the underside of this trailer.

STEP 4
To the rear of the trailer add some brake lights using a couple of 1x1 knob bricks with a red light brick attached to each.

STEP 5
To attach the wheels and wheel arches, first attach some x1 wide inverted tile bricks around where the wheels will sit. Next, attach a couple of bearing element bricks onto the bricks on the trailer underside. Clip on four medium-sized rims with tires attached.
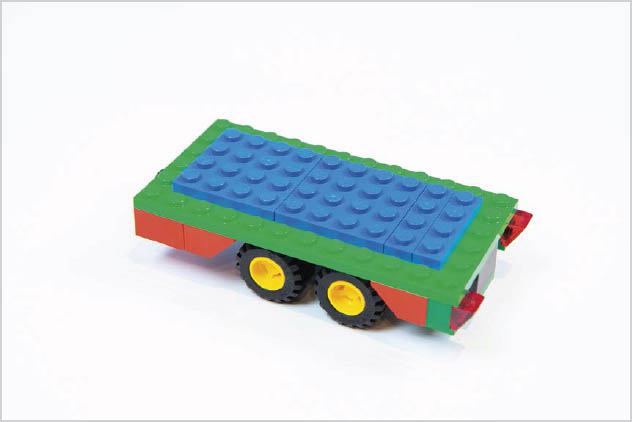
STEP 6
Flip the trailer over, then add a layer of plate bricks down the center, leaving space around them so you can attach bricks for the side of your trailer.
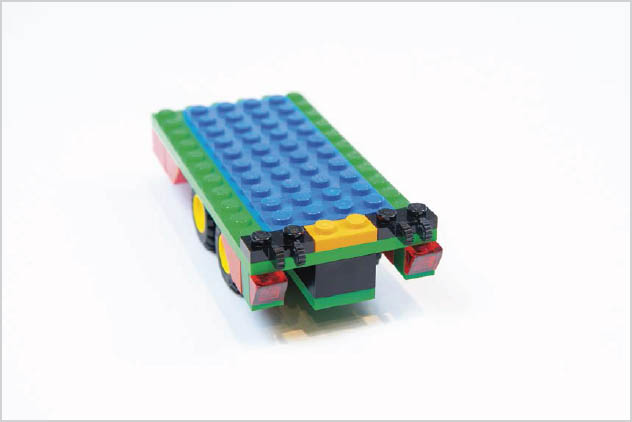
STEP 7
At the rear, attach two plate bricks with vertical forks on either corner of the trailer to serve as the hinge bases for a moveable ramp at the back of the trailer.

STEP 8
Add a layer of flat tile bricks onto the plate bricks you placed on the trailer in step 6, then add a layer of x1 wide bricks around the tile bricks for the trailer sides.

STEP 9
For the trailer sides, build up as many layers of bricks as you like. At this point you may even decide to build a camper instead!
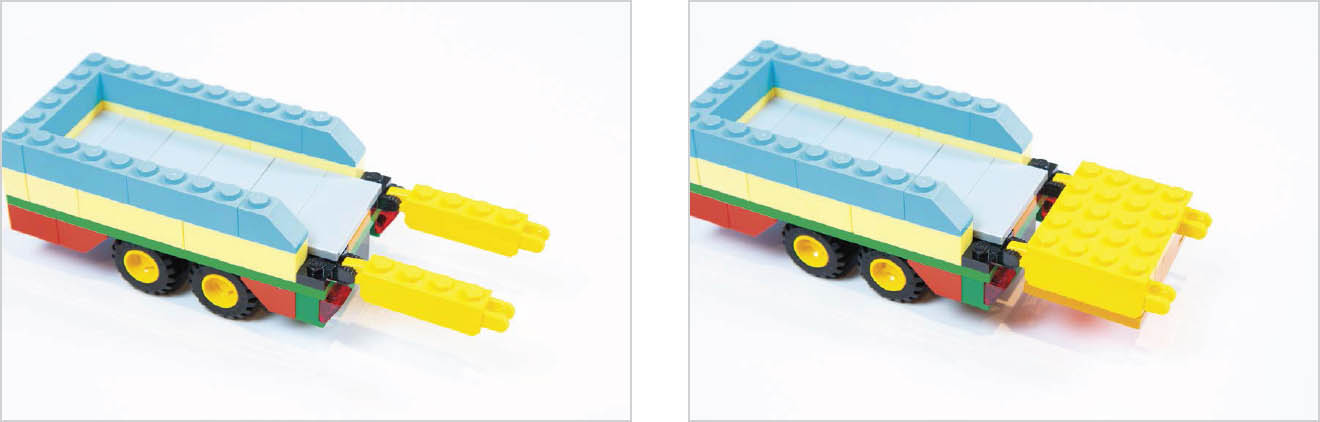
STEP 10
To complete the ramp, attach a stub brick to each of the vertical fork bricks on the rear of the trailer. Attach the two stub bricks together using basic LEGO bricks and plate bricks, then push the ramp upwards to close.
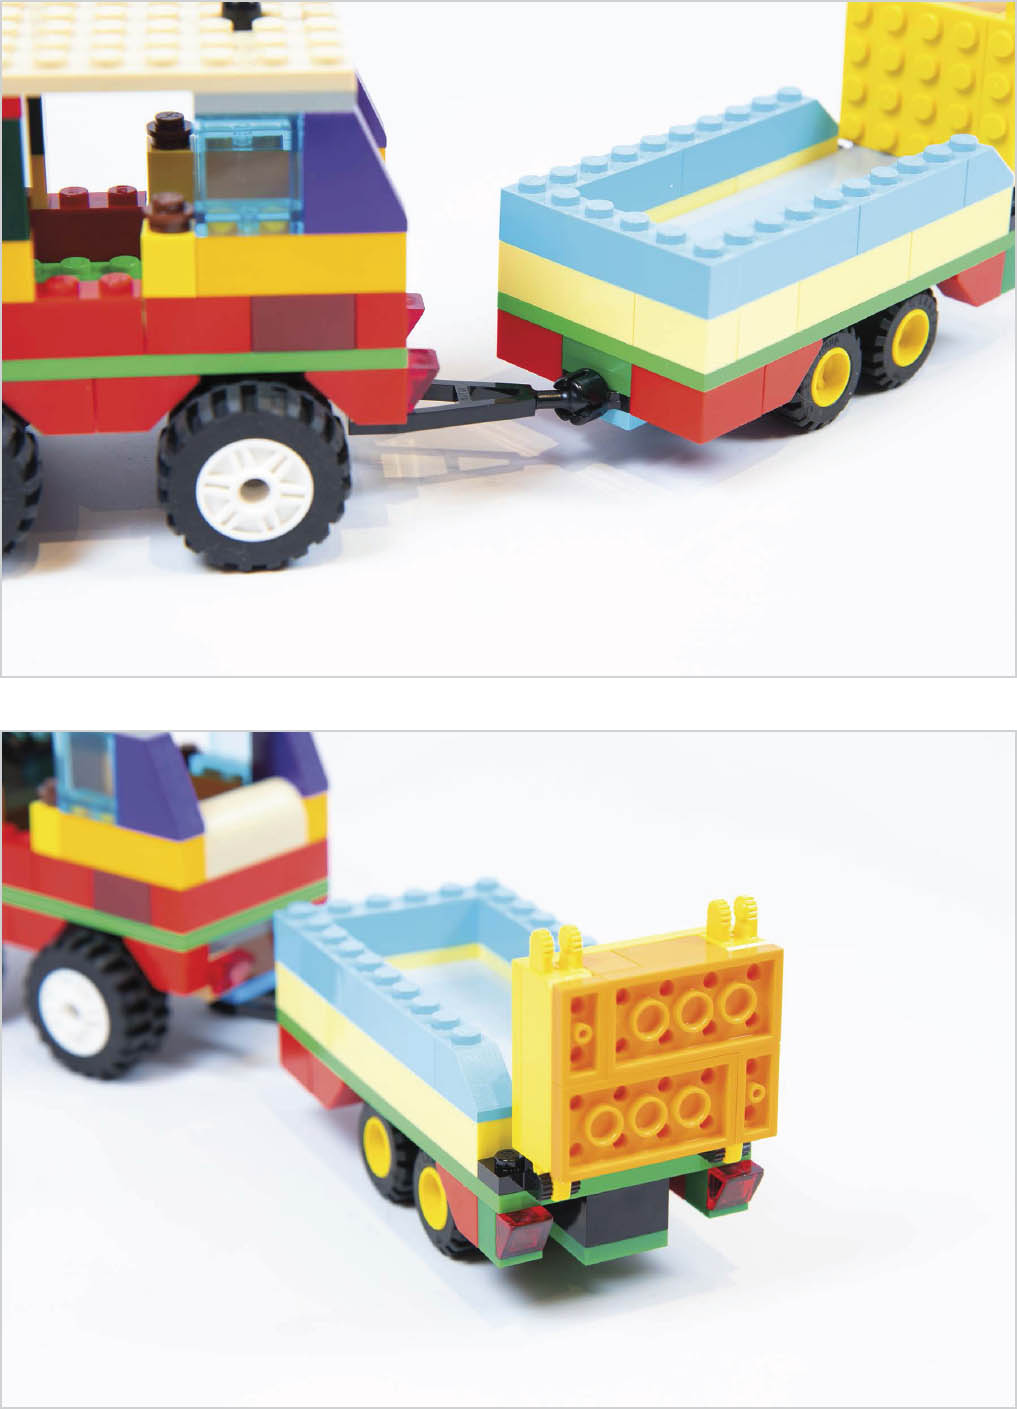
STEP 11
Finally, connect the car and trailer together, and drive off for deliveries or adventures.

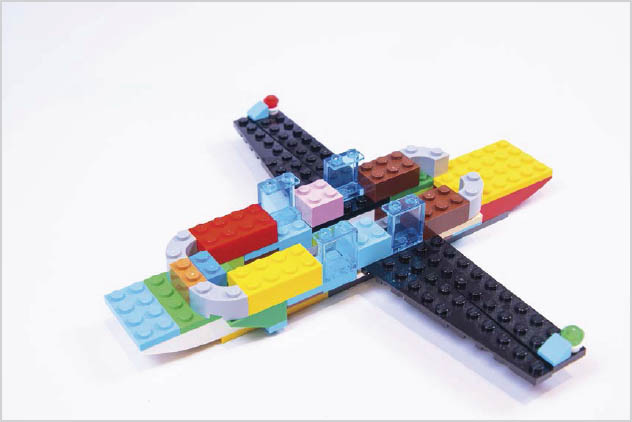
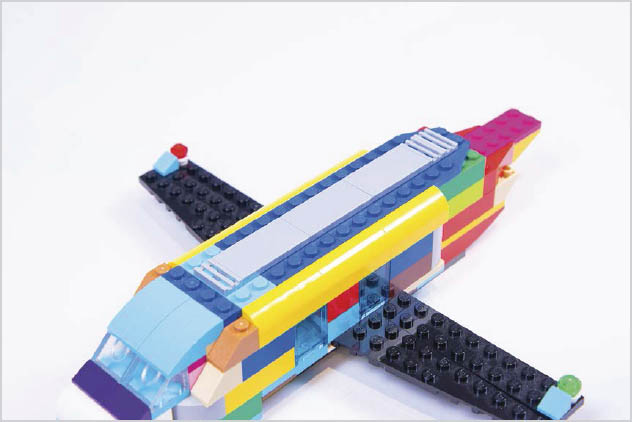
Airplane
Specialty pieces needed:
- 1 left and 1 right large wing brick
- 1 left and 1 right small wing brick
- 4 1x6 reverse bow bricks
- Flat tile bricks
- Grille bricks
If your family is anything like mine, then your vacation starts the minute you arrive at the airport. The first glimpse of a plane on the runway gets the kids excited—which makes a LEGO airplane the perfect build. Not only will it get your little ones really excited about jetting off on vacation, it will also occupy their minds while waiting to take off.
One of my go-to airplanes, this project has lots of little details that makes it perfect to build with your kids. When you do arrive at the airport—or see any plane—you can make a game of trying to spot the parts you put on your LEGO airplane on a real life one, too. Don’t let size limit you either! As time goes on, why not go bigger and better with a two-story jumbo jet?

STEP 1
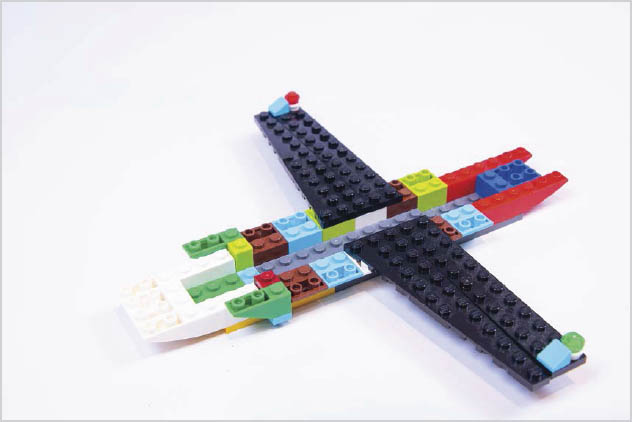
Start by lining up a couple of small, x4 wide baseplates to form the base of the fuselage. Attach them together with a x2 wide plate brick. Also add a couple of plate bricks to the front to form the base of the nosecone, as shown.

STEP 2
Lay inverted roof tile bricks facing outward along the long edges of the baseplate. Use longer, 1x6 reverse bow bricks for the nose and tail end of the airplane.
STEP 3
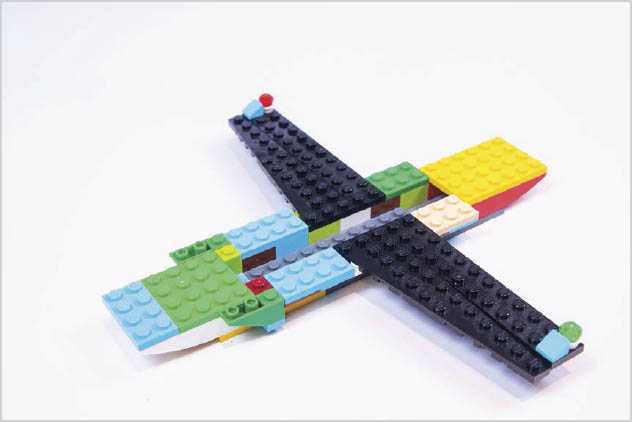
Add large wing bricks to either side of the fuselage. For even more realism, you can also add some winglets and strobe lights onto the end of each wing.
STEP 4
As the wings have made the fuselage uneven, use plate bricks to make the surface the same level so you can build up the sides of the airplane.
STEP 5
Build up the sides of the airplane using basic LEGO bricks along with window pieces and “inside and out bow” bricks for the front and back of the main cabin.
STEP 6
To start building the tail end of the aircraft, use inverted roof tile bricks, a 4x4 18° brick and plate bricks to build a surface strong enough and large enough to hold the tail, which you’ll add later.
STEP 7
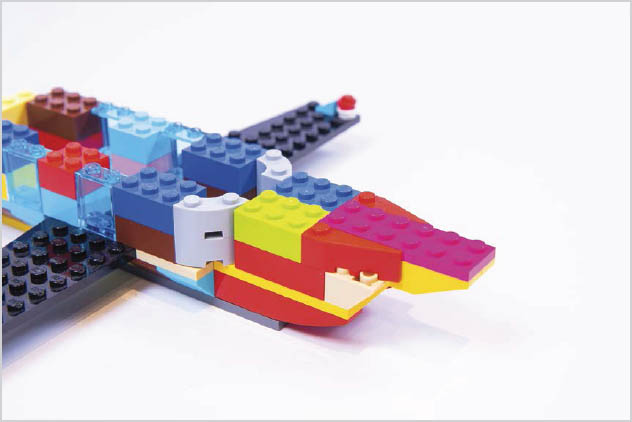
For the nose of the airplane, start by using a couple of arch bricks to create that curved look.
STEP 8
Then use roof tile bricks and see-through roof tile bricks for the cockpit window. Finish the front off with four 1x3 bow bricks on top of the cockpit window, then you should have a nice aerodynamic front.

STEP 9
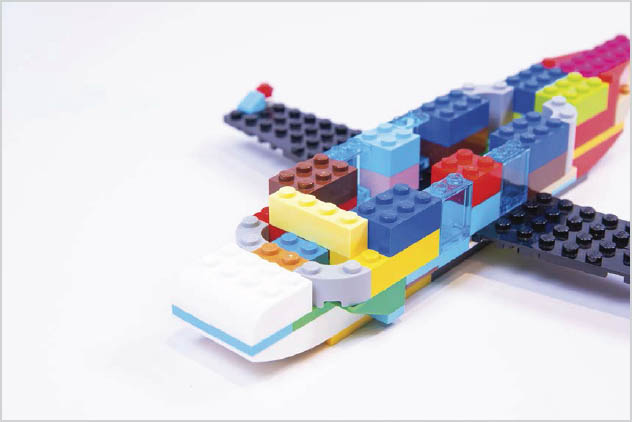
To continue that common cylindrical look, run 4x1x1 bow bricks along the top of each side of the airplane fuselage between the nose and tail sections.
STEP 10
Now add multiple plate bricks on top with a 18° 2x4 plate brick at the tail end to streamline the roof. Also run flat tile bricks along the center of the roof, finished off with grille bricks at either end.
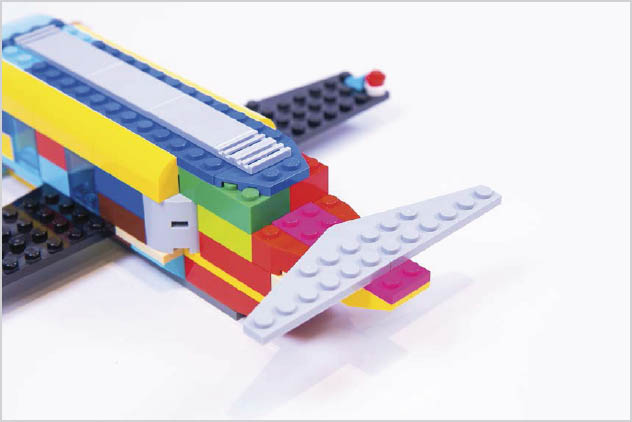
STEP 11
Back to the tail of the aircraft: This time, add a couple of small wing bricks across the rear of the tail section you built earlier.

STEP 12
On top of the small wing bricks, place on some regular and plate bricks then add a row of three 2x2 1 knob plate bricks. You want these to sit one row higher than the top of the plane. In a few steps you’ll place the tail on these bricks, and they’ll allow the tail to sit centrally on the airplane.

STEP 13
Flip the aircraft upside down so you can add the jet engines. These are really simple to build. Start by placing an angle plate brick onto the underside of each wing, then attach a row of 2x2 circle bricks onto each angle plate to make a cylinder. Then attach a “final” brick to the end of the jet engine to finish them off.

STEP 14
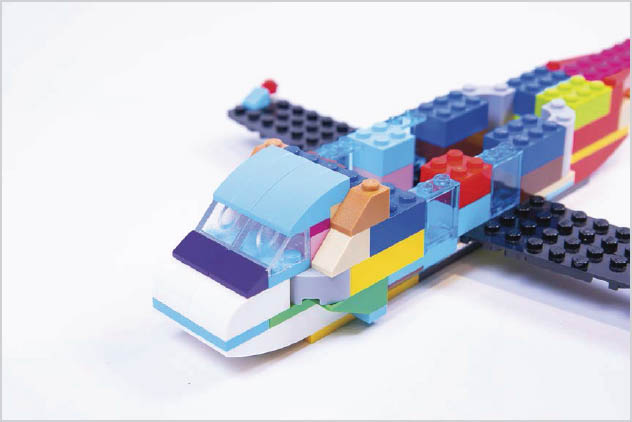
Attach the front landing gear by placing a single wheel centered under the cockpit. For the rear landing gear, put a plate brick across the plane body behind the wings, centering it so two stubs extend beyond the body on either side. Add a single wheel on each side.

STEP 15
Build the tail simply by attaching a 1x6 plate brick to the row of 2x2 1-knob plate bricks at the rear of the plane. To this, attach longer tile bricks at the front for the first couple of rows of the tail, with an inverted tile brick at the back. Then use narrower tile bricks along with regular x1 wide bricks for the remaining rows. Attach a strobe to the top of the tail then your airplane is ready for take off!
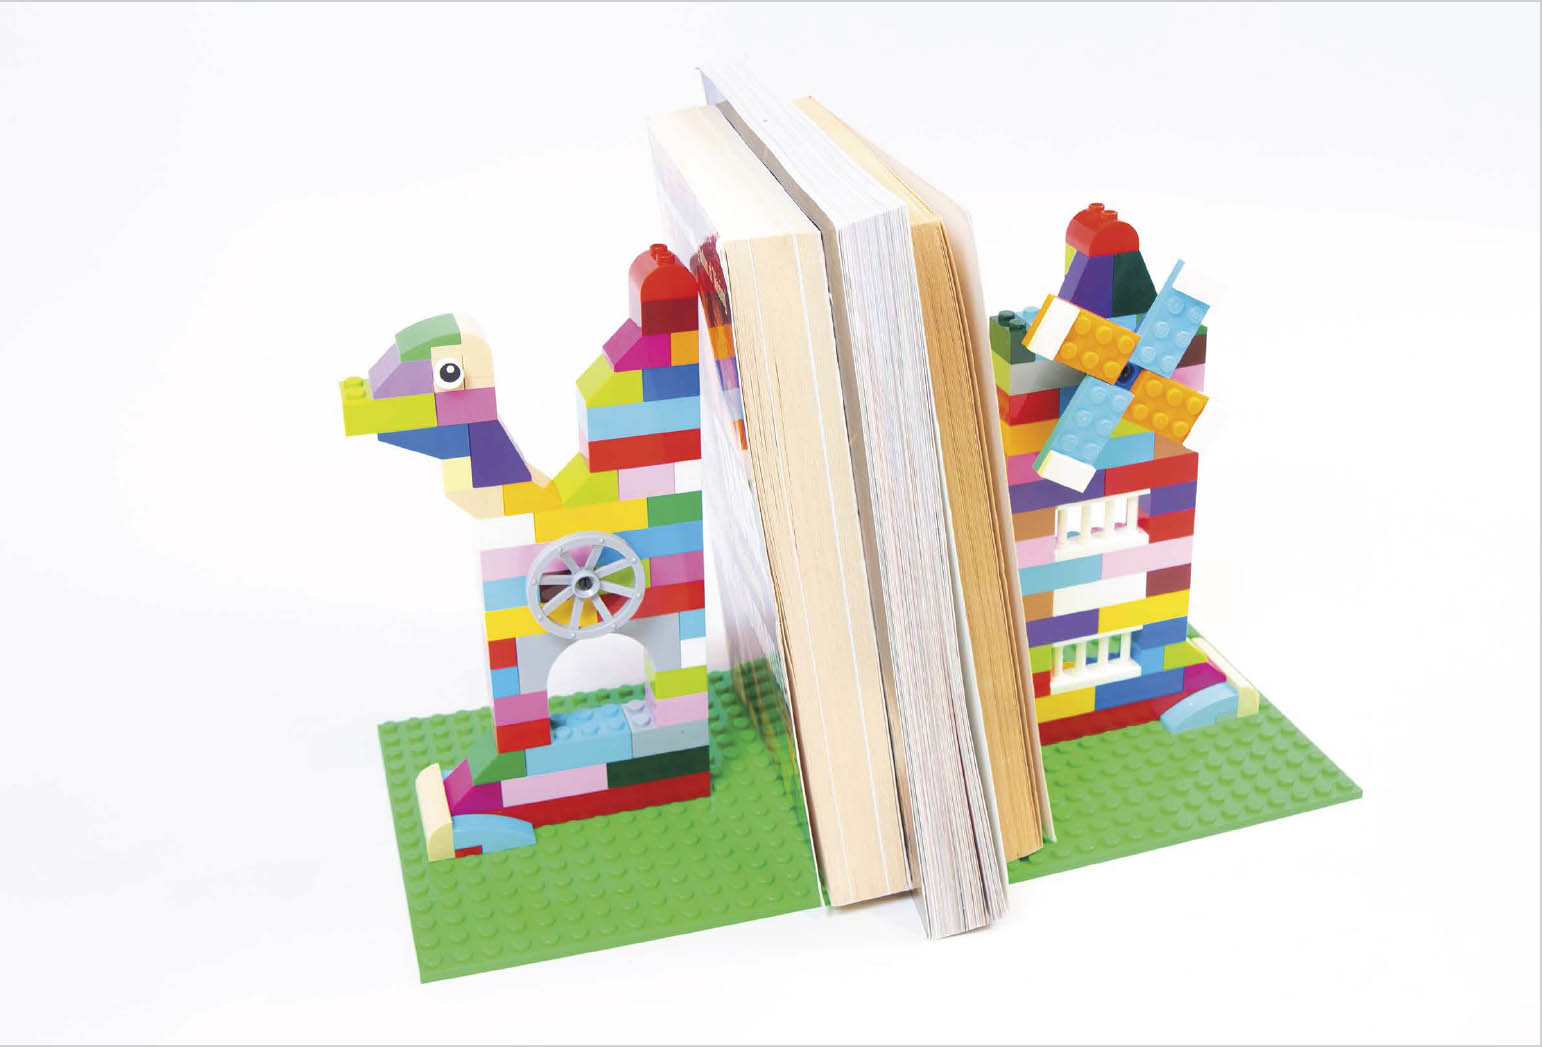
Bookends
Specialty pieces needed:
- Propeller
- Eyeball
- Other embellishments as needed
If you find keeping all your family’s books organized a problem, then you need some LEGO bookends! I’ve found building them with my son has been a great way to encourage him to read more, as he gets to use the bookends at the same time. We also update ours throughout the year. Why not consider building some themed ones during the holiday season or to give as gifts? Kids get great satisfaction from making something useful, then seeing it in use by their families.
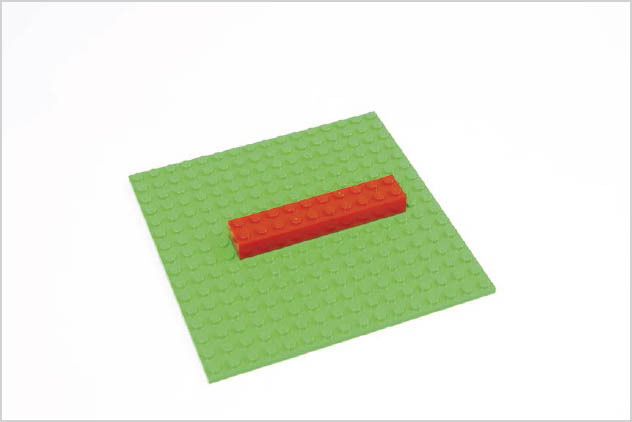
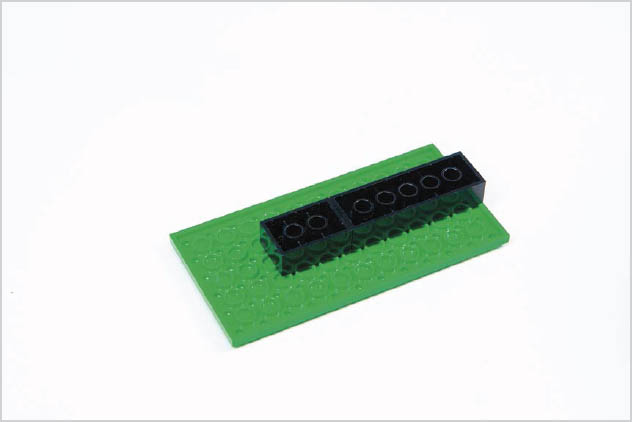
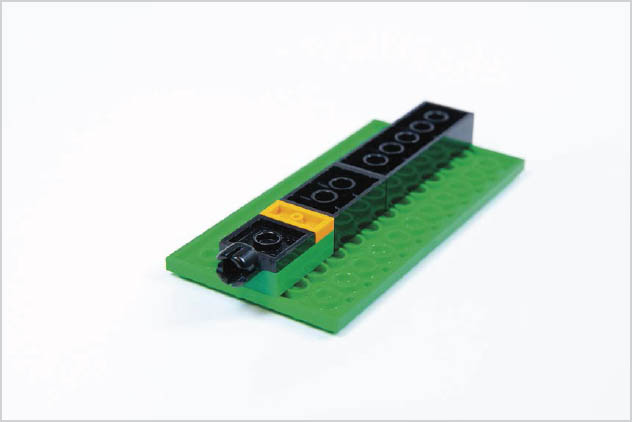
STEP 1
For each bookend, start with a square baseplate. Add a 2x10 brick running along the center of the baseplate, leaving a little extra room on one side for books to sit on.

STEP 2
Place a couple of bricks onto the end of this brick which will help support the weight of the books when stacked up against the bookends. These can be any type of brick, and here I’ve used 1x3 bow bricks and a 1x4x1⅓ brick.

STEP 3
Now start building up your bookends. Your bookends can be any shape you like; you’ll just need to make sure they’re wide enough and strong enough to support the weight of your books. Here I’m building a windmill for one of my bookends.

STEP 4
You can easily turn a tower into a windmill: Once the bookend is high enough, add a snap and cross brick, then attach a four-blade propeller onto it to hold the sails.

STEP 5
Attach some large sails onto the windmill brick using 2x4 plate bricks with some tiles on the end for decoration. I also added a couple of roof tile bricks to the top, to finish it off.

STEP 6
Now, build your second bookend. Remember, it doesn’t have to be the same as the first; it can be whatever you like! I built an animal for the second one. Whatever you build, again make sure it’s strong enough and large enough to support your books.
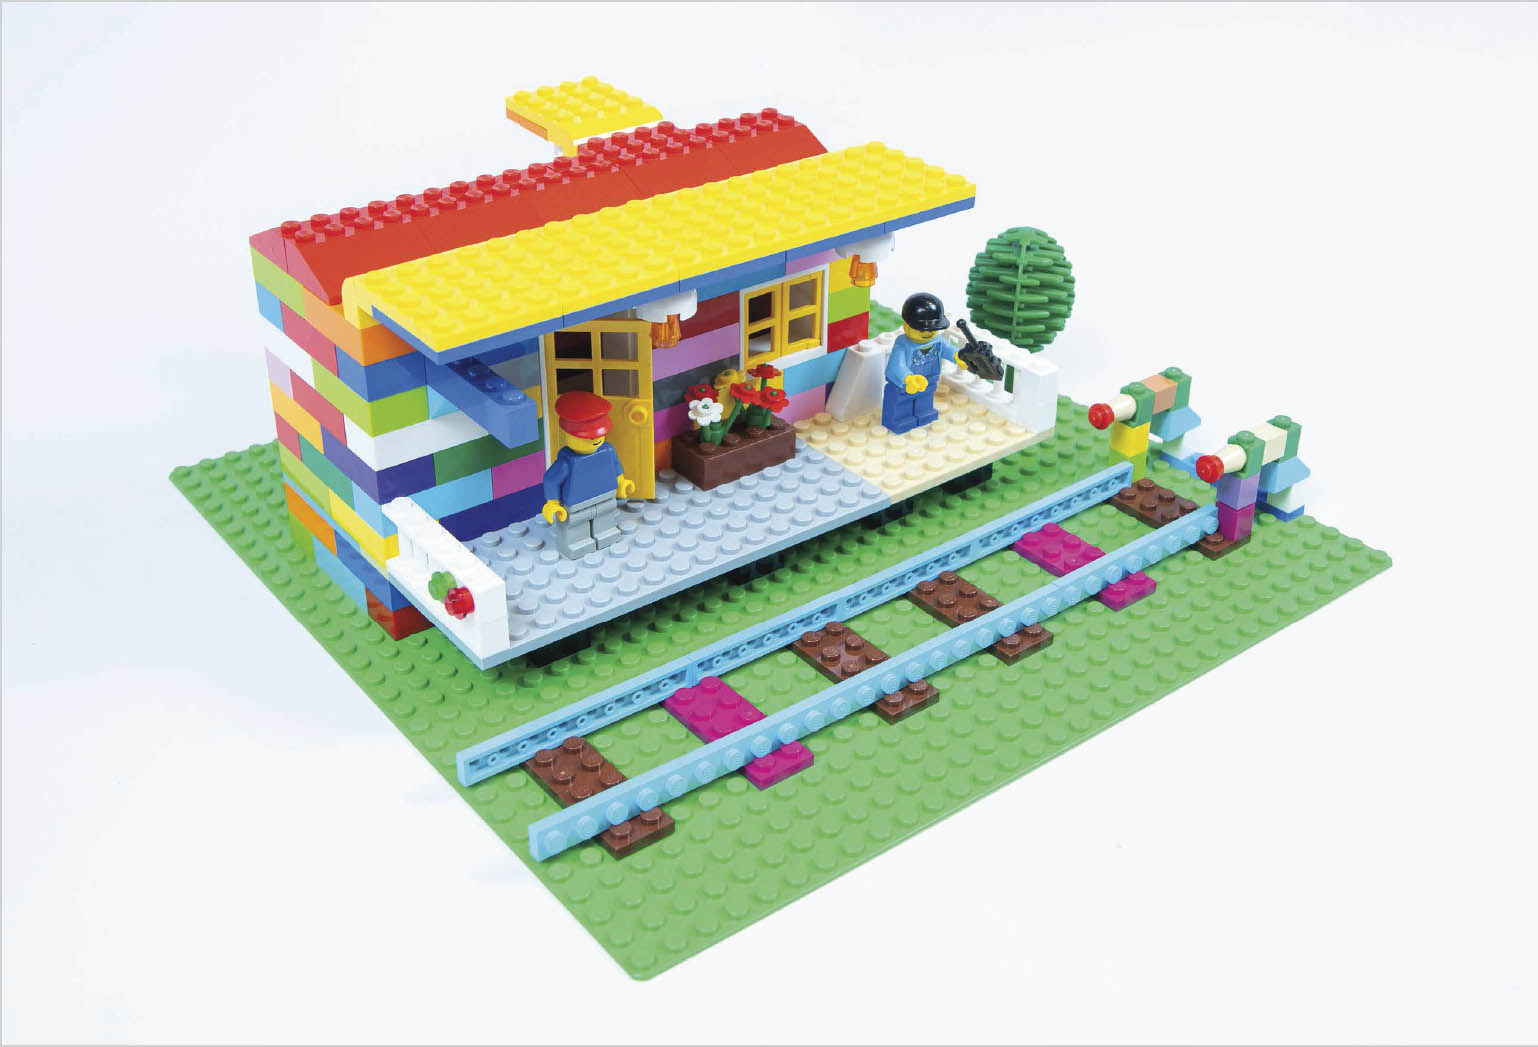
Railway Station
Specialty pieces needed:
- Additional roof tile bricks
- Tree
- Flowers
- Minifigures
- Doors and windows
My son loves anything with wheels, and he always loves a trip to the station where he can see all the trains. This build brings the railway station home and includes loads of little details to make it extra special.
This build really is one to be proud of and it’s great fun to make as a family project. Don’t worry if you don’t have official LEGO track, we’ll use the technique of building track with plate bricks shown in Chapter 2.
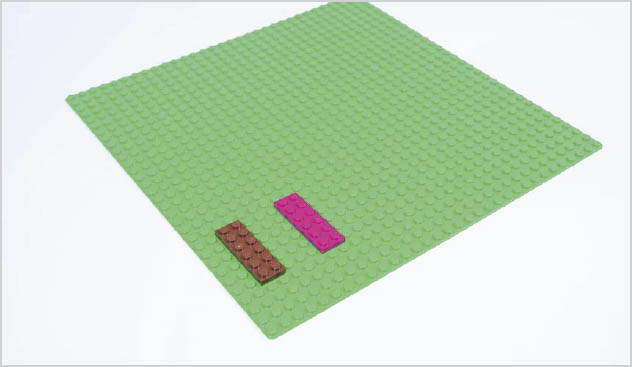
STEP 1
Find a large baseplate, and begin laying down 2x6 plate bricks as railroad ties.

STEP 2
Next, attach some x1 wide plate bricks to the ties. Do this by snapping them into place between the studs on the tie bricks as shown.
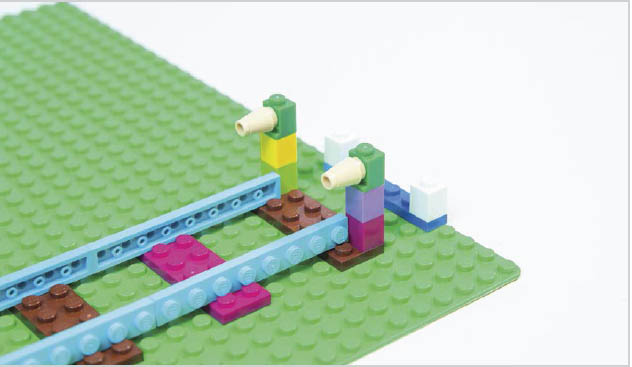
STEP 3
Leave some space at the end of the track to build a set of bumpers. These are used to prevent trains running off the end of the track. Begin building the bumpers using 1x1 bricks and attaching some nose cone bricks to some 1x1 knob bricks.
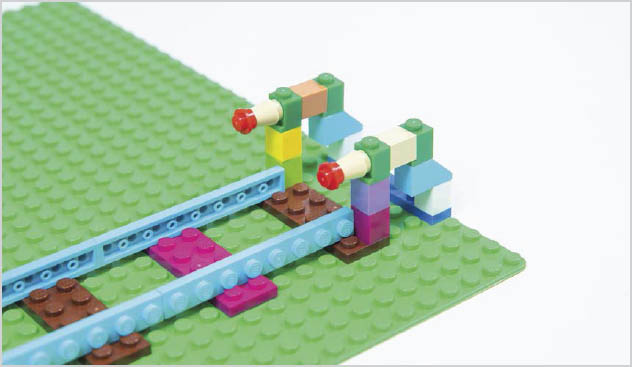
STEP 4
Then add some 1x1 round pieces to the end of the nose cone bricks and ensure the bumpers are well supported so they can absorb any impact from an oncoming train.

STEP 5
Now we need to begin building the platform. Start by adding the supports to raise the platform up. Use some basic bricks for the base of the supports, then add a 2x2 brick and an inverted roof tile brick on top of each.

STEP 6
To build the platform, place medium-sized plate bricks on top of the supports. Make sure you use enough to run along the length of the track you have laid.

STEP 7
We now need to begin constructing the station building. Use basic LEGO bricks to start building the walls of the building. Ensure it’s constructed all the way up to the edge of the platform.
STEP 8
When the wall almost reaches the height of the platform, add a layer of plate bricks to the walls to make them level with the platform. Add another row of bricks, but be sure to leave openings for a front and rear entrance.
STEP 9
Because the station is raised, it needs some steps leading up to the station entrance at the rear. Build these using some simple LEGO bricks and x1 wide roof tile bricks for the staircase handrails.

STEP 10
With the steps in place, add a door to the back and front of the station building, along with some windows. Then continue building the station building walls.

STEP 11
Also add some fencing bricks from the walls of the station building along the edges of the platform. For one of the fences, why not incorporate a start/stop signal using a double knob brick with a green and red light attached?
STEP 12
At the top of the station building, add a timetable board that pokes out above the platform. Attach a 1x6 brick to the side of the station wall, with an inverted tile brick underneath to support it.

STEP 13
For the final layer of bricks at the top of the station building, on the side attached to the platform, ensure the final layer of bricks is x3 studs deep. You can achieve this by adding one row of x1 wide bricks.

STEP 14
Place roof tile bricks on top of the station building, leaving a gap above the rear entrance door so you can attach a canopy.

STEP 15
Use a 4x1x1 bow brick and small baseplate brick above the rear door to create the canopy.
STEP 16
For the platform side, attach a row of 4x1x1 bow bricks along the length of the station building. Attach plate bricks to these bricks to create a shelter over the station platform.

STEP 17
Now it’s time to add some of the finer details! You can add lighting under the platform shelter using “final” bricks with orange nose cone bricks attached. And why not add a planter to the platform by attaching some flower bricks to a brown brick?

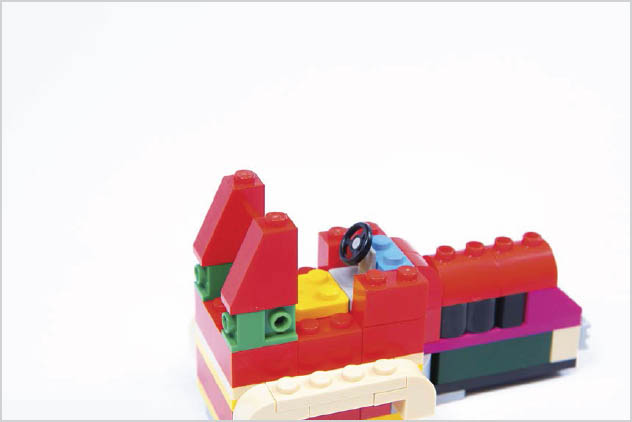
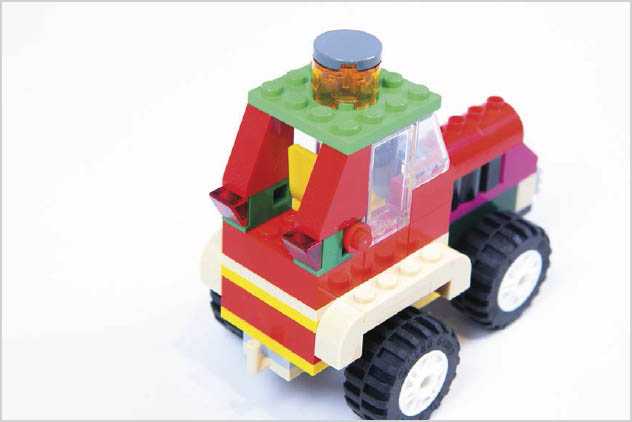
Tractor
Specialty pieces needed:
- Chair
- Steering wheel
- Windshield
- Cyclinder brick
- Palisade bricks
“Tractor” is one of the first words my son said—it was one of the first things we built together with LEGO! Because this build doesn’t require too many bricks, we’ve found it’s a great one to build if you’re travelling and have brought along only a limited amount of bricks. If you have plenty of bricks and room, you could add farm buildings and animals to go with your tractor.
STEP 1
Find a 4x6 plate brick and attach a 2x6 plate brick to the front of it (using a plate brick underneath to attach them together). You’ll build the tractor cab on the 4x6 plate and the engine section on the 2x6 plate brick.

STEP 2
Attach the radiator grille to the front of the tractor by first attaching a double knob brick then a radiator grille brick.

STEP 3
For the base of the tractor, use basic bricks and “inside and out bow” bricks to build the first layer. Then add base and plate bricks on top, as shown.

STEP 4
We now need to build the wheel arches that will sit over the top of the rear wheels. To do this, attach 1x1x1 arch bricks to 2x4 plate bricks, then attach these to the side of the tractor cab. Ensure all the plate bricks here sit flush on the cab.

STEP 5
Place another layer of basic bricks on the cab and use some palisade bricks on the front section to give an engine effect. Also add a roof tile brick to the front of the engine section.

STEP 6
Join the engine and cab sections together using 1x1x1 arch bricks then place a LEGO chair and steering wheel into the cab.
STEP 7
Place some tall roof tile bricks at the back of the cab that will support the roof. I also used a couple of knob bricks, which I’ll attach some brake lights to later.

STEP 8
Now use window bricks on the side of the cab and a windshield brick at the front. Also use a 4x4 plate brick for the roof.
STEP 9
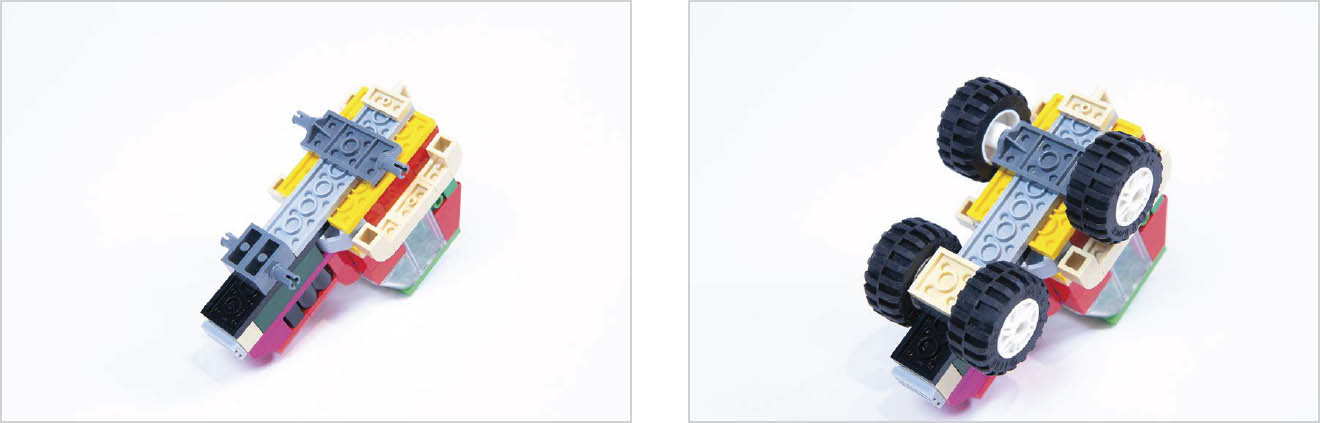
It’s now time to add wheels. Flip your tractor upside down and attach a 2x4 wheel suspension brick at the back and two 1x2 snap and cross bricks at the front (as shown). Onto these, clip on some large wheel rims with chunky tires attached.
STEP 10
Add your finishing touches. I used a cylinder round 2x2 brick to make a strobe light on the cab roof, as well as added brake lights and a tow bar.

Airport Control Tower
Specialty pieces needed:
- Mini antenna
- Minifigure radio
- Chair
- Windows and doors
- Minifigure
- Windows
The control tower is generally always the first thing you see on the approach to an airport. If a trip to the airport is part of an upcoming vacation, you can really build the hype for your kids if you suggest constructing an airport control tower.
The sky’s the limit too! Make this build as tall as you like using all your LEGO bricks. Build the airplane project alongside it, and you’ve got yourself a fully operational airport!

STEP 1
Find a 16x16 baseplate to build the control tower on, and then begin building the walls of your control tower. I built a larger section for the entrance and a smaller section for the tower.

STEP 2
Build the walls of the control tower up, adding doors and windows along with fences and plants in front of it on the baseplate.

STEP 3
When you have built the walls to the height of the door, place a longer brick across the top of the tower section for extra support.
STEP 4
Finish off the entrance section by using tile bricks to provide a roof. Also insert a brick between the front and rear tiles for the ridgeline.
STEP 5
Once the roof is in place, continue building up the tower section until it’s as tall as you like. I also added some lights to the side of the tower using knob bricks going up the tower.
STEP 6
To prepare the top of the tower for the control center, add roof tile and plate bricks to provide a base.
STEP 7
Add a layer of inverted roof tiles around your plate bricks to make the control center bigger. Onto this, add some more plate bricks to make it easy to build on.

STEP 8
For the control center, use x1 wide bricks and “inside and out bow” bricks to build the walls. Then use window bricks and transparent bricks for the windows too. Remember to also use bricks between the windows, on the corners as well.
STEP 9
On the inside of the control center, build a console table using a mini antenna and utensil brick, or whatever bricks you can find that are suitable. Also add a chair for your air traffic controller to sit in.
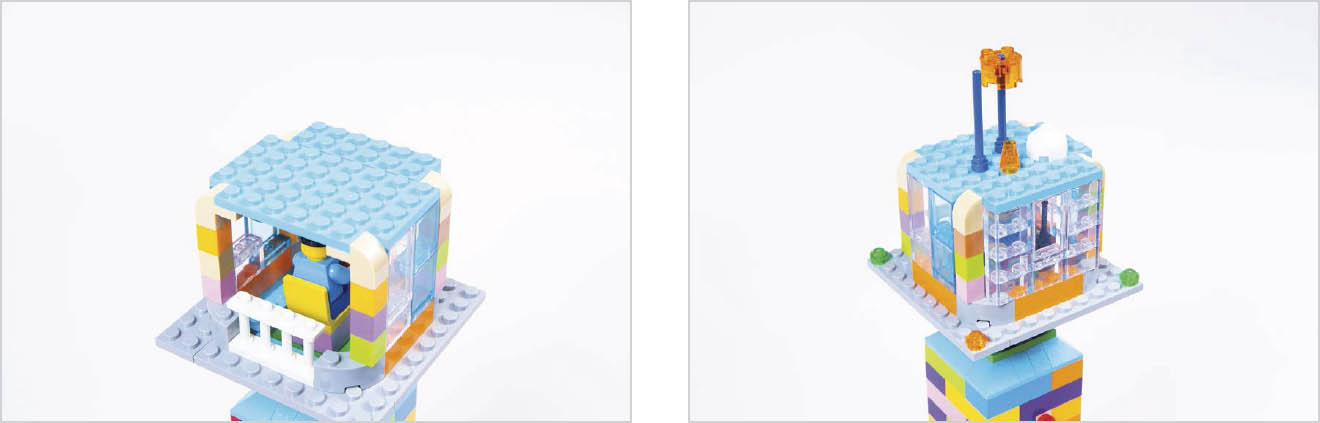
STEP 10
Place some plate bricks on top of the windows as a roof, and also add some antenna and light bricks to the roof as well.

STEP 11
Add any more finishing touches you like, then your air traffic control tower is complete.
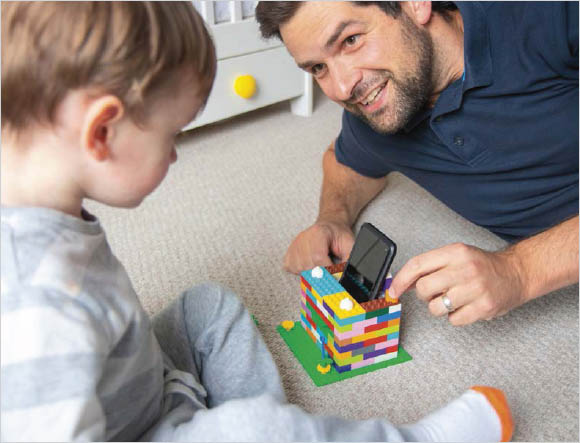
Phone Speaker
Specialty pieces needed:
- Smartphone
- Other decorative embelishments
Placing your phone in a glass can boost the bass and volume of the music playing from it. As phones have got bigger, finding a glass big enough to act as a speaker has become a struggle. We’ve found building a phone speaker from LEGO works just as well and you can make it big enough to fit all kinds of phones.
My family uses a LEGO phone speaker in all kinds of ways, whether it’s in the garden for entertainment or the bedroom for playing lullabies when trying to get the little one to sleep.

STEP 1
Find a small baseplate and ensure your phone is at least two-thirds of the width of the baseplate.
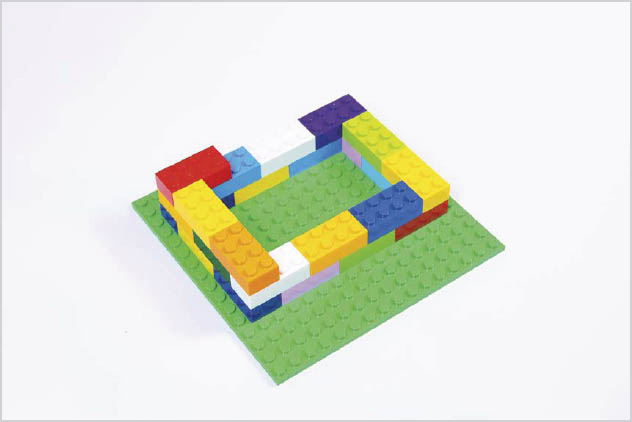
STEP 2
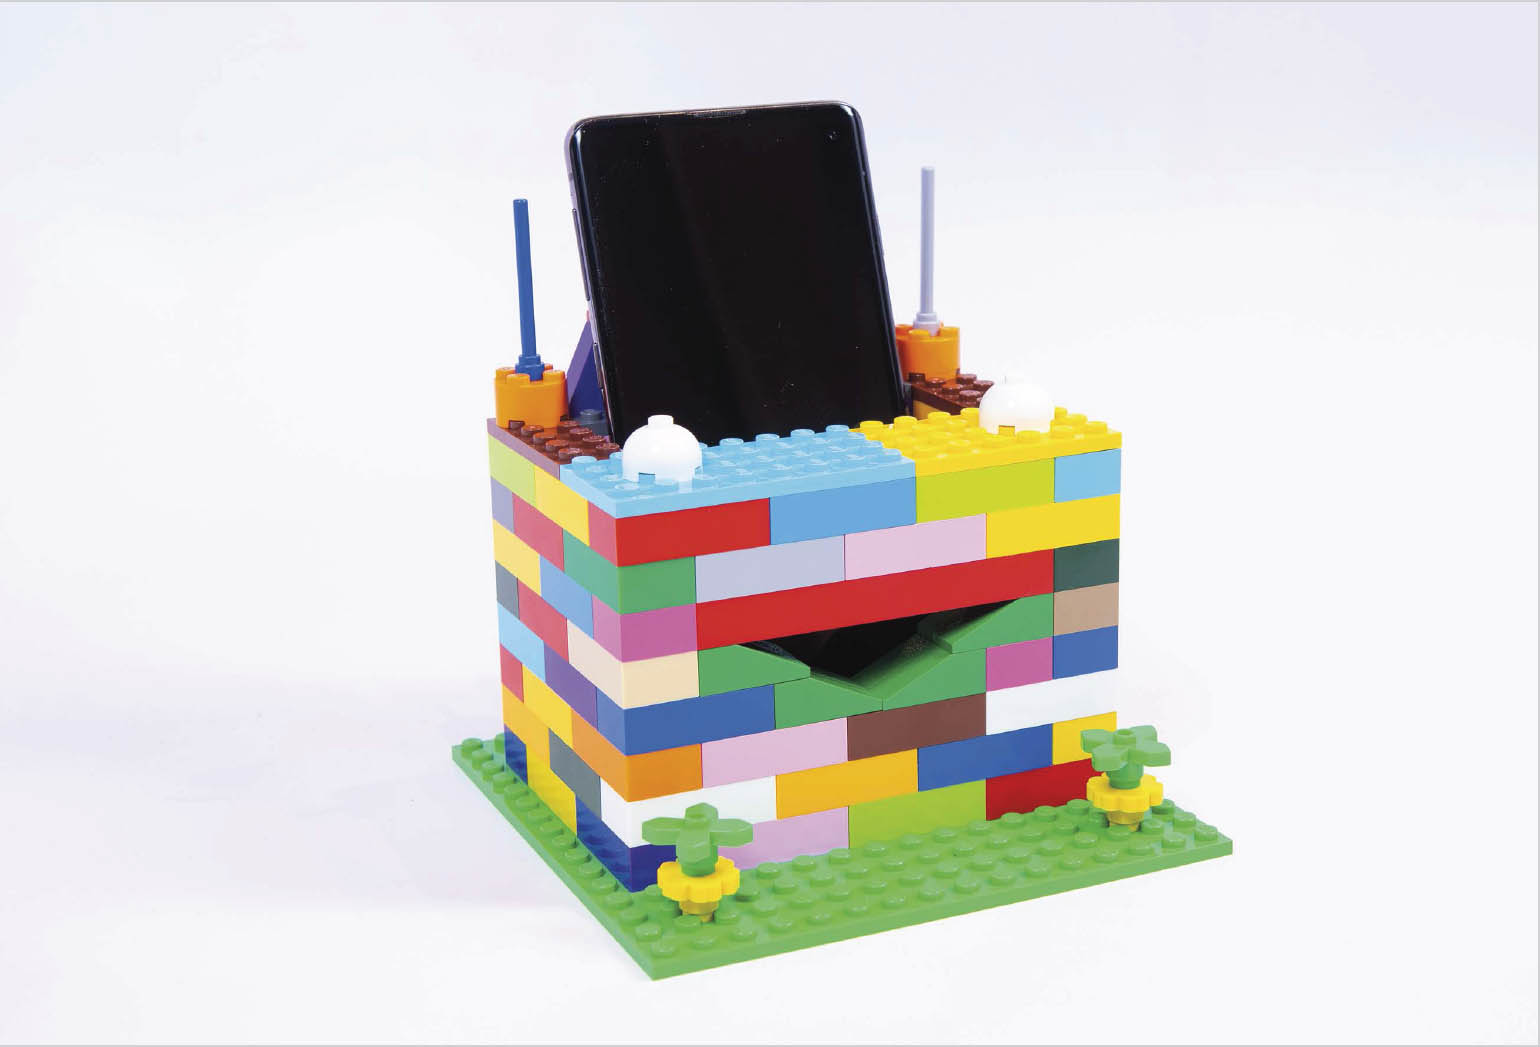
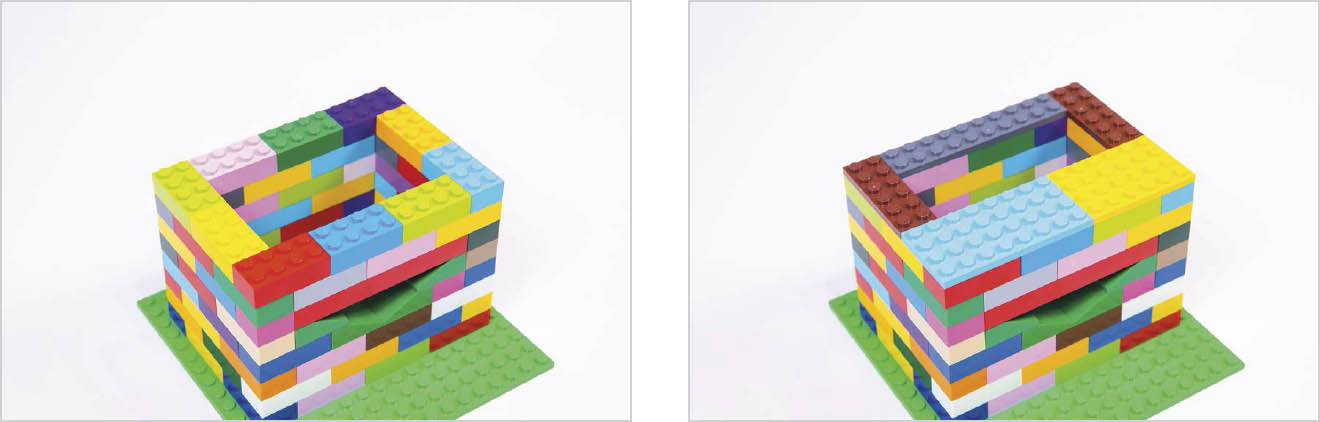
Start building the speaker using basic bricks. Your phone is going to stand within the speaker, so ensure it’s slightly wider than the phone you’ll be using to play music.
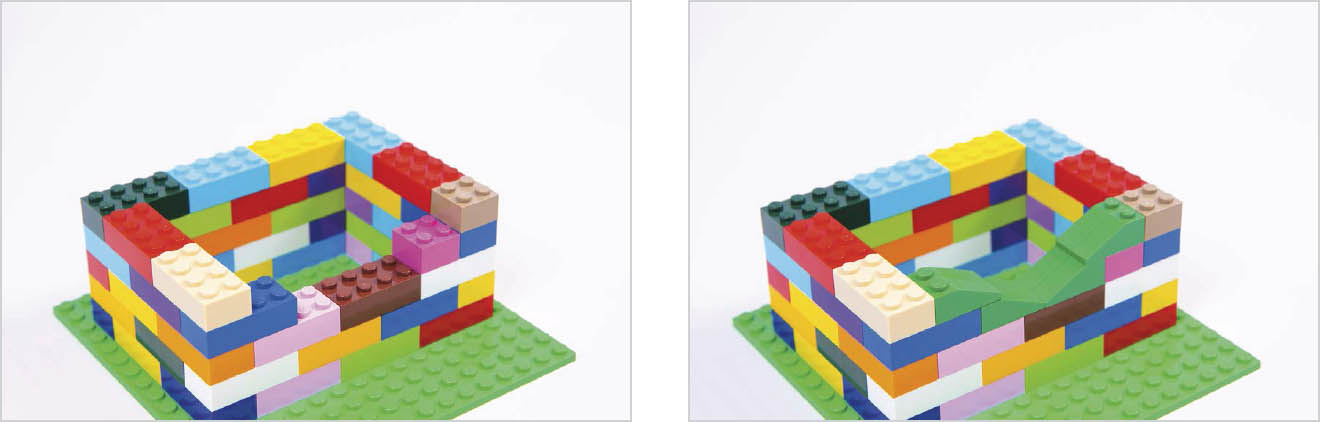
STEP 3
We need to construct an area at the front of the speaker for sound to travel through. To do this, use roof tile bricks pointing towards each other in the middle of the speaker, as shown.
STEP 4
Use a long brick above the roof tile bricks, and then continue to build up the height of the speaker.
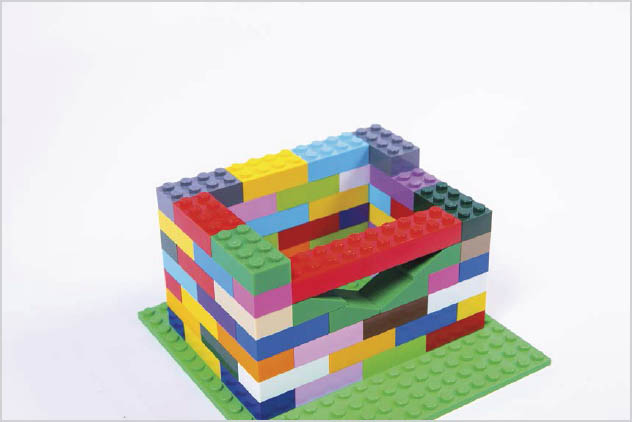
STEP 5
Ensure the speaker is tall enough so approximately one-third of your phone pokes out of the top, then add some plate bricks to the front of the speaker so the phone can slot in neatly.

STEP 6
Add some decorative bricks to your phone speaker, then slot your phone in and play some of your favorite music!