

The word photography means drawing (or writing) with light. It’s a good description because every time you take a photograph you are really allowing light from the subject to draw its own picture on the sensor or film. But just how does this ‘automatic drawing’ take place? Have you ever been lying in bed in the morning watching patterns formed on walls or ceiling by sunlight coming through gaps in the curtains? Sometimes the shadowy shapes of trees and buildings can be made out, especially if the curtains are dark with only one narrow space between them. If you can use a room with a window small enough, cover the window completely with black paper or opaque kitchen foil. Pierce a small clean hole through the blackout with a ball-point pen. Provided the daylight is bright and sunny you should be able to see the dim outlines of the scene outside projected on a piece of thin paper held about 30 cm (1 ft) from the hole (Figure 7.1). Various shapes should be visible although everything will be upside down.
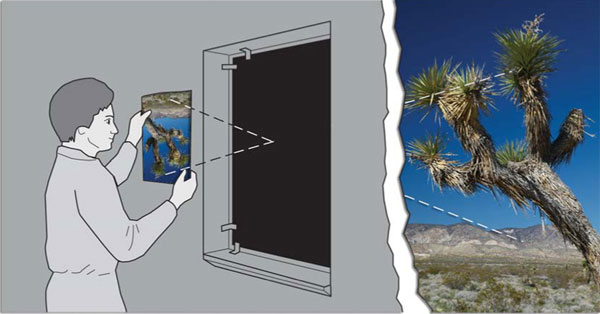
Figure 7.1 A small hole in a window blackout forms a dim image of the sunlit tree on the tracing paper.
This arrangement for making images is called a camera obscura, meaning ‘darkened chamber’. It has been known for centuries, and all sorts of portable camera obscuras about the size of shoe boxes were made which also allowed people to trace over the image, and so help them draw scenes. Figure 7.2 shows a camera obscura you can make yourself out of an old cardboard cylinder and tracing paper. The image is upside down because light always travels in straight lines. Light from the top of the window passing through the small hole reaches the bottom of the image on the paper viewing screen.

Figure 7.2 Home-made camera obscura. (Paint its inside surface matt black for best results.)
Enlarging the hole makes the image brighter but much more blurred. However, you can greatly improve clarity and brightness by using a magnifying glass instead of just an empty hole. A magnifier is a piece of glass polished so that its edges are thinner than its center. This forms a converging lens, which is able to give a brighter and more detailed image of the scene, provided it is the correct distance from the screen. Try fitting a lens of this kind to the hole in your camera obscura. You will find that you now need some way of altering the distance between lens and screen (‘focusing’) until the best position is found to give a clearly defined image. All properly made camera lenses are made up of several lenses together in a single housing. In this way, the faults, or ‘aberrations’, of individual lens elements and be cancelled out to give clearer, ‘sharper’ images.
Light-sensitive films and sensors
We have now almost invented the photographic camera, but need some way of recording the image without actually having to trace it by hand. There are many materials that are sensitive to light. Curtains and carpets and paintwork of all kinds gradually fade under strong illumination. Newspaper yellows if left out in the sun. The trouble with these sorts of materials is that they are much too slow in their reaction – exposure times measured in years would be needed to record a visible picture in the camera. For many years, most cameras used film coated with chemical compounds of silver called silver halides to record the scene. The silver halides are extremely light sensitive and change from a creamy color to black when exposed to light. To construct the film, the silver halides are mixed with gelatine and the resulting light sensitive emulsion is coated onto a plastic backing.
Scientists also discovered that it is not even necessary to wait until the silver halides darken in the camera. You can just let the image light act on it for a fraction of a second, keep the film in the dark and then later place it in a solution of chemicals that develops the silver until the recorded image is strong enough to be visible.
With most films, processing gives us a negative picture on film. Subjects that were white appear as black metallic silver, and dark subjects as clear film. Parts of the subjects that were neither light nor dark are represented as intermediate gray density. The negative is then printed in the darkroom onto paper coated with a similar emulsion containing silver halides. After development, the image on the paper is ‘a negative of the negative’, i.e. the paper appears white where the original subject was light, black where it was dark and (assuming you are using monochrome materials) a suitable gray tone where it was in between. We have a positive print. The advantage of using negative and positive stages is that many prints can be run off one camera exposure. And by putting the negative in an enlarger (which is rather like a slide projector), enlarged prints can be made. So you don’t have to have a big camera to make big photographs.
Figure 7.3 shows, in basic form, the optical and chemical steps in making a black and white photograph. Most pictures of course are shot in color, but the same principles apply. Color films are coated with several emulsion layers, sensitive to blue, green and red. After appropriate processing, color negative film carries images that are reversed in color (blues appear yellow, greens magenta, etc.) as well as in tone. When such a negative is enlarged onto multi-coated color paper the paper responds in a similar way to give a positive print with colors brought back to their original subject hues.

Figure 7.3 Basic stages in making a traditional black and white photograph – from loading and using the camera (top) to processing and printing the film.
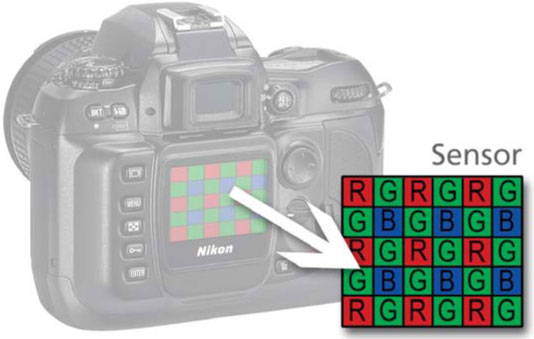
Figure 7.4 Digital cameras have a sensor in the place where film would be in traditional cameras.
The change to digital
More recently, photography has undergone a massive change in the way that we record images. Film cameras, though still readily available, are being outsold by their digital equivalents. With these cameras, the film is replaced as the light-sensitive part of the photographic process with an electronic sensor or, more accurately, a grid of sensors (see Figure 7.4). Instead of the light in a scene being recorded by silver halide grains, it is captured with small electronic sensors. Each of the individual sensors provides a small portion of the full description of the scene that makes up the digital file. After photographing the file is stored on a memory card held within the camera. For more details on how sensors work, see page 44.
Unlike with film, there are no chemical steps involved in using your digital files to make prints. The camera is connected to your computer and all the digital photographs stored on your camera’s memory card are transferred into the memory of the computer. This process is called downloading. Once on the computer, the pictures can be displayed on screen, enhanced and edited using a software program called an image editor, such as Adobe Photoshop or Photoshop Elements. After all the picture changes have been made, the image is then printed using a desktop color printer or taken to a photo-laboratory for printing. Figure 7.5 shows the basic steps involved in producing a simple digital photograph.
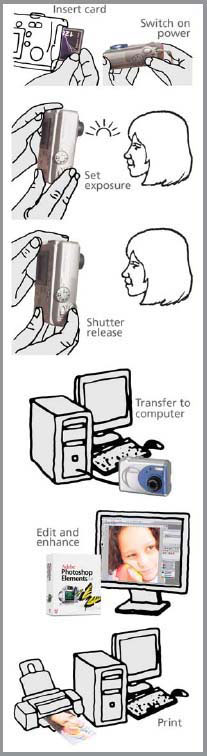
Figure 7.5 The basic steps in taking and making a digital photograph – from exposing (top) through editing on a computer to printing.
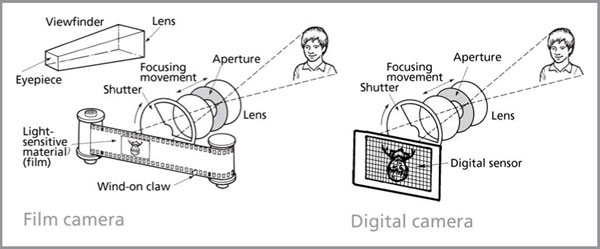
Figure 8.1 The basic elements of a simple 35 mm film camera and its digital equivalent.
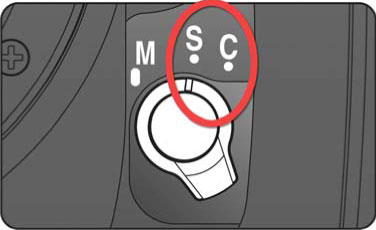
Figure 8.2 Most modern cameras have automatic focusing systems built in, with some SLR models containing features that allow the user to switch between manual and auto-focus modes.
There are so many cameras you can buy that, to begin with, it is quite confusing. Remember though, every camera is basically just a light-tight box with a lens at one end and a light-sensitive surface (e.g. sensor or film) at the other. Film and digital cameras vary a great deal in detail, but they all possess the basic features shown in Figure 8.1 in some form. These are, first and foremost, a lens positioned the correct focusing distance from the film/sensor; a shutter; a lens aperture; a viewfinder; a means of moving to the next picture or advancing the film; and an indicator to show how many pictures you have taken.
The lens is the most important part of the whole camera. It must be protected from finger-marks and scratches, otherwise images resemble what you see when your eyes are watering. The spacing of the lens from the sensor/film has to change for subjects at different distances. Cheapest cameras have the lens ‘focus free’, meaning it is fixed for what the makers regard as the subject distance for average snaps. Some have a ring or lever with a scale of distances (or symbols for ‘groups’, ‘portraits’, etc.). Operating this focusing control moves the lens slightly further from the film the nearer your subject distance setting. Most modern cameras have lenses with an auto-focusing mechanism able to alter focusing to suit the distance of whatever the camera is pointing at in the central area of your picture (see Figure 8.2). In all cases though, anything nearer than the closest subject setting the camera allows will not appear sharp, unless you switch to macro mode, fit an extra close-up lens or extension ring (see page 42).
The shutter prevents light from the lens reaching the sensor/film until you press the release button, so it allows you to decide exactly when the picture will be taken. On simplest beginners’ cameras it may function at one speed only, typically opening for about 1/125 second, although this may not be marked. Shutters on more advanced cameras offer a range of ten or so speed settings, from several whole seconds down to 1/1000 second or less. Having a choice allows you to ‘freeze’ or ‘blur’ moving subjects, and also compensate for dim or bright lighting (see Figure 8.3). On fully automatic cameras, such as most compacts, the shutter speed is selected by the camera mechanism itself, according to the brightness of the scene and light sensitivity of your sensor/film.
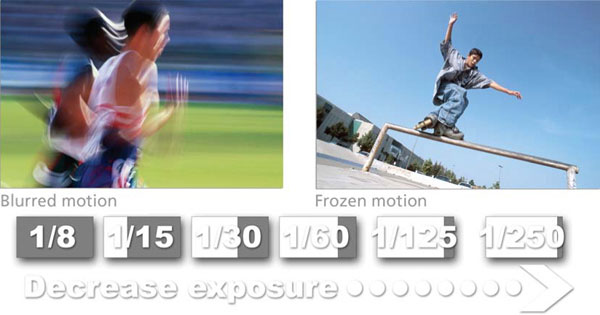
Figure 8.3 The shutter speed controls both the amount of light entering the camera and the way that action or movement is captured. Fast shutter speeds freeze the action, whereas slower settings blur the movement.
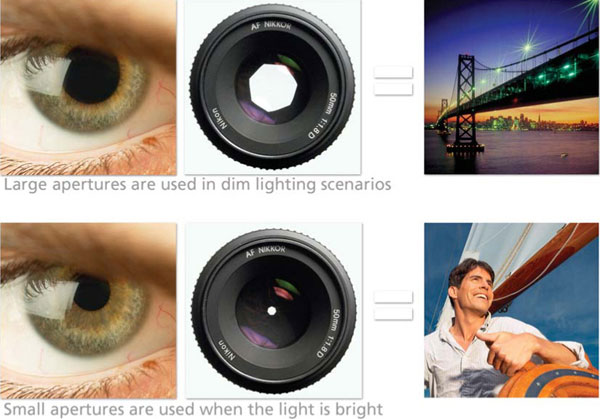
Figure 8.4 The aperture of the camera works like the iris in our eyes. Changing the aperture size (hole size) alters the amount of light entering the camera. Typically, small aperture holes (large f-numbers) are used for bright days and larger ones (small f-numbers) when the light is low.
The aperture (also known as the diaphragm or stop) is a circular hole positioned within or just behind the lens. It is usually adjustable in size like the iris of the eye – changing to a smaller or larger diameter makes the image dimmer or brighter, so again this is a means of compensating for strong or weak lighting conditions (see Figure 8.4). The shutter therefore controls the time the image is allowed to act on the film, and the aperture controls the brightness of the image. Together, they allow you to control the total exposure to light the film receives. The aperture also has a very important effect on whether parts of scenes closer and further away than the subject on which the lens is focused also appear sharp. The smaller the aperture, the greater this foreground to background sharpness or ‘depth of field’ (see Figure 8.5).
Very basic cameras have one fixed aperture, or two to three settings simply marked in weather symbols – ‘clouds’ for dull light conditions and ‘sun’ for bright lights. Most advanced or single lens reflex cameras offer half a dozen aperture settings, which are given ‘f-numbers’. Each change of f-number lets in half or double the light; this is explained further on page 68. Automatic cameras have an aperture setting selected by the camera mechanism in response to the brightness of your subject lighting, and often display no settings at all.
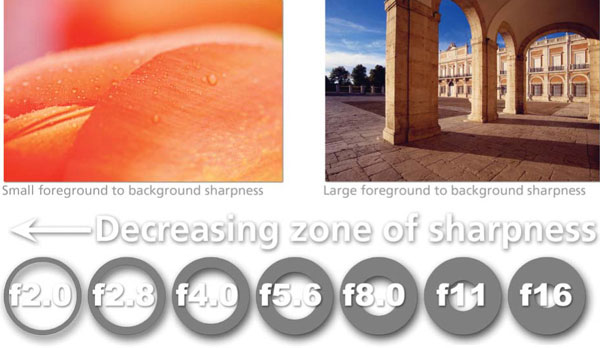
Figure 8.5 The aperture setting also controls the depth of sharpness in the picture. Smaller holes are used to create pictures where sharpness extends further into the image. Large apertures tend to restrict sharpness to just the subject that is focused.
The viewfinder allows you to aim the camera and preview how much of your subject will be included in the picture. Some cameras (non-reflex types) have a direct viewfinder, which you can recognize by its own separate window above the lens (Figure 8.6). SLR (single lens reflex) cameras allow you to look inside the camera itself and view the actual image formed by the lens. This is the same for both digital and film SLR cameras (Figures 8.7a and b). Digital cameras which look like compacts often use a combination of a direct viewfinder and a small flat display screen (LCD monitor) on the back. Since this screen is wired direct from the CCD it shows your picture when you are framing up your subject, offering the same parallax-free accuracy as an SLR film camera. An added advantage is that, after shooting, it displays the picture you have just taken so that you can check your results.
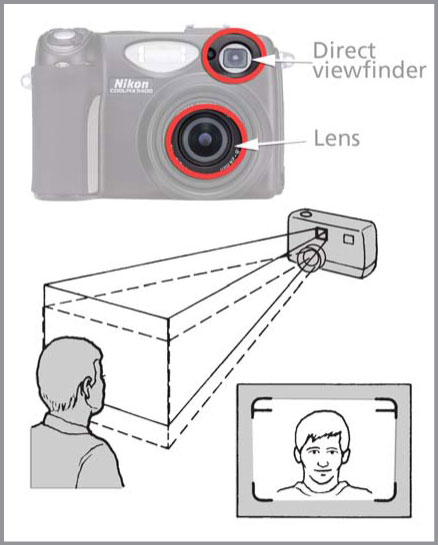
Figure 8.6 Direct viewfinder cameras allow the user to compose the picture via a viewing window that is separate from the lens.
Direct viewfinders are bright and clear, but less accurate than SLR or LCD monitor systems for composing pictures, particularly close-ups. You have to follow correction lines denoting the true top edge of your picture at the camera’s closest focusable distance.
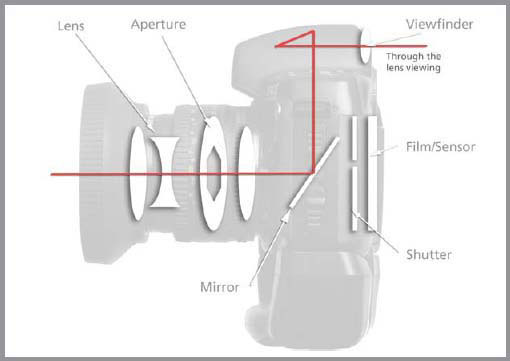
Figure 8.7a When you look through the viewfinder of an SLR or single lens reflex camera you are looking through the actual lens that will be used to take the picture. For this reason focusing and composition are more accurate when using SLR cameras rather than direct viewfinder compacts.

Figure 8.7b Viewing through the lens in an SLR camera is accomplished with the aid of a mirror positioned in front of the shutter and film. When you press the shutter of most SLR cameras, the mirror raises to allow the light to pass through to the film stored at the back of the camera. After the exposure, the mirror returns to its original position to allow viewing again.
Shot advance or film wind-on mechanisms
Cameras that accept 35 mm wide film in cassettes use a roller with teeth to engage in the film’s two rows of perforations. Winding on after you have taken a picture (by hand or motorized) moves the film onto a built-in take-up spool. At the same time a frame number, displayed in a window on the camera body, shows how many shots you have taken and the shutter is made ready for the next picture. As digital cameras have no film to advance, the process involves storing the picture just taken onto the camera’s memory card and preparing the shutter for a new exposure.
Although all the features above are found in every camera, the way they are presented to you to use (or arranged to function automatically) varies from one brand to another. Cameras fall into two main ‘families’:
• Compact cameras, which often have a direct viewfinder, limited focusing, shutter and aperture control, and tend to be all-in-one models with no add-on extras.
• Single lens reflex cameras, which are slightly larger and heavier, and allow you to see through the taking lens. These are often the nucleus of a kit comprising a whole range of interchangeable lenses and other attachments.
Both are made in manual and automated forms. Their parts and features can be summarized as follows (see Figure 8.8):
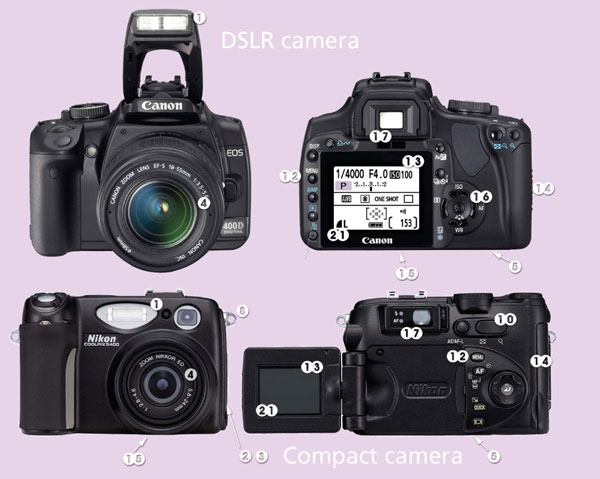
1. Built-in flash – designed for night-time and inside photography to add extra light to a scene when needed.
2. Video out connection – to connect your camera to a television so that your pictures can be viewed on screen.
3. USB connector – used to connect your camera to a computer for downloading of pictures.
4. Lens – to focus the image in front of the camera onto the sensor. On some cameras, the lenses are interchangeable. Almost all models, both digital and film based, are now supplied with a zoom lens.
5. Battery compartment – to hold the batteries used by your camera to power its different functions.
6. Mode or command dial – switches the camera between different shooting modes, such as night-time, portrait and landscape.
7. Shutter release button – captures the photograph when pressed.
8. Eyelet for camera strap – used to secure a carrying strap to your camera.
9. Power switch – to turn the camera on and off.
10. Zoom buttons or controls – adjust the lens of the camera to bring distant scenes closer (to zoom in) or capture a wider view (to zoom out).
11. Flash mode button – turns flash on and off, and switches between flash functions such as red eye reduction and flash with long exposure.
12. Menu button – used to display the camera’s settings in menu form on the monitor or LCD screen.
13. Monitor/preview screen – a screen used to play the pictures stored in your camera or preview the scene you are about to photograph.
14. Memory card chamber – insert the memory card here that will be used to store your photographs.
15. Tripod socket – screw a tripod to this socket when taking pictures with a long shutter speed.
16. Multi selector button – used to change camera or picture options or settings.
17. Viewfinder – used to compose the scene before capturing the photograph.
18. Film chamber – used to house the film whilst it is being exposed.
19. Film release/rewind button – press here before rewinding the film into the canister.
20. Flash hot shoe – a connector used to hold and control an additional external flash.
21. LCD information panel – displays your camera’s current settings and functions.

Figure 8.8 Modern film and digital cameras are full of functions that will help you capture the best image possible in a range of different shooting scenarios. Getting to know your camera’s various parts and features will help you make the most of these shooting functions and the creative opportunities they afford. See text for explanation of numbered items.
New, or young, photographers often start with a low-cost, entry-level digital compact camera (see Figure 8.9). Also included in this category is the simplest reloadable film compact cameras as well as disposable or, more accurately termed, single use cameras. Cameras in this category generally have a viewfinder window (with eyepiece at the back of the camera) that gives you a direct view of the subject. You see your subject clear and bright, and apparently with everything always in focus. Most settings are ‘fixed’, so all you have to do after inserting a memory card or loading the film is to point the camera and press the shutter. This sounds ideal, but with many models the lens has a fixed setting to focus subjects from infinity (the far horizon) through to about 2.5 m (8 ft) away. You cannot get sharp images any closer, nor can you take shots with foreground detail sharp and background unsharp.
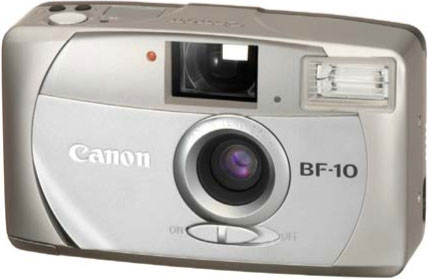
Figure 8.9 Low-cost, entry-level cameras are a good place for kids and new photographers to start. Though there is little control over the shutter speed, aperture and focus, good images can still be taken in well-lit situations.
The fixed (or limited range) shutter speed of about 1/125 second avoids camera shake effects when you shoot hand-held, but is too slow to freeze fast subject movement. The fixed (or very limited range) aperture means that you cannot adjust for correct exposure for all lighting conditions, nor choose between deep or limited depth of field to suit your picture. The viewfinder, being an inch or so from the taking lens, ‘sees’ your subject from a slightly different position. This difference of viewpoint or parallax error becomes greater the nearer your subject. Remember to use the correction lines or, better still, digital photographers can use the preview on the LCD monitor at the back of the camera as a more accurate guide for composition.
Nevertheless, with care reasonable photographs can be taken with a simple compact provided you understand and work within its limitations. (Otherwise, you may start with a simple camera, expect too much of it and end up disheartened.) Film users should load fast (ISO 400) film for correct exposure in cloudy conditions and slow (ISO 100) film for bright sunshine, and use flash indoors.
As a general rule simple compact digital cameras have many of the same limitations of their film equivalents, including limited focus and exposure control. In addition, some models do not contain a preview monitor on the back of the camera and do not have the ability to increase the amount of memory available for picture storage via removable memory cards. The cheapest cameras have a relatively small number of sensor sites and therefore produce pictures that are only suitable for viewing on screen or producing small prints. For example, a sensor grid having 640 × 480 pixels gives a just acceptable image viewed on a small computer monitor, but to get 6 in × 4 in photo-quality color pictures out of your computer printer the camera must have several million pixels. Since, unlike film, you can’t change the camera’s sensor, pixel (number of sensors) count has to be considered when you buy the camera and is very much linked to price.
Top-of-the-range compact cameras are more expensive than the entry-level models. They are fitted with lenses giving higher resolution images (noticeable when you make bigger enlargements) and wider apertures (to cope with dimmer light). Advanced compacts are still designed to handle most things automatically, but more and more models are being released with manual override for features such as aperture and shutter speed. This is especially true in the area of digital cameras, where good quality compact cameras hold most of the market. Whether used manually or in automatic mode, these units give technically good results over a wide range of lighting conditions and subject distances.
Such control is gained through sophisticated electronic automation. For example, a camera as shown in Figure 8.10 will be able to automatically match the level of light in the scene with the aperture/shutter speed settings and chip sensitivity to create a good exposure in a wide range of situations. A sensor near the lens measures the brightness of your subject. The camera then uses this information to set an appropriate aperture and shutter speed – ranging from smallest aperture and fastest speed in brilliant lighting, to widest aperture and slowest holdable speed in dim light.
Other sensors judge the distance to your main subject and as you press the release button, the lens adjusts its focusing position to suit this distance. If the subject is too close, the camera signals a warning in the viewfinder; if lighting is too dim, another signal warns you and may automatically switch on the camera’s built-in flash or even activate the flash automatically. When the flash is in use it will sense how much light to give out, according to subject distance, and whether other lighting is present. For the film-based models, a motor winds on the film one frame after each shot and once you have taken the last picture on the film it winds it all back into the cassette ready to unload.
Figure 8.10 Fully automatic advanced compacts with zoom lenses and built-in flashes are the most popular of all film and digital cameras. More and more models are now offering manual and semi-manual modes to cater for those photographers who want to regain a little more control of the process.
Despite this level of sophistication internally, often the only external control offered to the photographer, apart from the shutter release, is a focal length changing ‘zoom’ button, which makes the image bigger or smaller. In this way you get more (or less) of a scene to fill your picture without having to move further back (or closer) – see page 80. The camera’s viewfinder automatically zooms too, adjusting to match these focal length changes. It may also tilt slightly according to the distance of your auto-focused subject, to help to compensate for parallax error and so more accurately show what you are getting in.
Between completely ‘fixed’ and completely automatic models you will find a whole range of compact cameras at a range of prices and with a variety of features. Towards the upper end of the compact camera market many of the models possess the ability to override the automatic features either partially or completely. Bear in mind that having a camera with settable controls is often an advantage, as you will see in Part 3 of this book.
Single lens reflex (SLR) cameras
All SLR cameras have a clever optical system (as shown in Figure 8.7b), which allows you to view an image of the subject formed by the lens. It is a true ‘what you see is what you get’ (WYSIWYG) system. Unlike a compact camera, the shutter is not in the lens but in the back of the camera just in front of the film or sensor.
Looking into an eyepiece at the back of an SLR you observe a small, ground-glass focusing screen, onto which the scene is reflected by a mirror. So you see what the lens sees, and as you focus the lens it is easy to examine which parts of the subject are in focus and sharp and which areas are blurry. When you are satisfied that the picture is correctly composed, you press the shutter release button. The mirror then rises out of the way, blocking out the focusing screen briefly and allowing the image to reach the back of the camera, where the shutter opens to expose the sensor or film. As the distance from lens to film is the same as lens to screen (via the mirror), what was focused in the viewfinder will also be sharp on the film/sensor. In addition, because we view through the lens there is no viewfinder parallax error no matter how close the subject.
Since the shutter is at the back of the camera body, you can remove the lens and fit others of different focal length, even in the middle of a film roll or when the camera card is half empty. In fact, single lens reflexes are ‘system cameras’, meaning that the makers offer a wide variety of lenses and accessories, ranging from close-up rings (page 42) to special dedicated flashguns. So, starting off with a camera body and regular lens, you can gradually build up quite an elaborate camera outfit bit by bit as you become more experienced.
Cameras of SLR design include manual types, where you set most of the controls, automatic models that work with built-in programs and those that combine both systems. Both manual and automatic approaches have their advantages and limitations, so let’s take a closer look at each design.
Figure 8.11 Fully manual SLR cameras provide the photographer complete control over all aspects of focus and exposure.
Manual SLRs
A typical manual-only camera, like the one shown in Figure 8.11, is very rare these days as most SLR cameras have some form of automatic control built in. A manual SLR has setting dials for shutter, aperture and focus, and also a film wind-on lever and a rewind knob. Having loaded and set the speed of your film, you look through the eyepiece and turn the lens focusing ring until the most important part of your picture appears sharp. Typically, you then set a shutter speed such as 1/125 second if you are hand-holding the camera (see page 64). Look through the eyepiece, half depress the shutter release and turn the aperture control until a signal light or needle next to the focusing screen indicates that the exposure set is correct. Alternatively, you can first make an aperture setting because depth of field is important (see page 66) and then alter the shutter setting until correct exposure is signalled. Pressing fully on the release then takes your picture, and you must use the wind-on to advance the film by one frame ready for the next shot.
As you can see from this sequence of steps, a manual SLR camera requires you to know something about choice of technical settings, but it will tackle a wider range of lighting conditions and subject distances than all but the most advanced compacts. Since it only uses electronics for its exposure meter, the camera will still take photographs with its (tiny internal) batteries flat.
Fully manual cameras are film only. Though most digital SLR cameras have a manual mode that allows you to set your camera as above, there are no manual-only digital SLR cameras on the market. All models contain at least some automatic modes along with their manual options.
Advanced SLRs
A technologically advanced SLR (Figure 8.12) has features such as auto-focusing, film speed sensing, built-in flash, the ability to take
a sequence of pictures with rates of five pictures per second and more, and what is known as ‘multi-mode’ functioning.
Multi-mode means that by selecting one mode you can have the camera function as if it were manual, or by selecting another have it totally auto-programmed (just point and shoot). Yet another mode will allow you to choose and set shutter speed, but makes every other setting automatically, whilst a fourth mode allows you to make the aperture your priority choice instead.
An SLR camera like this may also offer you five or six modes covering different ways of exposure reading and making settings, plus an almost overwhelming range of other options. You can even program the camera to take a rapid ‘burst’ of three pictures when you press the button, each one giving a slightly different exposure. Virtually all the camera actions are battery powered – from its internal focus sensor, motor drive for film advancement, to the electronically timed shutter providing a much wider setting range (typically 1/8000–30 seconds) than a manual camera. The digital version of these cameras also includes the ability to change the sensitivity of the sensor frame by frame, adjust the camera to suit shooting under different colored lighting conditions and even alter the contrast or color saturation of specific photographs.

Figure 8.12 Advanced multi-mode (auto, semi-auto and manual) SLR cameras contain many features and controls. These cameras are available for both film-based and digital photography.
Typically, all the information concerning the chosen mode, shutter and aperture settings made and number of pictures left appears on a display panel on top of the camera body or on the LCD monitor on the back of the camera. Some of this data is also shown alongside the focusing screen when you look through the eyepiece. Digital cameras often record this information along with details about the picture itself in the digital file. These settings can be displayed by calling up the information (sometimes called metadata) in an image editing program such as Photoshop.
Some cameras contain a range of shooting modes designed to take the guesswork out of adjusting camera settings to suit different shooting scenarios. Selecting these modes will automatically change your camera’s functions to the most appropriate setting for the photographic task at hand. The guide below will give you an idea of when best to use which mode.
N.B. Not all modes will be available on all cameras and some modes are digital-only options. Check you manuals for details of what specialist modes your camera contains.

Figure 8.13 Portrait mode.
Portrait. Designed for portraits producing a picture where the main subject is sharply focused whilst other details in the background are softened or left unsharp. The degree to which the background is unsharp will depend on the amount of light that is available (see Figure 8.13).

Figure 8.14 Party/Indoor mode.
Party/Indoor. This mode is designed for use in low light situations, where detail is required both in the foreground and background. This setting uses a slow shutter speed, so be sure to hold your camera very still or use a tripod (see Figure 8.14).

Figure 8.15 Night Portrait mode.
Night Portrait. You should use this mode if you want to create a good balance of lighting between the foreground subject and the background lights. It is great for photographing portraits against a background of night scenery. With this setting the flash is activated to light the foreground and a long shutter speed is used to capture the night lights. When using this mode be careful of camera shake (see Figure 8.15).

Figure 8.16 Beach/Snow mode.
Beach /Snow. Brightly lit, lightly colored subjects often fool your camera, resulting in dark muddy images. This mode rectifies this problem by adjusting the camera so that light tones in beach and snow scenes are recorded correctly (see Figure 8.16).

Figure 8.17 Landscape mode.
Landscape. Designed to enhance the color and detail of distant scenes, this mode is great for making landscape pictures. With this setting the flash is turned off automatically and the camera’s focusing system is locked at the most distant setting (see Figure 8.17).

Figure 8.18 Sunset mode.
Sunset. Designed to preserve the strong colors often found in sunsets, this mode automatically turns off the flash for the camera. This means that foreground objects appear silhouetted against the sunset sky. Use a tripod or hold your camera very still to stop camera shake when using this mode (see Figure 8.18).

Figure 8.19 Night Landscape mode.
Night Landscape. As a slow shutter speed is in this mode to capture the dimly lit tones of a night landscape, a tripod is recommended when shooting with this setting. In addition, the flash is automatically turned off and the focus set to the most distant setting (see Figure 8.19).

Figure 8.20 Museum mode.
Museum. For use indoors when flash is not permitted, this setting is perfect for capturing pictures in museums or art galleries. The flash is turned off automatically and, where available, a function like the Best Shot Selector (BSS) is activated to ensure that only the finest quality photograph is saved (see Figure 8.20).

Figure 8.21 Fireworks Show mode.
Fireworks Show. This mode fixes the focus at the most distant setting, turns off the flash and uses a slow shutter speed to capture the expanding burst of light from a firework. For best effect follow the trail of the ascending firework, releasing the button at the start of the burst (see Figure 8.21).

Figure 8.22 Close Up mode.
Close Up. The camera is set to focus on subjects very near to the lens (10 cm or less). This setting is also called ‘macro’ mode. Be sure to hold the camera steady or use a tripod to reduce camera shake when capturing these close-up photographs (see Figure 8.22).

Figure 8.23 Copy mode.
Copy. This setting is designed to provide clear photographs of maps, documents or business cards. The mode works best with black and white type or printed documents with high contrast (see Figure 8.23).

Figure 8.24 Back Light mode.
Back Light. Use this mode when light is coming from behind your subject. The camera’s flash is turned on automatically and fills in the shadows in the foreground of the picture (see Figure 8.24).
Off. Turns off all preselected camera mode settings, allowing the photographer to choose how the camera is set up.

Figure 8.25 Shooting modes are selected using the mode dial on the top of the camera or via the settings menu.
A great range of accessories is available for cameras – although almost all are designed for SLR types. Figure 8.26 shows the most useful items.
• Extra lenses. Provided your camera body accepts interchangeable or supplementary lenses, you can fit a wide angle or telephoto type in place of its standard focal length or zoom lens (the advantages of doing this are explained on page 84).
• Extension tubes. Fitted between the lens and body, these allow you to work very close up to your subject (see page 131). Digital cameras often contain a specialist macro shooting mode that changes the way that the camera lens works, so that you can get in closer to your subject. Some models can focus down to 1 cm (0.4 in).
• Tripod with tilting top. A firm support when you want to use exposure times that don’t allow the camera to be steadily held by hand (longer than 1/60 second, for instance). Most compact cameras as well as SLRs have a threaded baseplate to accept a tripod.
• Shutter release extension. As long as your camera’s shutter button is either threaded for a cable release or has connections for a cable switch, this accessory minimizes risk of camera shake when you give a long exposure. For some cameras not accepting either form of release it may be possible to fit an adapter or you can use the self-timer option to allow the camera to settle before the shutter is released.
• Flashgun. Even if your camera has a built-in flash, a separate, more powerful, unit that can be attached and used instead will allow far more interesting lighting opportunities (see page 156).
• Lens hood. A much underrated accessory, the lens hood not only shades the lens from flare created by strong back or side light on your subject, but it also helps protect it from knocks. For sharp, well-saturated pictures, always use a lens hood wherever possible.
• Filters. Push-on or screw-on color filters can be helpful in black and white photography (see page 240), and color correcting filters help neutralize color photographs taken under unusual lighting. There is also a whole range of filters designed for creating special effects.
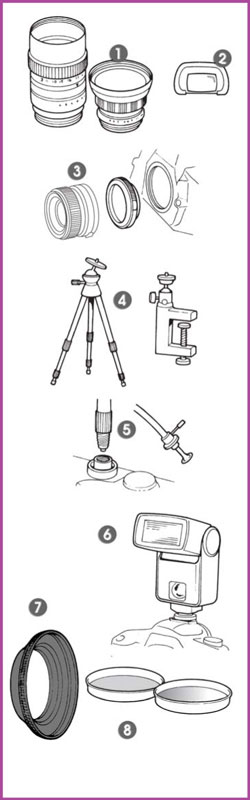
Figure 8.26 Useful camera accessories. (1) Extra lenses. (2) SLR eyepiece corrector. (3) Extension tube (close-up ring) between SLR body and lens. (4) Tripod and camera clamp. (5) Cable release or remote release. (6) Flashgun, fits on the hot shoe connector. (7) Lens hood. (8) Lens filters.
There is no ideal camera, which is why so many variations exist even within the types discussed here. Even if money is no object and you buy the most expensive multi-mode SLR, just having so many options available can be confusing, overwhelming your picture making. And yet keeping it set to ‘auto-program’ is wasteful if you then never use its other possibilities.
A modern, automatic-only compact camera is easy to carry and quick to bring into use. It is a truly pocketable camera, lightweight and small. You don’t have to carry accessories either, which encourages you to take the camera everywhere. Without the delays caused by you having to adjust your camera’s settings, you can concentrate on composition, viewpoint and people’s expressions when taking pictures, knowing that technicalities like focus and exposure are taken care of.
If you want a bit more image control, without having to understand any technicalities, a compact with zoom lens gives you helpful image size adjustment. The wider the zoom range though, the more a camera increases in size and price. If you buy a low-cost compact camera, remember that poorly lit or fast-moving subjects will be generally beyond its capabilities, as well as accurate and sharp close-ups. Digital compacts with LCD preview or monitor screens and SLR cameras are unrivalled for framing accuracy and close working, but they are more expensive and, in the case of SLR equipment, definitely generally heavier and more bulky.

Figure 8.27
Automatic modes or automatic-only cameras work using programs that ensure a high level of technical success (e.g. sharp focus, correct exposure) under most conditions. The trouble is that, when using these modes, you are unable to make individual settings – such as distance, shutter speed and aperture – which means that you deprive yourself of many of the creative visual possibilities, as shown here in the next parts of this book. For someone who wants to understand photography and is prepared to learn to set the controls, it is still difficult to beat an advanced compact with a manual mode or a manual SLR. Such cameras generally accept a great range of accessories. For SLRs in particular, this includes the same high-quality lenses used on the makers’ most expensive models. Again, if you buy an SLR with a choice of modes, make sure one of these is ‘manual’. Then, having really learnt the controls, you are in an informed position to know whether changing to a semi-automatic or fully programmed mode offers a short cut for particular subject conditions, but will still give the result you want.

Figure 9.1 Digital photographs are constructed from a grid of colored rectangles called pixels (picture elements).
For most new digital camera owners it comes as a bit of surprise when they find out that their beautifully colored and delicately textured photographic prints are in fact constructed of a grid of rectangular colored boxes. These boxes are the basic building ingredient of any digital photography and were originally called ‘picture elements’.
These days, most readers will know them by their common title – pixels – but their original description as elements from which a picture is made still holds true. Traditional film-based photography has a similar image component called grain, and for this reason some writers have also started to call pixels ‘digital grain’. Whatever the terminology you use, you cannot escape the importance of pixels when creating great pictures.
Each pixel represents both color and tone. Together, many pixels create the shapes and details in your images in much the same way that the great mosaics of Roman times depicted scenes using small pieces of tile. But unlike the mosaics, the grid-like structure of the digital image is not noticeable when the picture is seen from a distance, or the pixels are printed very small. Our eyes mix the colors and tones so that what we see is a photographic image containing smooth graduations and sharp details, and not a collection of discrete blocks arranged in rows and columns (see Figure 9.1).
Creating pixels
Creating images in this form is essential if they are to be edited or enhanced by computers. There is no doubt that computers are amazing machines. Their strength is in being able to perform millions of mathematical calculations per second. To apply this ability to working with images, we must start with a description of pictures that the computer can understand. This means that the images must be in a digital form. This is quite different from the way our eyes, or any film-based camera, see the world.
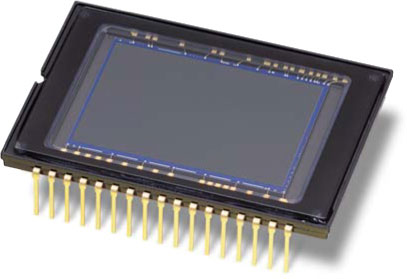
Figure 9.2 Sensors replace film in digital cameras. When the shutter button is pressed, the image (individual RGB colors and tone) is captured by each cell of the sensor and a digital photograph results.
With these devices we record pictures as a series of ‘continuous tones’ that blend seamlessly with each other. To make a version of the image the computer can use, the tones need to be converted to a digital form. The process involves sampling the image at regular intervals and assigning a specific color and brightness to each sample. Each of these areas, or samples, becomes a pixel in the resultant digital file, and in this way the pixel grid is constructed.
The grid can be made by taking pictures with a digital camera or by using a scanner to convert existing prints or negatives into pixel-based form. Most digital cameras have a grid of sensors, called photosites, in the place where traditional cameras would have film. Each sensor measures the brightness and, more indirectly via a series of filters, the color of the light that hits it. When the values from all sensors are collected and collated, a digital picture made up of a grid of pixels results (see Figure 9.2).
Scanners work in a similar way, except that these devices use rows of CCD sensors that move slowly over the original, sampling the picture as they go. Generally, different scanners are needed for converting film and print originals; however, some companies are now making products that can be used for both.
What is all this fuss about megapixels?
With the rapid rate of change in the development of digital cameras, photographers and manufacturers alike have been searching for ways to compare the many different models that fill the marketplace. To this end, the number of ‘megapixels’, or millions of pixels, contained in the camera’s sensor is often used as a means of comparison.
The general consensus from most quarters is that the ‘more megapixels the better’, and as a general rule this is probably true. This is certainly the case if your goal is to produce the biggest photographic quality prints possible. In this scenario, more pixels from the sensor translates into bigger print sizes. But this is certainly not the whole story. For instance, some compact cameras with moderate megapixels create files that are clearer and contain less noise than similar models with sensors of a higher pixel count.
Table 9.1

It is worth thinking about what you are going to use your digital files for. If we can identify the ‘end use’ of our image files first, then we can relate this back to camera sensor sizes. For example, if you intend to produce web pages exclusively, there is little reason for you to have a 10 or 12 megapixel camera. You simply will never use this number of pixels for screen-based presentations. Similarly, if you intend to print your pictures from an A4 desktop printer only, then a 6.0 megapixel camera will be sufficient to guarantee you fantastic photo-quality images.
It pays to remember the old adage ‘horses for courses’ when selecting the right sensors for your shooting requirements. Too few pixels and your prints will not be photo-quality at the size you want, too many and you will pay for image detail you don’t need (see Table 9.1).
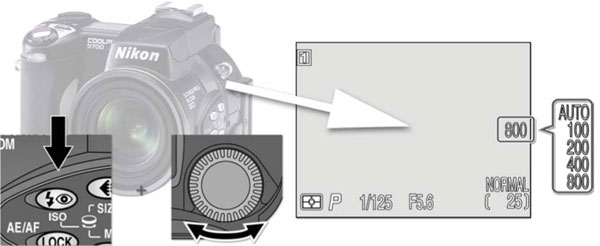
Figure 9.3 With most mid- to high-level digital cameras, it is possible to change the ISO (ISO equivalence) of the chip from frame to frame.
Sensor sensitivity (ISO equivalence)
Like film, digital sensors have an amount of light that is optimum for making well-exposed pictures. Films are rated with an ISO value according to their sensitivity – the higher the value, the greater the film’s sensitivity to light (see Section 10 for more details). With digital cameras the restrictions of being locked into shooting with a single film with all its particular abilities and flaws have been lifted. The ISO idea still remains, though strictly we should refer to it as ‘ISO equivalence’, as the original ISO scale was designed specifically for film not sensors. Most digital cameras have the ability to change the ISO equivalent setting for the sensor, with a growing number offering settings ranging from 100 to 1600. Each frame can be exposed at a different ‘ISO’ value, releasing the digital shooter from being stuck with a single sensitivity through the whole shooting session.
Entry-level digital cameras usually contain chip sensitivity that is fixed by the manufacturer and can’t be altered by the user, but as you start to pay a little more, the level of sophistication and control of the camera’s ISO begins to increase. Most middle-of-the-range and prosumer cameras now contain a variety of sensitivity settings. Changing the ISO is usually a simple matter of holding down the ISO button whilst turning a command dial. The changed setting is reflected in the LCD screen at the back of the camera and, in some cases, in the viewfinder as well (see Figure 9.3).
Some digital cameras also contain an Auto ISO setting that can be selected instead of specific sensitivity values. This feature keeps the camera at the best quality option, usually 100, when the photographer is shooting under normal conditions, but will change the setting to a higher value automatically if the light starts to fade. It’s a good idea to select and use this option as your camera’s default setting. It’s good for most situations and you can always change to manual when specific action or low light scenarios arise.
Sensor size compared to film
The physical dimensions of most digital sensors are smaller than a 35 mm film frame. The exception being two ‘full-frame’ DSLR cameras (EOS 1DS Mark II and EOS 5D) developed by Canon that contain sensors the same size as a 35 mm film frame.
For compact cameras where the lenses are matched with the sensor there is no real need to know the physical size of the chip for everyday shooting, but with DSLR cameras the situation is a little different. If the sensor is smaller than the 35 mm frame then a multiplication effect comes into play with lens lengths. Depending on your camera model this may mean that a 200 mm lens, when coupled to a camera with a small sensor, provides the same view as a 300 mm lens would if used on a full frame or 35 mm film camera.
Many people believe that the lens’ focal length is increased and they use a multiplication factor published by the camera companies to compare the changes. As an example, the Canon EOS-1D and the EOS-1D Mark II both have a multiplication factor of 1.3. So when these cameras are coupled to the Canon EF 100-300 F/4.0-5.6 lens most people believe that it would become a 130–390 mm lens. Technically, that is not correct.
In fact, there is no change of focal length as you switch the lens from a film (or full frame sensor) camera to one with a smaller sensor. The actual change is that the picture angle of the lens is narrowed on the digital format because the sensor is smaller than a 35 mm frame. Focal length and reproduction ratio remain constant for the comparable viewed portions of the image. It is only the picture angle that changes. When shooting digitally with small sensor DSLRs, it is like we are just cutting the middle section out of a picture taken with a film, or full frame sensor, camera (see Figure 9.4). For more details on using lenses with DSLR cameras containing sensors smaller than a 35 mm film frame go to Section 15.
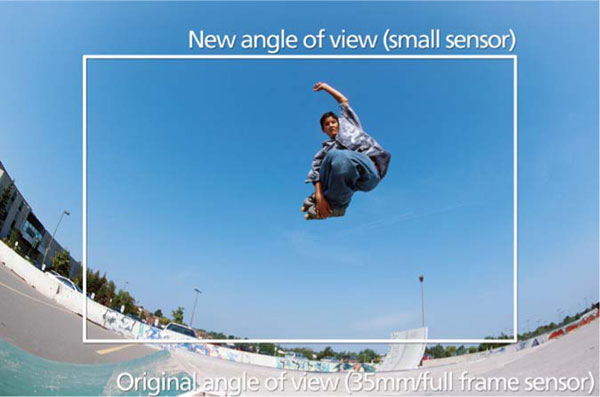
Figure 9.4 Because most sensors housed in DSLR bodies are smaller than the original 35 mm film format, the angle of view will be reduced. Depending on the size of the sensor and therefore the ‘multiplication effect’ this may mean a change in the angle of view by as much as 1.6, making a 100 mm lens on a small sensor camera record a similar angle as a 160 mm lens on a full frame camera.
Capture formats
Alongside sensor design and function the file format that you choose for saving your captured photos in-camera has a direct impact on the quality of the images. For a few years at the beginning of the digital revolution all photos were saved to the memory card in the camera in the JPEG format. Designed specifically for digital photography the JPEG format does a great job of squeezing large image files into small documents so that they don’t take up too much space on the memory card or your computer’s hard drive. The small file sizes also mean that they are suitable for use on web pages or for e-mailing to friends or relatives all over the world.
The downside of the format (you knew there had to be one!) is that to save space some of the original image detail captured by your camera’s sensor is discarded. Now for most photographs that have been captured with good exposure and printed to small sizes, such as 5 × 7 inches or postcard, it is pretty hard to tell the difference between a compressed JPEG version of the photo and a version where all the original capture detail is still present.
This said, most photographers who are concerned about producing the best quality photos choose to save their images in formats which maintain all the detail in the original capture. For this task there are two main formats to choose from, TIFF or RAW. Neither format loses any picture detail during the save-to-card process but they do handle the information in very different ways.

Figure 9.5 Selecting the file format to use to save your captured pictures onto the camera’s memory card affects not only the space that these photos consume but also the final quality of the picture.
Capture formats explained:
JPEG (Joint Photographic Experts Group) – This format is the industry standard for compressing photos destined for the World Wide Web (www) or for storage when space is limited. JPEG compression uses a ‘lossy compression’ (image data and quality are sacrificed for smaller file sizes when the image files are closed). The user is able to control the amount of compression. A high level of compression leads to a lower quality image and a smaller file size. A low level of compression results in a higher quality image but a larger file size. It is recommended that you only save to the JPEG file format for web work and only after you have completed all your image editing.
TIFF (Tagged Image File Format) – This file type is the industry standard for images destined for publishing (magazines and books). TIFF uses a ‘lossless’ compression (no loss of image data or quality) called ‘LZW compression’. Although preserving the quality of the image, LZW compression is only capable of compressing images a small amount.
RAW – RAW file formats differ from one camera manufacturer to another but they all contain the full description of what the camera ‘saw’ in the image file. Unlike other capture formats, choosing RAW stops the camera from processing the color information from the sensor and reducing the image’s bit depth, and saves all the picture detail in an unprocessed form. To edit or enhance a RAW file you will need to either convert it to a regular file format using a conversion utility or open the file in a RAW enabled editing program such as Adobe’s Lightroom or Apple’s Aperture.
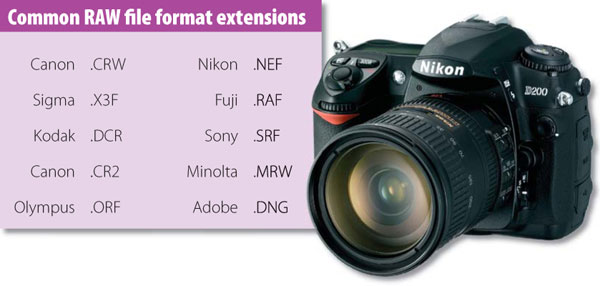
Figure 9.6 Different camera manufacturers use different RAW file formats to save the image detail from sensor. Each format has a different file extension indicating file type and manufacturer.
A TIFF file is ready to use straight from the camera and can be easily printed, edited and enhanced with most image editing software packages. A RAW file, on the other hand, requires further processing before it can be manipulated inside programs such as Photoshop and Photoshop Elements. This is not necessarily a problem as both packages contain a RAW conversion utility (Adobe Camera RAW) that is designed for the job, but it does mean that the photographer needs to undertake an extra processing step in the workflow from capture to print. The reward for this extra work is that the photographer gets to determine how the RAW file is processed and for many image makers this extra level of control is worth the effort.
In the last couple of years both Adobe and Apple have developed image enhancement programs designed to work with RAW files without the need to convert them first. Add to this the fact that initially the option to save in RAW was only available on the most expensive DSLR cameras, but now this feature is also appearing on a variety of advanced compact cameras, more and more photographers are using the format as their primary way to save their captured files. Go to Section 31 for details on the RAW conversion process.
Table 9.2 Advantages and disadvantages of different capture file formats
FILE TYPE |
ADVANTAGES |
DISADVANTAGES |
RAW |
• Provides potentially the best image quality • Allows the photographer to handle the conversion process • Uses lossless compression |
• Bigger file sizes than JPEG • Slow to read/write files from/to memory card • Requires and additional processing step • Requires conversion utility |
TIFF |
• Uses lossless compression |
• Very big file sizes • Very slow to read/write from/to memory card |
JPEG |
• Produces small files • Level of compression is variable • Fast to read/write from/to memory card |
• Uses lossy compression • Repeated saving after editing steps degrades the picture further |
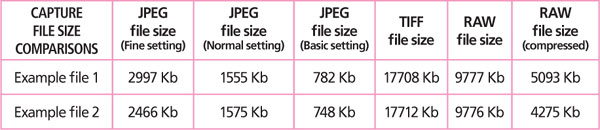
Table 9.3 Capture format versus file size – The capture format you select directly affects not only the way the file is saved and its visual quality but also the size of the final file. JPEG produces the smallest files but uses a ‘lossy’ compression system to do so. In the JPEG format you can adjust the level of compression used when saving the photo. In this table the Fine setting uses the least compression and the Basic option the most. Both TIFF and RAW formats preserve all the image detail and any compression used with these formats is ‘lossless’.
Saving digital photographs
Before the days of digital, the film was both the capture medium as well as the storage device for our precious photos. Now the two tasks are split. The sensor handles the capture part of the process and the camera’s memory card is responsible for the storage (at least until it is transferred to your computer). There are several different types of cards and they also vary in capacity (how many photos they can store) and transfer speed. For readers with cameras with high resolution chips the faster the transfer speed of the card the quicker the pictures will be written to and read from the card. Memory card prices have fallen dramatically in the last couple of years so you should buy the largest capacity and fastest transfer speed that you can afford (see Figure 9.7).
Figure 9.7 Memory cards store the pictures captured by the digital sensors. Different manufacturers favor different card types. Check which type your camera uses before purchasing additional cards.
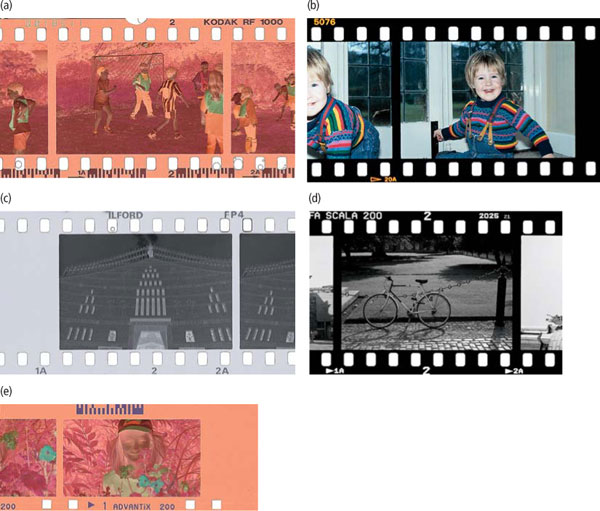
Figure 10.1 A range of film types. From the top: (a) 35 mm color negative; (b) color slide; (c) black and white negative; (d) black and white slide; (e) APS color negative. All actual size.
10 Films (see Figure 10.1)
Film records the image exposed onto it in your camera, using light-sensitive chemicals (silver halide crystals) coated as a gelatine emulsion on a plastic base. The size, shape and how tightly packed these silver halides are basically determines the speed of a film – from fine grained and relatively ‘slow’ in reaction to light, to coarser grained and ‘fast’ in sensitivity.
Color negative films
These are the most popular and are made in the widest range of types and speeds, particularly in 35 mm size. From color negatives it is possible to have enlargements made cheaply in color or (in some labs) in black and white. Labs can also scan negatives and slides and save them to a CD ready for input into a home computer system.
Black and white films
Black and white films make a refreshing change. Pictures are simplified into monochrome without the realism (and sometimes distraction) of color. However, few labs offer a black and white processing service. One solution is to use the type of monochrome negative film – Kodak TMAX-TCN or Ilford XP2, for example – which labs can process in their regular color chemicals and produce black and white results. Black and white is also your best choice to start your own processing and printing (see page 210).

Figure 10.2 High ISO films (or sensor settings) allow the photographer to capture pictures under low light, but contain large and sometimes distracting grain (or noise in the case of digital).
Color slide films
Color slide films are designed to be ‘reversal’ processed so that positive color images are formed in the film instead of negatives. You can then project these pictures as slides. It is possible to have color prints made off 35 mm slides, but (as with the purchase and processing of the film itself) this is more expensive than making the same prints from color negatives. You must be more accurate with exposure when shooting slides and, where necessary, have a filter to correct the lighting (see page 164).
Film information
The film box gives you all the important information. Apart from type, brand and size, it shows the number of pictures, film speed, type and the ‘use by’ date.
Film speed
Light sensitivity is shown by your film’s ISO (International Standards Organization) speed rating. Every doubling of the ISO number means that a film is twice as fast. Regard films of about ISO 100 or less as slow in speed, ISO 200 and 400 as medium, and ISO 800 upwards as fast.
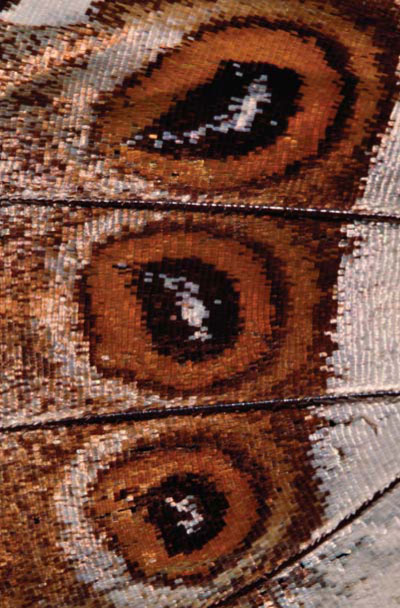
Figure 10.3 Slow films or those with a low ISO number (or sensor setting) record the finest detail and the smoothest gradation of tone and color.
Choose a fast film if all your pictures will be shot under dim lighting conditions with a simple camera, or when you don’t want to have to use a slow shutter speed or wide lens aperture. However, expect resulting prints – especially big enlargements – to show a more visible granular pattern. Sometimes ‘graininess’ suits a subject, as in Figure 10.2. But since it destroys fine detail and coarsens tones, it would not be the best choice for the fine pattern and texture in Figure 10.3. Fast film is also more expensive.
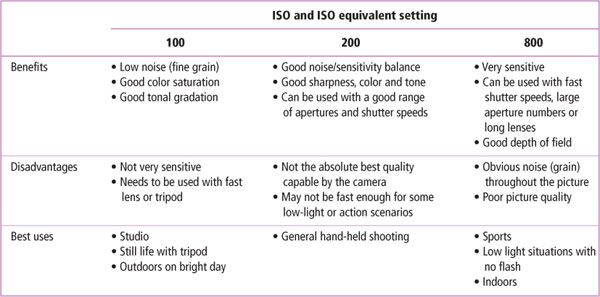
Table 10.1 Benefits and disadvantages of different ISO settings
A slow film suits bright light conditions, where you don’t want to be forced into using a fast shutter speed or small lens aperture. It’s clearly the best choice if you want prints with the highest image resolution. For most situations though, a medium-speed film offers the best compromise. Always check that your camera is properly set for the ISO rating of the film it contains.
Table 10.1 summarizes the benefits and disadvantages of different ISO settings. Use it as a guide when selecting which value to use for your own work.
Expiry date
The expiry date is the ‘use before’ date on the film box. It assumes average storage conditions away from fumes, heat and humidity. Outdated film becomes less light sensitive, and colors may suffer. To extend shelf-life, store your films (sealed) in the main compartment of your refrigerator.
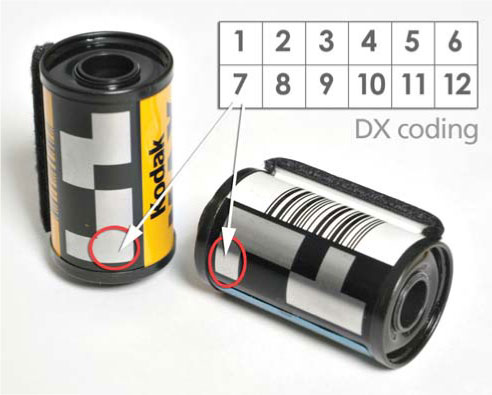
Figure 10.4 The DX coding on the outside of film canisters informs the camera about the characteristics of the film. The characteristics conveyed by each conductive position are: positions 1 and 7 always set; positions 2–6 used for ISO value; 8–10 for number of exposures per film; 11 and 12 for exposure latitude of the film.
35 mm film
The biggest range of film is made for 35 mm cameras. Double perforated 35 mm wide film comes in a light-tight cassette you load into your camera’s empty film compartment with its paler, light-sensitive surface facing the back of the lens. As you take pictures, the film winds onto an open take-up spool within the camera. It therefore has to be rewound back safely into the cassette before you open the camera and remove your exposed film. Never load or remove film in bright light – especially direct sunlight. (The slot in the cassette through which the film protrudes has a velvet lining, but intense light may still penetrate.) Always find a shady area or at least turn away from the sun. Speed, length and type are also encoded in a chequer-board silver pattern on the side of the cassette (Figure 10.4). Electrical contacts inside the film compartment press against this pattern and so read and program the camera’s exposure measuring circuit for film speed, etc.
Number of pictures
The standard picture format given by a 35 mm camera is 24 mm × 36 mm, and you can buy cassettes containing sufficient length of film for either 24 or 36 pictures. A few come in 12 exposure lengths.
APS films and cameras
The Advanced Photo System (APS) is a film format introduced in 1996. APS films are only 24 mm wide, giving negatives slightly over half the area of pictures on 35 mm film (see page 51). They do not fit 35 mm cameras, and so a whole range of scaled down cameras from compacts to single lens reflex designs have been introduced for APS photography. They are similar in price to 35 mm equipment.
APS film comes in an oval-shaped cartridge (Figure 10.5) that, when inside the camera, opens and pushes out the leading edge of the film to automatically load it. After the last shot is taken the film rewinds automatically and you hand in the cassette for processing. APS film carries a transparent magnetic coating used to record information from your camera to instruct the processing laboratory machinery. For example, a picture shape setting on your camera allows selection of either ‘H’ format (4:3 ratio), ‘widescreen’ (9:16 ratio), ‘classic’ format (2:3, the same height-to-width ratio as 35 mm) or a longer, narrower ‘panoramic’ 1:3 ratio. This causes the lab printer to crop the particular picture to the shape you selected when framing up your shot.
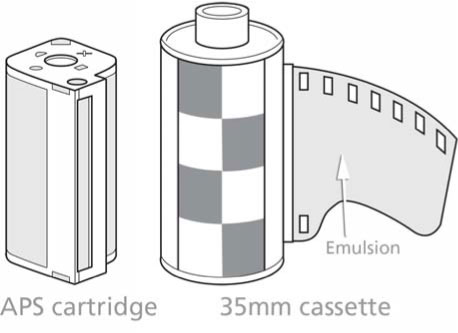
Figure 10.5 APS (Advanced Photo System) catridge (left) and 35 mm film cassette (right).
Other information passed from an APS camera via the film to the lab can also cover the lighting used for each individual shot, and time and date of shooting (ink printed on the back of your photo). APS films and equipment therefore offer many conveniences, but for large prints they do not match 35 mm in final image quality. There is a much wider choice of film types available in 35 mm size, and this larger format is also less costly to have processed than APS.

Figure 10.6 Inserting and loading a 35 mm film into a manual or auto-loading camera. Manual loading instructions: (1) Pull out rewind knob and lay cassette in film chamber. Replace knob. (2) Push film tip fully into take-up spool slot. (3) Wind over enough film to bring both sets of perforations onto teeth. (4) Close camera and wind on two frames before starting to shoot. Auto-loading instructions: (1) Insert film cassette (motor-driven cameras have no rewind knob). (2) Pull out enough film to lay across and touch far end. (3) Close the camera back. The window in the back allows you to read film data off the cassette. (4) Closing triggers film advance and the counter moves from S to 1.
Though much of the big hype surrounding digital photography is concentrated on the new camera technologies, the humble desktop scanner is still the most cost-effective way to capture high-quality digital images. In this module we will look at the features and functions that make a good scanner, as well as the steps involved in making your first scan.
Film and print scanners
For the most part, scanners can be divided into two distinct varieties – print and film.
Print scanners, which are sometimes also called flatbed or reflection scanners, are designed to convert standard photographs into digital images by reflecting light from the surface of the picture onto a sensor. The film variety captures digital information from negative or slide originals. With these machines the image is scanned by passing light through the film to a high-resolution sensor. This process is the reason why these types of devices are sometimes referred to as ‘transmission’ scanners. The capture process involves recording the color and brightness of the image, converting these values to digital form and then saving the file to computer (see Figures 11.1 and 11.2).
As most negative and slide originals are smaller than their print counterparts, film scanners generally have higher specifications and are therefore more expensive than flatbeds.
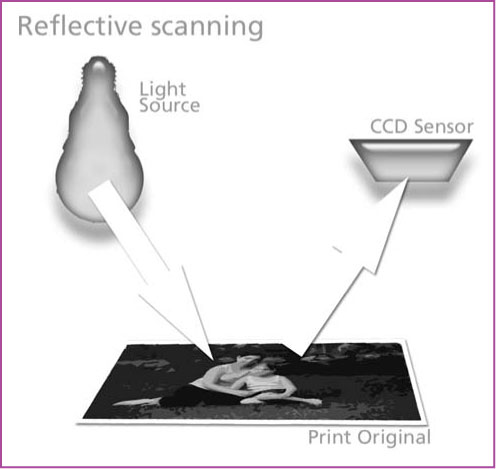
Figure 11.1 Reflective scanners, sometimes called ‘flatbeds’, are used for prints and documents.
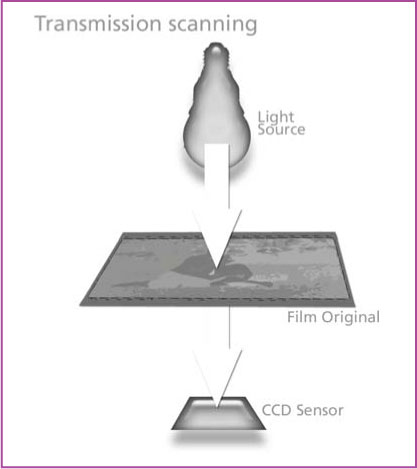
Figure 11.2 Transmission scanners are specially designed for use with negatives and transparencies, and are usually referred to as film scanners.
Scanner types
Up until a few years ago, the technology needed to capture each of the photographic media types meant that photographers had to buy two completely different pieces of equipment to handle their prints and negatives/slides. Though it is still possible to buy dedicated print and film scanners, many manufacturers are now producing combination or hybrid products that are capable of capturing both media.
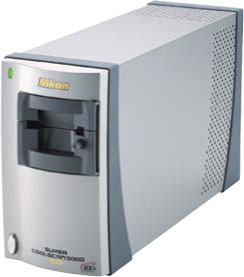
Figure 11.3 Dedicated film scanners can obtain very good quality results from negative and slide originals.
Dedicated film. This device is set up specifically for negative or slide capture. Some models such as those designed specifically for 35mm film are usually restricted to this single format but others such as medium format film scanners can be used with a variety of film size. The hardware is not capable of reflective scanning. If your business involves the repeated capture of images of the one film type, a dedicated scanner is a good investment (see Figure 11.3).
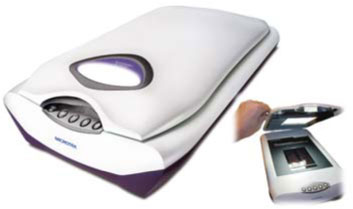
Figure 11.4 Hybrid film scanners have the advantage of being able to scan prints as well as negatives/slides.
Hybrid. These scanners are capable of both reflective and transmission scanning. This means that both film and print images can be captured by the one device. Starting life as flatbeds with added transparency adapters, these scanners have developed into multi-function devices that are capable of producing quality files from both types of originals (see Figure 11.4).

Figure 11.5 Print scanners are the most economical way to generate high-quality digital images.
Dedicated print. The scanners in this category are the most affordable and easily obtainable of the three types. If you can’t afford a digital camera of the quality that you desire and you have loads of prints in boxes lying around the house, then spending a couple of hundred dollars here will have you enhancing high-quality digital versions of your pictures in no time (see Figure 11.5).

Figure 11.6 The software that controls your scanner will differ from manufacturer to manufacturer and model to model.
1. Document type
2. Scan settings
3. Color, brightness and contrast controls
4. Preview button
5. Scan button
6. Preview image
7. Scan selection marquee
Controlling your scanner
The software that controls the scanner is often called the scanner driver. These programs are supplied by the manufacturers in two forms – stand-alone and plug-in.
The stand-alone software is a self-contained program that allows the user to control the scanner settings, capture the image, make some basic adjustments to the digital file and then save the results to disk. If the scanner is capable of automatically scanning several images from the one roll of film then these settings will also be contained here (see Figure 11.6).
The plug-in sits between the scanner and your photo editing program. The software is activated from inside a host program by selecting the scanner from the File > Import menu. The plug-in controls the scanner settings and will contain much of the same tools and functions as the stand-alone software. Once the scan is completed rather than saving the file, the plug-in window shuts and you are left with the image in your photo editing program.
Built into the driver software are controls for adjusting the size and the dimensions of the file to be created from the scan. Other features include the ability to control the brightness, contrast and color of the scan. Images can be lightened, color casts eliminated and contrast reduced using these tools. Some scanner software also includes dust and scratch removal, color restoration and descreening (removal of the fine dots from scans taken of magazine photos) features as well.

Figure 11.7 Common scanner parts and features. See text for explanation of numbered items (note that items numbered 8 and 9 in text are not shown here).
Scanner parts
Getting to know your way around your scanner will help you make digital versions of your treasured prints and negatives more quickly and easily. Many companies provide a printed instruction manual as well as online help files that will introduce you to your scanner’s particular functions and features, but here we provide a visual guide to the most common scanner parts and features (see Figure 11.7):
1 Power button – used to switch the scanner on and off. Some models do not have a power button, with the unit being turned on and off via the computer.
2 Quick scan button – many newer scanners have several one-step buttons at the front of the unit. These are designed to help make the job of everyday scanning quick and easy. The quick scan button creates a scan with a single click.
3 Copy button – used to provide a one-step copy or ‘scan and print’ option for those users who want to make ‘photocopies’ of documents or papers.
4 E-mail button – used to provide a one-step scan and e-mail option for those users who regularly want to send pictures to friends via the web. After the picture is scanned, your e-mail program will open automatically and the picture will be inserted as an attachment to a new message. Simply address and add a few words of explanation and mail away.
5 Photocopy or direct print button – a single-step process that scans a picture and then prints it with the press of one button. Some companies provide a little pop-up window, which looks very much like the key pad of a photocopier to be used with this feature.
6 Scanning area – the part of the scanner where your original is placed. This usually takes the form of a glass plate for print scanners or a negative holder for film scanners.
7 Negative holder – supports the film as it is scanned. These devices are hinged, with the film inserted and sandwiched between two plastic supports. Care has to be taken so the edges of the holder match up with each of the negative frames.
8 Power light – indicates that the scanner is turned on. Some models also use a blinking version of this light as a way to show that a scan is in progress.
9 Scanning light – the light source that illuminates the surface of the print. In film scanners the negative is positioned between the light source and the sensor.
10 Power socket – used to connect power to the scanner. Some units combine the power and computer (data) connection in the one cable and so don’t contain a separate power socket.
11 Computer socket – connects the scanner to the computer and is used for transferring the picture data. Depending on the scanner model, this connection might be in the form of a USB, Firewire, SCSI or Parallel port socket.
12 Transparency adapter – provides a way to scan your negatives using a flatbed or print scanner. These adapters are usually purchased separately as an optional extra. If you have a varied collection of photographs, in both print and negative forms, this type of scanner might be a good option.
Analog to digital
The act of scanning, be it using a flatbed model or one designed for film stock, involves converting continuous tone images into digital files. Photographs in either print or negative (or slide) form contain a range of subtle tones and colors that blend smoothly into each other. These are referred to as continuous tone images. For instance, in a black and white image it is difficult to see where one shade of gray starts and another one finishes. The effect is a smooth transition from the deepest shadows through to delicate highlights.
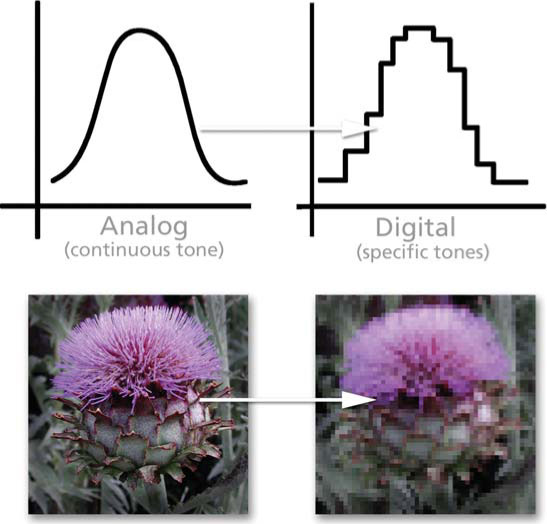
Figure 11.8 Scanners convert continuous tone images such as prints or negatives into the same pixel-based files that we obtain from digital cameras. In this exaggerated detail you can see how individual areas of tone and colour are digitized.
Computers are clever machines but they have difficulty handling images in this form. So, in order for the photograph to be used in an image manipulation program like Photoshop or Photoshop Elements, it must be changed to a digital file. The file describes the image as a series of discrete colors and tones. When we scan a negative or slide we make this conversion by sampling the picture at regular intervals. At each sample point, a specific color is chosen to represent the hue found in the original. In this way, a grid of colors is put together to form a digital version of the continuous tone original (see Figure 11.8).
What scanning settings do I use?
Knowing what is the best resolution, or scanning quality, for a particular task can be a daunting question. Some scanning software allows users to pick from a list of output options such as ‘web use’, ‘laser print’ and ‘photo quality print’. The program then selects the best resolution to suit the selection. This makes the process of selecting easier. If the software that you are using doesn’t have this feature use the details in the table below as a starting point:
Table 10.2 Starting points for scanning settings for different image applications.
What the scanned picture will be used for - |
Print scan quality to produce the same size as the original |
Film scan quality of a 35 mm frame to produce a 6 × 8 inch print |
Web or screen |
72 spi* |
600 spi |
Draft quality prints |
150 spi |
1200 spi |
Photographic quality prints |
200–300 spi |
1600 – 2400 spi |
Magazine printing |
300 spi |
2400 spi |
* spi stands for Samples Per Inch and refers to the number of times the scanner samples the original (film or print) in the space of an inch. Some scanning software refers to this setting as dots per inch or dpi but this is strictly a setting for printing as it refers to the number of ink dots per inch and shouldn’t be used with scanning applications.
Film scanners versus flatbed scanners
The current crop of print or reflection scanners are quality machines that are capable of creating good quality, high-resolution images containing millions of colors. Most mid-range and even some entry-level devices are more than capable of capturing the full range of image content and picture details present in your photographic prints. New, and perhaps tentative, scanner users might find it useful to cut their teeth using economical flatbed technology. This option provides the cheapest way to gain access to the world of digital photography. Despite my comments in the next few sentences, very good results can be obtained from files captured using this type of technology.
Until recently, the cost of most film scanners was out of the range of most desktop imaging budgets, but new technology advancements and more competition in the market now mean that these pieces of kit are more affordable. This fact should have serious digital image makers dancing in the aisles.
Why? Because scanning from film gives you the chance to capture more of what your camera saw when you pressed the button. This is for the simple reason that the information contained in a negative or slide is greater than what can be printed. Some of the detail and spread of tones that was initially captured on your film is lost when it is converted to print.
If you carefully compare a negative and its print you will probably be able to see details in the shadows and highlights that have failed to make it to the print. With careful printing, using techniques like burning-in and dodging, or split grade filtration, these details can be made more evident, but they will never be recorded as well as they were in the film original. It follows then that a quality film scan will capture more information than the flatbed version made from the print.
Dedicated film scanners have the advantage of being specifically designed for the job of transmission scanning. These units generally can capture high resolution, large numbers of different colors and detail in both highlight and shadow areas. The new range of hybrids have been designed from the ground up as two separate scanners that are then built into the one box. Sure, they use the same scanning head but they are a lot more than a reflective model with an add-on. In this way, manufacturers such as Epson have been able to provide a single solution for both transmission and reflective needs.
Choosing which of type of scanner to buy will be largely dependent on the way that you work, your budget and your existing equipment.
If you don’t own a scanner, then a flatbed is a cheap and easy way to get your digital hands dirty. If, on the other hand, you already own a flatbed and regularly shoot one film size such as 35 mm, then a dedicated scanner might be a good investment. For the photographer with a little more to spend, who is looking to buy a first scanner, likes to photograph with a range of film stock (35 mm, 6 cm × 6 cm, 5 in × 4 in) and wants to scan prints as well, then a good quality hybrid scanner will provide a one-unit solution for all scanning needs.
Making your first scan
Use this nine-step guide to help you through the process of making your first scan. Keep in mind that the time you take to adjust your settings correctly at the scanning stage will pay dividends in the production of high-quality digital originals. You should take as much time and care in the scanning process as you would when photographing a great scene. Just as with the photographic process good exposure and color control will ensure that you capture as much of the original as possible.
Step 1: Start the scanner
Some computers won’t recognize the scanner unless it is turned on first so make a habit of switching on the scanner before starting the computer.

Step 2: Clean print/negative
Making sure that your negatives/prints are clean before scanning can save a lot of time spent removing marks from the picture later. Use a soft cloth or a blower brush to remove surface particles before placing the film strip into the holder or the print on the platen and don’t forget to clean the glass as well.

Step 3: Place print
Check with your manual to see which way the film or print should be placed in the scanner. For flatbed scanners, place the photograph face down on the glass surface, making sure that the edges are parallel with the scanner’s edge. For negatives ensure that you have the film strip the correct way up before inserting.
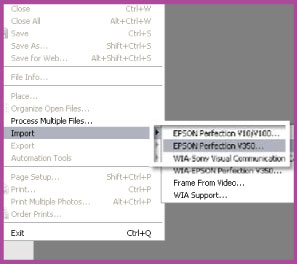
Step 4: Open the software
Select the scanner name from the Import (Photoshop Elements: File > Import), WIA or Twain menus. Some scanners are supplied with a stand-alone version of this software that you can access from your program’s menu without having to open an editing package first.
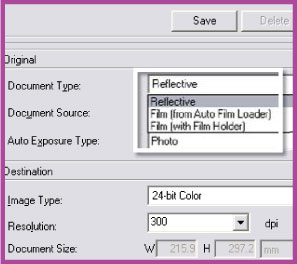
Step 5: Select media type
For film scanning select the film type – negative or transparency. For prints select Photo or Reflective. Choose the type of the original – color, black and white or line, and resolution. Select the size that you want the picture to be after scanning – this is sometimes called output document or image size and is usually measured in inches or centimeters.
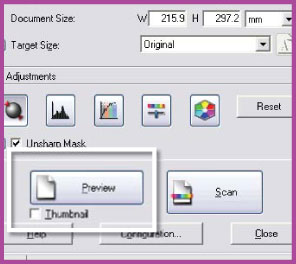
Step 6: Create a preview
To check your settings click on the Preview or Pre-scan button. This will produce a quick, proof, version of the picture. Some scanners perform this function automatically as soon as you select the scanner. This way you are presented with a preview as soon as the scanning software window opens.
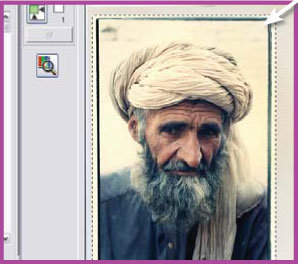
Step 7: Select area to scan
Using the selection or marquee tool, drag a rectangle around the part of the preview that you want to scan. This selection box is the boundary between what is included and what is left out of the scan. If the preview is small, making a precise selection difficult, dRAW the box a little bigger so that it encompasses more of the picture than you need. The excess can be cropped down later in your image editing program.
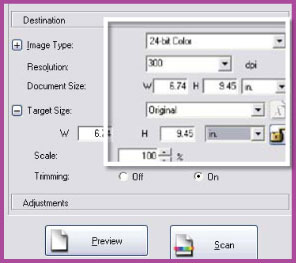
Step 8: Alter output size
DRAWing a selection marquee on the preview will change your output picture size, so it is at this point that you should check that the final size of your scan displayed in the software is still suitable for your needs. If it is too small increase the output dimensions to suit.
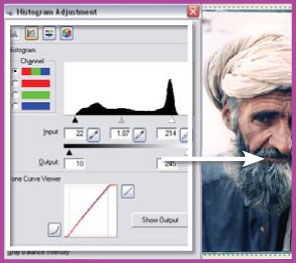
Step 9: Adjust brightness, contrast and color
Using the software control tools, change the brightness and contrast of the image. Be sure not to lose subtle dark or light details by making the image too bright/dark or too contrasty. It is also a good idea to eliminate obvious color casts in this part of the process. With all features adjusted click on the Scan button to start the final conversion process.