

Each of the camera’s technical features introduced in the previous part – lens focusing, shutter, aperture, etc. – is there for two purposes. Firstly, it helps you to get clear, accurately framed and properly exposed pictures of subjects – distant or close, under dim or bright lighting conditions. But each control also has its own creative effect on the image. This allows you some interesting options – in other words, you can choose a particular setting for its creative influence, and then adjust the other controls if necessary to still maintain correct exposure. Clearly, the more controls your camera offers and the wider their range, the more choices you will be able to make. Fully automatic-only cameras work from set programs based on choices set by the manufacturer, but as you will see, even here a measure of control is possible – for example, by loading fast or slow film.
12 Shutter speeds and movement
A shutter set for 1/125 second should safely avoid overall blur due to camera movement when you are trying to hold it stationary in the hand. This setting will also overcome any blurring of slower moving subjects, particularly if some distance away.
If you want to ‘freeze’ action subjects you will need a camera offering faster shutter speeds. The movements of athletes in most sporting activities can be frozen using a shutter speed of 1/250 second or faster. Cycle races and autocar events will probably need 1/1000 or 1/2000 second to lose all blur, but much depends on the direction of movement and how big the moving subject appears in your picture, as well as its actual speed. Someone running across your picture will record more blurred than the same runner moving directly towards you. Filling up your picture with just part of the figure – by shooting close or using a telephoto lens – again exaggerates movement and needs a shorter shutter speed to freeze detail.
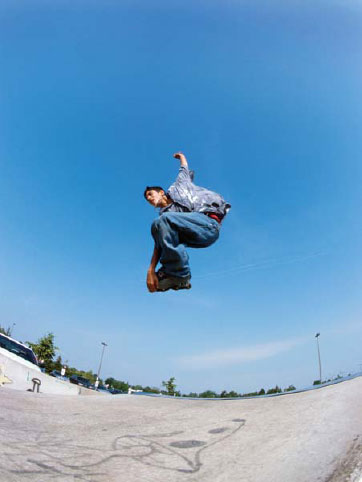
Figure 12.1 Using a fast shutter speed can freeze the movement of subjects in your photographs.
With a manually set camera select a fast shutter setting, then alter the lens aperture until the meter signals that the exposure is correct. On a semiautomatic or multi-mode camera choose ‘shutter priority’ (‘Tv’ or ‘S’), pick a fast shutter speed and the camera will do the aperture setting for you. An auto-only camera loaded with fast film will set its briefest shutter speed, in strong light. In fact, shooting on film of ISO 400 or 1000, or equivalent setting for digital cameras, is advisable with all cameras using briefest shutter settings, to avoid underexposing. If you have a simple, one-fixed-shutter-speed camera, try instead to swing (‘pan’) the camera in the same direction as the moving subject (see page 236). This can give you a reasonably sharp picture of your subject against a blurred background. Another alternative is to freeze the motion using a short burst of light, such as a flash (see page 155).
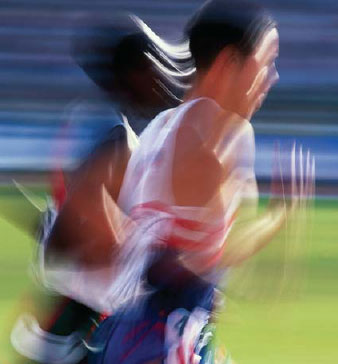
Figure 12.2 In this example you can see how different parts of the runners are more blurred than others, depending on how much they moved during the long shutter speed used for exposure.
Slow shutter speeds, say 1/30 second, or as long as several whole seconds may be necessary just to get a correctly exposed result in dim light, especially with slow film. These longer times also allow you to show moving objects abstracted by different degrees of blur. Look at the blurred runners in Figure 12.2. Notice that different parts of the body show different amounts of blur depending on how much these areas moved during the long exposure. Often, action can be suggested more strongly this way than by recording everything in frozen detail.
Working with these longer exposures, however, means taking extra care to steady the camera, or camera shake will blur everything instead of just those parts of your subject on the move. Figure 12.3 suggests several ways of improving steadiness when using your camera hand-held. Learn to squeeze the shutter release button gently – don’t jab it. Even then, if you use settings of 1/30 second or longer, find a table, doorway or post and press the camera firmly against this. With some models your camera may display a ‘shake’ warning when it automatically selects a slow shutter speed. Be careful too when using a telephoto lens, because the larger image it gives magnifies camera movement, like looking through binoculars. A tripod, or even a clamp, which will secure your camera to the back of a chair, will allow steady exposures of unlimited length. Make sure that the tripod has a pivoting head so you can angle the camera freely before locking it in place (see page 42).
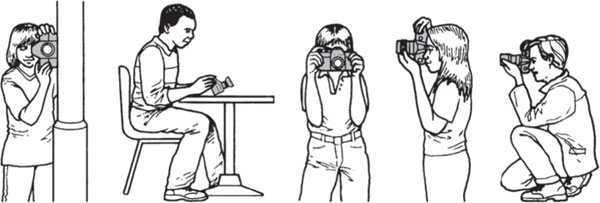
Figure 12.3 When using slow shutter speeds it is important to ensure that you keep the camera as steady as possible during the exposure. Here are a few techniques that you can use to make sure that you obtain blur-free photographs.
The range of slow shutter speeds offered on many compacts and manually set SLR cameras only goes down to about 1 or 2 seconds. For exposures longer than this, SLRs (and a few compacts) offer a ‘B’ or time setting. With this feature the shutter stays open for as long as the release button remains pressed, and you time your exposure with a watch.
In practice, it is best to use an extension shutter release (Figure 8.26) to avoid camera shake. Advanced SLR cameras may set timed exposures of 30 seconds or longer. Exposure times of several seconds open up a whole range of blur effects that you can first experiment with and then increasingly control – although results always have an element of the unexpected. Pick something light and sparkling against a dark background. At night fairgrounds, fireworks, or simply street lights and moving traffic, make good subjects. Use slow film and a small lens aperture so that you can give a long exposure time without overexposing. (Some manual SLR camera meters will not measure exposure for B settings, in which case ‘cheat’ the meter as described on page 234.)
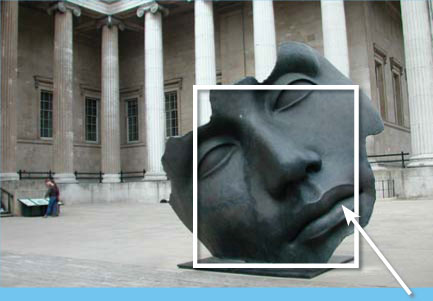
Selectively focusing your camera lens on a chosen part of the subject is a powerful way of drawing attention to it, subduing unwanted details at other distances, and helping to give your picture a sense of depth. In Figures 13.1 and 13.2, for example, emphasis has been switched from the flowers to the background simply by changing the focus setting. Think carefully about where your location of greatest sharpness should be. In portraits, it is best to focus on the eyes; with sports events you might pre-focus on the crossbar of the high jump or just the sports track lane a runner will use.

Figure 13.1 Focusing on the flowers only draws the viewer’s attention towards this part of the frame. In this way, the photographer can direct the way that his or her audience looks at their pictures.
A manually focused SLR camera allows most scope to actually observe how a particular point of focus makes the whole picture look. With an auto-focusing (AF) camera you will probably need your point of focus filling the tiny auto-focus frame line in the center of your viewfinder (see Figure 13.3). Then, if you want to compose this point off-center, operate the camera’s AF lock (often half pressure on the release) to maintain the same focus while you reframe the picture before shooting.

Figure 13.2 Switching the focus to the background directs the attention to the leaves first, as they are the sharpest part of the picture. This is despite the fact that the flowers are a vibrant color and, for this reason, would usually attract our attention first.
The degree of auto-focusing accuracy your camera will give depends upon the number of ‘steps’ (settings) it moves through between nearest and furthest focusing positions. Fewer than ten is relatively crude; some have over 100. Where a good AF scores most is when faced with a moving target. Here it will adjust continually to maintain your subject in focus as subject distance changes. However, most auto-focusing SLR cameras allow you to change to manual focusing if you prefer to work this way.
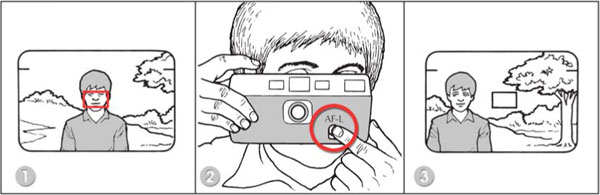
Figure 13.3 An auto-focus camera with AF lock allows you to sharply focus a main subject you compose off-center. (1) First, center the subject in the auto-focus rectangle. (2) Half depress the shutter release to make the lens focus, then operate the AF-L control. (3) Now you can compose the subject anywhere within the frame before shooting.
Aperture and depth of field
The adjustable size aperture in your lens has an effect on how much of your picture appears sharply focused (see Figure 13.4). The smaller the diameter of the hole (large f-stop number), the greater the range of items, at distances closer or further away, that will appear sharply focused (along with the specific subject that you actually focused on). A photograph with objects spread over a wide range of distances, where all are clearly focused, is said to have a large depth of field.
The opposite to large depth of field (small or shallow depth of field) is created when you photograph a scene using an aperture with a large-diameter hole (small f-stop number). These images generally have a single object sharply focused, with the rest of the image blurry or unsharp. Using a shallow depth of field is a great way to ensure that your audience is concentrating on the part of the picture that you, as the photographer, deem as important.
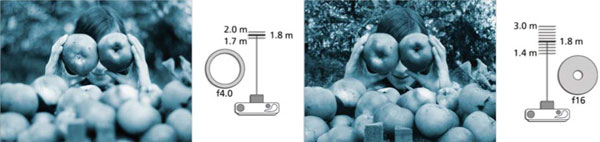
Figure 13.4 The effect of aperture. In both pictures, the lens focus setting remained the same, but changing from f4.0 to f16 greatly increases depth of field.
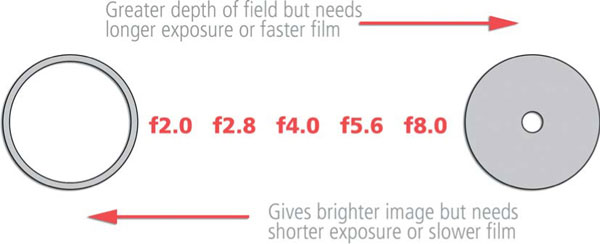
Figure 13.5 F-number aperture settings.
Aperture size is described by an ‘f-number’, and if your camera lens has manual control this will carry a scale of f-numbers as set out in Figure 13.5. Advanced digital compacts and most new SLR cameras also display the aperture setting on a small readout screen located on the top of the camera. Unlike the numbers marked on the lens barrel, which represent full f-stop changes, the settings displayed on the small LCD screen often change in quarter or third of an f-stop jumps.
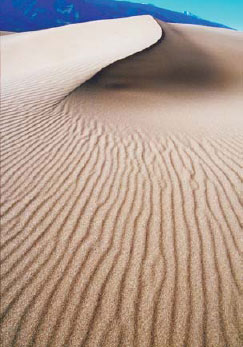
Figure 13.6 Using the aperture to control the amount of the picture that appears sharp is a great way to control the look of your image and to direct your viewer’s attention to the important parts of the picture. In this photograph, a large depth of field has been used to ensure that detail is sharp from the foreground right into the distance.
Notice how the wider the aperture, the lower the f-number. To see this in action, look at the picture of the girl with apples (Figure 13.4). In both shots the lens was focused on the girl’s hands. But whereas one picture was taken at a wide aperture (an f-number of f4.0), the other was taken at a small aperture (f16). The f4.0 result has a very shallow depth of field. Only where the lens was focused is really sharp – apples in the foreground and trees in the background are very fuzzy. The other version shows much greater depth of field. Almost everything nearer and further away than the point of focus, the hands, now appears sharp.
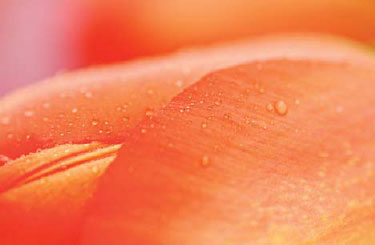
Figure 13.7 In contrast, a shallow or small depth of field is employed in this image to ensure that only a portion of the whole photograph is sharp.
Of the two versions, the one on the left works best for this subject because it concentrates your attention on the two apple ‘eyes’. The same applies to the edges of the flower’s petals shown in Figure 13.7. But on other occasions – the sand dunes shown in Figure 13.6, for example – you may want to show all the pattern and detail clearly from just in front of the camera to the far horizon. So controlling depth of field in a picture by means of the lens aperture setting is a useful creative tool.
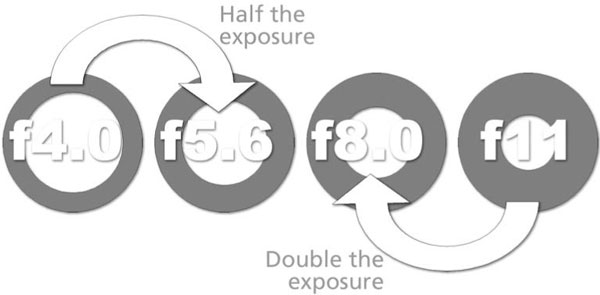
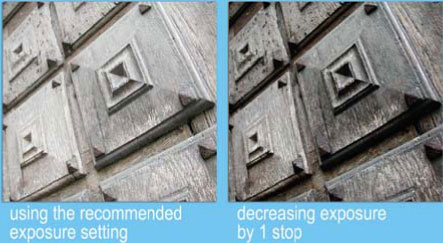
Figure 13.8 As well as changing the zone of sharpness in our pictures, the aperture also controls the amount of light entering the camera. Each full f-number change represents a halving or doubling of light.
As well as changing the zone of sharpness in a picture, each f-number in the series also doubles, or halves, the brightness of the image (see Figure 13.8). The wider the maximum aperture provided by a lens, the more expensive and bulky the lens becomes). A simple fixed-aperture camera may only offer a single aperture of f5.6; many compacts have lenses which ‘open up’ to f4.5 and ‘stop down’ to f16. SLR standard lenses may offer a longer range of f-numbers – from f1.8 or f1.4, through to f16 or f22 (see Figure 13.9.
SLR cameras are designed so that you always see the image on the focusing screen with the lens held open at the widest aperture, which is brightest to view and most sensitive to focus. This situation is deceptive, though, if you have set a small aperture – just as you release the shutter the aperture changes to the size you set, so the picture is recorded with far more depth of field than you originally saw on the screen. Some single lens reflex cameras have a depth of field preview or ‘stop-down lever’. Pressing this while you are looking through the viewfinder reduces the aperture size to whatever you have set, so you can visually check exactly which parts of a scene will be sharply recorded. (Although, at the same time, the smaller aperture makes the image on the screen become darker.)
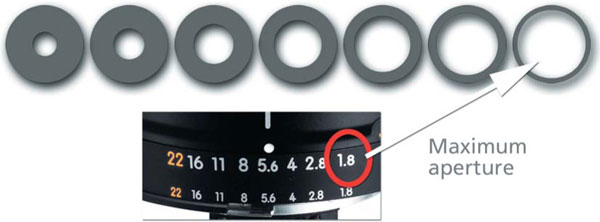
Figure 13.9 Most lenses display the available apertures on the barrel of the lens, with the widest aperture (biggest hole) being represented by the smallest f-number.
Another way of working, if you have time, is to use the depth of field scale shown on some SLR camera lenses (Figure 13.10). First, sharply focus the nearest important detail – in the example shown, this reads as 3 m on the focusing scale. Next, refocus for the furthest part you also want sharp, which might be 10 m. Then, refer to the depth of field scale to see where to set focus between the two, and what f-number to use in order to embrace both 3 and 10 m – in this case f8.
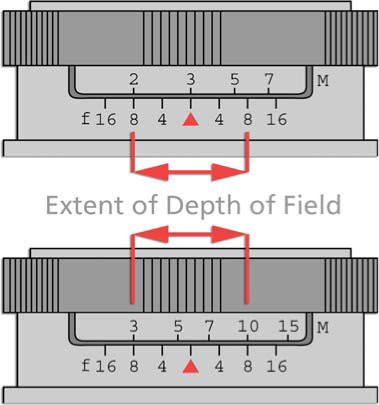
Figure 13.10 Depth of field scale on SLR lens. (Top) Lens focus at 3 m; lower scale shows that f8 gives sharpness from 2 m to nearly 6 m. (Bottom) Focus 5.5 m, depth 3–10 m at f8.
Many digital camera users have the advantage of being able to preview the results of their aperture selection on the LCD screen immediately after the image is taken. Unlike film users, they have the advantage of being able to check their zone of sharpness straight away. Using this preview technique it is possible to shoot a range of images at different aperture settings and, after reviewing the depth of field results in each picture, make a final aperture selection.
Maximum depth of field (see Figure 13.11)
Pictures taken with an automatic-only camera will show greater depth of field the brighter the light and/or when fast film is loaded or a high ISO setting is selected in the case of digital cameras. This is because, in these conditions, the camera automatically sets a small aperture (along with brief shutter speed) to avoid overexposure. A simple fixed-focus compact camera is likely to have its lens set for about 4 m with a fixed aperture of about f8. In this way, you get depth of field from about 2 m to the far horizon. But remember that it remains unchangeable in every shot.
To adjust the depth of field when using a manually focused lens, you should first set the lens for the key element in your picture or, if there is not one, then focus for a distance of about one-third of the way into the scene. So, if the nearest important details are about 2 m (7 ft) and furthest detail 7.5 m (25 ft) from the camera, a difference of 5.5 m (18 ft), set your focus at about 4 m (13 ft). Select your smallest lens aperture (such as f16 or f22), then alter the shutter speed until the meter reads correct exposure.
Using a semi-automatic or multi-mode camera, choose ‘aperture priority’ (‘Av’ or ‘A’), set the smallest aperture your lens offers and the camera will adjust the shutter speed to suit. In poor light, unless you are using fast film, this may lead you to a slow shutter speed – so be prepared to use a tripod or some other means to steady the camera when you are trying to capture large depth of field images.
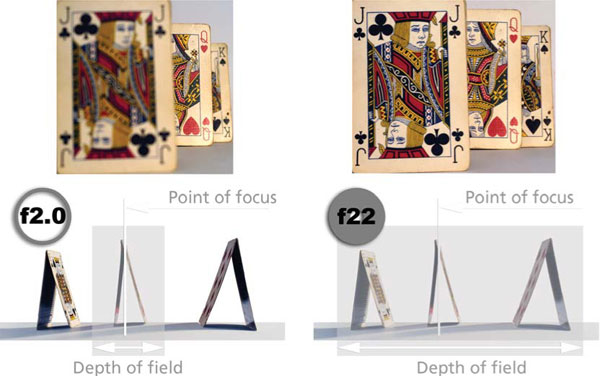
Figure 13.11 To achieve the maximum zone of focus in a picture using your aperture only, select the highest f-number available (i.e. f22, f32). In contrast, select the smallest f-number for shallow depth of field effects.
Minimum depth of field
To get minimum depth of field you need a camera with a wide aperture lens and a really accurate method of focusing. But remember, using apertures such as f2 means that a fast shutter speed will probably have to be set, to avoid overexposure. In bright lighting, such as a summer’s day, it will be helpful to load slow film (for digital users set a low ISO number) into your camera to account for the big aperture hole.
There are two other methods for creating a shallow depth of field – use a longer focal length lens or move closer to your subject. Changing to a telephoto lens (or setting your zoom control to the longest setting, sometimes marked as ‘T’) gives less depth of field even if you keep to the same f-number. Remember, however, that this use of shallow, selective focus means there is no margin for error in setting the lens for your chosen subject distance. This is especially true with close-ups or macro subjects, where the depth of field is often measured in millimeters (fractions of an inch).
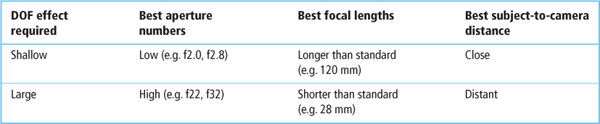
Use Table 13.1 as a quick guide for setting up your camera for either shallow or large depth of field effects.
Table 13.1 Create pictures with shallow or large depth of field effects using the following camera set-ups
Essentially, giving ‘correct’ exposure means letting the image formed by the camera lens act sufficiently on your light-sensitive film or digital sensor to give a good quality picture. Good exposure, then, is a balance of neither too much nor too little light falling on the film or sensor. Remember, setting your aperture and shutter speed controls the amount of light entering your camera and therefore the degree of exposure that the film or sensor receives.
Notice in the image series in Figure 14.1 that the picture that is correctly exposed has plenty of detail recorded in both the darkest shadows and the brightest parts of the picture. The picture on the left, however, has been seriously underexposed (received too little light). Dark parts of the picture have been recorded as detail-free black – and appear heavy and featureless when printed. Only the very lightest parts of the image, such as the girl’s blouse (on the right), could be said to show as much detail as the correctly exposed version.
In contrast, the picture on the right has been overexposed. So much light has recorded in the highlight (lightest) parts of the subject they appear white and ‘burnt out’ on the print. Only the hair area shows the same detail that was evident in the correctly exposed shot.
To summarize, too much exposure and delicate light shades or highlight details in the image are lost, too little light and subtle shadow tones are converted to pure black. This is true for both digital and film-based images. When you are shooting slides the same final differences apply, although there are no negatives involved.
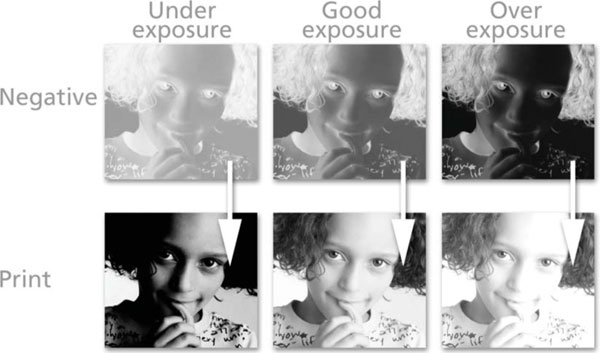
Figure 14.1 Correct or good exposure produces good prints. Images that are overexposed (too much light) or underexposed (too little light) result in prints with poorer image quality. Overexposure causes the highlights in the print to burn out and lose detail. Underexposure produces the reverse effect, losing detail in the shadow area.
Most cameras make settings that will give correctly exposed results by:
1 Knowing the ISO speed rating of the film you have loaded or ISO setting you have selected.
2 Measuring the brightness of the subject you are photographing.
3 Setting a suitable combination of shutter speed and aperture, either directly or by signalling when you have manually made the right settings.
The simplest film cameras have no exposure adjustments and they expect you to load an appropriately fast or slow film for your lighting conditions (page 53), then rely on the ability of modern films to give prints of fair quality even when slightly over- or underexposed.
If you are using a manual SLR, you point the camera at your subject and alter either the shutter speed or lens aperture until a ‘correct exposure’ signal is shown in the viewfinder. Being able to choose aperture and/or shutter speed is like filling a bowl of water either by using a fully open tap (big aperture hole) for a short time (fast shutter speed) or a dribbling tap (small aperture hole) for a long time (slow shutter speed). Figures 14.2 and 14.3, for example, are both correctly exposed although one had 1/30 second at f2.8 and the other 1 second at f16.
The f-numbers associated with aperture sizes on your lens are set out in a special series, where each change in number represents a doubling or halving of the light entering the camera. Each change to a higher f-number halves the light, so f16 lets in only one-thirtieth of the light let in by f2.8, five settings up the scale. The pictures differ greatly, though, in other ways. Figure 14.2 has very little depth of field but frozen hand movements; Figure 14.3 shows nearly all the keys in focus but the moving hands have blurred during the slow exposure.
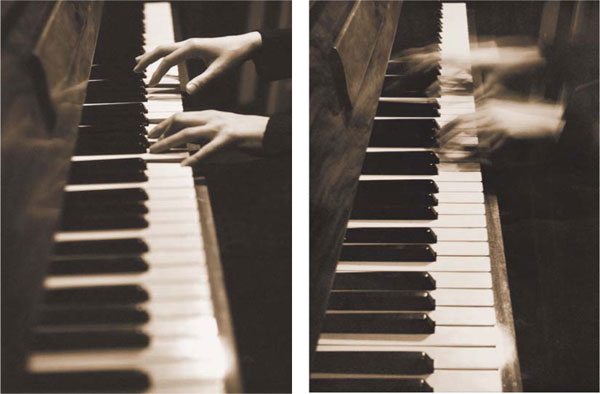
Figures 14.2 and 14.3 Metering will tell you how the f-numbers and shutter speeds line up. Left picture: 1/30 second at f2.8. Right picture: 1 second at f16. Both are correctly exposed but very different in appearance.
A fully automatic camera makes settings according to a built-in program or mode. This might start at 1/1000 second at f16 for a very brightly lit scene then, if the light progressively dims, changes to 1/500 second at f16, and 1/500 second at f11, 1/250 second at f11 … and so on, alternating shutter speed and aperture changes to account for the changing light conditions. Such an automatic program would never give results like either Figure 14.2 or Figure 14.3. It is more likely to set 1/8 second at f5.6.
If your camera, like most compacts, is fully automatic only you will always get maximum depth of field (combined with freezing of movement) in brightest light, especially if fast film is loaded. This is why multi-mode cameras, mainly SLRs and advanced compacts, also offer aperture priority mode, allowing you to set the f-number and so control depth of field. Alternatively, by selecting shutter priority mode you can choose and set shutter speed to control blur.
Advanced cameras may contain more than one fully automatic program designed to make intelligent exposure setting decisions for you. For example, when you change to a telephoto lens the program alters to a set-up using the aperture mostly to adjust exposure, leaving the shutter working at its faster speed to counteract the extra camera shake risk from a long focal length. Other models contain specialist shooting modes that alter the camera’s set-up to suit a range of photographic situations – portrait, sunset, landscape, etc.
Standard shooting modes (see Figure 14.4)
These basic modes can be found on all but the most basic or entry-level film and digital cameras, and determine how the camera sets the correct aperture and shutter speed settings from the light available in the scene.
• Auto or Program – the camera determines the shutter and aperture settings automatically based on the light in the scene.
• Shutter priority – the shutter speed is set by the photographer and the camera adjusts the aperture automatically to suit the light in the scene.
• Aperture priority – the aperture is set by the photographer and the camera adjusts the shutter speed automatically to suit the light in the scene.
• Manual – both the shutter speed and the aperture are set by the photographer.
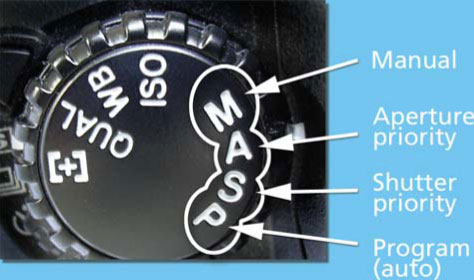
Figure 14.4 The four basic shooting modes, found on many cameras as standard, provide different approaches for the setting of the camera’s aperture and shutter speed to suit the light in the scene. Manual provides the photographer with the most control and the Auto or Program setting the least. Aperture and Shutter priority allow the photographer to determine one aspect of the exposure combination (shutter speed and aperture) with the camera automatically adjusting the other.
Most compact cameras have a small, separate window next to the viewfinder. This window holds a sensor that responds to light reaching it from the whole of the scene you can see in the camera viewfinder. This so-called ‘general’ light reading is accurate enough for average subjects, such as those in Figures 14.5 and 14.6. In both photographs, the areas taken up by dark parts are roughly equal to the areas occupied by the brightest parts, with the rest of the scene in tones approximately halfway between the two. A general reading of the whole lot averages out all these differences, and the camera settings that are made have produced an exposure that is a good compromise for everything in the picture.
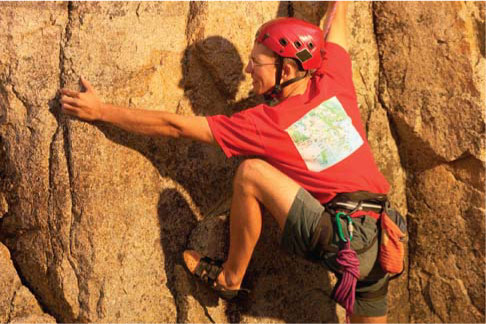
Figure 14.5 In this photograph, a general light reading works well as all the elements included in the scene combine to form a balance of light and dark tones.
Contrasty subjects
Simply averaging the whole subject area in this way is not suitable for all subjects. Sometimes this approach can let you down, especially when the subject is full of mainly dark or light subjects.
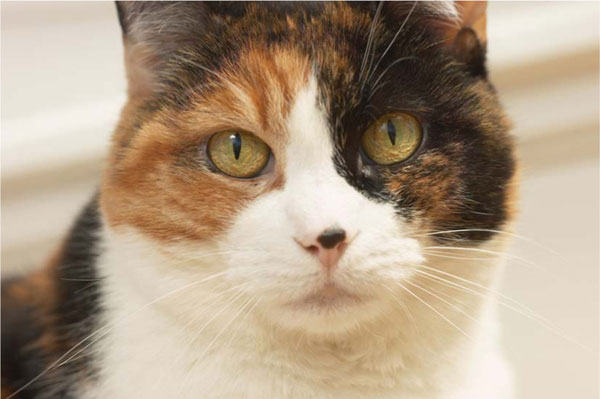
Figure 14.6 Despite the light background in this photograph, when all the picture parts are averaged with a general light reading, detail is held throughout.
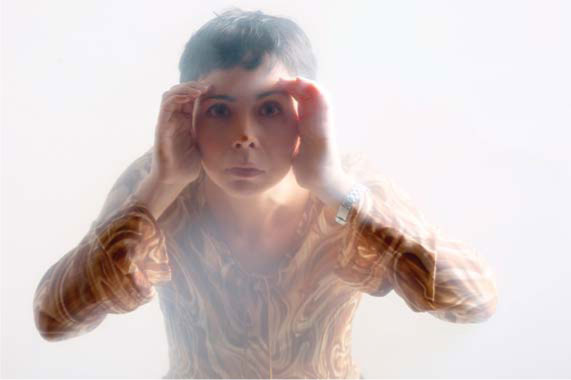
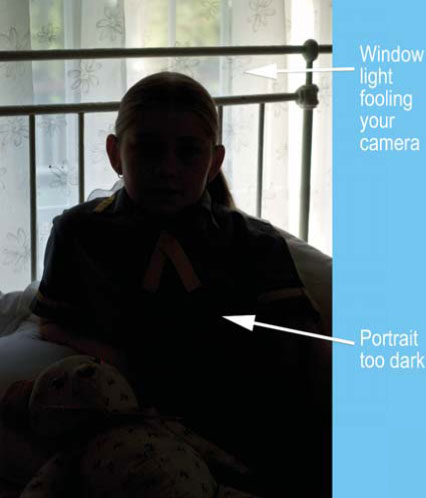
Figure 14.7 General light readings are not suitable for scenes containing large areas of light or dark tones, as these picture parts will overly influence the final exposure settings. To maintain detail in the face in this photograph, you need to alter the aperture and shutter speed selected by the camera to add extra exposure.
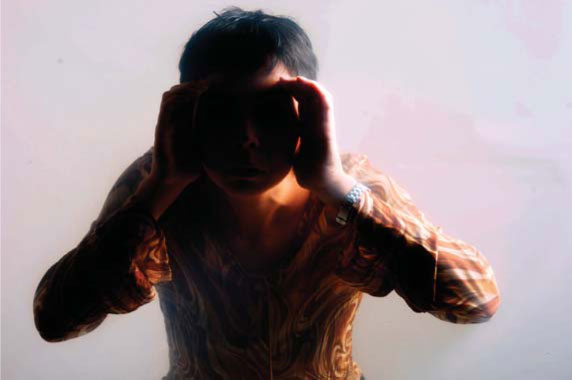
Figure 14.8 Using settings based on a general light reading only will cause the important face detail in this example to be too dark in the final photograph. Here we see how the camera’s meter has overcompensated for the bright white background, making the whole photograph too dark.
For instance, an overall reading of the scene will not work. If you want to shoot a picture, such as Figure 14.7, where the majority of the picture is filled with the light background. A general reading here would have been over-influenced by the (unimportant) lighter background, averaging out the scene as quite bright, and so providing settings which underexpose the girl’s face. The result might even be a black, featureless silhouette such as Figure 14.8, as the camera does not know that detail in the girl’s face is vital. Much the same thing can happen if you are photographing a room interior by existing light, and include a bright window.
In pictures like Figure 14.9, you meet the opposite problem. A general reading here would be influenced by the large shadowy dark areas that form the majority of the picture. It would cause the camera to select settings that would render the lighter areas, and the delicate details they contain, overexposed and bleached out. With the correct exposure, the camera indicated exposure less 1.5 stops, the picture maintains the original feeling of the lighting whilst keeping detail throughout all the important areas.
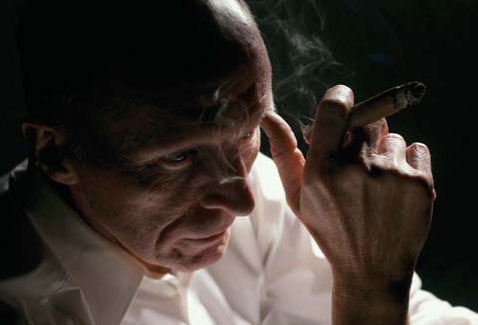
Figure 14.9 In this dark and moody portrait, the camera’s meter is confronted with the opposite problem. A general light reading will cause the resultant photograph to be recorded as too light. Adjusting the camera settings so that it uses 1.5 stops less exposure maintains the dark and moody feel.
If your automatic camera has an exposure lock, you can first tilt the camera towards the area that you want to expose correctly so that the entire frame is filled. Then, by pressing the shutter halfway down or pushing the exposure lock button, the light reading is memorized and does not change when you compose the shot as you originally intended (see Figure 14.10).
With a camera set to manual mode you should use the same frame-filling procedure, adjust aperture or shutter speed to get a ‘correct exposure’ signal, and keep to these settings (even though over- or underexposure may be indicated when you recompose).
Automatic cameras with an ‘exposure compensation’ control will also allow you to override the aperture or shutter speed values and allow an increase or decrease of the overall exposure from that suggested by the camera’s meter. To double the exposure, for scenes with predominantly light subjects, you change the setting to ‘+1’. To reduce the exposure by half for scenes filled with dark objects, adjust the feature to ‘−1’.
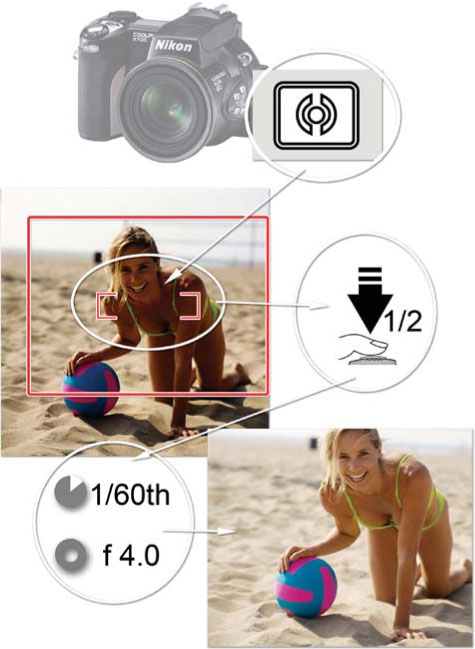
Figure 14.10 By pressing down the shutter button halfway it is possible, with many cameras, to lock the exposure settings used to capture a scene. As the metering system will try to average the scene’s tones to match a mid-gray, photographers should carefully choose the parts of the picture that they use as exposure references. Pick a subject that is too dark and the picture will be overexposed. Use a section of the scene that is too light and the image will be underexposed.
Most entry-level cameras use a so-called ‘center-weighted’ light measurement, designed to take more account of the broad central part of the picture, where the majority of main subjects are deemed to be placed. Advanced compacts and many SLRs offer a ‘multi-pattern’ form of metering light. Measurements are taken from several parts of the picture and the camera then calculates the exposure from the variety of brightnesses in the scene. The more sophisticated versions of this system also take into account which segments should most influence the exposure for a given scene. This ‘matrix’ metering mode provides the most accurate exposure measurements for the majority of scenes and should be the mode that you keep as the default on your camera.
Some models also contain a ‘spot’ reading mode, whereby just a tiny area, shown centrally in the focusing screen, measures the light. You can position this over any key part, such as a face, even when some way off. A spot reading is very accurate and convenient, provided you don’t let it stray to a completely wrong part of the scene.
Deciding priorities
It is important to learn to recognize situations where special care over the way the light is read will greatly improve a shot. For instance, in situations where the sun is lighting a small but important portion of a distant scene, you can overcome the meter’s tendency to suit the exposure for the general view by temporarily filling the viewfinder with a similarly lit subject close at hand. Using a similar approach, you can measure the exposure for people’s faces by reading off the back of your own hand (as long as both subjects have the same lighting). If your camera is equipped with a zoom lens, then it may also be possible to zoom in to take a reading from the important area of the scene and then zoom back to take the photograph.
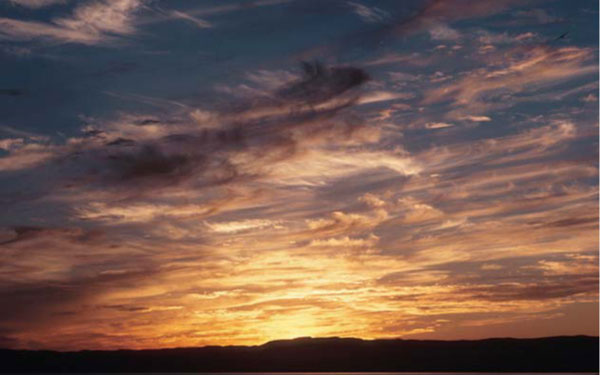
Figure 14.11 To ensure that your sunset shots are not recorded as too light and washed out, tilt the camera towards the sky to take your exposure reading first before recomposing. This way, the dark foreground detail will not affect the overall exposure of the picture.
Sunsets against tree shapes are often disappointingly colorless when exposure is measured by a general reading. For Figure 14.11, the camera was first angled so only sky filled the frame to make the exposure reading. Even when you make use of an exposure technique like this, it is best to take several shots of contrasty situations, ‘bracketing’ your exposure settings, i.e. use the exposure override or aperture or shutter settings to give twice and/or one-half the metered exposure.
Digital shooters, on the other hand, can use a shoot and review approach, checking the exposure of the picture just taken on the preview screen on the back of the camera, to ensure the correct settings have been used before proceeding.
Film users will need to make sure that contrasty pictures like these are followed up with sympathetic printing by your processing lab. Otherwise, the lab could strain to ‘correct’ the very effect you wanted to produce. If necessary, ask for a reprint, explaining what you were aiming for.
Seven Commandments for better exposure
Use the following Exposure Commandments list as a guide to making better exposures.

1. Use the camera as a guide.
The metering system in your camera is a very sophisticated device and for the most part your camera will choose the right exposure settings for a scene. All but the most basic models will allow you to see the settings for shutter and aperture in the viewfinder or on the LCD screen. Start to take notice of these settings and recognize how your camera reacts to different lighting situations.
2. Fill the frame with your subject.
Most meters use the subject that is in the center of the frame as a guide for the exposure of the whole image. A good way to ensure that your image is well exposed is to make sure the most important parts of the picture feature in the center of the frame and are therefore used to calculate exposure. Be warned though, filling the center of the frame on all occasions for the sake of good exposure can lead to monotonous symmetrically balanced compositions.
3. Off-center can mean bad exposure.
In wanting to be more creative with your compositions you may wish to try designing the frame with your subject a little off-center. Doing this may help the look of your images but your exposures may suffer. To solve this it is helpful to know that most cameras have the ability to lock exposure (and focus) by pushing down the shutter button halfway. For the situation where you want to create an off-center shot, point your camera at the subject and press the button halfway and then, without removing your finger, recompose the picture before pushing the button down fully to expose the photograph.
4. Watch out for dark subjects.
The camera’s meter works on averages. When you point your lens at a scene the meter averages the various colors, tones and brightnesses in that scene to a mid-gray. The shutter speed and aperture recommended by the camera is based on reproducing this mid-gray. Now for most multi-colored scenes this is a good approach but in special circumstances it just doesn’t work. Mostly dark subjects is just such a scene. Here the camera will try to suggest using settings that will result in the picture being too light (overexposed). Knowing this you can adjust your settings to compensate. Simply increase your shutter speed setting by one, or two speeds, or close down your aperture by a couple of f-stops. The amount you will need to alter these settings will be determined by your scene, but the beauty of digital is that you can preview your results straight away and reshoot if necessary.

5. Keep an eye on light color scenes.
For the same reason you should always be wary of light colored scenes as well. Prime examples are the type of images that we all take on holidays to the beach or the snow fields. Most pictures in these environments contain large areas of lightly colored subjects. Leave the camera to its own devices and you will end up with muddy, under-exposed (too dark) pictures. The solution is to add more exposure than what is recommended by the camera. You can do this manually as detailed in Commandment 4 or try using the Exposure Compensation feature on your camera. Usually labelled with a small plus and minus sign, this feature allows you to add of subtract exposure by simply pressing and turning the command dial. The change in exposure is expressed in fractions of f-stops. For the beach and snow scenes add 1.0 or 1.5 stops using this control.
6. Be careful of backlighting.
A nice portrait taken in front of an open window with a beautiful vista in the distance sounds like the scenario for a great photograph, but often the results are not the vision of loveliness that we expected. The person is too dark and in some cases is even a silhouette. Now this is not necessarily a bad thing, unless of course you actually wanted to see their face. Again your meter has been fooled. The light streaming in the window and surrounding the sitter has caused the meter to recommend using a shutter speed and aperture combination that cause the image to be underexposed. To rectify this increase the amount of light entering the camera either manually, or with your camera’s exposure compensation feature. Shoot the portrait again and preview the results on screen. If need be change the settings and shoot again.

7. Histograms to the rescue.
Being able to preview your work immediately on the LCD panel on the back of your camera is a real bonus for digital photographers. This means that a lot of the exposure mistakes made during the days when ‘film was king’ can be avoided via a simple check of the picture. Any under- or over-exposure problems can be compensated for on the spot and the image reshot. But let’s not stop there. Many cameras also contain a built-in graphing function that can actually display the spread of tones in your image. This graph, usually called a histogram, can be used to quickly and easily diagnose exposure problems. A bump of pixels to the right-hand end of the graph means an underexposed picture, a bump to the left end means overexposure.
As well as providing a way for the light (and image) to be focused onto the sensor or film, the lens on the front of your camera also has a creative side. The creative controls your camera lens offers include:
• focus control (allowing a sharp image of things at your main subject distance, and so giving them emphasis); and
• aperture control (allowing changes in depth of field as well as helping to control the amount of exposure).
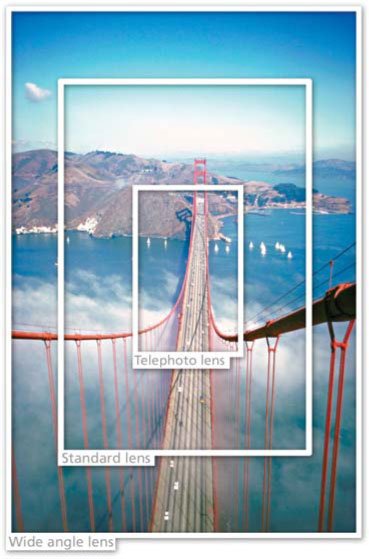
Figure 15.1 The focal length of the lens you use (or the zoom setting you pick) determines how much of the scene will fill your camera’s viewfinder. Long or telephoto lenses magnify distant parts of the view, whereas wide-angle lenses are used to encompass as much of the vista as possible.
But your camera offers a third possibility, which is to alter its lens focal length. When you change focal length you alter the image size. This makes a difference to how much of your subject the camera now ‘gets into the frame’.
Two practical advantages stem from changing the focal length of the lens that you use:
1 You can fill up the frame without having to move closer or further away from your subject.
2 The perspective, or look, of your picture can be altered by changing your subject distance and altering focal length.
‘Normal’ focal length
A normal (or ‘standard’) lens for a film-based 35 mm SLR camera has a focal length of 50 mm. On a 35 mm compact, a lens of 35 mm focal length or less is often fitted as standard, mainly for space-saving reasons. These lenses give an angle of view of 46° or 60° respectively. A 50 mm lens is accepted as making the images of objects at different distances in a scene appear in about the same proportions as seen in real life (judged from a typical size final print held at reading distance).
Changing to a lens of longer focal length (also described as a telephoto lens) makes the image bigger. So you have a narrower angle of view and fill up your picture with only part of the scene. A change to a shorter focal length (a wider angle lens) has the opposite effects (see Figures 15.1 and 15.2). But beware, the more extreme these changes are from normal focal length, the more unnatural the sizes and shapes of objects at different distances in your picture begin to appear.
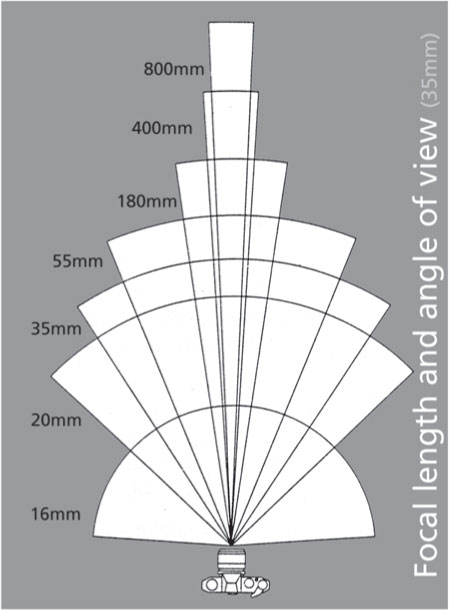
Figure 15.2 The angle of view of a lens is a measure of the amount of the scene that a lens includes in the photograph. Wide-angle lenses have a small focal length but a large angle of view; long lenses are the opposite.
Normal lenses and digital cameras
One of the factors that determines what is a standard lens is the size of the film or sensor in relation to the focal length of the lens. As most digital cameras have a sensor size that is smaller than a 35 mm frame, normal lenses for these cameras tend to have focal lengths shorter than 50 mm. This is even true for the SLR digital cameras that use the same lenses as the film camera version. To accurately compare the perspective of digital camera lenses, look for values that indicate the lens’s ‘35 mm comparative’ focal length. This converts the actual lens size to its equivalent on a 35 mm film camera.
In addition, knowing the Lens Multiplication Factor for a specific DSLR camera will enable you to calculate the difference in angle of view that results from using a sensor that is smaller in physical dimensions than a 35 mm frame. For instance, the multiplication factor for Nikon DSLR cameras is 1.5. This means that if I attached a lens that would be considered standard when shooting film – 50 mm – it will provide the angle of view equivalent to a 75 mm lens (50 mm × 1.5 = 75 mm) when used with a Nikon DSLR camera. This means that if I need a lens that will work as a normal lens on a Nikon DSLR then you will need to select a wider than normal lens to suit, i.e. a 35 mm lens on a digital DSLR has the same angle of view as a 52.5 mm lens on a film body.
Use the Lens Multiplication Factors listed in Table 15.1 as a guide to the angle of view changes with different lens and body combinations.
Table 15.1 The angle of view of lenses changes when they are attached to digital camera bodies which use a sensor that is smaller than a 35 mm film frame. Camera manufacturers commonly publish Lens Multiplication Factors to help users determine the changed angle of view compared to how it will appear when the lens is used with a film body. This table details the Lens Multiplication Factor for common camera models.
DSLR Camera |
Lens Multiplication Factor |
Equivalent lens length for a 50 mm standard lens on a film camera body |
Canon EOS-30D |
1.6 |
80 mm |
Canon EOS-1D Mark II |
1.3 |
65 mm |
Canon EOS-1Ds Mark II |
1.0 (full frame sensor) |
50 mm |
Canon 5D |
1.0 (full frame sensor) |
50 mm |
Canon 400D |
1.6 |
80 mm |
Fujifilm FinePix S3 |
1.5 |
75 mm |
Nikon D200 |
1.5 |
75 mm |
Nikon D80 |
1.5 |
75 mm |
Nikon D2Xs |
1.5 |
75 mm |
Nikon D40 |
1.5 |
75 mm |
Sony A100 |
1.5 |
75 mm |
Pentax K100D |
1.5 |
75 mm |
How changes are made
Compact cameras have non-removable lenses, so changes of focal length have to take place internally. Most compacts have a zoom lens, meaning it will change focal length in steps or by smooth continuous movement, which is usually powered by a motor. Pressing a ‘T’ (telephoto) button progressively increases focal length and narrows the angle of view. Pressing ‘W’ (wide angle) has the opposite effect. The zoom range, as written on the lens rim, might be 35–70 mm. This lens makes image details twice as large at 70 mm than at 35 mm and is described as a 2× zoom. The compact’s viewfinder optics zoom at the same time, to show how much your picture now includes.
Single lens reflex cameras have detachable lenses. You might start off with a normal 50 mm lens, which combines a large maximum aperture (f1.8) and a very reasonable price (because of the large numbers made). This normal lens can be interchanged with any of a very wide range of wide-angle or telephoto fixed focal length lenses. They could include anything from an extreme 8 mm fish-eye through to an extreme 1000 mm super telephoto (see Figure 15.3). Alternatively, the most popular lens that you can attach to your SLR is a variable zoom lens, where the focal length is controlled by a ring on the lens mount. Most SLR cameras are supplied with this type of lens as the default (see Figure 15.4).
Zoom lenses can cover a middle range (35–70 mm) or a tele zoom (70–210 mm, for example) or wide-angle range (18–35 mm). More recently, some manufacturers have even started to produce super-zooms that can cover a focal range as broad as 28–200 mm. Bear in mind, though, that general, non-professional, versions of these lenses – zooms, wide-angles or telephotos – tend to offer a maximum aperture of only f3.5 or f4 at best. Zooms and telephotos are also bigger and heavier than normal fixed focal length types. Professional models offer better maximum apertures but at a price and weight premium.
All this said, one of the real advantages of using a zoom lens with an SLR camera is the fact that any changes in focal length, depth of field and image size are all accurately seen in the viewfinder, thanks to the SLR camera’s optical system.
Using a longer focal length
A very useful reason for changing to a longer focal length telephoto lens is so that you can keep your distance from the subject and yet still make it fill your picture. In portraiture photography, changing to 70 or 100 mm allows you to take a head-and-shoulders type photograph without being so overbearingly close that you make the person self-conscious, or creating steepened perspective which distorts the face. Candid shots of children or animals are more easily shot with a 135 or 150 mm focal length lens from a greater distance, where you can keep out of their way. At sports events too, you are seldom permitted to approach close enough to capture action details with a normal lens. Both here and when photographing animals or birds in the wild, a lens of 210 mm or longer is worthwhile (see Figure 15.5).
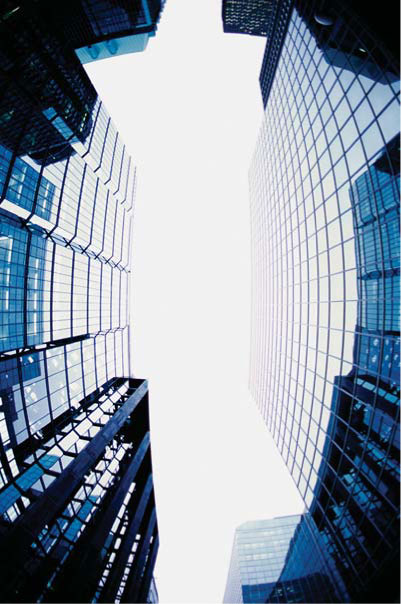
Figure 15.3 A fixed wide- and ultra-wide-angle lens can be added to many cameras and produces dramatic images displaying highly exaggerated perspective.
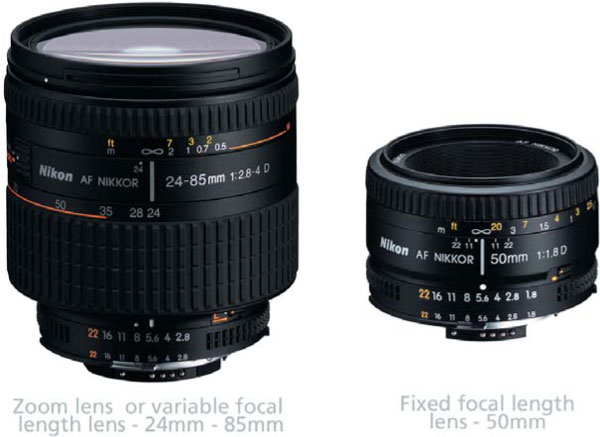
Figure 15.4 Fixed focal length lenses provide a single angle of view and are less popular than zoom lenses, which can be adjusted to provide a variety of focal lengths and therefore angles of view.
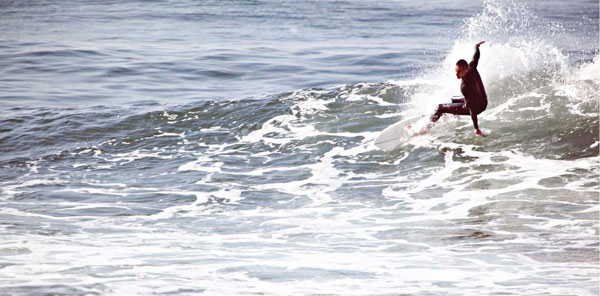
Figure 15.5 Long lenses are great for capturing close-up versions of distant scenes.
Long focal length lenses are also useful for picking out high-up, inaccessible details in monuments or architecture, or to shoot a landscape from a distance so that mountains on the horizon look relatively large and more dominant.
Remember, however, that longer focal length means less depth of field, so you must be very exact with your focusing. The more magnified image also calls for greater care to avoid camera shake than when using the normal focal length. So keep a tripod handy to help steady those zoomed-in photographs.
Using a shorter focal length
Zooming or changing to a shorter, wider angle, focal length (28 mm, for example) is especially useful when you are photographing in a tight space – perhaps showing a building or the interior of a room – without being able to move back far enough to get it all in with a normal lens. It will also allow you to include sweeping foregrounds in shots of architecture or landscape. The differences in scale between things close to you and objects furthest away are more exaggerated with wide lenses (see Figures 15.6 and 15.7). This effect can make people seem grotesque, even menacing. When you use lenses of 24 mm or shorter they begin to distort shapes, particularly near the corners of your picture. Another change you will notice when using a short focal length lens is the extra depth of field it gives, relative to a normal or a telephoto lens used at the same f-number setting.
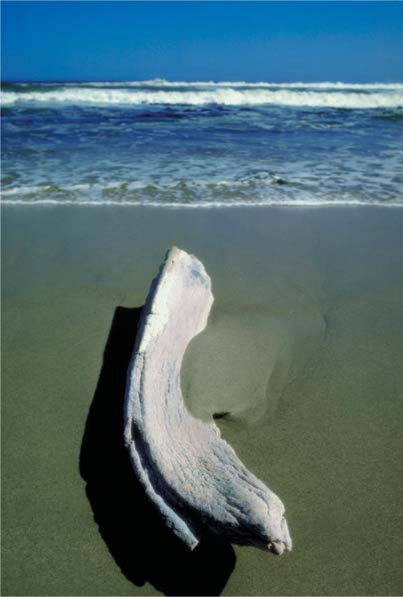
Figure 15.6 Wide-angle lenses provide quite a different perspective, making close subjects appear large in the frame and distant image parts much smaller.
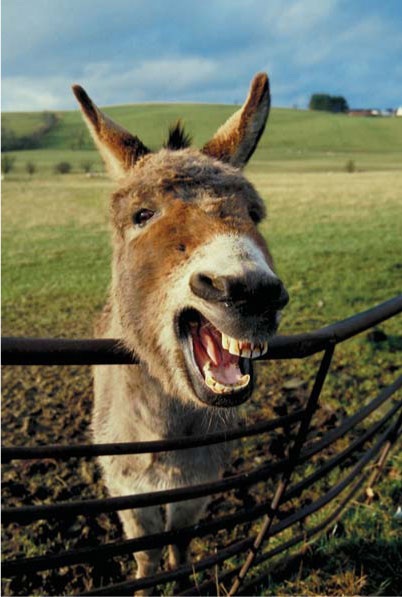
Figure 15.7 The wider the lens, the more dramatic the exaggerated perspective effect becomes. This is the reason why these lenses are not recommended for portrait photography and should be used with care for images where it is important not to show the type of distortion evident here.
Controlling perspective
It used to be said that the camera cannot lie, but using different focal length lenses you have almost as much freedom to control perspective in a photograph as an artist has when drawing by hand. Perspective is an important way of implying depth, as well as height and width, in a two-dimensional picture. A photograph of a scene such as a landscape shows elements smaller and closer together towards the far distance, and parallel lines seem to taper towards the background. The more steeply such lines appear to converge (the greater the difference in scale), the deeper a picture seems to the eye and the greater visual depth.
As Figure 15.8 shows, it’s all a matter of relative distances. Suppose you photograph (or just look) at someone from a close viewpoint so that their hands are only half as far from you as their face. Instead of hands and face being about equal in size, normal human proportions, the hands look twice as big.
Perspective is steep. But if you move much further back, your distance from both hands and face becomes more equal. Hands are only 1.2 times as big as the face. Perspective is flattened. Of course, being further away too, everything is imaged smaller – but by changing to a longer focal length lens you can fill up your picture again.
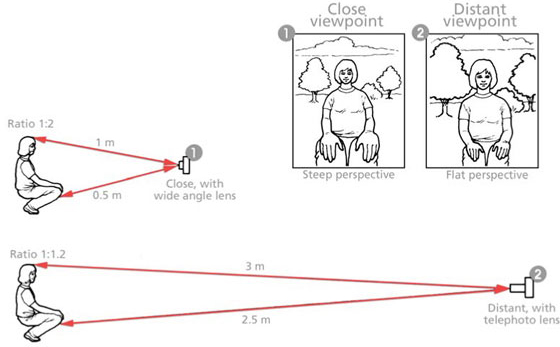
Figure 15.8 Whether drawing or photographing, a close viewpoint gives the steepest perspective (change of apparent size between nearest and furthest elements). Moving back reduces this ratio of nearest and furthest distances, flattening perspective.
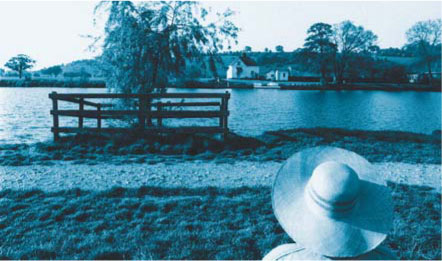
Figure 15.9 Changing both distance and focal length.
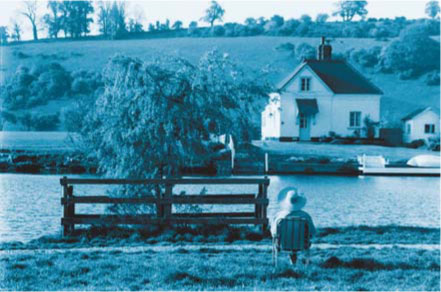
Figure 15.10 Changing both distance and focal length.
So to steepen perspective the rule is to move closer and then get everything in by either zooming to wide or changing to a wide-angle lens. A shot like Figure 15.9 makes you feel close to the person with the hat and distant from the cottage across the river. It was shot using a 35 mm lens with the camera some 10 m from the fenced tree. In Figure 15.10, the camera was moved to three times this distance and then the lens changed to a 100 mm to restore the tree to about its previous image size. But look what has happened to the cottage and the seated figure! There is now much less scale difference between foreground and background elements. With the camera further away, perspective has been flattened (painters would call this ‘foreshortening’) and the photograph has a cramped-up feel. Figure 15.11 also makes use of this foreshortening technique to flatten the distance between the two buildings in the picture.
Extremely short or long focal length lenses give results so unlike human vision they are really special effects devices. Figure 15.12, shot with an 8 mm fish-eye lens on an SLR, demonstrates its extreme depth of field as well as plenty of distortion (the building behind was one long straight wall). Lenses of this kind are very expensive, but lower cost ‘fish-eye attachments’ that fit over the front of a normal lens provide a more affordable option.
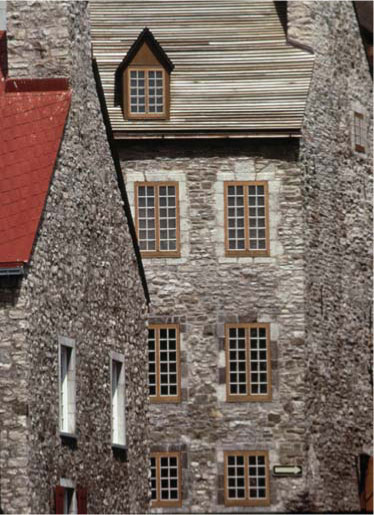
Figure 15.11 Longer lenses flatten the distance between the subjects in a scene. Here the buildings almost look as if they are sitting right next to each other rather than across the street.
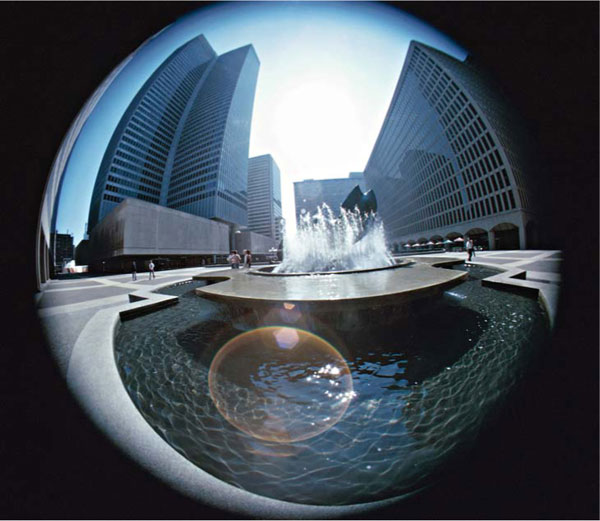
Figure 15.12 Fish-eye lenses (or lens attachments) provide a highly distorted view of scenes that with some lenses equals a 180º view. Notice also the large depth of field produced by virtue of the fact that this is an ultra-wide-angle lens.
Along with swapping film for a sensor, shooting with a digital camera also includes the ability to change a variety of in-camera capture settings that aren’t available to film shooters. In particular, digital camera users can modify the following capture characteristics on a frame-by-frame basis:
• Color strength – Options for altering the vibrancy or saturation of the color recorded.
• White balance – The ability to match the color of the light source in the scene with the way that the camera processes the color in order to achieve cast-free photos.
• Contrast – Controls for adjusting the contrast of the tones recorded.
• Sharpening – The ability to apply sharpening filters to photos during the capture and save process.
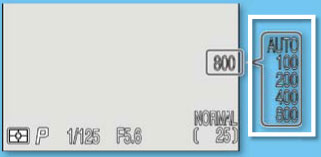
• ISO sensitivity – Changes the ability of the camera to record images in low light situations or when using very fast shutter speeds or small apertures.
• Noise reduction – Reduces the appearance of noise in high ISO or long exposure images.
Understanding how these ‘digital only’ capture characteristics work and the impact that they have on your image making is key to helping you create the best images that you can. This section introduces these controls and guides you through their use.
Color strength
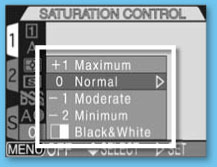
On most cameras you have the following saturation options:
Maximum – to produce vivid color in your images,
Normal – capture standard colors that are not boosted or reduced, good for most circumstances,
Moderate – to create a picture with a slight reduction in color strength,
Minimum – used to create low saturation color photographs, and some models also have
Black and White – or more correctly no color produced by reducing the color saturation so much that only the tone remains, and
Sepia – a simulation of the brown toned monochrome images of old.
Altering color saturation
The saturation, or vividness, of color within your images can either make, or break, them. Sometimes color is the cornerstone of a picture, providing both the focal point and design for the whole image. In these circumstances, desaturated or pastel hues will only serve to weaken the strength of the picture. In contrast, strong color elements can distract from important subject matter, causing the viewer to concentrate on the color rather than elsewhere in the image.
Digital shooters can take more control of the color content of their images by selecting just how dominant or vivid the hues will be in their pictures. For shots that rely on color the vividness can be increased, for those that work more effectively with subdued hues, the color strength can be reduced by way of the camera’s ‘saturation’ control. The effectiveness or suitability of each setting should be previewed and, if necessary, several images with different color settings can be captured and the final choice made later. Though not as critical for retention of details as the contrast settings, it is important to capture as much color information as possible when shooting. This does not mean that you shoot all subjects with maximum saturation, it is just a reminder that if color is important consider changing the saturation settings to suit your needs and your objectives (see Figure 16.1).
Many digital photographers leave the saturation setting at normal, preferring to adjust the strength of the color back at the desktop. This is especially true of black and white shooters who capture in color and then convert to gray using image editing software such as Photoshop or Photoshop Elements.
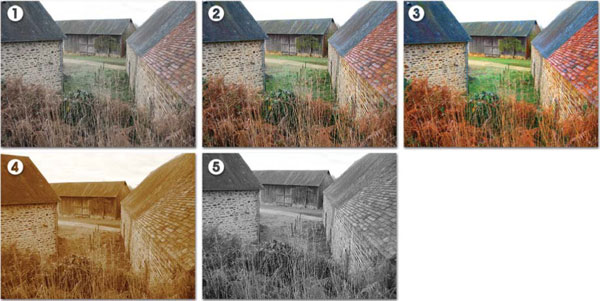
Figure 16.1 Adjusting the saturation in your image will change the strength of its colors. Reducing the saturation to zero will produce a black and white image, increasing the color strength to maximum will create a vivid picture. Some cameras even have the option to record the picture as a tinted monochrome like an old sepia print. (1) Minimum. (2) Normal. (3) Maximum. (4) Sepia. (5) Black and White.
Balancing the color of light
Our eyes are extremely complex and sophisticated imaging devices. Without us even being aware they adjust automatically to changes in light, color and level. For instance, when we view a piece of white paper outside on a cloudy day, indoors under a household bulb or at work with fluorescent lights, the paper appears white. Without realizing it our eyes have adapted to each different light source. Unfortunately digital sensors are not as clever. If I photographed the piece of paper under the same lighting conditions, the pictures would all display a different color cast. Under fluorescent lights the paper would appear green, lit by the household bulb (incandescent) it would look yellow and when photographed under cloudy conditions it would be a little blue. This situation occurs because the default settings of camera sensors are designed to record images without casts in daylight only. As the color balance of the light for our three examples is different to daylight – that is, some parts of the spectrum are stronger and more dominant than others – the pictures record with a cast. The color of the light source illuminating the subject in your picture determines the cast that will result.
Traditional shooters have been aware of this problem for years and because of the limitations of film, most photographers carried a range of color conversion filters to help change the light source to suit the film – tungsten light to daylight film, fluorescent light to daylight film, etc. Digital camera producers, on the other hand, are addressing the problem by including ‘White Balance’ functions in their designs. These features adjust the captured image to suit the lighting conditions it was photographed under. The most basic models usually provide automatic white balancing, but it is when you start to use some of the more sophisticated models that the choices for white balance correction can become a little confusing.
White Balance options
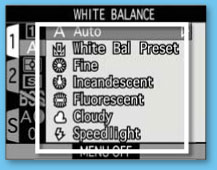
Most mid- to high-end digital compacts as well as all DSLR cameras provide a vast array of White Balance options that should have you shooting ‘cast free’ in any lighting conditions. The selections include:
• Auto,
• Fine or Daylight,
• Incandescent,
• Fluorescent,
• Cloudy,
• Speedlight or Flash, and
• White Balance Preset or Custom setting.
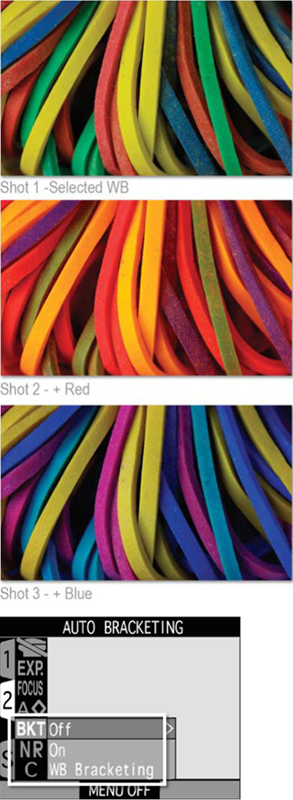
Figure 16.2 The White Balance Bracketing features available in some cameras capture several images with different settings, giving you the opportunity to select the best result back at the desktop.
Auto white balance
The Auto white balance function assesses the color of the light in the general environment and attempts to neutralize the midtones of the image. As with most ‘auto’ camera features, this setting works well for the majority of ‘normal’ scenarios. The feature does a great job with scenes that contain a range of colors and tones, but you may strike some difficulty, though, with subjects that are predominantly one color, or are lit from behind. Also keep in mind that some subjects, such as cream lace, are meant to have a slight color shift and the use of the auto feature in this case would remove the subtle hue of the original.
Apart from these exceptions most camera’s auto features produce great results that require little or no post-shooting color correction work. So it’s my suggestion that if in doubt try the auto setting first. Check the results on the preview screen of the camera and if there is a color cast still present, then move onto some more specific white balance options.
Light source white balance settings
The Daylight (Fine), Incandescent, Fluorescent, Cloudy and Flash (Speedlight) options are designed for each of these light types. With this group of settings the camera manufacturers have examined the color from a variety of each of these sources, averaged the results and produced a white balance setting to suit each light source. If you know the type of lighting that your subject is being lit by, then selecting a specific source setting is a good move.
Again, for the majority of circumstances these options provide great results, but for those times when the source you are using differs from the ‘norm’ you will also find a fine-tuning adjustment. With the light source set, the command dial is turned to adjust the color settings to suit a specific source. For example, with Nikon cameras set to the Daylight, Incandescent, Cloudy or Flash option, selecting positive values will increase the amount of blue in the image. Alternatively, negative numbers will increase the red/yellow content. In contrast if you have selected Fluorescent as your light source then the fine-tuning feature will generally allow you to adjust the white balance settings between green and magenta.
Applying fine-tuning automatically
If you are like me and find manually fine-tuning hampers the flow of your photography – shoot, stop, switch to menu, fine-tune white balance, shoot again, stop, switch to menu … you get the idea – then check to see if your camera has an Auto White Balance Bracketing option. This feature automatically shoots a series of three images starting with the standard white balance settings and then adding a little blue and finally a little red.
I find white balance bracketing particularly useful when shooting difficult subjects like multi-colored hand-blown glass or the collection of rubber bands in the example. As three separate images are saved I can make decisions about the most appropriate color by previewing them on my workstation’s large color calibrated monitor later rather than the small preview screen on the back of my camera in the field (see Figure 16.2).
Customizing your white balance
In a perfect world the scene you want to shoot will always be lit by a single source. In reality most scenarios are illuminated by a variety of different coloured lights.
For instance, what seems like a simple portrait taken in your lounge could have the subject partially lit by the incandescent lamp stand in the corner, the fluorescent tube on the dining room ceiling and the daylight coming through the windows. Because of the mixed light sources a specific white balance setting is not appropriate. Instead, you should use the customize, or preset, white balance option in your camera.
This feature works by measuring the light’s combined color as it falls onto a piece of white paper or gray card. The camera then compares this reading with a reference white swatch/gray card in its memory and designs a white balance setting specifically for your shooting scenario. With the process complete you are now set to shoot your portrait secure in the knowledge that you will produce cast-free images. Always remember though, because this is a customized process, if you decide to turn a light off, or move your subject to another position in the room, then you will need to re-measure and re-set you white balance (see Figure 16.3).
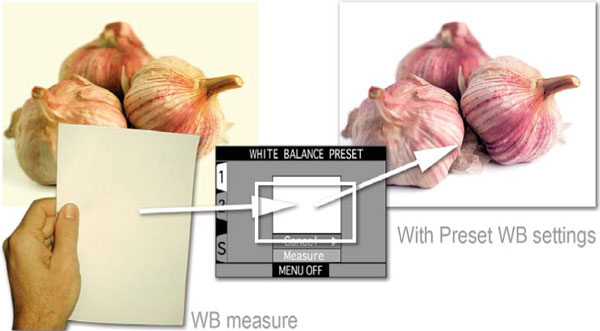
Figure 16.3 Customizing your white balance settings to suit the environment is the most accurate way of ridding your images of color casts in mixed lighting environments.
Over the years film shooters have had little control over the contrast in their images. Sure, dedicated black and white photographers could (and still can) manipulate the contrast in their multi-grade prints using filters and in their films using techniques like the Zone system, but on the whole the contrast that was present in the scene when you captured the frame is what you are stuck with. This is especially true in color photography, where these specialized development techniques do not apply.
Thankfully this is not the case for most digital photographers. Almost all intermediate to high-end cameras contain a series of settings that control how the range of brightness in a scene is recorded to memory. With some camera manufacturers, contrast control features are even becoming available on modestly priced entry-level models.
Contrast choices
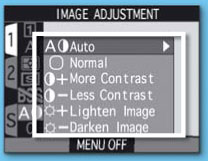
Generally you will have a choice between contrast increasing and contrast decreasing options with some camera models also providing an auto setting:
Auto – With this option the contrast setting is selected and set by the camera according to the lighting conditions in the scene. Subjects with a large brightness range will be recorded with a low contrast setting, whereas flatly lit scenes will be improved with a high contrast setting. This is a good option to store as your camera’s default.
Normal – In this mode the contrast setting is fixed. This setting is useful for standard ‘normal’ lighting conditions, but should be used cautiously if the brightness in the scene is fluctuating. Some photographers prefer to keep their camera at this setting and apply any contrast correction at the desktop using their favorite image editing program.
More Contrast – Used for low-contrast shooting conditions to enhance the tonal values of the captured image. This setting is designed for images shot under overcast skies, landscapes and general low-contrast scenes.
Less Contrast – This option reduces the contrast of brightly lit scenes. It should be used in situations such as sunlit beach and snow shots or situations where strong light creates dark shadows.
Contrast control in action
For the true seeker of quality images the contrast control is one of the most useful features for the digital camera owner. When you are faced with shooting a beach, or snow scene, on a sunny day the range of brightness between the lightest and darkest areas can be extremely wide. Set to normal your camera’s sensor can lose detail in both the highlight and shadow areas of the scene. Delicate details will either be converted to white or black. Changing the setting to ‘less contrast’ will increase your camera’s ability to capture the extremes of the scene and preserve otherwise lost light and dark details.
In the opposite scenario, sometimes your subject will not contain enough difference between shadows and highlights. This situation results in a low-contrast or ‘flat’ image. Typically pictures made on an overcast winter’s day will fall into this category. Altering the camera’s setting to ‘more contrast’ will spread the tonal values of the scene over the whole range of the sensor so that the resultant picture will contain acceptable contrast (see Figure 16.4).
‘How do I know that my scene either has too much or too little contrast?’ The beauty of shooting digitally is that we can preview our image immediately. There is no waiting around for processing – the results are available straight away. If you are in a situation where you feel that the image may be enhanced by altering the contrast, shoot a couple of test pictures and assess the results. Check in particular the shadow and highlight areas. Any noticeable loss of detail in either of these two places will warrant a contrast change and a reshoot.
Some cameras have a histogram function that will visually graph the spread of the pixels in the image. This feature takes the guesswork out of determining whether your image is too flat of too contrasty. A bunching of pixels in the center of the graph usually indicates a need for more contrast, whereas a mass grouping at both ends requires a reduction in contrast.
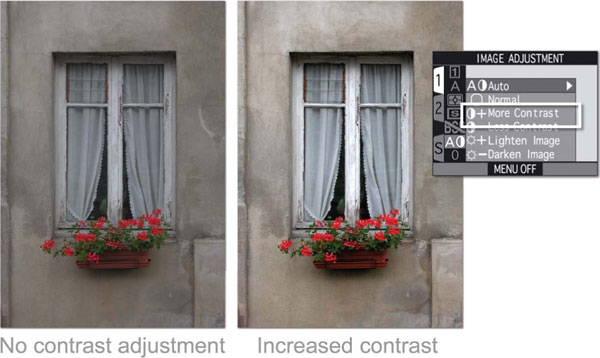
Figure 16.4 Most mid- to high-end digital cameras provide some control over how a scene’s contrast is processed. Selecting the ‘More Contrast’ setting will increase the recorded contrast for an otherwise flat or low-contrast scene.
Along with good exposure control, selecting the right contrast setting is critical if the greatest amount of the scene’s detail is to be captured, processed and saved. A little time and care taken to adjust your contrast and exposure options so that they better suit the subject will always pay big dividends in terms of great image quality.
Sharpening in-camera
Despite the high resolution of many modern sensors and specially developed digital lenses the captured image contains a degree of softness that is a direct result of the capturing process. To help create crisper images camera manufacturers include in-camera sharpening as one of their enhancement options. Designed to improve the crispness across the picture, these features enhance the edge of objects by increasing the difference in tones between adjacent pixels. In essence, the sharpening function boosts the contrast of the image at a pixel level. This change, when viewed from a distance, produces a noticeable increase in overall visual appearance sharpness.
Sound confusing? Well it doesn’t need to be. You don’t really need to worry about how the feature works, but it does pay to remember that the act of sharpening changes the pixels in your image and just like any other enhancement tool (in-camera or on-desktop), too much sharpening can destroy you picture. So select your enhancement level carefully.
I use the terms ‘appearance’ and ‘visual sharpness’ on purpose as it is important to make a distinction between the sharpness that comes from quality lenses, well focused and steadily held, and techniques used to enhance the image such as the features discussed here. After all, no amount of in-camera sharpening will ‘re-focus’ a blurry picture!
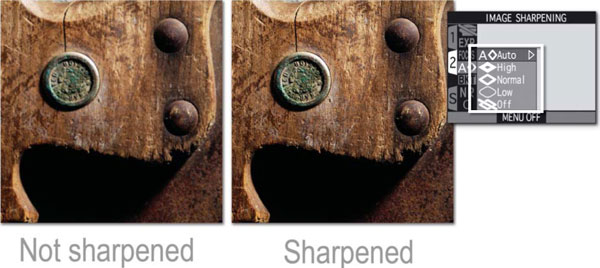
Figure 16.5 Applying a little sharpening during the save process will make your images appear crisper. Sharpening can also be applied after capture in the image editing stage.
Sharpening settings
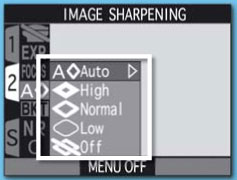
Photographers have a range of settings when it comes to selecting the type of in-camera sharpness to apply:
Auto – This option allows the camera to search for the optimum settings for each individual image. The picture is analyzed and sharpening applied to the edges of contrasting objects. The way that sharpening is applied will change as the subject matter changes. If you don’t want to sharpen on the desktop this is a good default setting.
High or Maximum – This option drastically increases the overall sharpness of all images. In some cases the change is so great that the sharpening is very obvious and distracting. Use this setting carefully, reviewing your results as you shoot.
Normal or Standard – This option applies the same level of sharpening to all images irrespective of subject matter. Designed as the ‘most’ suitable setting for ‘most’ subjects ‘most’ of the time there will be occasions when this selection applies too much sharpening as well as situations when not enough sharpening occurs. Generally Auto provides a better all round option.
Low or Minimum – This option is for shooters who worry about what their camera is doing to their images. This setting applies the least sharpening. A good choice if you generally apply sharpening via an image editing package.
No – This option is for dedicated image editors only. The pictures captured with this setting will appear soft if you do not apply some desktop sharpening. Making this the default on your camera commits you to manually sharpening every image you take. Select carefully.
Auto, high, low or no sharpening?
How do I know what settings to use? There are two schools of thought for deciding when and where to apply sharpening to your images. Some shooters apply sharpening in camera, using one of the specific settings (high, normal, low) or the auto option. Others prefer to leave their images untouched, or use the minimum setting so that they can use the sharpening tools built into their favorite image editing program to enhance their pictures.
Most basic digital cameras provide the option of turning the sharpening feature off. Doing this does means that you take back control over ‘where and how’ sharpening is applied to your image, but it also adds another, sometimes unwanted, step to the enhancement process. For situations where you have plenty of time to tinker, and where absolute quality is required, this approach certainly does produce great results, but for most day-to-day imaging applying a little sharpening in-camera is the best option.
For those of us growing up with film, the idea of an ISO number (or if I really show my age – ASA number) indicating how sensitive a particular film is to light is not new. These values, ranging from slow (50 ISO) through medium (200 ISO) to high speed (1600 ISO), have been one way that photographers have selected which film stock to choose for particular jobs. Each film type had its advantages and disadvantages and selecting which was best was often a compromise between image quality and film speed. If the day’s shooting involved a variety of different subjects then the decision was always a difficult one, as once the choice was made you were stuck with the same stock for the whole of the roll.
In the digital era the restrictions of being locked into shooting with a single film with all its particular abilities and flaws has been lifted. The ISO idea still remains. Though strictly, we should refer to it as ‘ISO equivalence’ as the original ISO scale was designed specifically for film not CCDs. Most cameras have the ability to change the ISO equivalent setting for the sensor, with a growing number offering settings ranging from 100 to 1600. Each frame can be exposed at a different ‘ISO’ value, releasing the digital shooter from being stuck with a single sensitivity through the whole shooting session. Oh happy days!
Unlike changing film, where one photographic recording device was swapped with another that was either more or less sensitive, changing the ISO setting of a digital camera doesn’t swap the old sensor with a new one. Instead, selecting a higher ISO amplifies the output signal from the sensor, which allows the photographer to capture images with less light. The downside of this freedom is that amplifying the signal has the undesirable effect of increasing the noise or grainy look of our digital files. So you should take care when choosing to work at high ISO values as such a decision does have a direct effect on the image quality of your captured files.

Figure 16.6 High ISO settings are generally used to capture photographs in low light situations but care should be taken when using high values as they can produce photos with noticeably more noise than the same picture taken with a lower ISO setting.
ISO equivalence
Where you are provided with a choice of ISO settings use the following guide to help you select which value to use for specific shooting scenarios:
100/200 ISO – Low ISO settings provide the best overall image quality with good detail and gradation of color and very little, if any, noise. Be careful of camera shake or subject movement when shooting with these settings as they often require you to use comparatively slow shutter speeds. Use these settings when there is plenty of light or when you have a tripod available to hold the camera steady.
400 ISO – Values around 400 ISO often provide a good balance between noise and sensitivity when shooting with overcast or winter light or even indoors. With most modern cameras the level of noise introduced at this setting is still acceptable and the overall color and detail are also of a high standard.
800/1600 ISO – Generally the highest ISO values available on your camera will enable you to photograph in very low light or with extremely fast shutter speeds but this flexibility comes at a price. Though much improved in recent years the performance of all but the most expensive sensors at these ISO values is such that the noise is very apparent and degrades both the detail and the color gradation of the photos. You should only use these settings when not employing them will mean missing the photograph. A far better alternative is to use faster lenses (ones with a large maximum apertures such as f1.4 or f2.0) coupled with a tripod in low light situations.
Adjusting sensitivity
As we have already seen in Section 2 of this text, most entry-level digital cameras usually only have fixed or fully auto ISO settings, whereas more expensive prosumer and professional models provide a variety of ISO settings. Changing the ISO is usually a simple matter of holding down the ISO button whilst turning a command dial. The changed setting is reflected in the LCD screen at the back of the camera and, in some cases, in the viewfinder as well.
The Auto ISO feature
For most scenarios it is a good idea to leave the camera set to the Auto ISO setting. This option keeps the camera at the best quality setting, usually 100, when the photographer is shooting under normal conditions, but will change the setting to a higher value automatically if the light starts to fade. In specific shooting circumstances, that require higher ISO values, you always have the option to manually override the auto setting and select a specific ISO value suited to the scene.
Irrespective of if you decide to select your ISO manually, or let the camera automatically adjust the chip’s sensitivity for you, always keep in mind that choosing the lowest setting possible will give you the sharpest and best quality images overall – so use it when you can.
Pro’s Tip – When using higher ISO settings turn off the camera’s sharpening feature as this function can tend to exaggerate the noise that is present in the image.
What is sensitivity?
Sensitivity in digital terms is based on how quickly your camera’s sensor reacts to light. The more sensitive a chip is the less light is needed to capture a well-exposed image. This means that higher shutter speeds and smaller aperture numbers can be used with fast sensors. Sports shooters, in particular, need cameras with sensitive chips, to freeze the action. The same is true for tasks that require photographing in low light situations.
With such advantages we would all be shooting with our cameras set to the highest sensitivity possible, but there is a downside. Just as films with high ISO values produce images with large grain, using the more sensitive settings for your digital camera will increase the amount of noise (digital grain) present in your images. The photographer needs to weigh up the merits of higher sensitivity with the disadvantages of lower image quality when choosing what ISO equivalent value to use for a specific shooting task.
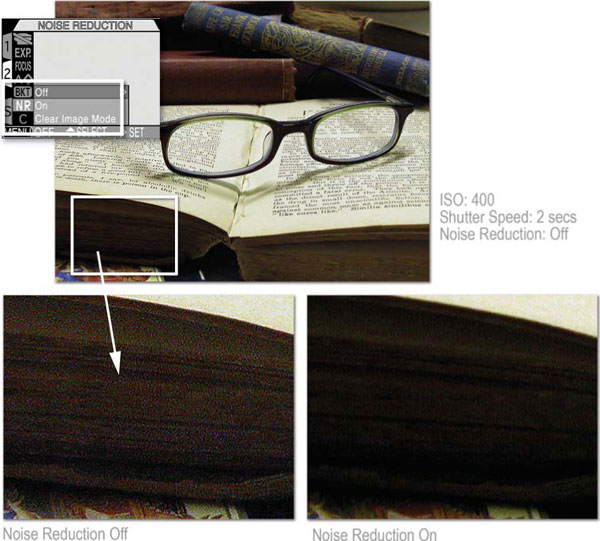
Figure 16.7 The example is taken with settings of both a high ISO and long exposure, producing noticeable noise in the shadow areas of the image. A second exposure was made with the noise reduction feature activated and the results show much less noise, especially in the shadow areas of the photo.
The problem of noise
Noise is usually seen as a series of randomly spaced, brightly colored pixels that sometimes appear in your digital images. A large amount of noise in an image will reduce the overall sharpness and clarity of the picture. Particularly noticeable in shadow areas, there are two distinct factors that control the amount of noise present in a picture:
• High ISO – Increasing the ISO setting of your camera will increase the level of noise in the image. Images exposed with an 800 setting will contain more of these randomly spaced and brightly lit pixels than the same photograph exposed with a 100 ISO setting.
• Long exposure times – Pictures taken with exposure times longer than 1/2 second will contain more noise than those shot with a fast shutter speed. The longer the exposure the more noticeable the noise becomes.
As both these factors come into play when shooting in low light situations you will find that the images you take at night are more susceptible to noise problems than those photographed on a bright sunny day.
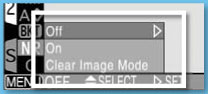
Noise reduction
More and more digital cameras now include noise reduction (NR) features as part of their standard feature set. Many models activate the feature automatically, and sometimes without the photographer knowing, when high ISO settings and/or long exposure times are used. Other models provide a manual control, letting the photographer choose when and with which images the noise reduction system is used.
In a perfect world there would never be an occasion when there was a need for photographers to use either a high ISO value or a long exposure and so all the images produced would be beautifully noise free. But alas this is not the case and all too regularly you will find yourself shooting in environments with very little light. Does this mean that we have to put up with noise-filled images for the sake of shooting convenience? The answer is no.
Most mid- to high-range digital cameras now contain specialized noise reduction or suppression features that help to minimize the appearance of random pixels in images produced with either high ISO or long exposure settings. These tools attempt to isolate and remove the errant pixels from the image, creating much cleaner and sharper images in the process.
For example, some cameras in the Nikon range, have a choice of two noise reduction systems that function in slightly different ways:
• NR (Noise Reduction) – This is the standard noise reduction setting that functions on all of the camera’s different resolution settings as well as in conjunction with other features such as Best Shot Selector and Exposure Bracketing. Taking at least twice as long as a standard image to process and record, the camera’s in-built software attempts to identify and eliminate noisy pixels in the image.
• Clear Image Mode – This setting minimizes noise and increases color gradation by capturing a sequence of three images of the one scene. The first two pictures are exposed with the shutter open, the third with the shutter closed. Using some sophisticated processing the three images are then compared and a single ‘noise reduced’ image is recorded. As several images are recorded it is recommended that a tripod be used when employing this feature.
The noise reduction features are activated via the camera’s menu system. When noise reduction is in effect and the shutter speed is less than 1/30th of a second a small NR appears in the viewfinder. So when you are selecting a high resolution or long exposure time consider using your camera’s noise reduction techniques to increase the quality of the resulting images. See Figure 16.7.
Why don’t I just leave the noise reduction feature turned on?
Photographers want the best quality images all the time so why not set up your camera so that the noise reduction features are left permanently on? In theory this sounds fine but in practice the extra processing and recording time taken to reduce the level of noise in an image would greatly increase the time period between successive shots. In most normal shooting circumstances, where noise isn’t a problem, the extra time lag between shots would hamper the photographer’s ability to shoot successive images quickly.
There is also a school of thought that says that any image enhancement activities (including noise reduction) are best undertaken back at the desktop with photo editing software such as Photoshop or Photoshop Elements. Photographers are then able to carefully customize the noise reduction process to suit each image which, in turn, should produce better results than the automatic and speedy approach used by the in-camera feature.
In the last section we looked at how many new cameras now offer the option to save captured photos in the RAW file format. We also saw that RAW capture brings with it an extra processing step that is required to convert the RAW image data to a format that is more easily edited with programs such as Photoshop and Photoshop Elements. What we haven’t yet explored is the impact that shooting RAW has on the digital-only camera characteristics examined here. But to do that we need to look at the RAW format a little more closely.
So what is in a RAW file?
It is helpful to think of a RAW file as having three distinct parts (see Figure 16.8):
• Camera data, usually called the EXIF or metadata, including things such as camera model, shutter speed and aperture details, most of which cannot be changed.
• Image data which, though recorded by the camera, can be changed in a RAW editing program such as Adobe Camera RAW (ACR) and the settings chosen here directly affect how the picture will be processed. Changeable options include color depth, white balance, saturation, distribution of image tones (contrast), noise reduction and application of sharpness.
• The image itself. This is the data drawn directly from the sensor in your camera in a non-interpolated form. For most RAW-enabled cameras, this data is supplied with a 12 or 16 bits per channel color depth, providing substantially more colors and tones to play with when editing and enhancing than found in a standard 8 bits per channel camera file.

Figure 16.8 RAW files are constructed of three basic parts – camera data, image data and the image itself. As the majority of the image data settings, such as white balance, sharpness and contrast, can be changed or fine-tuned in the RAW conversion process, many photographers do not spend the time adjusting these capture settings at the time of shooting. Instead they prefer to make these alterations later at the desktop via a RAW conversion utility such as Adobe Camera RAW (see Figure 16.9).
But how does this impact on my day-to-day shooting?
Most experienced photographers pride themselves on their ability to control all the functions of their cameras. Often their dexterity extends way beyond the traditional controls such as aperture, shutter speed and focus to ‘digital-only’ features we have examined here, such as white balance, contrast, sharpness, noise reduction and saturation. For the best imaging results they regularly manipulate these features to match the camera settings with the scene’s characteristics.
For instance, a landscape photographer may add contrast, boost saturation and manually adjust the white balance setting of his or her camera when confronted with a misty valley shot early in the morning. In contrast, an avid travel photographer may choose to reduce contrast and saturation and switch to a daylight white balance setting when photographing the floating markets in Thailand on a bright summer’s day. It has long been known that such customization is essential if you want to make the best images possible and are capturing in a JPEG or TIFF format. But as we have already seen, settings such as these, though fixed in capture formats such as TIFF and JPEG, are fully adjustable when shooting RAW (see Figure 16.9).
What does this mean in our day-to-day photography? Well, if after documenting some interiors you accidentally forget to switch the white balance setting from tungsten back to daylight before commencing to photograph outside, all is not lost. The white balance setting used at the time of capture is recorded with the RAW file but is only applied when the picture is processed. This means that when you open the images in a RAW converter, the picture is previewed using the capture setting (tungsten), but you can easily select a different option to process the file with. In this example it would mean switching the setting from tungsten back to daylight in the white balance menu of the conversion software. All this happens with no resultant loss in quality. Hooray!

Figure 16.9 When you open a RAW file in Photoshop Elements or Photoshop the Adobe Camera RAW editor is activated, providing you with a range of sophisticated controls for the enhancement and conversion of your RAW files. Many of the digital-only capture characteristics are still adjustable at this stage in the conversion process using the controls grouped here. (1) Adjust tab options. (2) Detail tab options. Photoshop Elements version of Adobe Camera RAW.
The same situation exists for other digital controls such as contrast, saturation and, with some cameras, sharpness and noise reduction. As before, the settings made at the time of shooting will be used as a basis for initial RAW previews but these are not fixed and can be adjusted during processing. This leads some people to believe that there is no longer any need to pay attention to these shooting factors and so consequently they leave their cameras permanently set to ‘auto everything’ (auto contrast, auto white balance, standard saturation), preferring to fix any problems back at the desktop. Other photographers continue to control their cameras on a shot-by-shot basis, believing that an image captured with the right settings to start with will end up saving processing time later. Both approaches are valid and which suits you will largely get down to a personal preference and the choice of whether you would prefer to spend your time manipulating your camera or computer.

1 Shallow depth of field. Set your camera lens to the smallest f-stop number and longest focal length it contains. Proceed to photograph a series of objects at the closest distance possible. Notice how the long focal length, small f-stop and close distance create images with very small depth of field or areas of focus.
2 All things sharp. Shoot a second series of pictures with the reverse settings to those above – i.e. use wide-angle lenses (or zoom settings), big f-stop numbers and medium ‘subject-to-camera’ distances. Notice that the images you create with these settings have large zones of focus extending from the foreground into the distance.
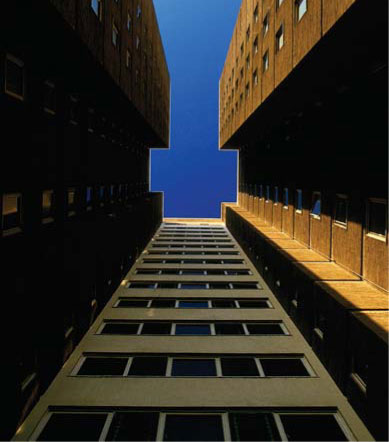
3 Dramatic architecture using exaggerated perspective (see Figure 15.3). Many wide- and ultra-wide-angle lenses produce images displaying highly exaggerated perspective. Subjects close to the lens loom large and those in the distance seem microscopic in comparison. This type of perspective not only gives us a wider angle of view, but also provides us with a great opportunity to create some very dramatic pictures. Graphic architectural photographs with strong hard-edged lines and contrasting shapes and colors work particularly well. Using a modern building in your local area as a starting point, compose and photograph a series of dramatic, wide-angle architectural images. Don’t be afraid to try a range of different angles – shoot up, shoot down, move in closer, try a little further back.
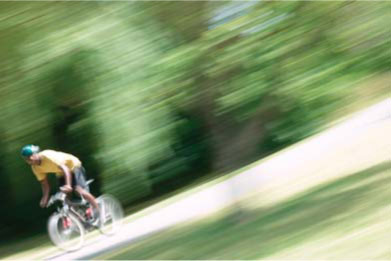
4 Panning techniques. As we have seen, using a slow shutter speed blurs the moving subjects in an image. An extension of this technique involves the photographer moving with the motion of the subject. The aim is for the photographer to keep the subject in the frame during the exposure. When this technique is coupled with a slow shutter speed, it’s possible to produce shots that have sharp subjects and blurred backgrounds. Try starting with speeds of 1/30 second, gradually reducing them to around 1/4 second. Practice by shooting a subject that contains repeated action, such as a cycling or amateur motor sports event.
5 White balance precision. Using a simple household bulb as the main light source, set up and shoot a still-life photograph using a range of white balance settings. Be sure to try the preset or custom option as well as those designed to match the light source (flash, tungsten, daylight, etc.). Import the pictures into your editing program ensuring not to alter the color of each photo in the process. Assess which photo provides the most neutral (cast-free) result.
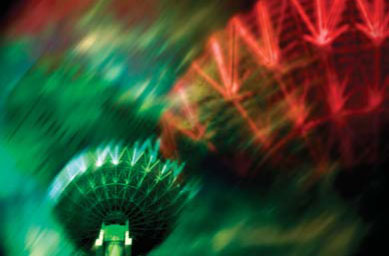
6 Experiment with blur. With a camera offering settable shutter speeds, expose a series of images at settings of ISO 100 and 1/8 second. Include people and traffic on the move, preferably close. Use your camera hand-held, on a support, and panning (in various directions). Compare results.
7 Advance a sunset. Take a quick sequence of four color pictures of a landscape at late dusk. Give the first one correct exposure, progressively halved as you continue. Which print gives the most atmospheric result?
8 Angles of view. Using a cardboard frame sliding on a transparent ruler, simulate the use of different focal length lenses. A 24 mm × 36 mm slide mount positioned 50 mm from your eye matches the angle of view of a 35 mm SLR normal lens.

9 Matching contrast. On a sunny day capture a series of photos in JPEG or TIFF format with and without the use of the camera’s contrast reduction setting. Under the same lighting conditions photograph a second group of pictures using the RAW format. Process the RAW files twice, once with no contrast change and the second time using the contrast controls in the conversion software to reduce contrast. Compare your results.
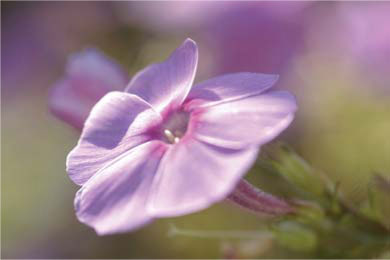
10 Maintaining monochrome contrast. Using the Black and White or No Saturation option on your digital camera, photograph a series of flowers of varying colors. Try to predict how each of the colors will be converted to grayscale by the camera. Look for a set of subject colors that retain the same contrast when shot in black and white as they do when photographed in color. If your camera doesn’t have a black and white option photograph in color and then perform the conversion using the tools in Photoshop or Photoshop Elements.