Android apps are written in Java and use various Java application program interfaces (APIs) . Because you’ll want to write your own apps, but may be unfamiliar with the Java language and these APIs, this book teaches you about Java as a first step into Android app development. It provides you with Java language fundamentals and Java APIs that are useful when developing apps.
This book illustrates Java concepts via non-Android Java applications. It’s easier for beginners to grasp these applications than corresponding Android apps. However, we also reveal a trivial Android app toward the end of this chapter for comparison purposes.
An API is an interface that application code uses to communicate with other code, which is typically stored in a software library. For more information on this term, check out Wikipedia’s “Application programming interface” topic at http://en.wikipedia.org/wiki/Application_programming_interface.
This chapter sets the stage for teaching you the essential Java concepts that you need to understand before embarking on an Android app development career. We first answer the question: “What is Java?” Next, we show you how to install the Java SE Development Kit (JDK) and introduce you to JDK tools for compiling and running Java applications.
After presenting a few simple example applications, we show you how to install and use the open source Eclipse IDE (integrated development environment) so that you can more easily (and more quickly) develop Java applications and (eventually) Android apps. We then provide you with a brief introduction to Android and show you how Java fits into the Android development paradigm.
What Is Java?
Java is a language and a platform originated by Sun Microsystems and later acquired by Oracle. In this section, we briefly describe this language and reveal what it means for Java to be a platform. To meet various needs, Oracle organized Java into two main editions: Java SE and Java EE. A third edition, Java ME for embedded devices, plays no prominent role nowadays. This section briefly explores each of these two editions.
Java Is a Language
Java is a language in which developers express source code (program text). Java’s syntax (rules for combining symbols into language features) is partly patterned after the C and C++ languages in order to shorten the learning curve for C/C++ developers.
Java and C/C++ share the same single-line and multiline comment styles. Comments let you document source code.
Many of Java’s reserved words are identical to their C/C++ counterparts (for, if, switch, and while are examples) and C++ counterparts (catch, class, public, and try are examples).
Java supports character, double-precision floating-point, floating-point, integer, long integer, and short integer primitive types via the same char, double, float, int, long, and short reserved words.
Java supports many of the same operators, including arithmetic (+, -, *, /, and %) and conditional (?:) operators.
Java uses brace characters ({ and }) to delimit blocks of statements.
Java supports an additional comment style known as Javadoc.
Java provides reserved words not found in C/C++ (extends, strictfp, synchronized, and transient are examples).
Java doesn’t require machine-specific knowledge. It supports the byte integer type (see http://en.wikipedia.org/wiki/Integer_(computer_science)), doesn’t provide a signed version of the character type, and doesn’t provide unsigned versions of integer, long integer, and short integer. Furthermore, all of Java’s primitive types have guaranteed implementation sizes, which is an important part of achieving portability (discussed later). The same cannot be said of equivalent primitive types in C and C++.
Java provides operators not found in C/C++. These operators include instanceof and >>> (unsigned right shift).
You’ll learn about single-line, multiline, and Javadoc comments in Chapter 2. Also, you’ll learn about reserved words, primitive types, operators, blocks, and statements in that chapter.
Java was designed to be a safer language than C/C++. It achieves safety in part by not letting you overload operators and by omitting C/C++ features such as pointers (storage locations containing addresses; see http://en.wikipedia.org/wiki/Pointer_(computer_programming)).
Java also achieves safety by modifying certain C/C++ features. For example, loops must be controlled by Boolean expressions instead of integer expressions where 0 is false and a nonzero value is true. (There is a discussion of loops and expressions in Chapter 2.)
These and other fundamental language features support classes, objects, inheritance, polymorphism, and interfaces. Java also provides advanced features related to nested types, packages, static imports, exceptions, assertions, annotations, generics, enums, and more. Subsequent chapters explore most of these language features.
Java Is a Platform
Java is a platform consisting of a virtual machine and an execution environment. The virtual machine is a software-based processor that presents an instruction set, and it is commonly referred to as the Java virtual machine (JVM) . The execution environment consists of libraries for running programs and interacting with the underlying operating system (also known as the native platform).
The execution environment includes a huge library of prebuilt class files that perform common tasks, such as math operations (e.g., trigonometry) and network communications. This library is commonly referred to as the standard class library .
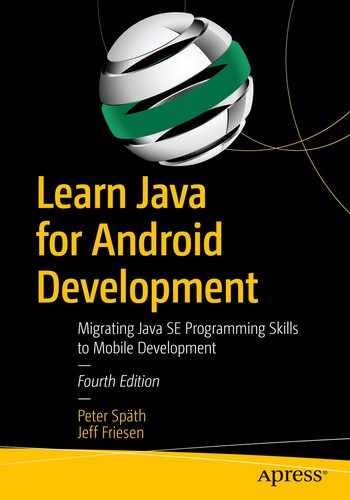
The Java compiler translates Java source code into Java object code consisting of bytecode and associated data
The compiler stores a program’s bytecode and data in files having the .class extension. These files are known as class files because they typically store the compiled equivalent of classes, a language feature discussed in Chapter 3.
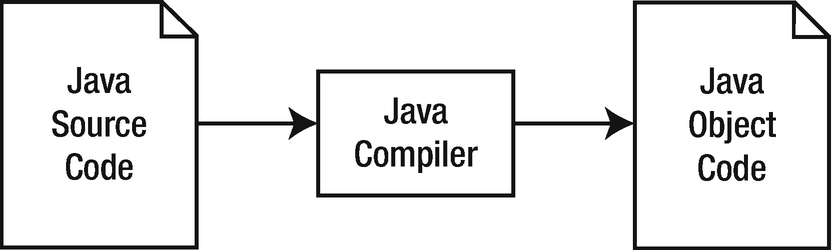
A Java program executes via a tool that loads and starts the JVM and passes the program’s main class file to the machine. The JVM uses its classloader component to load the class file into memory.
After the class file has been loaded, the JVM’s bytecode verifier component makes sure that the class file’s bytecode is valid and doesn’t compromise security. The verifier terminates the JVM when it finds a problem with the bytecode.
Assuming that all is well with the class file’s bytecode, the JVM’s interpreter component interprets the bytecode one instruction at a time. Interpretation consists of identifying bytecode instructions and executing equivalent native instructions.
Native instructions (also known as native code) are the instructions understood by the native platform’s physical processor.
When the interpreter learns that a sequence of bytecode instructions is executed repeatedly, it informs the JVM’s just-in-time (JIT) compiler to compile these instructions into native code.
JIT compilation is performed only once for a given sequence of bytecode instructions. Because the native instructions execute instead of the associated bytecode instruction sequence, the program executes much faster.
During execution, the interpreter might encounter a request to execute another class file’s bytecode. When that happens, it asks the classloader to load the class file and the bytecode verifier to verify the bytecode before executing that bytecode.
The JVM provides all of the necessary components for loading, verifying, and executing a class file
The platform side of Java promotes portability by providing an abstraction over the underlying platform. As a result, the same bytecode runs unchanged on Windows, Linux, Mac OS X, and other platforms.
Java was introduced with the slogan “write once, run anywhere.” Although Java goes to great lengths to enforce portability (such as defining an integer always to be 32 binary digits [bits] and a long integer always to be 64 bits (see http://en.wikipedia.org/wiki/Bit to learn about binary digits), it doesn’t always succeed. For example, despite being mostly platform independent, certain parts of Java (such as the scheduling of threads, discussed in Chapter 7) vary from underlying platform to underlying platform.
The platform side of Java also promotes security by doing its best to provide a secure environment (such as the bytecode verifier) in which code executes. The goal is to prevent malicious code from corrupting the underlying platform (and possibly stealing sensitive information).
Many security issues that have plagued Java have prompted Oracle to release various security updates.
Java SE and Java EE
Java Platform, Standard Edition (Java SE ) : The Java platform for developing applications, which are stand-alone programs that run on desktops.
Java Platform, Enterprise Edition (Java EE ): The Java platform for developing enterprise-oriented applications and servlets, which are server programs that conform to Java EE’s Servlet API. Java EE is built on top of Java SE.
This book largely focuses on Java SE and applications.
The open source variant of Java SE gets called OpenJDK; the open source variant of Java EE has the name Jakarta EE.
Installing the JDK and Exploring Example Applications
The Java SE edition can be downloaded from Oracle at www.oracle.com/technetwork/java/javase/overview/index.html. It contains everything needed to compile and run Java programs. For the corresponding open source variant, go to https://openjdk.java.net/install/.
Click the appropriate Download button to download the current JDK’s installer application for your platform. Then run this application to install the JDK.
bin: This subdirectory contains assorted JDK tools. You’ll use only a few of these tools in this book, mainly javac (Java compiler) and java (Java application launcher). However, you’ll also work with jar (Java ARchive [JAR] creator, updater, and extractor [a JAR file is a ZIP file with special features]), javadoc (Java documentation generator), and serialver (serial version inspector).
lib: This subdirectory contains Java and native platform library files that are used by JDK tools. Here you can also find the sources.
javac is not actually the Java compiler. It’s a tool that loads and starts the JVM, identifies the compiler’s main class file to the JVM, and passes the name of the source file being compiled to the compiler’s main class file.
You can execute JDK tools at the command line, passing command-line arguments to a tool. For a quick refresher on the command line and command-line arguments topics, check out Wikipedia’s “Command-line interface” entry (http://en.wikipedia.org/wiki/Command-line_interface).
The .java file extension is mandatory. The compiler complains when you omit this extension.
You can compile multiple source files by specifying an asterisk in place of the file name, as follows:
javac *.java
You must not specify the .class file extension. The java tool complains when .class is specified.
Oracle’s JDK documentation at https://docs.oracle.com/javase/
Google’s Java Android API documentation at https://developer.android.com/reference/packages.html
Oracle’s JDK documentation presents many APIs that are not supported by Android. Furthermore, it doesn’t cover APIs that are specific to Android. This book focuses only on core Oracle Java APIs that are also covered in Google’s documentation.
Hello, World!
It’s customary to start exploring a new language and its tools by writing, compiling, and running a simple application that outputs the “Hello, World!” message. This practice dates back to Brian Kernighan’s and Dennis Ritchie’s seminal book, The C Programming Language.
Saying Hello in a Java Language Context
This short five-line application has a lot to say about the Java language. We’ll briefly explain each feature, leaving comprehensive discussions of these features to later chapters.
This source code declares a class, which you can think of as a container for describing an application. The first line, public class HelloWorld, introduces the name of the class (HelloWorld), which is preceded by reserved words (names that have meaning to the Java compiler and which you cannot use to name other things in your programs) public and class. These reserved words respectively tell the compiler that HelloWorld must be stored in a file named HelloWorld and that a class is being declared.
The rest of the class declaration appears between a pair of brace characters ({}), which are familiar to C and C++ developers. Between these characters is the declaration of a single method, which you can think of as a named sequence of code. This method is named main to signify that it’s the entry point into the application, and it is the analog of the main() function in C and C++.
public: This reserved word makes main() visible to the startup code that calls this method. If public wasn’t present, the compiler would output an error message stating that it couldn’t find a main() method.
static : This reserved word causes this method to associate with the class instead of associating with any objects (discussed in Chapter 3) created from this class. Because the startup code that calls main() doesn’t create an object from the class to call this method, it requires that the method be declared static. Although the compiler will not report an error when static is missing, it will not be possible to run HelloWorld, which will not be an application when the proper main() method doesn’t exist.
void: This reserved word indicates that the method doesn’t return a value. If you change void to a type’s reserved word (such as int) and then insert code that returns a value of this type (such as return 0;), the compiler will not report an error. However, you won’t be able to run HelloWorld because the proper main() method wouldn’t exist. (We discuss types in Chapter 2.)
(String[] args ): This parameter list consists of a single parameter named args, which is of array type String[]. Startup code passes a sequence of command-line arguments to args, which makes these arguments available to the code that executes within main(). You’ll learn about parameters and arguments in Chapter 3.
main() is called with an array of strings that identify the application’s command-line arguments. These strings are stored in String-based array variable args. (We discuss method calling, arrays, and variables in Chapters 2 and 3.) Although the array variable is named args, there’s nothing special about this name. You could choose another name for this variable.
System identifies a standard class of system utilities.
out identifies an object variable located in System whose methods let you output values of various types optionally followed by a newline (also known as line feed) character to the standard output stream. (In reality, a platform-dependent line terminator sequence is output. On Windows platforms, this sequence consists of a carriage return character [integer code 13] followed by a line feed character [integer code 10]. On Linux platforms, this sequence consists of a line feed character. On Mac OS X systems, this sequence consists of a carriage return character. It’s convenient to refer to this sequence as a newline.)
println identifies a method that prints its "Hello, World!" argument (the starting and ending double quote characters are not written; these characters delimit but are not part of the string) followed by a newline to the standard output stream.
The standard output stream is part of standard I/O (http://en.wikipedia.org/wiki/Standard_streams), which also consists of standard input and standard error streams, and which originated with the Unix operating system. Standard I/O makes it possible to read text from different sources (keyboard or file) and write text to different destinations (screen or file).
Text is read from the standard input stream, which defaults to the keyboard but can be redirected to a file. Text is written to the standard output stream, which defaults to the screen but can be redirected to a file. Error message text is written to the standard error stream, which defaults to the screen but can be redirected to a file that differs from the standard output file.
DumpArgs
Dumping Command-Line Arguments Stored in main()’s args Array to the Standard Output Stream
Listing 1-2’s DumpArgs application consists of a class named DumpArgs that’s very similar to Listing 1-1’s HelloWorld class. The essential difference between these classes is the for loop (a construct for repeated execution and starting with reserved word for) that accesses each array item and dumps it to the standard output stream.
The for loop first initializes integer variable i to 0. This variable keeps track of how far the loop has progressed (the loop must end at some point), and it also identifies one of the entries in the args array. Next, i is compared with args.length, which records the number of entries in the array. The loop ends when i’s value equals the value of args.length. (We discuss .length in Chapter 2.)
Each loop iteration executes System.out.println(args[i]) ;. The string is stored in the ith entry of the args array. The first entry is located at index (location) 0. The last entry is stored at index args.length - 1 and is accessed and then output to the standard output stream. Finally, i is incremented by 1 via i++, and i < args.length is reevaluated to determine whether the loop continues or ends.
EchoText
Echoing Text Read from Standard Input to Standard Output
EchoText is a more complex application than HelloWorld or DumpArgs. Its main() method first declares a Boolean (true/false) variable named isRedirect that tells this application whether input originates from the keyboard (isRedirect is false) or a file (isRedirect is true). The application defaults to assuming that input originates from the keyboard.
There’s no easy way to determine if standard input has been redirected, and so the application requires that the user tell it if this is the case by specifying one or more command-line arguments. The if decision (a construct for making decisions and starting with reserved word if) evaluates args.length != 0, assigning true to isRedirect when this Boolean expression evaluates to true (at least one command-line argument has been specified).
main() now introduces the int variable ch to store the integer representation of each character read from standard input. (You’ll learn about int and integer in Chapter 2.) It then enters a sequence of code prefixed by the reserved word try and surrounded by brace characters. Code within this block may throw an exception (an object describing a problem) and the subsequent catch block will handle it (to address the problem). (We discuss exceptions in Chapter 5.)
The try block consists of a while loop (a construct for repeated execution and starting with the reserved word while) that reads and echoes characters. The loop first calls System.in.read() to read a character and assign its integer value to ch. The loop ends when this value equals -1 (no more input data is available from a file; standard input was redirected) or ' ' (the newline/line feed character) has been read, which is the case when standard input wasn’t redirected. ' ' is an example of a character literal, which is discussed in Chapter 2.
For any other value in ch, this value is converted to a character via (char), which is an example of Java’s cast operator (discussed in Chapter 2). The character is then output via System.out.print(), which doesn’t also terminate the current line by outputting a newline. The final System.out.println() ; call terminates the current line without outputting any content.
When standard input is redirected to a file and System.in.read() is unable to read text from the file (perhaps the file is stored on a removable storage device that has been removed before the read operation), System.in.read() fails by throwing a java.io.IOException object that describes this problem. The code within the catch block is then executed, which outputs an I/O error message to the standard error stream via System.err.println("I/O error");.
System.err provides the same families of println() and print() methods as System.out. You should only switch from System.out to System.err when you need to output an error message so that the error messages are displayed on the screen, even when standard output is redirected to a file.
You should see this text duplicated on the following line and the application should end.
Although it looks like there are two command-line arguments, there is only one: x. (Redirection symbols followed by file names don’t count as command-line arguments.) You should observe the contents of EchoText.java listed on the screen.
This time, x isn’t specified, so input is assumed to originate from the keyboard. However, because the input is actually coming from the file EchoText.java, and because each line is terminated with a newline, only the first line from this file will be output.
If we had shortened the while loop expression to while ((ch = System.in.read()) != -1) and didn’t redirect standard input to a file, the loop wouldn’t end because -1 would never be seen. To exit this loop, you would have to press the Ctrl and C keys simultaneously on a Windows platform or the equivalent keys on a non-Windows platform.
Installing and Exploring the Eclipse IDE
Working with the JDK’s tools at the command line is probably okay for small projects. However, this practice isn’t recommended for large projects, which are hard to manage without the help of an IDE.
An IDE consists of a project manager for managing a project’s files, a text editor for entering and editing source code, a debugger for locating bugs, and other features. Although Google favors the Android Studio for app development, we briefly describe another popular IDE: Eclipse. The usage scenarios of the Studio and Eclipse do not differ very much, but for Java language learning, Eclipse is the more straightforward choice.
For convenience, we use JDK tools throughout this book, except for this section where we discuss and demonstrate the Eclipse IDE.
Eclipse IDE is an open source IDE for developing programs in Java and other languages (such as C, COBOL, PHP, Perl, and Python). Eclipse IDE for Java Developers is one distribution of this IDE that’s available for download; version 2019-12 is the current version at time of this writing.
You should download and install Eclipse IDE for Java Developers to follow along with this section’s Eclipse-oriented example. Begin by pointing your browser to www.eclipse.org/downloads/ and navigate to the version applicable for your desktop operating system.

Keep the default workspace or choose another workspace
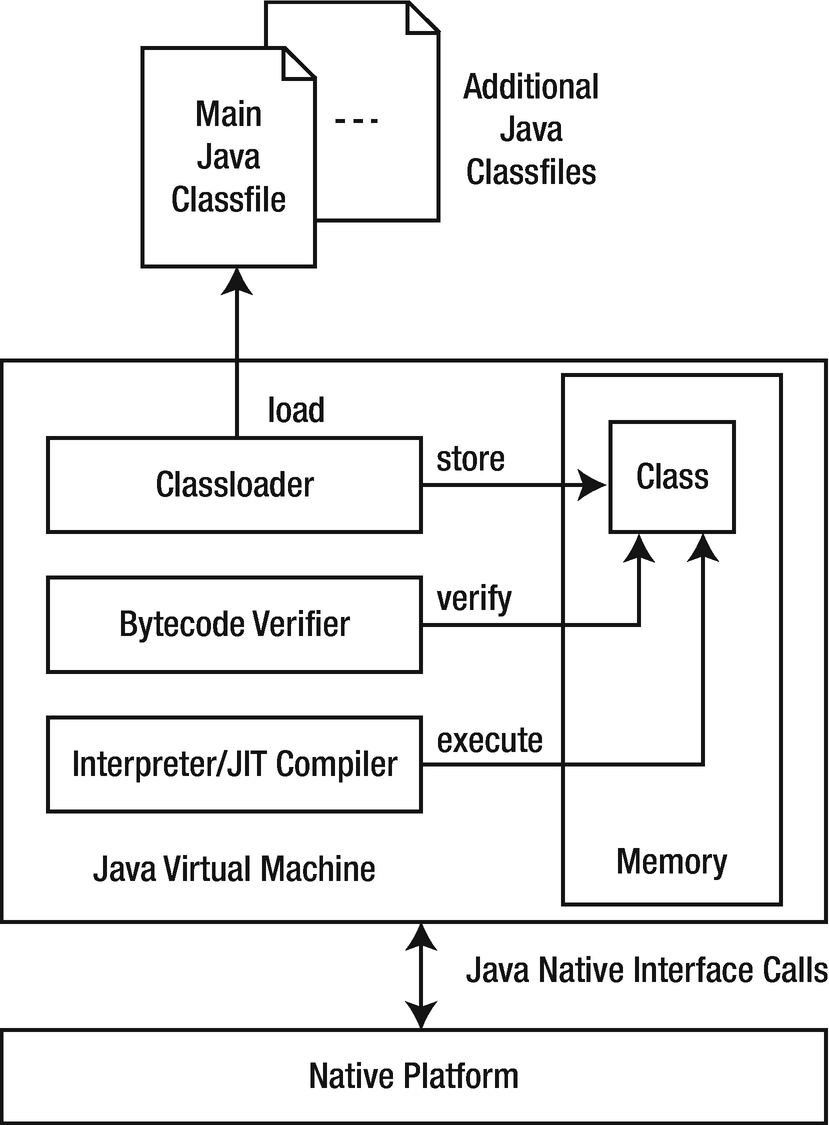
The main window initially presents a Welcome tab
The main window initially presents a Welcome tab from which you can learn more about Eclipse. Click this tab’s X icon to close this tab; you can restore the Welcome tab by selecting Welcome from the menu bar’s Help menu.
The Eclipse user interface is based on a main window that consists of a menu bar, a toolbar, a workbench area, and a status bar. The workbench presents windows for organizing Eclipse projects, editing source files, viewing messages, and more.
To help you get comfortable with the Eclipse user interface, we’ll show you how to create a DumpArgs project containing a single DumpArgs.java source file with Listing 1-2’s source code. You’ll also learn how to compile and run this application.
- 1.
Select New from the File menu and then Project… and Java Project from the resulting pop-up menu.
- 2.
In the resulting New Java Project dialog box, enter DumpArgs into the Project name text field. Keep all of the other defaults, and click the Finish button.
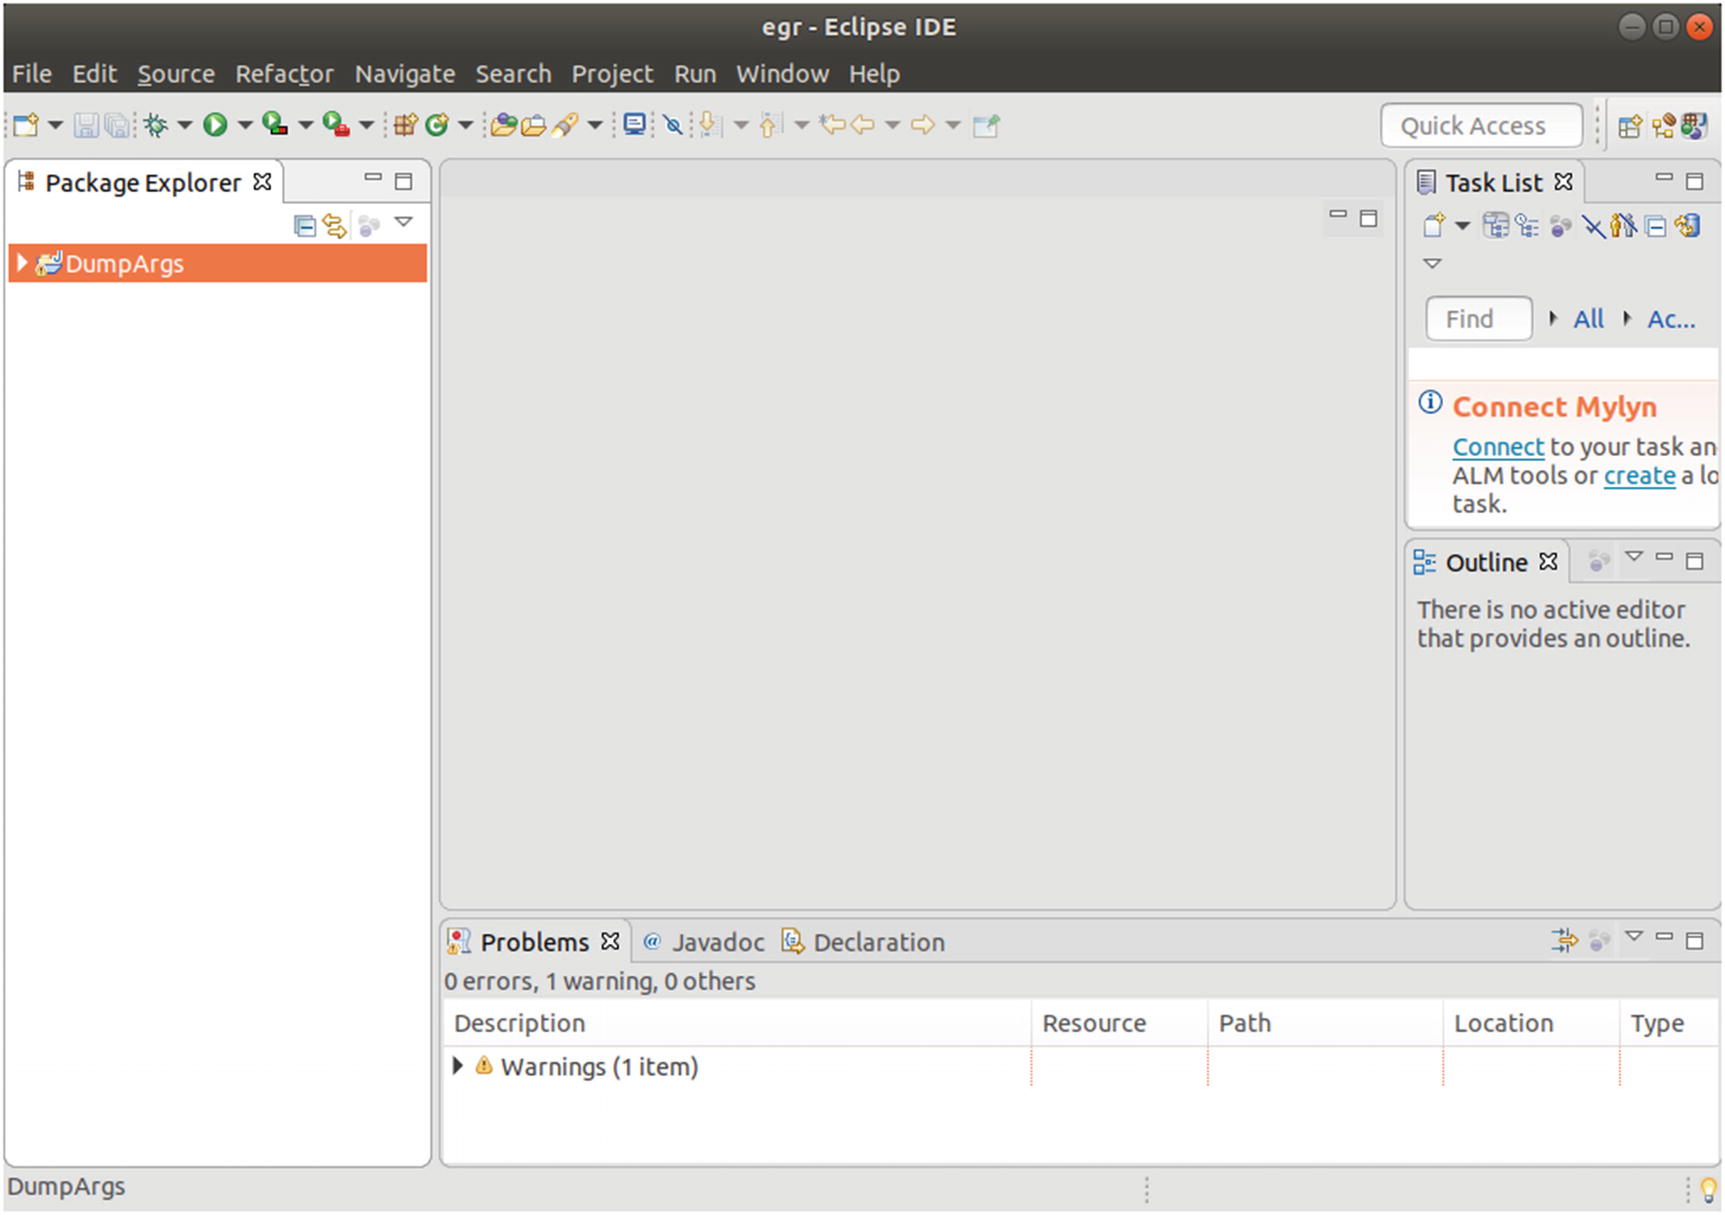
A DumpArgs entry appears in the workbench’s Package Explorer
On the left side of the workbench, you’ll see a window titled Package Explorer. This window identifies the workspace’s projects in terms of packages (discussed in Chapter 5). At the moment, only a single DumpArgs entry appears in this window.
Clicking the triangle icon to the left of DumpArgs expands this entry to reveal src and JRE System Library items. The src item stores the DumpArgs project’s source files, and the JRE System Library item identifies various JRE files that are used to run this application.
- 1.
Highlight src, and select New and Class from the resulting pop-up menu.
- 2.
In the resulting dialog box, enter DumpArgs into the name text field, and click the Finish button.
Eclipse responds by displaying an editor window titled DumpArgs.java. Copy Listing 1-2 content to this window. Then compile and run this application by selecting Run and Run As Java Application from the Run menu. (If you see a Save and Launch dialog box, click OK to close this dialog box.) The output will be shown in the Console view.
- 1.
Select Run Configurations… from the Run menu.
- 2.
In the resulting Run Configurations dialog box, select the Arguments tab.
- 3.
Enter Curly Moe Larry into the Program arguments text area, and click the Close button. See Figure 1-6.

Arguments are entered into the Program arguments text area
Once again, select Run As Java Application from the Run menu to run the DumpArgs application. This time, the Console tab reveals Curly, Moe, and Larry on separate lines below "Passed arguments:".
This is all we have to say about the Eclipse IDE. For more information, study the tutorials via the Welcome tab, access IDE help via the Help menu, and explore the Eclipse documentation at www.eclipse.org/documentation/.
Java Meets Android
In the previous editions of this book, we provided an introduction to Java language features and assorted APIs that are helpful when developing Android apps. Apart from a few small references to various Android items, we didn’t delve into Android. This edition still explores Java language features and APIs that are useful in Android app development. However, it also introduces you to Android.
In this section, we first answer the “What is Android?” question. We next review Android’s history and talk about its various releases. After exploring Android’s architecture, we present the Android version of HelloWorld.
What Is Android?
Android is Google’s software stack for mobile devices. This stack consists of apps (such as Browser and Contacts), a virtual machine in which apps run, middleware (software that sits on top of the operating system and provides various services to the virtual machine and its apps), and a Linux-based operating system.
An application framework enabling reuse and replacement of app components
Bluetooth, mobile network and Wi-Fi support (hardware dependent)
Camera, GPS, compass, and accelerometer support (hardware dependent)
Android RunTime (ART) virtual machine optimized for mobile devices
GSM telephony support (hardware dependent)
Integrated web browser
Media support for common audio, video, and still image formats (MPEG4, H.264, MP3, AAC, AMR, JPG, PNG, GIF)
Optimized graphics powered by a custom 2D graphics library; 3D graphics based on OpenGL ES 1.0, 1.1, 2.0, or 3.0 (hardware acceleration optional)
SQLite for structured data storage (We introduce SQLite in Chapter 14.)
Although not part of the software stack, Android’s rich development environment provided by Android Studio could also be considered an Android feature.
History of Android
Contrary to what you might expect, Android didn’t originate with Google. Instead, Android, Inc., a small Palo Alto, California-based startup company, initially developed Android. Google bought this company in the summer of 2005 and released a beta version of the Android SDK in November 2007.
On September 23, 2008, Google released Android 1.0, whose core features included a web browser, camera support, Google Search, Wi-Fi and Bluetooth support, and more. This release corresponds to API Level 1. (An API level is a 1-based integer that uniquely identifies the API revision offered by an Android version; it’s a way of distinguishing one significant Android release from another.)
The Wikipedia entry for Android gives you quite a good overview about various Android releases. Or enter “android version history” in your favorite search engine.
Android Architecture
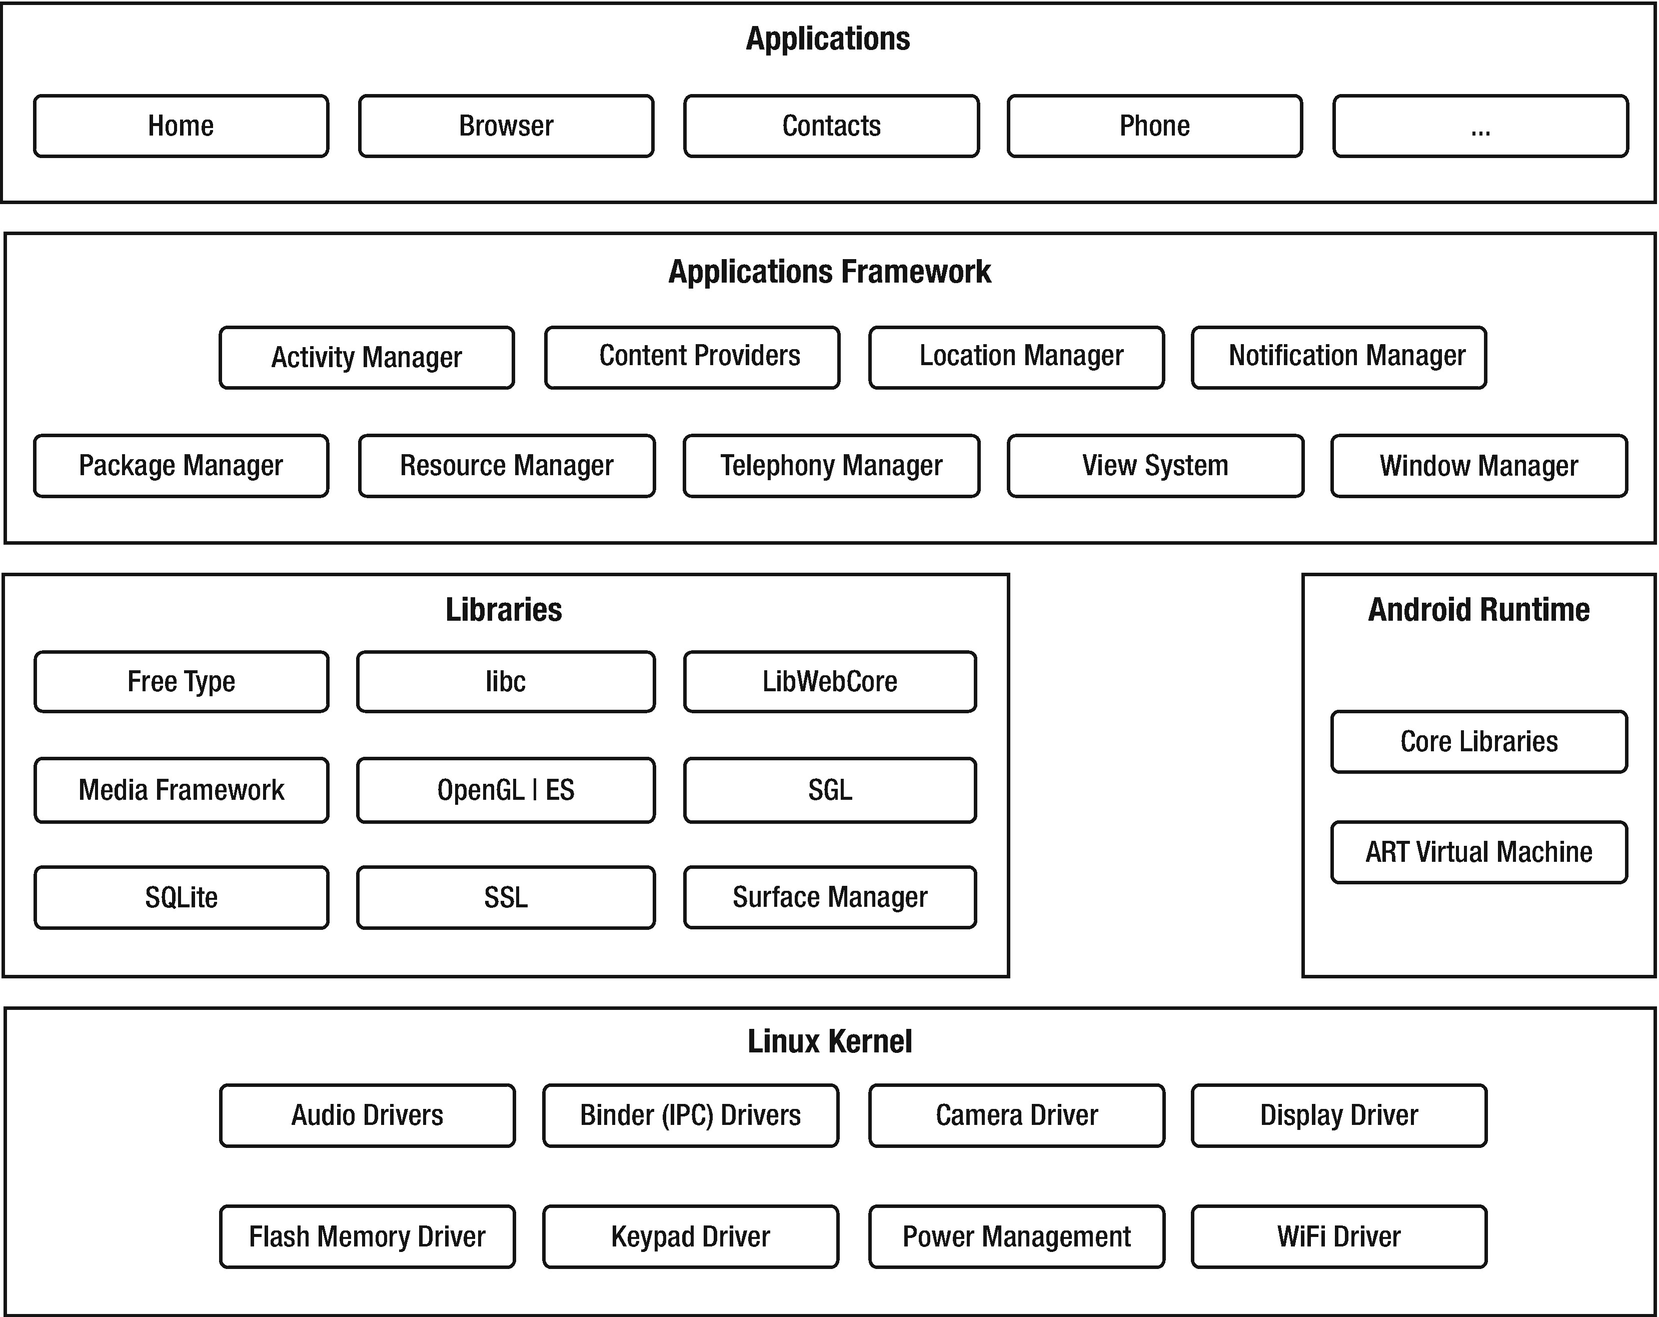
Android’s layered architecture consists of several major parts
Users care very much about apps, and Android ships with a variety of useful core apps, which include Browser, Contacts, and Phone. All apps are written in the Java programming language. Apps form the top layer of Android’s architecture.
Android doesn’t officially recognize Java language features newer than Java 8, which is why we don’t discuss them in this book. Regarding APIs, this platform supports many APIs from Java 8 and previous Java versions. Also, Android provides its own unique APIs.
Activity Manager: This component provides an app’s life cycle and maintains a shared activity stack for navigating within and among apps.
Content Providers: These components encapsulate data (such as the Browser app’s bookmarks) that can be shared among apps.
Location Manager: This component makes it possible for an Android device to be aware of its physical location.
Notification Manager: This component lets an app notify the user of a significant event (such as a message’s arrival) without interrupting what the user is currently doing.
Package Manager: This component lets an app learn about other app packages that are currently installed on the device.
Resource Manager: This component lets an app access its resources.
Telephony Manager: This component lets an app learn about a device’s telephony services. It also handles making and receiving phone calls.
View System: This component manages user interface elements and user interface–oriented event generation.
Window Manager: This component organizes the screen’s real estate into windows, allocates drawing surfaces, and performs other window-related jobs.
FreeType: This library supports bitmap and vector font rendering.
libc: This library is a BSD-derived implementation of the standard C system library, tuned for embedded Linux-based devices.
LibWebCore: This library offers a modern and fast web browser engine that powers the Android browser and an embeddable web view. It’s based on WebKit (http://en.wikipedia.org/wiki/WebKit), and the Google Chrome and Apple Safari browsers also use it.
Media Framework: These libraries, which are based on PacketVideo’s OpenCORE, support the playback and recording of many popular audio and video formats, as well as working with static image files. Supported formats include MPEG4, H.264, MP3, AAC, AMR, JPEG, PNG, and GIF.
OpenGL | ES: These 3D graphics libraries provide an OpenGL implementation based on OpenGL ES 1.0/1.1/2.0/3.0 APIs. They use hardware 3D acceleration (where available) or the included (and highly optimized) 3D software rasterizer.
SGL: This library provides the underlying 2D graphics engine.
SQLite: This library provides a powerful and lightweight relational database engine that’s available to all apps and that’s also used by Mozilla Firefox and Apple’s iPhone for persistent storage.
SSL: This library provides secure sockets layer-based security for network communication.
Surface Manager: This library manages access to the display subsystem and seamlessly composites 2D and 3D graphic layers from multiple apps.
Android provides a runtime environment that consists of core libraries (implementing a subset of the Apache Harmony Java version 5 implementation) and the ART virtual machine (a non-JVM).
Each Android app defaults to running in its own Linux process (executing application) , which hosts an instance of ART. This virtual machine has been designed so that devices can run multiple virtual machines efficiently.
Android starts a process when any part of the app needs to execute, and it shuts down the process when it’s no longer needed and system resources are required by other apps.
Perhaps you’re wondering how it’s possible to have a non-JVM run Java code. The answer is that ART doesn’t run Java code. Instead, Android transforms compiled Java class files into a special ART binary format, and it’s this resulting code that gets executed by ART.
Finally, the libraries and Android runtime rely on the Linux kernel for underlying core services, such as threading, low-level memory management, a network stack, process management, and a driver model. Furthermore, the kernel acts as an abstraction layer between the hardware and the rest of the software stack.
Android’s architecture includes a security model that prevents apps from performing operations that are considered harmful to other apps, Linux, or users. This security model is mostly based on process-level enforcement via standard Linux features (such as user and group IDs) and places processes in a security sandbox.
By default, the sandbox prevents apps from reading or writing the user’s private data (such as contacts or emails), reading or writing another app’s files, performing network access, keeping the device awake, accessing the camera, and so on. Apps that need to access the network or perform other sensitive operations must first obtain permission to do so.
Android handles permission requests in various ways, typically by automatically allowing or disallowing the request based upon a certificate or by prompting the user to grant or revoke the permission. Permissions required by an app are declared in the app’s manifest file so that they are known to Android when the app is installed. These permissions won’t subsequently change.
Android Says Hello
The Android Equivalent of HelloWorld
Listing 1-4 isn’t too different from Listing 1-1, but there are some significant changes. For one thing, HelloWorld extends another class named Activity (stored in a package named android.app—see Chapter 5 for a discussion of packages). By extending Activity, HelloWorld proclaims itself as an activity, which you can think of as a user interface screen. (We discuss extension in Chapter 4.)
By extending Activity, HelloWorld inherits that class’s create() method, which Android calls when creating the activity. HelloWorld overrides this method with its own implementation so that it can output the “Hello, World!” message. However, create() first needs to execute Activity’s version of this method (via super.onCreate()), so that the activity is properly initialized.
“Hello, World!” isn’t displayed on an Android device’s screen. Instead, it’s written to a log file that can be examined by Android’s adb tool.
HelloWorld, DumpArgs, and EchoText demonstrate public staticvoid main(String[] args) as a Java application’s entry point. This is where the application’s execution begins. In contrast, as you’ve just seen, an Android app doesn’t require this method for its entry point because the app’s architecture is very different.
- 1.
What is Java?
- 2.
What is a virtual machine?
- 3.
What is the purpose of the Java compiler?
- 4.
True or false: A class file’s instructions are commonly referred to as bytecode.
- 5.
What does the JVM’s interpreter do when it learns that a sequence of bytecode instructions is being executed repeatedly?
- 6.
How does the Java platform promote portability?
- 7.
How does the Java platform promote security?
- 8.
True or false: Java SE is the Java platform for developing servlets.
- 9.
Which JDK tool is used to compile Java source code?
- 10.
Which JDK tool is used to run Java applications?
- 11.
What is standard I/O?
- 12.
How do you specify the main() method's header?
- 13.
What is an IDE? Identify the IDE that Google supports for developing Android apps.
- 14.
What is Android?
Summary
Java is a language and a platform. The language is partly patterned after the C and C++ languages to shorten the learning curve for C/C++ developers. The platform consists of a virtual machine and associated execution environment.
The Java language shares several similarities with C/C++, such as presenting the same single-line and multiline comments and offering various reserved words that are also found in C/C++. However, there are differences, such as providing >>> and other operators not found in C/C++.
The Java platform includes a huge library of prebuilt class files that perform common tasks, such as math operations (e.g., trigonometry) and network communications. This library is commonly referred to as the standard class library.
A special Java program known as the Java compiler translates source code into object code consisting of instructions that are executed by the JVM and associated data. These instructions are known as bytecode.
Developers use different editions of the Java platform to create Java programs that run on desktop computers and web servers. These editions are known as Java SE and Java EE.
The JDK provides tools (including the Java compiler) for developing and running Java programs.
Working with the JDK’s tools at the command line isn’t recommended for large projects, which are hard to manage without the help of an integrated development environment. Eclipse is a popular IDE used for that purpose. Another IDE, Android Studio, is specially tailored for Android development.
Android is Google’s software stack for mobile devices. This stack consists of apps, a virtual machine in which apps run, middleware that sits on top of the operating system and provides various services to the virtual machine and its apps, and a Linux-based operating system.
Android didn’t originate with Google. Instead, Android, Inc., a small Palo Alto, California-based startup company, initially developed Android. Google bought this company in the summer of 2005, and it released Android 1.0 on September 23, 2008.
Android’s architecture is based on an application layer, an application framework, libraries, an Android runtime (consisting of core libraries implementing a subset of the Apache Harmony Java version 5 implementation and the ART virtual machine), and a Linux kernel.
Android doesn’t officially recognize Java language features newer than Java 8, which is why we don’t discuss them in this book. Regarding APIs, this platform supports many APIs from Java 8 and previous Java versions. Also, Android provides its own unique APIs.
Chapter 2 introduces you to the Java language by focusing on this language’s fundamentals. You’ll learn about comments, identifiers, types, variables, expressions, statements, and more.