
In this chapter, you will learn how to manage your hard disk in Linux. You will learn how to create new partitions on your drive. Then you will learn how to create and mount filesystems. Finally, you will learn how to use LVM to create logical volumes.
Where are your devices?
As we all know by now, a file represents everything in Linux, and devices are no exception. All your devices are located inside the /dev directory; this includes your keyboard, mouse, terminal, hard disk, USB devices, CD-ROM, and so on.
The terminal you are working on right now is, in fact, a device. If you run the w command, you will see the name of the terminal you are connected to in the second column of the output.
elliot@ubuntu-linux:~$ w
11:38:59 up 17 min, 1 user, load average: 0.00, 0.00, 0.02
USER   TTY       FROM             LOGIN@  IDLE  JCPU  PCPU  WHAT
elliot pts/0     172.16.1.67      11:22   0.00s 0.06s 0.00s w
In my case, it is pts/0; pts is short for pseudoterminal slave. Now, this terminal is represented by the file /dev/pts/0:
elliot@ubuntu-linux:~$ ls -l /dev/pts/0
crw------- 1 elliot tty 136, 0 Nov 7 11:40 /dev/pts/0
I will echo the line Hello Friend to /dev/pts/0 and pay close attention to what will happen:
elliot@ubuntu-linux:~$ echo "Hello Friend" > /dev/pts/0
Hello Friend
As you can see, Hello Friend got printed to my terminal! Now you can play that game with other users on your system. You can run the w command to figure out which terminal they are using and then start sending them messages!
Where is your hard disk?
To know which file represents your hard disk; you need to run the command lsblk, which is short for list block:
elliot@ubuntu-linux:~$ lsblk
NAME   MAJ:MIN  RM SIZE RO  TYPE MOUNTPOINT
sda      8:0     0  20G  0  disk
| sda1   8:1     0  20G  0  part /
sr0      11:0    1 1024M 0  rom
From the output, I can see that the name of my hard disk device is sda, which is short for SCSI Disk A. Now you need to understand that depending on the type of your hard disk drive, you may get a different name. Figure 1 summarizes Linux naming strategies for different types of hard drives:

So from the output of the lsblk command, you can conclude that I only have one disk (sda) on my virtual machine. Now we don't want to play with this disk as it contains the root filesystem, so let's add another disk to our virtual machine for learning purposes.
Adding disks to your virtual machine
There are a few steps you need to follow to successfully add a new disk to your virtual machine. You have to follow these steps in this specific order:
- Shut down your virtual machine.
- Go to Virtual Machine Settings | Storage | Create new Disk.
- Start your virtual machine.
So the first step is pretty simple; shut down your virtual machine because you cannot add a new disk to your virtual machine while it is still running. For the second step, you need to go to your virtual machine settings, then click on storage and then select your disk controller, right-click, and then create a new disk as shown in Figure 2:

You will then be asked to choose the size for your new disk. You can select any size you want. I have an abundance of disk space on my host machine, so I will add a 10 GB disk to my virtual machine. After you are done, the last step is to start up your virtual machine again.
You should be able to see your new disk as soon as your virtual machine starts:
elliot@ubuntu-linux:~$ lsblk
NAME    MAJ:MIN RM SIZE RO TYPE MOUNTPOINT
sda       8:0   0  20G  0  disk
| sda1    8:1   0  20G  0  part /
sdb       8:16  0  10G  0  disk
sr0      11:0   1 1024M 0  rom
My new disk got the name sdb because it is the second disk on my virtual machine, and you can also see that its size is 10 GB.
Creating new disk partitions
Now let's play with the new disk that we just created. The first thing you may want to do is to create a new partition. To create a new partition, we use the fdisk command followed by the disk name:
fdisk [options] device
So to create a new partition on the /dev/sdb disk; you can run the following command:
root@ubuntu-linux:~# fdisk /dev/sdb

Welcome to fdisk (util-linux 2.31.1).
Changes will remain in memory only, until you decide to write them.
Be careful before using the write command.

Device does not contain a recognized partition table.
Created a new DOS disklabel with disk identifier 0xb13d9b6a.

Command (m for help):
This opens up the fdisk utility. If you are unsure what to do; you can enter m for help:
Command (m for help): m
Help:
  DOS (MBR)
  a   toggle a bootable flag
  b   edit nested BSD disklabel
  c   toggle the dos compatibility flag

  Generic
  d   delete a partition
  F   list free unpartitioned space l list known partition types
  n   add a new partition
  p   print the partition table t change a partition type
  v   verify the partition table
  i   print information about a partition

  Save & Exit
  w   write table to disk and exit
  q   quit without saving changes

  Create a new label
  g   create a new empty GPT partition table
  G   create a new empty SGI (IRIX) partition table
  o   create a new empty DOS   partition table
  s   create a new empty Sun partition table
We want to create a new partition so enter n:
Command (m for help): n
Partition type
    p primary (0 primary, 0 extended, 4 free)
    e extended (container for logical partitions)
Select (default p):
It will then ask you if you want a primary partition or an extended partition. We would accept the default selection (primary) so just hit Enter:
Using default response p.
Partition number (1-4, default 1):
It will then ask you to select a partition number. We will also accept the default, which is partition number 1, so just hit Enter. Notice that you can create up to four primary partitions on a given disk:
Partition number (1-4, default 1):
First sector (2048-20971519, default 2048):
You will then be prompted to choose the sector you would want your new partition to start at; hit Enter to accept the default (2048):
First sector (2048-20971519, default 2048):
Last sector, +sectors or +size{K,M,G,T,P} (2048-20971519, default 20971519):
Now you will be asked to choose the size of your new partition; I want a 2 GB partition so I would type +2G and then hit Enter:
Last sector, +sectors or +size{K,M,G,T,P} (2048-20971519, default 20971519): +2G

Created a new partition 1 of type 'Linux' and of size 2 GiB.
Command (m for help):
Finally, you have to save the configuration by hitting w:
Command (m for help): w
The partition table has been altered.
Calling ioctl() to re-read partition table.
Syncing disks.
Now you can run lsblk to see the new partition you just created:
root@ubuntu-linux:~# lsblk
NAME   MAJ:MIN RM SIZE  RO TYPE MOUNTPOINT
sda      8:0   0  20G   0  disk
| sda1   8:1   0  20G   0  part /
sdb      8:16  0  10G   0  disk
| sdb1   8:17  0  2G    0  part
sr0     11:0   1 1024M  0  rom
You can see the 2 GB partition sdb1 is listed under sdb. You can also use the -l option with the fdisk command to print out the partition table of your disk:
root@ubuntu-linux:~# fdisk -l /dev/sdb
Disk /dev/sdb: 10 GiB, 10737418240 bytes, 20971520 sectors
Units: sectors of 1 * 512 = 512 bytes
Sector size (logical/physical): 512 bytes / 512 bytes
I/O size (minimum/optimal): 512 bytes / 512 bytes
Disklabel type: dos
Disk identifier: 0xb13d9b6a

Device      Boot Start    End Sectors  Size  Id Type
/dev/sdb1        2048 4196351 4194304   2G   83 Linux
Creating new filesystems
I cannot start creating files and directories on my /dev/sdb1 partition just yet; first, I need to create a filesystem. A filesystem basically dictates how data is organized and stored on a disk (or partition). A good analogy would be passengers on an airplane; flight companies can't just let the passengers (data) seat themselves in an airplane (partition); it would be a total mess.
There are many different types of filesystems available on Linux. It is important to note that ext4 and xfs are the most commonly used filesystems. Figure 3 shows you only a few of the available filesystems that are supported on Linux:

You can read the description of each Linux filesystem type in the filesystems man page:
root@ubuntu-linux:~# man filesystems
To create a filesystem, we use the mkfs command, which is short for make filesystem. The general syntax for the mkfs command is as follows:
mkfs --type [fstype] disk_or_partition
Now let's create an ext4 filesystem on our new partition /dev/sdb1:
root@ubuntu-linux:~# mkfs --type ext4 /dev/sdb1
mke2fs 1.44.1 (24-Mar-2018)
Creating filesystem with 524288 4k blocks and 131072 inodes
Filesystem UUID: 61d947bb-0cd1-41e1-90e0-c9895b6de428
Superblock backups stored on blocks:
32768, 98304, 163840, 229376, 294912

Allocating group tables: done
Writing inode tables: done
Creating journal (16384 blocks): done
Writing superblocks and filesystem accounting information: done
We have created an ext4 filesystem on our partition /dev/sdb1. We can verify our work by running the file -s command on the /dev/sdb1 partition:
root@ubuntu-linux:~# file -s /dev/sdb1
/dev/sdb1: Linux rev 1.0 ext4 filesystem data,
UUID=61d947bb-0cd1-41e1-90e0-c9895b6de428 (extents) (64bit) (large files) (huge files)
As you can see, it displays that there is an ext4 filesystem on the /dev/sdb1 partition.
You can use the wipefs command to remove (wipe out) a filesystem. For example, if you want to remove the ext4 filesystem that we just created on /dev/sdb1, you can run the following command:
root@ubuntu-linux:~# wipefs -a /dev/sdb1
/dev/sdb1: 2 bytes were erased at offset 0x00000438 (ext4): 53 ef
Now if you rerun file -s on the /dev/sdb1 partition, you will see there is no filesystem signature:
root@ubuntu-linux:~# file -s /dev/sdb1
/dev/sdb1: data
Let's recreate an ext4 filesystem on /dev/sdb1 and keep it this time around:
root@ubuntu-linux:~# mkfs --type ext4 /dev/sdb1
mke2fs 1.44.1 (24-Mar-2018)
Creating filesystem with 524288 4k blocks and 131072 inodes
Filesystem UUID: 811aef62-d9ca-4db3-b305-bd896d1c8545
Superblock backups stored on blocks:
32768, 98304, 163840, 229376, 294912

Allocating group tables: done
Writing inode tables: done
Creating journal (16384 blocks): done
Writing superblocks and filesystem accounting information: done
Mounting filesystems
We have created an ext4 filesystem on the partition /dev/sdb1. Now we need to mount our filesystem somewhere in the Linux directory tree.
Mounting refers to the process of attaching any filesystem or any storage device (like USB flash drives, CDs, etc.) to a directory.
But why do we need to mount? I mean we have just created an ext4 filesystem on the 2 GB partition /dev/sdb1. Can't we just start creating files in /dev/sdb1? The answer is a big FAT NO! Remember, /dev/sdb1 is only a file that represents a partition.
To mount a filesystem, we use the mount command as follows:
mount filesystem mount_directory
So let's assume we are going to use the filesystem /dev/sdb1 to store our games. In this case, let's create a new directory /games:
root@ubuntu-linux:~# mkdir /games
Now the only thing left is to mount our filesystem /dev/sdb1 on the /games directory:
root@ubuntu-linux:/# mount /dev/sdb1 /games
We can verify our work by running the lsblk command:
root@ubuntu-linux:~# lsblk
NAME   MAJ:MIN  RM SIZE RO TYPE MOUNTPOINT
sda      8:0    0  20G  0  disk
| sda1   8:1    0  20G  0  part /
sdb      8:16   0  10G  0  disk
| sdb1   8:17   0  2G   0  part /games
sr0     11:0    1 1024M 0  rom
As you can see, /dev/sdb1 is indeed mounted on /games.
You can also use the mount command by itself to list all the mounted filesystems on your system. For example, to verify that /dev/sdb1 is mounted on /games, you can run the following command:
root@ubuntu-linux:/# mount | grep sdb1
/dev/sdb1 on /games type ext4 (rw,relatime,data=ordered)
We now have 2 GB available for us to use in /games and you can use the df command to display the filesystem disk space usage:
root@ubuntu-linux:~# df -h /games
Filesystem     Size Used Avail Use% Mounted on
/dev/sdb1      2.0G 6.0M 1.8G   1%  /games
Now let's create three files in /games:
root@ubuntu-linux:~# cd /games
root@ubuntu-linux:/games# touch game1 game2 game3
Unmounting filesystems
You can also unmount (the reverse of mounting) a filesystem. As you may have guessed, unmounting refers to the process of detaching a filesystem or a storage device. To unmount a filesystem, you can use umount as follows:
umount filesystem
Change to the /games directory and try to unmount the /dev/sdb1 filesystem:
root@ubuntu-linux:/games# umount /dev/sdb1
umount: /games: target is busy.
Oops! It is saying that the target is busy! That's because I am inside the mount point /games; I will back up one directory and then try again:
root@ubuntu-linux:/games# cd ..
root@ubuntu-linux:/# umount /dev/sdb1
This time it worked! You have to be careful and never unmount a filesystem or any storage device while it is actively being used; otherwise, you may lose data!
Now let's verify the filesystem /dev/sdb1 is indeed unmounted:
root@ubuntu-linux:/# lsblk
NAME   MAJ:MIN RM SIZE  RO TYPE MOUNTPOINT
sda      8:0   0  20G   0  disk
| sda1   8:1   0  20G   0  part /
sdb      8:16  0  10G   0  disk
| sdb1   8:17  0  2G    0  part
sr0     11:0   1 1024M  0  rom
root@ubuntu-linux:/# mount | grep sdb1
Yup! It is definitely unmounted! Now let's list the contents of the /games directory:
root@ubuntu-linux:/# ls /games
Nothing! But do not panic or worry! The three files we created still exist in the /dev/sdb1 filesystem. We need to mount the filesystem again, and you will see the files:
root@ubuntu-linux:~# mount /dev/sdb1 /games
root@ubuntu-linux:~# ls /games
game1 game2 game3 lost+found
Permanently mounting filesystems
The mount command only mounts a filesystem temporarily; that is, filesystems mounted with the mount command won't survive a system reboot. If you want to mount a filesystem permanently, then you need to include it in the filesystem table file /etc/fstab.
Each entry (or line) in /etc/fstab represents a different filesystem, and each line consists of the following six fields:
- filesystem
- mount_dir
- fstype
- mount_options
- dump
- check_fs
So, for example, to mount our /dev/sdb1 filesystem on /games permanently, you need to include the following line in /etc/fstab:
/dev/sdb1 /games ext4 defaults 0 0
You should add the line to the end of the /etc/fstab file:
root@ubuntu-linux:~# tail -1 /etc/fstab
/dev/sdb1   /games ext4   defaults   0   0
Now let's unmount /dev/sdb1:
root@ubuntu-linux:~# umount /dev/sdb1
Finally, you can now mount /dev/sdb1 permanently by running:
root@ubuntu-linux:~# mount /dev/sdb1
Notice we did not specify a mount destination this time; that's because the mount destination is already specified in the /etc/fstab file. You can use the -a option with the mount command:
root@ubuntu-linux:~# mount -a
To mount all the filesystems that are included in /etc/fstab. It is also used to check for syntax errors. For example, if you made a typo in /etc/fstab and wrote /dev/sdx1 instead of /dev/sdb1, it will show you the following error:
root@ubuntu-linux:~# mount -a
mount: /games: special device /dev/sdx1 does not exist.
All the mounts specified in /etc/fstab are permanent and they will survive a system reboot. You may also refer to the fstab man page for more information on /etc/fstab:
root@ubuntu-linux:~# man fstab
Running out of space
Let's create huge files that would consume all the available disk space in /games.
A fast way to create big files in Linux is by using the dd command. To demonstrate, let's first change to the /games directory:
root@ubuntu-linux:~# cd /games
root@ubuntu-linux:/games#
Now you can run the following command to create a 1 GB file named bigGame:
root@ubuntu-linux:/games# dd if=/dev/zero of=bigGame bs=1G count=1
1+0 records in
1+0 records out
1073741824 bytes (1.1 GB, 1.0 GiB) copied, 1.44297 s, 744 MB/s
We have now already used more than half of the available space in /games:
root@ubuntu-linux:/games# df -h /games
Filesystem    Size Used Avail Use% Mounted on
/dev/sdb1     2.0G 1.1G 868M  55%  /games
Now let's attempt to create another file named bigFish of size 3 GB:
root@ubuntu-linux:/games# dd if=/dev/zero of=bigFish bs=1G count=3
dd: error writing 'bigFish': No space left on device
1+0 records in
0+0 records out
1016942592 bytes (1.0 GB, 970 MiB) copied, 1.59397 s, 638 MB/s
We got an error as we ran out of space:
root@ubuntu-linux:/games# df -h /games
Filesystem    Size Used Avail Use% Mounted on
/dev/sdb1     2.0G 2.0G  0    100% /games
Now we can't even create a tiny file with the word Hello in it:
root@ubuntu-linux:/games# echo Hello > greeting.txt
-su: echo: write error: No space left on device
Corrupting and fixing filesystems
In some unfortunate situations, you may run into an issue where your system will not boot because of a corrupted filesystem. In this case, you have to fix your filesystem so your system boots properly. I will show you how you can corrupt a filesystem, and then I will show you how you can repair it.
An easy way to corrupt a filesystem is by writing random data to it.
The following command will surely corrupt your /dev/sdb1 filesystem:
root@ubuntu-linux:/games# dd if=/dev/urandom of=/dev/sdb1 count=10k
Your /dev/sdb1 filesystem is now corrupted! If you don't believe me, unmount it and then try to mount it back again:
root@ubuntu-linux:~# umount /dev/sdb1
OK, it unmounted successfully! Let's see if it will mount:
root@ubuntu-linux:~# mount /dev/sdb1 /games
mount: /games: wrong fs type, bad option, bad superblock on /dev/sdb1,
missing codepage or helper program, or other error.
As you can see, it fails to mount as it spits out an error message.
Congrats! Your filesystem is corrupted. What can we do now? Well, we can certainly fix it!
You can use the file system check command fsck to check and repair filesystems. So let's run fsck on our corrupted filesystem:
root@ubuntu-linux:~# fsck /dev/sdb1
fsck from util-linux 2.31.1
e2fsck 1.44.1 (24-Mar-2018)
/dev/sdb1 was not cleanly unmounted, check forced.
fsck.ext4: Inode checksum does not match inode while reading bad blocks inode
This doesn't bode well, but we'll try to go on...
Pass 1: Checking inodes, blocks, and sizes
Inode 1 seems to contain garbage. Clear<y>?
As you can see, it states that the filesystem contains garbage data and asks if you want to clear the errors. You can hit Y, but it will keep asking you again and again for every single inode it is fixing! You can avoid that by using the -y option, which answers an automatic yes to all prompts during the repair process:
root@ubuntu-linux:~# fsck -y /dev/sdb1
When you run it, you will see a lot of numbers running down on your screen. Do not worry! It is fixing your corrupted filesystem. It is basically going through thousands of inodes.
After it finishes, you can rerun fsck to verify the filesystem is now clean:
root@ubuntu-linux:~# fsck /dev/sdb1
fsck from util-linux 2.31.1
e2fsck 1.44.1 (24-Mar-2018)
/dev/sdb1: clean, 11/131072 files, 9769/524288 blocks
Amazing! Now let's try to mount it:
root@ubuntu-linux:~# mount /dev/sdb1 /games
It mounted this time around. Mission accomplished! We have successfully fixed the filesystem.
LVM to the rescue
When you run out of space on a filesystem, things can get very ugly. We already ran out of space in /games, and there is no easy solution that exists for adding more space using standard partitioning. Luckily, Logical Volume Manager (LVM) offers a better alternative for managing filesystems.
Installing the LVM package
Before we start playing with LVM, first, we need to install the lvm2 package:
root@ubuntu-linux:~# apt-get install lvm2
After the installation is complete, you can run the lvm version command to verify the installation is successful:
root@ubuntu-linux:~# lvm version
  LVM version:     2.02.176(2) (2017-11-03)
  Library version: 1.02.145 (2017-11-03)
  Driver version:  4.37.0
Three layers of abstraction
To understand how LVM works, you first need to visualize it. LVM is like a cake that is made up of three layers, as shown in Figure 4.
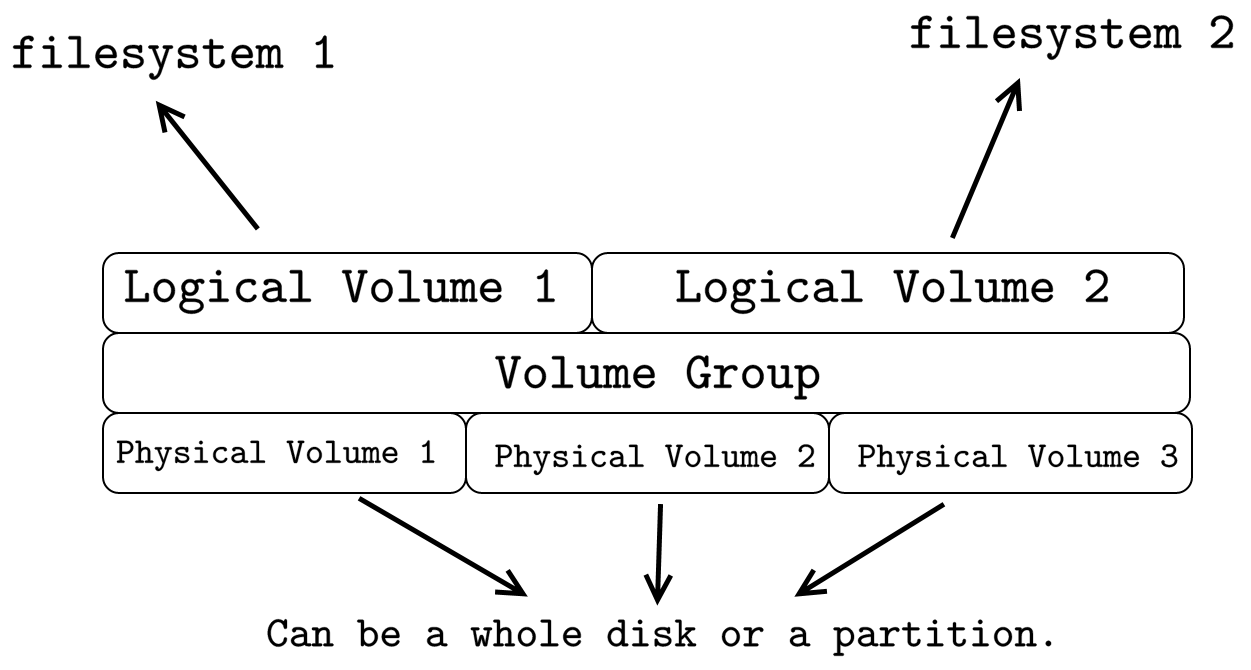
Physical volumes construct the first (base layer) of the LVM cake. Physical volumes can either be whole disks (/dev/sdb, /dev/sdc, etc) or partitions (/dev/sdb2, /dev/sdc3, etc).
The Volume Group layer is the second and biggest layer in the LVM cake, and it sits on top of the Physical Volume layer. A volume group can span multiple physical volumes; that is, one volume group can be composed of one or more physical volumes.
The Logical Volume layer makes up the third and last layer in the LVM cake. Multiple logical volumes can belong to the same volume group, as shown in Figure 4. Finally, you can create filesystems on logical volumes.
Creating physical volumes
The recipe for creating physical volumes is pretty simple; you only need a disk or a partition. We have already created a 2 GB partition /dev/sdb1. Now go ahead and create three more partitions under /dev/sdb, each of size 2 GB.
This is what the end result should look like:
root@ubuntu-linux:~# lsblk
NAME    MAJ:MIN  RM  SIZE  RO  TYPE MOUNTPOINT
sda       8:0    0   20G   0   disk
| sda1    8:1    0   20G   0   part /
sdb       8:16   0   10G   0   disk
| sdb1    8:17   0    2G   0   part /games
| sdb2    8:18   0    2G   0   part
| sdb3    8:19   0    2G   0   part
| sdb4    8:20   0    2G   0   part
sr0      11:0    1  1024M  0   rom
To create a physical volume, we use the pvcreate command followed by a disk or a partition:
pvcreate disk_or_partition
We are going to create three physical volumes: /dev/sdb2, /dev/sdb3, and /dev/sdb4. You can create all three with one command:
root@ubuntu-linux:~# pvcreate /dev/sdb2 /dev/sdb3 /dev/sdb4
  Physical volume "/dev/sdb2" successfully created.
  Physical volume "/dev/sdb3" successfully created.
  Physical volume "/dev/sdb4" successfully created.
Cool stuff! You can also use the pvs command to list all physical volumes:
root@ubuntu-linux:~# pvs
  PV       VG Fmt Attr PSize PFree
/dev/sdb2    lvm2 --- 2.00g 2.00g
/dev/sdb3    lvm2 --- 2.00g 2.00g
/dev/sdb4    lvm2 --- 2.00g 2.00g
Alright! Everything looks good so far.
Creating volume groups
One volume group can span multiple physical volumes. So let's create a volume group that would consist of the two physical volumes: /dev/sdb2 and /dev/sdb3.
To create a volume group, we use the vgcreate command followed by the name of the new volume group and then the physical volumes:
vgcreate vg_name PV1 PV2 PV3 ...
Let's create a volume group named myvg that would span /dev/sdb2 and /de- v/sdb3:
root@ubuntu-linux:~# vgcreate myvg /dev/sdb2 /dev/sdb3
  Volume group "myvg" successfully created
Awesome! You can also use the vgs command to list all volume groups:
root@ubuntu-linux:~# vgs
  VG   #PV #LV #SN Attr   VSize VFree
  myvg   2   0   0 wz--n- 3.99g 3.99g
Notice that the size of the volume group myvg is equal to 4 GB, which is the total size of /dev/sdb2 and /dev/sdb3.
Creating logical volumes
We can now create logical volumes on top of our mvg volume group.
To create a logical volume, we use the lvcreate command followed by the size of the logical volume, the name of the logical volume, and finally, the volume group name:
lvcreate --size 2G --name lv_name vg_name
Let's create a logical volume named mybooks of size 2 GB:
root@ubuntu-linux:~# lvcreate --size 2G --name mybooks myvg
  Logical volume "mybooks" created.
Now create another logical volume named myprojects of size 500 MB:
root@ubuntu-linux:~# lvcreate --size 500M --name myprojects myvg
  Logical volume "myprojects" created.
You can use the lvs command to list all logical volumes:
root@ubuntu-linux:~# lvs
  LV         VG   Attr       LSize Pool Origin Data% Meta% Move Log
  mybooks    myvg -wi-a----- 2.00g
  myprojects myvg -wi-a----- 500.00m
One final step remains, which is creating filesystems on our logical volumes.
Your logical volumes are represented in the device mapper directory /dev/mapper:
root@ubuntu-linux:~# ls /dev/mapper
myvg-mybooks myvg-myprojects
Let's create an ext4 filesystem on our mybooks logical volume:
root@ubuntu-linux:~# mkfs --type ext4 /dev/mapper/myvg-mybooks
mke2fs 1.44.1 (24-Mar-2018)
Creating filesystem with 524288 4k blocks and 131072 inodes
Filesystem UUID: d1b43462-6d5c-4329-b027-7ee2ecebfd9a
Superblock backups stored on blocks:
32768, 98304, 163840, 229376, 294912

Allocating group tables: done
Writing inode tables: done
Creating journal (16384 blocks): done
Writing superblocks and filesystem accounting information: done
Similarly, we can create an ext4 filesystem on our myprojects logical volume:
root@ubuntu-linux:~# mkfs --type ext4 /dev/mapper/myvg-myprojects
mke2fs 1.44.1 (24-Mar-2018)
Creating filesystem with 512000 1k blocks and 128016 inodes
Filesystem UUID: 5bbb0826-c845-4ef9-988a-d784cc72f258
Superblock backups stored on blocks:
8193, 24577, 40961, 57345, 73729, 204801, 221185, 401409

Allocating group tables: done
Writing inode tables: done
Creating journal (8192 blocks): done
Writing superblocks and filesystem accounting information: done
We have to mount both filesystems somewhere so we will create two new directories, /books and /projects:
root@ubuntu-linux:~# mkdir /books /projects
Now we can mount both filesystems:
root@ubuntu-linux:~# mount /dev/mapper/myvg-mybooks /books
root@ubuntu-linux:~# mount /dev/mapper/myvg-myprojects /projects
We can check the last two lines of the mount command output:
root@ubuntu-linux:~# mount | tail -n 2
/dev/mapper/myvg-mybooks on /books type ext4 (rw,relatime,data=ordered)
/dev/mapper/myvg-myprojects on /projects type ext4 (rw,relatime,data=ordered)
Indeed! Both filesystems are mounted.
To summarize; these are the steps that you need to follow to create LVM logical volumes:
- Create a physical volume(s).
- Create a volume group(s).
- Create a logical volume(s).
- Create a filesystem(s) on the logical volume(s).
- Mount the filesystem(s).
Pretty easy, right?
Extending logical volumes
Now comes the moment of appreciation. After all the hard work you have put in so far, you will see why LVM is such a big deal in Linux.
Let's consume all the available space in /books. Notice we only have 2 GB to use:
root@ubuntu-linux:~# df -h /books
Filesystem               Size Used Avail Use% Mounted on
/dev/mapper/myvg-mybooks 2.0G 6.0M 1.8G   1% /books
Change to the /books directory and create a 1 GB file named book1 as follows:
root@ubuntu-linux:/books# dd if=/dev/zero of=book1 bs=1G count=1
1+0 records in
1+0 records out
1073741824 bytes (1.1 GB, 1.0 GiB) copied, 1.47854 s, 726 MB/s
Now create another file book2 of size 900 MB:
root@ubuntu-linux:/books# dd if=/dev/zero of=book2 bs=900M count=1
1+0 records in
1+0 records out
943718400 bytes (944 MB, 900 MiB) copied, 1.34533 s, 701 MB/s
We are now running out of space! You will get an error if you attempt to create a 100 MB file:
root@ubuntu-linux:/books# dd if=/dev/zero of=book3 bs=100M count=1 dd: error writing 'book3': No space left on device
1+0 records in
0+0 records out
6103040 bytes (6.1 MB, 5.8 MiB) copied, 0.0462688 s, 132 MB/s
We are now officially out of disk space in /books:
root@ubuntu-linux:/books# df -h /books
Filesystem               Size Used Avail Use% Mounted on
/dev/mapper/myvg-mybooks 2.0G 2.0G  0    100% /books
Here comes LVM to our rescue. We do have some disk space left on our myvg volume group, so we can extend the size of our logical volumes and thus the size of our filesystems:
root@ubuntu-linux:/books# vgs
  VG   #PV #LV #SN  Attr VSize VFree
  myvg 2    2   0 wz--n- 3.99g 1.50g
We precisely have 1.5 GB of disk space left on myvg. We can now use the lvextend command to add 1 GB to our /dev/mapper/myvg-mybooks logical volume:
root@ubuntu-linux:/books# lvextend -r --size +1G /dev/mapper/myvg-mybooks
  Size of logical volume myvg/mybooks changed from 2.00 GiB (512 extents) to
    3.00 GiB (768 extents).
  Logical volume myvg/mybooks successfully resized.
resize2fs 1.44.1 (24-Mar-2018)
Filesystem at /dev/mapper/myvg-mybooks is mounted on /books; on-line resizing required
old_desc_blocks = 1, new_desc_blocks = 1
The filesystem on /dev/mapper/myvg-mybooks is now 786432 (4k) blocks long.
The -r option is essential as it resizes the filesystem along with the logical volume. We can now see that our mybooks logical volume has grown from 2 GB to 3 GB:
root@ubuntu-linux:/books# lvs
  LV          VG    Attr LSize     Pool Origin Data% Meta% Move Log Cpy%Sync Convert
  mybooks    myvg -wi-ao---- 3.00g
  myprojects myvg -wi-ao---- 500.00m
Consequently, we have gained more disk space in /books:
root@ubuntu-linux:/books# df -h /books
Filesystem               Size Used Avail Use% Mounted on
/dev/mapper/myvg-mybooks 2.9G 1.9G 865M  70% /books
Now let's check how much disk size we have remaining in our myvg volume group:
root@ubuntu-linux:/books# vgs
  VG   #PV #LV #SN Attr   VSize VFree
  myvg 2    2   0  wz--n- 3.99g 516.00m
Let's go all out and extend our myprojects logical volume to take up all the remaining space left in myvg:
root@ubuntu-linux:~# lvextend -r -l +100%FREE /dev/mapper/myvg-myprojects
  Size of logical volume myvg/myprojects changed from 516.00 MiB (129 extents)
    to 1016.00 MiB (254 extents).
  Logical volume myvg/myprojects successfully resized.
resize2fs 1.44.1 (24-Mar-2018)
Filesystem at /dev/mapper/myvg-myprojects is mounted on /projects;
The filesystem on /dev/mapper/myvg-myprojects is now 1040384 (1k) blocks long
Notice that the size of our myprojects logical volume has increased and eaten up all that's left in myvg:
root@ubuntu-linux:~# lvs
  LV          VG    Attr     LSize    Pool Origin Data% Meta% Move Log Cpy%Sync Convert
  mybooks    myvg -wi-ao---- 3.00g
  myprojects myvg -wi-ao---- 1016.00m
root@ubuntu-linux:~# vgs
  VG   #PV #LV #SN Attr   VSize VFree
  myvg 2    2   0  wz--n- 3.99g 0
Now we can't extend our logical volumes as the myvg volume group ran out of space. Try to add 12 MB to our mybooks logical volume, and you will get an error message:
root@ubuntu-linux:~# lvextend -r --size +12M /dev/mapper/myvg-mybooks
 Insufficient free space: 3 extents needed, but only 0 available
Extending volume groups
We can only extend our logical volumes if we have available space on the volume group. Now how do we extend a volume group? We simply add a physical volume to it!
Remember, I left out the one physical volume /dev/sdb4 that I didn't add to the volume group myvg. Now it's time to add it!
To extend a volume group, we use the vgextend command followed by the volume group name and then the physical volumes you wish to add. So to add the physical volume dev/sdb4 to our myvg volume group, you can run the command:
root@ubuntu-linux:~# vgextend myvg /dev/sdb4
  Volume group "myvg" successfully extended
Now we have added a whole 2 GB to our myvg volume group:
root@ubuntu-linux:~# vgs
  VG   #PV #LV #SN Attr    VSize VFree
  myvg 3    2   0  wz--n- <5.99g <2.00g
How amazing is that? You can now extend either of your two logical volumes as we added more disk space to the volume group. We should all take a moment to appreciate the power and flexibility of Linux LVM.
Now it's time for the last knowledge check exercise in the book. I am sure you will miss them!
Knowledge check
For the following exercises, open up your Terminal and try to solve the following tasks:
- Add a new 1 GB disk to your virtual machine.
- Create three 250 MB partitions on your new disk.
- Use your three new partitions to create three physical volumes.
- Create a volume group named bigvg that spans all your three physical volumes.
- Create a logical volume named biglv of size 500 MB.
- Create an ext4 filesystem on the biglv logical volume.
- Mount your filesystem on the /mnt/wikileaks directory.