
11. Publishing Your Games
The first ten chapters of this book dealt primarily with learning about HTML5 and associated technologies and developing games. In this chapter, we shift our focus and cover how to deploy your games with a good measure of optimization thrown in. Applications on the Web live and die based on their speed. Optimization and effective use of offline cache are important pieces of the puzzle when pushing out your work to the masses.
Optimizing Your Game’s Assets
We are making games, so lots of our payload will be in the games’ logic. In an attempt to write code that you will understand in six months’ or a year’s time, you may have painstakingly commented and formatted your code. Or not. The problem with all those comments is that they take up space in your files and your users don’t care that you’ve explained how something works, just that it does. The smaller your files are, the faster they will download. Minification is the process of making code smaller. Often, this will include removing white space and comments as well as renaming functions and variables.
Minification with Google Closure Compiler
Google Closure Compiler is a code analyzer, optimizer, and minimizer, all rolled into one package. Most minimizers will do the standard function and variable renaming, comment removal, and then call it a day. Closure Compiler goes one step further and walks the abstract syntax tree for your code and notes which code can be removed because it is unreachable or can be simplified by inlining, which is replacing a function call with code from that function. It can also identify mistakes in your code. We won’t be using the advanced features in this chapter, but you are encouraged to research this more if you are so interested. Closure Compiler does require Java to be installed to run the application, so go ahead and take a moment to grab it if you don’t already have Java installed on your machine.
Download and extract compiler.jar from the zip file located at http://closure-compiler.googlecode.com/files/compiler-latest.zip. The compiler doesn’t have any external Java dependencies. We can optimize a file by executing
java -jar compiler.jar
at the command line, followed by the options and values we desire. The useful flags for our needs are --js, --compilation_level, and --js_output_file.
You can see the available command-line options, including the ones we won’t be covering at all, by executing the following:
java -jar compiler.jar --help
--js specifies files to be minified. We can include as many as we want, as long as each file has its own --js flag. We have three choices for the --compilation_level:
• WHITESPACE_ONLY
• SIMPLE_OPTIMIZATIONS
• ADVANCED_OPTIMIZATIONS
As mentioned before, we will leave ADVANCED_OPTIMIZATIONS for another place and time. The WHITESPACE_ONLY identifier only removes white space and comments. SIMPLE OPTIMIZATIONS executes the WHITESPACE_ONLY optimizations and additionally mangles top-level variable and parameter names. --js_output_file, as its name hints, allows us to specify an output file to hold the optimized JavaScript. If we passed multiple files via --js, they will be concatenated into a single file. You can see an example of how a call to optimize several files with simple optimization would look here:
java -jar compiler.jar --js Game.js —js zepto.min.js
--js_output_file outfile.js --compilation_level SIMPLE_OPTIMIZATIONS
The amount of white space and comments will determine how small the minified version is. On some of the project files from other chapters, I noticed an average 40% reduction in size after minification. Think about that for a moment: that’s 40% less data to download and in most cases a reduction in files to download (because they are concatenated together). It’s a clear win. If you are running your own server, you should know that most web servers allow you to go a step further in gzipping your assets. You might have to install an additional module or plug-in, but it is something to consider because minifying then gzipping can yield a reduction in file size in the high double digits. When a client requests a file from the server, the server will respond to the request with a gzipped version that the client then extracts. The web page that requested the asset has no idea that it was served a gzipped resource.
CSS can also be minified and gzipped. Closure Compiler doesn’t do CSS minification. Most of your games will probably be light on CSS and heavy on JavaScript, so CSS minification is not likely to make a significant difference.
Images can likewise be optimized. Every image included in a document is a separate HTTP request. Combining them into a sprite sheet allows us to save precious time by providing them all in one go.
Running Applications Offline with Application Cache
One of the trends that has been ushered in with HTML5 is a desire to blur the lines between online and offline access. In Chapter 1, “Introducing HTML5,” we talked briefly about how the now-defunct Google Gears allowed you to store data for offline access; that concept has been carried forward with HTML5 Application Cache. It takes away the binary decision users had to previously face: whether to be online and able to access the app, or not. A properly structured app could retain some subset of functionality while offline. Although you won’t be able to hit an external server (for instance, to post leader board scores), other tools, such as localStorage, can cache data locally and re-transmit it to the server when connectivity is re-established.
Listing 11-1 shows a basic Application Cache manifest file. All manifests must begin with the line CACHE MANIFEST. The manifest listed is using the default behavior to cache all indicated files if there are no section headers.
Listing 11-1. Basic Application Cache Manifest
CACHE MANIFEST
/game.css
/game.js
The sections we can specify in a cache manifest are as follows:
• CACHE
• NETWORK
• FALLBACK
These indicate to always cache, to never cache, and how to handle a request for an uncached file, respectively. CACHE is the default. Listing 11-1 is equivalent to the code shown in Listing 11-2.
Listing 11-2. Basic Application Cache Manifest
CACHE MANIFEST
CACHE:
/game.css
/game.js
The NETWORK section can be specified in one of two ways. We can either specify explicitly which assets can only be accessed online, as we did for cached assets in Listings 11-1 and 11-2, or we can specify wildcard (*) values. Listing 11-3 shows a manifest were we exclude all Ruby files from caching. If we had omitted the .rb extension, the manifest would require network access for everything we didn’t explicitly list in the CACHE section. Any line whose first non-white-space character is a # is treated as a comment. Unlike comments in programming languages, these must be on their own lines. The reason for this is that the # is also used in URLs as a fragment indicator. A comment on the same line as a URL would be ambiguous to the browser.
Listing 11-3. Application Cache Manifest with Network Section
CACHE MANIFEST
# Manifest with CACHE and NETWORK sections
CACHE :
/game.css
/Game.js
NETWORK:
*.rb
The last and arguably the most important part of the manifest file is the FALLBACK section. The pairs in the FALLBACK section help your user cope with offline access. The first value in the pair is the URL pattern to match. It is followed by the asset to serve in its place. We might show a generic avatar for some users if they are viewing the leader board offline. We could also route them to a page stating that they are offline and certain features will be unavailable until they reconnect. The goal again is to give them as much functionality of the app as possible. Listing 11-4 shows a manifest file that serves generic_avatar.png for all requests made to the /images/avatars/ directory and shows offline.html for all uncached HTML files.
Listing 11-4. Application Cache Manifest with All Sections
CACHE MANIFEST
#Manifest with all sections
CACHE:
/game.css
/Game.js
NETWORK:
*.rb
FALLBACK:
/images/avatars/ /generic_avatar.png
/ /offline.html
Now that we have a manifest with all sections defined, we need to tell our application to serve it to users. You might have noticed that we never specified any HTML files to be cached. We both indicate the HTML to be cached and serve the manifest to users by adding a property value to our code, as shown in Listing 11-5.
Listing 11-5. HTML File with manifest Property
<!DOCTYPE html>
<html lang="en" manifest="/offline.manifest">
// Stuff goes here
</html>
The filename can be anything, but it must end in .manifest. It should also be served with the MIME type text/cache-manifest. That’s of less concern than the filename. Most web servers will properly guess the MIME type of files based on their extension and contents. If we have a single-file app, after adding the code from Listing 11-5, we’re done. For a multipage app, we need to include the manifest property in each page that should be cached. Although you can list the HTML files in the manifest itself, it is less messy to have the property be a part of your templates and omit it, as necessary to prevent caching rather than trying to maintain a massive list of HTML files in the manifest.
A common misconception is that changing files on the server without changing the manifest will somehow automagically retrieve the changed files and leave the unchanged files alone. That simply is not the case. Changing the manifest file is how the browser is notified of changes to the files. One quick-and-easy way to change the manifest is to add a comment line with a version number or identifier and to increment the number when you change assets referenced in the file. When you visit the site, it looks at the manifest file and checks whether it has viewed the file before, firing a checking event along the way. The manifest is checked against the local version if one exists; if they match, the browser fires a noupdate event and the function ends. If the local version doesn’t exist or the browser notices a change, a downloading event is fired and all assets are downloaded again. Periodically during the download process, progress events will be fired to give updates on the download status. When complete, either a cached or updateready event will be fired for the site without or with a previous manifest, respectively. Although caching occurs, unless you force an refresh on receipt of the updateready event, the user’s session will not be swapped to use the cached assets. The cached assets will be used on the next refresh after caching occurs.
Hosting Your Own Server
When it comes to running your own server, you can choose to physically run the equipment at your home or place of work or you can use a hosting service. Some services give you a curated experience, where you just log in to an online dashboard to upload files; others give you a clean instance of a server to install the software you need to run on it.
If you are anything like me, even if you have been diligent about gifting your slow machines to non-gamers, you still probably have one or two usable machines around the house. One of my castoffs was a laptop whose screen went bad but has a decent processor and 2GB RAM in it. With an external monitor to do the initial setup, that is the perfect machine to run a site.
The Domain Name System (DNS) translates human-friendly domain names to their IP addresses. When you have an instance at Rackspace or Amazon, the IP address is not going to change for the lifetime of that instance. Residential Internet providers, on the other hand, routinely invalidate and reassign the IP address assigned to your cable modem. This presents a problem for your users if the IP address for your site changes often. It’s the equivalent of someone changing their e-mail address every month. At first, you would try to keep up and actively seek them out, but eventually you would get lost and lose interest. Dynamic DNS services solve this problem by running software that reports the IP address back to the host at short intervals so that it catches changes quickly. Many modern wireless routers have this functionality built in. DynDNS and No-IP.com are two of the better-known and trusted dynamic DNS services. In addition to handling the routing of your domain name, they offer a number of free branded domain names you can use to get started.
When a user types in the domain for your website, several operations take place. First, the root servers, which contain the canonical information for the top-level domains (TLD; that is, .com, .uk, .fr, .me, and so on) are contacted to find the address of the TLD your site uses. The TLD is then queried to find the name server for your domain. Those servers are queried to get the IP address of your site. The last hop before returning the IP address is where dynamic DNS would fit in. Dynamic DNS doesn’t work for all situations, especially those that need 100 percent uptime. However, it is a great way to test ideas before growing to a hosted server.
Deploying Applications on Hosted Node.js Services
At the time of this writing, only a few companies specifically target deploying Node.js applications. This situation is expected to improve as Node.js becomes more of a mainstay. The advantage of using such a service is that you don’t have to worry about the minutiae of maintaining a hosted server, such as opening and routing to ports, enforcing separation between apps sharing the box on different domains, and operating system updates. A disadvantage of using such a service is lack of control. You don’t have a say in what equipment your site will run on and can’t do much if intermittent connectivity issues arise. Due to their elastic replication nature, you won’t be able to save new files into the application instance while it is running. This is an issue easily handled with online storage services such as Amazon and Rackspace, but it is certainly something to think about. In this section, we will focus on the services offered by Nodester.
Nodester (www.nodester.com) is a open-source hosting platform for Node.js applications. Nodester uses Git to track changes as well as to start and stop your applications. Provided you have Node.js and NPM installed, you can get started by installing the nodester module with the following command:
Next, you need to request a registration token:
nodester coupon <email address>
Within a couple hours or so, you should have a welcome e-mail with your registration code and some basic “Getting Started” instructions. The e-mail takes you through the steps to create a new user, generate an SSH key, and provide a password. We will conveniently skip those steps here and instead focus on what makes Nodester cool: its API.
Nodester’s command-line interface is a bridge over common tasks from Node, NPM, and Git. When you create a Nodester application with the command
nodester app create <app_name>
you are actually creating a remote Github repository for the application. You can manage NPM modules by just running the following command:
nodester npm <install|uninstall> <modules>
You can start, stop, or restart an app at any time by running this command:
nodester app <start|stop|restart> <app_name>
These commands only affect the code that is on the remote server. Any local changes need to be committed and pushed to the remote server before they will show up.
Having an application run from appname.nodester.com is fine for proof-of-concept apps, but real apps will need their own domain. Nodester can accept redirects from your own domain. You can manage aliases from your app name to your domain by executing the following command:
nodester appdomain <add|delete> <app-name> <domain-name>
You also need to add an A record to your DNS host pointing from your domain to Nodester’s IP address, currently 50.16.203.53. You can discover the other available commands by running nodester on the command-line with no parameters.
Nodester puts forth a novel solution to the hosting problem by providing hosting and version control deeply integrated into the same package. One area where it falls short is in persistence. Nodester doesn’t offer a built-in database for you to use—and probably with good reason. It would be hard to build a solution that solves the needs of most developers and keeps data properly segregated. Fortunately, the cloud database-hosting industry is fairly strong with offerings from MongoHQ (MongoDB), Cloudant (CouchDB), and Amazon (SimpleDB/SQL).
Publishing Applications on the Chrome Web Store
The Chrome Web Store is a place where you can purchase apps, themes, and extensions for the Chrome web browser. Estimates place the number of Chrome users at somewhere around 120 million worldwide. The Chrome Web Store is also the primary means for Chromebooks (Netbooks running Chrome OS) to install applications. Computers running Chrome OS have a Linux core, but the sole interface with which users will interact is the Chrome browser. The Chrome browser updates itself mostly silently in the background, so you don’t have the concerns that you have with other major browsers in supporting legacy versions. Applications distributed through the Chrome Web Store also have the ability to have updates pushed to users with little effort. With the Chrome Web Store, you can lean forward and code to the cutting-edge capabilities of the browser. That’s not to say you won’t have to do a little sniffing to determine capabilities of something such as WebGL or hardware acceleration, but targeting a single browser reduces the pain. We’ve talked a lot throughout the book about what apps are, but we haven’t really discussed themes and extensions. A theme modifies the look and feel of your Chrome application window with custom images and fonts. Extensions are mini-applications often have only a single purpose. An example of an extension would be a tool that “linkifies” text that appears to be a Twitter handle. In this section, we focus on packaging applications. When it comes to apps, the Chrome Web Store gives you two options for delivery to your users. You can deploy an app hosted on your servers or a packaged app that the user downloads.
Describing Your Application’s Metadata
Every installable app—be it a hosted or packaged app—needs some metadata about it to be described in a file called manifest.json. In the manifest file, we describe essentials, such as the name, description, and version of the application, icons, URLs (either external or bundled), and what permissions the application will use. Listing 11-6 shows a sample manifest.json file for a packaged app.
Listing 11-6. Sample manifest.json File
{
"name":"Copy Me Game",
"version":"0.0.1",
"description":"A Simon-like 'repeat the pattern' game",
"app" : {
"launch": {
"local_path": "index.html",
"container":"tab"
}
},
"icons": {
"16": "icons/icon_16.png",
"128": "icons/icon_128.png"
}
}
Deploying a Hosted Application
Hosted apps are not just glorified bookmarks. The manifest file allows you to request additional permissions at installation. Listing 11-7 shows a typical manifest file for a hosted app. One notable change from the previous example is the web_url key/value pair. It indicates the website that will be launched when the app is started. The site will also be approved for the requested permissions.
Listing 11-7. Sample Hosted App manifest.json File
{
"name":"Copy Me Game",
"version":"0.0.1",
"description":"A Simon-like 'repeat the pattern' game",
"app" : {
"launch": {
"web_url": "http://copyme.example.com/index.html",
}
},
"icons": {
"16": "icon_16.png",
"128": "icon_128.png"
},
"permissions": [
"unlimitedStorage",
"notifications"
]
}
In the case of Listing 11-7, users will be presented with a single pop-up listing all the requested permissions, as opposed to multiple requests in succession. Here’s a list of the permissions we can request for an app:
• background
• geolocation
• notifications
• unlimitedStorage
In Chapter 1, we discussed using geolocation and notifications, so turn back to that chapter for a refresher. unlimitedStorage removes the 5MB restrictions on localStorage and database storage. Without the permission, users would be shown a pop-up when they have reached the threshold. If they decline, it might negatively affect your application. Therefore, if you are going to be saving any sort of substantial data, it’s better to request it than not.
The background permission allows an app to load as soon as Chrome is started and run even if the user isn’t actively interacting with the app or Chrome. It runs a background HTML page that it can use to run miscellaneous tasks. The Twitter client, Tweet-Deck, uses background pages to check for new tweets and sends browser notifications when a user is mentioned or direct-messaged. In the context of a game, this might be where you would send and receive the game state, messages, and moves. In order to use the background permission, you also have to add a background_page key/value pair to the manifest.
Deploying a Packaged Application
Packages applications are great for offline access and, like hosted applications, use a zipped file that contains a manifest.json file. In addition, all of the app code is included. Packaged applications can also leverage the Licensing API, but that functionality does come with a couple words of caution. Because the whole application is downloaded to the user’s machine, a motivated user can alter files to circumvent your security. If your application is free, this won’t be a concern at all. For an application that is free but uses in-app payments for content, perhaps, it likewise might not be that much of an issue.
Testing Your Applications Locally
Chrome gives you the ability to rapidly test your applications locally without having to redeploy to the web store. The Extension Options pane, which can be accessed from Tools | Extensions or by typing chrome://extensions in the omnibar, allows you to install a working copy of your application as well as configure, uninstall, or disable other themes, extensions, and applications. Figure 11-1 shows the Extensions pane with the Developer Mode collapsible pane expanded. You would click the Load Unpacked Extension button and navigate to the root directory of your application.
Figure 11-1. Chrome Extensions pane

Uploading Your Application to the Chrome Web Store
When you have tested locally to your heart’s content, it’s time to take it to the next level with either beta testing or full deployment to the world. If you go to the Chrome Web Store from a new tab, near the bottom will be a Developer Dashboard link. From this dashboard, you can manage updates or add new themes, extensions, and apps for the Chrome Web Store. If you weren’t grandfathered in during the beta period, you will have to pay a $5 fee to distribute applications through the Chrome Web Store. Like the Android developer fee, that is not an annual recurring fee—it’s a one-time fee. After you sort out the registered developer situation, you can navigate to the dashboard. Figure 11-2 shows a dashboard with a couple of apps that are in beta test.
Figure 11-2. Chrome Web Store Developer Dashboard
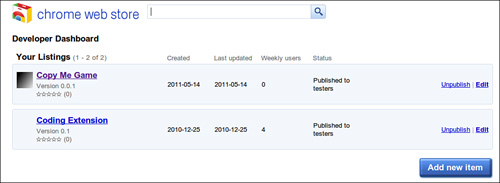
In beta test mode, these applications show up in the Chrome Web Store, but only for the creator and any testers the creator has white-listed. Below the listed apps is a “so big you can’t miss it” button permitting you to add a new item. When you click the button, you are greeted with a simple web form asking you to upload an archive file, as shown in Figure 11-3.
Figure 11-3. The Add New Item screen
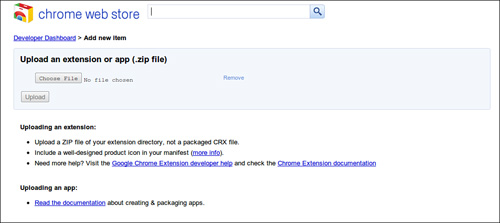
When you attempt to submit the file, the server parses it to make sure that it has, at the very least, a manifest.json file, a small icon (16×16 pixels) for the browser tab, and a large icon (128×128 pixels) for the New Tab app dashboard of all installed apps. Forget to include any of these items, and the server will refuse to upload the file.
To the far right of the applications in Figure 11-2 are two links: one to toggle whether the application is published or unpublished, and link to edit an item. The latter link allows us to configure the app with more granularity than the manifest file allows.
Configuring Your Application
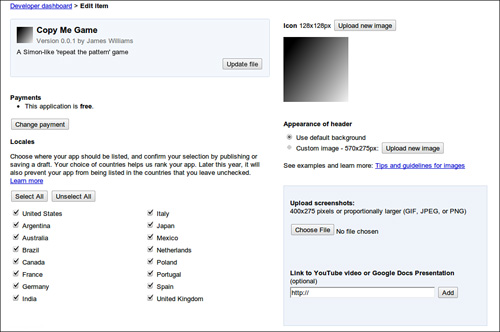
Figure 11-4 shows the first portion of a large form for configuring app attributes. You can see that it populates some basic information from the manifest file, including the app name, version, and description. You can also select which countries’ users will be able to see the app in the Chrome Web Store. From this form, we can also load an icon and add screenshots, a link to a YouTube video, or a link to Google Docs presentation.
Figure 11-4. The Edit Item screen
The second portion, shown in Figure 11-5, gives you a chance to select preset categories for the app or to add your own. There is also the area for providing a detailed description as well as upload buttons for promotional banners in the event your app gets featured. Lastly, there is a default language designation. Chrome provides built-in localization for themes, extensions, and apps so you can include all messages in deployment instead of deploying several versions of the app.
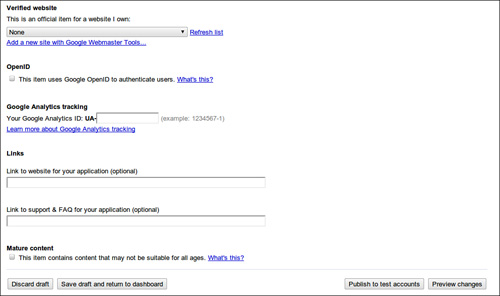
The third and final portion, shown in Figure 11-6, allows you to associate the item with a verified website you own, mark the content as “Mature,” attach links, and designate the use of OpenID authentication. It is important to note that if you are using Chrome Web Store Payments, you must use OpenID authentication so that the purchase can be verified and attached to the user’s Google account. All the documentation on the matter suggests using OpenID because it purportedly makes the path to transitioning from a free to a paid app easier and improves the user experience.
Figure 11-5. The Edit Item screen, continued
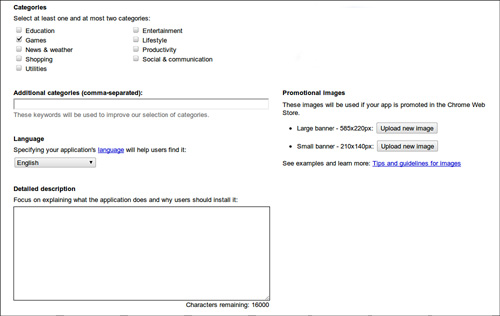
Figure 11-6. The final portion of the Edit Item screen
Deciding Between Packaged and Hosted Chrome Apps
The decision on whether to make your application a hosted or packaged app depends on many factors. Free apps can use either model with ease, whereas paid apps have to take extra pains for verification if deployed as packaged apps. Although the app updates can be made available to users with a simple button click, updating packaged apps takes more steps for the user. Although both hosted and packaged apps require code updates and loading to your or Google’s servers, users of a hosted app will automatically have the updated application whereas there might be a delay for users of a packaged app.
Google encourages developers to allow their users to have a limited free trial of their applications. Hosted applications can handle both trial and paid users in the same codebase, whereas for packaged applications, the suggested method is to prepare two packages: one for the trial and the other for paid access. Size is also a concern. The maximum size for a packaged app and all its included assets is 10MB. Though in beta at the time of this writing, Chrome in-app payments will provide a way to convert a trial version to a paid version of your app. However, developers aren’t locked into using Chrome Payments; they can also elect to use their own payment providers—either directly in the application or by requiring users to register and provide credentials on their website. The video-streaming service Netflix does this with its native iOS and Android apps. Users have to register and pay for Netflix before they can use the mobile application. The mobile app simply asks for username and password.
Publishing Applications with TapJS
TapJS is a game-hosting platform that allows you to seamlessly integrate the following social elements into your games using a concise JavaScript API:
• Achievements
• Leader boards
• Player accounts
Integrating with TapJS is simple: Just include the script tags shown in Listing 11-8 in your head tag and you are ready to use the TapJS APIs.
Listing 11-8. TapJS Script Tags
<script type="text/javascript"
src="https://ajax.googleapis.com/ajax/libs/jquery/1.4.4/jquery.min.js"></script>
<script type="text/javascript"
src="http://YOUR-GAME-URL.tapjs.com/api/js"></script>
Creating a TapJS Application
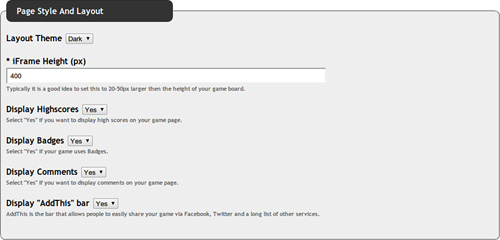
It’s also simple to create a TapJS game: Simply fill in a title and click Continue, as shown in Figure 11-7, and you are brought to a long form shown in sections in Figures 11-8 through 11-12. Figure 11-8 shows the areas where you can describe your app in more detail, and Figure 11-9 shows the limited set of themes and layout options as well as achievements.
Figure 11-7. The Add a New Game screen
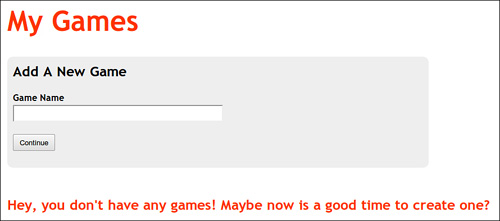
Figure 11-8. Adding a description and category
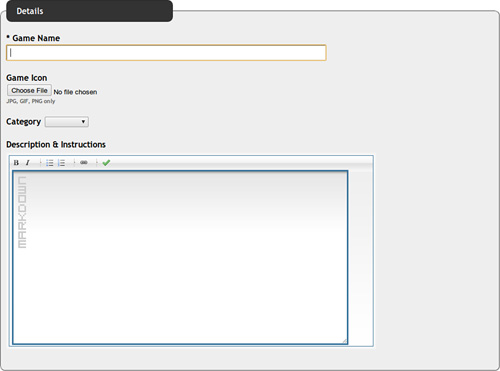
Figure 11-9. Adding a theme, layout, and achievements
The subdomain defines the URL that you will give your friends and that Facebook will use to access your game. This is shown in Figure 11-10. Figure 11-11 shows the permissions your game can ask for—that is, whether Internet Explorer 7 and 8 users will be told to download a modern browser, whether mobile devices can access your game, and whether your game is published and playable. Lastly, Figure 11-12 shows where you would enter the Facebook-specific details.
Figure 11-10. Adding a subdomain
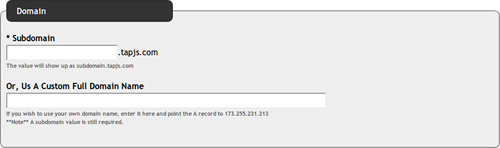
Figure 11-11. Adding permissions
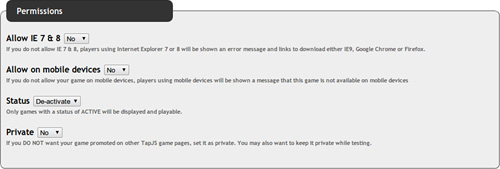
Figure 11-12. Adding Facebook integration

Packaging an Application for TapJS
Packaging an app for TapJS is as easy as creating a zip (archive) file and you’re all set. You can include any of the following file types in the zip file:
• .html
• .css
• .ttf
• .js
• .swf
• .jpg, .png, .gif
• .mp3 and .ogg
You are free to use any folder structure you prefer. The only requirement is to include the aforementioned script tags somewhere in your application and an index.html file.
Publishing a TapJS Application to Facebook
TapJS can also deploy applications to be used on Facebook. This choice does come with compromises in regard to what functions you can call. You will first need to create a Facebook application. We covered this briefly in Chapter 9, “Building a Multiplayer Game Server,” but let’s revisit it with the changes needed for a TapJS application. Figure 11-13 shows the Web Site tab of the Facebook Developer Application console. You needed to set the Site URL to the URL you picked when you created the game on TapJS (generally http://YOURGAME.tapjs.com).
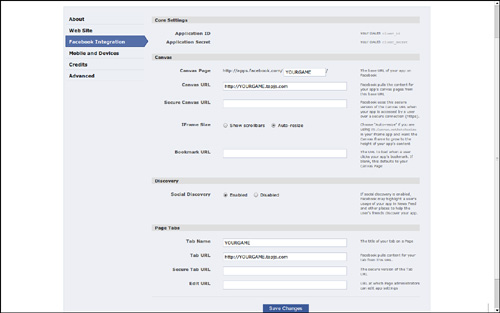
On the Facebook Integration tab, the Canvas URL and Tab URL fields should be set to your TapJS URL. The IFrame Size option should be set to Auto-Resize. The Canvas Page and Tab Name fields should be set as well. Figure 11-14 shows a screenshot of this part of the developer console.
Figure 11-13. Facebook Application Web Site tab

Figure 11-14. Facebook Application Facebook Integration tab
TapJS’s Facebook API is rather concise. There are three functions on the tapjsSocial object. Their signatures are listed here:
• tapjsSocial.fbCheck ([callbackFunction] )
• tapjsSocial.fbApp ([callbackFunction] )
• tapjsSocial.fbWallPost (message [,link] [,caption] [,description] [callbackFunction] )
fbCheck determines whether the user is accessing the application from a Facebook Canvas. This can be called to give your applications hints on Facebook-specific features to turn on or off. One in particular is the Facebook ban on AdSense ads. fbApp retrieves information about your app, such as the app ID and Canvas page URL. fbWallPost, as its name implies, allows you to post to a user’s Facebook wall. The TapJS API doesn’t currently support in-app payments such as Facebook Credits and Google Payments, although in-app payments are listed on the roadmap. Using TapJS to deploy on Facebook is a good means for performing a smoke test rollback on Facebook before trying to do something more tailored to the platform.
Publishing Games with Kongregate
Kongregate is a online game-hosting platform that originally supported only Flash and Unity games but is now able to host HTML5 games. It is very mature and boasts a large number of users and developers. Konduit, its application platform, incorporates many of the same elements as TapJS, and more, including the following:
• Chat integration
• Micropayments
• Guest game players (not signed in to Kongregate)
• User profiles
One point of interest is that when you deploy to Kongregate, you are also deploying to Android. Kongregate publishes an Android app that grants access to all the games on its platform. Konduit is a bit large to discuss with any justice here, but interested readers are encouraged to read up on it at www.kongregate.com/developer_center/docs/konduit-platform.
Publishing HTML5 Applications to the Desktop
As mentioned before, Webkit, the browser engine that powers Google Chrome and Apple Safari, started its life as an open-source project called KHTML. Webkit’s open-source roots means that it is addressable from many different programming languages that interface with C/C++. Developers can write their own bindings from their language of choice to Webkit or choose from ready-made solutions using the GTK (http://en.wikipedia.org/wiki/GTK) or wxWidgets (http://en.wikipedia.org/wiki/WxWidgets) widget libraries, each of which has bindings for many programming languages. These libraries are additionally cross-platform. These bindings allow you to make your application as rich or as basic as needed. You could just code a shell app that loads the application like any other browser (as if often the case with XULRunner apps), or you could allow your app to use gamepads or other peripherals that wouldn’t be available in a regular browser.
XULRunner (http://en.wikipedia.org/wiki/XULRunner) is the runtime engine in Mozilla products that allows you to build applications. XULRunner lags in language support behind Webkit and isn’t as open to being embedded as Webkit is. With a XULRunner solution, you aren’t actually coding as much as you are composing an application. Your application runs in an XULRunner instance, and for the most part, besides some XUL layouts, you don’t address the app internals.
HTML5 applications have even been published to the Mac App Store (www.apple.com/mac/app-store/) with no changes to game code and only a little code to wrap a WebView around the game. On Linux, the Ubuntu Software Center (http://developer.ubuntu.com/), which initially allowed you to install free apps and libraries, as of late 2010 has added a paid app area. At the time of this writing, it was only open to a few partners and eventually will be rolled out to the general public.
Summary
We covered a lot of ground in this chapter. We opened with some techniques to reduce file sizes and make your apps run faster. We had a crash course in DNS routing for those of you who might want to host your own site on commodity hardware lying around your house. We then transitioned to looking at dedicated cloud Node.js hosting. For those who don’t want to manage your own server, we discussed the social options that TapJS provides—both as a standalone application on TapJS’s servers and as an embedded Facebook application. We dove into the options provided by the Chrome Web Store and had a healthy discussion of the desktop options for deploying HTML5 applications, including the Mac App Store (not to be confused with the iOS App Store) and the Ubuntu Software Center. We also discussed the upcoming options (in beta at the time of this writing) for in-app payments in Chrome apps and paid apps on the Ubuntu Software Center.
Exercises
1. How would you force new assets to be cached using a manifest file?
2. Does localStorage have a limit when accessed from a website not packaged in the Chrome Web Store? If so, what is it?
3. What are the pros and cons of using TapJS to deploy applications to Facebook?
You can download chapter code and answers to the chapter exercises at www.informit.com/title/9780321767363.