
1. Introducing HTML5
HTML5 is a draft specification for the next major iteration of HTML. It represents a break from its predecessors, HTML4 and XHTML. Some elements have been removed and it is no longer based on SGML, an older standard for document markup. HTML5 also has more allowances for incorrect syntax than were present in HTML4. It has rules for parsing to allow different browsers to display the same incorrectly formatted document in the same fashion. There are many notable additions to HTML, such as native drawing support and audiovisual elements. In this chapter, we discuss the features added by HTML5 and the associated JavaScript APIs.
Beyond Basic HTML
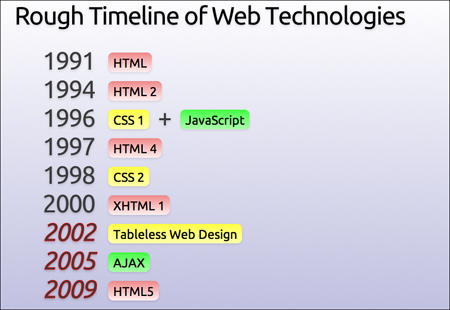
HTML (Hypertext Markup Language), invented by Tim Berners-Lee, has come a long way since its inception in 1990. Figure 1-1 shows an abbreviated timeline of HTML from the HTML5Rocks slides (http://slides.html5rocks.com/#slide3).
Although all the advancements were critical in pushing standards forward, of particular interest to our pursuits is the introduction of JavaScript in 1996 and AJAX in 2005. Those additions transformed the Web from a medium that presented static unidirectional data, like a newspaper or book, to a bidirectional medium allowing communication in both directions.
JavaScript
JavaScript (née LiveScript and formally known as ECMAScript) started as a scripting language for the browser from Netscape Communications. It is a loosely typed scripting language that is prototype-based and can be object-oriented or functional. Despite the name, JavaScript is most similar to the C programming language, although it does inherit some aspects from Java.
The language was renamed JavaScript as part of a marketing agreement between Sun Microsystems (now Oracle Corporation) and Netscape to promote the scripting language alongside Sun’s Java applet technology. It become widely used for scripting client-side web pages, and Microsoft released a compatible version named JScript, with some additions and changes, because Sun held the trademark on the name “JavaScript.”
AJAX
AJAX (Asynchronous JavaScript and XML) started a new wave of interest in JavaScript programming. Once regarded as a toy for amateurs and script kiddies, AJAX helped developers solve more complex problems.
At the epicenter of AJAX is the XMLHttpRequest object invented by Microsoft in the late 1990s. XMLHttpRequest allows a website to connect to a remote server and receive structured data. As opposed to creating a set of static pages, a developer was empowered to create highly dynamic applications. Gmail, Twitter, and Facebook are examples of these types of applications.
We are currently in the midst of another JavaScript renaissance, as the major browser makers have been using the speed of their JavaScript engines as a benchmark for comparison. JavaScript as a primary programming language has found its way into server-side web components, such as Node.js, and mobile application frameworks, such as WebOS and PhoneGap.
Bridging the Divide
Even the best of standards takes a while to gain uptake. As a means to not let the lack of features limit innovation, Google created Chrome Frame and Google Gears (later, simply Gears) to bring advanced features to older browsers.
Google Gears
Google Gears, which was initially released in May 2007, has come to define some of the advanced features of the HTML5 draft specification. Before the advent of HTML5, many applications used Gears in some way, including Google properties (Gmail, YouTube, Doc, Reader, and so on), MySpace, Remember the Milk, and WordPress, among others. Gears is composed of several modules that add functionality more typical of desktop applications to the browser. Let’s take a moment and talk about some of its features.
In its first release, Gears introduced the Database, LocalServer, and WorkerPool modules. Gears’ Database API uses an SQLite-like syntax to create relational data storage for web applications. The data is localized to the specific application and complies with generalized cross-site scripting rules in that an application cannot access data outside its domain. The LocalServer module enables web applications to save and retrieve assets to a local cache even if an Internet connection is not present. The assets to serve from local cache are specified in a site manifest file. When an asset matching a URL in the manifest file is requested, the LocalServer module intercepts the request and serves it from the local store.
The WorkerPool module helps address one of the prevalent problems with JavaScript-intensive websites: long-running scripts that block website interaction. A website by default has a single thread to do its work. This is generally not a problem for very short, bursty actions (such as simple DOM manipulation) that return quickly. Any long-running task, such as file input/output or trying to retrieve assets from a slow server, can block interaction and convince the browser that the script is unresponsive and should be forcefully ended. The WorkerPool module brought the concept of multithreading computing to the browser by letting your WorkerPool create “workers” that can execute arbitrary JavaScript. Workers can send and receive messages to and from each other, provided they are in the same WorkerPool, so they can cooperate on tasks. Workers can work cross-origin but inherit the policy from where they are retrieved. To account for the fact that several properties such as Timer and HttpRequest are exposed by the window object, which is not accessible to workers, Gears provides its own implementations.
Another API of interest is the Geolocation API. The Geolocation API attempts to get a fix on a visitor by using available data such as the IP address, available Wi-Fi routers with a known location, cell towers, and other associated data.
Google ceased principal development of Gears in November 2009 and has since shifted focus to getting the features into HTML5. Thankfully, all these features we’ve discussed found their way into HTML5 in some shape or form.
Chrome Frame
Chrome Frame is a project that embeds Google Chrome as a plugin for Internet Explorer 6 and higher versions, which have weak HTML5 support. Chrome Frame is activated upon recognition of a meta tag. Chrome Frame currently does not require admin rights to be installed, thus opening opportunities on systems that are otherwise locked down.
You can find more information about Chrome Frame at http://code.google.com/chrome/chromeframe/.
Getting Things Done with WebSockets and Web Workers
One of the additions to HTML5 is APIs that help the web application communicate and do work. WebSockets allow web applications to open a channel to interact with web services. Web Workers permit them to run nontrivial tasks without locking the browser.
WebSockets
WebSockets allow applications to have a bidirectional channel to a URI endpoint. Sockets can send and receive messages and respond to opening or closing a WebSocket. Although not part of the specification, two-way communication can be achieved in several other ways, including Comet (AJAX with long polling), Bayeux, and BOSH.
Listing 1-1 shows the code to create a WebSocket that talks to the echo server endpoint. After creating the socket, we set up the functions to be executed when the socket is opened, closed, receives a message, or throws an error. Next, a “Hello World!” message is sent, and the browser displays “Hello World!” upon receipt of the return message.
Listing 1-1. WebSocket Code for Echoing a Message
var socket = new WebSocket(ws://websockets.org:8787/echo);
socket.onopen = function(evt) { console.log("Socket opened");};
socket.onclose = function(evt) {console.log("Socket closed");};
socket.onmessage = function(evt){console.log(evt.data);};
socket.onerror = function(evt) {console.log("Error: "+evt.data);};
socket.send("Hello World!");
Web Workers
Web Workers are the HTML5 incarnation of WorkerPools in Google Gears. Unlike WorkerPools, we don’t have to create a pool to house our Web Workers. Listing 1-2 shows the code to create a simple worker and set a function for it to execute upon receipt of a message. Listings 1-2 and 1-3 show the HTML code for creating a web page with a Web Worker that displays the current date and time on two-second intervals.
Listing 1-2. Web Page for Requesting the Time
<!DOCTYPE HTML>
<html>
<head>
<title>Web Worker example</title>
</head>
<body>
<p>The time is now: <span id="result" /></p>
<script>
var worker = new Worker('worker.js'),
worker.onmessage = function (event) {
document.getElementById('result').innerText = event.data;
};
</script>
</body>
</html>
The associated JavaScript worker.js file is shown in Listing 1-3.
Listing 1-3. Worker.js File for Getting a Date and Time
setInterval(function() {w
postMessage(new Date());
}, 2000);
In the two listings, we see that workers can send messages using postMessage() and can listen for messages on the closure onmessage. We can also respond to errors and terminate workers by passing a function to onerror and executing terminate(), respectively.
Workers can be shared and send messages on MessagePorts. As with other aspects of the Web Worker spec, this portion is in a state of flux and somewhat outside the needs of the examples in this book. Therefore, using SharedWorkers is left as an exercise for the reader to investigate.
Application Cache
Application Cache provides a method of running applications while offline, much like the LocalServer feature in Gears. A point of distinction between the two features is that Application Cache doesn’t use a JSON file, using a flat file instead to specify which files to cache. A simple manifest file to cache assets is shown in Listing 1-4.
Listing 1-4. Sample Application Manifest
CACHE MANIFEST
# above line is required, this line is a comment
mygame/game.html
mygame/images/image1.png
mygame/assets/sound2.ogg
The Application Cache has several events it can respond to: onchecking, error, cached, noupdate, progress, updateready, and obsolete. You can use these events to keep your users informed about the application’s status. Using the Application Cache can make your game more tolerant to connectivity outages, and it can make your users happy by letting them start game play quicker (after the assets are cached). Also, if you choose, Application Cache can be used to allow users to play your game offline. Don’t worry too much about it right now. In Chapter 11, “Publishing Your Games,” we discuss using the Application Cache in more detail.
Database API
At present, there are multiple ways to store structured data using HTML5, including the WebSQL API implemented by Webkit browsers and the competing IndexedDB API spearheaded by Firefox.
WebSQL API
WebSQL provides structured data storage by implementing an SQL-like syntax. Currently, implementations have centralized around SQLite, but that isn’t a specific requirement.
There isn’t a “createDatabase” function in WebSQL. The function openDatabase optimistically creates a database with the given parameters if one doesn’t already exist. To create a database name myDB, we would need to make a call in the form
var db = openDatabase("myDB", "1.0", "myDB Database", 100000);
where we pass "myDB" as the name, assign the version "1.0", specify a display name of "myDB Database", and give it an estimated size of 100KB. We could have optionally specified a callback to be executed upon creation. Figure 1-2 shows the content of the Chrome Developer Tools Storage tab, which we will cover in more detail in Chapter 2, “Setting Up Your Development Environment,” after executing the preceding line of code.
Figure 1-2. Storage tab showing a created database

In the window to the right, we can run arbitrary SQL code, as shown in Figure 1-3, where we created a table, inserted some information, and ran a query.
Figure 1-3. Storage tab showing SQL statements

Although not universally supported, the specification does call out the existence of both asynchronous and synchronous database connections and transactions. Our current example creates an asynchronous connection; to create a synchronous one, we would call openDatabaseSync with the same parameters. After the initial connection, there is no distinction when it comes to database transactions besides calling transaction(...) for read/write transactions and readTransaction for read-only transactions.
A word of caution: Synchronous connections are not well supported and, in general, you should structure your code to run asynchronously.
IndexedDB API
IndexedDB stores objects directly in object stores. This makes it easier to implement JavaScript versions of NoSQL databases, like those of the object databases MongoDB, CouchDB, and SimpleDB. At the time of this writing, the implementations of the APIs weren’t synchronized and used different naming schemes and strictness to the specification. The Internet Explorer implementation requires an ActiveX plugin. I encourage you to check out http://nparashuram.com/trialtool/index.html#example=/ttd/IndexedDB/all.html to see some examples in action on Firefox, Chrome, and Internet Explorer. The Chrome code in most cases will work seamlessly on Safari.
Web Storage
Web Storage provides several APIs for saving data on the client in a fashion similar to browser cookies. There is a Storage object for data that needs to persist between restarts named localStorage and one for data that will be purged once the session ends named sessionStorage. The data is stored as key/value pairs. These two objects implement the functions listed in Table 1-1.
Table 1-1. Web Storage Functions
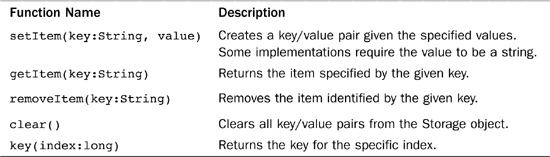
Each Storage object also has a length property indicating the number of present key/value pairs.
Web Storage offers a more fluent API we can use in lieu of the getItem and setItem functions listed in Table 1-1. The alternate API uses an array-like means of referencing a key. To set a localStorage key/value pair with the values of a hometown newspaper, we could use the following, for example:
localStorage['newspaper'] = 'The Baltimore Sun';
Likewise, we could retrieve that value with just the left half of the preceding expression:
localStorage['newspaper'];
In the context of game programming, we could use Web Storage to store user high scores as well as data for saved games.
Geolocation
The Geolocation API doesn’t have an explicit function to ask for the user’s permission to track his or her position. Instead, the browser handles this transparently for us. When the Geolocation API first requests position information from a website for which it doesn’t have permission, a contextual pop-up appears to request permission from the user.
We can check to see if the browser supports the Geolocation API by checking for the following object:
navigator.geolocation
If it resolves to a non-null value, we have the ability to geolocate.
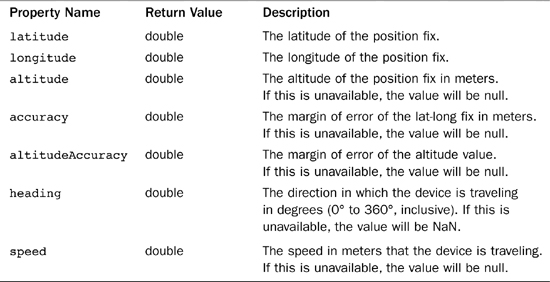
The calculated position of a user is defined by the Position object, which contains a Coordinates object named coords and a timestamp indicating when the fix was retrieved. Table 1-2 shows the properties of the coords object.
Table 1-2. Coordinates Object Properties
After we have verified that geolocation is available, obtaining a position fix on a device is simple. We just call getCurrentPosition with either one, two, or three parameters, corresponding to the functions to run if getting a fix is successful, if it fails, and the options on the request, respectively.
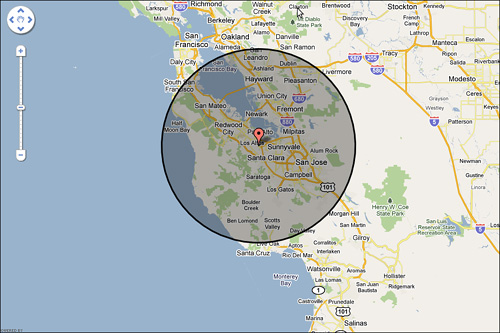
Listing 1-5 shows the code needed to retrieve a location, draw it on a map with a marker, and draw a proximity circle around the marker.
Listing 1-5. Drawing a Map with Geolocation
if(navigator.geolocation) {
navigator.geolocation.getCurrentPosition(function(pos) {
var latitude = pos.coords.latitude;
var longitude = pos.coords.longitude;
var options = {
position:new google.maps.LatLng(latitude, longitude)
,title:"Your location"};
var marker = new google.maps.Marker(options);
var circle = new google.maps.Circle({
map:map, radius:pos.coords.accuracy
});
circle.bindTo('center', marker, 'position'),
marker.setMap(map);
map.setCenter( new google.maps.LatLng(latitude, longitude));
},
function(error) {
console.log(error.message);
});
}
After verifying that geolocation is available, we first attempt to retrieve a fix on the position of the device. In this example, we are passing in the two parameter functions of getCurrentPosition to execute if successful, an error occurs, or if the user declines geolocation. After getting the latitude and longitude portions, we create a marker centered at that position with the title “Your location.” To the marker, we attach a circle whose radius is equivalent to the accuracy of the position fix. Lastly, if there is an error, our error-handling function prints out the error message to the console. Figure 1-4 shows a sample position fix using the OpenStreetMap tile set.
Although we did not use it, we could have also specified an options object that indicates several preferences on the retrieved data. We could also set up a listener to execute every time there is a position change returned from the watchPosition function. Geolocation is an expensive API. Use it judiciously and don’t be afraid to cache the location.
Figure 1-4. Geolocation from the browser
We could use geolocation to create localized leader boards, or on a multiplayer server to match players who are physically close to one another.
Getting Users’ Attention with Notifications
In HTML4, the options to communicate messages to the user were limited. You could show the user an alert window or show a message in a div element. Showing an alert window is well supported on all browsers, but it is highly disruptive. It is something that requires immediate attention and doesn’t let you move on until you have handled it. One sure way to annoy a user is by making him lose a life because some message obscured his view. Showing a message in a div element fares slightly better, but there isn’t a standard way to add them. These types of messages can be easily ignored. On one side we have notifications that crave attention, and on the other we have notifications that can be easily ignored. There has to be a middle ground. Enter web notifications.
On the Mac OS X and Ubuntu platforms natively, and with a plugin on Windows, an application can send configurable messages to users and notify them of events or changes it deems important. An example of such a notification is shown in Figure 1-5.
Figure 1-5. Desktop notification message

Like their desktop counterparts, web notifications can contain an image along with a contextual message.
Requesting Permission to Display Notifications
Before we can display notifications to users, we first have to get their permission. Explicit permission protects the users from being bombarded with unwanted notifications. We can request permission to display notifications by executing the following:
window.webkitNotifications.requestPermission();
This will show a contextual message in the browser to allow the user to approve or deny access, as shown in Figure 1-6. Instead of a no-argument function call, we can also pass a function to execute when the user responds to the prompt.
Figure 1-6. Web notification permissions message
![]()
We can likewise verify permission by running the following command:
window.webkitNotifications.checkPermission();
In this case, checkPermission() returns an integer that indicates the permission level, as shown in Table 1-3.
Table 1-3. Notification Permission Level
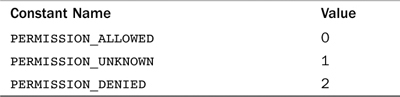
Looking at the name, you would expect notifications to work in at least the major Webkit browsers, namely Chrome and Apple Safari. Although Safari uses Webkit, it doesn’t implement the Notification API. If the spec is implemented globally, the namespace could presumably change from webkitNotifications to simply notifications.
Creating Notifications
You can create two types of notifications: simple and HTML. Simple notifications display a simple message with an optional title and icon image, whereas HTML notifications display an arbitrary URL. For example, we can create a simple notification by executing the following:
var msg = window.webkitNotifications.createNotification(
'', 'Test Notification', 'Hello World'
);
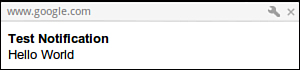
Our notification will have the title “Test Notification” with the message “Hello World.” Because we passed an empty string for the icon image, the API omits it. We can do this for any other parameter. Do this to hide parameters you don’t want displayed. Passing no value to the function will cause a text message of “undefined” or a broken image link. Figure 1-7 shows our notification running in the browser. As you can see, it is pretty Spartan, and we have no control over the design besides the parameters we passed it.
Figure 1-7. Simple web notification
As mentioned before, HTML notifications can get their content from an arbitrary URL such as a website or an image. The function just takes the desired URL to display in the form:
var msg =window.webkitNotifications.createHTMLNotification(
'http://example.com'
);
HTML notifications give you no means to resize them, and unless the URL has code to optimize the notification for small screens, scroll bars will probably be included. On a 1680×1050 screen, the default size seems to be approximately 300 pixels wide by 50 pixels high, but because the notifications API is still a draft at the time of this writing, that is certainly subject to change. Until fine-grained height and width attributes are added, stick with simple notifications.
Interacting with Notifications
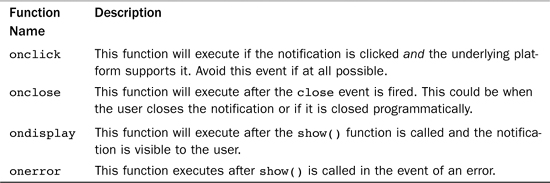
The resulting notification has two basic functions for controlling it: show(), which surfaces the notification to the user, and cancel(), which hides the notification if it’s currently visible or prevents it from being displayed if it is not visible. Web notifications can also execute functions in response to notification events. Table 1-4 shows a list of the applicable functions you can specify to respond to events.
Table 1-4. Web Notification Functions
You can check the current status of the draft specification at http://dev.chromium.org/developers/design-documents/desktop-notifications/api-specification.
Media Elements
When HTML was originally designed, it was concerned with mostly textual links. Native display of images would come much later. It is not hard to understand why you would need a plugin or browser extension to play audio or video. In most cases, this meant Flash. HTML5 has tried to address that issue with the inclusion of the audio and video tags.
The audio and video tags allow us to play media in the browser natively. Also, a group of properties can be set to control playback. Here is the most basic HTML form for embedded media (in this case, an audio file):
<audio src="song.mp3" autoplay />
This creates an audio HTML element, assigns the source to song.mp3, and instructs the page to “autoplay” the content. It is equivalent to the following JavaScript code:
var song = new Audio();
song.src = "song.mp3";
song.autoplay = true;
song.load();
Controlling Media
In addition to the autoplay attribute listed in the previous example, several other attributes can be used to control our media. For example,
<video src="vid.avi" controls />
or
var vid = new Video();
vid.src = "vid.avi";
vid.controls = true;
tells the browser to provide a default set of controls for starting and pausing playback, setting the volume level, and seeking in the stream. In the absence of such a property, the developer can provide a custom set of controls using the JavaScript functions and properties listed in Tables 1-5 and 1-6.
Table 1-5. Media Tag Functions

Table 1-6. Media Element Properties
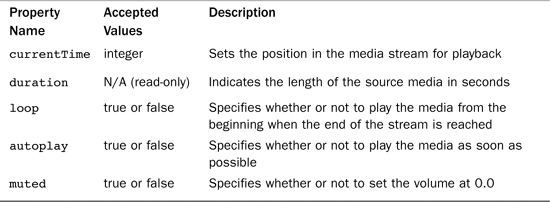
The list of properties has been truncated for brevity and usefulness. To see a full list of available properties, check out the HTML5 draft spec at http://dev.w3.org/html5/spec.
Handling Unsupported Formats
At the time of this writing, the audio and video elements in different browsers don’t necessarily all support the same types of audio and video. The reason a particular browser doesn’t support a particular format might be due to the age of the format, competition with an endorsed format, or patent restrictions that the browser’s parent company doesn’t want to deal with. Media tags have several methods to deal with this.
Listing Multiple Sources
Instead of specifying a single source, the developer can choose to list multiple sources to let the browser choose the appropriate one to use. The following snippet lists two sources for a video tag and the fallback message if neither format is supported or the browser doesn’t support the video tag.
<video>
<source src="video.ogv" />
<source src="video.avi" />
<!— Neither is supported, can show message or fallback to Flash —>
<div><span>Use a modern browser</span></div>
</video>
Although listing multiple sources is an option for a static page, it’s not great for applications with dynamic content. For those instances, using the tool Modernizr is recommended. We’ll discuss Modernizr in more detail in Chapter 2, but consider this a primer.
Using Modernizr
Modernizr (www.modernizr.com) inspects browser capabilities at runtime and injects the properties into a JavaScript object. To see whether the browser can play audio or video, we would check the value of Modernizr.audio or Modernizr.video to see if it evaluates to true.
Checking support for a particular format is slightly different. Verifying support for MP3 files is done by checking the value of Modernizr.audio.mp3, but the value returned isn’t true or false. The HTML5 spec states that the browser should return its confidence level that it can play the format. The return value will be “probably,” “maybe,” or an empty string. When we use Modernizr.audio.mp3 in a conditional clause, any non-empty value is treated as true and the empty string is treated as false.
CSS3
CSS3 doesn’t fit the scope of this book, and readers are encouraged to explore the specification if they are interested in it. Like HTML5, CSS3 extends its predecessor (CSS2) by adding new features and codifying previous proposals, such as web fonts and speech, which were introduced in previous versions but not widely supported. A useful website for further information is http://www.css3.info.
HTML5 Drawing APIs
An interesting area of the HTML5 spec is the new drawing APIs. Canvas, SVG, and WebGL provide bitmapped, vector, and three-dimensional drawing capabilities, respectively.
Canvas
The canvas element started its life as an Apple extension to Webkit, the layout engine powering Safari and Chrome, to display Dashboard gadgets and additions to the Safari browser. It was later adopted by Opera, Firefox, and related browsers, eventually becoming a component of the HTML5 specification. The beta release of Internet Explorer 9 (IE9) has brought native support to all major browsers, although support in IE9 is not as complete as the aforementioned browsers.
The canvas element can be most simply described as a drawable region with height and width attributes using JavaScript as the medium to draw and animate complex graphics such as graphs and images. A full set of 2D drawing functions is exposed by the JavaScript language. Given the close relationship between JavaScript and ActionScript, a Flash drawing or animation using ActionScript can be easily ported to JavaScript with only moderate effort. Canvas will be covered in more detail in Chapter 5, “Creating Games with the Canvas Tag.”
SVG
SVG (Scalable Vector Graphics) is a mature W3C specification for drawing static or animated graphics. The ability to inline SVG without the use of an object or embed tag was added in HTML5. Vector graphics use groupings of mathematics formulas to draw primitives such as arcs, lines, paths, and rectangles to create graphics that contain the same quality when rendered at any scale. This is a marked benefit over images whose discernible quality degrades when they are displayed at a scale larger than that for which they were designed.
SVG takes a markedly different approach from the canvas element in that it represents drawings in XML files instead of purely in code. XML is not the more concise representation of data, so a file may contain many repeated sections. This can be addressed by compressing the file, which can greatly reduce its size. As with the canvas element, interaction can be scripted using JavaScript. Prior to IE9, IE supported an incompatible vector format called VML. As of IE9, all major desktop browsers support a fairly common feature set of SVG 1.1. Chapter 6, “Creating Games with SVG and RaphaëlJS,” puts SVG front and center.
WebGL
WebGL is a JavaScript API for 3D drawing that enables the developer to assess graphics hardware and control minute details of the rendering pipeline. It is managed by the Khronos group and shares much of its syntax with OpenGL 2.0 ES. At the time of this writing, WebGL is not supported in Internet Explorer 6+ or the stable branches of Opera and Safari. It is available in the stable builds of Firefox and Chrome/Chromium and in development builds of Opera and Safari. Chapter 7, “Creating Games with WebGL and Three.js,” dives into WebGL.
Conveying Information with Microdata
A web application or API parsing a page can interpret HTML marked up with microdata and respond to it. For instance, a search engine that returns results marked up with microdata could be parsed by a browser extension or script to better present the data to a visually impaired or colorblind user. Microformats are a preceding concept that serves the same goal. One key difference between microformats and HTML5 microdata is the way that the data is denoted. As shown in Listing 1-6, microformats use the class property of an object to indicate the fields on an object.
Listing 1-6. hCard Microformat Example
<div class="vcard">
<div class="fn">James Williams</div>
<div class="org">Some Company</div>
<div class="tel">650-555-3055</div>
<a class="url" href="http://example.com/">http://example.com/</a>
</div>
Microdata uses the same concept with slightly different notation. Instead of marking properties using classes, the itemprop keyword is used. The keyword itemscope marks an individual unit. At its core, microdata is a set of name/value pairs composed into items. Listing 1-7 shows a microdata example. The itemtype property indicates a definition of the object and specifies valid properties. You could use microdata to encode the names and scores on a leader board page or instructions and screenshots from a game.
Listing 1-7. Microdata Example
<p itemprop="address" itemscope
itemtype="http://data-vocabulary.org/Address">
<span itemprop="street-address">1600 Amphitheatre Parkway</span><br>
<span itemprop="locality">Mountain View</span>,
<span itemprop="region">CA</span>
<span itemprop="postal-code">94043</span><br>
<span itemprop="country-name">USA</span>
</p>
Summary
HTML5 marks a groundbreaking change in how we interact with the browser. This chapter highlighted the major additions that apply to our needs. You learned how Google Chrome Frame brings HTML5 features to IE browsers as well as the multiple ways to draw assets.
In exploring HTML5, in addition to its drawing APIs, you learned about features that allow you to run computationally heavy tasks without blocking the browser, setting up bidirectional communications channels between applications, and enabling offline execution of applications.
You can download chapter code at www.informit.com/title/9780321767363.