Chapter 7. Model-Making Resources
“By seeking and blundering we learn.”
—Johann Wolfgang von Goethe
You’re not limited to the models from TensorFlow Hub. Every day there are new and exciting models being tweeted, published, and highlighted in the community spotlight. These models and ideas are shared outside the Google-approved hubs, and sometimes they are even outside the realm of TensorFlow.js.
You’re starting to advance beyond the garden walls and work with models and data in the wild. This chapter is specifically geared toward arming you with new ways to make models from existing models, as well as charge you with the challenges of gathering and understanding data.
We will:
-
Introduce model conversion
-
Introduce Teachable Machine
-
Train a computer vision model
-
Review where training data comes from
-
Cover some key concepts of training
When you finish this chapter, you’ll be armed with a few ways of making a model and a better understanding of the process of using data to make a machine learning solution.
Out-of-Network Model Shopping
TensorFlow.js hasn’t been around for long. Consequently, the number of models available is limited, or at least there are fewer than other frameworks. That doesn’t mean you’re out of luck. You can often convert models that were trained on other frameworks to TensorFlow.js. Converting existing models to make new models that work in a new environment is a great way to find recently developed resources and create exciting and contemporary models.
Model Zoos
One somewhat endearing term that has emerged from the machine learning world is that a collection of models is sometimes called a zoo. These model zoos are a treasure trove of models that do a wide variety of tasks for a given framework, much like TensorFlow Hub.
The model zoos are a fantastic place to find unique models that could inspire or fit your needs. Zoos often link you to published works that explain the choices that were made for both the model architecture and the data that was used to create them.
The real benefit comes from the principle that once you’ve learned how to convert one of these models to TensorFlow.js, you could likely convert a lot of them.
It’s worth taking a moment to review converting models so you can comprehend how accessible each model zoo or published model might be to TensorFlow.js.
Converting Models
Lots of Python-programmed TensorFlow models are saved in a format called Keras HDF5. HDF5 stands for Hierarchical Data Format v5, but is most commonly referred to as Keras or merely an h5 file. This file format is portable as one file with an h5 extension. The Keras file format has lots of data inside:
-
An architecture that specifies the layers of the model
-
A set of weight values, analogous to the bin files
-
An optimizer and the loss metric for the model
This is one of the more popular model formats, and more importantly, they are easy to convert to TensorFlow.js even though they were trained in Python.
Note
With the knowledge of being able to convert TensorFlow Keras models, it means that any TensorFlow tutorial that you find can be read as a tutorial where the final product can likely be used in TensorFlow.js.
Running conversion commands
To convert from h5 to TensorFlow.js model.json and bin files, you’ll need tfjs-converter. The tfjs-converter can also convert TensorFlow model types other than just HDF5, so it’s a great tool for handling any TensorFlow to TensorFlow.js
format.
The converter requires that your computer is set up with Python. Install the converter with pip. The pip command is the package installer for Python, similar to npm in JavaScript. There are multitudes of tutorials on installing Python and pip if your computer is not ready. You can run tfjs-converter once you have pip and Python installed.
This is the install command for the converter:
$pip install tensorflowjs[wizard]
This installs two things: a no-nonsense converter that you can use in automation (tensorflowjs_converter) and a walk-through converter that you can run by typing tensorflowjs_wizard. For our purposes, I suggest using the wizard interface for conversion so you can take advantage of new capabilities as they become available.
You run the wizard by calling your newly installed tensorflowjs_wizard command from the command line, and you’ll be prompted with questions like you see in Figure 7-1.

Figure 7-1. The wizard starts asking questions
This wizard will ask you for your input model format and your desired output model format. It will also ask quite a few questions depending on your answers. While the wizard will continue to be updated, here are some concepts you should keep in mind while selecting your desired settings:
- When choosing between Graph/Layers models
-
Remember, Graph models are faster but lack some of the introspective and customization properties that Layers models provide.
- Compression (via quantization)
-
This moves your model from storing 32-bit accuracy weights down to 16- or even 8-bit accuracy weight values. Using fewer bits means your model is substantially smaller in a possible sacrifice for accuracy. You should retest your model after quantization. Most of the time, this compression is worth it for client-side models.
- Shard size
-
The suggested shard size is to optimize your model for client-side browser caching. This should stay the recommended size unless you’re not using the model in the client browser.
Note
The quantization affects the model size on disk only. This provides significant network transfer benefits for websites, but when the model is loaded into RAM, the values are returned to 32-bit variables in the current TensorFlow.js.
Features continue to show up in the wizard interface. If a new feature shows up that confuses you, keep in mind documentation for converting models will be available in the tfjs-converter README source code. Your experience will be similar to Figure 7-2.

Figure 7-2. An example wizard walk-through on Windows
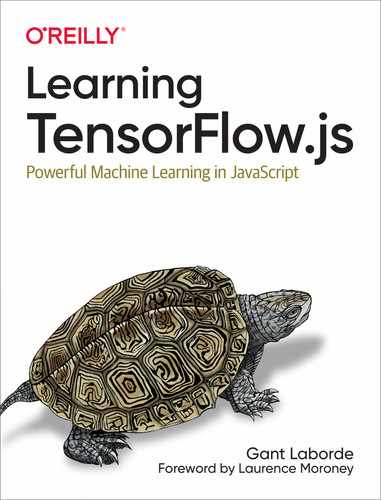
The resulting folder contains a converted TensorFlow.js model, ready for use. The h5 file is now a model.json and the cachable bin files in chunks. You can see the resulting conversion in Figure 7-3.
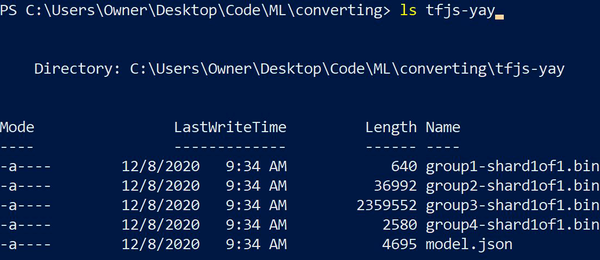
Figure 7-3. The TensorFlow.js model result
Intermediate models
If you find a model you’d like to convert to TensorFlow.js, you can now check if there’s a converter to move that model to the format Keras HDF5, and then you know you can convert it to TensorFlow.js. It’s worth noting that there’s a significant effort to standardize models converting to and from a format called Open Neural Network Exchange (ONNX). Currently, Microsoft and many other partners are working on the proper conversion of models in and out of ONNX format, which will allow for a framework-independent model format.
If you find a published model that you’d like to utilize in TensorFlow.js, but it wasn’t trained in TensorFlow, don’t give up hope. You should check if there’s ONNX support for that model type.
Some models do not have a direct conversion to TensorFlow, and because of that, you might need a more circuitous route through other conversion services. Outside of TensorFlow, the other popular framework library most machine learning enthusiasts use is called PyTorch. While ONNX is getting closer every day, currently the best way to convert from PyTorch to TensorFlow.js is to convert through a chain of tools, as shown in Figure 7-4.

Figure 7-4. Converting models
While it might seem like a good bit of work to do a model conversion, converting models from existing formats to TensorFlow.js can save you days or even weeks of re-creating and retraining a model on the published data.
Your First Customized Model
If downloading existing models was all you needed to do, you’d be done. But we can’t all wait for Google to release models that classify what we need. You might have an idea that requires an AI to have an intimate knowledge of pastries. Even Google’s Inception v3 might not be strong enough if you need to know the difference between a variety of items in a single domain.
Fortunately for you, there’s a trick that allows us to ride the coattails of existing models. Some models can be slightly adjusted so they classify new things! Rather than retraining the entire model, we train the last few layers to look for different features. This allows us to take an advanced model like Inception or MobileNet and turn it into a model that identifies things we want. As a bonus, this method allows us to retrain a model with a minuscule amount of data. This is called transfer learning, and it’s one of the most common methods for (re)training models on new classes.
We’ll cover the code for transfer learning in Chapter 11, but there’s no reason you can’t experience it right now. Google has an entire transfer learning UI built for people to try training models.
Meet Teachable Machine
To start things off, you’ll use a tool provided by Google called Teachable Machine. This tool is a simple website that is powered by TensorFlow.js, and it lets you upload images, upload audio, or even use your webcam for training, capturing data, and creating TensorFlow.js models. The models are trained directly in your browser and then hosted for you to try your code immediately. Your resulting model is a transfer learning version of MobileNet, PoseNet, or some other practical model that fits your needs. Because it uses transfer learning, you don’t need much data at all.
Warning
Models created with a small amount of data will appear to work wonders but have a significant bias. That means they will work well with the conditions they were trained in, but they will error with background, lighting, or positional changes.
The website for training a model is located at teachablemachine.withgoogle.com. When you access the site, you can get started with various projects, like audio, image, and even body poses. While you can and should experiment with each of these, this book will cover the Image Project option. This is the first option shown in Figure 7-5.

Figure 7-5. Awesome Teachable Machine options
On the resulting page, you’re given the option to either upload or use your webcam to collect sample images for each class.
Here are a few ideas you can use to create your first classifier:
-
Thumbs up or thumbs down?
-
Am I drinking water?
-
Which cat is this?
-
Secret hand signal to unlock something?
-
Book or banana!?
Use your creativity! Whatever model you create could be something easy to show off to friends and social media or something that could be turned into a web page to help you. For instance, the “Am I drinking water?” classifier could be hooked up to a timer for your self-hydration project. You can come up with all kinds of fun projects as long as you train the model with a few samples.
Personally, I’ll be training a “Is Daddy working?” classifier. Many of you might have experienced difficulty with family in a remote work environment. If I’m sitting at my desk and the door is closed, you’d think that would tell people I’m working, right? But if the door is open, “come on in!” I’ll ask Teachable Machine to use my webcam to classify what I look like when I’m working and what I look like when I’m not working.
The cool part is that since the detector will be tied to a website, “Is Daddy working?” could be expanded to do all kinds of awesome things. It could send text messages, turn on an “unavailable” light, or even tell my Amazon Echo devices to answer “yes” when asked if I am working. There’s a whole world of opportunity as long as I can make a quick AI image classifier that is dependable.
Training from scratch is a scalable solution, but the task at hand is to train my presence in my office, and for that, we’ll use Teachable Machine.
Use Teachable Machine
Let’s take a quick tour through the UI for creating a model with Teachable Machine. The UI is set up like a network graph where information is filled in top-down from left to right. Utilizing the site is easy. Follow along as we review Figure 7-6.
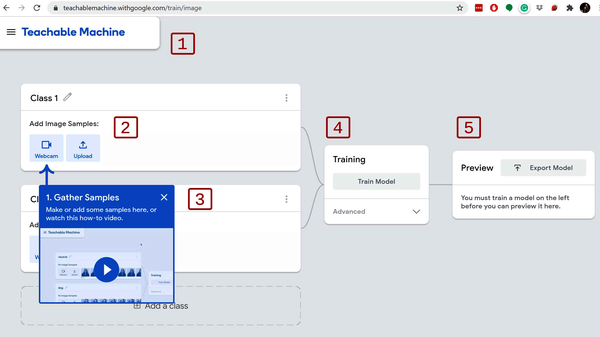
Figure 7-6. Image project UI tour
-
This upper header is meant to be small and stay out of the way on larger monitors. From the header, you can use Google Drive to manage your data and your results, so you can pick up where you left off or share the training of your model with others.
-
The top item is called “Class 1” and indicates one of the classes for your classification. Of course, you can rename it! I’ve renamed mine to “Working.” Inside this workflow card, you can provide access to your webcam or upload image files that would fit this classification.
-
This second workflow card is any second class. This could be “Free” or “Not Working” in the case of my example I’m trying to build. Here you provide the data that fits your secondary classification.
-
All classes feed into the training workflow. When you have examples of what you want to build, you can click the Train Model button and actively train the model. We’ll dig deeper into what this is doing with the Advanced tab when we get to it.
-
The Preview section immediately displays the model’s real-time classifications in action.
Gathering Data and Training
You can hold down the webcam’s “Hold to Record” button and instantly provide hundreds of images for example data. It’s crucial that you evaluate and include variation as much as possible in your dataset. For example, if you’re doing “Thumbs up or thumbs down,” it’s important that you move your hands around the screen, catch different angles, and put your hands in front of your face, shirt, and any other complex background.
For me, I adjusted my lighting, as sometimes I have a camera keylight, and sometimes I have backlights. Within a few seconds, I had hundreds of various conditions with my office door open and closed. I even did some photos where my door is closed but I’m not sitting at my desk.
One of the great things about Teachable Machine is that it gives you the results quickly in your browser, so if the model needs more data, you can always come back and add more right away.
Once you have a few hundred photos, you can click the Train Model button, and you’ll see a “Training…” progress graph (see Figure 7-7).
Figure 7-7. Teachable Machine active training
So what’s happening now? Succinctly put, Teachable Machine is using your images to perform transfer learning to retrain the MobileNet model. A random 85% of your data has been used to train the model, and the other 15% is reserved for testing the model’s performance.
Click the Advanced tab to view the details of this particular configuration. This will expose some of what are often called the hyperparameters for machine learning training (see Figure 7-8). These hyperparameters are parameters tunable to the model training.

Figure 7-8. Teachable Machine hyperparameters
In here, you’ll see some new terminology. While it’s not critical for you to learn these terms now, you’ll need to learn them eventually, so we’ll go over them quickly. Each of these concepts will show up when you get into coding your own models in Chapter 8.
- Epochs
-
If you’re coming from coding, especially JavaScript coding, the epoch was January 1, 1970. That is not what epoch means in this domain. An epoch in machine learning training is one full pass through the training data. At the end of an epoch, the AI has seen all the training data at least once. Fifty epochs means the model will have to see the data 50 times. A good analogy is flashcards. This number is how many times you’re going through the entire deck of flashcards with the model for it to learn.
- Batch size
-
The model is trained in batches that are loaded into memory. With a few hundred photos, you can easily handle all of the images in memory at the same time, but it’s nicer to batch in reasonable increments.
- Learning rate
-
The learning rate affects how much the machine learning model should adapt with each prediction. You might assume higher learning rates are always better, but you’d be wrong. Sometimes, especially when fine-tuning a transfer learning model, it’s about the details (as covered in Chapter 11).
There’s also a button at the bottom of the card with the text “Under the hood,” which will give you lots of detailed information on the progress of the trained model. Feel free to look at the reports. You’ll implement metrics like these later.
Verifying the Model
Once Teachable Machine is done, it immediately hooks the model up to your webcam and shows you what the model predicts. This is a great opportunity for you to test the results of the model.
For me, when I’m at my desk and my door is closed, the model predicted I was working. Hurray! I have a usable model ready to go. Both classes were performing impressively well, as illustrated in Figure 7-9.
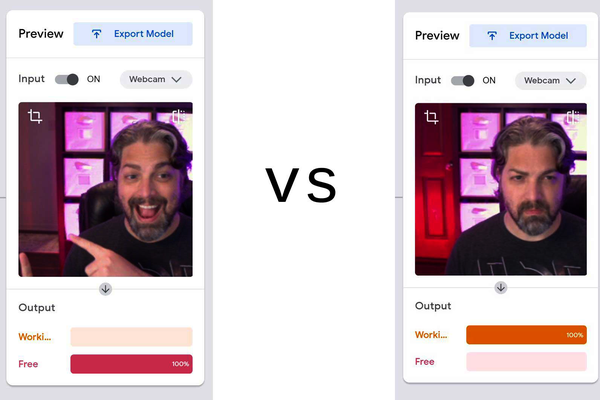
Figure 7-9. The model works
Ideally, your training went just as well. Now it’s essential to retrieve the trained model so it can be implemented in your more extensive project. If you’d like to share your model with your friends, you can click the Export Model button in the preview, where you’re given a variety of options. The new modal window provides paths for applying your model in TensorFlow, TensorFlow Lite, and TensorFlow.js. There’s even an option for hosting your trained model for free, rather than downloading and hosting your model yourself. We get all these friendly options and some nifty copy-and-paste code for you to quickly implement these models. The export code screen should be similar to Figure 7-10.
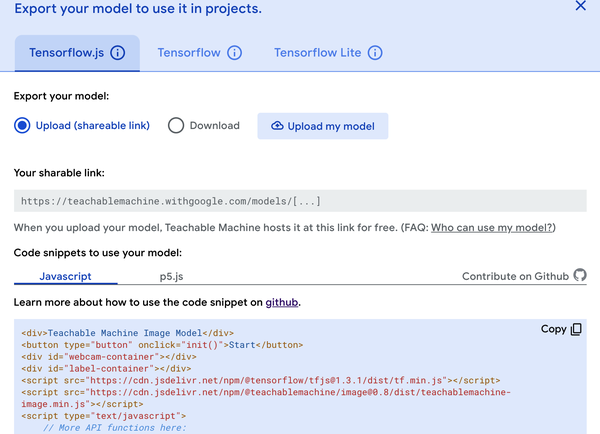
Figure 7-10. Teachable Machine export options
When your model is downloaded or published, your data is not published with it. To save the dataset, you’ll have to save your project in Google Drive. Keep this in mind if you plan on advancing your model or growing your dataset over time. Identifying and handling edge cases is part of the data science process.
The code provided for free in the copy-and-paste section of Teachable Machine hides the nitty-gritty of webcams and tensors with an NPM package called @teachablemachine/image. While this is great for people who don’t understand webcams and tensors, it’s pretty useless for a finalized product. Your advanced UI skills from Chapter 6 make your creative potential far superior to the copy-and-paste code option.
Tip
Each Teachable Machine model will be different; the visual model you just trained is built on top of our old friend MobileNet classifier. So when you implement the model, resize the input to 224 x 224.
You’ve just trained your first model. However, we cut as many corners as we could. Training models with a UI is going to be a large part of machine learning, and it helps everyone new to machine learning to get a fantastic start. But a tensor wizard like yourself can train a much more dynamic model. You’re obviously looking to command your machines with explicit instructions like code. So let’s get started on training a model by writing some JavaScript.
Machine Learning Gotchas
When coding, there are a wide variety of issues any developer might have to face. Even as programming languages vary, there’s a core set of potholes that carries over to every infrastructure. Machine learning is no different. While there are issues that might be specific to any chosen genre and problem, it’s important to identify these early so you can spot some of the most common complications with data-driven algorithms.
We’ll quickly elaborate on a few concepts now, but each of these will be revisited when they apply to the work in the rest of this book:
-
Small amounts of data
-
Poor data
-
Data bias
-
Overfitting
-
Underfitting
Let’s review these so we can look out for them in upcoming chapters.
Small Amounts of Data
I’ve had people come to me with an excellent idea for a machine learning solution, and they have three labeled samples. Few things in this world could benefit from such a small training set. When data is how you train an algorithm, you’ll need a fair amount of data. How much? There’s never an answer that fits every problem, but you should lean toward more data over less.
Poor Data
Some people have clean, situated, and organized lives, but in the real world, data doesn’t end up that way by accident. If your data has missing, mislabeled, or downright outrageous data, it can cause problems in your training. Lots of times, data needs to be scrubbed, and outliers need to be removed. Just getting the data ready is a big and critical step.
Data Bias
Your data can be clearly labeled, with every detail in the correct place, but it might be missing information that would make it work in a real-world case. In some cases, this can cause severe ethical issues, and in other cases, this can cause your model to perform poorly in various conditions. For instance, my “Is Daddy working?” model that I trained earlier (Figure 7-9) probably won’t work for other people’s office configurations because the data was only for my office.
Overfitting
Sometimes a model is trained to the point where it only works well on the training set data. In some cases, a more straightforward but lower-scoring accuracy would generalize better to fit new data points.
See how this separation graph in Figure 7-11 is overfitting the data? While it solves the given problem perfectly, it’s likely to be slower and fail as new points it’s never seen get added.
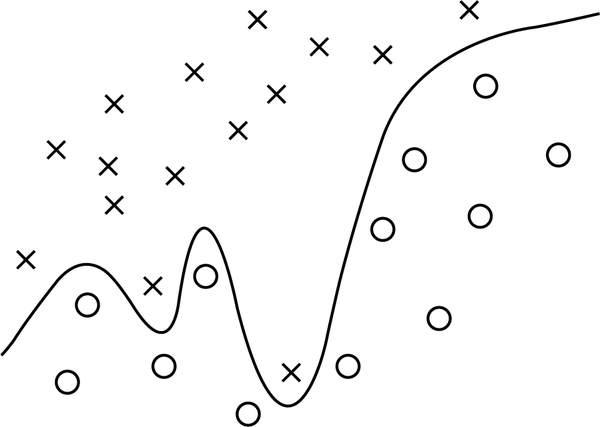
Figure 7-11. Overfitting data
Sometimes you’ll hear overfitting called high variance, which means the fluctuations you have in your training data cause the model to randomly fail on new data.
If your goal is to have your model work on new, never-before-seen data, overfitting can be a real concern. Fortunately, we have the test and validation sets to help.
Underfitting
If your model wasn’t trained enough or it’s structured in a way that’s incapable of adapting to the data, the solution might fail or even completely diverge from any extrapolated or additional data. This is the opposite of overfitting, but in the same sense, it creates a poor model.
See how the separation graph in Figure 7-12 underfits the subtle curve of the data?
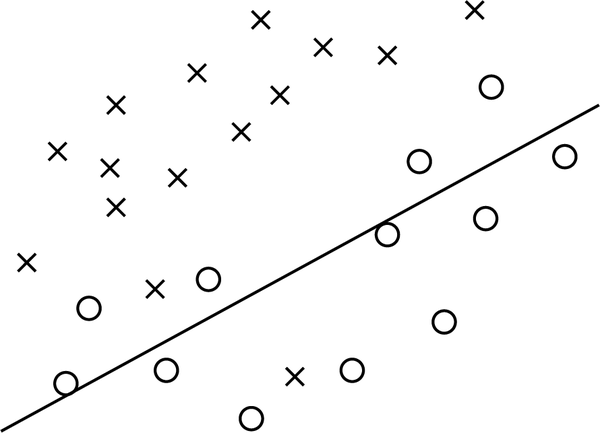
Figure 7-12. Underfitting data
When a model underfits, it is said that the model has high bias because of grand assumptions on data that are effectively wrong. While similar, do not confuse this term with data bias, covered earlier.
Datasets Shopping
Now you understand why having diverse data is essential. While the Teachable Machine “Is Daddy working?” model is useful for me, it’s far from diverse enough to be used with other offices. Happily, one of the most impressive aspects of the machine learning community is how generous everyone is with their hard-earned datasets.
Before collecting your data, it’s helpful to research if others have published usable and labeled data. It’s also beneficial to see how expert machine learning datasets are organized.
Datasets are like JavaScript libraries: they can seem quite unique at first, but after a while, you start to see the same ones referenced time and again. Universities around the world have excellent catalogs of useful datasets, and even Google has a dataset-hosting service similar to TensorFlow Hub, but none comes close to the dataset residence known as Kaggle.
Kaggle has a significant collection of datasets for all types of data. From bird songs to IMDb reviews, you can train all kinds of models with a wide variety of data from Kaggle. Figure 7-13 shows a friendly and searchable interface for datasets.
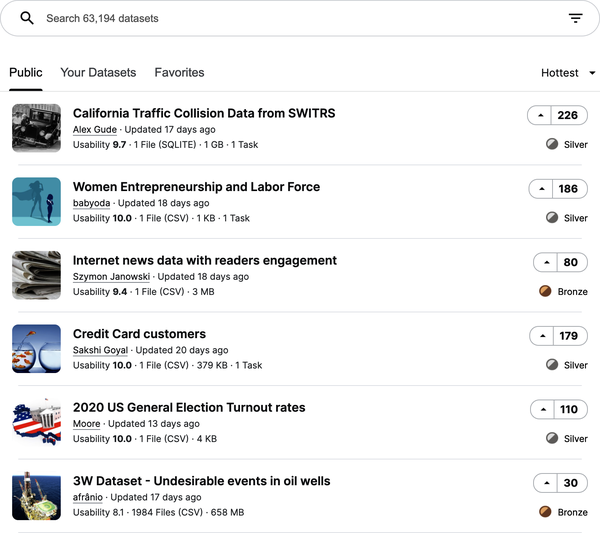
Figure 7-13. Kaggle provides more than 60,000 free datasets
Whether you’re researching data for training your model or you’re looking for ideas of what kind of crazy new thing you can make with machine learning, Kaggle has you covered.
Note
Kaggle does more than just provide datasets. It’s also a community for sharing, competing, and winning prizes.
If you’re not interested in the extracurricular aspect of Kaggle, you can generally use Google’s dataset search site and most likely find your Kaggle datasets and others: https://datasetsearch.research.google.com.
The Popular Datasets
While the list of datasets grows every day, for a long time, there weren’t many to choose from. Published datasets were rare, so a few became the fundamentals of training examples. Other datasets were published as the first of their kind and unwittingly became the brand ambassador for a type of machine learning. Like secret passphrases, these popular datasets get used casually in talks and documentation. It’s good to know some of the most common and famous:
- ImageNet
-
ImageNet was used to train some of the most popular computer vision models. This large dataset of images is consistently used by academic researchers to benchmark models.
- MNIST
-
This is a collection of 28 x 28 grayscale handwritten digits to train a model on reading numbers. It is often the “Hello World” of computer vision models. The name comes from its source, a modified dataset from the National Institute of Standards and Technology.
- Iris
-
In 1936, Ronald Fisher figured out you can identify the genus and species of iris flowers with three physical measurements. The dataset is a classic for nonvisual classification.
- Boston Housing Prices
-
This dataset contains median home values with their associated attributes for solving a line of best fit (linear regression) model.
- The Titanic
-
This is the collected passenger log from the “unsinkable” RMS Titanic that sank on April 15, 1912. We will use this dataset to create a model in Chapter 9.
- Wine Quality
-
For brewers and crafters, the idea of using machine learning to identify what makes a tasty drink is exhilarating. This dataset contains the physicochemical properties of each wine and its score.
- Pima Indians Diabetics
-
Quite a few datasets are available for health care. This is a small and approachable diabetes dataset based on patient history.
- CIFAR
-
While ImageNet is a gold standard, it’s a bit unapproachable and complicated. The CIFAR dataset is a low-resolution and friendly collection of images for classification.
- Amazon Reviews
-
This is a collection of product reviews from Amazon.com over many years. The dataset has been used to train the emotional sentiment of text, as you have the user’s comments and their ratings. A close second to this would be the IMDb review dataset.
- COCO
-
This is a large-scale object detection, segmentation, and captioning dataset.
These 10 are a good start for standard reference datasets. Machine learning enthusiasts will cite these in tweets, talks, and blog posts at will.
Chapter Review
Of course, you don’t have a diverse collection of photos of volcanoes on Venus. How would you? That doesn’t mean you can’t take a model trained for it and move it to your new browser game. Just download the dataset off Kaggle and upload the images to Teachable Machine to create a decent “Volcano or Not” astronomy model. The same way TensorFlow.js launches you into machine learning orbit, these existing models and datasets build a foundation for your application mastery.
Like web development, machine learning contains a variety of specializations. Machine learning relies on a variety of skills across data, models, training, and tensors.
Chapter Challenge: R.I.P. You Will Be MNIST
It’s your turn to take a model from Keras HDF5 to TensorFlow.js. In the code associated with this book, you’ll find a mnist.h5 file, which contains the model for identifying handwritten digits.
-
Create a Graph TensorFlow.js model.
-
Quantize the model with
uint8to make it small. -
Use the wild card to access all weights in the model.
-
Set the shard size to 12,000.
-
Save to a folder ./minist (min because it was quantized, get it!?).
Answer these questions:
-
How many bin files and groups were generated?
-
What was the final output size?
-
If you used the default shard size, how many bin files would have been made?
You can find the answer to this challenge in Appendix B.
Review Questions
Let’s review the lessons you’ve learned from the code you’ve written in this chapter. Take a moment to answer the following questions:
-
If you’re given gigs of data for a specific task, what are some concerns and thoughts you would have before training?
-
If a model is trained and gets 99% accuracy, but then when you use it in the field, it does terribly, what would you say happened?
-
What is the name of the website Google created to help you train your own model?
-
What is the drawback to using Google’s website?
-
What is the image dataset used to train MobileNet and other popular machine learning models?
Solutions to these exercises are available in Appendix A.