Location
Shooting in a studio may give you absolute control over what appears in front of the camera, but almost anywhere can become the setting for a successful fashion shoot. The images featured in this chapter, for example, cover a wide range of locations, indoors and out: from the luxurious surroundings of a five-star Parisian hotel and a mansion house, all the way through to less exotic backdrops such as a parking lot or the restroom of a bar. Yet as disparate as these settings are, they all have one fundamental thing in common and that is their ability to return fantastic photographs.
Although shooting on location provides you with a ready-made setting for your photographs, it requires a slightly different skill-set to studio-based photography if you want to get things right. We’ve already seen how lighting on location doesn’t necessarily just mean rolling up and plugging in your lights, and there are also many other issues to consider and problems to overcome. If you’re shooting outdoors, for example, there’s the weather to consider, which can help or hinder your lighting efforts, and if you suddenly realize you need a certain piece of kit that you left behind, you’ll have to think on your feet to come up with a solution. These are just two immediately obvious challenges you’ll face (a full list would be endless), but with a bit of pre-planning and, at times, a certain amount of luck, there’s no doubt that stunning location shots are totally within your reach, as we’ll see in this chapter.
Marine Hein
Based in Porto Alegre, Brazil, professional photographer Alexandre Godinho has spent many years shooting for a wide range of clients. This includes a two-year stint as the sole photographer for Elder Depizzol Casting, a model agency based in the Brazilian city of Curitiba, which saw Alexandre traveling to the city every month to meet and photograph both new and established models in a wide range of styles.
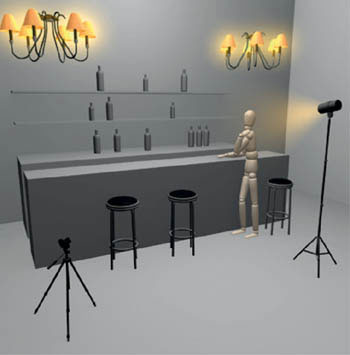
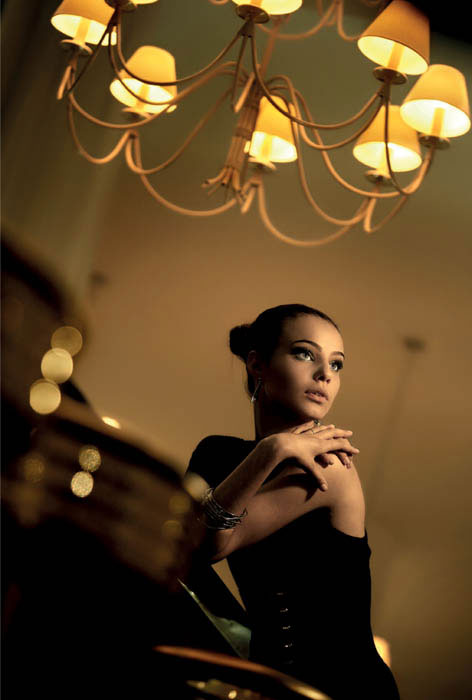
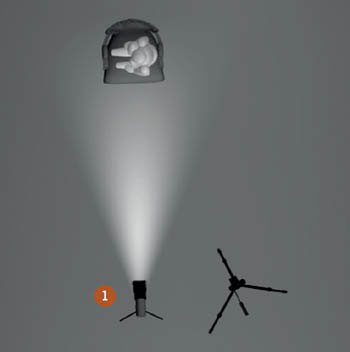
“THIS PARTICULAR SHOT was taken in a hotel bar in Curitiba and the model, Marine Hein, was one of the last models I was photographing that day. Although the room had large windows, it was getting late and it was quite dark inside, with the only light coming from the overhead lights in the bar. I didn’t want to lose the warm atmosphere the domestic bulbs were creating, so instead of using flash I fitted my studio strobe with a more powerful, 100-watt modeling bulb. This isn’t really recommended because it can apparently damage the capacitors in the flash head, but it was my only option at the time and it still seems to work ok.
“I had my assistant hold the light above and slightly in front of the model, using the strobe’s modeling lamp like a large torch to fill in any shadows around the eyes. I also shot handheld, setting a high ISO and a custom white balance to get the look I was after, and the only retouching I needed to do was to smooth the model’s skin slightly and fine-tune the color.”
 GET THE LOOK
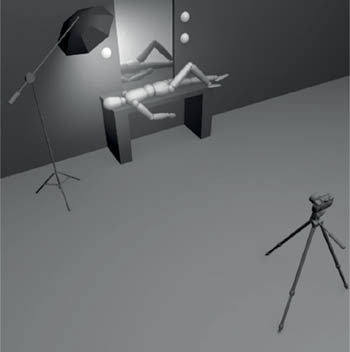
![]() If you want to make sure that all your light sources match in terms of their color, you have two choices—you either make sure all the lights you’re using have the same color temperature to start with, or you use colored gels to convert the color of one or more of them until they all match. So, for example, you’d use an orange color correction gel over a flash if you wanted to balance it with tungsten lighting, or a blue color correction gel over an incandescent lamp if you wanted to give it a daylight color balance. However, for this shot Alexandre only had a studio strobe with him, and he didn’t have any gels. There was a fairly straightforward answer, though: Instead of using the cool blue flash, which would have totally destroyed the warm atmosphere, he used the flash head’s incandescent modeling lamp, effectively turning his strobe into a low-powered tungsten light.
If you want to make sure that all your light sources match in terms of their color, you have two choices—you either make sure all the lights you’re using have the same color temperature to start with, or you use colored gels to convert the color of one or more of them until they all match. So, for example, you’d use an orange color correction gel over a flash if you wanted to balance it with tungsten lighting, or a blue color correction gel over an incandescent lamp if you wanted to give it a daylight color balance. However, for this shot Alexandre only had a studio strobe with him, and he didn’t have any gels. There was a fairly straightforward answer, though: Instead of using the cool blue flash, which would have totally destroyed the warm atmosphere, he used the flash head’s incandescent modeling lamp, effectively turning his strobe into a low-powered tungsten light.
![]() PLAN VIEW
PLAN VIEW

![]() PERSPECTIVE VIEW
PERSPECTIVE VIEW
![]()
PHOTOGRAPHER: Alexandre Godinho
CAMERA: Canon EOS 5D
LENS: Canon EF 70–200mm f/2.8L IS USM @ 115mm focal length
APERTURE: f/2.8
SHUTTER SPEED: 1/60 sec
ISO: 800
LIGHTING:
![]() Ambient light
Ambient light
![]() 100 watt modeling bulb
100 watt modeling bulb
Vogue Italia
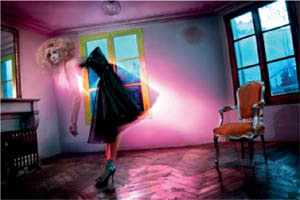
Initially setting out as an illustrator, Miles Aldridge is something of an “accidental photographer,” falling into the role when a collection of photographs he’d taken for his girlfriend, an aspiring model, led to a meeting at British Vogue. Since then his iconic images have been published around the world in prestigious titles such as The New Yorker, The New York Times, Numéro, and, of course, throughout the Vogue empire, with advertising commissions seeing him work for YSL, Coca-Cola, L’Oreal, as well as shooting the prestigious Lavazza calendar for 2010.
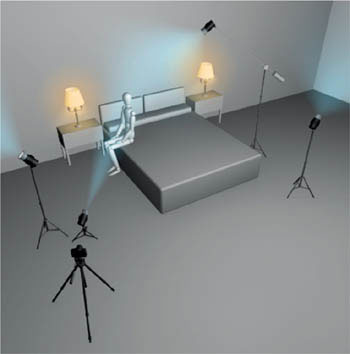
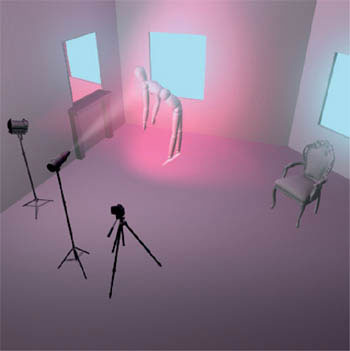
THIS IMAGE COMES from Gleaming Evenings, one of Miles’s many fashion stories for Vogue Italia, and was shot on location in the presidential suite of the five-star Meurice Hotel in Paris. Like the other pictures in the series, it uses an exceptionally limited color palette, contrasting cool cyan-blues and warm tungsten hues. However, this isn’t the result of digital manipulation; it’s purely down to the lighting.
To provide the base color and exposure Miles used two strobes with spill-kill reflectors, firing them through ½ CTB (Color Temperature Blue) color-correction gels and bouncing the lights off the room’s walls. A dedicated 1200ws spotlight with a ½ CTB gel became his key light, aimed from ground level up toward his model, while a fourth strobe—this time fitted with a fresnel attachment and mounted on a boom—acts as a high-angle clip light, adding highlights to the model’s hair and shoulders. The final touch was the inclusion of the bedside lamps, creating a warm glow from their tungsten bulbs.
GET THE LOOK
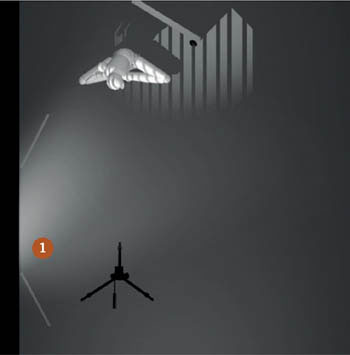
![]() The recipe for this shot is all to do with the color, or, more specifically, manipulating the color to emphasize the contrast between the warm and cool hues. In Miles’s case, the ingredients needed to make this happen were daylight-balanced film, daylight-balanced (flash) lights gelled to make them appear cooler on film, and incandescent lamps that would naturally appear warm.
The recipe for this shot is all to do with the color, or, more specifically, manipulating the color to emphasize the contrast between the warm and cool hues. In Miles’s case, the ingredients needed to make this happen were daylight-balanced film, daylight-balanced (flash) lights gelled to make them appear cooler on film, and incandescent lamps that would naturally appear warm.
![]() If you’re shooting digitally, a similar result can be achieved through the white balance setting. Daylight and flash have a color temperature of around 5500K (Kelvin), while tungsten has a temperature close to 3200K. Instead of setting your camera’s white balance to one of these specific presets, manually set it to a color temperature between the two: 4000–4500K, for example. This will mean any daylight- or flash-lit areas will appear cooler (more blue), while incandescent light sources will appear warmer (more orange).
If you’re shooting digitally, a similar result can be achieved through the white balance setting. Daylight and flash have a color temperature of around 5500K (Kelvin), while tungsten has a temperature close to 3200K. Instead of setting your camera’s white balance to one of these specific presets, manually set it to a color temperature between the two: 4000–4500K, for example. This will mean any daylight- or flash-lit areas will appear cooler (more blue), while incandescent light sources will appear warmer (more orange).
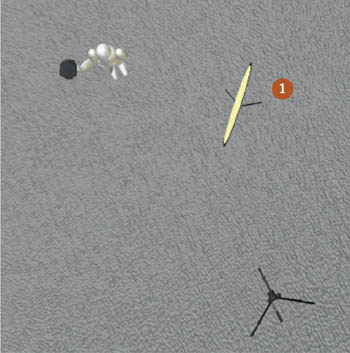
![]() PLAN VIEW
PLAN VIEW

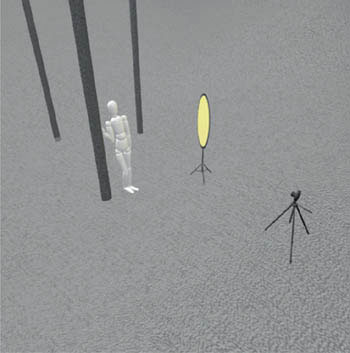
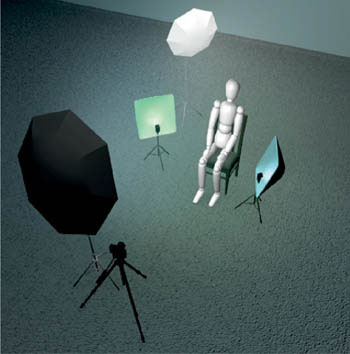
![]() PERSPECTIVE VIEW
PERSPECTIVE VIEW
![]()
PHOTOGRAPHER: Miles Aldridge (Courtesy of Miles Aldridge/trunkarchive.com)
CAMERA: Rollei 6001
LENS: 80mm
APERTURE: f/16
SHUTTER SPEED: 1/4 sec
FILM: Fuji Provia 400 at ISO 400
LIGHTING:
![]() Profoto strobe with spot attachment and ½ CTB (Color Temperature Blue) gel
Profoto strobe with spot attachment and ½ CTB (Color Temperature Blue) gel
![]() Two Profoto strobes with reflector dish and ½ CTB (Color Temperature Blue) gel
Two Profoto strobes with reflector dish and ½ CTB (Color Temperature Blue) gel
![]() Profoto strobe with fresnel
Profoto strobe with fresnel
![]() Two bedside lamps with 100-watt tungsten bulbs
Two bedside lamps with 100-watt tungsten bulbs

Sheridan @ The Brewery
Although he’s usually found working full time as a doctor, Danny Tucker’s main interest is shooting lifestyle and fashion-inspired portraits, seeking out locations in and around his hometown in Queensland, Australia.
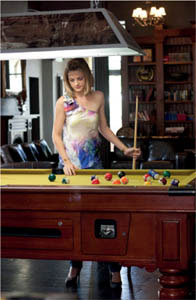
“THIS PHOTOGRAPH WAS TAKEN as a portfolio-builder for the model and the setting is a public bar. I’d arranged permission to shoot there with the manager on a previous scouting visit, but even so, we only had about 45 minutes between the bar opening and the lunchtime rush, so we had to work extremely quickly.
“Shooting using just the ambient light helped speed things up, although there was a real mix of lighting sources going on: there was indirect sunlight coming from a large window, with warm incandescent lights in the background and a fluorescent striplight over the pool table. Because of the wild variation of color temperatures, a custom white balance wasn’t necessarily going to help, so as I was shooting Raw I decided to take a chance and leave it to the camera. I knew I’d be doing some color toning in the post-processing stage anyway, so a perfect white balance wasn’t vital, although the camera did a great job considering the variety of temperatures in the mix.
“Despite all the lightsources, it was still quite dark inside the bar, so I selected a fast ISO, knowing from previous tests that the 5D Mk II and Lightroom’s noise reduction could produce a good result. I did consider setting up a couple of strobes, but there wasn’t that much time and, in any case, we weren’t allowed to introduce extra clutter in the public bar.”
GET THE LOOK
![]() Although Danny’s camera did a great job at managing the different color temperatures of the lightsources in the bar, manipulating the color was planned from the start. Once he had imported the Raw file into Lightroom it underwent cropping and straightening, with a medium contrast tone curve added before both color and luminance noise reduction were used to counter the high ISO. Toning was also performed in Lightroom, although not with the usual range of tools. “The magenta tone was introduced using changes in Lightroom’s Camera Calibration panel—shifting the hue and increasing the saturation of the reds and adjusting the green/blue channels a small amount until it just looked right. Although the camera calibration tab isn’t intended to be used like this, I find it sometimes produces a better color result than is achievable using HSL (Hue/Saturation/Luminance).”
Although Danny’s camera did a great job at managing the different color temperatures of the lightsources in the bar, manipulating the color was planned from the start. Once he had imported the Raw file into Lightroom it underwent cropping and straightening, with a medium contrast tone curve added before both color and luminance noise reduction were used to counter the high ISO. Toning was also performed in Lightroom, although not with the usual range of tools. “The magenta tone was introduced using changes in Lightroom’s Camera Calibration panel—shifting the hue and increasing the saturation of the reds and adjusting the green/blue channels a small amount until it just looked right. Although the camera calibration tab isn’t intended to be used like this, I find it sometimes produces a better color result than is achievable using HSL (Hue/Saturation/Luminance).”
![]() PLAN VIEW
PLAN VIEW
![]() PERSPECTIVE VIEW
PERSPECTIVE VIEW
![]()
PHOTOGRAPHER: Danny Tucker
CAMERA: Canon EOS 5D Mk II
LENS: Canon EF 85mm f/1.8 USM
APERTURE: f/4.5
SHUTTER SPEED: 1/200 sec
ISO: 4000
LIGHTING:
![]() Indirect sunlight through window
Indirect sunlight through window
![]() Overhead fluorescent strip
Overhead fluorescent strip
Original Image


Coquette
By Amy Dunn
Coquette
Having graced the pages of magazines such as Vogue, Marie Claire, Harper’s Bazaar, and Cosmopolitan, it’s hardly surprising that former model Amy Dunn’s move from in front of the lens to behind the camera has seen her concentrate on fashion photography.
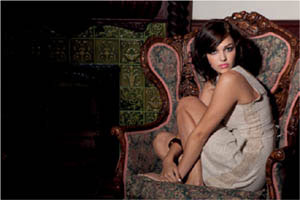
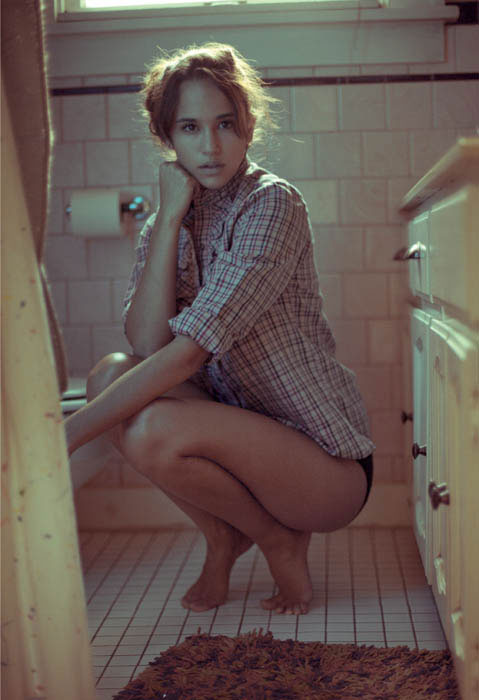
“I LOVE CREATING pretty, quirky, and fun images that are loaded with personality,” says Amy, “so I’m all about interesting locations. For this shot, the model’s mother secured a historical house in Galveston, Texas. I loved all of the wonderful textures in the house and fell in love with this stately chair that was positioned against the ornately-tiled fireplace. The furniture had an aristocratic feel, so it was important the wardrobe wouldn’t compete with the setting. The simplicity of fashion designer Clare Renee’s handmade linen dress worked perfectly with the warm tones of the room.”
To light her ornate location, Amy kept things simple, using a single strobe fitted with a 30° grid and barndoors, set to the left of the camera and angled down on the model to emphasize her face. An exposure that favored the flash over the ambient light, created a distinct, concentrated pool of light on her subject that falls off into a natural, dark vignette toward the left of the shot, preventing the viewer’s eye from wandering out of the shot. “We achieved the results in minutes, with minimal retouching. All that was needed on the model herself was a little dodging and burning to add definition, and a change of nail color from light to dark.”

GET THE LOOK
![]() When you’re photographing your model against a plain backdrop in a studio environment, the full focus of the image is naturally going to be on them and their clothes, with nothing else to distract the viewer. But, when you switch to location shooting, the setting adds a further level to the “story” you’re trying to tell, which makes choosing the right location critical; the wrong location can detract from the subject, just as easily as the right one can enhance the shot.
When you’re photographing your model against a plain backdrop in a studio environment, the full focus of the image is naturally going to be on them and their clothes, with nothing else to distract the viewer. But, when you switch to location shooting, the setting adds a further level to the “story” you’re trying to tell, which makes choosing the right location critical; the wrong location can detract from the subject, just as easily as the right one can enhance the shot.
![]() Not only is it the setting that’s important, but also the smaller elements and details within it, which all need to be working in harmony. In this shot, for example, the patch of wall at the top right of the photograph was originally a stark, off-white color that distracted from the model (see small image on page 74). Adding the red, patterned wallpaper in post-production not only helps concentrate the focus on the subject, but the careful choice of color and pattern complements and enhances the grandeur of the setting.
Not only is it the setting that’s important, but also the smaller elements and details within it, which all need to be working in harmony. In this shot, for example, the patch of wall at the top right of the photograph was originally a stark, off-white color that distracted from the model (see small image on page 74). Adding the red, patterned wallpaper in post-production not only helps concentrate the focus on the subject, but the careful choice of color and pattern complements and enhances the grandeur of the setting.
![]() PLAN VIEW
PLAN VIEW
![]() PERSPECTIVE VIEW
PERSPECTIVE VIEW

![]()
PHOTOGRAPHER: Amy Dunn
CAMERA: Canon EOS 5D Mk II
LENS: Canon EF 24–70mm f/2.8L USM @ 70mm focal length
APERTURE: f/8
SHUTTER SPEED: 1/125 sec
ISO: 160
LIGHTING:
![]() AlienBees AB1600 monolight with 30° grid and barndoors
AlienBees AB1600 monolight with 30° grid and barndoors
Edwin
After pursuing a degree in Visual Arts in her hometown of Bogotá, Colombia, Diana Sandoval headed to the acclaimed TAI college in Madrid, Spain, earning a masters degree in digital fashion photography. Now she is running her own photography studio, shooting a wide range of fashion and advertising projects for a variety of clients.
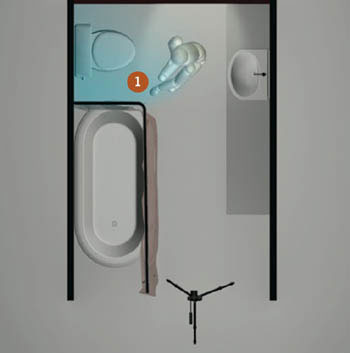
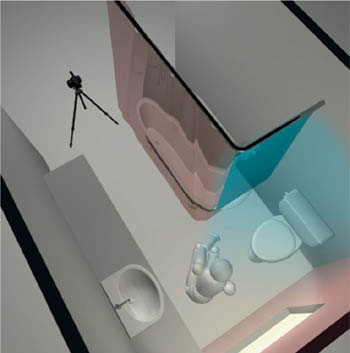
THIS SHOT COMES FROM a series that was commissioned by the model, Edwin, for his portfolio. With a free hand over what she could do—and where—Diana scouted Bogotá for potential locations before settling on an unlikely, but striking setting—the unisex restroom in a popular city bar.
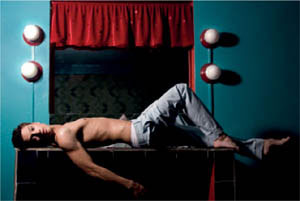
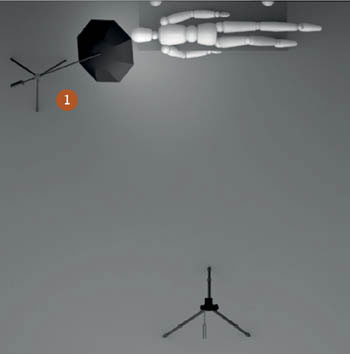
“I loved the contrast of the turquoise blue wall and the red curtains, and also the small, white, symmetrical lights, and I knew I wanted to have Edwin lying on the washstand at some point. There wasn’t much space to work in the restroom, but because I’d checked it out before I arrived I had an idea about how I’d be lighting my shots. In the end it was actually lit more simply than I’d anticipated—a single flash with a white umbrella to the left of the camera, just above the model. It was a great shoot, and it’s still in Edwin’s portfolio. We get on really well now, and I love to photograph him—I even went to LA to do a second photo book with him.”
GET THE LOOK
![]() Unless you’re shooting specifically for a black-and-white result, color has a significant effect on your photographs. This is perhaps most important with fashion photography, as any garments you shoot will naturally be colored (even if it’s shades of gray) making the overall color “theme” an important consideration. Here, for example, Diana’s color palette is incredibly limited. In addition to the model’s skin there are only five colors or tones: the turquoise of the walls, the red of the curtains and light surrounds, and black, white, and gray.
Unless you’re shooting specifically for a black-and-white result, color has a significant effect on your photographs. This is perhaps most important with fashion photography, as any garments you shoot will naturally be colored (even if it’s shades of gray) making the overall color “theme” an important consideration. Here, for example, Diana’s color palette is incredibly limited. In addition to the model’s skin there are only five colors or tones: the turquoise of the walls, the red of the curtains and light surrounds, and black, white, and gray.
![]() What makes the shot so successful is the color contrast between the red and turquoise (which sit on opposite sides of the color wheel and are therefore naturally complementary), and the tonal contrast of the light-skinned model in pale gray pants lying on, and in front of, areas that are effectively black. Everything is working in harmony, resulting in a shot where the model clearly stands out.
What makes the shot so successful is the color contrast between the red and turquoise (which sit on opposite sides of the color wheel and are therefore naturally complementary), and the tonal contrast of the light-skinned model in pale gray pants lying on, and in front of, areas that are effectively black. Everything is working in harmony, resulting in a shot where the model clearly stands out.
![]() PLAN VIEW
PLAN VIEW
![]() PERSPECTIVE VIEW
PERSPECTIVE VIEW
![]()
PHOTOGRAPHER: Diana Sandoval
CAMERA: Canon EOS 20D
LENS: Sigma 18–250mm f/3.5–6.3 DC OS
APERTURE: f/10
SHUTTER SPEED: 1/125 sec
ISO: 100
LIGHTING:
![]() 600w monolight with white umbrella
600w monolight with white umbrella

Edwin
By Diana Sandoval
Yvonne
Although he trained as a graphic designer, Mauricio González has always preferred photography, and after a three-year period spent assisting two of Colombia’s most renowned photographers (Mauricio Vélez and Raul Higuera) he decided to turn his passion into a full-time career. Five years later, having spent time in New York, he is back in his native Colombia producing work for a number of the country’s leading advertising agencies and fashion designers.
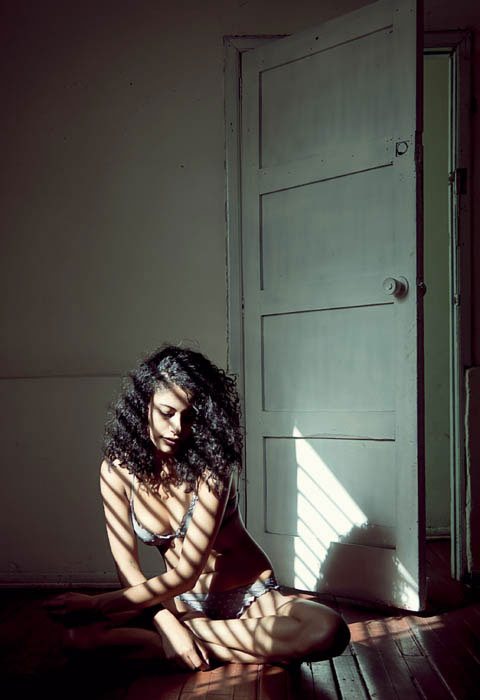
THE SHOT SEEN HERE is the result of an informal photography session with a model and old friend that Mauricio hadn’t seen for a long time. “She is so beautiful—she has gorgeous curly hair, a lovely tan complexion, and is great to work with. We decided to meet up and do the shoot at an empty house that belongs to a friend of mine. It wasn’t for any real reason, we just wanted to take some pictures and have a good time. When we got to the house I picked a room that had light flooding through the window and positioned the model in the ‘sun spot.’ I wanted to get the effect of light streaming through shutters, but because the window didn’t have any I had to improvise. I got a roll of one-inch wide masking tape and tore off about 20 or 30 pieces—enough to cover the window and create the ‘shutter’ effect. We did a range of poses, sitting and standing, but really it was just about enjoying ourselves, and other than adjusting the contrast and adding a warm tone, everything you see was achieved in-camera.”
GET THE LOOK
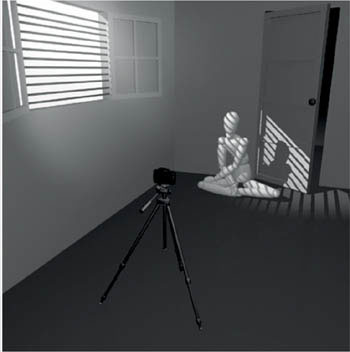
![]() Although Mauricio’s lighting setup is incredibly simple—nothing more than sunlight pouring through a window—the addition of the window-shutter effect breaks up the light and adds another dimension to the shot. Recreating this is obviously straightforward when you’re in the right location with the sun in the right position, requiring nothing more exotic than a roll of tape. But even in a windowless studio you can create a similar effect, using a focusing spotlight and a “gobo”—a piece of metal or card with the shutter-like slats cut out of it. Shining the light through the gobo will throw the shadows onto your subject, while you can use the spot’s focus to control how hard- or soft-edged those shadows are.
Although Mauricio’s lighting setup is incredibly simple—nothing more than sunlight pouring through a window—the addition of the window-shutter effect breaks up the light and adds another dimension to the shot. Recreating this is obviously straightforward when you’re in the right location with the sun in the right position, requiring nothing more exotic than a roll of tape. But even in a windowless studio you can create a similar effect, using a focusing spotlight and a “gobo”—a piece of metal or card with the shutter-like slats cut out of it. Shining the light through the gobo will throw the shadows onto your subject, while you can use the spot’s focus to control how hard- or soft-edged those shadows are.
![]() PLAN VIEW
PLAN VIEW
![]() PERSPECTIVE VIEW
PERSPECTIVE VIEW
![]()
PHOTOGRAPHER: Mauricio González
CAMERA: Canon EOS 5D Mk II
LENS: Canon EF 28–135mm f/3.5–5.6 IS @ 47mm focal length
APERTURE: f/4.5
SHUTTER SPEED: 1/250 sec
ISO: 160
LIGHTING:
![]() Ambient window-light
Ambient window-light
Meltdown
As well as teaching fashion photography and lighting at his studio in Brighton, England, Kevin Mason shoots for a wide range of editorial and commercial clients, and is equally at home in the warmth of the studio as he is battling the elements on location.
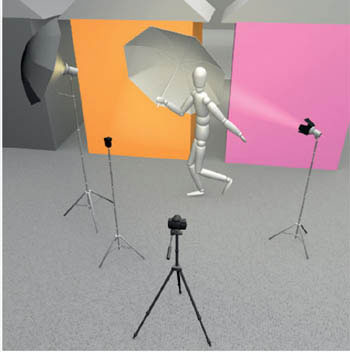
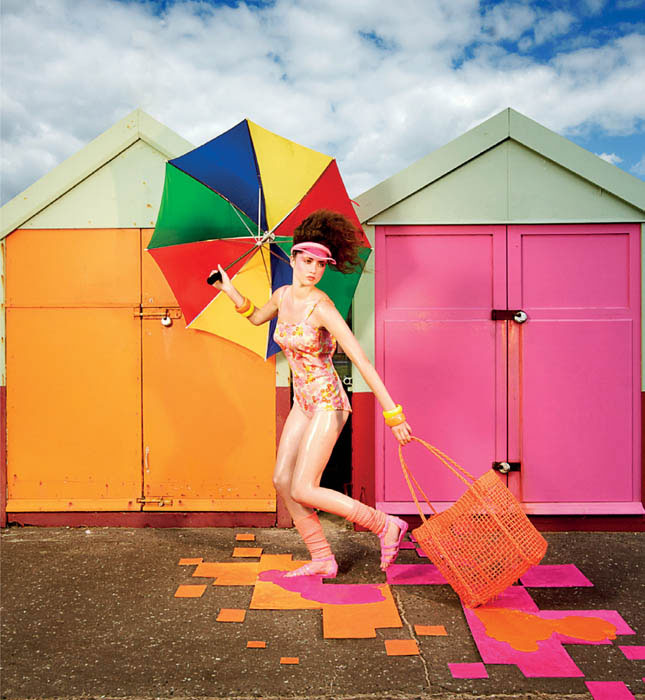
“THIS SHOOT WAS FOR a magazine cover, with a loose brief that just had to involve summer/ Brighton/the seaside and needed to work as a square crop. It was a collaboration between myself and Emma Sandham-King, based on a ‘melting’ idea: a hot, summery image with a slight global-warming theme.
These beach huts are naturally vibrant and, after we’d checked out the most colorful, we settled on orange and pink as our backdrop. We sourced as many similarly colored items as we could, and used cheap polystyrene tiles to create a feel of the ‘pixelated’ beach hut colors falling onto the floor. We went with an equally stylized look for the model, with a lot of bold colors in the makeup and hair (which was wired to make it look as if she was really running).
The lighting was relatively simple—two Bowens 500 watt monolights, a Nikon Speedlight, and a reflector—but battling the heavy wind meant we had an umbrella turn inside out, and we weren’t helped when a passer-by crashed his bicycle into our lights! Despite this we managed to get the shot done in the two-hour window we had for it, and after a quick tidy-up of the seafront we had it ready to print a couple of hours later.”
GET THE LOOK
![]() As many photographers who work (or have worked) with transparency film will already know, slightly underexposing your shots is a great way of increasing the saturation. You don’t need to underexpose by much—1/3 of a stop is enough to boost the color without the shot simply looking too dark—but it’s an effective way of making already saturated colors really “pop.”
As many photographers who work (or have worked) with transparency film will already know, slightly underexposing your shots is a great way of increasing the saturation. You don’t need to underexpose by much—1/3 of a stop is enough to boost the color without the shot simply looking too dark—but it’s an effective way of making already saturated colors really “pop.”
![]() To a certain extent, the same is true of digital capture, with slight underexposure helping to intensify already-bold colors. In this shot, for example, Kevin had an exposure reading of f/16 on the model, but with the same ISO and shutter speed, the ambient light was reading f/13—½ a stop less. Rather than reduce the power of his flashes to balance the daylight, he set the camera at f/16 and allowed the ambient light to be underexposed slightly “to get added punch to the clouds and sky.”
To a certain extent, the same is true of digital capture, with slight underexposure helping to intensify already-bold colors. In this shot, for example, Kevin had an exposure reading of f/16 on the model, but with the same ISO and shutter speed, the ambient light was reading f/13—½ a stop less. Rather than reduce the power of his flashes to balance the daylight, he set the camera at f/16 and allowed the ambient light to be underexposed slightly “to get added punch to the clouds and sky.”
![]() PLAN VIEW
PLAN VIEW

![]() PERSPECTIVE VIEW
PERSPECTIVE VIEW
![]()
PHOTOGRAPHER: Kevin Mason
CAMERA: Canon EOS 40D
LENS: Canon EF-S 10–22mm f/3.5–4.5 USM @ 13mm focal length
APERTURE: f/16
SHUTTER SPEED: 1/125 sec
ISO: 160
LIGHTING:
![]() 500ws Bowens monolight with barndoors and light straw gel
500ws Bowens monolight with barndoors and light straw gel
![]() 500ws Bowens monolight with silver umbrella and light straw gel
500ws Bowens monolight with silver umbrella and light straw gel
![]() Nikon Speedlight with straw gel
Nikon Speedlight with straw gel
I Love Fashion
As a visual artist, Rossina Bossio works across a range of media that includes painting, drawing, and video, as well as photography. This also makes her approach fashion photography in a slightly different way to many commercial photographers—her images are not so much about idealized beauty and seduction, but more about realism.
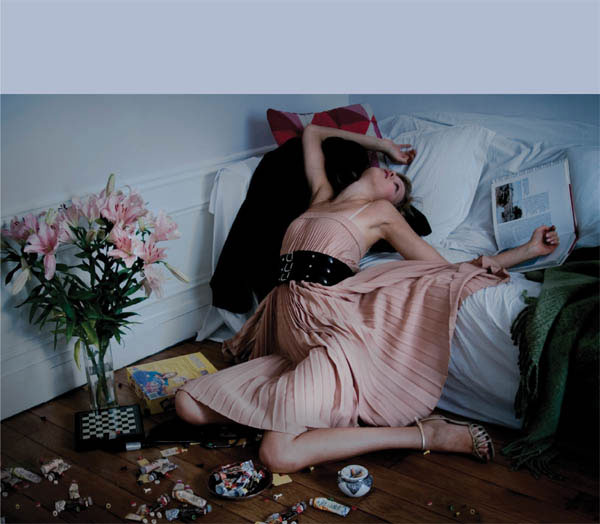
“THIS WAS THE FIRST TIME I had photographed Bella, so we hadn’t done any test shots or anything like that before I arrived at her apartment in Paris with my camera and tripod. When it comes to working with models, I generally work with whatever I have to hand because I think this makes everything more experimental and spontaneous. For this shot, Bella had already taken lots of great clothes out of her closet and we chose some outfits together for the shoot.
“After we’d finished styling her, we went to the living room and it occurred to me that it would look cool if we messed up the place a little bit. So we threw stuff on the floor and I asked her to crash on the sofa, as if she’d just arrived home drunk from a party. Then she just let go and started doing her thing! I like things to be about ‘the moment’—I have a character in mind, but I like to give the model the freedom to improvise if they want to, so Bella did a lot of poses until she slipped and fell onto the floor. That was the moment when the shot happened.”
GET THE LOOK
![]() With the image downloaded to her computer, Rossina did all of her post-production in Photoshop, introducing the muted color palette, enhancing the cold atmosphere, and darkening areas around the model to focus the attention of the shot. The key to her shot’s muted, low-contrast look lies in adjusting the output levels so the highlights are toned, rather than pure white. This can be done with either Levels or Curves in Photoshop and both let you control the highlights and shadows independently. To lower the brightness of the highlights in Levels, simply use the Output Levels slider at the bottom of the dialog window. Sliding the white (highlight) slider to the left will lower the value of the highlights from 255 (pure white), darkening them down and reducing the overall contrast. Alternatively, if you prefer to work with curves, lowering the top right end of an RGB curve vertically downward has the same effect.
With the image downloaded to her computer, Rossina did all of her post-production in Photoshop, introducing the muted color palette, enhancing the cold atmosphere, and darkening areas around the model to focus the attention of the shot. The key to her shot’s muted, low-contrast look lies in adjusting the output levels so the highlights are toned, rather than pure white. This can be done with either Levels or Curves in Photoshop and both let you control the highlights and shadows independently. To lower the brightness of the highlights in Levels, simply use the Output Levels slider at the bottom of the dialog window. Sliding the white (highlight) slider to the left will lower the value of the highlights from 255 (pure white), darkening them down and reducing the overall contrast. Alternatively, if you prefer to work with curves, lowering the top right end of an RGB curve vertically downward has the same effect.
![]() PLAN VIEW
PLAN VIEW

![]() PERSPECTIVE VIEW
PERSPECTIVE VIEW

![]()
PHOTOGRAPHER: Rossina Bossio
CAMERA: Canon Rebel XT (EOS 350D)
LENS: Canon EF 28–105mm f/3.5–4.5 II USM @ 28mm focal length
APERTURE: f/3.5
SHUTTER SPEED: 1/40 sec
ISO: 100
LIGHTING:
![]() Ambient daylight
Ambient daylight
Cape Town Carousel
South African photographer Sean Knott is as confident shooting fashion as he is advertising, portraiture, documentary, and still life, so it’s hardly surprising that his commissions see him traveling widely and working closely with advertising agencies and designers the world over.
“THIS IMAGE WAS PART of a lingerie campaign, taken on location in Cape Town, South Africa. It was going to be used for window graphics and in-store point-of-sale advertising, but I wanted to avoid the typical soft and romantic look that characterizes lingerie photography and produce a series of shots with an edgier feel.
“Most of my fashion work is done on location and I like to mix flash with daylight. At the time of this shot, strong sunlight was falling onto the carousel behind the girl and that’s partly why I used ringflash—it’s an even light that prevents harsh shadows, but it still lets you create a great ‘flash-lit’ feel. This was also important because we had a lot of shots to get through each day and I didn’t have the time to constantly change the setup. In these situations I’ll always try and keep the lighting simple, and a camera handheld with a ringflash lets me do just that, but still achieve great results.
“I let the flash dominate the shot, to darken the bright background, which was helped by the natural ‘fall-off.’ The contrast was increased in post-production to enhance the mood and create the vivid, saturated look I was after.”
GET THE LOOK
![]() Although a lot of people see using a ringflash as a relatively “easy” way of lighting an image, this has its advantages. For a start, as Sean has pointed out, it’s a great way of producing a distinctly flash-lit shot that can be repeated across a series of pictures in a short space of time, providing consistency in a series of fashion photographs.
Although a lot of people see using a ringflash as a relatively “easy” way of lighting an image, this has its advantages. For a start, as Sean has pointed out, it’s a great way of producing a distinctly flash-lit shot that can be repeated across a series of pictures in a short space of time, providing consistency in a series of fashion photographs.
![]() However, you still need to think about how you’re going to use the flash, as it can produce very different results depending on its distance from the subject. Used fairly close, as Sean has done here, the light from the flash will fall-off quickly, meaning the model will be considerably brighter than the background, enhancing the apparent contrast between the two elements and helping the model “pop.” Conversely, if you use a ringflash with a longer focal length (from a greater distance), the light will fall off more gradually, effectively lowering the contrast between the subject and their background.
However, you still need to think about how you’re going to use the flash, as it can produce very different results depending on its distance from the subject. Used fairly close, as Sean has done here, the light from the flash will fall-off quickly, meaning the model will be considerably brighter than the background, enhancing the apparent contrast between the two elements and helping the model “pop.” Conversely, if you use a ringflash with a longer focal length (from a greater distance), the light will fall off more gradually, effectively lowering the contrast between the subject and their background.
![]() PLAN VIEW
PLAN VIEW
![]() PERSPECTIVE VIEW
PERSPECTIVE VIEW

![]()
PHOTOGRAPHER: Sean Knott
CAMERA: Canon EOS-1DS Mk III
LENS: EF 24–70mm f/2.8L USM @ 59mm focal length
APERTURE: f/6.3
SHUTTER SPEED: 1/125 sec
ISO: 100
LIGHTING:
![]() Profoto ringflash and daylight
Profoto ringflash and daylight

Urban Fashion
By Danny Tucker
Urban Fashion
Inspired by photographers such as Nick Onken, Zack Arias, and Chase Jarvis, self-taught photographer Danny Tucker enjoys putting what he learns into practice in his fashion shots, but that doesn’t always mean multiple strobes or complex lighting setups—equally striking results can be produced with much less kit.
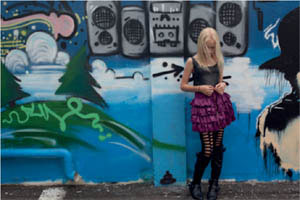
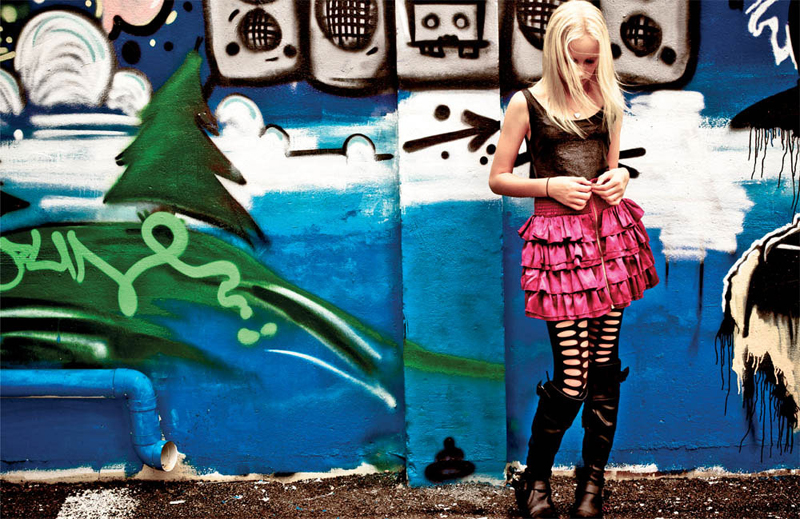
“THIS IS MY DAUGHTER, Katy, who loves to dress up for photoshoots and is taking a strong interest in fashion. We weren’t looking to shoot anywhere specific on the day, but when we came across this wall I knew I wanted to use it—the graffiti-style artwork made a great backdrop and complemented the colors of Katy’s outfit. The wall was at the back of the car park of a local art gallery, so we dropped by the gallery and they gave me permission to shoot. I do a lot of location work, and most places I call on are happy to let me photograph once I’ve explained what I want to do. Katy tried a number of different poses while we were there, but I like this one best, without direct eye contact.”
There was nothing exotic about Danny’s lighting for this shot—he didn’t have strobes with him, so it was a case of using the ambient light. With the sun setting behind clouds, this meant a diffuse light was being thrown down, so the contrast was low, and shadows weak. But although the lighting at the time wasn’t strong, Danny knew that could be easily remedied in post-production.
GET THE LOOK
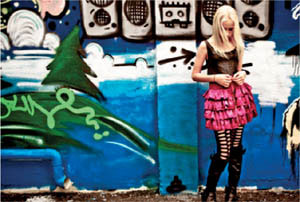
![]() With the sun behind the clouds and no in-camera processing of his Raw files, the contrast and saturation were both lacking, so software intervention was vital if Danny wanted to make the colors “pop.” Danny carried out the work in Adobe Lightroom, starting out by pushing the Exposure and Fill Light options in the Basic editing panel to the max. This gave a bright image overall, so the blacks were adjusted, deliberately clipping the histogram to get the blocked-in look to the shadow areas. This was reinforced with a contrast-boosting S-curve, giving it an additional push at the highlight end to add extra brightness to the highlights.
With the sun behind the clouds and no in-camera processing of his Raw files, the contrast and saturation were both lacking, so software intervention was vital if Danny wanted to make the colors “pop.” Danny carried out the work in Adobe Lightroom, starting out by pushing the Exposure and Fill Light options in the Basic editing panel to the max. This gave a bright image overall, so the blacks were adjusted, deliberately clipping the histogram to get the blocked-in look to the shadow areas. This was reinforced with a contrast-boosting S-curve, giving it an additional push at the highlight end to add extra brightness to the highlights.
![]() With the contrast sorted, the blue saturation was increased in the HSL (hue/saturation/luminance) panel, with its luminance reduced to saturate the wall. The saturation of the purples and greens was also increased to emphasize the skirt and green paint (see small image on page 88), with the vibrance and saturation sliders fine-tuned so the effect wasn’t over the top.
With the contrast sorted, the blue saturation was increased in the HSL (hue/saturation/luminance) panel, with its luminance reduced to saturate the wall. The saturation of the purples and greens was also increased to emphasize the skirt and green paint (see small image on page 88), with the vibrance and saturation sliders fine-tuned so the effect wasn’t over the top.
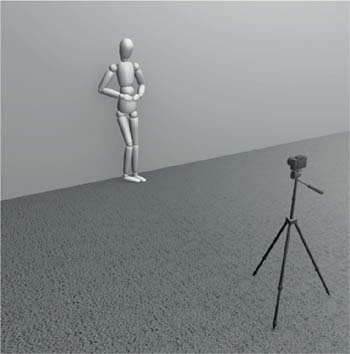
![]() PLAN VIEW
PLAN VIEW

![]() PERSPECTIVE VIEW
PERSPECTIVE VIEW
![]()
PHOTOGRAPHER: Danny Tucker
CAMERA: Canon EOS 5D Mk II
LENS: Canon EF 50mm f/1.4
APERTURE: f/8
SHUTTER SPEED: 1/50 sec
ISO: 320
LIGHTING:
![]() Daylight
Daylight
ED Magazine
Raised in a predominantly female environment, it’s perhaps not that surprising that Simon Pais’ early artistic interest centered on drawing female portraits. However, at the age of 17, drawing gave way to photography, and despite starting a course in advertising photography, it wasn’t long before Simon returned to his initial inspiration, abandoning his studies to pursue a career in the female-orientated world of fashion photography.
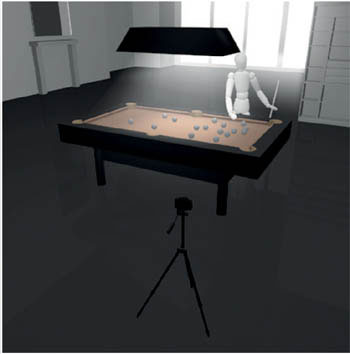
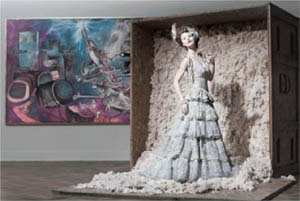
“I WAS COMMISSIONED to shoot a selection of wedding dresses for ED Magazine in Chile, including this dress by couture designer Ruben Campos, the ‘architect of Chilean fashion’ and one of the premiere designers in South America. I shot on location at Museo de la Solidaridad Salvador Allende in Santiago, Chile, and the idea was to show a glamorous bride emerging from an export crate, looking more like a doll than a real person. This meant directing the model in a way that created a deliberate doll-like pose: stiff, but at the same time flowing and feminine.
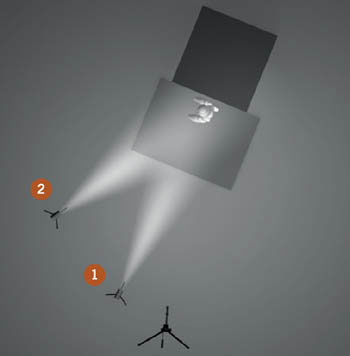
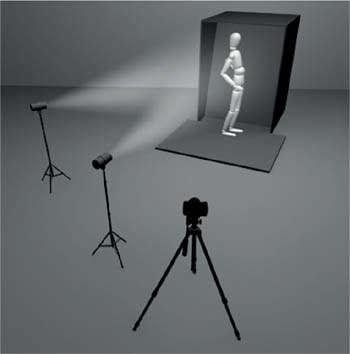
“To enhance the artificial look I used a lighting setup that added drama and volume to the figure, with strong diagonal lighting and shadows providing the obvious theatricality. To achieve this, I set both of my lights to the left of the camera and aimed them directly at the model: a 1000ws monolight as my key, and a 500ws monolight from a tighter angle as a fill, so the shadows weren’t heavy and black.”
GET THE LOOK
![]() Mise en scène (literally “put in scene”) is a term that’s more closely associated with cinema than it is with photography, yet when it comes to “staging” a fashion photograph, the elements that appear in front of the camera—and how they are presented—are incredibly important: it’s much more than a model and an outfit. In this shot, for example, everything from the materials used in the construction of the “packaging crate” through to the painting in the background and the model’s pose has been carefully controlled, or directed, to create the desired end result. This meant careful styling of the model to ensure that her hair and makeup matched the overall doll theme, with the skin made deliberately pale to suggest porcelain, rather than flesh. Lighting also plays an important part, with unidirectional, contrasty lighting often associated more with looking at a small object close-to, rather than a life-size subject from afar.
Mise en scène (literally “put in scene”) is a term that’s more closely associated with cinema than it is with photography, yet when it comes to “staging” a fashion photograph, the elements that appear in front of the camera—and how they are presented—are incredibly important: it’s much more than a model and an outfit. In this shot, for example, everything from the materials used in the construction of the “packaging crate” through to the painting in the background and the model’s pose has been carefully controlled, or directed, to create the desired end result. This meant careful styling of the model to ensure that her hair and makeup matched the overall doll theme, with the skin made deliberately pale to suggest porcelain, rather than flesh. Lighting also plays an important part, with unidirectional, contrasty lighting often associated more with looking at a small object close-to, rather than a life-size subject from afar.
![]() PLAN VIEW
PLAN VIEW
![]() PERSPECTIVE VIEW
PERSPECTIVE VIEW
![]()
PHOTOGRAPHER: Simon Pais
CAMERA: Canon EOS 40D
LENS: Canon EF 24–70mm f/2.8L USM @ 32mm focal length
APERTURE: f/8
SHUTTER SPEED: 1/100 sec
ISO: 100
LIGHTING:
![]() Hensel 1000ws monolight
Hensel 1000ws monolight
![]() Hensel 500ws monolight
Hensel 500ws monolight

ED Magazine
By Simon Pais
Swimming Pool
Efrén Hernández Luis is a relative newcomer to fashion photography, but since getting his first SLR he has worked hard to hone his skills, enrolling on photographic courses and experimenting whenever he has the opportunity.
“WHEN I STARTED taking pictures I’d go out and look for images I already had in my mind, especially landscapes. As I learnt more, my interest in portraits increased and fashion seemed like a natural progression. What I like most is the lack of rules—you can be as imaginative as you like—and the whole thing is more about teamwork, with designers, makeup artists, stylists, and of course models all bringing something to a shoot.
“This shot was taken at a fashion workshop at Casa Rahn (the Old Convent of Santo Domingo) located in Puerto de la Cruz, Tenerife and it’s actually a very simple shot. It was taken at midday in an empty swimming pool and, although the sun was directly overhead, it was a cloudy day so there were no problems with shadows—I didn’t even need to use a reflector, just the natural soft light.”
But while the shoot was straightforward, Efrén worked hard on the post-processing, using Adobe’s Camera Raw convertor to regulate the tonal range before adding two gradients to the image; one to lower the exposure of the sky and bring out the cloud detail, and a second to lighten the bottom half of the image and “lift” the model. Taking the image into Photoshop, Efrén went on to use the program’s HDR tools, applying subtle tonemapping to create the slightly “hyper-real” look.
GET THE LOOK
![]() A fairly recent photographic development, HDR (High Dynamic Range) photography is primarily used as a way of overcoming extreme contrast in a scene. By shooting a series of exposures that cover the full range of tones and then combining, or tonemapping them, it’s possible to produce an image with detail in every area, from the brightest highlight to the deepest shadow, even when this would normally exceed the dynamic range of your camera. However, while it has a technical purpose, there’s no reason why the tools associated with HDR imagery can’t be used in less conventional ways as Efrén has done here. By tonemapping a single image—either in Photoshop or a dedicated HDR program such as Photomatix Pro—the contrast levels can be manipulated to give a distinctive appearance. While this will never look entirely natural, it’s definitely eye-catching, and certainly a way of adding an extra level of visual excitement to a fashion shot.
A fairly recent photographic development, HDR (High Dynamic Range) photography is primarily used as a way of overcoming extreme contrast in a scene. By shooting a series of exposures that cover the full range of tones and then combining, or tonemapping them, it’s possible to produce an image with detail in every area, from the brightest highlight to the deepest shadow, even when this would normally exceed the dynamic range of your camera. However, while it has a technical purpose, there’s no reason why the tools associated with HDR imagery can’t be used in less conventional ways as Efrén has done here. By tonemapping a single image—either in Photoshop or a dedicated HDR program such as Photomatix Pro—the contrast levels can be manipulated to give a distinctive appearance. While this will never look entirely natural, it’s definitely eye-catching, and certainly a way of adding an extra level of visual excitement to a fashion shot.
![]() PLAN VIEW
PLAN VIEW

![]() PERSPECTIVE VIEW
PERSPECTIVE VIEW
![]()
PHOTOGRAPHER: Efrén Hernández Luis
CAMERA: Canon EOS 1000D
LENS: Canon EF-S 18–55mm f/3.5–5.6 IS @ 34mm focal length
APERTURE: f/8
SHUTTER SPEED: 1/320 sec
ISO: 100
LIGHTING:
![]() Ambient daylight
Ambient daylight

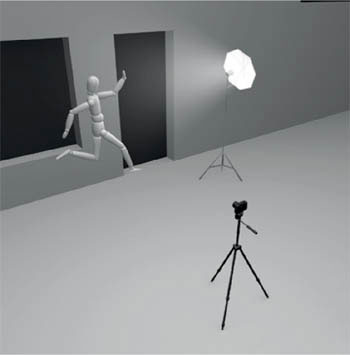
Jump
When he isn’t selling his own, and other photographers’ work through the online Cuba Gallery, New Zealand-based creative director and commercial photographer, Andrew Smith, is constantly experimenting behind the camera.
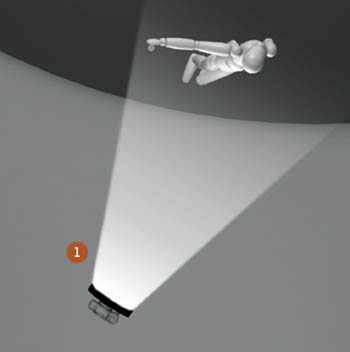
“I WAS LOOKING TO SHOOT a series of fashion images based on New Balance shoes and because of the product I wanted to create a strong urban/street feel. I had the idea of the model jumping in a kind of ‘free-running’ pose, so I chose a gritty location where the model could leap from a higher level so he would appear to be ‘flying’ across the scene. We used the narrow ledge at the bottom of the metal shutter behind him, and although it took a lot of attempts to get it right, the additional height makes the shot stronger. The leap looks almost bionic!”
Although the pose required a lot of work, the lighting setup was very basic—a remotely-triggered Nikon SB-800 Speedlight bounced into an umbrella was all that Andrew needed to produce the streetlamp-style light for the nocturnal shoot. While this produced an already striking shot, it’s the post-production work that really brings it to life. After cropping the image square, and correcting the perspective in Photoshop, Andrew worked on the model’s torso to optimize the detail and introduced a subtle split-tone to warm the highlights and cool the shadows. The most significant change, though, was to the color of the metal door in the background—changing the hue from a blue-gray to a shade of green that complements the detail of the shoes, helps integrate the subject and background so they work together as a whole.
GET THE LOOK
![]() Adopting or enhancing a universal color theme throughout an image is a great way of fusing the various elements in a picture so they work harmoniously with one another. While the initially-neutral backdrop made the green logo on the shoes stand out, it also created two distinct layers in the shot—the background and the subject—whereas changing the color of the door links the two together.
Adopting or enhancing a universal color theme throughout an image is a great way of fusing the various elements in a picture so they work harmoniously with one another. While the initially-neutral backdrop made the green logo on the shoes stand out, it also created two distinct layers in the shot—the background and the subject—whereas changing the color of the door links the two together.
![]() In Photoshop CS4 or higher, a color shift like this is relatively easy to achieve using the Hue/Saturation tool. In the dialog window, simply click on the small hand icon and then on the part of the image that you want to change. This restricts subsequent Hue adjustments to the sampled color, in this case allowing the blue-gray of the steel shutter to be turned a suitable shade of green.
In Photoshop CS4 or higher, a color shift like this is relatively easy to achieve using the Hue/Saturation tool. In the dialog window, simply click on the small hand icon and then on the part of the image that you want to change. This restricts subsequent Hue adjustments to the sampled color, in this case allowing the blue-gray of the steel shutter to be turned a suitable shade of green.

Original Image
![]() PLAN VIEW
PLAN VIEW

![]() PERSPECTIVE VIEW
PERSPECTIVE VIEW
![]()
PHOTOGRAPHER: Andrew Smith
CAMERA: Nikon D3
LENS: Nikon AF-S 24–70mm f/2.8G ED @ 35mm focal length
APERTURE: f/5.6
SHUTTER SPEED: 1/60 sec
ISO: 400
LIGHTING:
![]() Nikon SB-800 Speedlight with silver umbrella
Nikon SB-800 Speedlight with silver umbrella

Sabra
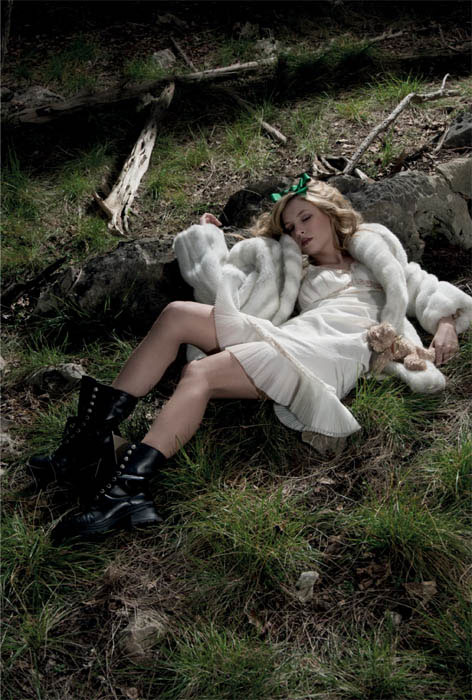
A budding fashion photographer, Jaysen Turner has collaborated with a wide range of models and stylists to achieve his vision, building a solid portfolio of work to take him to the next level. For this shot, his co-conspirators were model Sabra, with Brittany taking care of the hair and makeup.
“SABRA HAD BEEN INSPIRED by a collection of images that she had seen elsewhere and called on myself and Brittany to execute them. We’ve shot several times together, and I love working with her because she’ll come to me with a broad concept, then allow me to add my touch with the lighting—just like working for any other client.
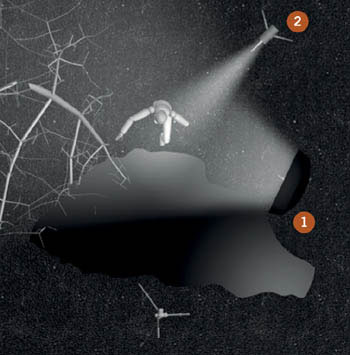
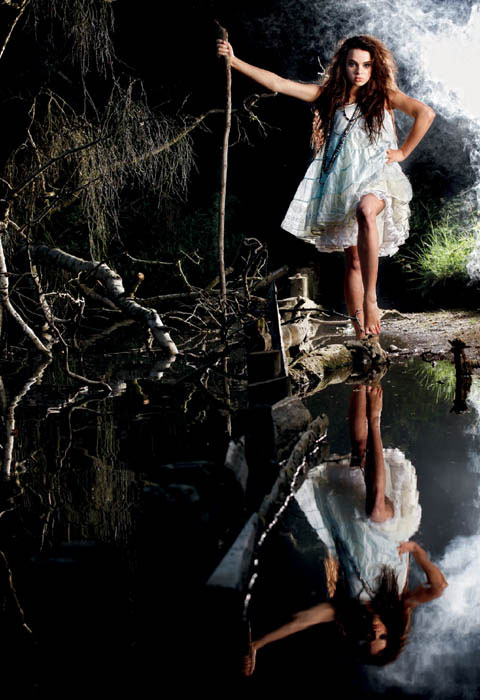
“For this shot, we had total privacy in a park in the heart of Austin, Texas, and when we arrived the sun was streaming through the trees, throwing out these beautiful rays of light. This quickly faded as storm clouds rolled in, but I knew I wanted to emulate the look and take it a step further. With rain closing in fast I knew we didn’t have long, so I set my strobe behind the model at full power and fired off as many frames as I could before the clouds burst.”
Although time was against them, Jaysen and his team have created a shot that hints at a much larger story—one of the key elements for an editorial fashion series. Like a still from a David Lynch movie, the combination of a luxurious fur jacket, grungy military boots, and a teddy bear sends out conflicting messages that raise far more questions than are answered: Who is this girl? Where was she going? Is she asleep, or have we stumbled across something far more sinister…?
GET THE LOOK
![]() Although it was the beauty of the sunlight streaming through the trees on a bright day that initially provided the inspiration for the lighting, by allowing the flash to overpower the ambient light Jaysen has taken it to a new, darker level. The warmth of the sun has been removed, and the look is deliberately nocturnal—sunlight has been replaced by cool moonlight. To do this successfully requires two things: a perfectly neutral color balance and preventing the ambient daylight from having too much of an effect on the scene. The former comes down to the choice of white balance and sensitive post-processing, while the latter depends on the exposure, typically achieved with a low ISO, small aperture, and a relatively fast shutter speed.
Although it was the beauty of the sunlight streaming through the trees on a bright day that initially provided the inspiration for the lighting, by allowing the flash to overpower the ambient light Jaysen has taken it to a new, darker level. The warmth of the sun has been removed, and the look is deliberately nocturnal—sunlight has been replaced by cool moonlight. To do this successfully requires two things: a perfectly neutral color balance and preventing the ambient daylight from having too much of an effect on the scene. The former comes down to the choice of white balance and sensitive post-processing, while the latter depends on the exposure, typically achieved with a low ISO, small aperture, and a relatively fast shutter speed.
![]() PLAN VIEW
PLAN VIEW

![]() PERSPECTIVE VIEW
PERSPECTIVE VIEW

![]()
PHOTOGRAPHER: Jaysen Turner,
Brooks Institute
CAMERA: Nikon D300
LENS: Nikon 24–120mm f/3.5–5.6G ED-IF
AF-S VR @ 34mm focal length
APERTURE: f/10
SHUTTER SPEED: 1/60 sec
ISO: 100
LIGHTING:
![]() AlienBees AB800 with 7" reflector
AlienBees AB800 with 7" reflector

Three-Phase Time
By Raul Higuera
Three-Phase Time
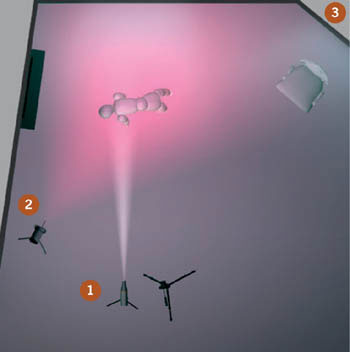
Raul Higuera shoots for personal pleasure as well as commissions, using the freedom a self-initiated project offers to experiment with new ideas and techniques. This image, for example, was initially conceived in Paris for a series of exhibition photographs, and was shown in New York, Miami, Mexico, Bogotá, and the Dominican Republic before being published in a number of fashion magazines.
WITHOUT A BRIEF, Raul was at liberty to approach the shot however he chose, and for this photograph that meant combining both continuous and flash lighting, with ambient daylight also thrown into the mix. His key light was a strobe fitted with a snoot, which created a small pool of light that was limited to the model. This was augmented with a daylight-balanced HMI lamp that he covered with a red gel and aimed at the wall behind his model, creating the distinct patch of color. To exaggerate the vibrant color in the shot, the windows were also covered with gels, this time blue, which intensified the ambient light spilling into the room and contrasted with the red of the HMI.
When it came to making the exposure, a daylight white balance setting ensured that the unfiltered strobe remained neutral, while a small aperture and low ISO combination produced the long exposure time necessary to create the “ghost-like” look: once the shutter was fired, the flash “froze” the model, with the extended exposure recording her subsequent movement as a blur.
GET THE LOOK
![]() Combining continuous and flash lighting has enabled Raul to set a shutter speed for a perfect “flash and blur” effect, while the use of contrasting colored gels injects a rich vibrancy that immediately gives the image its “wow” factor. Yet while Raul has started with light sources that all match in terms of their color temperature, a similar look can be achieved on a smaller budget, without going to the expense of buying gel material for all the windows. Instead of lighting the interior with daylight-balanced lights, you could instead use tungsten-balanced light sources—an 800-watt redhead instead of an HMI, and a full CTO (color temperature orange) gel on the flash. Setting a tungsten white balance in-camera would provide a neutral color base that could then be further gelled, as Raul has done with the HMI. The cool daylight outside would naturally appear far bluer.
Combining continuous and flash lighting has enabled Raul to set a shutter speed for a perfect “flash and blur” effect, while the use of contrasting colored gels injects a rich vibrancy that immediately gives the image its “wow” factor. Yet while Raul has started with light sources that all match in terms of their color temperature, a similar look can be achieved on a smaller budget, without going to the expense of buying gel material for all the windows. Instead of lighting the interior with daylight-balanced lights, you could instead use tungsten-balanced light sources—an 800-watt redhead instead of an HMI, and a full CTO (color temperature orange) gel on the flash. Setting a tungsten white balance in-camera would provide a neutral color base that could then be further gelled, as Raul has done with the HMI. The cool daylight outside would naturally appear far bluer.
![]() PLAN VIEW
PLAN VIEW
![]() PERSPECTIVE VIEW
PERSPECTIVE VIEW
![]()
PHOTOGRAPHER: Raul Higuera
CAMERA: Canon EOS 1Ds Mk II
LENS: Canon EF 24–70mm f/2.8L USM @ 28mm focal length
APERTURE: f/16
SHUTTER SPEED: 1.3 seconds
ISO: 125
LIGHTING:
![]() Profoto 1200ws monolight with snoot
Profoto 1200ws monolight with snoot
![]() 800-watt HMI with red gel
800-watt HMI with red gel
![]() Daylight (blue gels over windows)
Daylight (blue gels over windows)
Rock ‘n’ Roll
Croatia-born Kristina Jelcic moved to London to develop her career as a fashion photographer, assisting a number of established professionals as she continued to build her portfolio. But she knows that fashion photography isn’t just about the photographer and the model—it’s also about “the other creatives who bring things to the table and help make a fashion photo what it is.”
DESPITE APPRECIATING fully the role of stylists, hair, and makeup artists, Kristina is just as happy to take on these roles herself when appropriate, as she did here. “The idea behind the shoot was to recreate a slightly retro, summery, 1970s’ Americana feel that was both soft and natural, yet strong as an image. I thought Jessica, with her long blonde hair, was the perfect model to invoke those feelings. With every shoot I do I pay attention to the styling—it can be really simple, but it’s important to get it right as it can make or break the feel of the photo.”
Shot in Epping Forest, on the outskirts of London, Kristina waited until late afternoon when the sun was low in the sky. With the sun behind and to the side of her model, the only other element needed was a small gold reflector, used to enhance the already-warm light as she bounced it back onto the model. Setting the camera’s white balance to “cloudy” helped add a golden glow to the overall color, with a wide, f/1.8 aperture setting providing a shallow depth of field and the finishing touch to the soft, dreamy image.

GET THE LOOK
![]() Even though the shot already had a hazy feel due to Kristina shooting toward the sun, she wanted to emphasize it in post production. “I cleaned up the skin and hair from the face (not too much as I wanted the overall feel to be quite natural) and created a curves adjustment layer with the blending mode set to normal. I grabbed the bottom of the master curve and moved it up slightly, which lightens the darkest tones and introduces an overall haze. Next, I switched to the red channel (still in the curves dialog) and brought the bottom of this curve up as well, adding an overall red glow. Switching to the blue channel, I grabbed the center of the curve, and pulled it down to get an overall yellow tone. Finally, I added a Hue/Saturation layer and reduced the saturation: Voila! A retro, seventies-style summer look!”
Even though the shot already had a hazy feel due to Kristina shooting toward the sun, she wanted to emphasize it in post production. “I cleaned up the skin and hair from the face (not too much as I wanted the overall feel to be quite natural) and created a curves adjustment layer with the blending mode set to normal. I grabbed the bottom of the master curve and moved it up slightly, which lightens the darkest tones and introduces an overall haze. Next, I switched to the red channel (still in the curves dialog) and brought the bottom of this curve up as well, adding an overall red glow. Switching to the blue channel, I grabbed the center of the curve, and pulled it down to get an overall yellow tone. Finally, I added a Hue/Saturation layer and reduced the saturation: Voila! A retro, seventies-style summer look!”
![]() PLAN VIEW
PLAN VIEW
![]() PERSPECTIVE VIEW
PERSPECTIVE VIEW
![]()
PHOTOGRAPHER: Kristina Jelcic
CAMERA: Nikon D70
LENS: Nikon 50mm f/1.8DAF
APERTURE: f/1.8
SHUTTER SPEED: 1/1000 sec
ISO: 200
LIGHTING:
![]() Ambient plus gold reflector
Ambient plus gold reflector

Rock ’n’ Roll
By Kristina Jelcic
Magical Winter Wish
For CT Pham—aka “Phamster”—creative strobe lighting is paramount for his fashion and portrait photography. This has meant a heap of research into the photographers and photographs that inspire him, analyzing other people’s lighting setups and then determining how to recreate and develop them himself.
“THIS SHOT WAS the first I took for a series that was going to be based on the Four Seasons—something I’d been thinking of doing for a while. It was inspired by the photographer Oleg Igorin, who had done something similar, but I wasn’t attempting to ‘copy’ his work outright; I simply saw it as the catalyst for my own images.
“The photograph was done in a parking garage, and one night I headed there with the model, two assistants, three Nikon Speedlights, and a single AlienBees AB1600 strobe with a Vagabond battery pack. I used the AB1600 for my key light, fitting it with a versatile 64-inch parabolic umbrella, and added two Speedlights—one each side of the model—to cross light the glitter. Both Speedlights were firing from small softboxes, with one gelled blue, and the other green to add some color. A third Speedlight was positioned behind the model and fired into a shoot-through umbrella to lighten the wall and provide partial side lighting. Because of the difference between my hotshoe flashes and the monolight, I had to set the AB1600 to 1/4 power, while the Speedlights were fired at full strength. It was then just a case of getting the model to blow the glitter from her hands while I shot. We got through a lot of glitter that night!”
GET THE LOOK
![]() When you’re shooting on location using batteries to power any strobes you use is a great solution if there isn’t a main power supply—unless you take a generator with you. An increasing number of studio packs have a battery-powered equivalent that allows you to take them on location, and there are also battery packs for some monolights. However, don’t write off using hotshoe-style flashes. Although they put out less power than a studio strobe, this isn’t a problem when you’re shooting in a dark interior, or outdoors at night—the flash will still overpower the ambient light. Also, more and more companies are producing accessories for small flashes, so you can shoot with softboxes and snoots, or stick them on a stand and use an umbrella to bounce the light. It’s much easier and cheaper to carry spare batteries for them as well.
When you’re shooting on location using batteries to power any strobes you use is a great solution if there isn’t a main power supply—unless you take a generator with you. An increasing number of studio packs have a battery-powered equivalent that allows you to take them on location, and there are also battery packs for some monolights. However, don’t write off using hotshoe-style flashes. Although they put out less power than a studio strobe, this isn’t a problem when you’re shooting in a dark interior, or outdoors at night—the flash will still overpower the ambient light. Also, more and more companies are producing accessories for small flashes, so you can shoot with softboxes and snoots, or stick them on a stand and use an umbrella to bounce the light. It’s much easier and cheaper to carry spare batteries for them as well.
![]() PLAN VIEW
PLAN VIEW

![]() PERSPECTIVE VIEW
PERSPECTIVE VIEW
![]()
PHOTOGRAPHER: CT Pham
CAMERA: Canon EOS 5D Mk II
LENS: Canon 85mm L
APERTURE: f/9
SHUTTER SPEED: 1/160 sec
ISO: 500
LIGHTING:
![]() AlienBees AB1600 monolight with 64-inch parabolic umbrella
AlienBees AB1600 monolight with 64-inch parabolic umbrella
![]() Two Nikon Speedlights firing from small softboxes (one blue gel, one green gel)
Two Nikon Speedlights firing from small softboxes (one blue gel, one green gel)
![]() Nikon Speedlight fired into shoot-through umbrella
Nikon Speedlight fired into shoot-through umbrella

Love Miss Daisy
After a six-year stint working as a photographer in Miami, Brett Harkness returned to the UK to set up his own studio. Specializing in fashion, portraiture, and social photography, his work attracts a diverse number of clients and commissions, and is regularly featured in a wide range of photography magazines.
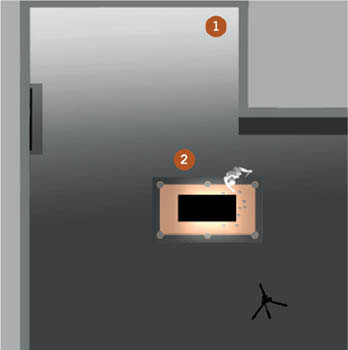
THIS IMAGE WAS SHOT for a clothing company called Love Miss Daisy, which focuses on 1950s’ vintage clothing. Taken in the UK in July, Brett decided to end the day-long shoot with something a little different. “It was around 9pm, the light was fading fast, and we were about to wrap. But I wanted to finish with a bang. I had some smoke bombs with me that I’d been looking to use for a while, so I thought this was the time to give them a go!”
Wrapping the model in vintage petticoats, Brett set up his main strobe with a 135cm octabox, adding a second strobe behind the model to light the fallen tree at the left of the frame and create a rim-lighting effect as it passed through the smoke and across the subject. Although it was starting to get dark, there was still enough ambient light to get the shot if he’d wanted to, but Brett decided to let the flash dominate. By deliberately setting a short exposure with a fairly small aperture setting, the ambient light had little effect on the scene, allowing the flash to create the high-contrast look he was after. When a fallen branch was handed to the model to give her a more dramatic pose, the mystical scene was set.
GET THE LOOK
![]() Smoke can add an extra dimension to a location shoot, whether it’s adding a light, low-level fog around the model’s feet in a gritty, urban environment, or using intense clouds to partially conceal the subject. For most photographers this means buying or renting a theatrical-style smoke machine, but as most of these need a power outlet this isn’t always ideal when you’re shooting on location, unless you want to take a generator with you. Brett’s solution was simple: he headed to his local hardware store and picked up some smoke “bombs” that are more commonly used to check if chimneys and flues are clear. Although you don’t have much control over the smoke, on a small-scale shoot like this they can work well. A word of warning, though—the smoke they produce is toxic, so don’t use them too close to the model, and definitely don’t think about using them in the confines of a studio!
Smoke can add an extra dimension to a location shoot, whether it’s adding a light, low-level fog around the model’s feet in a gritty, urban environment, or using intense clouds to partially conceal the subject. For most photographers this means buying or renting a theatrical-style smoke machine, but as most of these need a power outlet this isn’t always ideal when you’re shooting on location, unless you want to take a generator with you. Brett’s solution was simple: he headed to his local hardware store and picked up some smoke “bombs” that are more commonly used to check if chimneys and flues are clear. Although you don’t have much control over the smoke, on a small-scale shoot like this they can work well. A word of warning, though—the smoke they produce is toxic, so don’t use them too close to the model, and definitely don’t think about using them in the confines of a studio!
![]() PLAN VIEW
PLAN VIEW
![]() PERSPECTIVE VIEW
PERSPECTIVE VIEW

![]()
PHOTOGRAPHER: Brett Harkness
CAMERA: Canon EOS 1Ds Mk III
LENS: Canon EF 70–200mm f/2.8L IS USM II @ 90mm focal length
APERTURE: f/8
SHUTTER SPEED: 1/100 sec
ISO: 400
LIGHTING:
![]() Elinchrom Ranger with 135cm octabox
Elinchrom Ranger with 135cm octabox
![]() Elinchrom Ranger with reflector
Elinchrom Ranger with reflector
Bathroom
When Kerry Burrow isn’t producing TV commercials or shooting promotional videos he can be found on location or in the studio, exploring a variety of creative techniques and experimenting with his fashion photography.
“SOMETHING I DO quite often when I’m shooting on location is to look for architectural features or interior designs that control the natural light. I’ll look for colors and textures that complement and accommodate my end vision—that ‘perfect’ spot that works for the shot I’ve got in my head. In this image I was looking to push that concept further and step outside my comfort zone. While I normally look for colors that I know will work harmoniously together, this time round I wanted to experiment with ‘unnaturally’ grouped colors and see if I could work them into a result that would somehow look natural.
“I shot this in a pink-tiled bathroom, waiting until the end of the day when it was flooded with the light from a golden sunset. The light streaming through the window provided me with a strong backlight, but I needed to use a reflector to bounce some of it back onto my model. I went with a metallic blue reflector, just to see what would happen, and I actually surprised myself with the way it turned out. I only needed to play with the tones a small amount in post-production to get a good balance between the vibrant and inherently different blues, yellows, and pinks in the picture.”
GET THE LOOK
![]() When you’re thinking of using a reflector in a fashion shot, the chances are you’ll consider one of three options—a standard white reflector, silver for a bit more “power,” or gold to warm the image. In this shot, Kerry ignored those established “rules” and opted for a metallic blue reflector. This not only reflected more light onto the subject, thanks to its metallic surface, but it also colored the light, countering the golden sunset and introducing its complementary color—blue—into the mix.
When you’re thinking of using a reflector in a fashion shot, the chances are you’ll consider one of three options—a standard white reflector, silver for a bit more “power,” or gold to warm the image. In this shot, Kerry ignored those established “rules” and opted for a metallic blue reflector. This not only reflected more light onto the subject, thanks to its metallic surface, but it also colored the light, countering the golden sunset and introducing its complementary color—blue—into the mix.
![]() The best thing about this is you don’t need to spend a stack of cash to create a similar effect, or simply experiment with alternative colors. Commercial pop-up reflectors from a photo store may be designed for a specific purpose, but a large sheet of card or board from your local art supplier will have a similar effect. It also has the added bonus of costing next to nothing.
The best thing about this is you don’t need to spend a stack of cash to create a similar effect, or simply experiment with alternative colors. Commercial pop-up reflectors from a photo store may be designed for a specific purpose, but a large sheet of card or board from your local art supplier will have a similar effect. It also has the added bonus of costing next to nothing.
![]() PLAN VIEW
PLAN VIEW
![]() PERSPECTIVE VIEW
PERSPECTIVE VIEW
![]()
PHOTOGRAPHER: Kerry Burrow
CAMERA: Canon EOS 5D Mk II
LENS: EF 50mm f/1.4 USM
APERTURE: f/1.4
SHUTTER SPEED: 1/80 sec
ISO: 1000
LIGHTING:
![]() Ambient daylight and metallic blue reflector
Ambient daylight and metallic blue reflector
Marina
Having traveled for a while, living first in Shanghai, and then Bangkok, Jens Ingvarsson is currently based in New York where he splits his time between running his commercial modeling agency, Exodus Model Management, designing and producing his own range of handbags, and photography.
JENS HAD BEEN SHOOTING a handbag catalog in his studio when the sun began to set. “This shot wasn’t planned at all, but when I saw the warm, almost magical light through the window I knew I wanted to use it. The model I was using for the catalog was wearing this stylish black feather hat—a hand-made improvisation that my fashion stylist put together right before the shoot—and I thought all those feathers would look great against the light. It was the right time for a coffee break, so we all took a break from the studio shoot and headed up to the roof with the camera.
“It was a very easy setup—I just positioned the model with the sun right behind her, and had my assistant hold a white reflector in front of her to bounce back some of the sunlight. I opened the aperture up to f/4 to get a relatively shallow depth of field and with the ISO at its lowest setting I handheld the camera at 1/60 second, allowing a fair amount of ambient light to flow in to overexpose the background slightly and enhance the flare. There was only a little bit of post-production work needed to finish up—other than some basic color correction I just added a purple tint to the shadows to emphasize the warmth of the highlights.”
GET THE LOOK
![]() The sun is one of the most accessible (and cheapest) lightsources available, and it can be a great way of getting some really striking shots for your portfolio or a commission. Shooting against the light is a classic technique and, as Jens shows here, it really doesn’t require much more than a striking subject and a reflector. Simply position your model with their back toward the sun, position a reflector in front of them to act as a fill light, and shoot. Using wider aperture settings will enhance any flare, which can add to the effect, and don’t be afraid to overexpose your shots to blow out the background entirely. In the studio, you can create a similar effect just as easily with a large softbox set up directly behind your model—use warm gels or manipulate the white balance if you want to create a “sunset” vibe.
The sun is one of the most accessible (and cheapest) lightsources available, and it can be a great way of getting some really striking shots for your portfolio or a commission. Shooting against the light is a classic technique and, as Jens shows here, it really doesn’t require much more than a striking subject and a reflector. Simply position your model with their back toward the sun, position a reflector in front of them to act as a fill light, and shoot. Using wider aperture settings will enhance any flare, which can add to the effect, and don’t be afraid to overexpose your shots to blow out the background entirely. In the studio, you can create a similar effect just as easily with a large softbox set up directly behind your model—use warm gels or manipulate the white balance if you want to create a “sunset” vibe.
![]() PLAN VIEW
PLAN VIEW

![]() PERSPECTIVE VIEW
PERSPECTIVE VIEW

![]()
PHOTOGRAPHER: Jens Ingvarsson
CAMERA: Canon EOS 5D Mk II
LENS: Canon EF 24–70mm f/2.8L USM @ 70mm focal length
APERTURE: f/4
SHUTTER SPEED: 1/60 sec
ISO: 50
LIGHTING:
![]() Ambient plus white reflector
Ambient plus white reflector

The Stairs
Currently based in Curitiba, Brazil, Paula Anddrade specializes in people photography, be it private commissions of couples, families, or children, or commercial fashion projects and model folios.
“IT IS REWARDING to photograph people who give me access to their world in order to capture them from my point of view; to discover their best angles and the right moment. There is grace to explore in everyone and I’m passionate about recording people, life, and the world at large through the camera’s eye. I have a passion for pictures that are slightly unconventional, but communicate beauty through light, contrasting colors, and composition.”
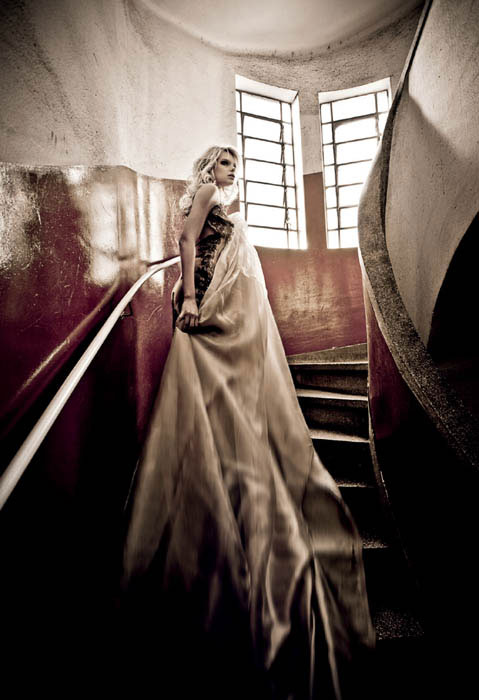
It’s that exact combination of light, color, and composition that come together so successfully in this shot and, although incredibly simple, it’s the naturalness of the lighting that plays a significant part in tying it all together. Taking advantage of the natural light streaming through the windows, Paula simply relied on the curved, light-colored walls to bounce the light around and act as a fill. Introducing artificial light into the location would almost certainly have destroyed the atmosphere here, by opening up the shadows and losing some of the sense of mystery.
Post-processing offered Paula the opportunity to heighten this mood, carefully adjusting the already-muted colors in her limited claret and gold palette, and deepening the shadows at the base of the image to balance the lighter tones at the top. However, the biggest change was the application of Photoshop’s Motion Blur filter to the fabric—it’s not the most refined filter available, but in this instance it works perfectly.
GET THE LOOK
![]() The success of Paula’s shot comes in no small part through the composition: the careful balance of both the visual elements in the frame and the tonal range. Almost monochromatic in appearance, the muted color palette of the location works in harmony with the subject, with the light walls balancing the swathe of fabric, and the deep red walls echoing the detail in the dress. More importantly, the viewer is drawn expertly into the image through the use of leading lines: the white rail to the left takes us up to the model, as does the motion-blurred fabric, while the curved wall to the right sweeps the eye toward the model and prevents our gaze from leaving the frame. This has all been emphasized through the choice of a wide-angle, 17mm focal length, which naturally exaggerates the perspective, especially when used from a low angle, looking upward.
The success of Paula’s shot comes in no small part through the composition: the careful balance of both the visual elements in the frame and the tonal range. Almost monochromatic in appearance, the muted color palette of the location works in harmony with the subject, with the light walls balancing the swathe of fabric, and the deep red walls echoing the detail in the dress. More importantly, the viewer is drawn expertly into the image through the use of leading lines: the white rail to the left takes us up to the model, as does the motion-blurred fabric, while the curved wall to the right sweeps the eye toward the model and prevents our gaze from leaving the frame. This has all been emphasized through the choice of a wide-angle, 17mm focal length, which naturally exaggerates the perspective, especially when used from a low angle, looking upward.
![]() PLAN VIEW
PLAN VIEW
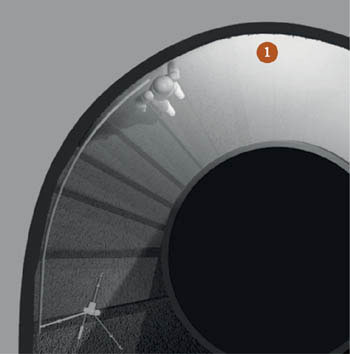
![]() PERSPECTIVE VIEW
PERSPECTIVE VIEW

![]()
PHOTOGRAPHER: Paula Anddrade
CAMERA: Canon EOS 5D Mk II
LENS: Canon EF 17–40mm f/4L USM @ 17mm focal length
APERTURE: f/4
SHUTTER SPEED: 1/40 sec
ISO: 200
LIGHTING:
![]() Daylight
Daylight