Mono
Black-and-white imagery is pervasive in all forms of photography, but combining fashion with monochrome seems somehow counterintuitive and perhaps even perverse when you consider the amount of time and effort that designers spend carefully choosing the color palette for their latest creations. Yet despite this, fashion stories and adverts that are strictly monochrome continue to be produced and published, and you don’t need to look any further than the images in this chapter to see why this is.
Sure, monochrome may not be able to record color, but it more than makes up for this in other areas. Without the distraction of color, the shape, texture, and form of a designer’s vision can come to the fore, while from a narrative perspective, black and white has the ability to create a specific mood in a highly enigmatic way. From stark, single-light setups that produce a harsh chiaroscuro effect harking back to the cinematic tradition of “film noir,” through to far softer, more ethereal images that rely on a delicacy of touch from the photographer to create a limited tonal range, black and white is arguably more emotive than color, undoubtedly just as valid. And, of course, lighting plays a crucial part in this.
Tom
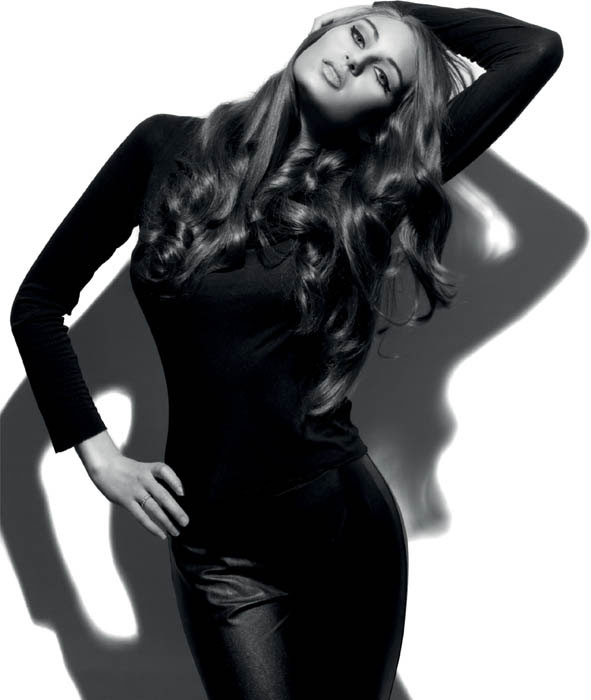
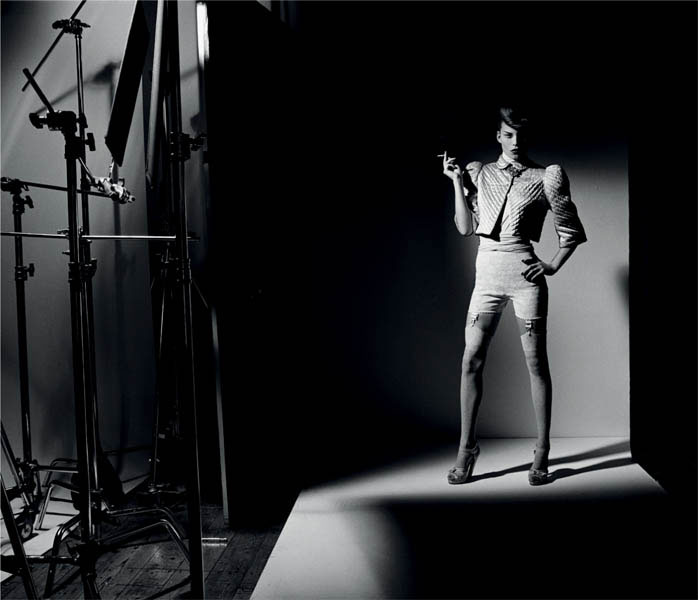
Like many photographers, Polish-born Anna Olszewska headed to art school to learn her craft, where the freedom to experiment with a multitude of creative techniques enabled her to build up a stunning portfolio of work with which to launch her professional career.
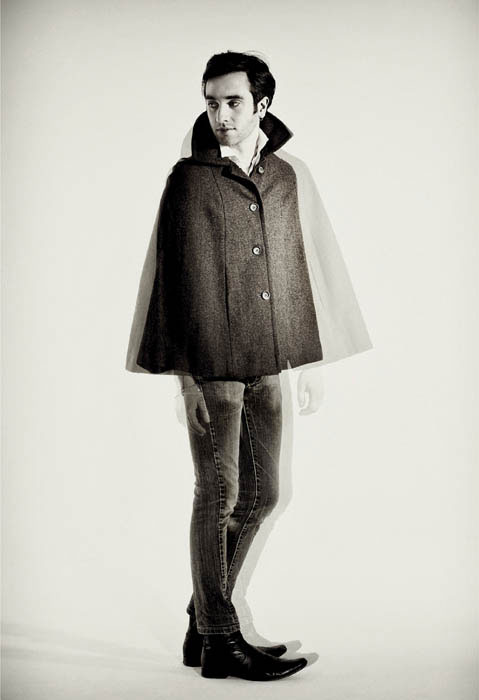
“I WAS WORKING with a professional stylist in the studio with the idea of creating a series of simple images with a quirky look. I was using a Canon EOS 40D with a 50mm ‘standard’ lens, and the lighting came from two strobes: the first to the right of the camera, fitted with a reflector and a grid to keep the light pool fairly tight, plus a spotlight aimed at the background to eliminate any strong shadows on the floor. A white reflector on the opposite side of the camera was added to bring out the detail in the left side of the model’s face.
“It wasn’t until I started working on the images in Photoshop that the ‘ghostly’ effect came to me. I combined two different images, copying one onto a layer above the other. By lowering the opacity of the second image I got the ghostly look, but I needed to work on the layer mask to conceal specific elements that I wanted to leave untouched—primarily the model’s face. I then converted the color original into black and white using Silver Efex Pro, a Photoshop plug-in, increasing the contrast, the brightness, and emphasizing the textures, as well as adding a warm tone.”
 GET THE LOOK
![]() Multiple exposures walk a fine line between looking overly contrived and unnatural, and enhancing a concept and (literally) adding another layer to an image. Anna’s picture falls firmly into the latter category, with the ghost-like overlay creating a subtle sense of movement in an otherwise static studio shot.
Multiple exposures walk a fine line between looking overly contrived and unnatural, and enhancing a concept and (literally) adding another layer to an image. Anna’s picture falls firmly into the latter category, with the ghost-like overlay creating a subtle sense of movement in an otherwise static studio shot.
![]() In the pre-digital age, multiple exposures were a hit-and-miss technique, requiring careful attention to the exposure and composition of both shots to make sure that both aligned correctly and exhibited the right balance in terms of their density. However, with an image-editing program it’s very easy to experiment with this type of look—simply put each shot that you want to use on its own layer and move and manipulate them on screen until you get the result you are after. As well as reducing the opacity of one, or both, of the layers, you can also experiment with blending modes to create different effects, as well as combining both color and monochrome in a single image.
In the pre-digital age, multiple exposures were a hit-and-miss technique, requiring careful attention to the exposure and composition of both shots to make sure that both aligned correctly and exhibited the right balance in terms of their density. However, with an image-editing program it’s very easy to experiment with this type of look—simply put each shot that you want to use on its own layer and move and manipulate them on screen until you get the result you are after. As well as reducing the opacity of one, or both, of the layers, you can also experiment with blending modes to create different effects, as well as combining both color and monochrome in a single image.
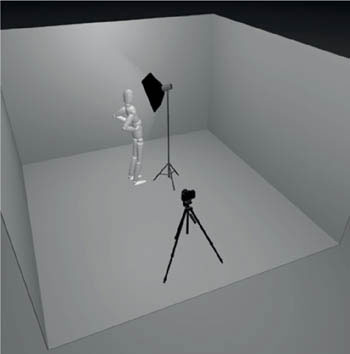
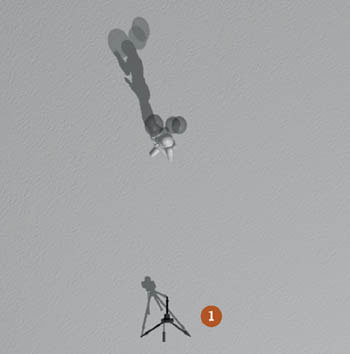
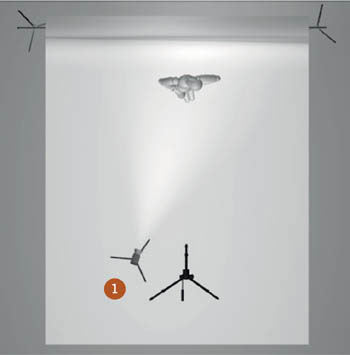
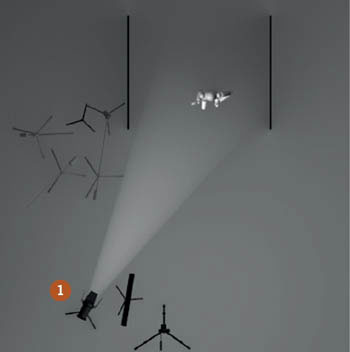
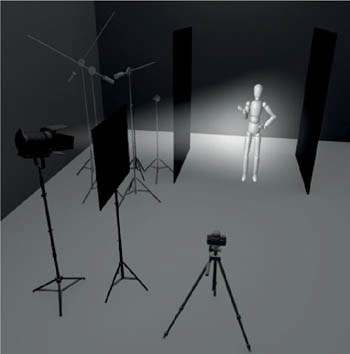
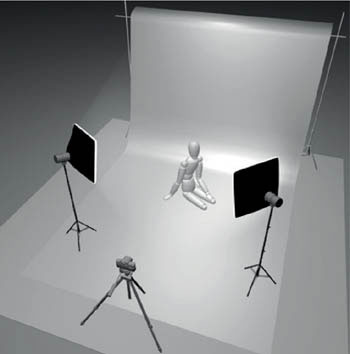
![]() PLAN VIEW
PLAN VIEW

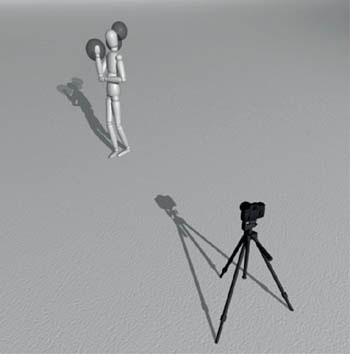
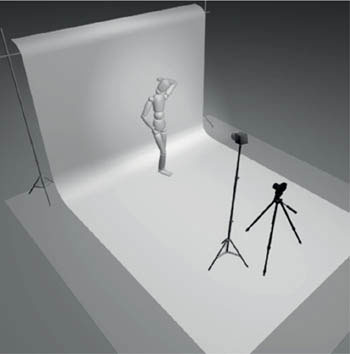
![]() PERSPECTIVE VIEW
PERSPECTIVE VIEW

![]()
PHOTOGRAPHER: Anna Olszewska
CAMERA: Canon EOS 40D
LENS: Canon EF 50mm f/1.8 II
APERTURE: f/8
SHUTTER SPEED: 1/125 sec
ISO: 100
LIGHTING:
![]() Strobe with reflector
Strobe with reflector
![]() Grid spotlight
Grid spotlight
![]() White reflector
White reflector
Isabella Araújo
As the sole photographer for Elder Depizzol, a Brazilian casting agency, fashion photographer Alexandre Godinho was responsible for producing a wide range of portfolio images for an assortment of models. Working to tight shooting schedules in makeshift studio environments often meant there was little time for elaborate lighting setups, yet the photographer still had to deliver results that would appeal to both the local and international modeling markets.
THIS STRIKING black-and-white image was taken in the mundane surroundings of a hotel meeting room. Measuring only 16' x 13' (5m x 4m), and with a low ceiling height, positioning multiple strobes in the confined space wasn’t an option, so Alexandre used a simple one-light setup.
“When Isabella, the model, walked in wearing a gray dress I knew that my pictures were going to be black and white so I wanted contrast in the shot. The problem was that the room wasn’t very big, and because the walls and ceiling were white they were all working like giant reflectors, creating an overall softness light. This was great as a general fill, but I wanted a high-contrast look. To achieve this I set up a small 200-watt monolight with a square softbox and positioned it about one foot (30cm) from the model’s face, tilting it downward slightly to create the shadow under her chin. With the flash set at 1/4 power I could still use a relatively small aperture. When it came to post-processing I simply increased the contrast a bit more and added some noise to give it a ‘grainy’ look.”
GET THE LOOK
![]() Despite shooting in a space that most photographers would deem “unsuitable” for photography and using a strobe that many would assume isn’t powerful enough, Alexandre has created a stunning black-and-white image that required surprisingly little Photoshop work. The single, low-powered flash—even at ¼ power—easily becomes the dominant lightsource in the windowless room, rendering the white wall in the background a deep gray thanks to the combination of a fast shutter speed and low ISO. At the same time, the proximity of the flash to the subject has meant that her skintones remain bright while the shadows are dark: the closer the flash, the higher the contrast. This has also allowed Alexandre to overexpose the skintones slightly, and while this doesn’t affect the impact of the image, it successfully conceals any blemishes without having to rely on image editing at a later date.
Despite shooting in a space that most photographers would deem “unsuitable” for photography and using a strobe that many would assume isn’t powerful enough, Alexandre has created a stunning black-and-white image that required surprisingly little Photoshop work. The single, low-powered flash—even at ¼ power—easily becomes the dominant lightsource in the windowless room, rendering the white wall in the background a deep gray thanks to the combination of a fast shutter speed and low ISO. At the same time, the proximity of the flash to the subject has meant that her skintones remain bright while the shadows are dark: the closer the flash, the higher the contrast. This has also allowed Alexandre to overexpose the skintones slightly, and while this doesn’t affect the impact of the image, it successfully conceals any blemishes without having to rely on image editing at a later date.
![]() PLAN VIEW
PLAN VIEW

![]() PERSPECTIVE VIEW
PERSPECTIVE VIEW
![]()
PHOTOGRAPHER: Alexandre Godinho
CAMERA: Canon EOS 5D
LENS: Canon EF 70–200mm f/2.8L IS USM @ 150mm focal length
APERTURE: f/9
SHUTTER SPEED: 1/200 sec
ISO: 200
LIGHTING:
![]() Atek 200 strobe with 70cm x 70cm softbox
Atek 200 strobe with 70cm x 70cm softbox
Santa Monica
Caitlin Bellah’s exquisitely stylized fashion images have appeared in magazines around the globe, from Cellardoor in the UK to Peppermint in Australia, and Teen Vogue in her native USA. But perhaps what is more remarkable about this young photographer’s success is that she’s entirely self-taught, proving that a formal photographic education isn’t as important as natural talent, vision, and persistence.
“AS FAR AS LIGHTING goes, all of my images are taken using natural light—sometimes with reflectors, other times without, as was the case with this picture. The shot was inspired by a collection of Victorian photographs of women at Ocean Beach, in San Francisco. I thought it was strange how these women would go to the beach in all of these heavy clothes and even though it should be a joyful day of ‘fun in the sun’ they almost always looked bored. I just wanted to take an image that reflected that mood; a shot that was slightly strange, where the mood contrasted with the location.”
Styling plays a clear part in the success of Caitlin’s slightly maudlin fashion shot, with the outfit and accessories giving it a timeless quality and the balloons adding a slightly surreal edge. This feeling of a photograph taken in “another time” is enhanced by the entirely nondescript beach location and quite intensive post-production work in Photoshop. Blurring the upper section of the frame digitally has transformed it into a featureless “fog” that adds to the somber mood, while a colored gradient and subtle vignette adds to the vintage tone.
GET THE LOOK
![]() Although Caitlin has used a colored gradient to add an aged look to her photograph, applying a uniform color, or “stain,” is also a great way to add color interest to a black-and-white photograph. Staining is a process that goes back to the traditional black-and-white darkroom, but unlike toning, it would be done to the print without bleaching it first, so it only affected the lighter areas of the picture, keeping the shadows deep and relatively neutral.
Although Caitlin has used a colored gradient to add an aged look to her photograph, applying a uniform color, or “stain,” is also a great way to add color interest to a black-and-white photograph. Staining is a process that goes back to the traditional black-and-white darkroom, but unlike toning, it would be done to the print without bleaching it first, so it only affected the lighter areas of the picture, keeping the shadows deep and relatively neutral.
![]() Recreating a stain is incredibly straightforward in most image-editing programs that feature layers and blending modes. In Photoshop, simply add a Solid Fill adjustment layer and choose the color you want to use for your stain from the color picker. It’s then just a case of changing the blending mode to Darken or Multiply and reducing the opacity to add a vintage stain to your otherwise monochrome picture.
Recreating a stain is incredibly straightforward in most image-editing programs that feature layers and blending modes. In Photoshop, simply add a Solid Fill adjustment layer and choose the color you want to use for your stain from the color picker. It’s then just a case of changing the blending mode to Darken or Multiply and reducing the opacity to add a vintage stain to your otherwise monochrome picture.
![]() PLAN VIEW
PLAN VIEW
![]() PERSPECTIVE VIEW
PERSPECTIVE VIEW
![]()
PHOTOGRAPHER: Caitlin Bellah
CAMERA: Nikon D50
LENS: 18–55mm f/3.5–5.6G AF-S DX @ 50mm focal length
APERTURE: f/9
SHUTTER SPEED: 1/320 sec
ISO: 200
LIGHTING:
![]() Daylight
Daylight

Molly
Whether you’re a full-time professional, or an aspiring fashion photographer, a portfolio of images that shows the depth and breadth of your work is essential. This means constant testing, not only with your kit and your techniques to explore new creative options, but also with the people who are vital to the final shot: your models and stylists.
JAYSEN TURNER’S AIM was simple with this test shot—he wanted to produce a series of black-and-white images with hard shadows that emulated the work of his favorite photographers. Working in the studio with a simple one-light setup, Jaysen set his strobe high and to the left of the camera, positioning his model close to a plain white seamless backdrop. Aiming the flash directly at her from a high angle created the hard shadows he was looking for, while the pose prevented the shot from looking static and ensured an even tonality on the face.
“This shoot was strictly for portfolio development for all three of us and I was really happy that we came up with something that we all ended up using. It’s good when the photographer gets the result they’re after, but even better when the model and stylist get something out of it as well, especially when we hadn’t worked together before and everyone was giving up their time without being paid. Because we were a small team I think it facilitated much more of a collaborative effort than when you’re working for someone with a very specific look in mind—you can work more freely, and that helps make a shoot more relaxed.”
GET THE LOOK
![]() Lighting fashion shots doesn’t necessarily mean a complicated setup or multiple lights and, as Jaysen proves, a single strobe and a well-defined goal is more than enough to produce a striking picture. The key to this image is its simplicity: the single, direct flash and the naturally heightened contrast of a black outfit against a white background. However, when you’re dealing with such extremes of tone, getting the exposure right is critical. For this shot, Jaysen took an incident light reading with a handheld flashmeter, which reads the light falling onto the subject, rather than the light being reflected off it. As a result, there’s no chance of the exposure being affected by extremely light or dark areas, making it far easier to gauge the optimum exposure, even with a high contrast shot.
Lighting fashion shots doesn’t necessarily mean a complicated setup or multiple lights and, as Jaysen proves, a single strobe and a well-defined goal is more than enough to produce a striking picture. The key to this image is its simplicity: the single, direct flash and the naturally heightened contrast of a black outfit against a white background. However, when you’re dealing with such extremes of tone, getting the exposure right is critical. For this shot, Jaysen took an incident light reading with a handheld flashmeter, which reads the light falling onto the subject, rather than the light being reflected off it. As a result, there’s no chance of the exposure being affected by extremely light or dark areas, making it far easier to gauge the optimum exposure, even with a high contrast shot.
![]() PLAN VIEW
PLAN VIEW
![]() PERSPECTIVE VIEW
PERSPECTIVE VIEW
![]()
PHOTOGRAPHER: Jaysen Turner, Brooks Institute
CAMERA: Nikon D300
LENS: Nikon 50mm f/1.8D
APERTURE: f/11
SHUTTER SPEED: 1/60 sec
ISO: 100
LIGHTING:
![]() AlienBees AB800 monolight with 7" reflector
AlienBees AB800 monolight with 7" reflector
Test Session
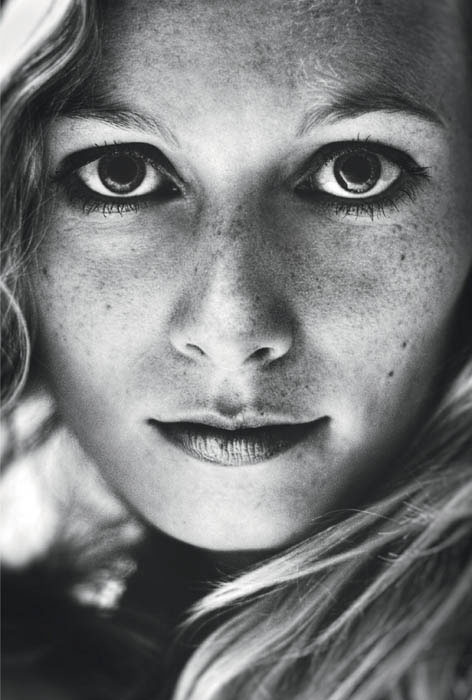
By day, German-born Malte Pietschmann studies Media and Entertainment Management at Stenden University in The Netherlands, but his evenings and weekends are spent behind the camera as he expands his impressive fashion and beauty portfolio.
“I WORK WITH amateur models on a regular basis and I usually do a short test session before the actual shoot. This gives my models the opportunity to get used to being in front of the camera, I show them how I work, and create a relaxed atmosphere for when we work together again. When I’m doing a test session I tend not to use extensive lighting equipment because all the flashes and cables can easily overwhelm someone who hasn’t been in that environment before—my main aim is to get the best from the model from the very start, and that means creating a comfortable working atmosphere.”
Although he usually relies on natural light for his test shots, when the light isn’t working for him, Malte will introduce unobtrusive artificial lightsources, usually starting with a single incandescent lamp. For this shot, he positioned a tungsten lamp to the left of the camera at the model’s eye level, augmenting this with a hotshoe-mounted Nikon SB-900 that he bounced off the white ceiling to provide an overall soft light. Shooting in black and white meant there was no issue with the different color temperatures of the lights, which limited his post-production work to a small amount of retouching and “cleaning,” followed by contrast adjustments to optimize the tonal range.
GET THE LOOK
![]() Almost all digital SLR manufacturers have a fast 50mm lens in their line-up, and these can be incredibly useful for fashion photographers. Although you’re restricted to a single focal length, the wide aperture settings on these lenses—typically f/1.8 or f/1.4—allow the depth of field to be restricted far more than it can be with a zoom lens, which enables you to concentrate the focus on the subject. For his tight head-and-shoulders beauty shot, Malte used a Nikon D90, which has a 23.6 x 15.8mm sensor. Because it isn’t a “full-frame” sensor the focal length of his prime lens was increased by a factor of 1.5, giving it an effective focal length of 75mm, which is perfect for portrait-style images. Shooting at the lens’ maximum aperture of f/1.4 has allowed Malte to focus precisely on the model’s eyes, with the defocused hair creating a soft vignette that frames the face.
Almost all digital SLR manufacturers have a fast 50mm lens in their line-up, and these can be incredibly useful for fashion photographers. Although you’re restricted to a single focal length, the wide aperture settings on these lenses—typically f/1.8 or f/1.4—allow the depth of field to be restricted far more than it can be with a zoom lens, which enables you to concentrate the focus on the subject. For his tight head-and-shoulders beauty shot, Malte used a Nikon D90, which has a 23.6 x 15.8mm sensor. Because it isn’t a “full-frame” sensor the focal length of his prime lens was increased by a factor of 1.5, giving it an effective focal length of 75mm, which is perfect for portrait-style images. Shooting at the lens’ maximum aperture of f/1.4 has allowed Malte to focus precisely on the model’s eyes, with the defocused hair creating a soft vignette that frames the face.
![]() PLAN VIEW
PLAN VIEW

![]() PERSPECTIVE VIEW
PERSPECTIVE VIEW

![]()
PHOTOGRAPHER: Malte Pietschmann
CAMERA: Nikon D90
LENS: Nikon 50mm f/1.4D
APERTURE: f/1.4
SHUTTER SPEED: 1/80 sec
ISO: 250
LIGHTING:
![]() Incandescent lamp
Incandescent lamp
![]() Nikon SB-900 Speedlight
Nikon SB-900 Speedlight
Celluloid Closet
For anyone with even a passing interest in fashion photography, Rankin’s name is instantly recognizable. His rise to stardom arguably began two decades ago when, in 1991, he co-launched the iconic style magazine, Dazed & Confused. Almost immediately, the magazine gained universal popularity, becoming one of the main outlets for Rankin’s creative fashion and portrait work. Stars such as Eminem, Hilary Swank, and Jake Gyllenhall have all appeared on the cover, while Rankin’s credits as a photographer include iconic figures such as The Rolling Stones, former British Prime Minister Tony Blair, and even Her Majesty the Queen.
THIS IMAGE WAS SHOT for a Dazed & Confused fashion story published in 2003, and later appeared in Rankin’s book, Fashion Stories. Yet despite its age it is incontrovertibly timeless. Its execution in black and white—and on film—immediately sets it outside any of the quickly dated trends associated with color photography, such as cross-processing, over- or under-saturation, or the heavy manipulation that heralded the arrival and excitement of digital imaging. The styling is also impossible to place—the vintage look of the outfit is at once historical and totally in keeping with the contemporary fascination for “retro” fashion. This is all brought together by the classic “film noir” style, created by a single HMI light (itself a crossover from the world of movie-making) and set within a studio that reveals and revels in the tools of the photographer’s, and cinematographer’s for that matter, trade.
GET THE LOOK
![]() Black-and-white photography and the cinematographic film noir style are made for each other when it comes to fashion images. Deep, impenetrable shadows punctuated by brilliant white highlights work naturally in monochrome—more so than color—and it’s one area where continuous lighting, rather than flash, excels. It’s also a great place to start when you want to learn about light and lighting: Whether you’re working with a low-cost incandescent lamp or using an ultra-expensive HMI there are no concerns about the white balance when you’re shooting for a black-and-white result, and seeing precisely where your shadows are falling provides immediate feedback. With just a single lamp it’s possible to create a wide range of looks through careful attention to the angle and height of the lamp, the light-to-subject distance, and the position of the model in relation to the camera, and all of this will provide a solid foundation when you want to start exploring more extravagant setups.
Black-and-white photography and the cinematographic film noir style are made for each other when it comes to fashion images. Deep, impenetrable shadows punctuated by brilliant white highlights work naturally in monochrome—more so than color—and it’s one area where continuous lighting, rather than flash, excels. It’s also a great place to start when you want to learn about light and lighting: Whether you’re working with a low-cost incandescent lamp or using an ultra-expensive HMI there are no concerns about the white balance when you’re shooting for a black-and-white result, and seeing precisely where your shadows are falling provides immediate feedback. With just a single lamp it’s possible to create a wide range of looks through careful attention to the angle and height of the lamp, the light-to-subject distance, and the position of the model in relation to the camera, and all of this will provide a solid foundation when you want to start exploring more extravagant setups.
![]() PLAN VIEW
PLAN VIEW
![]() PERSPECTIVE VIEW
PERSPECTIVE VIEW
![]()
PHOTOGRAPHER: Rankin (Courtesy of Rankin/trunkarchive.com)
CAMERA: Mamiya RZ67 Pro II
LENS: Mamiya 65mm f/4
APERTURE: f/11
SHUTTER SPEED: 1/60 sec
FILM: Kodak T-Max 100
ISO: 200
LIGHTING:
![]() 1200w HMI
1200w HMI
Eve
Specializing in fashion, hair, and beauty, Polish photographer Piotr Zgodziński’s work can be found in many international publications, as well as gracing the covers of magazines such as Marie Claire, Métamorphose, Coiffure Professionnelle, Estetica, HAIR, and Coiffure.
THE MAJORITY OF PIOTR’S commercial work is—like most photographers’—shot digitally, but when the day job is over he will often recharge his batteries by shooting film. “After the work is finished I feel exhausted, and at moments like this I want to take things at a slower pace, quietly, with just available light and a model. With film, you have to value each frame and expose carefully, so the art of previsualizing the end result becomes the most important skill. I find this also helps with my digital photography, allowing me to ‘see’ the right result with less trial and error.”
For this shot, there were two main lightsources—a large window to the right of the camera, and a household lamp placed to the left (partly visible) that provides the rim light to the hair. Piotr added a small silver reflector to reduce the shadows on the model’s face, which was helped by the white walls and ceiling, which also bounced the ambient light back onto the subject. Then, using nothing more sophisticated than a Kiev 60 medium-format camera, Piotr loaded up with Kodak Tri-X black-and-white film, attaching a yellow filter to the lens to lighten the model’s skin and hair, and rating it at ISO 1600 so he could shoot handheld. He finished up by push-processing it himself through Rodinal developer for a distinctly filmic look.
GET THE LOOK
![]() Although film is nowhere near as popular as it once was, Piotr shows how it can be beneficial, even to pro photographers. Because there are only a few exposures on a roll, this encourages you to think more carefully about what it is you are shooting and how you are going about it—the composition, exposure, and lighting, for example. Film also has a very unique characteristic: grain. While you can try and recreate this digitally (some methods are more convincing than others), nothing produces the same effect as “the real deal.” With this image, Piotr uprated his Kodak Tri-X so he was effectively treating it as if it were an ISO 1600 film, instead of rating it at its actual ISO 400 speed. The development of the film was then extended to compensate, a process that typically increases both contrast and grain in a way that is unique to the film/developer combination.
Although film is nowhere near as popular as it once was, Piotr shows how it can be beneficial, even to pro photographers. Because there are only a few exposures on a roll, this encourages you to think more carefully about what it is you are shooting and how you are going about it—the composition, exposure, and lighting, for example. Film also has a very unique characteristic: grain. While you can try and recreate this digitally (some methods are more convincing than others), nothing produces the same effect as “the real deal.” With this image, Piotr uprated his Kodak Tri-X so he was effectively treating it as if it were an ISO 1600 film, instead of rating it at its actual ISO 400 speed. The development of the film was then extended to compensate, a process that typically increases both contrast and grain in a way that is unique to the film/developer combination.
![]() PLAN VIEW
PLAN VIEW

![]() PERSPECTIVE VIEW
PERSPECTIVE VIEW

![]()
PHOTOGRAPHER: Piotr Zgodziński
CAMERA: Kiev 60 6x6
LENS: Carl Zeiss Jena MC 120mm f/2.8 Biometar
APERTURE: f/2.8
SHUTTER SPEED: 1/30 sec
FILM: Kodak Tri-X Professional
ISO: 1600
LIGHTING:
![]() Natural daylight from window
Natural daylight from window
![]() Silver reflector
Silver reflector
![]() Incandescent lamp
Incandescent lamp

Museu Histórico
Based in Santa Catarina, south Brazil, Estudio Nagô was formed in 2005 when photographer Marcos Moreira and illustrator Marcelo Fausto decided to fuse their respective disciplines and love for fashion.
REINVENTING THEIR APPROACH to the fast-paced fashion industry on a regular basis, the duo draw on a wide range of influences for their ever-changing portfolio, with this image inspired in part by Thomas Dworzak, a photographer and Magnum member known for his intense documentary work and coverage of global conflict. “We had been invited to shoot some images for a new fashion magazine, and were given an open brief. As we rarely get the chance to do any commercial work in black and white, that was where we decided to start. I was looking at the work of Thomas Dworzak, and in one particular image a lady sits in a bus near a window, with the light coming from behind her. As soon as I saw that shot, I knew that was the look that I wanted.
“The location we arranged was the beautiful Museu Histórico (History Museum) in Itajaí. Because of the art they’ve got on display we weren’t allowed to use flash, so we had to use a continuous, cool-running 1200w HMI light instead. Although we were shooting just after midday, we had to reduce the power of the lamp to 50% to get the look we were after because it was cloudy outside and there were protective screens over the windows, which both reduced the ambient light levels. This meant using a relatively long exposure and ISO 1600—not only because of the low light, but also because we wanted a gritty look.”
GET THE LOOK
![]() Black-and-white images often respond far better to high contrast than color shots and this image is characterized by deep shadows and bright highlights that give it a classic “film noir” feel. This is undoubtedly helped with the styling (the vintage hat, feather boa, ornate chair, and art deco surroundings all allude to the past), but it also owes a lot to the lighting. With windows on three sides of the model it would have been easy to choose an exposure that revealed her in her entirety, filling in the shadows and creating a much softer image. However, the addition of the bright, direct light from above has changed the main lightsource and therefore the exposure. Now, instead of seeing everything, the model sits in a sharp pool of light that creates a far more exciting chiaroscuro image.
Black-and-white images often respond far better to high contrast than color shots and this image is characterized by deep shadows and bright highlights that give it a classic “film noir” feel. This is undoubtedly helped with the styling (the vintage hat, feather boa, ornate chair, and art deco surroundings all allude to the past), but it also owes a lot to the lighting. With windows on three sides of the model it would have been easy to choose an exposure that revealed her in her entirety, filling in the shadows and creating a much softer image. However, the addition of the bright, direct light from above has changed the main lightsource and therefore the exposure. Now, instead of seeing everything, the model sits in a sharp pool of light that creates a far more exciting chiaroscuro image.
![]() PLAN VIEW
PLAN VIEW

![]() PERSPECTIVE VIEW
PERSPECTIVE VIEW

![]()
PHOTOGRAPHER: Estudio Nagô
CAMERA: Canon EOS 5D Mk II
LENS: Canon EF 17–55mm f/2.8 IS USM @ 38mm focal length
APERTURE: f/4
SHUTTER SPEED: 1/20 sec
ISO: 1600
LIGHTING:
![]() 1200w HMI
1200w HMI
![]() Ambient window light
Ambient window light

Mook
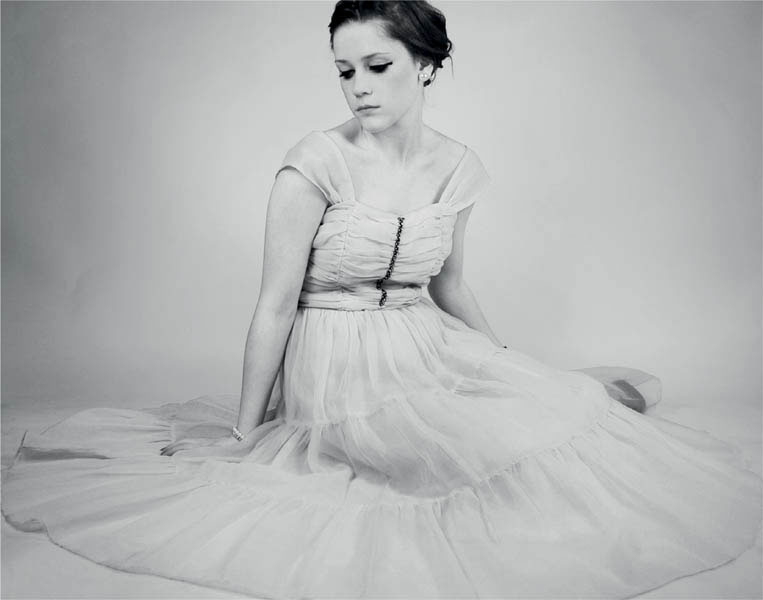
Inspired by Mario Testino, Rankin, Corinne Day, and Patrick Demarchelier, Amy Pledger may just have left college, but she’s already shooting fashion images for an ever-expanding range of magazines and retailers. Amongst her clients is Mook, a UK-based fashion store specializing in vintage clothing. The company was looking to promote its unique range of retro evening dresses for the prom season, and asked Amy to take the photographs.
“THE BRIEF FOR THIS SHOOT was ‘classically simple.’ The client wanted a set of pictures that showed their vintage outfits without the model dominating the shot, or the dresses getting lost against a distracting backdrop. For reference I looked at classic adverts for designers such as Calvin Klein—shots that were taken a few years ago, but were simple and to the point. Although most of the photographs for this shoot were used in color (the dress was a vibrant pink), the source material I was looking at was predominantly black and white so I converted some of my shots into monochrome. The color images worked well, but I like the romantic yet minimal black-and-white look.”
To light her model, Amy used two monolights fitted with softboxes, positioning them either side of the model and aiming them slightly downward. This provided the even illumination that preserves the soft, diaphanous feel of the fabric, while the slight downward angle of the lights meant the model’s face was subtly darker. In Photoshop, the image was converted from color into black and white, manipulating the tones to create the gentle “gray-on-gray” result.
GET THE LOOK
![]() Although the majority of digital SLR cameras let you shoot in black and white, shooting in color—even if you’re certain you want a monochrome image—offers much greater versatility. If you’re shooting Raw images (which is recommended for quality), then the obvious option is to convert to mono when you process your shots. However, not all Raw converters offer as much scope as a dedicated editing program such as Photoshop, which offers a powerful set of black-and-white tools. The most useful of these is the Black and White option found under Image > Adjustments in the top menu. A range of sliders enables you to specifically control the mix of red, yellow, green, cyan, blue, and magenta in your monochrome conversion, effectively providing a complex system of filters that allow you to lighten and darken specific hues for a precise black-and-white conversion.
Although the majority of digital SLR cameras let you shoot in black and white, shooting in color—even if you’re certain you want a monochrome image—offers much greater versatility. If you’re shooting Raw images (which is recommended for quality), then the obvious option is to convert to mono when you process your shots. However, not all Raw converters offer as much scope as a dedicated editing program such as Photoshop, which offers a powerful set of black-and-white tools. The most useful of these is the Black and White option found under Image > Adjustments in the top menu. A range of sliders enables you to specifically control the mix of red, yellow, green, cyan, blue, and magenta in your monochrome conversion, effectively providing a complex system of filters that allow you to lighten and darken specific hues for a precise black-and-white conversion.
![]() PLAN VIEW
PLAN VIEW

![]() PERSPECTIVE VIEW
PERSPECTIVE VIEW
![]()
PHOTOGRAPHER: Amy Pledger
CAMERA: Nikon D60
LENS: Nikon 18–55mm f/3.5–4.5D ED @ 20mm focal length
APERTURE: f/4.2
SHUTTER SPEED: 1/50 sec
ISO: 200
LIGHTING:
![]() Two 600ws monolights with softboxes
Two 600ws monolights with softboxes
Francisca
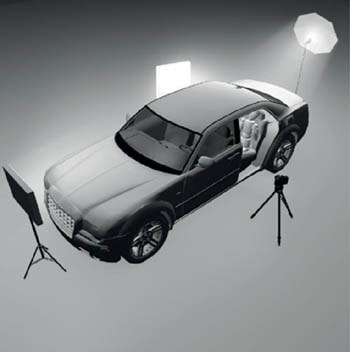
Having dropped out of college to pursue a photographic career, teenager Harry Crowder has got off to a solid start, shooting both private and commercial commissions, with a client list that includes Lebanese couture designer Ziad Ghanem.
UNAFRAID TO EXPERIMENT with the kit he’s using, Harry turned in part to an innovative, non-photographic lighting solution for this shot—a high-power, daylight-balanced lamp designed for treating Seasonal Affective Disorder, the medical condition more commonly referred to as “the Winter Blues.”
“I used the S.A.D. lamp as my main light, shining it through the car’s windshield. In addition I set up two low-powered flashes—one aimed through the side window and the other through the rear windshield, both pointing toward the camera. Although I was using a softbox on one flash and an umbrella on the other, I wanted to diffuse the light even more so I hung white cotton sheets over the car’s windows to add another level of diffusion and clean up the background.”
The result is a beautifully soft lighting setup that envelops the model on three sides, effectively converting the interior of the car into a giant light-tent. To further enhance the overall softness of the shot, Harry took it with the aperture on his 50mm f/1.8 prime lens wide open, focusing manually, but not on the subject. Instead, he knocked the focus back very slightly to introduce a subtle, yet effective soft-focus effect that’s reminiscent of the treatment given to Hollywood screen sirens of the 1930s, ’40s, and ’50s.
GET THE LOOK
![]() Although much of this image’s soft look was created in-camera, postprocessing offered the opportunity to take it a step further. Harry intensified the flare from the backlighting and adjusted the output levels to reduce the overall contrast. By increasing the value of the black output in Photoshop’s levels dialog, shadow areas can be lightened, turning black into dark gray, which immediately decreases the contrast and adds a low-level visual “haze.” This works especially well when you want to create a high-key look to an image or, as Harry has done here, go on to introduce a subtle warm tone and give an image a faded, vintage look.
Although much of this image’s soft look was created in-camera, postprocessing offered the opportunity to take it a step further. Harry intensified the flare from the backlighting and adjusted the output levels to reduce the overall contrast. By increasing the value of the black output in Photoshop’s levels dialog, shadow areas can be lightened, turning black into dark gray, which immediately decreases the contrast and adds a low-level visual “haze.” This works especially well when you want to create a high-key look to an image or, as Harry has done here, go on to introduce a subtle warm tone and give an image a faded, vintage look.
![]() PLAN VIEW
PLAN VIEW
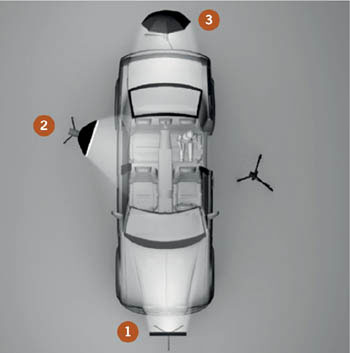
![]() PERSPECTIVE VIEW
PERSPECTIVE VIEW
![]()
PHOTOGRAPHER: Harry Crowder
CAMERA: Canon EOS 500D
LENS: Canon EF 50mm f/1.8 II
APERTURE: f/1.8
SHUTTER SPEED: 1/40 sec
ISO: 400
LIGHTING:
![]() Daylight-balanced S.A.D. lamp
Daylight-balanced S.A.D. lamp
![]() 150ws monolight with softbox
150ws monolight with softbox
![]() 150ws monolight with umbrella
150ws monolight with umbrella
