
Lighting Terminology
Timing Your Landscape Exposures
Working with Overcast Light
Using Filters to Enhance Your Shot
Shooting Landscapes in Fog
You've no doubt seen an Ansel Adams or a David Muench western landscape photograph. These photographers spent years mastering light, composition, exposure, and timing to create unbelievable photographic art of the American West.
One of the most vital elements that goes into any landscape photograph is the light. And those photographers spent countless hours finding their locations and waiting for the light to be just right. Throughout the day and throughout the year the light is rarely the same twice in any location. Sunlight is always changing, so when shooting landscapes you must learn to work with the weather to create the best light and shadow opportunities for your photographs.
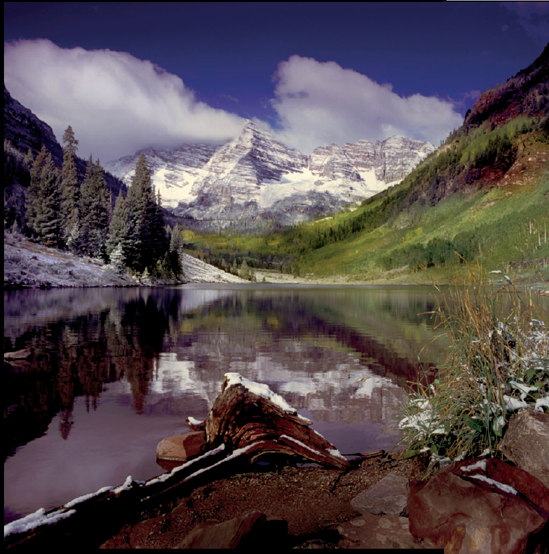
However, landscapes are much more than just the great canyons, mountains, and oceans of the world (see 7-1). Because you can look at the world in many different ways, I want to look at landscapes as a style rather than focusing on the specific photography subject. Landscapes can be in a city, on the plains of the central United States, in the suburbs, or even in your home or workplace, such as in 7-2. Each of these locations has its own distinct lighting characteristics and challenges, which are discussed in this chapter.
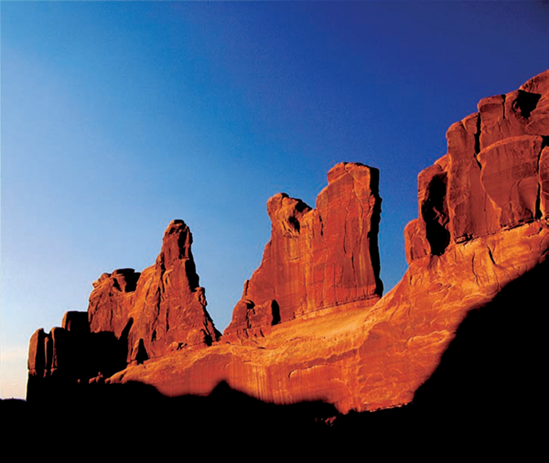
Figure 7-1. ABOUT THIS PHOTO Late afternoon sun lights up the Rocks of Park Avenue at Arches National Park. That light was captured with a 28–105mm zoom lens with a polarizer using Aperture Priority automatic.
Figure 7-2. ABOUT THIS PHOTO This tiny interior landscape was taken with a 105mm f/2.8 Micro Niklor. The ISO was 100, and the exposure was f/7.1 at 1/3 second.
Before you delve completely into lighting for your landscapes, take a moment to review some of these lighting terms and how they relate to landscapes. In earlier chapters, light direction (front, back, side, top), light quality (soft and hard), and contrast and brightness range were discussed.
Directional lighting. If the lighting is from the top or flat, it has a tendency to look flat and uninteresting. Light coming from the side of the scene, called sidelight or crosslight, emphasizes shape and texture in your images. Backlight in a landscape is just as tricky as it is beautiful. Well done backlight can cause parts of your image to glow rich with color, although if you are not careful, backlight can fill your image with black shadows and your lens with flare.
Light quality. Unlike a portrait, it is easier to use harder light in a landscape because you don't need to see anyone's eyes. Generally, though, the most pleasing light quality for landscapes comes during the twilight of dawn and dusk. With the sun lower in the horizon, the light is filtered through many layers of atmosphere, softening and changing the light. Early morning sun seems to have more tones of pink and yellow, while in the evening, the light will look more orange or red.
Face it, when you go out to photograph a landscape, you hope to get an ultra-dramatic, panoramic landscape; however, what you often get is more snapshot than art. Even if you live close to a natural wonder, getting to the most scenic parts of, for example, the Grand Canyon or Zion National Park, is difficult. And you have to consider whether you are going at the right time of the year. Is your spring break at the optimal time to see and shoot sunset at Delicate Arch? Is a storm going to roll in just as you pull into Yellowstone? Are the wildflowers going to be at their peak?
The sun is the predominant light source for landscape photography. The sun is constantly moving across the sky, taking the light hitting the landscape with it. Finding the right time of day for the landscape you have in mind is immensely helpful. For example, in the mornings light hits the eastern faces of landscapes, which is optimal. In the afternoon and evening, scenes that face the west have the best light hitting them.
In the morning, beautiful light exists even before the sun rises. In that pre-dawn time, the light level is still very low. You need to use a tripod and a cable release to keep the camera still and eliminate blur as your exposures could reach many seconds or even minutes. As discussed in Chapter 1, to maximize the image quality, keep the ISO as low as possible. Long exposures also have a tendency to generate noise or graininess in photographs.
If you use the Aperture Priority mode of your camera, you can select an aperture that gives you enough depth of field to get your entire scene in focus, and then the camera selects an appropriate shutter speed. Before the sun rises, while just a slight glow is in the sky, you could set an exposure around f/8 at 30 to 60 seconds or even more. Even if it seems to be very dark out, just that little bit of glow, with the long exposure, can still make for a very bright scene, as shown in 7-3.
The light quality at twilight is soft and tends to wrap your landscapes with a blue glow. This is a great opportunity to work with the different white balances in your camera. At the daylight or sunny white balance, landscapes have a cool or blue cast. Changing the white balance to cloudy or shady incrementally makes for warmer looking photographs. The shade white balance should cause a relatively neutral scene because that is exactly what the situation is — in twilight you are at the edge of the shadow of the globe.
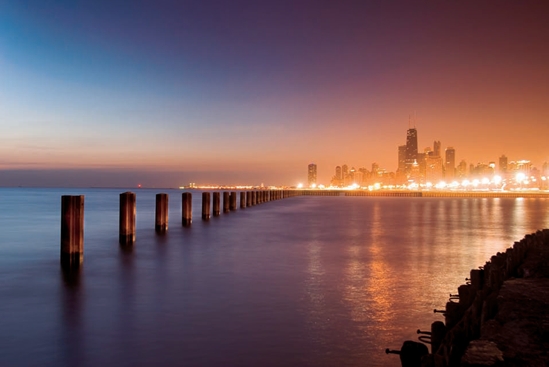
Figure 7-3. ABOUT THIS PHOTO Taken with a 18-200 Nikkor Lens. The exposure was f/5.0 for 30 seconds, giving the water its soft glow and leaving streaks from the headlights. Shot 15 minutes before sunrise.
It may be necessary to keep the sky out of twilight photographs as the sky gets brighter before the landscape in longer exposures. This could cause too much contrast in a landscape photograph because the sky either exposes as a beautiful blue and the rest of the landscape is very dark or the landscape is exposed correctly, and the sky is far too bright.
When the sun finally starts to spread the light across the landscape, the light generally hits the tops of mountains, hills, and trees first, which can make for a very dramatic scene with rays of light hitting a small portion of your photograph. This tricky light situation is a great time to use the spotmeter of the camera, as shown in 7-4.
Your digital camera probably has a spotmeter. Unlike the averaging or multi-segmented meter, which averages the scene to get the right exposure, the spotmeter allows you to select a very small part of the scene and find the exposure for just that area. This is particularly useful when you need to find the exposure of your subject because it is surrounded by large amounts of light or dark.
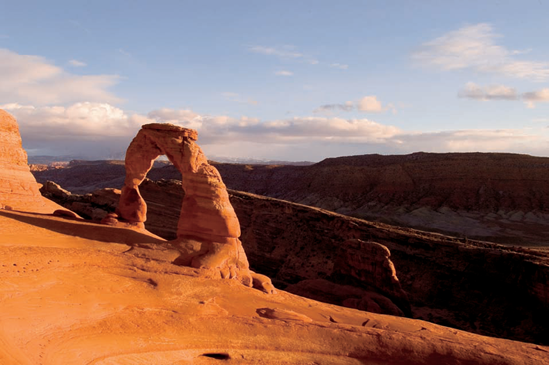
Figure 7-4. ABOUT THIS PHOTO An exposure of 1/60 sec. at f/11 at ISO 200 was used. A spotmeter reading was taken at the base of the arch so that the brightness to the left of the arch and the darkness in the background weren't metered.
Placing the spotmeter's spot circle or spot frame where the sun is hitting the landscape should get your camera's meter to the correct exposure. Remember, the meter is going to tell the camera the correct exposure for a middle grey. As the sun comes up, it does not take long for the sun to be far brighter than middle grey, so you have to over-expose the spotmeter setting by a stop.
A camera without a spotmeter is still able to capture this difficult scene. Using the average or multi-segmented metering mode creates an exposure that is too bright because the meter is measuring the overall dark scene with just a small amount of brightness. By underexposing the scene by one to two stops, you get an exposure that captures the drama of this light.
As the sunrise turns to full sun, you have the sun at your back when looking west. Positioning the camera and the landscape to get sidelight or crosslight can accentuate the natural shape and texture of the landscape. However, because light does not fall into canyons or tree-lined meadows until later in the morning, this is still a difficult time to shoot. Much contrast can exist between large areas of shadow in valleys and the large amount of sun on the mountains. Using some of the shadows falling across a field helps to add texture and scale to a wide scene.
Tip
A quick way to check on the contrast of your scene is simply to squint. If an area is much brighter than everything else, squinting eyes read the shadowed areas as almost black, while brighter areas are still bright. This allows you to see what the contrast of your final image is going to look like.
When the sun has risen, and the brightness of the sky more closely matches the brightness of the landscape, using Aperture Priority and your average or multi-segmented meter allows you to control the depth of field and proper exposure. In 7-5, the sun is up, lighting the entire scene and backlighting the leaves, making them glow. Using f/13 was a compromise in this situation; more depth of field would have made the image too busy when the important part of the image is the leaves, and less depth of field would have made the mountains and trees in the background less defined.
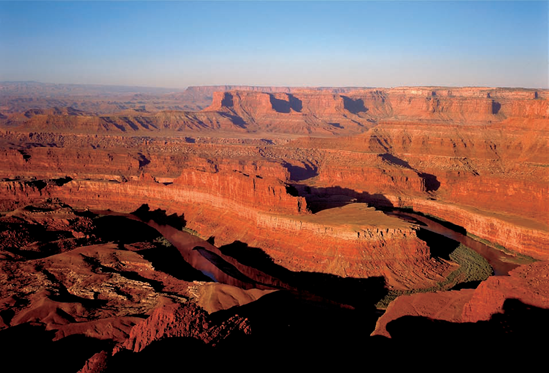
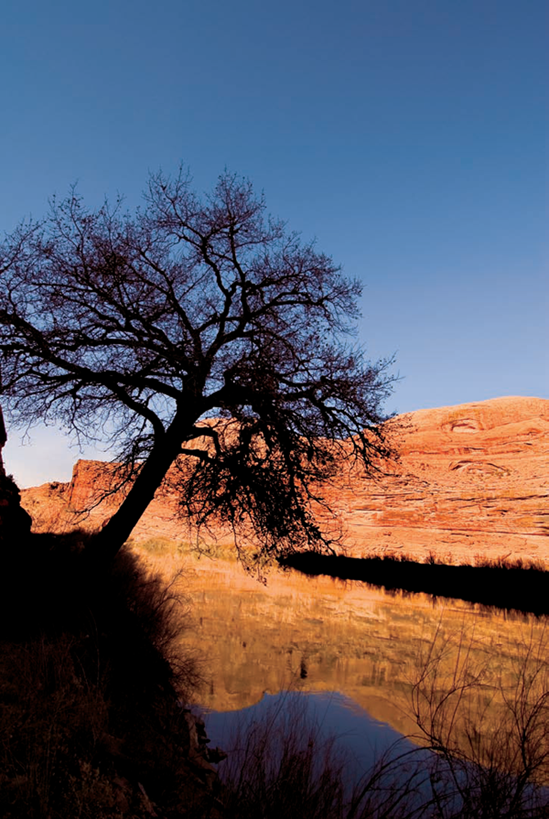
With the sun still at your back, the mid-morning is another good time to create great landscapes. The light has already been up on the high points of your landscape for a while and, the light is now spreading all over the landscape. Although the light in 7-6 is coming from the side, because of the angle of the valley, the rock faces of the scene are very front lit.
Shooting the light at this time of the day is a trade-off because the light has strong direction and great warm color in the morning, but it also is creating some strong shadows in the valley. In this case the shadows are used to separate the mesa from the plains outside of the valley.
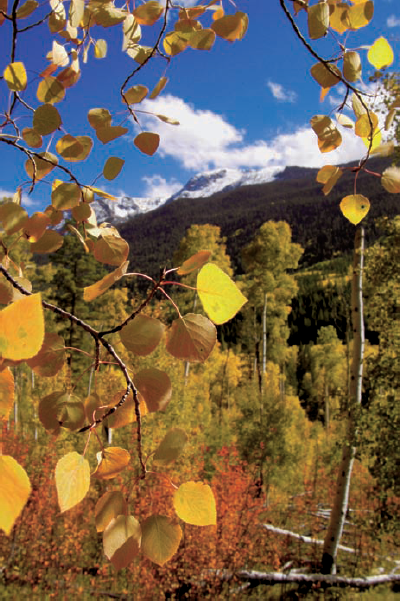
Figure 7-5. ABOUT THIS PHOTO A Nikkor 20-35mm f/2.8 lens was used here at ISO 200, 1/160 sec. at f/13. Even though a wide-angle lens and small aperture were used, the leaves are close to the lens, leaving the background slightly soft.
In many cases, a photographer can use the strong shadows from directional light for framing or as another graphic element in the photo. If it is important to see into the valley in a scene like this, the light will be far less dramatic as the sun gets higher in the sky.
Photographs taken in midday can have a hard and flat appearance. Sometimes, though, the midday light is the best light you are going to get. In 7-7 of Antelope Canyon, in Northern Arizona, the sun slips through a crack in the ground about three feet across. A shaft of bright midday sun hits the red walls and that light bounces off the walls creating both a warming and softening effect.
Because the light is reflected, it also then becomes much softer, making the light redder and creating a warm glow inside the canyon. The midday sun enters the canyon unimpeded, and the light has enough contrast for the color and the shadows to be full and rich, so this is an ideal scenario for using midday light.
Not all of your midday landscapes are going to work in your favor. But, good composition and balance can make up for less than ideal light. The image in 7-8 was taken in the middle of the day — almost exactly at noon in the middle of the summer. The scene and the final image were very compelling to me nonetheless, and coming back later was not an option. The positioning of the cloud, the foreground, and the horizon was a once-in-a-lifetime shot; certainly getting into an overloaded motorboat off the coast of Maine on a blustery day with very choppy seas wasn't going to happen again anytime soon.
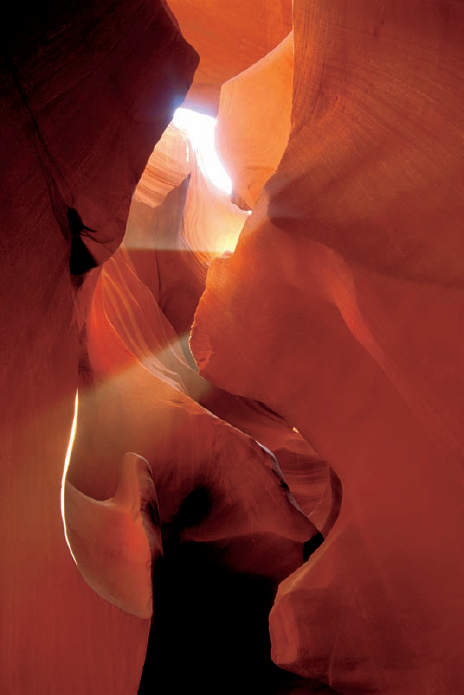
Figure 7-7. ABOUT THIS PHOTO A Nikkor 20-35mm f/2.8 zoom lens was used for this photo with an exposure of 1/30 sec. at f/8 at ISO 200. The interplay of the light and the dark shadows in this red rock canyon makes it a photographer's favorite subject.
As the sun climbs high into the day, the light quality of the light can be hard, even harsh. Often, however, that is when you can capture a landscape photograph. Take this time to focus on composition elements like shape, balance, and repetition in your landscapes if you can't get the light just perfect.
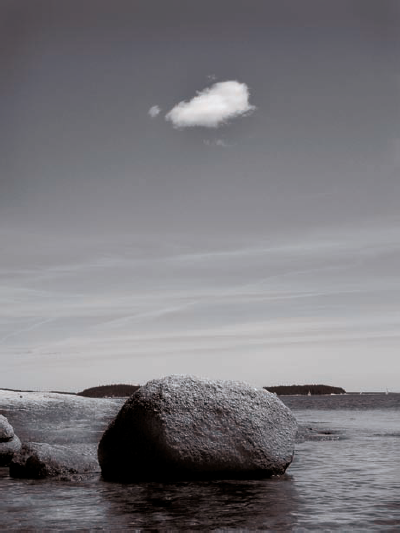
Figure 7-8. ABOUT THIS PHOTO Good composition and balance can make up for less than ideal light when shooting in the middle of the day. Program mode at ISO 100 at 1/800 sec. at f/6.3 using −1/3 exposure compensation.
Composing for black and white in middle-of-the-day sunlight is also a good option. Because of the contrast, black and white can simplify what you see in your images. Realize that the hard, bright light of that bright sun washes out a lot of color in your photographs.
Most digital cameras now have a black and white option, which gives pretty good results simply by changing a setting in your camera's menu.
However, to get more control of the tone and contrast of your digital photographs, you should use a color image and convert it into black and white on the computer.
Using the black and white setting on your camera is far more forgiving when it comes to light with more contrast; however, it won't mask other problems in your photographs. Overexposure is one of the most common mistakes in black and white photographs. Seeing shadows that are too black is better than seeing highlights that are overexposed and blown out. When parts of an image have lost all detail in the highlight or white areas, those areas are considered blown out. It is virtually impossible to retrieve that detail from the image after you are in the computer.
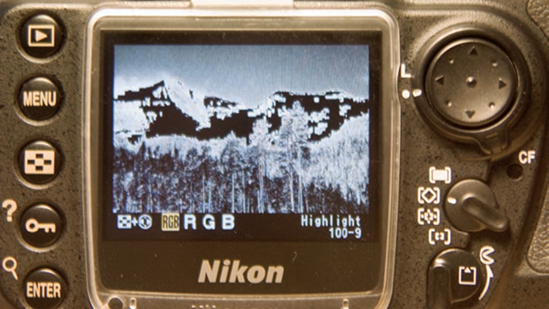
Most digital SLRs have functions in the playback that will show where those overexposed highlights are. This setting is usually called highlight and in this setting the image on the LCD screen on the back of the camera, if there are overexposed highlight areas, are shown by flashing black into the area or overexposed highlight. In 7-9, the scene is full of bright snow along with dark trees. To make sure all that white snow still has detail and tone in it, you can go to the highlights screen and see what is too washed out. In 7-10, you can see the snow area is blacked out meaning that the white area is totally overexposed. To get the correct exposure the scene needed to be underexposed so that the blacked-out highlight area is minimal.
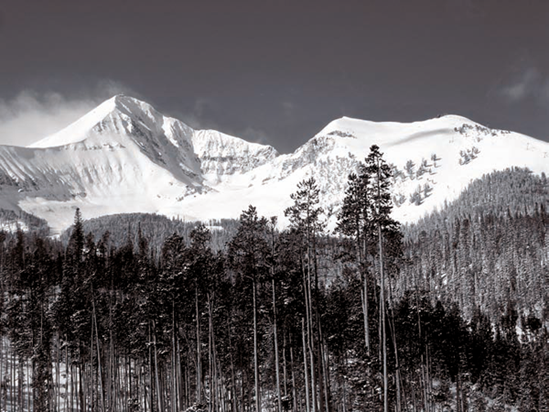
Figure 7-9. ABOUT THIS PHOTO For bright scenes or those with extreme contrast, the camera has tools such as the highlight setting, which shows where the overexposed areas are. The correct exposure was 1/500 sec., f/8 at ISO 100.
Tip
As many of the best known landscapes have been captured in black and white, consider some things to help better visualize the black and white image. Although both high and low contrast scenes work great with black and white, scenes that have strong graphics, such as line, shape, and repetition work best. Scenes that are busier are harder to read without a high contrast or high impact subject.
As the day goes on, shadows start to re-emerge and lengthen, and the scene that was so compelling and beautifully lit in the morning starts looking hazy and flat. That happens because the sun is behind the scene, making it backlit.
Much as the morning light, afternoon light is bright and makes most scenes look nice. The exposure, on a clear day, remains static until the last hour or two of the day, but the shadows lengthen, making many scenes darker. Paying attention to where the shadows of valleys, trees, and mountains fall helps. By shooting all through light that is changing, you can see how the moving light affects your scene when you get back to your computer.
You often are surprised at how nice something looks at one time over another because of the light, as in 7-11, and in other cases, you are pleased because the light is only doing something for one particular moment, and then it is gone.
The light at dusk is very similar to the light at daybreak, but because of the particulate matter generated by the activities of the Earth over the course of the day, the sunset light is visually more intense. As discussed in Chapter 1, the molecules of the atmosphere as well as the additional airborne particles create light that appears more reddish in color.
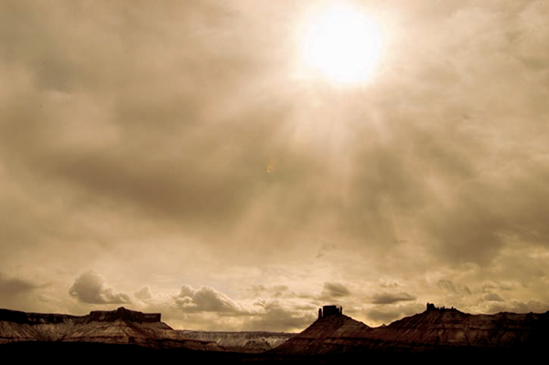
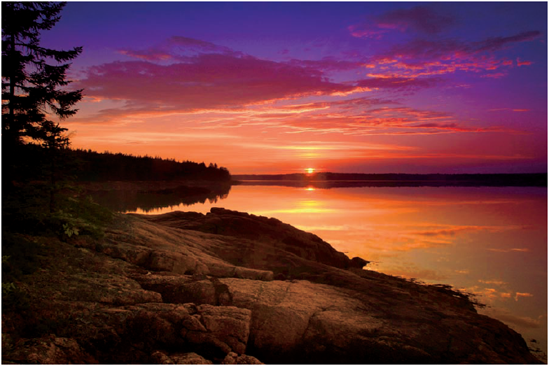
During the sunset, often four types of light are happening, although rarely can a photographer optimize them all in one landscape location. With the sun dropping low in the sky, the light will get more and more directional. This can create very strong sidelight across your landscape. In this scenario, the camera's light meter usually does a fine job in the evaluative or matrix meter mode, but watch out for large areas of shadow or large areas of brightness. The second type of light during your sunset is the front light, and as front light comes over your shoulder, watch out for your shadow in the scene and watch out for how bright the scene is. If the light is hitting a big wall of red rock or white capped mountain, you may have to overexpose by a half or a whole stop to capture the brightness of the scene, as in 7-12. If you have bright front light, you probably have lots of back light in the opposite direction. This is great for generating silhouettes in your landscape as in 7-13 and actually capturing the sunset.
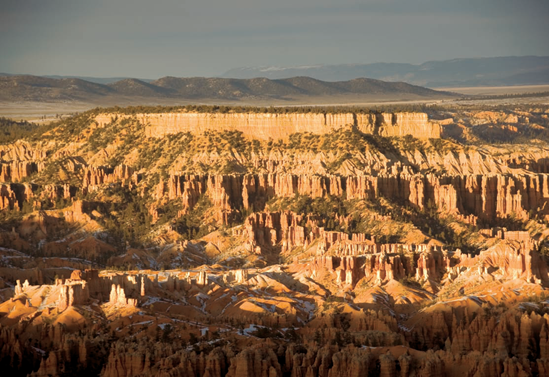
Figure 7-12. ABOUT THIS PHOTO As the sun goes down in a scene like this, the shadows quickly fill up the valley, making the entire scene dark. An exposure of 1/250 sec. at f/5.6 at ISO 100 is determined by the evaluative meter.
Backlight can be confusing, so don't over-think your situation, especially if you are trying to maximize the saturation and richness in the sunset. If you are actually photographing the sunset, with the meter trying to get that bright scene into grey, it is actually doing the underexposing for you.
The fourth type of sunset light really doesn't happen until the sun has set. Although the light is below the horizon, the sun's rays are now going upward, and when clouds are available for the light to reflect off of, beautiful soft light is the result. This reflected light is much more subtle and pastel in tone, as in 7-14. In fact, if no clouds are in the sky and the skyline is open, often you can see how the color of the sky along the horizon changes from very red around the point of sunset to orange, yellow, pink, and purple on the opposite horizon.
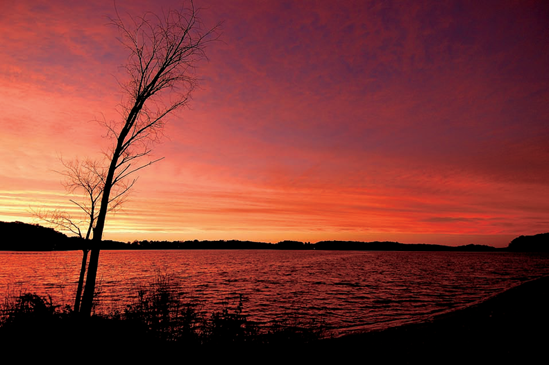
Figure 7-14. ABOUT THIS PHOTO With a 12–24mm f/4 lens, the skyline and sunset color are captured. The exposure here is 1/60 sec. at f/5.6 at ISO 100, with the white balance set to shade to increase the warm glow of the sunset.
This light is often called the afterglow, and in this situation very little light is on the ground, but a lot of light is still in the sky. Placing the subject of your landscape as a silhouette against a colorful sky is one way to be able to capture the afterglow. Another option would be to use the color of that soft, low light for tighter landscapes, such as rocks in a stream or gently swaying wildflowers.
Weather is one variable in photographic lighting that you can't control, but you can use it if you understand how the weather is affecting your light. Weather brings drama, texture, and excitement to photographs, especially in the case of landscapes.
Most of us consider sunny blue skies as an optimal time to take a photograph; however, sometimes that solid blue sky can be just as boring as a dull, overcast day. You want your landscape's sky to be exciting and full of life, so don't pack it in quite so fast when the weather begins to turn a little stormy, as in 7-15.
Gloomy days might tempt you to just keep the camera in your packs, but this is a great time to look a little deeper into a scene and capture the details in a landscape.
It was indeed fortuitous to come upon this rock with flowers on a pretty dreary day with a little speck of sunlight on it. On a sunnier day, you might be temped to overlook such a beautiful scene as many grand vistas come from every direction. An overcast, even stormy, sky really brings up the drama because of the great contrast of these rocks with flowers with the dark silhouettes in the backgrounds in 7-16.
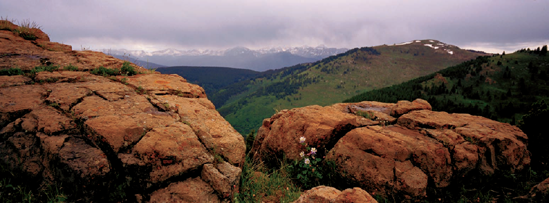
Figure 7-16. ABOUT THIS PHOTO The exposure for this photo was 1/30 sec. at f/8 at ISO 100 using an evaluative meter and Aperture Priority. This image also shows nice color balance with the warmth of the rocks and the blue of the sky.
Landscapes look different on cloudy and overcast days, because the quality of the light is much different; it is softer, flatter, and has a moody, dramatic look. Much like midday shots, overcast days can be perfect for black and white photographs (see 7-17). If your digital camera has a black and white option, you can use it to create drama in your overcast landscapes. Converting color pictures into black and white in the computer allows you far more additional options with filtration and tone.
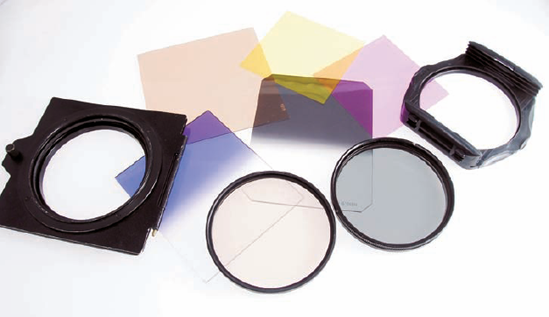
Sunsets and sunrises make for great photographs, and in many cases your photographs can be enhanced with the use of photographic filters. Filters are pieces of glass or optical resin that are placed in front of the lens to affect the image in the camera (see 7-18). During a landscape shot, I usually have the camera on a tripod; often the fastest moving thing in the image is the light, and this makes for perfect situations for working with filters.
Filters come in three basic types:
Screw-in. Circular with metal threads that screw into the front of the lenses. Generally these filters are glass and can be used for UV elimination, black and white effects, light polarization, and some color correction.
Slide on. Usually square in shape. Slides into a holder that screws into the lens threads. Slide-in filters are usually for image effects, such as changing the overall color of the image, to softening, to adding the look of fog or motion to the image. The most commonly used slide-on filter is the neutral density graduated.
Gels. Very thin pieces of resin that are placed in a holder in front of the lens. Generally used for color correction. Gels can come in small increments of effect to precisely change or correct your image.
Because such a wide variety of filters and associated effects are available, the following sections take a look at a few of the filters that are most used for landscape photography.
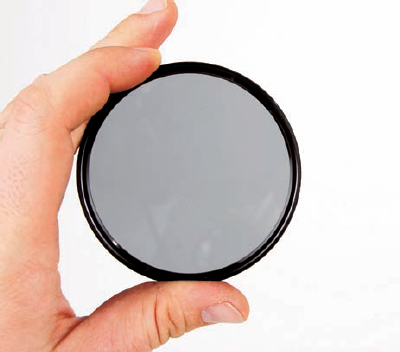
A polarizer as shown in 7-19 is used for taming reflections and glare on glass, water, and foliage. It can also darken the sky and increase color saturation. No other filter can do these things. The polarizer does all this by aligning light waves as they come into the lens so that they only come in from one direction. The major pitfall of this filter is that it also blocks 1-1/2 to 2 stop of light. In-camera meters can compensate for this, at the cost of slower shutter speeds, less depth of field, or higher ISO.
This filter is immensely helpful in landscape photography, particularly during sunrise and sunset. The bottom of this filter is clear; the top is a neutral grey; and the middle is a smooth gradation between the two (see 7-20). The grey part, the neutral density, simply lets less light in. This is used to darken a bright sky, bringing the exposure closer to that of a shaded foreground. Often called an ND grad, this filter comes in various levels of density and lengths of gradation. The most commonly used ND grads are the 3 stop with a short or hard gradation and the 2 stop with a long or soft gradation.
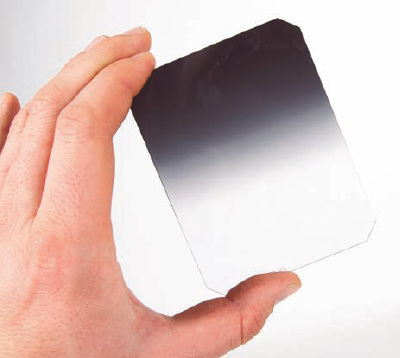
Figure 7-20. ABOUT THIS PHOTO A Neutral Density Graduated Filter blocks light from half of the scene and lets all the light through, making the upper half darker to better match the light on the lower half of the scene.
Many colors and special effects filters have now been replaced by software. The effects of the polarizing filter and graduated neutral density are filters that affect the photograph in ways that the computer simply cannot easily duplicate. Because neither a film nor a digital photograph can capture the entire brightness range when bright sky and shadowed foreground are included in one image, using the ND grad is recommended.
Light from foggy mornings often produces some of the most beautiful and ethereal images. Fog creates a light quality unlike anything else and that is really unrepeatable with filters or other post photography devices. You can use the effect of the background disappearing into nowhere as a tool in itself, as in 7-21; it really allows you to make landscapes of the things in the foreground, as the background just becomes this ghostly visage lending some scale.
Foggy days, however, present challenges. In fog, your light meters attempt to expose for middle grey, which creates images that tend to look murky and dark without some adjustments. Try to overexpose a little, maybe 1/3 or 1/2 of a stop. You can then see the soft texture of the light without blowing out any of the whites.
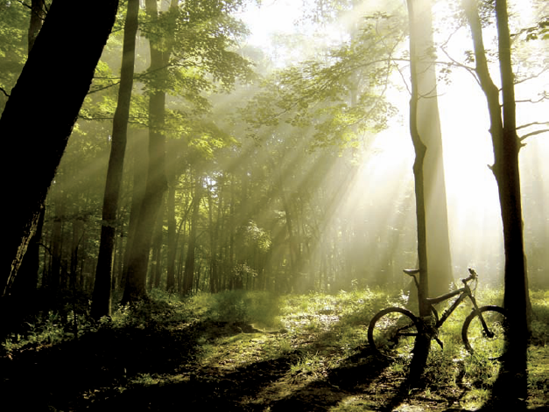
If you are looking for a moodier or spookier look, you can underexpose by 1/2 of a stop or more. When the fog starts lifting and you can see the sun, stop down more to create silhouettes of the subjects against the fog. Direct sunlight coming through fog can create beautiful direct rays of sun. Take care not to overexpose if you are starting to see the rays of light through trees or buildings. To actually see the rays of sun, you need to place them against a darker background for your camera to see them. Also, there must be something in the air such as dust or moisture for the light to reflect off of to create the effect shown in 7-22.
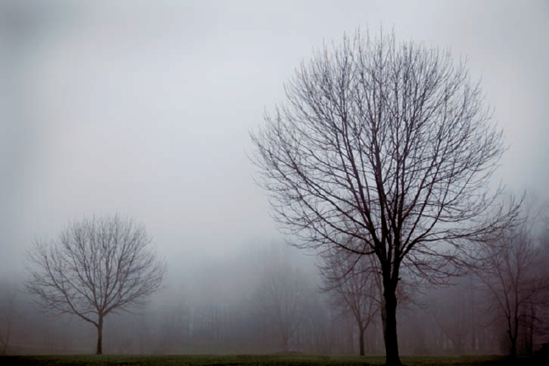
Like many of the overcast situations that I have talked about, the color balance or light temperature of a foggy day is very cool and blue in color, so if you want your pictures to look neutral, you either need to dial in a shade or cloud white balance, filter the lens, or both. A very cool effect might be to dial in an incandescent white balance. Since in a foggy scene you see very de-saturated colors, the blue cast of the incandescent white balance might make for a very interesting photograph. Shooting in fog already gives a very monochrome look, and using that almost black and white look helps to create layers within the image. As the subjects disappear deeper into the fog they become more diffused and soft, as in 7-23.
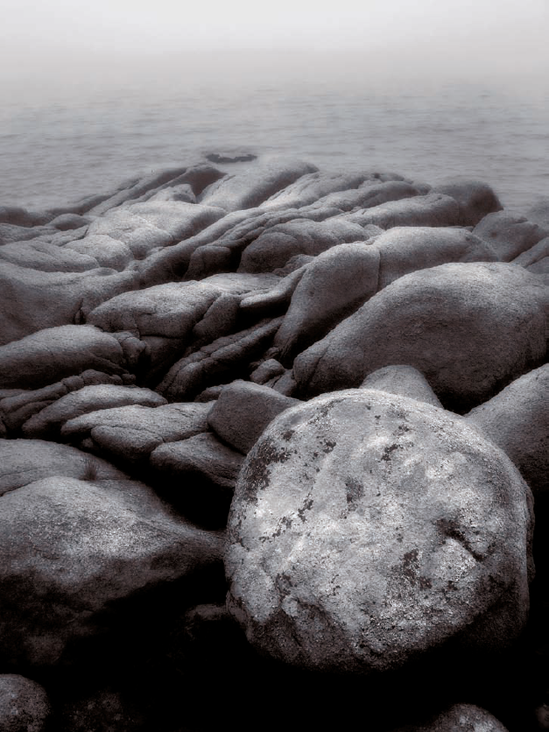
Figure 7-21. ABOUT THIS PHOTO Using a compact digital camera on a foggy day, this image was captured at 1/200 sec. at f/5.6 at ISO 100. The soft glowing light of the scene was enhanced somewhat in Photoshop Elements.
Getting the Best Light from Your Landscape
This assignment is to show you how to better see the ever-changing light over the course of time, especially through the twilight time and to teach you to see how your camera handles those changes. Shoot a sunset at a chosen location. Shoot a number of images of that landscape from 20–30 minutes before the sunset through 20–30 minutes after. See how drastically the light changes throughout that relatively short period of time.
Shooting all the way through the sunset, you can capture so many different colors and various light qualities. I can rarely stay still during a sunset, but it is hard to move too far because the next vantage point may or may not be better. For this particular sunset, the shot needed something. As I looked around to see what else was going on with the colors and shapes, I saw the small boat. By the time I positioned myself, the colors in the sky had changed. I used a graduated ND filter to make the sky darker, which closed the gap in contrast between the sunset sky and the shadows of the beach. Taken with an AF Nikkor 17-35 f/2.8 lens set to 1/2 second at f/9 at ISO 100. Evaluative metering and the camera set to manual.
Note
Remember to visit www.pwassignments.com when you complete this assignment and share your favorite photo! It's a community of enthusiastic photographers and a great place to view what other readers have created. You can also post comments and read other encouraging suggestions and feedback.