Learning to Use the Meter
Sunrise and Sunset
Making Great Images with Overcast Lighting
Dealing with outdoor light might seem easy — and certainly plenty of rules of thumb are passed around regarding outdoor photography.
Photographers might refer to the Sunny 16 Rule (see Table 3-1) or the saying "f/8 and be there." However, it is more important that you know how and why the light works in your photographs than what exposure to use.
The obvious problem with rules of thumb is that they only get you started. What about light underneath clouds or shade? What about times when the sun is just rising or setting? That is what this chapter is all about.
Tip
The Sunny 16 Rule is a middle of the day exposure of f/16 at 1/ISO. This means that if you are using ISO 100, your exposure should be f/16 at 1/125 second. If you were to use ISO 400, the exposure is f/16 at 1/500 second. In most cases, the shutter speed won't exactly match the ISO but can be set as close as possible; just remember "shutter speed = ISO." With digital cameras and the ability to immediately check the photo on the LCD, this rule is mostly obsolete but still good to know.
A light meter is used to measure the amount of light that is available to make the exposure. All digital cameras measure the light that is reflected back toward the camera and are, thus, appropriately called reflective meters.
There are no good or bad exposures; the light measurement simply is what it is, and as the photographer, you can use the exposure information to help best create your image. Using what you already know about aperture, shutter speed, and ISO, start to visualize what you want the image to look like. That should help you with your initial settings of the camera as far as how much depth of field or motion you want to control.
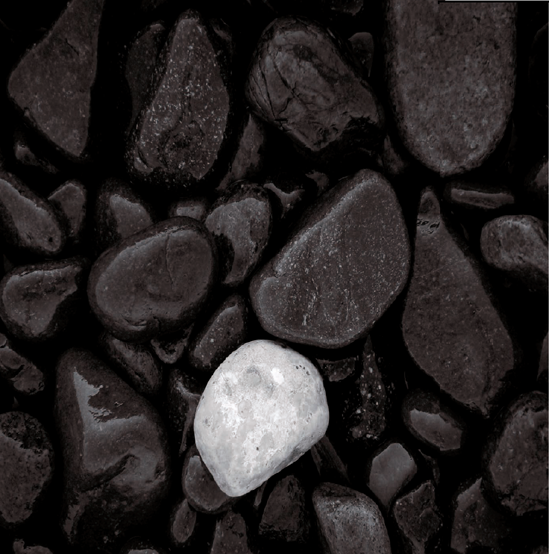
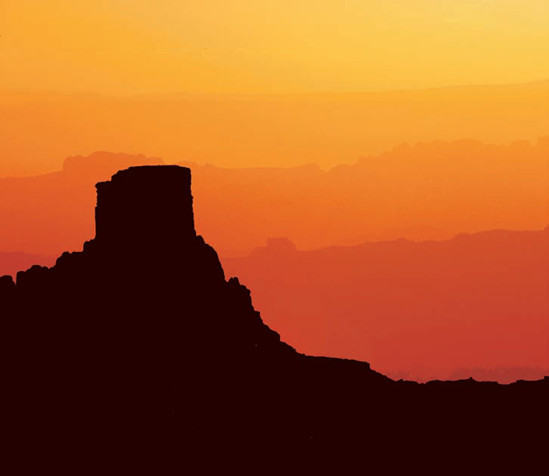
The next step is to look at what the meter tells you. When you are using Manual exposure, most cameras have you adjust the shutter speed or aperture until you line up the correct bars or arrows to the correct exposure. Remember, the meter is telling you that what it sees is middle grey, so visually evaluate your scene to determine whether the tones and brightness appear as though they will average out to that middle tone. If you think that the scene should be brighter, as in 3-1, then you need to set the aperture or shutter to let more light through to the sensor, and if you think the scene should look darker, close the aperture or speed up the shutter to make the scene darker. An example of a scene that should look darker than the meter might tell you is shown as this chapter's opener. The meter would look at all those black rocks and overexpose them to make them grey, so underexposing the scene makes them darker.
Table 3-1. SUNNY 16 CHART
Aperture | Lighting Conditions | Shadow Detail |
|---|---|---|
f/16 | Sunny | Distinct |
f/11 | Slightly overcast | Soft around edges |
f/8 | Overcast | Barely visible |
f/5.6 | Heavy overcast | No shadows |

Figure 3-1. ABOUT THIS PHOTO The evaluative meter's reading is averaged over the entire scene. The glow of the flag is bright so exposure compensation is set to +2/3 to keep it bright. 1/320 sec., f/5.6, ISO 100.
As light falls across your subject or scene, creating the exposure, the light wraps around the subject or is blocked by the subject, which creates interest. The interplay of light and shadow can create dynamic shapes and textures. In 3-2, the photograph is nothing but the shape of a shadow, yet the bride and groom are unmistakable.
Watching the interplay of the light with your subjects shows ever changing lines and textures with the light and shadow. Working around the different angles and seeing where the light and shadows move inside the camera can be fascinating. In 3-3, the camera was moved all around until the shadow of the barbed wire became just an extension of the rest of wire.
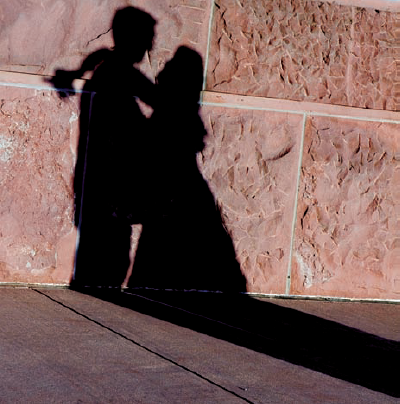
Figure 3-2. ABOUT THIS PHOTO This shadow was captured just before sunset with the long shadows that are only available near dawn and dusk. 1/400 sec., f/7.1 at ISO 100.
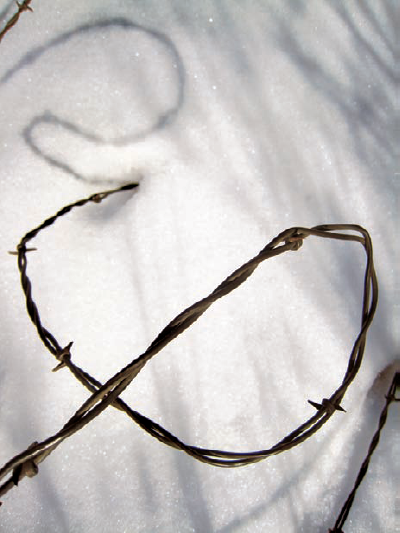
Figure 3-3. ABOUT THIS PHOTO The shadow appears to continue the line of barbed wired. This image was photographed in macro mode. To keep the exposure bright enough +2/3 exposure compensation was used with an exposure of 1/500 sec. at f/7.1 at ISO 100.
Without shadows, lighting can look flat and uninteresting even if the subject is beautiful or the scene is dramatic. Conversely, great light with exciting shadows can help make mundane subjects more interesting. Sometimes, a simple adjustment in your shooting position and, therefore, a change in the angle of the light increases the drama of the photo.
Although capturing shadows in your scene can create drama, you need to remember to adjust your camera setting in situations where the appearance of shadows changes. In outdoor photography, shadows lengthen while you watch during the waning moments of the day. As shadows increase in the scene and the amount of light in your scene decreases, the in-camera meters read that the light level is lower. Lower light levels give the scene more exposure to maintain an average, which makes your shadows grey.
If you want to keep the shadows in your scene black, you can make several different adjustments. If you are using an evaluative meter set to automatic exposure modes—A, S, or P—you can set your exposure compensation to a minus value starting at −1/2 or −2/3 to make sure the meter maintains enough black in the shadows, as in 3-4. Check the exposure on your LCD to make certain that it is having the desired effect. A value of −2/3 might not be enough; in that case, continue to turn down your exposure compensation.
Although you want the shadows darker, maintaining the proper value on the subject is more important.
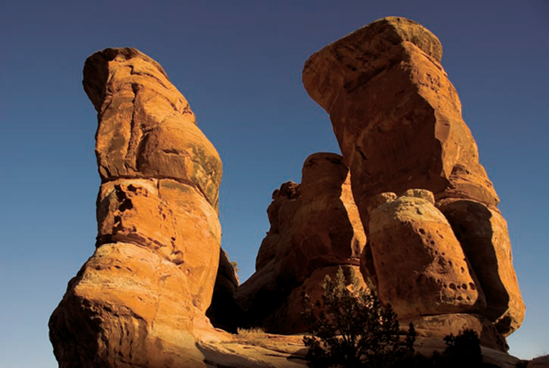
Figure 3-4. ABOUT THIS PHOTO With the sun low in the horizon, the light comes across the rocks very dramatically. To maintain the darkness in the shadows and richness of the colors, −1.3 exposure compensation was used. 1/180 sec., f/7.1, ISO 100.
Maintaining the richness in a photograph full of shadows can be accomplished with a spotmeter. Evaluative meters are adequate in most situations, but they are not as accurate in tricky light situations because they average the scene out. Setting your camera to the spotmeter lets you precisely select your exposure by pointing the spotmeter, which is located in the center focus area of the viewfinder at the most important part of the scene. After you have gotten a reading with the spotmeter, you can maintain the proper exposure after the spotmeter reading by either setting your camera to that exposure in manual exposure mode or using the auto exposure lock button to keep the exposure before you recompose.
The spotmeter only reads exposure from that tiny area in the center of the viewfinder. It tells you what the exposure should be to make what is in that area 18-percent grey, which is an average, middle grey and is close to an average skin tone. If you take the spotmeter reading on something too light or too dark, it can throw the rest of your exposure off by quite a bit. The spotmeter is a very powerful tool; using your spotmeter can help your photographs if you make the time to learn how to best use it.
Tip
Auto exposure lock (AEL) is a button generally on the back of your SLR that allows you to take a meter reading in one direction and then maintain that reading while you recompose and take the photo in a different direction. The AEL can be used in any of the auto-exposure modes–A,S or P–as well as any of the metering modes–evaluative, center-weighted, or spot.
You can create a dynamic photograph by using a recognizable shape in the form of a shadow in front of an already interesting background. Subjects with shadows that create a silhouette in front of a scene give images a sense of scale and create layers within the image. In 3-5, the subject of the silhouetted juniper tree creates an interesting shape of shadow within the image. The darkness of the juniper's shadow is not large enough to cause substantial exposure change. A −1/3 stop lowering of the exposure darkens the shadow and maintains the richness of the color in the background. Using a slight underexposure along with a bright scene, you can make the silhouetted subject a rich black shape, complementing the rest of the scene.
The reverse effect can be used with a bright subject in front of a very dark background. This is a more difficult situation because a large dark area can trick the meter into overexposing the shadow area, which washes out the subject matter. An example of this is shown in 3-6. The tiny wildflowers are being hit by some bright sunlight, but the background is a nearly black, shadowed mountain. The background is so dark, and the small flowers are so slight, that substantial darkening of the exposure is needed to maintain the correct brightness of the flowers. Both the evaluative meter and center-weighted meter try to average the lights and darks in the scene, making the image too bright. By setting the exposure compensation to −1 1/3, you get the correct exposure, darkening the background and keeping the colors appropriately rich.
A bright subject in front of a dark background subject can be taken to an extreme. In 3-7, this spindly stark white tree, stuck deep in the shadows of a valley, gets just a tiny kiss of light. Using the evaluative meter, the tree barely registers as any sort of brightness, and the exposure is entirely one of the shadows of the valley. When the meter sees such a dark scene, it still attempts to expose for middle grey, which in this case would wash out the tree and grasses that are getting sunlight.
Learning to see how the shadows work with the bright parts of the scene and learning how the meter responds to different situations helps you create better photographs. Seeing the light and learning how the camera sees the light is important. The ability to view your photographs immediately after you've taken them makes digital photography immensely advantageous.

Figure 3-5. ABOUT THIS PHOTO A polarizing filter and −1/3 exposure compensation with an exposure of 1/125 sec., f/5.6, ISO 100 let this shadow pop out of the scene. The exposure for the sunlit rocks and the tree in shadow create this contrast.
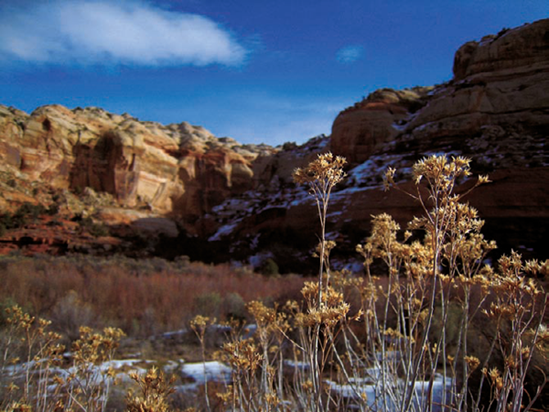
Figure 3-6. ABOUT THIS PHOTO By underexposing −1 1/3 stop, you can keep the colors saturated and the shadow of the mountain properly dark. ISO 100 at 1/500 sec. at f/7.1.
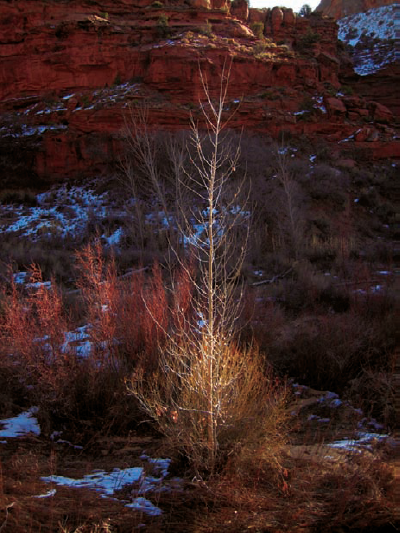
Figure 3-7. ABOUT THIS PHOTO The darkness of this image needs even more exposure to match what was seen. For the small tree to be properly exposed, −2 f-stops of exposure compensation makes the entire scene dark enough. 1/1000 sec., f/3.2, ISO 100.
By taking a photograph and reviewing the lighting and exposure, you can reshoot with more appropriate settings. Take the time to do this. If you keep the first and final images, you can review them at home and learn how changes in settings affect your photographs. You'll be ready the next time a similar situation arises.
Shadows also give shape and texture to images. Dappled light comes through leaves or branches, casting organic shaped shadows onto the subjects and scenes of your photographs. Dappled light can be beautiful, but it can also be hard to handle. In bright sunlight, the light is very bright, and the shadows are very dark.
If the exposure is set for the bright areas, those are correctly exposed, while the shadows are very dark if not black; if the exposure is set to see much detail in the shadows, the bright areas are quickly washed out. In the case of 3-8, a middle ground is met by setting the exposure compensation to +1/3. Any more, and the impact of the dark shadows would be gone, and the red washed out.
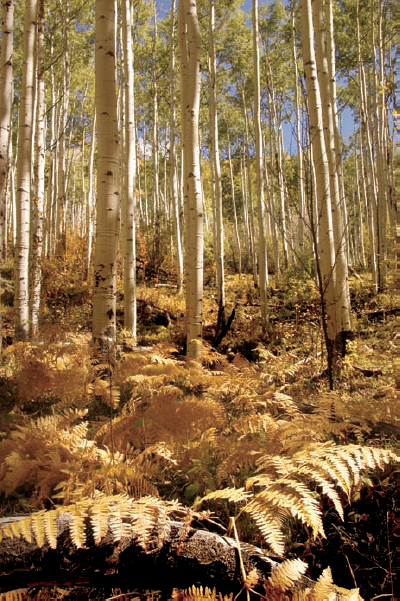
If dappled shadows cover your entire scene, exposing for the shadows might be the only option. In 3-9, the light is coming from three quarters behind the trees, meaning that it is not completely backlit or completely sidelit. Nice white highlights are on the white trees, but a larger portion of the scene, the ground cover in the front, is in shadow. Set the camera to Aperture Priority and use the evaluative, or Matrix, meter; this setting tells the camera that the scene is already in shadow. A small amount of highlights should not affect a scene too much, but if the meter doesn't recognize a large amount of shadows, setting the exposure compensation to +1/3 or +2/3 helps.
When evaluating how bright the exposure should be, take a look at the main subject of the photograph, in this case the fern at the bottom of the scene. Even though much of the scene is in shadow, the fern in the foreground has sunlight on it. Because the fern is such a prominent part of the image, maintaining a correct exposure is very important.
Any camera's meter gives an exposure that averages the light in the scene so that it averages a grey tone. Learning how to see where that light is actually going in the photograph, how it is affecting the subject, and where to take the proper exposure while photographing outdoors all has to do with light direction which is illustrated in 3-10.
In the preceding section, terms such as backlight and sidelight were used. These terms, along with front light, top light, and crosslight, are simple ways to talk about the direction from which light is happening in the scene or photograph. Front light is when light hits the subject or scene head on—the light comes from right behind the photographer.
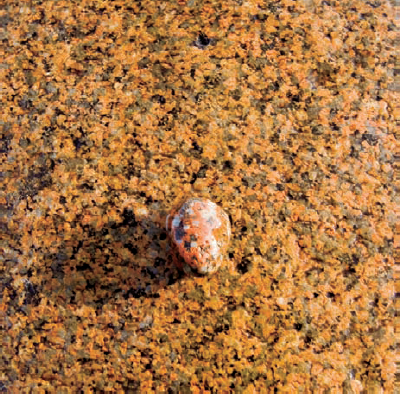
Figure 3-10. ABOUT THIS PHOTO The shadow of one rock on another gives clear indication about where the light is coming from in this photo taken with a 17–35mm f/2.8 lens at ISO 200, 1/160 sec. at f.5.6.
Sidelight and crosslight are interchangeable terms meaning that the light comes across the scene from right or left. Top light is when the light comes largely from directly above the subject, such as at noon. Backlight happens when the light is behind the subject, shining into the camera.
Note
For more information on the meter go to Chapter 2 and read about in-camera metering.
The simplest type of light comes from the front of the scene. When photographing outdoors, keep the sun over your shoulder to take a photograph. On-camera flash is another example of front lighting. Front light allows for bright scenes and easy exposures, as shown in 3-11. The red in the rocks is rich, which complements the dark blue sky, and no complex shadows are available to work with. Sometimes, you can have too much of a good thing. Strong front light can often appear too bright as there is little in the way of shadows, and the light comes straight back into the camera. In those cases, underexposing by −1/3 or 1/2 of a stop can help tone down such brightness.
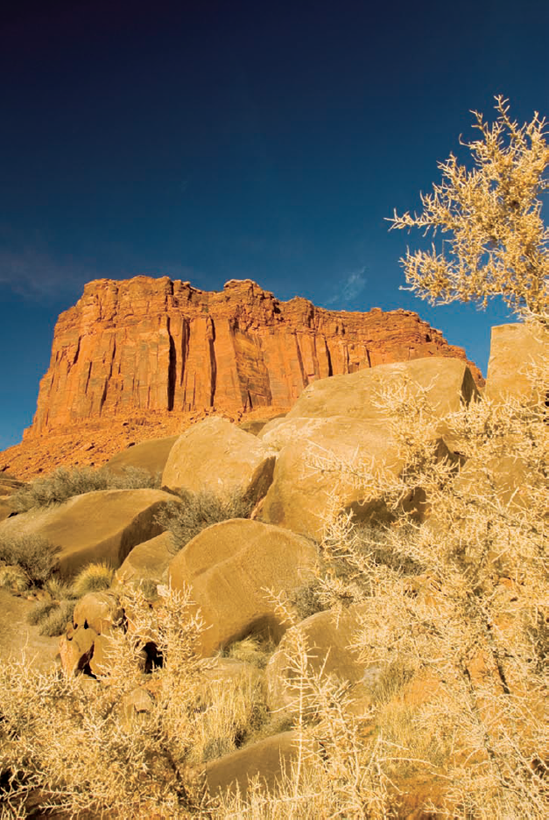
Figure 3-11. ABOUT THIS PHOTO The rich red color of the iron-rich rocks and the deep blue are accentuated by a polarizing filter with a 17–35mm f/2.8 lens. ISO 100 at 1/45 sec. at f/8.
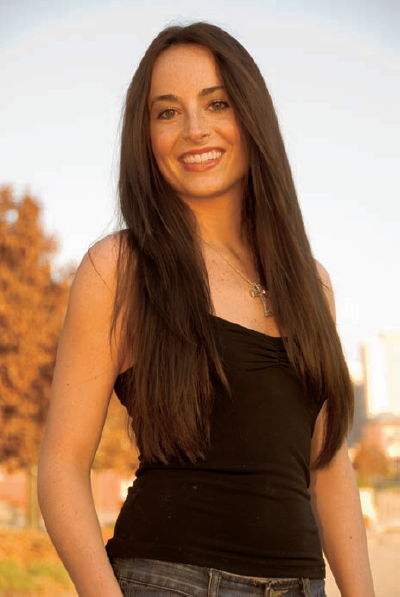
In a portrait setting, front light is often best when slightly softer. The light coming from the front allows the eyes to be bright and the cheek bones to have a nice shape as in 3-12. Front light also lets the entire face to be shown without shadows distracting the viewer's eye. Many fashion magazines use some version of front light to best showcase the models and their clothes.
The light that comes across a scene is called sidelight or crosslight. Subjects and scenes that are sidelit usually show great texture by focusing on shadows and shape. The sidelight often accentuates the leading edge of the subject with the light fading on the opposite side. Sidelight in a portrait causes the shape of the face to fall into shadow such as in 3-13. The sunlight in this image is low, and the way it is coming across the woman's face, it is just beginning to soften. Measuring the exposure from the sunny side of the face using a spotmeter or center-weighted meter helps to maintain good skin tone.
Using the evaluative meter is the best meter for most things. Sometimes brightness or shadows in the background might skew the exposure of the face in a wider portrait. In those situations, you can zoom in tightly into the face or physically move closer and take the meter reading. At that point, you can either use the auto exposure lock or set the exposure manually when you move back or recompose. If the light on the face remains the same, the exposure continues to be the same.
Sidelight is where photographers have to begin really evaluating the light as it becomes part of their photographs. The difference in exposure from the bright side to the shadow side of the scene can either create great images or big problems. If there are equal parts light and shadow, then using an evaluative meter is easy, such as in 3-14.
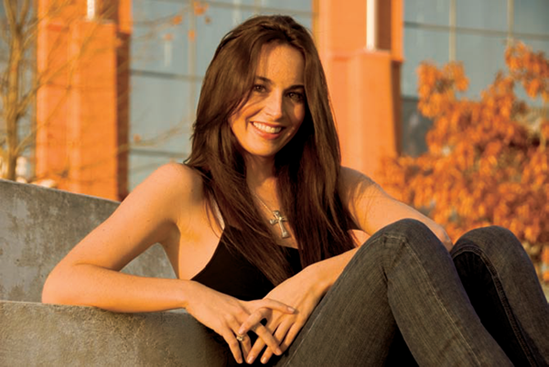
Figure 3-13. ABOUT THIS PHOTO By zooming in close to the face, it was easier to measure the light on the bright side of the face at 1/160 sec. at f/5 at ISO 100 using a 18–200mm f/3.5–5.6 zoom lens.
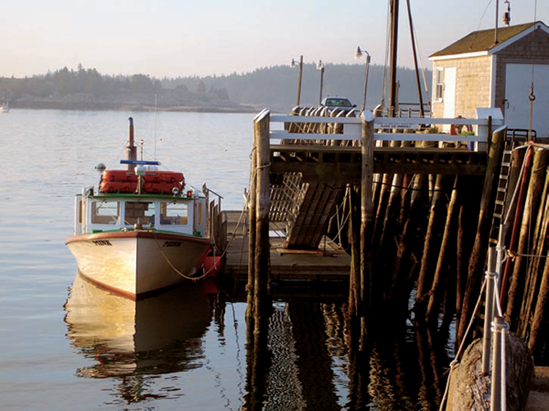
Figure 3-14. ABOUT THIS PHOTO The sidelight in this image is made for nearly equal amounts of light and dark. ISO 100 at 1/320 sec. at f/4.5.
More interesting light, in which the shadows play a bigger roll in the photograph, can challenge the meter and the auto settings. In 3-15 the sky is a dark blue, and the sidelight is creating deep shadows, both on the foreground rock and across the canyon wall and into the valley. Along with those dark shadows, the surfaces of the rocks are being brightly lit by the hard sidelight of the early sun. Setting the exposure compensation to −2/3 was necessary to get the drama desired out of the image; this also ensured that the colors of the rock remained rich.
In many cases, light from behind the subject can be just as exciting and dramatic as when light is directly on the scene. This backlight is difficult to deal with because, if you are not careful, lens flare can result. This light is also the most difficult for the camera's meter to deal with as exposure difference between the light and dark areas of the scene are far greater. When the scene is backlit, the subject is generally in shadow, so you must start thinking about what light is available in those shadows.
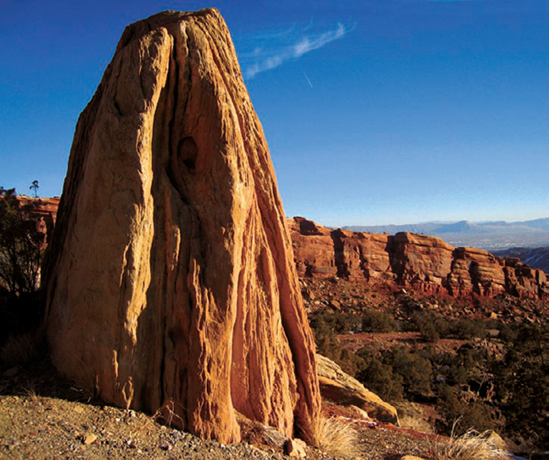
Figure 3-15. ABOUT THIS PHOTO The light coming across the scene created great interplay of light and shadow. 1/320 sec. at f/7.1 at ISO 100 with an underexposure of −2/3 of a stop.
In 3-16, the main light in the scene is sunlight coming from behind the model. This bright sun lights her hair beautifully, but no part of her face directly. Her face is entirely in the shadow created by her head and body, and the light inside that shadow is still beautiful and has very soft texture, with gentle highlights in her eyes and along her nose. Using the spotmeter, focused directly on her forehead, yields an exposure of 1/50 second at f/4.5 at ISO 100. Obviously, for being outside that is not a lot of light, but inside that shadow, there is great light.
Backlight can also create very interesting highlights because of angle of the light and the direction it hits the camera. These highlights are called specular light because they have properties similar to a mirror. In 3-17, specular highlights are all across the bow of the boat caused by the sun hitting the water droplets on the deck and the bright metal trim. The backlight also creates even more contrast with the highlights of the water and the shiny parts on the deck against the shadows created across the deck. Use the trick of squinting to see the highlights and shadows more clearly; the nearly equal amounts of bright and shadow make this an easy, normal exposure situation, even though it is a scene with very high contrast.
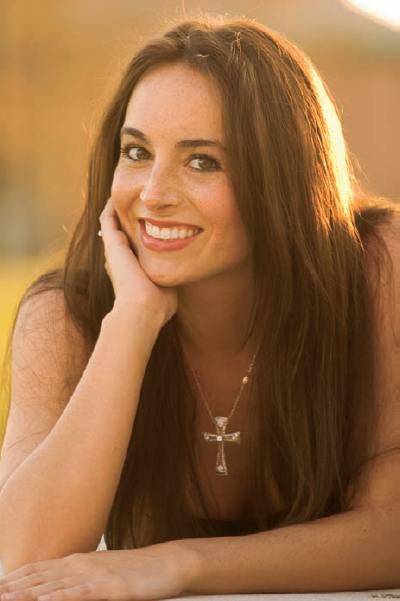
Figure 3-16. ABOUT THIS PHOTO No exposure compensation was needed because of the spotmeter reading, but the white balance is set to shade to maintain the warmth of her skin tone in the blue light of the shadow. 80–200mm f/2.8 lens.

Figure 3-17. ABOUT THIS PHOTO This photo was taken using an exposure of 1/320 sec. at f/5.6 at ISO 200. The shade white balance makes sure that the dark shadows are not too blue and accentuates the warmth of the morning light.
Extreme backlighting can also create layers within the image and silhouettes a subject. During the last moments of the day, the sun's rays create color as the light goes through the atmosphere. With each layer of canyon farther away from the mesa in the foreground in 3-18, the layers get brighter. Using a telephoto lens helps to visually compress the layers. A center-weighted meter allows you to select just the part of the mesa, but mostly the light filled shadows of the canyon. Metering in a backlight situation, such as 3-18, often gives an exposure that is too bright, so set your meter to −1 or −2 stops below the meter's selection to get the silhouette exposure.
Anytime that the sun is out, you have the chance for flare. Today, lens manufacturers use both advanced computer design as well as coatings on the glass to minimize flare, but it can still happen. As discussed in Chapter 2, flare happens when a direct light source enters through the front of the lens and reflects on the many glass surfaces inside the lens.
Flare occurs mostly in backlit situations or times when the sidelight comes at the camera more at a diagonal than straight across. Flare can even happen near midday if the sun's rays hit the front of the lens just right and can be seen in 3-19. The circular shaped light anomalies are lens flare, which is distracting and easily seen against a dark background. Luckily with digital photography, you have the opportunity to check on the back of the camera to see whether the flare affects the shot. In 3-20 the angle to the sun has not changed, but the flare is gone, after the judicious use of a ball cap held over the top of the lens. Even in an overcast scene, having a small bit of light in the wrong place can cause havoc in a photograph.
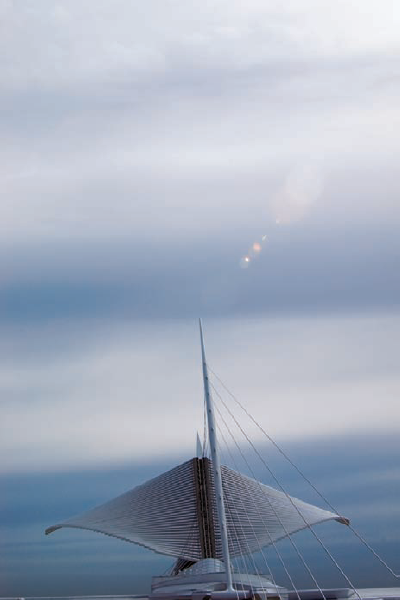
Figure 3-19. ABOUT THIS PHOTO This photo was taken with a 28–105mm f/2.8 zoom lens. Obviously, the photographer left his lens hood in the car in his haste to capture this image and was too lazy to walk back and get it.
Note
Longer lenses allow a photographer to control flare somewhat better because with the narrow angle of view, you can move to somewhere the lens doesn't flare or place more shade over it. When shooting with a wide angle lens, because the lens sees so much of the scene, sometimes there is nowhere you can turn that you don't get flare.
In some cases, flare is desired, and shooting into the sun is exactly what works for the image. Any time the sun, a powerful light source, enters the viewfinder, it darkens the rest of the exposure, creating great shape in the form of silhouettes. In 3-21, the red rock formation of Landscape Arch in Arches National Park provides the perfect foil for the sun's bright rays. Underexposing an additional −1/2 stop from the meter reading ensured that the shape of the silhouette is completely black and the blue of the sky is rich and saturated with the clouds making for a small measure of texture in the sky.
As discussed in Chapter 1, the light at sunrise and sunset is full of color and drama. Shooting at sunrise and sunset has its own challenges as well, but the challenges are not insurmountable, and the rewards of shooting at that time of day are great. Shooting sunrise and sunset takes some planning and forethought as well as good photographic skills. The light is so dramatic for only a small window of time, so being where you need to be, with the equipment that you need well before the light gets golden, will help immensely.
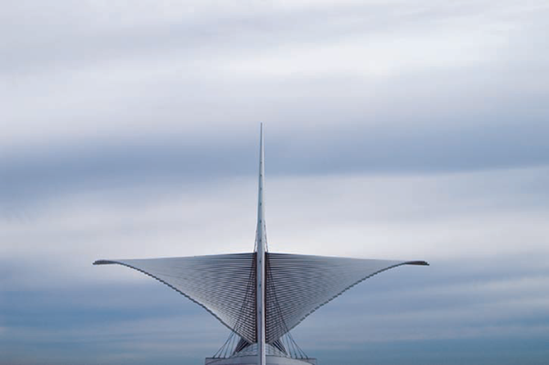
Figure 3-20. ABOUT THIS PHOTO Turning the camera horizontally, which tilted the lens down, and placing a shade over the front of the lens eliminated the flare. 28–105mm f/2.8 zoom lens, ISO 200 at 1/640 sec. at f/7.1 with +2/3 exposure compensation.
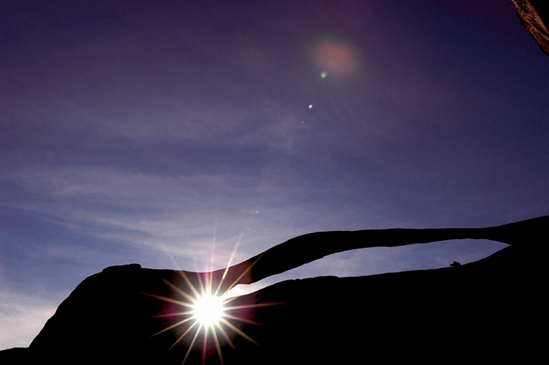
Figure 3-21. ABOUT THIS PHOTO The exposure was made at ISO 200 with a 1/1250 shutter speed at f/9.5, using evaluative, matrix metering and using −1/2 stop of exposure compensation. 28–105mm f/2.8 zoom lens.
This time should probably be labeled the golden moments of light. When the angle of the sun starts to get into those few degrees of sunlight just above the horizon, it takes only a few moments before everything starts to slip into shadow. Although the time is called golden, mostly because the light takes on a golden or amber tone, it also tends to have an almost mystical quality. The color and the low, long shadows make these golden moments such an exciting time to shoot.
In 3-22 the sun is very low in the sky, still probably a half of an hour before sunset. The shadows are growing longer, and the sky is becoming more infused with light. A normal evaluative meter setting in one of the auto exposure modes gives great results. In some situations, you might be tempted to underexpose by −1/3 of a stop to give the rocks some additional richness and saturation; this might cause the shadows on the back sides of the rocks to become too black. In this case, you can use a telephoto lens to bring all the layers of the rocks and mountains together.
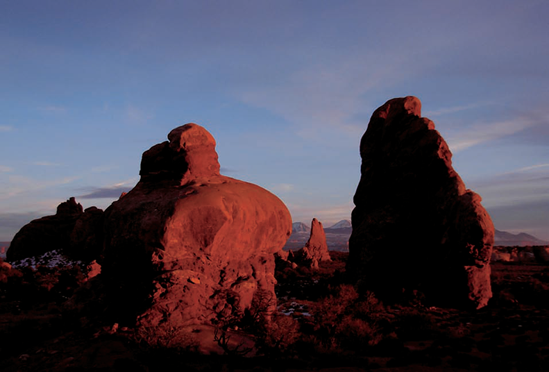
Figure 3-22. ABOUT THIS PHOTO 80-200mm f/2.8 lens, exposed at ISO 100 at 1/180 sec. at f/7.1. Matrix meter, using Aperture Priority and −1/3 exposure compensation.
Only moments later, the light becomes far more saturated with red, and the angle of the light is far lower. The clouds also begin to pick up some to of the colored light, giving the sky texture. Using up to −1 full stop in exposure compensation really gives the scene unreal richness. Moving in closer to use a wide-angle lens gives the scene even more of an otherworldly feel. The red and the blue also complement each other very well in 3-23.
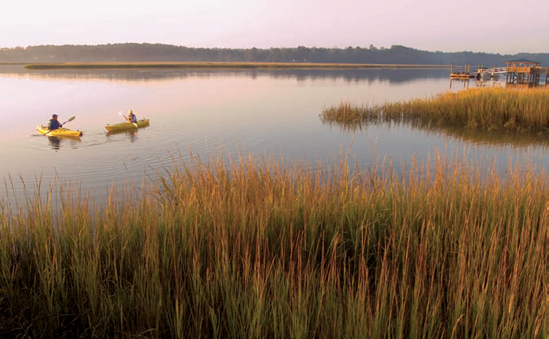
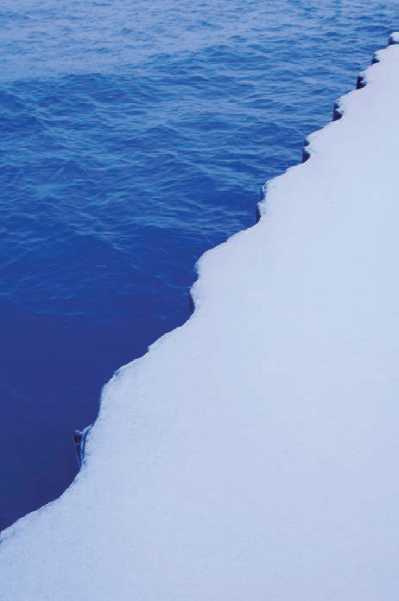
In the golden moments of the morning, the light always seems so much softer than in the evening, but that is probably just perception. The subtle light of morning looks great with sidelight coming across a scene. Look for the pastels of the early morning light low on the horizon and in the water scene and watch the sidelight give texture to foreground elements such as in 3-24.

When the sun is below the horizon and is about to make its appearance or has just disappeared, a low level of beautiful soft light is available. This low light situation means that exposures get very long, so using a tripod is a must. This twilight works for some situations because there is still light in the sky, but the entire scene is in shadow. This, in effect, lowers the contrast of the scene but is more like a giant soft box than when the light is just overcast. An example is seen in 3-25.
When shooting while the sun is below the horizon, remember that the entire scene is in shadow, and this light is very blue. To maintain the color of the scene as your eye sees things in this low blue light, it might be necessary to set the white balance to cloudy over shady, and even then the image might seem too blue. You can take this opportunity to use either the in-camera manual white balance setting to warm the scene further, or set the image to the warmest standard setting and then make white balance changes in Photoshop Elements. Additionally, when in question about extreme situations, it is then that using the RAW file is particularly helpful because of all of the ability to change white balance at the base level of the image file.
Great sunset photos come from great cloud formations. This is a double-edge sword, because the texture clouds are needed to capture and reflect the sunset's red light; without them, the sky just turns darker blue until night. Sometimes everything is perfect for a fantastic sunset, with puffy clouds interspersed with sections of blue sky, but then something happens in the atmosphere with some low clouds and the blue sky with clouds just turns grey.
The Rayleigh effect, as discussed in Chapter 1, is when atmospheric particles scatter the sun's rays and make the light more red in color, which helps to get the vibrant color in sunsets. Using the evaluative meter might render a scene that looks too washed out without some underexposure. In 3-26, the exposure compensation was set to −1 stop to maintain the richness of the color. The amount of shadow in this scene also makes this difficult because the evaluative meter tries to give an exposure that lightens that shadow area. This scene also uses a Neutral Density Graduated filter to bring the brightness of the sky down to better match the detail of the beach and the boat in the shadow.
Note
More on filters, especially neutral density graduated filters, is located in Chapter 7.
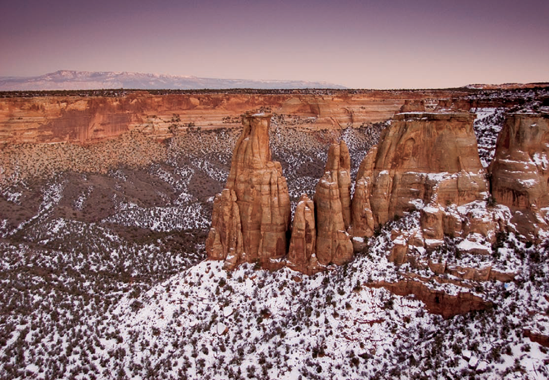
A more subtle sunset might happen when the clouds are more dispersed and wispy. In that situation, some of the sun's rays might pass through the clouds, letting only some of the light reflect back toward the camera. This gives clouds more of a pastel color — pink and orange rather than a rich red. Over the course of the sunset, the clouds continue to change color. Varying exposures and techniques when you are in place can bring many different looks to your photographs. Using a neutral density graduated filter once again brings the sky exposure close enough to the canyon exposure so that detail could be seen as in 3-27. Without that filter making the sky three stops darker, the foreground would be almost complete shadow.
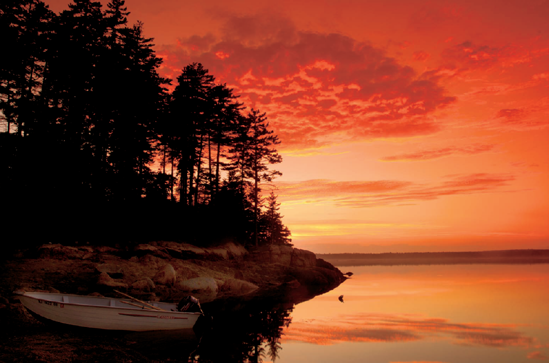
Figure 3-26. ABOUT THIS PHOTO A Nikon 17–35mm f/2.8 zoom lens was used for this sunset. The exposure was ISO 100 at 1/25 sec. at f/9 with the exposure set at −1 in Aperture Priority automatic.
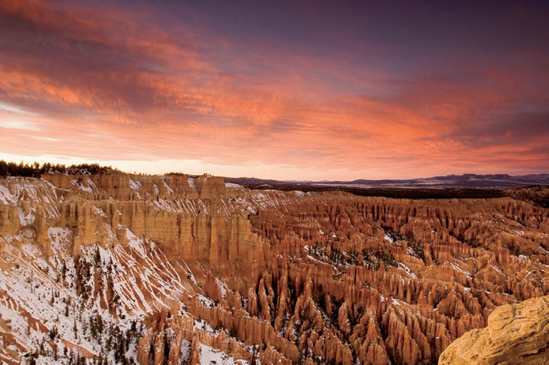
Figure 3-27. ABOUT THIS PHOTO A 17–35mm f/2.8 lens was used for this image. The exposure was 1/2 sec. at f/8 with an ISO of 100. A 3 f-stop ND grad was placed over the sky to hold back that exposure.
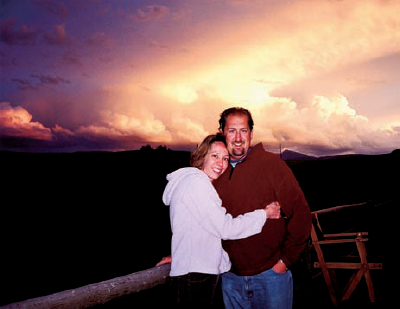
Using a strobe with a sunset is a great way to light up a subject in front of the beautiful sunset light. Sunsets have a lot of light, and items in front of them become shadows and silhouettes. Using a strobe along with the sunset is a great way to get light on a subject that is otherwise totally backlit. This type of scene could be captured with any sort of digital camera, and many digital cameras even have a special scene setting for this, which is called anything from night strobe, fill-in flash, or night snapshot. This label often is paired with an icon that displays a person with a moon. This scene mode gives the proper longer exposure to the scene in the background and then uses the automatic strobe; it only fires as much light onto the subject as it needs (3-28). In many cases, a tripod is needed as the exposures in this setting can get long.
When the weather conditions become overcast, it should not mean that the photography is done. You have plenty of ways to work with the soft light of low clouds and still make dynamic images.
The best part of working with overcast skies is the softness of the light. The shadows aren't as black, and the highlights have nice detail. The drawbacks to photographing when it is overcast are that the colors are less vivid, things begin to look more monochromatic, and when a scene is busy, it is hard to discern the shapes that separate the subject from the rest of the image.
Learning to see more simple objects and scenes when it is cloudy helps your photography when it is bright and sunny. Separate shapes and textures with your camera when it is cloudy by getting closer to the subjects. Finding subjects in the details where you might otherwise never look is a great thing to do when the great sunset panoramic shot gets grey and flat. The light on an overcast day allows you to see texture in the scene, when on a sunny day, it might just look like darks and lights. In 3-29, the texture of the weathered wood really pops off the fine red sand, and by using the proper white balance, cloudy, the tones remain warm and rich.
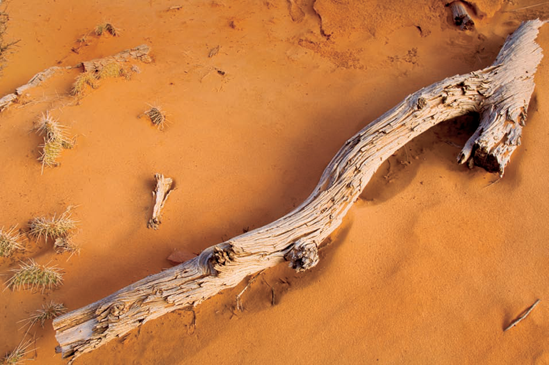
Figure 3-29. ABOUT THIS PHOTO Using a tripod to get low on this gloomy day shows how using the correct exposure and white balance can help create warmth. 17–35mm f/2.8 lens with an exposure of 1/5 sec. at f/8 at ISO 100.
Just as you can find texture on a cloudy day, you can also find great shape. The light on an overcast day has very little direction to it, so shape can come directly from the subject that you find. Because the light is lower on an overcast day, it often helps to slightly overexpose your images. In 3-30, the image is overexposed +1/2 stop over what the meter said, and to further make this scene simple, the color was removed to just show the shape and tones of the plant.
The soft light of an overcast day works so well with the softness of organic shapes, because the light is so even and wraps around those shapes. Once again, a monochromatic scene allows the shape and subject of the scene to become the prominent part of the image. The pale white of the bone pops out of the darkness of the rest of the scene so nicely, letting the smoothness and symmetry form the shape of the image in 3-31.
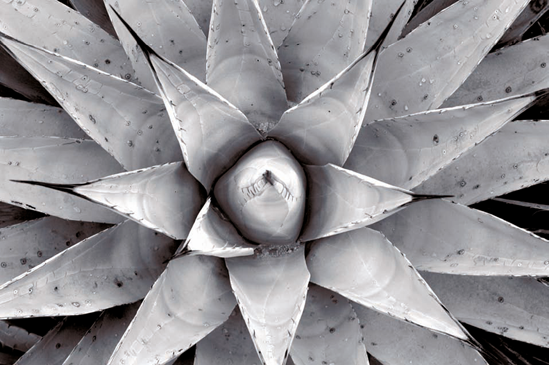
Figure 3-30. ABOUT THIS PHOTO The soft light gives the plant even exposure so that you can focus on the texture and design of the plant. A 17–35mm f/2.8 lens was used with an exposure of ISO 200 at 1/80 sec. at f/8.
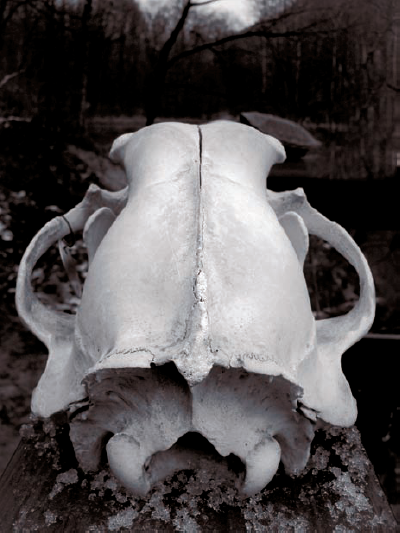
Figure 3-31. ABOUT THIS PHOTO In color, this image might be just a snapshot, but by shooting in black and white, you can create an interesting image. The shape of the bone is interesting with great texture. 1/200 sec., f/5.6 at ISO 400.
Sometimes, the cool color cast of a stormy or cloudy day can enhance the image. By leaving the white balance at sunny or even forcing the image to be even more blue by setting it to incandescent, you can use the blue monochrome look to accentuate the simplicity and strength of the image, such as in 3-32.
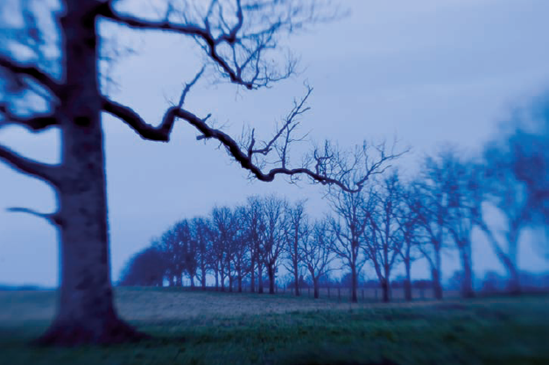
The mood of an image with a strong blue cast is very different from one with warm sunny skies, and those images can use graphic elements and drama just as well by being monochromatic, blue, and projecting a more ominous feeling. The stark look of the empty trees across an empty field works better with a heavy sky and the soft dark light of 3-33. To give the image an even greater edge, a nontraditional lens was used. The LensBaby is a simple lens attached to rubber bellows. This lens does not auto focus, auto expose, or zoom. It has a fixed aperture and is focused by pushing or pulling the bellows back and forth. The LensBaby also can be tilted and bent in an interesting manner so that certain parts of the image can be thrown out of focus.
Cloud cover can increase the drama of a scene, and when there is real texture in the clouds on an overcast day, the interplay of the sky and the ground often makes for exciting photographs.
Usually, a storm front going through creates clouds. Heavy clouds, as opposed to just a low flat sky, have very interesting and ever-changing texture in them. A photographer who can find that texture and use the light available can bring fantastic drama to his or her photographs on a day when most people wouldn't bother shooting.
The light on a cloudy day has some small pockets of brightness that actually give the clouds their definition. The contrast between the sky and the ground is still high, and the exposure must be accurate, or the drama of the clouds is washed out and pale or the scene is too dark. Using the evaluative meter in this situation is the obvious choice. The chance that a spotmeter would pick just the right tone to match the sky and ground exposure is extremely small.
Because 3-34 is still nearly monochromatic, the thought of converting this to black and white might be a good one. When the image is showing on the monitor, the options are endless; trying different things to the image is one of the great parts of photography. Digital photography has brought instant gratification to a new level.
A truly exciting cloudy scene happens when heavily textured clouds, moving in against the sun, are allowing the light to hit the subject; yet the clouds are extremely prominent in the sky. Metering for this scene is relatively straightforward as the light is generally from the front, lighting both the foreground and maybe the clouds a bit. Photographing in this situation is difficult, not because the lighting is particularly hard, but because the light is fleeting and fast, probably faster than a setting sun. To make matters worse, a storm is often rolling in after this type of weather.
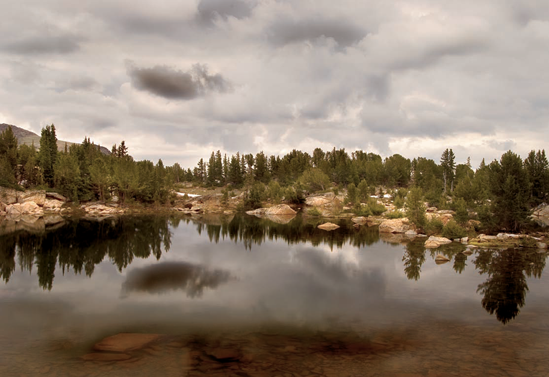
Figure 3-34. ABOUT THIS PHOTO The cloudy light minimizes the color in the scene, but the shadows bring out some drama. The exposure here is 1/60 sec., f/8 at ISO 200.
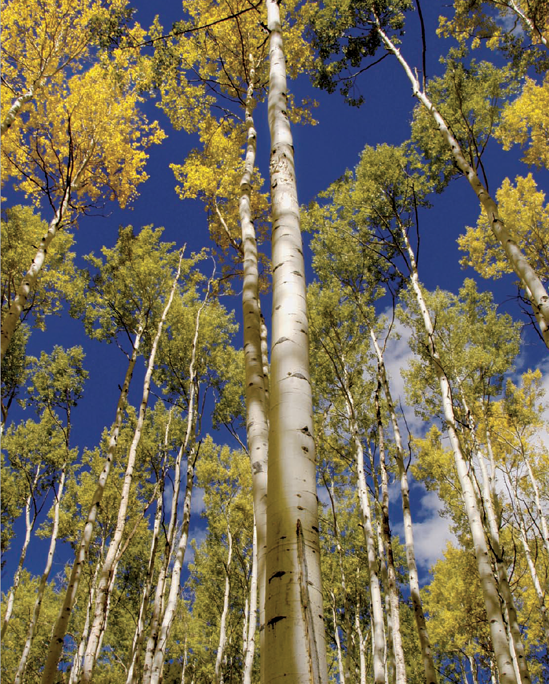
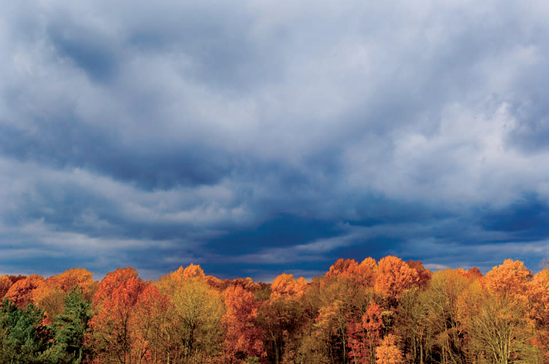
The light is so glorious on the fall foliage in 3-35 and the sky so ominous, it is hard not to be excited about lighting like this. The situation in 3-35 is a rare one when the foreground is actually brighter than the sky, making the metering and exposing pretty easy. This particular instance would have been easy to underexpose for more drama in the sky and increase the richness of the color, but already plenty of drama and rich color are available, and underexposing would just make the shadows in the tree trunks too dark.
Even the addition of a small amount of clouds can generally enhance a shot. In many cases, a photograph that is taken in less than perfect light, slightly overcast, or backlit, or in the case of 3-36 an image that is simply taken in the middle of the day. The hot midday light in the middle of the desert made for a very dry looking shot except for the balance of the warm and cool colors and the odd, nearly singular cloud in the sky.
Using the recommended meter setting and a polarizer to saturate the colors, the cloud does all the rest of the work to make this solitary mountain scene a dramatic photograph.
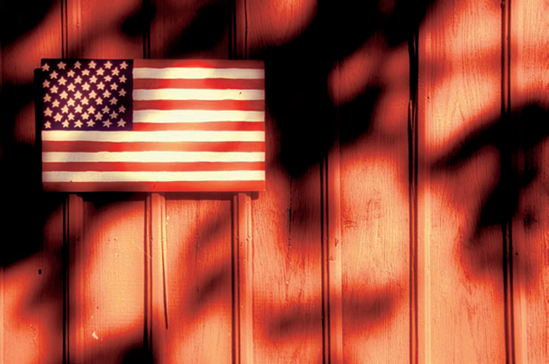
The polarizer along with a high contrast frontlit subject that is turned black and white creates a near black sky. By exposing for the brightness of the sun, the sky becomes very dark and adding clouds for relief from the stark black of the sky adds needed depth and texture to the photo of the sign in 3-37. The image was underexposed −2/3 of a stop to further darken the sky and maintain detail in the white of the clouds and sign.
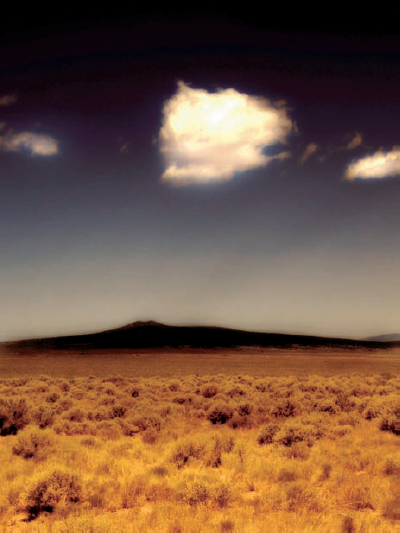
Figure 3-36. ABOUT THIS PHOTO Photoshop Elements used to darken the hill, saturate the colors, and give the foliage a bit of glow. This image taken with a Nikon D100 and 20–35mm f/2.8. Exposure was ISO 100, f/10 at 1/80 sec.
Clouds rarely need much in the way of additional exposure, mostly because they are generally peripheral to the shot and the subject that is being captured is on the ground, and the light there is what is important. Many times, though, the sky is the light source so it becomes flat and white and unimportant. Look for times when the sky has drama and the light is hitting the clouds, not coming from the clouds, to find the drama in your photographs.
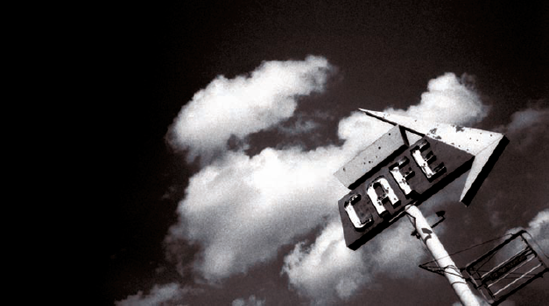
Figure 3-37. ABOUT THIS PHOTO A polarizing filter was used to darken the sky, and this works just the same with black and white. The contrast and grain of the image was done in Photoshop Elements. 1/60 sec. at f/8 at ISO 200.
Using a polarizing filter is one of the easiest ways to add drama to your skies because in most cases it helps to separate the clouds from the blue of the sky, by saturating that blue light. In 3-38 the scene is mostly backlit, and the sky appeared nearly washed out and white to the naked eye. By adding the polarizing filter to the scene, the sky becomes nearly striped with the thin high cirrus clouds above. Seeing the delicateness of those clouds across the blue sky is an interesting visual contrast with the heavy and strong red rock formations on the ground whose shapes are only intimated because of the back light giving them a sense of shape.
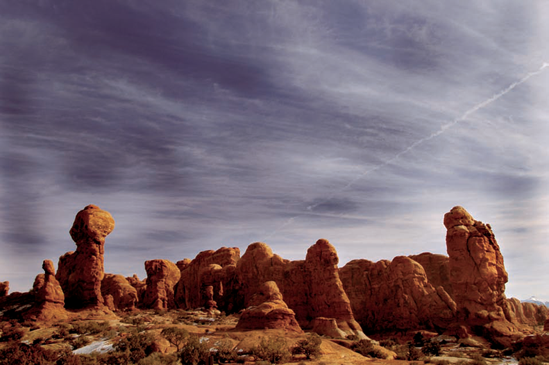
Figure 3-38. ABOUT THIS PHOTO Shooting in the late afternoon shows the light rimming around the rocks, and the polarizing filter helps to separate the sky from the clouds. The exposure was ISO 200 and 1/30 sec. at f/13.
Occasionally, the clouds become an element below the horizon. This situation is similar to shooting a scene with substantial snow and because the white of the clouds is so dominant, overexposure of the scene is called for. Because the evaluative meter is more than adequate for this situation, and there is a substantial amount of rich red rocks in the scene, it is determined that only about +1/3 exposure is needed to get the proper exposure. Anymore overexposure than that makes any texture in the low laying clouds disappear into a washed out white mass (see 3-39).

Take a photograph of a person or object with the light coming from behind the subject. Remember that this is tricky because you can get lens flare. Use what you learned in this chapter about metering for this kind of situation and take several photographs. Upload the best one and tell everyone how you compensated for the two different light conditions.
This photo has some extreme backlighting as the sun is directly behind the girls' heads. Even though I had the camera set to shade, the warmest standard setting, when I got the image in the computer I worked at maximizing the warmth. This makes the image more like how I saw it in my mind's eye. I had my lens shade on, but I still had to have the girls' mom hold my clipboard just above the lens, to prevent lens flare. The exposure was 1/180 sec. at f/5.6 using center-weighted metering and ISO 400. Using a Nikkor 80–200 f/2.8 lens allowed me to get in tight to their faces without being too close, and this also allowed for the background to go very out of focus.

Note
Remember to visit www.pwassignments.com when you complete this assignment and share your favorite photo! It's a community of enthusiastic photographers and a great place to view what other readers have created. You can also post comments and read other encouraging suggestions and feedback.