
It’s important to keep Linux systems up to date. Updates can help you keep your systems secure, help you fix problems, and help you incorporate the newest features. Updates in the world of computers are also known as patches.
In this chapter, we’ll examine the basics of patch management, how you can apply patches to your computer, and where you should get patches for several Linux distributions. Patch management methods vary by distribution. If you’re paying for support from Red Hat or SUSE, you’re paying in part for support through their patch management systems. If you’re using another Linux distribution, there are solid freely available alternatives.
When you administer a network, you’re responsible for updates on a number of computers. You could configure each of these computers to get their updates automatically, but that might overload your network and connection to the Internet. In later chapters, we will show you how to configure a patch management repository for your network.
In the world of Linux, patches are more than just something you might apply to the source code of a kernel. They include the updates that can help you keep your systems secure, error-free, and updated with the latest features.
Before we continue, it’s important to define the concept of a patch and note the variety of sources from where you can download patches for your computer systems.
A patch is an update. It incorporates changes in source code. Patches are normally applied to specific software components, such as the kernel, or a service, such as vsFTP. Patches may fix bugs, address security issues, or incorporate new features. As an administrator, you’re responsible for testing the new software, making sure that it addresses any problems before your users see them on their systems.
In general, when you patch a program, service, or system, you’ll be upgrading a package. Some Linux distributions can be configured to warn you when patches for installed software are available. We’ll show you how to configure this in later chapters.
The most important patches address security problems. This is where the Linux development model shines. Developers start working on a patch almost immediately after a security issue is revealed. The process is public, which reassures those concerned about the quality of the patch. As a result, security patches are often available in hours.
If you’re administering a Linux computer, you need to keep up to date on the latest security issues. If you’ve paid for a subscription to a Red Hat or a SUSE distribution, you can get email warnings about security problems with your installed services. Other distributions may make alerts available by email or through their mailing lists. Problems with services are often announced on major Linux news sites, such as www.linuxtoday.com.
Users will always demand upgrades. And Linux developers will respond. I suspect that after someone finds a way to use Linux to toast bread, another developer will start working on how to upgrade Linux into a bread maker.
More practically, if someone developed a way to make Samba on Linux emulate a Microsoft Active Directory domain controller (which is in work for Samba 4.0, per http://www.samba.org/samba/devel/roadmap-4.0.html), there would be a lot of demand for that service. You would likely find yourself downloading that package on a substantial number of computers.
In general, programs that are released with new features get a lot of demand. Unfortunately, bugs are most likely to be found when a program is released with new features.
Just remember, the developers of a service are usually different from the developers of a distribution. So if you have a problem with a service, the fault may not be with the developers at Red Hat, SUSE, Debian, and so on.
If software were perfect, I think there would not be so much work in computing, especially at Microsoft. A lot of work goes into diagnosing and repairing buggy programs. Fortunately, the same infrastructure which leads to quick security fixes also leads to quick bug fixes for open source Linux programs.
When users report problems, they’re likely to demand quick solutions. The previous performance of Linux developers in finding quick solutions leads to increased expectations for quick bug fixes. As an administrator, you’ll be expected to roll out patches quickly, reliably, and securely.
Patches to the Linux kernel are of a special kind. They include the changes in source code between consecutive versions of a kernel. For example, if you want to upgrade from kernel version 2.6.15 to 2.6.16, you should apply patch-2.6.16 to your current kernel.
There are special requirements associated with kernel patches. Generally, they work only with the kernel as released through www.kernel.org. The people behind some distributions build their kernels with different features. Native Linux kernel patches may lead to conflicts, lost features, or even kernel panics.
Standard Linux kernel patches require that you adjust perhaps dozens of settings and then compile that kernel in binary format. This process can take hours, and is therefore something that you may not want to repeat. Many Linux distributions include preconfigured kernels in their repositories that you can use to upgrade your systems without having to compile them.
Because the kernel is so important to the operating system, you should not take chances. It’s best to upgrade Linux kernels by installing them side-by-side with the current working Linux kernel. If there is a problem, you can still boot that system with the old kernel.
If your users add hardware, modify drivers, or otherwise experiment with the guts of Linux, there’s a chance that a new kernel that works on your test equipment may not work on some of the computers on your network.
In recognition, most upgrade services treat kernel-* packages differently. Services such as Red Hat’s up2date and SUSE’s YaST Online Update do not install upgraded kernels, unless you authorize the installation.
Whenever you install a patch, there are risks. For example, many kernel patches may lead to situations where you’re unable to boot Linux.
If you run into a situation where a patch leads to a crash, you may be able to restore your system from a backup. If you’re unable to boot your system for this purpose, you may need to use a “rescue mode” for your distribution. Rescue modes are available using the first installation CD associated with Red Hat/Fedora and SUSE.
Alternatively, you may be able to use a CD/DVD-based distribution, such as Knoppix. When you boot from a Knoppix CD, you can start a full-featured Linux distribution. You can then connect to backup media and even networks to restore your pre-patch configuration. For more information, see www.knoppix.org.
There are several sources for patches and upgrades. The best source is generally the upgrade repository preconfigured for your distribution. However, there is often a delay when distribution developers process updates from other sources, such as the kernel, or services, such as the Apache Web server.
If you’re in a hurry, you can download packages from the Web site directly associated with your service. While not built for your distribution, it can help you get new features into service as quickly as possible.
Sometimes the developers of a distribution don’t bother with every service or upgrade. In some cases, third parties, such as developers of related distributions or even independent developers, configure packages that you can use.
When you’re upgrading a service, it’s usually best to upgrade using the package built by the developers of your distribution. That is the most reliable way to be sure that the package you install copies files into expected locations. It also ensures that the package you install becomes part of that computer’s package database.
For example, if you want new features associated with a new version of vsFTP on Red Hat Enterprise Linux 3, you’ll want to use the associated vsFTP RPM package built by Red Hat. There are several advantages:
Files associated with the package are installed in locations expected by other programs built for that distribution.
Dependencies for a service may vary between distributions.
Upgrades built for a distribution are included in the package database for that system.
Upgrades can be installed with the native update systems for that distribution.
However, there may be a delay before the employees or volunteers associated with a distribution are able to build and customize a new or updated service.
If you absolutely need the latest update as soon as possible, you can install the package as released by the developer of that service. This may be appropriate if you’re testing new features before distributing the package to other users on your network or if you absolutely need the latest security patch.
If you do use a package released by a service developer, you may be able to use the Red Hat Package Manager (RPM) or the Debian Packaging System (DEB) package as built by those developers for your distribution. Sometimes the developers of a service are well-schooled in how to build a package for a distribution, such as Red Hat or Debian. Otherwise, you’ll have to download the package in a format such as a tarball and install it yourself.
Unless the developers of a service have specifically built a RPM or DEB package for your distribution, the disadvantages to installing such a service include
Additional work is required to process and install the service.
Files may be installed in directories not consistent with your distribution.
The service is not included in your distribution’s database of packages.
To overcome any resulting problems, you can install the service as packaged for your distribution as soon as it is available.
There are two kinds of third-party packages available. One is packaged for a different distribution that uses the same package manager. Another is configured by an independent developer or group who may or may not have customized a package for your distribution.
Linux programs are generally processed into one of two major package formats: the RPM and DEB. These formats are used by almost all the major Linux distributions. Some examples include
RPM: Red Hat, Fedora, SUSE, Mandriva, Turbolinux, Yellow Dog
DEB: Debian, Knoppix, Ubuntu, Xandros
For example, if a package has been created in RPM format only for Mandrake, you can use the rpm command to install that package on other RPM-based distributions, such as Red Hat and SUSE. However, the risks are similar to installing an uncustomized package released from a service developer.
There are several databases of RPM packages, from where you can search and download the package for the distribution and version of your choice. They include www.rpmfind.net and rpm.pbone.net.
As you’ll see in Chapter 4, “Making apt Work for You,” distributions based on the Debian package system are more closely integrated. If you want to install a package from a different distribution with Debian packages, all you need to do is refer to its respective repositories. RPM-based distributions are moving in the same direction with yum.
There are developers who maintain their own distributions. One of the most useful is maintained in apt and yum RPM repositories at dag.wieers.com.
Critical to the concept of patch management is testing. When applied indiscriminately, patches can override working drivers, break existing software, and change the links to key files. They may introduce new features that override services on which you rely.
Best practices suggest that you test every patch before installing it on production computers. Ideally, you’ll have one or more extra computers available for this purpose.
Test computers may be a luxury unavailable to administrators of smaller networks. If you’re in that position, you should at least test each patch on your own administrative system. Every problem you see on your own system is one less problem that you hear about from each of your users.
There is no single method for patch testing. Testing methods are as diverse as available applications and services. I’ve divided the testing process into three categories: installation, applications, and services. In any case, always follow this maxim: Do not install a patch on a production computer before testing.
The first step in testing a patch is installation. When you use the techniques described in this book, there should be no unmet dependencies. However, dependencies often require you to install more patches. Therefore, when you test a patch installation, you need to know what you’re installing to know the scope of the patch.
So, in summary, when checking the installation of a patch on a test computer, check for the following:
When checking a patch, make sure all package dependencies are satisfied. List the packages required to satisfy those dependencies.
If there are dependent packages, include those in your testing.
These are general guidelines that vary with what you’re installing. For example, if you’re installing a new Linux kernel, test everything on a production-level system. If you’re upgrading a stand-alone application, make sure that the upgrade won’t break features on which your users depend. If you’re upgrading a service, make sure that your configuration file still works as intended. If you’re upgrading dependent libraries, make sure they don’t affect the application or services which depend on them.
If you have problems with a patch, check the troubleshooting steps described at the end of this section.
The kernel is the most important patch to test. As the core of the Linux operating system, an upgraded kernel can affect everything. There are several principles that you should follow when testing a new Linux kernel:
Make sure you have a reason to change kernels. Check the release notes for that kernel. You may not need the patch. For example, if a new kernel incorporates a driver for network cards that you don’t use, there is no reason for you to go through all this trouble.
Never upgrade to a new kernel—in a way, that overwrites your existing kernel. Do not delete the existing kernel until you’re finished testing the new kernel.
Most distributions support side-by-side installations of new and existing kernels. In fact, when you install (and don’t upgrade) an existing kernel using a customized binary package, Red Hat/Fedora, SUSE, and Debian all “dual-boot” the new and existing kernels.
Test how the new kernel manages your boot process. Watch as it detects your hardware and starts your services. If there are problems or even unusual delays, the new kernel may have a problem with the associated hardware or service.
Check the log files associated with the boot process. Pay particular attention to services that won’t start or hardware that isn’t detected.
Test the new kernel on your system, based on the release notes. Make sure the new kernel works as intended on your computers.
Test your services and applications under the new kernel. Pay attention to any changes in behavior. Document these changes.
When you’re ready to upgrade the kernel on production computers, tell your users what they can expect.
If you identify a problem with the kernel and absolutely need the upgrade, you may need to recompile the kernel yourself. For more information, see the Kernel Rebuild Guide, available from www.tldp.org. After you rebuild, you can install and start the testing process again.
Many applications are patched frequently. Application patches may incorporate security improvements, additional features, bug fixes, or more. When you see an application patch, don’t just blindly upgrade. Consider the following:
Read the release notes. Evaluate the reason for the patch. Does it add any features that you need? Does it address any bugs which annoy you about the application? Does it improve your security in a way that applies to your computers or your network?
If there are configuration files associated with an application, back them up. For example, if a user customizes the look and feel of The GIMP, a patch might overwrite some of the settings in each user’s .gimp-* configuration directory.
You may want to use configuration files from users who use the application frequently. Tell them that you’re considering an upgrade. They can help identify key features that you will want to preserve.
If you decide that you need the application patch, test it carefully. Download and install it on your test system. Make a list of downloaded packages, especially if there are dependencies.
Test the patch on your system. First, based on the release notes, make sure the patch works as intended.
Identify any changes made to applicable configuration files, and assess their impact on your users. Make notes.
If there are problems with the patch, re-evaluate the changes. Make sure you actually need the patch.
When you’re ready to install the application patch in production, make sure your users know what to expect.
If you identify a problem with an application patch and absolutely need it, see the troubleshooting steps identified at the end of this section.
Many services are patched frequently. Service patches may incorporate security improvements, additional features, bug fixes, or more. When you see a service patch, don’t just blindly upgrade. Consider the following:
Read the release notes. Evaluate the reason for the patch. Does it add any features you need? Does it address any bugs that annoy you about the application? Does it improve your security in a way that applies to your computers or your network?
If configuration files are associated with the service, back them up, at least to another directory.
If you decide that you need the service patch, test it carefully. Download and install it on your test system. Make a list of downloaded packages, especially if there are dependencies.
Test the patch on your system. First, based on the release notes, make sure the patch works as intended.
Identify any differences from the previous configuration files, and assess their impact on your users. Make notes.
If the service is shared on a network, test the upgrade from another computer. Measure the current network demands on this service. If practical, find some way to simulate these demands on the upgraded service.
If there are problems with the patch, re-evaluate the changes. Make sure you actually need the patch.
When you’re ready to install the service patch in production, make sure your users know what to expect.
If you identify a problem with an application patch and absolutely need it, see the troubleshooting steps identified at the end of this section.
If you have a problem with a patch, the problem may or may not be with the patch. It could be a symptom of a different problem. Because troubleshooting depends on what you’re patching, I can provide only general guidelines here. But as with any troubleshooting, it’s best to apply the scientific method:
Observe the problem. Identify its symptoms, using log files where applicable.
Formulate a hypothesis of the cause. Was it the patch? Is there a configuration setting which conflicts with the patch? Is there something else you might need to install?
Test the hypothesis. If correct, you should be able to test the patch in a different way to confirm your hypothesis.
If you’re having trouble formulating a hypothesis, get support. If you’ve paid for support, such as with a subscription to Red Hat Enterprise Linux (RHEL), use it. Otherwise, make use of the documentation. Many Linux administrators have documented their experiences in HOWTOs, FAQs, and more. They may have experienced the problems you’re seeing now.
If you can’t find the answer in existing documentation, you can try documenting your problem on an appropriate mailing list. They’re frequently available for distributions, applications, and services. Identify the problem, the symptoms you’ve seen, the documentation you’ve read, and what you’ve tried to do to address the problem. Many Linux gurus are motivated to “show off” by solving your problem.
Every major Linux distribution includes a repository of installation programs and packages. Distribution developers also maintain patches on these same repositories, and they update these repositories with security patches, upgrades, bug fixes, and new kernels as needed.
In this book, we focus on the releases from the developers of three major distributions: Red Hat/Fedora, Novell/SUSE, and Debian.
The current distribution released by Red Hat is known as Red Hat Enterprise Linux 4 (RHEL). With its reliance on older technologies, it is widely regarded as a conservative, perhaps even boring, distribution. Red Hat has stated that it will provide support and updates for at least five years, which makes it an ideal candidate for the enterprise. But even a boring and stable distribution such as RHEL requires frequent updates.
RHEL updates are limited to computers with valid subscriptions on the Red Hat Network (https://rhn.redhat.com). Each subscription allows you to register one computer on the Red Hat Network, which includes the right to download updates and CDs. I explain how you can purchase and activate a subscription in detail shortly.
RHEL updates are often consolidated onto CDs, on a quarterly basis. If you’ve purchased a subscription to the Red Hat Network, you should be on the email list which notifies you of individual patches and quarterly updates as they’re released. While default updates are taken from Red Hat Network servers, Red Hat supports the use of Proxy and Satellite servers to cache that content on your LAN.
Because RHEL is released under the Free Software Foundation’s (FSF) General Public License (GPL), the source code is publicly available from ftp.redhat.com. Several groups have built the source code, without the Red Hat trademarks, into enterprise distributions that are functionally equivalent to RHEL. We’ll describe some of these “rebuilds,” as well as how to use their repositories, in Chapter 2, “Consolidating Patches on a Red Hat/Fedora Network.”
If you want RHEL, you may have already taken the following steps:
Register with the Red Hat Network at https://rhn.redhat.com.
Examine available RHEL distributions.
Purchase one or more subscriptions for RHEL.
Activate your subscription(s).
Download or acquire the CDs for RHEL.
Install RHEL on your computers.
Update your system through the Red Hat Network.
We’ll describe these steps (except installation) in detail in the following sections.
If you want to install RHEL on more than one computer, it’s best to register first with the Red Hat Network. That will help you manage all your RHEL computers with one Red Hat Network account. If you’re setting up a subscription for a corporate account, read Red Hat’s Best Practices Guide, available from rhn.redhat.com/help/.
To register with the Red Hat Network, you’ll need an account. To create a new account, navigate to https://rhn.redhat.com/newlogin/ and create a new corporate or personal login.
Red Hat currently supports several different versions of RHEL. As you can see in Table 1-1, there are several different versions available; pricing varies by system and architecture. For more information, including current prices, see https://www.redhat.com/software/rhel/compare/.
Table 1-1. Red Hat Enterprise Linux systems
Version | System | Architecture |
|---|---|---|
2.1 | Advanced Server (AS) | x86 |
Enterprise Server (ES) | x86 | |
Workstation (WS) | x86 | |
3 | AS | x86, Itanium, AMD64/Intel EM64T, iSeries/pSeries, S/390, zSeries |
ES | x86, Itanium, AMD64/Intel EM64T | |
WS | x86, Itanium, AMD64/Intel EM64T | |
Desktop | x86, AMD64/Intel EM64T | |
4 | AS | x86, Itanium, AMD64/Intel EM64T, iSeries/pSeries, S/390, zSeries |
ES | x86, Itanium, AMD64/Intel EM64T | |
WS | x86, Itanium, AMD64/Intel EM64T | |
Desktop | x86, AMD64/Intel EM64T |
When you purchase RHEL, you’re buying a time-limited subscription to the Red Hat Network, along with some level of Web, email, or phone-based support. There are three ways to get a subscription to RHEL:
Direct from Red Hat; for options, see www.redhat.com/software/rhel/.
As a boxed set from Red Hat or a third party.
Preinstalled on a server or workstation.
When you purchase RHEL, there are two ways to activate your subscription. If you have a registration number, you can activate your subscription at www.redhat.com/apps/activate; you can also activate a RHEL 4 subscription during the installation process. In either case, make sure to link this subscription to the appropriate Red Hat Network account.
Alternatively, if you purchased your subscription directly from Red Hat in the USA or via www.redhat.com, your subscription should already be active in your Red Hat Network account.
When you have a subscription to RHEL, you can download the CDs from the Red Hat Network. Because you’ll be downloading two or more GB of data, you’ll need a high-speed Internet connection. You can then download the CDs in ISO format by using the following steps:
Make sure you have sufficient room for the RHEL CDs. The four CDs of binary packages alone can easily require 2.5GB of space on a hard drive.
Log into the Red Hat Network at rhn.redhat.com.
To find the distributions that you can download, select Channels.
You can download individual packages from available software channels listed on this Web page.
To find the ISOs that you can download, select Easy ISOs.
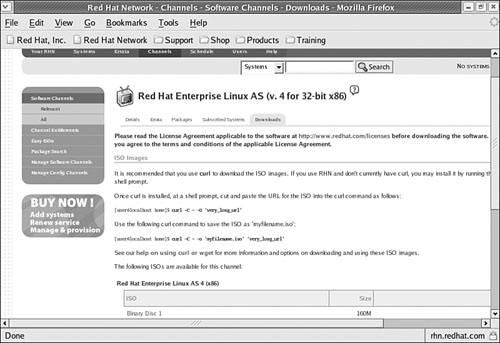
Select the desired distribution channel, such as Red Hat Enterprise Linux AS (v.4 for 32-bit x86).
You can download ISOs directly from the Red Hat Network at a Web page that looks similar to Figure 1-1.
Download the ISOs that you need. As shown in the figure, you can click the Install Disc links directly or use the
curlcommand. Copy and paste the URL for the ISO into thecurlcommand as follows:#curl -C --O 'very_long_url'
Of course, if you’ve purchased a boxed set, you can use the CDs directly from the box. Now you can set up an installation repository for your RHEL distribution. If you have the physical CDs, they’re easy to mount. Just insert them into the drive, and run the mount /media/cdrecorder or mount /mnt/cdrom command.
You can mount ISO files as if they were physical CDs. For example, I’ve downloaded the first ISO for RHEL AS 4 in my home directory and mounted it with the following command:
# mount -o loop /home/michael/RHEL4-i386-AS-disc1.iso /media/cdrecorder
You can then copy the files from each CD to the installation directory of your choice. After you share these files with the NFS, FTP, or HTTP protocols, you can then install RHEL from this directory over your LAN. Make sure to copy the hidden .discinfo file from the first installation CD; you can then use this installation repository for Red Hat’s system-config-packages utility.
Alternatively, you can configure a RHEL installation repository simply by sharing the directory with the installation ISO files on an NFS network.
The steps required to install RHEL are beyond the scope of this book. For more information on RHEL installation, see Red Hat’s installation guide, available from www.redhat.com/docs/manuals/enterprise.
If you’re installing RHEL on a computer that you intend to use as a local Red Hat Network Proxy Server, keep the packages that you include to a minimum.
RHEL’s Update Agent, also known as up2date, provides a complete system for updating the RPM packages installed on your RHEL computers. It allows you to register with and monitor appropriate Red Hat repositories for updates. In Chapter 2, you’ll learn how to configure a Red Hat repository locally on your computer.
You can review a standard RHEL 4 Network Alert Icon in Figure 1-2. It’s a circle next to the date in the upper right part of the GUI. There are four options associated with this icon, which is available only in the GUI:
The red exclamation point in the upper-right part of the figure indicates that this system is not fully up to date.
If you see a green icon with arrows pointing in two directions, the Update Agent is currently checking the repository for updates.
If you see a gray icon with a slash through it, RHEL on your computer is unable to connect to the repository. There may be a problem with the connection from your system or to the computer with the repository.
A blue check mark means that your system is fully up to date with the latest patches.

As you can see in the figure, there are four options associated with the Update Agent:
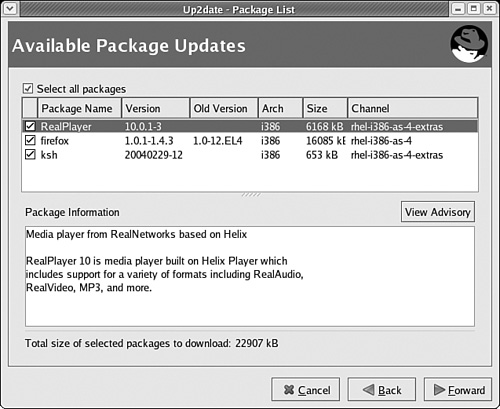
Check for updates allows you to check the versions of packages on your system against those in the RHEL repository. If you see a red exclamation point, updates are available. When you’ve configured the Update Agent, you can call up the list by clicking the exclamation point; you’ll see a screen similar to Figure 1-3.
Launch up2date initiates the Red Hat Update Agent. You’ll examine the process from a standard computer in the next section.
Configuration starts the Red Hat Network Alert Notification Tool.
RHN Website opens your default Web browser and navigates to rhn.redhat.com.

There are several things that you need to configure the Update Agent.
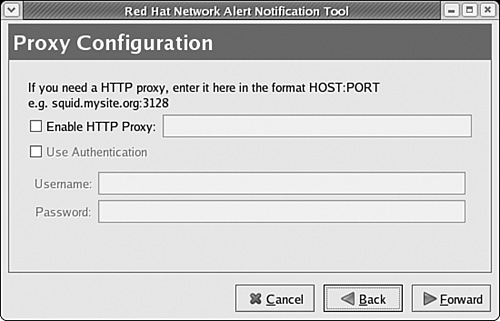
If you have a proxy server on your network, you’ll need to configure the Red Hat Network Alert Notification Tool. In the GUI, right-click the Update Agent icon, and click Configuration from the shortcut menu that appears. This opens the Red Hat Network Alert Notification Tool window. Click Forward through the Terms of Service to reach the Proxy Configuration page shown in Figure 1-4.
Test the result. Right-click the Red Hat Network icon, and then select Check for Updates. When you next hover your mouse over the icon, you’ll see the number of updates available. You can click the icon to bring up the available updates; you’ll see a screen similar to Figure 1-3.
Alternatively, in the command line interface, you can find a list of available updates, along with their dependencies, with the following command:
# up2date --dry-run
Now you can update RHEL using the Update Agent. You can start the process in a number of ways; one method that works in both the GUI and text console is the up2date command. We illustrate the process in the GUI for clarity; the process is essentially the same at the text console, and requires the following steps:
From the command line, run the
up2datecommand.When the Welcome to the Red Hat Update Agent window displays, click Forward.
If you see a Login Page, you’re prompted to enter your Red Hat Network account. You can then enter a new subscription number or prompt the Update Agent to use an existing active subscription. The Update Agent then sends your hardware information and collects a list of packages currently installed on your computer.
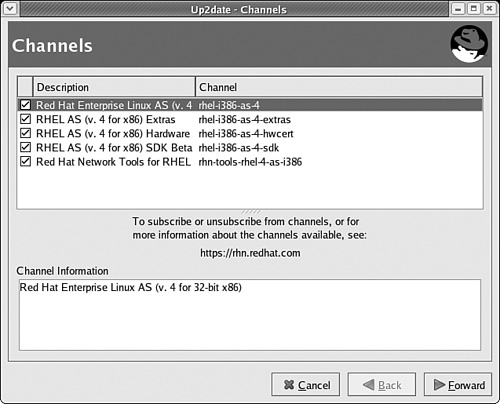
If you need to change the Red Hat Network account for your computer, such as from a personal to a corporate account, you can force the Update Agent to reset your account information with the
up2date --registercommand. If you’re using RHEL 2.1, the command isrhn_register --configure.Now you’ll see a list of available channels, such as those shown for my server in Figure 1-5. If you have more than one channel available, you can change update selections as desired. When done, click Forward to continue.
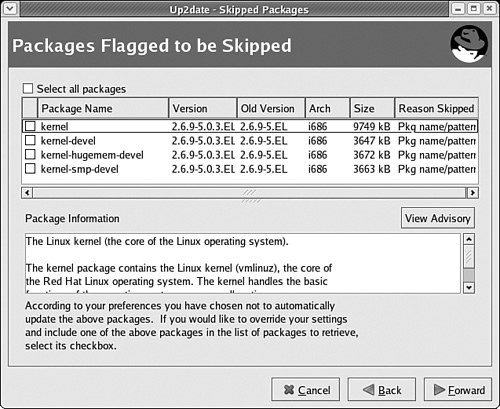
The Update Agent fetches headers from the repository associated with each channel. By default, it skips downloads of any kernel related packages, as shown in Figure 1-6.
You can change the list of packages to be skipped with the
up2date --configcommand. This opens a Red Hat Network Configuration window. You can change the list of packages under the Package Exceptions tab.Next, you’ll see a list of available package updates from your channels. You can select the packages of your choice, as shown in Figure 1-7. Click Forward when ready.
The Update Agent tests for dependencies. If found, other required packages are added to the update list. The Update Agent then proceeds with retrieving packages. When the process is complete, click Forward to continue.
Updated packages are downloaded by default to the
/var/spool/up2datedirectory.The Update Agent proceeds with installing the downloaded packages. When the process is complete, click Forward to continue.
The Update Agent lists the packages that it installed or upgraded on your system. Click Finish after you’ve reviewed these packages.
Naturally, Red Hat’s Update Agent is much more flexible when started from the command line interface. As an administrator, you may administer a number of your systems remotely; in this case, the command line interface is more efficient.
The Update Agent configuration command is up2date-nox --configure. As it opens several-dozen configuration options, it’s best to pipe the output to a pager with a command such as
up2date-nox --configure | less
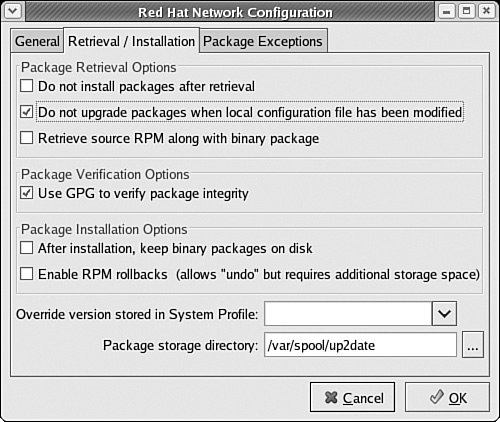
You can review the settings associated with the Update Agent in Table 1-2; the sequence in this table is based on RHEL 4. Changes are saved in /etc/sysconfig/rhn/up2date. Alternatively, if you run up2date --configure in the GUI, you’ll find many of the same settings in Figure 1-8.
Table 1-2. Update Agent configuration options
Option | Description |
|---|---|
debug | Enables or disables debugging |
useRhn | Set to yes if you have and want to use a RHEL subscription or a Proxy/Satellite server |
rhnuuid | Specifies the unique Red Hat Network user ID for the computer |
isatty | Connects the output to a terminal |
showAvailablePackages | Lists all available packages from the repository; disabled by default |
useNoSSLForPackage | Allows unencrypted downloads; disabled by default |
storageDir | Specifies a directory for headers, RPMs, and other files downloaded from the repository; default is |
pkgSkipList | Specifies packages that the Update Agent should skip when searching for updates; |
retrieveOnly | Sets update retrieval without installation; disabled by default |
noSSLServerURL | Specifies the URL for the repository |
networkSetup | Sets up the use of the Update Agent network configurator, where you can specify any proxy server on your network; one method is shown in Figure 1-4 |
networkRetries | Configures the number of times the Update Agent retries when there is a connection problem |
pkgsToInstallNotUp | Specifies the names of packages that are not installed automatically with an |
enableProxy | Allows you to update through a local proxy server, which controls your LAN’s connections to the Internet |
noBootLoader | Disables any upgrades to the boot loader |
proxyPassword | Sets a password to use for a local proxy server |
updateUp2date | Allows the Update Agent to update itself when an upgrade is available |
keepAfterInstall | Stores downloaded packages and headers in storageDir after installation |
useGPG | Requires the use of GPG signatures to verify the integrity of a package |
headerCacheSize | Configures a maximum number of headers to cache in RAM |
forceInstall | Overrides pkgsToInstallNotUp; would install new kernel |
systemIdPath | Specifies the file with System ID information |
retrieveSource | Configures retrieval of source RPMs; disabled by default |
enableRollbacks | Allows you to undo the current update; disabled by default |
gpgKeyRing | Specifies the file with the Update Agent GPG key |
adminAddress | When the Update Agent is run in batch mode, with the |
serverURL | Specifies the URL with the repository; may be changed if you’ve configured an Update Agent Proxy or Satellite server |
fileSkipList | Allows you to specify files for the Network Agent to skip |
versionOverride | Overrides the version listed in |
sslCACert | Specifies the file with the SSL Certificate |
noReplaceConfig | Packages that would change configuration data are not installed by default |
enableProxyAuth | Supports the use of an authenticated proxy server |
disallowConfChange | Sets a list of configuration changes not allowed through the Update Agent |
headerFetchCount | Sets the maximum number of RPM headers to acquire at a time |
Assigns a username for an authenticated proxy server | |
removeSkipList | While the Update Agent removes packages from StorageDir by default, this list specifies packages which should not be removed |
httpProxy | Specifies the URL of the local proxy server; standard TCP/IP ports suggest an address such as squid.example.com:3128 |
noReboot | Disables any instruction to reboot this computer |
There are a number of other useful actions that you can take with the Update Agent. They’re associated with different switches for the up2date command. While a complete list is available in the associated man page, I’ve listed the more important alternatives here:
up2date --configure
As described earlier, this command allows you to configure Update Agent options. If you’re in the GUI, this opens the Update Agent configuration window shown in Figure 1-9; if you want the full functionality associated with the command line interface, use the up2date-nox --configure command.
up2date --register
This command allows you to register (or revise your registration) with the Red Hat Network.
up2date -d packagename
This command downloads specified packages, without installing them. If you already have the most up-to-date version of the packagename, you’ll see a message to that effect.
up2date --src packagename
This command downloads the source package along with the associated binary RPM. If you already have the most up-to-date version of the packagename, you’ll see a message to that effect.
up2date --show-channels
This command lists the channels available for updates to your computer. For more information on Red Hat Network channels, see Chapter 2.
up2date --hardware
The --hardware switch updates the hardware profile for your computer, as documented on the Red Hat Network.
up2date --list-rollbacks
This switch lists packages that you can restore to their former versions.
up2date -u
This command automatically updates your system with all upgradeable packages.
up2date --installall --channel=rhel-i386-as-4
This downloads and installs all packages from the given channel, as defined in the output from the up2date --show-channels command. Naturally, you’ll want to enable the KeepAfterInstall configuration option described in the previous section. Otherwise, the Update Agent deletes these packages after downloading and installing them on your system.
If you administer just a few RHEL computers on a network, you may choose to configure them to download their updates directly from the Red Hat Network (after you’ve tested each update, of course). But if you have a substantial number of RHEL computers, their simultaneous updates may overload your connection to the Internet.
There are several methods you can use to manage and maintain control of how you keep your systems up to date.
Red Hat provides CD-based updates of its RHEL distributions on a quarterly basis. These updates include all upgraded packages otherwise available through the Update Agent. You can store these packages in a local installation repository and upgrade your system with said packages.
Another way to update a group of RHEL systems is with a proxy server. A Red Hat Network Proxy Server stores content locally and passes authentication requests to the Red Hat Network. It requires a relatively high-powered system; minimum requirements shown in the release notes include
Dell PowerEdge 1750 server or equivalent
Two or more CPUs
512MB of RAM
3GB of storage for RHEL AS
1.5GB for source and update packages
These are relatively minimal requirements. If you’re storing updates for more than one version of RHEL, practical hardware requirements increase accordingly.
The default Red Hat Network Proxy Server is available with 10 desktop subscription entitlements. Other packages may be available; contact Red Hat sales or www.redhat.com for more information.
You can learn how to install and configure the Red Hat Network Proxy Server in Chapter 2, as well as how to configure your RHEL clients to connect to those servers.
If you have a larger network, or one which requires a higher level of security, you may want more control over how your computers communicate with the Red Hat Network. This is possible with the Red Hat Network Satellite Server. Authentication, policies, and profiles are stored on the Satellite Server. Updates can be “pushed” directly to the clients of your choice. A Satellite Server can also serve as an installation server, from which you can automate the RHEL installation process on as many computers for which you have subscriptions.
Nominally, the hardware requirements for a Satellite Server are not significantly greater than for a Proxy Server. But if you have the number of RHEL systems that justify a Satellite server, you’ll want to follow Red Hat recommendations, including
Dell PowerEdge 2650 server or equivalent
Two or more 2.4GHz CPUs
2GB-4GB of RAM
3GB of storage for RHEL AS
5GB for source and update packages—per channel (such as for different hardware-based versions of RHEL)
2GB of storage for database RPMs
36GB of storage in the database repository
These are relatively minimal requirements. If you’re storing updates for more than one version of RHEL, practical hardware requirements increase accordingly.
The default Red Hat Network Proxy Server is available with 50 desktop subscription entitlements. Other packages may be available; contact Red Hat sales or www.redhat.com for more information.
You can create your own repository of available updates. If you enable the KeepAfterInstall option, updates that you download are stored in /var/spool/up2date. You can then share these updates with other computers on your network. Assuming their configurations are identical, you can upgrade with these same packages. Some administrators have been known to configure downloaded packages in a yum repository, as demonstrated in Chapters 6, “Configuring a yum Client,” and 7, “Setting Up a yum Repository.”
Alternatively, you can point the Upgrade Agent to repositories created by one of the Red Hat Rebuilds that you’ll learn about in Chapter 2.
The SUSE distributions, now owned by Novell, have a very different look and feel from the RHEL distributions. Administrative tools are integrated into the SUSE all-in-one tool, known as YaST (Yet another Setup Tool). While YaST is not geared to the command line interface, it does support a low-level graphical screen even from remote consoles, and it has a similar look and feel to YaST in the GUI.
In this section, you’ll examine detailed workings of the YaST Online Update tool and get a feel for what you can do with repositories on SUSE Linux Enterprise Server (SLES). Unlike Red Hat, SUSE does not have a dedicated interface for subscriptions similar to the Red Hat Network.
In this section, you’ll examine YaST Online Update on SUSE Linux Professional 9.3. Unlike RHEL, registration is not required at this operating system level. YaST Online Update, also known as YOU, provides a complete system for updating the RPM packages installed on your SUSE Linux Professional computers. It allows you to monitor appropriate SUSE repositories for updates. In Chapter 2, you’ll learn how to configure a SUSE repository locally on your computer.
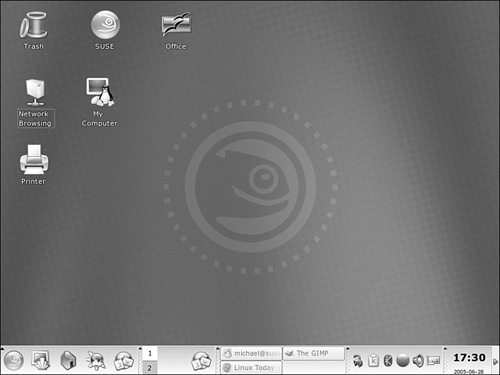
You can review a standard SUSE Professional GUI in Figure 1-9. You’ll see a circle next to the date in the lower-right part of the GUI. A red exclamation point indicates that updates are available.
To start YaST Online Update, take the following steps:
Click Menu -> System -> YaST.
You’re prompted to enter the root password before SUSE opens YaST.
In the YaST menu, select the Software option from the left-hand pane, and then select Online Update.
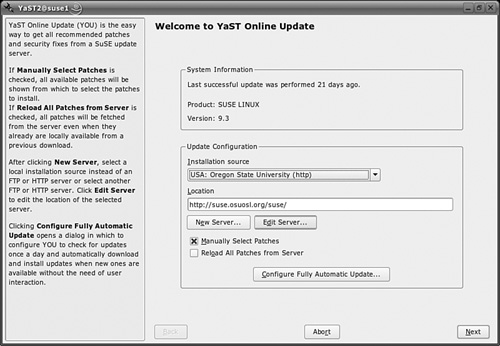
You can now configure YaST Online Update, as shown in Figure 1-10.
You can configure YaST Online Update in several different ways. The Installation source drop-down box allows you to choose from several pre-configured SUSE update mirrors from the USA or Europe. You can specify the URL of your choice in the Location text box. Click New Server, and you can select a local source on a directory, CD, or DVD. You can also select a network source from a FTP, HTTP, Samba, or NFS server. For your first update, select a preconfigured Installation source and the Manually Select Patches option.
If your chosen repository requires a user name and password, click Edit Server. You can verify authentication here.
When you’re comfortable with YaST Online Update, you can Configure Fully Automatic Update from this window, which allows automated updates on a daily or weekly basis, starting at a time specified by you.
When you’re finished with this window, click Next to continue.
YaST Online Update opens a window telling you that it’s “Retrieving information about new updates.” This process may take several minutes.
You can now configure the patches to be downloaded and installed, as shown in Figure 1-11.
You can customize what YaST Online Update does with each patch. As shown in Figure 1-11, you can set several conditions on what to do with each patch:
Install
Do not install during this update
Never install this package with YaST Online Update
Keep; retain the current package as is
Update if a newer version of this package is available
Update always; may overwrite previous configurations
Do not modify this package
Review the list of available packages. When ready, press Accept to continue.
YaST Online Update now proceeds with downloading the patches you’ve selected.
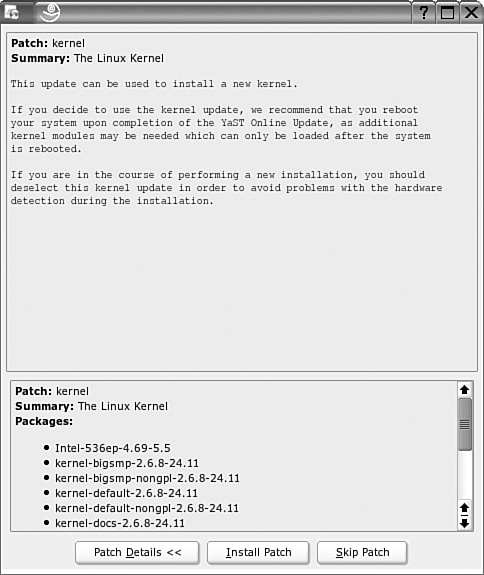
If you’ve included a kernel in the update list, YaST Online Update requests confirmation, as shown in Figure 1-12. As you can see for yourself, a kernel update includes several different packages. Unless you’re ready to risk a new kernel, press Skip Patch.
You may also have to confirm installation of other patches for packages, such as databases.
When the process is complete, you’ll see a message listing the number of patches which have been installed. Click Finish to continue.
To complete the process, YaST Online Update writes the system configuration and runs the scripts in the
/sbin/conf.ddirectory to integrate patches into your system.

When complete, you can find a repository of download patches in the following directory:
/var/lib/YaST2/you/mnt/i386/update/9.3
The directory with your patches will vary slightly, depending on your CPU and version of SUSE Linux. This repository includes four different categories of patches, as associated with their subdirectories:
Deltas include relatively small changes in the RPM package for installed systems.
Patches include text descriptions of the changes associated with each patch.
RPMs include new RPM packages; they’re generally installed as an upgrade to your current system.
Scripts include small text programs that generally apply new drivers to your system.
If you’re running SUSE Linux Enterprise Server 9, downloads are divided into SUSE-SLES and SUSE-CORE packages. The SLES packages are associated with the first installation CD; the CORE packages include downloaded updates associated with the remaining CDs. In other words, you can find updates in the following two directories:
/var/lib/YaST2/you/mnt/i386/update/SUSE-SLES/9
/var/lib/YaST2/you/mnt/i386/update/SUSE-CORE/9
Downloaded RPMs, patches and scripts can be found in the same subdirectories.
SUSE Linux Enterprise Server is designed to hold repositories. In SUSE Linux Enterprise Server 9, there is a YOU Server Configuration option available with the Online Update. When you start this server, you’ll see the YaST Online Update Server Configuration screen shown in Figure 1-13.

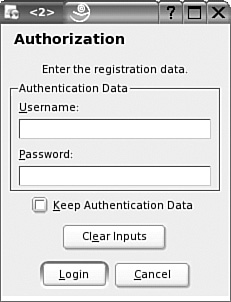
If you have a valid subscription for SUSE Linux Enterprise Server, it’ll be associated with your SUSE Linux online account. In the Update Server configuration screen, select a server and then click Edit Server. This opens the Authorization window shown in Figure 1-14, where you’ll need to enter the username and password for your account. Any SUSE subscriptions should be automatically linked to that account.
Two of the flagship distributions in the SUSE Linux line are SUSE Linux Professional and SUSE Linux Enterprise server.
While each version of SUSE Linux Professional is available only for sale during the first few months of each release, it’s available for download after that. For more information, see www.novell.com/products/linuxprofessional/. It’s best if you use a mirror; links are available from the noted Web site. As of this writing, downloads of SUSE Linux Professional 9.3 are available as a DVD ISO or a standard installation tree. If you download the installation tree, you’ll need a boot CD or floppy. Starting with version 10.0, Novell has made an open source version of SUSE Linux Professional available at www.openuse.org.
SUSE Linux Enterprise Server is available with a 30-day evaluation license. More information is available from www.novell.com/products/ linuxenterpriseserver. You’ll need a Novell account before you can download this system. SUSE Linux Enterprise Server 9 requires that you download six CDs from the SUSE servers in Ireland or Utah (USA).
As of this writing, with instructions available on the download page, you can extend the evaluation to six months. The license is only required for updates; the server remains functional thereafter.
For me, Debian offers what I think of as the Heathkit version of Linux. It offers a wide degree of flexibility. Debian repositories offer a wider variety of packages than any other distribution that I know.
Debian hearkens back to the origins of Linux, where it was solely a cooperative arrangement between developers. As you can see at www.debian.org, this distribution is the province of its volunteers. However, there is commercial support available for Debian. Ian Murdock, one of the founders of Debian, started Progeny as a company which provides commercial support for Debian (and several other versions of Linux). For more information, see www.progeny.com.
The current version of Debian Linux is known as Sarge. There is also a “testing” distribution, similar to a beta, known as Etch. The developmental distribution, which includes packages more likely to have problems, is known as Sid. You might recognize these names from the Disney movie Toy Story.
Debian Linux is different. You could download the 14 CDs or 2 DVDs associated with Sarge and install Debian from there. You could store the associated packages in a network repository. I have a fairly speedy cable modem connection, and I still find the thought of downloading this amount of data rather intimidating.
If you don’t have a high-speed connection, you can purchase CDs or DVDs from vendors, such as www.cheapbytes.com or www.thelinuxshop.co.uk. I’ve installed Debian Sarge over a network connection, installing just the packages that I need. For this purpose, a high-speed connection is still the only practical method. I’ve started with the first installation CD. I was able to install enough of the operating system, including links to Debian repositories in /etc/apt/sources.list. For more information on this method, see www.debian.org/CD/netinst/.
After you’ve installed the basic Debian distribution, you’ll want to configure your /etc/apt/sources.list file with one or more appropriate repositories. One list is available in the Debian Web page of mirrors at www.debian.org/mirror/list. I count mirrors available in over 50 countries.
To use a mirror, you’ll want to specify the URL, the distribution, and whether you want to be able to download source code. In my case, I’ve added the following mirrors to my sources.list file:
deb ftp://debian.oregonstate.edu/debian/ stable main
deb-src ftp://debian.oregonstate.edu/debian/ stable main
This points my Debian computer to a mirror at Oregon State University. This is direct from the Debian Web page of mirrors noted previously. As I’ve installed Debian Sarge on my system, I’ve listed the stable repository. I’ve also noted the main set of packages. If I wanted additional packages contributed by other developers, I’d add contrib to these lines. If I wanted to access repositories of proprietary packages, I’d add non-free to these lines.
The Debian patch management system is very closely integrated with the apt series of commands. You’ll learn about the apt commands in detail in Chapter 4. The strength of apt is how it searches for and includes any dependent packages as it installs (or removes) the packages you desire.
The apt commands are also in common use on Debian-based distributions, such as Knoppix, as well as some RPM-based distributions, such as Conectiva.
There are two apt commands which I use more than others. The first command is the following:
apt-cache search searchterm
I can check the repositories configured in my /etc/apt/sources.list for the package of my choice. All I need is a search term; for example, if I wanted to search for packages related to Linux office suites, I substitute office for searchterm. My repositories return a wide variety of packages, including the OpenOffice.org, KOffice, and Abiword applications, as well as related programs that might fit in an Office suite, such as xfonts and the HP Office Jet driver (hpoj).
The other apt command I use frequently is
apt-get install packagename
For example, if I want to install the standard Linux DNS server, I substitute bind for packagename. The appropriate version of bind is installed; if there are dependencies, they are also installed. If additional configuration is required, Debian prompts me for appropriate selections. Alternatively, if I wanted to remove a package with dependencies, I could run the following command:
apt-get remove packagename
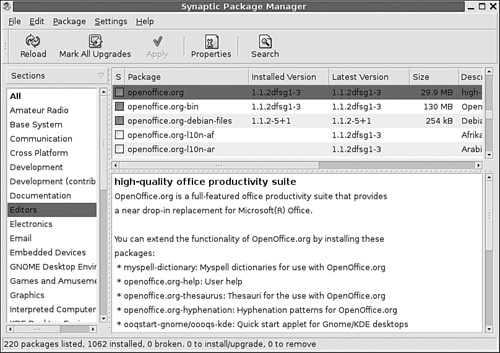
Synaptic offers a GUI front-end to the apt system. As you can see in Figure 1-15, Synaptic allows you to graphically view, install, and remove the packages you desire.
There are hundreds of Linux distributions. Many have their own update repositories. I’ll mention a few of the more important Linux distributions here:
Mandriva Linux. As of this writing, this company is merging the former Mandrake and Conectiva distributions. Mandrake was developed from Red Hat Linux and uses RPMs; they have a wide variety of graphical tools. Conectiva is the developer of apt for RPMs; before their work, the
apttools were most closely associated with Debian-based distributions. For more information, see www.mandriva.com.Yellowdog Linux. While this distribution was developed for PowerPC computers, their update tool, Yellowdog Updater, Modified (yum) is widely used on RPM-based distributions, including Red Hat’s Fedora Linux. For more information, see www.yellowdoglinux.com.
Linspire. Formerly known as Lindows, this distribution is known for its user friendliness and support, which has made it one of the distributions of choice at Walmart. For more information, see www.linspire.com.
Knoppix. This Debian-based distribution has quickly gained fame as the “handyman” that can fix numerous problems with Linux (and even Microsoft Windows) computers. For more information, see www.knoppix.org.
It’s not fair that I don’t really have the space to mention other Linux distributions. There are many other excellent distributions available, with repositories that you can use and even replicate on your own networks. Many of these distributions use the yum and apt tools that you can learn about in the last half of this book.
Besides Debian Linux, there are a number of distributions and “rebuilds” backed by a community of developers and users. This list includes Fedora Linux, the community-based offering of Red Hat, along with other distributions, such as Slackware Linux.
The most common current examples of rebuilds are the groups that have taken the source code from Red Hat Enterprise Linux and built their own binary packages and even downloadable CDs/DVDs.
When Red Hat moved to a subscription model for its flagship RHEL distribution, it wanted to retain the support of the Linux community. For this reason, it started the Fedora Linux project. Red Hat has stated that Fedora Linux distributions will be released every 4 to 8 months, and it will be the testbed for future RHEL releases. As of this writing, the current version is Fedora Core 4, and we’ll be using that version in our examples.
As a community project, Fedora Linux does not have access to the Red Hat Network. However, as a RHEL testbed, it uses the same basic Update Agent as described earlier in this chapter.
Therefore, Fedora Linux needed a community-based repository and update tool. The basic repositories are listed at fedora.redhat.com/download/mirrors. The basic update tool is the tool associated with Yellowdog Linux, yum. Before you can start the update process, you’ll need to import the Fedora GPG key into your update system. As it’s already available in the /usr/share/rhn directory, all you need to do is run:
rpm --import /usr/share/rhn/RPM-GPG-KEY-fedora
If you’re using Fedora Linux, you should update the files in the /etc/yum.repos.d directory. The default version of this directory includes six files:
fedora.repoincludes the basic Fedora Core repository.fedora-updates.repocontains the updates associated with Fedora Core.fedora-updates-testing.repohas updates that may not be ready for production for Fedora Core. These are proposed updates.fedora-extras.repocontains additional packages which are tested for Fedora Core, but are not part of the official distribution.fedora-extras-devel.repohas packages that may not be ready for production for the Extras repository of Fedora Core. These updates are incorporated in the Extras repository when they’re ready for production.fedora-devel.repoincludes the repository with the regular rebuilds of packages; formerly known as Rawhide.
These files include two variables, $releasever and $basearch. They refer to the release version of Fedora Core and the CPU version, respectively.
My version of this file in Fedora Core 4 points to random mirrors. The first time I ran yum, this file pointed my computer to a repository in Denmark. As I am in the USA, that is not what I want. So I’ll want to change each of the files in the /etc/yum.repos.d directory. For example, if I wanted to use the mirror at North Carolina State University at ftp://ftp.linux.ncsu.edu/, I’d comment out the mirrorlist command in each of the six files and substitute in the following files:
fedora.repobaseurl=ftp://ftp.linux.ncsu.edu/pub/fedora/linux/core/$releasever/ $basearch/os/
fedora-updates.repobaseurl=ftp://ftp.linux.ncsu.edu/pub/fedora/linux/core/updates/ $releasever/$basearch/
fedora-updates-testing.repobaseurl=ftp://ftp.linux.ncsu.edu/pub/fedora/linux/core/updates/ testing/$releasever/$basearch/
fedora-extas.repobaseurl=ftp://ftp.linux.ncsu.edu/pub/fedora/linux/extras/ $releasever/$basearch/
fedora-extas-devel.repobaseurl=ftp://ftp.linux.ncsu.edu/pub/fedora/linux/extras/ development/$basearch/
fedora-devel.repobaseurl=ftp://ftp.linux.ncsu.edu/pub/fedora/linux/core/development/ $basearch/
You should update these files with the mirror-based repositories of your choice. It’s OK to have more than one repository listed in each of the /etc/yum.repos.d configuration files. We’ll explore this process in more detail in Chapter 2.
There are several different groups that have rebuilt the Red Hat Enterprise Linux source code. This is allowable because Red Hat has released the source code for almost all RHEL packages under the GPL or related open source licenses. Before release, each of these groups has modified the source code to remove Red Hat trademarks. While there are several versions of RHEL 4, the developers behind the rebuilds have configured a generic rebuild, which can be configured as a server or workstation. While these rebuilds generally support 32- and 64-bit x86 systems, support for other architectures varies.
Some of the groups behind RHEL rebuilds include the following:
cAos is the group behind CentOS 4, which is based on the source code for RHEL 4. It has a strong following and is based on a community of volunteers. For more information, see www.caosity.org.
White Box Linux was developed by a group associated with a Louisiana library system; they had the first available rebuild of RHEL 3. For more information, see www.whiteboxlinux.org.
Lineox was built by a company in Finland, the original home of Linus Torvalds. They offer CDs, DVDs, and paid levels of support. For more information, see www.lineox.net.
Fermi Linux was rebuilt by several developers at the Fermi National Accelerator Laboratory near Chicago. Scientific Linux was developed from Fermi Linux and is maintained by developers at similar laboratories including the European particle physics laboratory (CERN). For more information, see www-oss.fnal.gov/projects/fermilinux/ and www.scientificlinux.org.
A more complete list of RHEL rebuilds is available at www.linuxmafia.com/faq/RedHat/rhel-forks.html.
When you configure a LAN with Linux, you need to consider the demands of patch management along with any other requirements of your users. While you can certainly schedule patch management upgrades during off-hours, there are a number of other demands which are often scheduled for off-hours, including backups, CPU intensive database programs, and more. This includes scripts run in the middle of the night on Linux computers, such as those in the /etc/cron.daily directory.
As an example, there have been around 2GB in updates to Fedora Core 3 over a four-month period. Averaged over this period, that’s approximately 20MB of downloads per day. That’s a problem only if you connect to updates via telephone modem (nearly half of all Internet connections in the USA still use a telephone modem). Therefore, one practical requirement for Linux patch management is a high-speed connection.
An update of 20MB per day might not be a big problem if you have one or two Linux computers and a typical residential DSL (Digital Subscriber Line) or Cable Internet connection. However, if you’re running a network of Linux computers, you need to think about your requirements. If you choose to consolidate patches on a local computer, you’ll need a computer that can handle the patch management demands from possibly all the other computers on your network.
The hardware requirements increase depending on whether you need to download source packages—and whether you’re planning Linux patch management for more than one architecture on your network.
If you have a substantial number of Linux computers, it may be cost effective to buy, configure, and dedicate one or more computers to the patch management task. For example, assume that you have a network of 100 computers, and patch management requires that each of these computers downloads 20MB per day. Downloading an additional 2GB per day, every day, can be expensive on business-level Internet connections.
Some packages, such as those associated with the OpenOffice.org suite, require several hundred MB to update. If 100 computers on your network download these packages simultaneously, this can overload many business-level Internet connections. For example, it could take all night for 100 computers to download this amount of data over a “T3” connection. This type of connection can easily cost upwards of $10,000/month.
If you can configure a proxy server, you could download Linux patch data once from the Internet, and then the 100 computers on your network could download the patches locally. You would then save the additional costs for your Internet connection.
Depending on the number of computers that require updates, you may want to configure more than one patch management proxy server for your network. While details are beyond the scope of this book, you should consider several factors before making this decision:
Marginal costs; what is the additional cost required if all your systems accessed a remote repository through the Internet?
Network capacity; for example, whether your network conforms to Ethernet or faster standards. The Red Hat hardware requirements for proxy servers specify computers with Gigabit Ethernet adapters.
Control; if you have subscriptions to a Linux support service, you may prefer to store those subscriptions on a local server. Some subscription services make this possible.
Frequency of updates; how often do you need to update or synchronize each of your proxy servers with each other and a central repository through the Internet.
You can examine some of these factors in the following sections.
Any computer that you configure as a local repository for Linux patch management meets the definitions of a proxy server. It caches content from the Internet for use by multiple computers on your network.
As suggested earlier in this chapter, Red Hat includes some fairly rigorous requirements for Red Hat Network Proxy Servers. It’s unlikely that you’ll be able to recycle an older workstation for this purpose.
If you’re configuring a new computer as a Linux patch management repository, you should first consider any recommendations from your distribution supplier. Among others, Red Hat and Novell/SUSE have experience with caching content from the Internet.
In general, CPU speed is less important on a proxy server. If you’ve dedicated a computer as a proxy server, you’re not expecting it to run many independent programs. However, if your network includes a substantial number of computers which need access to your local repository, multiple CPUs can be useful. The important hardware requirements of a proxy server repository include the following:
Network connections. If you have a limited budget for network hardware, it’s worth focusing the latest hardware on your repositories. In other words, make sure that computer has the fastest network cards, along with faster hubs, switches and routers nearby, when possible.
Hard drives. Naturally, Linux patch management repositories require larger hard drives for the many GB of data associated with each distribution. Access speed, controllers, and caching size are more important on a proxy server.
Hardware reliability may be less important on a Linux patch management repository. After all, this computer is essentially just a mirror of data that is already available. If that computer fails, you can reload the data through the Internet. However, if Linux patches are important and time-sensitive in your organization, your view of this may differ.
Hard drives don’t always have to be large. If you’re only storing updates on a Linux patch management repository, all you need on a proxy server is room for the operating system and the package updates. With today’s Linux distributions, that amounts to less than 10GB of data (even for SUSE Linux).
But this may grow quickly depending on your needs. As suggested earlier, if you have more than one type of system architecture, such as Intel 32-bit, 64-bit, PowerPC, and so on, data requirements can grow exponentially.
In addition, if you have more than one version of Linux that requires updates, you’ll need to keep separate repositories for each. In other words, not only do you need separate repositories for any RHEL, SUSE, and Debian computers, you’ll need separate repositories for RHEL 3, RHEL 4, SUSE 9.0, SUSE 9.1, SUSE 9.2, SUSE 9.3, SUSE 10.0, Fedora Core 1 through 5, and more.
The size of your repositories could easily double if your users need access to the source code.
Source code is readily available because of the requirements of the GPL. This allows any developer to take the source code and modify it for their own needs. Developers can modify and redistribute GPL source code, as long as it is still released under the GPL.
But unless you’re administering a network with Linux developers, you might think that you don’t have to worry about Linux source packages.
You don’t have to be a developer to need Linux source code. Anyone who wants to customize the Linux kernel needs the source code. While some distributions make the source code available in a binary package, Red Hat releases its build of the kernel source code as a source RPM.
Linux drivers for many hardware components are still under development. Experimental drivers often work well. But to install many of these drivers, you need the kernel source code.
The need for source code is not limited to the kernel. Regular users can modify the source code of many GPL-licensed programs. All they need is the source code, and they can revise, compile, and rebuild the program of choice.
Even if all the Linux computers on your network run the same version of the same distribution using the same CPU, you may need more than one repository. As noted earlier, Fedora Core 4 includes configuration files for six different repositories. While most users don’t need to access the Red Hat development, or repositories, you never know when one user might be so desperate for the latest features that he is willing to try a development version of his favorite program.
You might need separate repositories on a Linux patch management server for the following reasons:
Distribution brands; each distribution brand builds its packages differently and therefore maintains separate repositories.
Distribution versions; for example, if you have a reliable server on RHEL 2.1, you might not want to upgrade to RHEL 4, even though a subscription makes this possible. Red Hat has committed to support each of its enterprise distributions for at least five years, which means you might need to maintain local repositories for RHEL 2.1 through at least 2007.
Number of architectures; for each architecture where you have Linux installed on your network, you’ll need a separate repository.
Source requirements; if some of your users are Linux developers, you might need to download source packages into a separate repository.
Development packages; if you’re monitoring the progress of a program, you’ll want access to the development packages so you can monitor improvements as they’re made.
Testing packages; some groups make development packages available in a separate repository before declaring them stable and ready for a production environment.
Independent repositories; some developers keep independent repositories on their Web and FTP servers. Many are available for public use.
There are two basic methods you might use to keep a local repository up to date. Some distributions allow you to store download packages and their headers on a local computer. You can then share the directory with those download packages and point the other computers on your network to that local repository. Red Hat and SUSE make that possible in some cases with their Subscription systems.
Alternatively, you can synchronize your repositories with those available online. This is where the rsync command can help. I detail how you can do this in later chapters, especially Chapter 3, “SUSE’s Update Systems and rsync Mirrors.” While that chapter is focused on SUSE Linux, the use of the rsync command described in that chapter applies to repositories for all distributions.
Some administrators prefer to wait until updates are available in a more convenient format. For example, RHEL makes quarterly updates of its distributions available, which administrators can configure into a local repository using the techniques described in the last half of this book.
After you’ve determined how you’ll keep your repositories up to date, automate the process so that it happens during off-peak hours. Remember, you might be downloading hundreds of megabytes of packages, so make sure that the download does not interfere with other scheduled work, such as:
Computing-intensive programs. For example, intensive database programs require so much in computer and network resources that they’re often run while most users are not at work.
Administrative programs. Backups, log rotations, and more in Linux are often configured in scripts in the
/etc/cron.dailydirectory.Other downloads. Many Linux users download other distributions. It’s best if you can limit large downloads by regular users at least to specific time periods.
Power outages. Some networks may limit available power due to costs, availability, or local conditions.
When you apply patch management techniques to your Linux computers, you can keep them secure, up to date with the latest services, and nearly bug-free.
In this chapter, you learned to configure repositories and apply patches and updates on RHEL, SUSE, and some other Linux distributions. Subscriptions are required in some cases, which entitle you to keep your systems up to date with the latest patches from specific vendor repositories. As patches can easily run into hundreds of megabytes, it can be helpful to configure a patch management repository on one or more computers on your LAN so that you do not have to pay for an Internet connection where all your computers download updates individually from remote locations.
In the following chapters, you’ll learn how to configure and manage local patch repositories on your network.