
Patching Linux on one computer is a straightforward process. As you read in Chapter 1, “Patch Management Systems,” many distributions include patch management utilities that can keep a single system up to date. Regular patch downloads for one or two computers over a typical high-speed connection are not a problem. Regular patch downloads from dozens of computers from a LAN over a shared Internet connection can be troublesome.
Therefore, you need to know how to configure a central patch management repository for a network. In this chapter, I outline how you can plan a repository by using Fedora Core Linux. In Chapter 7, “Setting Up a yum Repository,” I provide the detailed instructions for setting up a repository for Fedora Core. Alternatively, if you’re administering patch management for Red Hat Enterprise Linux (RHEL) systems, you can set up a Red Hat Proxy Server. I’ll take you through the configuration process for a Red Hat Network proxy and client, step by step.
Finally, I’ll describe the basic patch management process for some of the rebuilds of RHEL, specifically CentOS and Lineox. Because they use the yum and apt tools, you can keep them up to date using the repository tools you’ll learn about later in this book.
In this section, you’ll learn the basic process for creating a Fedora repository. It relies on the yum commands, so you’ll learn the details in Chapter 7. For the most part, this section is a high-level overview; it can help you contrast the requirements for patch management for networks based on Fedora, RHEL, and RHEL rebuild distributions.
If you’re configuring a repository, it’s normally best if you create a dedicated partition for that repository. This section assumes that you’ve installed a new hard drive for this purpose and details the steps that you would take to create a dedicated partition.
Unlike with the Red Hat Network Proxy Server, there are no specific hardware requirements for a Fedora repository. Software requirements are fairly minimal. But the demands on a Fedora-based patch repository are the same. Other Fedora computers on your network will pull updates from your local repository on a regular basis. Therefore, on a Fedora-based patch repository, you should consider the following:
An ideal Fedora repository computer should meet the requirements associated with a Red Hat Network Proxy Server, as described in Chapter 1. To review, while CPU speed is less important, you should have a computer with the following:
Fast hard drive access; because any local cache of patches fills gigabytes of space, you’ll want a computer that can pull those updates quickly.
Fastest possible network connections; if dozens of computers download updates from your repository simultaneously, they need to share bandwidth on your LAN.
Extra RAM cache updates, which can help minimize the requirements on the hard drive(s).
When you configure Fedora as a patch management computer, it is best to set up a dedicated partition for the purpose. In this way, other programs that you might install and other services with ever-growing log files won’t crowd out your repositories (or vise versa).
Normally, patches are downloaded to the /var directory. Red Hat, Fedora, Debian, and SUSE all follow this convention. Red Hat and Fedora patch RPMs are normally downloaded to /var/spool/up2date and then deleted after the RPMs are used to update your system. As you learned in Chapter 1, Fedora clients are configured through files such as /etc/yum.conf or in the /etc/yum.repos.d directory to pull updates from FTP or HTTP servers.
Therefore, most administrators create Fedora repositories on a local FTP or HTTP server. The default directories for associated files are /var/ftp/pub and /var/www/html. If you want to protect the space assigned to your repositories, you’ll want to dedicate a partition for this purpose.
Compared with the space available on the latest inexpensive hard drives, the space required for a Fedora repository is not terribly significant. All you need is room for the operating system and the repository. However, if you manage multiple repositories for multiple versions of Fedora on more than one architecture, you can still run out of room quickly. It’s best if you plan ahead. If you plan to reinstall Fedora on your computers every time a new version is released, the requirements are straightforward; one possible scenario with an installation and update repository for x86 systems is shown in Table 2-1. This is just a hypothetical breakdown; I’ve tried to be generous with space requirements.
Table 2-1. Possible Fedora repository space requirements: one release, one architecture
Requirement | Space | Description |
|---|---|---|
Fedora Core | 3GB | Typical installation with GUI, without all services |
Installation Repository | 2.5GB | Fedora Core installation files typically require four CDs |
Update Repository | 5GB | Some packages are patched multiple times during the life of a distribution. It can be helpful to keep older updates in case of trouble |
That doesn’t seem so bad. With these requirements, it seems like you can install a Fedora repository on an older computer with a 10GB hard drive. As long as you make sure that your network can handle the load, this seems to be sufficient. But you need to consider additional factors:
As noted on fedora.redhat.com, releases are planned every four to eight months. Updates are made available for about a full year afterwards. If you don’t install every new version of Fedora, the update repository requirements may double or more.
If you want to maintain a Fedora update repository for more than a year, you’ll have to reconfigure your repository for Fedora Legacy updates. The space requirements increase accordingly. You may also need to reconfigure the associated configuration files. For more information, see www.fedoralegacy.org.
As you bring new computers online, you may want to install later releases of Fedora. Each release requires its own installation and update repository, which could double associated space requirements yet again.
Fedora is also available for 64-bit x86-64 systems. If you want to install and maintain Fedora on these computers (and continue to maintain regular 32-bit systems), the requirements on your installation and update repositories might double yet again.
Personally, I enjoy installing Linux on my computers. However, preserving the configuration and personal files associated with older versions can be a tedious process. After Linux is installed, you may not want to reinstall another version until there are significant changes, such as a major new kernel. It’s normally two or three years between major kernel releases (such as between versions 2.4 and 2.6). By then, you could be maintaining client computers with multiple architectures. It’s easy to see how a repository could grow to hundreds of gigabytes.
It’s easiest to configure partitions for Fedora Core during the installation process. The Disk Druid screen shown in Figure 2-1 allows you to dedicate partitions or logical volumes to the directory of your choice.
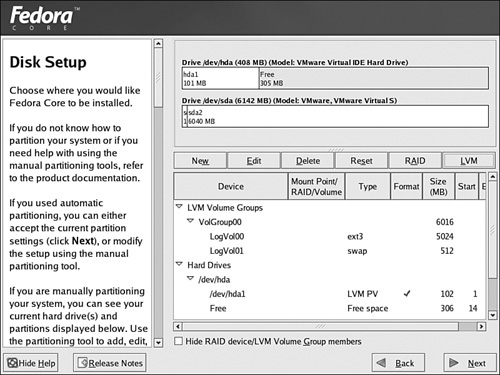
In Disk Druid, just click Add, and then you can assign a directory such as /var/ftp to a partition such as /dev/hda5. Alternatively, if there’s room on a Logical Volume Management (LVM) physical volume (PV), you can assign space from that area for your repository.
You can still configure a dedicated partition for your repository after Linux is installed. All you need is sufficient free space on an available hard drive. For example, assume that you’ve added a second hard drive on your computer and want to dedicate that space to a repository. You could then use fdisk to create a new partition on that drive. Just take the following steps:
Make sure you have sufficient room for your desired repository. The
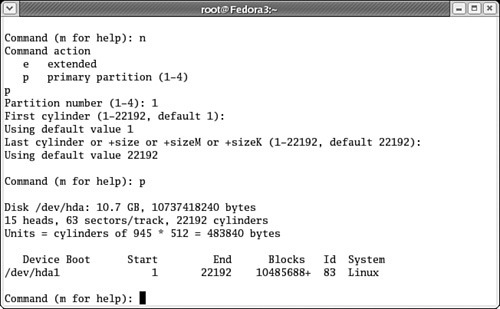
fdisk -lcommand lists available space on attached hard drives.As you can see in Figure 2-2, I have an empty 10GB IDE hard drive on
/dev/hda. I’ll want to dedicate this entire drive as a partition for the/var/ftpdirectory.Run the
fdisk /dev/hdacommand to open that hard drive to edit its partition table.Run the
pcommand; this confirms an empty partition table for this hard drive.Run the
ncommand; you’re prompted as shown whether you want to create a primary or an extended partition.Press
p; you’re prompted for a partition number between 1 and 4. As this is the first partition on this particular drive, press1.Accept the default values for the first and last cylinder; these actions assign the entire hard drive to the new partition.
If you wanted to limit the size of the new partition, you could have specified a size in kilobytes (K) or megabytes (M). For example, if you wanted a 5GB partition, you could have entered +5000M at the Last cylinder prompt.
Press
pto review the result on this hard drive’s partition table. You can review the result in Figure 2-3.If you’re satisfied, press
wto write the partition table to the hard drive. For a list of otherfdiskcommands, pressm.If the partition you create is on a hard drive that’s currently being used on your system, you’ll have to reboot Linux to reread the partition table. While you could force things, the results could be disastrous for your data.

After you’ve created a new partition, the remaining steps are straightforward. All you need to do is format the partition, mount it on a temporary directory, copy existing data, and then bring the result into your partition table. The next time you boot Linux, it’ll boot the desired directory on your new partition automatically. For details, take the following steps:
Format the new partition. For example, if the new partition is
/dev/hdb1, you’d run the following command:mkfs.ext3 /dev/hdb1
If the partition is already mounted on an active directory, Fedora Core won’t format the partition; it returns an error message.
When the format is complete, make sure journaling is enabled. Because the default Fedora ext3 file system is a journaling file system, you may want to make sure journaling is configured on the new partition:
tune2fs -j /dev/hdb1
Now you can mount the new partition on the directory of your choice. For now, you’ll want to mount it on a temporary directory; I often create
/mnt/testfor this purpose. To mount the newly formatted/dev/hdb1partition, run the following command:mount /dev/hdb1 /mnt/test
Now you can copy the files from the directory that you want to mount on the newly formatted partition. For example, if you want to create a repository on a local FTP server, copy the files from the local FTP source directory,
/var/ftpto/mnt/test. Thecp -arcommand copies any subdirectories recursively.cp -ar /var/ftp/* /mnt/test
Document the desired mount in your partition table configuration file,
/etc/fstab. Open it in the text editor of your choice. Based on the information shown here, you would add the following line:/dev/hdb1 /var/ftp ext3 defaults 1 2
Save your changes and reboot.
The next time Linux boots, it should mount the
/var/ftpdirectory on/dev/hdb1. You can verify this with themountcommand. You can now create a Fedora repository on this partition, with confidence that what you save here won’t be crowded out by other services or files that users might save to this computer.
If you haven’t already done so, you should run the Update Agent on this computer. Before you use it as a repository for other computers on your network, you should make sure this computer itself is up to date!
The steps are quite similar to those you’ve seen for RHEL in Chapter 1; one major difference is that you do not have to register your Fedora Linux computer on the Red Hat Network.
Now that you have a dedicated partition, you can create the repository that you need for the computers on your network. While we detail the process in later chapters, we describe the basic steps here:
Select a Web or FTP server. As discussed in Chapter 1, Fedora clients look for updates on Web and FTP servers.
Plan the directory tree for the repository. You’ll need separate directories for at least the installation and updates.
Download the files for the repository.
Synchronize the repository. You may want to create and automate scripts to keep that repository up to date.
As described in Chapter 1, Fedora clients pull updates from FTP and HTTP (Web) servers. You learned how to point a Fedora client to a FTP or HTTP mirror. You’ll want to create your repository on an FTP, NFS, or HTTP server, which is what Fedora users are familiar with. While I personally prefer FTP because the protocol is inherently faster, some prefer the security associated with an HTTP (or even an HTTPS) server.
After you choose a service, you should set up a dedicated partition, as described earlier in this chapter. Then you can install and configure the service of your choice. We’ll show you how to configure a yum repository on a vsFTP server in Chapter 7.
Next, you’ll need to plan the directory structure. The simplest plan is to mirror an existing repository from a server connected to the Internet. But as many repositories are configured for multiple architectures, mirroring may download much more than what you need.
There is a substantial number of directories associated with Fedora Core repositories. If you don’t need development, testing, or source packages, you do not need all the standard repository directories on your system. In fact, you may want to discourage users from downloading and installing developmental packages, because they may have unpredictable effects on your system.
For the latest releases of Fedora Core, you may need to justify your use of different repository directories. Some of the options include
Core and Extras—. Core includes the basic packages associated with Fedora. Extras include additional tools that can be added by individual developers and have often gone through less testing.
Different Fedora Core releases—. If you are configuring a repository for clients where Fedora Core 2, 3, 4, and 5 are installed, you’ll need different repository trees for each. Each release includes subdirectories for source RPMs and released architectures.
Development and test releases—. As described in Chapter 1, development releases include new features as they’re developed, even on a nightly basis. Test releases are the “beta” versions of Fedora. Generally, you can avoid these repository trees completely.
>Updates—. These are key. They include the patches and updates that you want your users to have and install on their systems (after you test and approve them, of course). There are testing and released updates.
Unless you’re a Fedora developer, you don’t want or need most of these directory trees in your repository.
Now that you know what you want to download, you can proceed with the process. With the right command, such as rsync or wget, you can download the repository trees of your choice. We’ll describe this process in more detail in Chapter 7. There are a number of developers who have automated this process.
When you’re managing patches for a group of RHEL computers, you may not want all of them downloading hundreds of megabytes of patches through the Internet simultaneously. As discussed in Chapter 1, you can configure one or more Proxy or Satellite Servers for patch management.
In this section, you’ll learn to configure a Red Hat Network Proxy Server and client. You can then attach other RHEL clients on your network, download the same updates more quickly, and keep the load on your Internet connection to a minimum.
The installation requirements for a Red Hat Network Proxy Server described in Chapter 1 mean that you’ll need a dedicated computer. Red Hat suggests that you keep what you install on the Proxy Server computer to an absolute minimum.
In other words, don’t install other services on a Red Hat Network Proxy Server computer. This includes a GUI. As a competent Linux administrator, you do not need a GUI to configure or update the Proxy Server.
In this section, you’ll configure a Red Hat Network Proxy Server from the command line interface and your administrative account on the Red Hat Network. In the following sections, we’ll describe specific installation requirements, and we will then outline everything that you need to do to configure your Proxy Server, which includes the following:
Install RHEL in a minimal configuration; even the standard Red Hat minimal configuration supports networking.
Configure your firewall to allow communication with the Red Hat Network.
Set up a connection to external NTP (Network Time Protocol) servers.
Configure the RHEL computer as a router.
Register this computer on the Red Hat Network.
Get to the Red Hat Network channel with the proxy packages.
Install the Proxy Server packages.
Provision this computer with a Proxy Subscription.
Create the certification keys which allow clients to communicate with this Proxy Server.
When this process is complete, you can configure the clients on your network to pull updates from this computer (and not directly from the Red Hat Network).
Red Hat suggests that what you install on a Proxy Server computer should be kept to a minimum. For RHEL versions 3 and 4, this corresponds to the Base and Core package groups. This does include all packages required to network and configure this computer through the Update Agent. And the network connection allows you to configure this computer remotely through your Red Hat Network account.
Red Hat also suggests that you should disable the iptables and ipchains firewall commands on a Proxy Server. While you can configure a Proxy Server between your RHEL clients and the Internet, you should not configure this computer as a firewall.
The Proxy Server packages that you’ll install through the Red Hat Network will allow you to configure minimal Web, Proxy, and routing services on this computer. However, it’s best if you don’t also configure this computer with any other functionality. For example, standard Apache or Squid services could interfere with the Red Hat Network Proxy Server.
After you’ve configured a minimal installation of RHEL, you’ll need to complete the configuration yourself.
A minimal installation doesn’t load the Red Hat Setup Agent, also known as the First Boot service. Therefore, you may not have a regular user account. You aren’t even connected (yet) to the Red Hat Network.
Before you can run this computer as a Red Hat Network Proxy Server, there are a few more things that you need to do. As you configure this RHEL computer, you’ll be working from the command line interface. You do remember how to do this, don’t you?
First, this computer needs to recognize its own Fully Qualified Domain Name (FQDN). While this can be accomplished through a DNS (Domain Name Service) server, you’ll need to update your /etc/hosts file with your FQDN. For example, I’ve added the following line to my version of this file:
192.168.1.1 enterprise3d.example.com
To keep your system secure, it’s best to disable any services which you don’t need. For example, while the CUPS (Common Unix Print System) is enabled by default even on a minimal installation of RHEL, you’re probably not going to use this computer as a print server. You can therefore disable this software with the following command:
chkconfig cups off
It would be even better if you could uninstall all unneeded services, but that isn’t always possible. In fact, with a RHEL minimal installation, most services that are installed are due to dependencies. Some of those services you might be tempted to uninstall are necessary for a Red Hat Network Proxy Server. While some of the installed services are not required, detailing those services is beyond the scope of this book.
Because Red Hat does not support the use of a firewall on a Red Hat Network Proxy Server, you should disable any firewall tools such as iptables or ipchains on that computer. The iptables service is installed by default on RHEL 3 and 4. You can disable this service with the following commands:
service iptables stop
chkconfig iptables off
Because you won’t have firewall tools on this computer, it will likely sit behind a firewall. It needs to communicate with the Red Hat Network. To do so, it requires open ports for outbound connections to regular and secure Web services, on TCP/IP ports 80 and 443. It’s normal to have these connections open for most computers on an Internet connected network, so your system is probably already set. However, you may need to reconfigure your firewall to open these ports.
However, if your Proxy Server connects to a Red Hat Network Satellite Server on an external network, you’ll also need to configure your firewall to allow inbound connections on TCP/IP port 5222. For details on firewalls and using the iptables command, see Real World Linux Security, 2nd Edition by Bob Toxen (Upper Saddle River, N.J.: Prentice Hall, 2003).
It’s important to make sure the clocks on the computers on your network are relatively synchronized. The standard method is with the NTP daemon (ntpd), which relies on the Network Time Protocol (NTP).
To configure the NTP service, add at least three active time servers to the associated /etc/ntp.conf configuration file and make sure the NTP daemon runs when you start RHEL. A list of public NTP servers is available online from ntp.isc.org/bin/view/Servers/. Many networks depend on these servers. If overloaded, their responses may be delayed, and that’s not good for a time server. As described on the noted Web site, the administrators of these servers may require you to notify them, and you often need to get authorization to link to their servers.
Some servers, especially those known as “Stratum 2” servers, are two levels away from official clocks and aren’t as heavily loaded. While they are less accurate, the variance is some small fraction of a second, which causes no problems for most network applications, including the Red Hat Network Proxy Server. Stratum 2 servers generally do not get as much traffic. If so noted on the Public NTP server Web site, you may connect to them without notifying their administrator.
To make sure the NTP server is running (and runs the next time you boot RHEL), run the following commands:
service ntpd start
chkconfig ntpd on
In many scenarios, you’ll want to configure your Red Hat Network Proxy Server between your LAN and a gateway to the Internet. As the associated software includes the router associated with the jabberd project (jabberd.jabberstudio.org), the process is simpler than it would be for a regular router.
Routing on a RHEL computer allows network communication between networks over that computer. All you need to do is configure forwarding of IP packets. You can do so during the current RHEL session with the following command:
echo '1' > /proc/sys/net/ipv4/ip_forward
To make sure RHEL enables routing the next time you boot, you’ll need to set the following line in your Linux kernel system control configuration file, /etc/sysctl.conf:
net.ipv4.ip_forward = 1
Before you can download the Red Hat Network Proxy Server software, you need to register that computer on the Red Hat Network. The most straightforward method is with one of the following commands:
rhn_register
up2date --register
Alternatively, if you have not yet registered this computer, the first time you run the up2date command, the Update Agent runs the registration process automatically.
Even if you’ve installed RHEL in a minimal configuration, Red Hat supports a low-intensity blue graphical screen for the Update Agent, similar to what you see if you install RHEL in text mode. Before you register, you’re taken through
Some of the latest features associated with the Red Hat Network.
The Red Hat Privacy agreement.
A login page; you should already have a registered account on the Red Hat Network, as described in Chapter 1. For more information, see rhn.redhat.com.
Registering a system profile, which includes basic information about your hardware.
Sending a profile with a list of installed packages to the Red Hat Network.
This is an excellent time to make sure this RHEL computer is up to date with the latest packages. You’ve read about using the Update Agent on RHEL in Chapter 1. Just remember, you don’t have the benefit (or curse, perhaps) of the GUI for this process. Now that you’ve registered this computer, you may be able to complete this process with a command that completely updates the system with all relevant packages:
up2date -u
When complete, you can download Red Hat Network Proxy Server software. We’ll illustrate the process from a Red Hat Network administrative account in the following sections.
Before you can administer the Red Hat Network Proxy Server software, you’ll need to subscribe to the Red Hat Network Tools software channel. In the next subsection, I’ll show how you can even “push” the installation of Proxy Server software. To subscribe to the right channel, you’ll need to take the following steps:
Log into the Red Hat Network. Assuming you’ve installed a minimal version of RHEL 4, there would no Web browser on the Proxy Server computer. You can log into the Red Hat Network from any other computer.
Click the Systems link. If you’ve properly registered the Proxy Server computer on your account, you’ll see the name of your system on this Web page. Otherwise, return to the Proxy Server computer and try registering it again.
Click System Entitlements. You’ll need to change the entitlement for your Proxy Server computer to a Base Management Entitlement, and include an Add-On Provisioning entitlement.
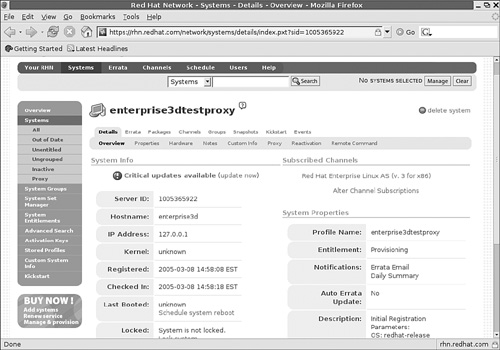
Select the name of your Proxy Server computer. It should open the subscription and configuration details associated with that computer. You can see mine in Figure 2-4.
Under Subscribed Channels, click Alter Channel Subscriptions. Now you can add the Red Hat Network Tools channel.
To install the packages required for a Red Hat Network Proxy Server, continue to the next section. Do not log out of your Red Hat Network account.
Now you’ll install the packages required for a Red Hat Network Proxy Server. It’s available from the Red Hat Network Tools channel that you just configured in the previous section. If you’re not already there, log into your Red Hat Network account, and click Systems. Click the name of your Proxy Server computer.
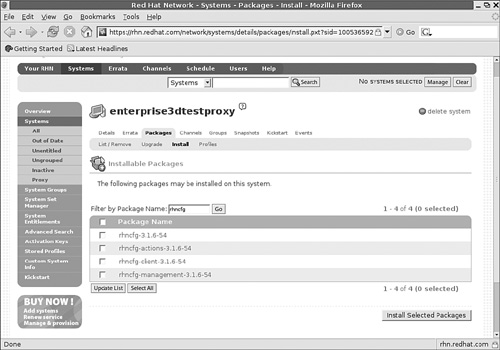
Now you’ll select the Proxy Server packages. Click Packages, and then click Install. In the Filter by Package Name box, enter
rhncfg. This leads to the screen shown in Figure 2-5, which lists the basic packages associated with the Red Hat Network Proxy Server.If no packages are shown, they may already be installed on your system. For example, you can verify installation of the basic Red Hat Network client configuration libraries with the
rpm -q rhncfgcommand.Select all
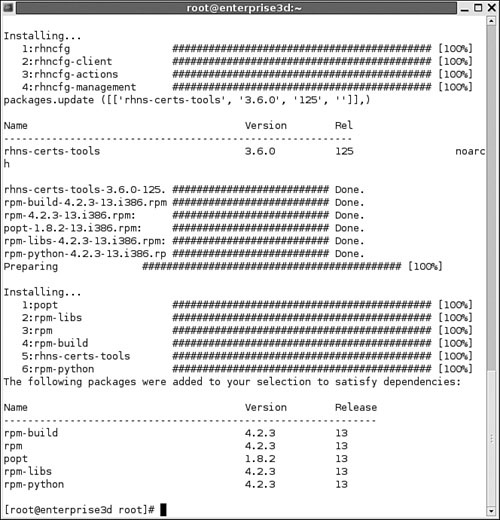
rhncfgpackages shown in Figure 2-5, and click Install Selected Packages. Click Confirm on the next screen. You’ll see a message that “...package install has been scheduled...” for your computer.Repeat this process to schedule installation for the
rhns-certs-toolspackage, to support SSL certificates for your network.You don’t have to wait until the next scheduled update. Return to your Proxy Server computer, and run the
rhn_checkcommand. The Red Hat Network automatically checks for the new packages that you want to install. It then downloads and installs these packages along with any dependencies. Figure 2-6 shows the messages you’ll see after logging in remotely to your Proxy Server computer (via SSH) and runningrhn_check.Return to your Red Hat Network account. You can confirm installation. Click Details, and then click Events. See what happened in your System History.
Before you continue, you’ll need to add several files and directories. These commands allow you to configure and control your Proxy Server through your Red Hat Network account:
mkdir -p /etc/sysconfig/rhn/allowed-actions/script
touch /etc/sysconfig/rhn/allowed-actions/script/run
mkdir /etc/sysconfig/rhn/allowed-actions/configfiles
touch /etc/sysconfig/rhn/allowed-actions/configfiles/deploy
Now you can provision your system as a Proxy Server.
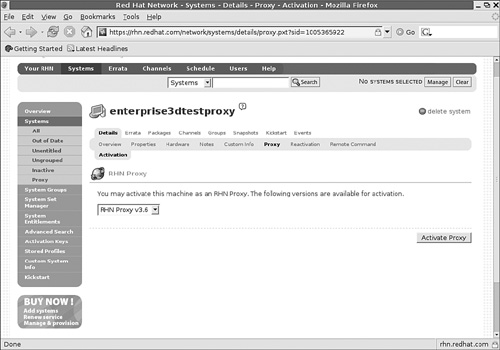
To provision your system as a Proxy Server, log into the Red Hat Network. Click Systems. Select the computer that you want to use. Click Details, and then click Proxy. If you have a valid and available Proxy subscription, you should see a screen similar to Figure 2-7.
Now you can provision your system as a Proxy Server.
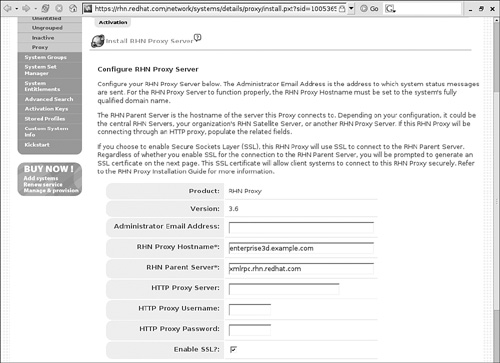
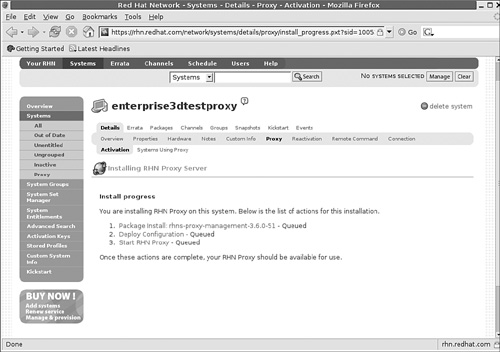
Now that you’ve installed the required software packages, you can start the Proxy Server configuration process through your administrative Red Hat Network account. Log into that account, navigate to the Proxy Server computer, click Details, and then click Proxy. Click the Activate Proxy button shown in Figure 2-7. This starts the Red Hat Network Proxy Installer. Follow these steps:
When you see the “Welcome to the RHN Proxy installer” screen, click Continue.
You’ll have to agree to the Red Hat terms and conditions; more information is available at www.redhat.com/licenses/. Click I Agree to continue.
At the Configure RHN Proxy Server screen shown in Figure 2-8, you can configure the following parameters:
Administrator Email Address: The desired administrative email address for critical messages; a substantial number of error-related emails are possible. I get them for every unsuccessful connection to the Proxy Server.
RHN Proxy Hostname: The FQDN for this proxy server.
RHN Parent Server: The name of the parent server is another Red Hat Network Proxy Server, a Red Hat Network Satellite Server, or the central Red Hat Network Server at xmlrpc.rhn.redhat.com.
HTTP Proxy Server: If there is a regular proxy server between your LAN and the Internet, you’ll need to enter the name and port of that server. Because proxy services use a different TCP/IP port number (3128) from regular (80) or secure (443) Web services, you should not use the http or https prefixes in the proxy server’s FQDN. Use a FQDN in a hostname:port format, such as proxy.example.com:3128.
HTTP Proxy Username and HTTP Proxy Password: If your LAN’s proxy server requires a username and password, you can enter them in the noted text boxes.
Enable SSL: Finally, while you don’t have to configure a Red Hat Network Proxy Server using the Secure Sockets Layer (SSL), it’s a good idea. It is the default. However, it may be easier to do after you’ve completed this process.
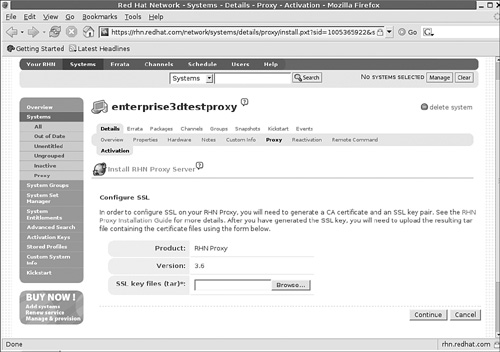
If you Enable SSL now, the next page you see will be the Configure SSL page shown in Figure 2-9. In that case, you’ll have to proceed to the next section, “Creating the Cert Keys,” to create a SSL key file to insert here before proceeding. The archive will have a
.tarextension.After you’ve completed your entries, press Continue. You should now see an Install Progress screen similar to Figure 2-10.
Return again to the Proxy Server computer. You can wait until the next update, or start the update yourself with the
rhn_checkcommand.After the
rhn_checkcommand is complete, return to the Red Hat Network. Refresh your browser from Figure 2-10. The previous steps that were queued should now be listed as Completed.Restart your Proxy Server with the following command:
service rhn-proxy restart
Verify that your Red Hat Network Proxy Server is working; you should see output similar to the following:
service rhn-proxy status
squid (pid 5515 5513) is running...
httpd (pid 5551 5550 5549 5548 5547 5546 5545 5544 5532) is running...
jabberd router (pid 5580) is running...
Your Red Hat Network Proxy Server system is now ready for clients. If you’ve configured a SSL Proxy Server, you’ll need to create cert keys for the Proxy Server and Web clients.
To secure your Update Agent system, create certificates for your Proxy Server and associated clients. This requires you to return to the Proxy Server and use the rhn-ssl-tool command, with several different options. Don’t run any of these commands until you understand the whole process as I describe in this section.
The rhn-ssl-tool command is part of the rhns-certs-tools package that you installed earlier in this process. There are two major command options. The first allows you to create a Certificate Authority (CA) for your network:
rhn-ssl-tool --gen-ca [followed by many options]
The second option creates Web server CA key sets, which is required for your Proxy Server:
rhn-ssl-tool --gen-server [followed by many options]
Let’s examine these options one at a time. To generate a proper CA for your network, you need to specify appropriate directories for the certificates, using secure passwords with certificates that reflect basic parameters for your organization. You can review some of the switches (which come after --gen-ca) in Table 2-2. You don’t need to use all the switches shown; however, the more you use, the more unique the CA you create.
Table 2-2. rhn-ssl-tool --gen-ca configuration options
Option | Description |
|---|---|
| Generates a Certificate Authority key pair and more for your network, also based on options which follow |
| Forces the creation of a new CA key pair |
| Specifies the directory where CA files are built |
| Specifies the filename for the private CA key; not required—by default, the command creates a |
| Specifies the filename for the public CA key; not required—by default, the command creates a |
| Sets a country code |
| Sets a code for your state or province |
| Sets a code for your city or town |
| Defines the name of your organization—your choice |
| Defines a group within your organization—your choice |
For a complete list of switches associated with the --gen-ca option, run the rhn-ssl-tool --gen-ca --help command. I don’t include switches such as --password=PASSWORD, because there is no reason to help a “shoulder surfer” by typing your CA password in clear text. The rhn-ssl-tool command prompts you for the password if you don’t use the --password switch.
On my Proxy Server, I run the following command:
rhn-ssl-tool --gen-ca --dir=" /root/ssl-build" --set-state="Somewhere
Else" --set-city="Nice One" --set-org="Mommabears" --set-org-
unit="home office"
This command first prompts for a password. Remember this password. You’ll have to use the same password shortly. It then generates a private and public CA key in the /root/ssl-build directory, with messages related to your location and organization. My use of this command leads to the following output:
Using distinguishing variables:
     --set-country     = "US"
     --set-state       = "Somewhere Else"
     --set-city        = "Nice One"
     --set-org         = "Mommabears"
     --set-org-unit    = "home office"
     --set-common-name = ""
     --set-email       = ""
This command adds several files to the specified /root/ssl-build directory, as noted in Table 2-3.
Table 2-3. rhn-ssl-tool --gen-ca generates the following files
Filename | Description |
|---|---|
| Lists files for Proxy Server clients, including the RPMs and the public SSL key |
| Text configuration file for SSL keys |
| Not used, unless you generate additional SSL keys |
| Key for client use; should be copied to the |
| RPM package for Proxy Server; can be installed on clients |
| Source code package |
Now, you can configure the Web server keys. Remember, to have a proxy server, you also need a Web server. The packages that you installed through your Red Hat Network account earlier install a customized version of an Apache and Squid proxy server.
To generate proper Web server keys, specify appropriate directories for the certificates, using secure passwords, with certificates that reflect basic parameters for your organization. You can review some of the switches (which come after --gen-ca) in Table 2-4. You don’t need to use all the switches shown; however, the more you use, the more unique the CA you create.
Table 2-4. rhn-ssl-tool --gen-server configuration options
Option | Description |
|---|---|
| Generates an SSL key set, along with an RPM and tar archive for that set, and other items based on options that follow |
| Specifies the directory where CA files are built |
| Sets a start date in two-digit format: year, month, day, hour, minute, second, in “Zulu” time, also known as GMT or UTC |
| Sets a country code |
| Sets a code for your state or province |
Sets a code for your city or town | |
| Defines the name of your organization—your choice |
| Defines a group within your organization—your choice |
| Required only if you’re building the key on a computer other than the Proxy Server |
| The email address of the certificate administrator |
For a complete list of switches associated with the --gen-server option, run the rhn-ssl-tool --gen-server --help command. I don’t include switches such as --password=PASSWORD, because there is no reason to help a “shoulder surfer” by typing your CA password in clear text.
On my Proxy Server, I run the following command:
rhn-ssl-tool --gen-server --dir="/root/ssl-build" --set-
state="Somewhere Else" --set-city="Nice One" --set-org="Mommabears"
--set-org-unit="home office" --set-email="[email protected]"
This rhn-ssl-tool command proceeds to generate SSL keys and certificate files for the Web server, as well as associated RPMs that you can use to build corresponding keys on client computers. The command adds several files to the hostname (enterprise3d) subdirectory of the /root/ssl-build directory, as noted in Table 2-5.
Table 2-5. rhn-ssl-tool --gen-server generates the following files
Filename | Description |
|---|---|
| Lists files for Proxy Server clients, including the RPMs and the public SSL tar archive |
| Text configuration file for Apaches SSL keys and certificates |
| The Web server’s public certificate file |
| The Web server’s certificate request |
| The Web server’s private SSL key |
| An archive of the server keys |
| An RPM package for you to install on the Proxy Server, which installs the server* files in the |
| Source code package |
Now that you’ve generated SSL keys for the Proxy Server and Web host, you’ll need to install the public CA certificate on each client and the Web service RPM on the Proxy Server.
While you’re still on the Proxy Server, install the associated Web service RPM. For the commands shown, you can install the Web service SSL certificate RPM package with the following command:
cd /root/ssl-build/enterprise3d/
rpm -i rhn-org-httpd-ssl-key-pair-enterprise3d-1.0-1.noarch.rpm
Next, make the RHN-ORG-TRUSTED-SSL-CERT file that you created earlier available for clients. Because the software that you’ve installed has created a Web server on the Proxy Server computer, you can copy this file to the /var/www/html/pub directory. To make sure your Proxy Server computer’s Web server sees this file, you’ll need to restart the Web service with a command, such as
service httpd restart
One more command; to make the files in the /var/www/html/pub directory accessible to Web clients, you’ll need to change ownership of these files to the apache user. It’s easy to do with the following command:
chown apache.apache /var/www/html/pub/*
In the next section, we’ll install this file on a client.
Now you can set up RHEL 2.1, 3, and 4 clients for your Red Hat Network Proxy Server computer. The process is straightforward. You’ll need to reconfigure the update agent to take updates from the Proxy Server (instead of the Red Hat Network). Then, you’ll need the cert keys created during the Proxy Server installation process.
If you have a substantial number of RHEL clients, you can automate this process with scripts. Finally, you can make sure RHEL clients are updated on a regular basis, either through the Red Hat Network or with a regular cron job.
Before you start configuring the Update Agent, you’ll need to copy the right client cert key. It’s embedded in the RHN-ORG-TRUSTED-SSL-CERT file described earlier.
If you’ve followed the instructions described earlier, this file is already available through the Web server on the Proxy Server computer. You need to download the RHN-ORG-TRUSTED-SSL-CERT file. You can do so with a graphical browser. Navigate to this computer with the name or even the IP address of that computer, and you’ll see a simple home page, as shown in Figure 2-11.
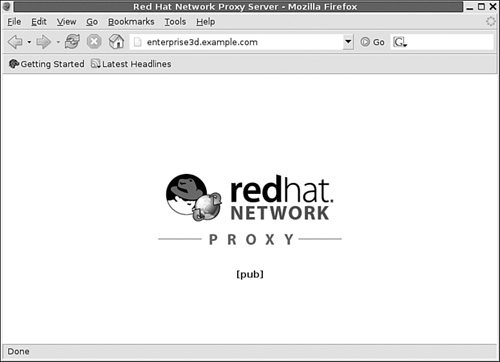
Now the process is easy. Click the [pub] link, and you’re taken to a list of files on the Proxy Server’s /var/www/html/pub directory. You can now download any files that you’ve loaded to that directory, including RHN-ORG-TRUSTED-SSL-CERT.
Alternatively, you can use the wget command to download this file from the command line interface:
wget http://enterprise3d.example.com/pub/RHN-ORG-TRUSTED-SSL-CERT
After you download the RHN-ORG-TRUSTED-SSL-CERT file, copy it to the /usr/share/rhn directory. Alternatively, if you’ve loaded the RPM on the Web server, you could install it directly with the following command:
rpm -i http://enterprise3d.example.com/pub/rhn-org-trusted-ssl-cert-
1.0-1.noarch.rpm
After all this talk about the Proxy Server, there’s one possible surprise: it is not a proxy server for your clients. (For details, see the note at the beginning of this chapter.) You won’t configure your clients’ Update Agent for a proxy server (unless you’ve configured one on a different computer, between your client and your Red Hat Network Proxy Server).
You could partially reconfigure the Update Agent in the GUI with the up2date-config command. The GUI interface allows you to modify only some of the settings you need. Alternatively, you could reconfigure the Update Agent from the command line interface using the up2date-nox --configure command. But as you can see for yourself, the interface is rather inconvenient.
The best way to fully reconfigure the Update Agent is to open its configuration file, /etc/sysconfig/rhn/up2date. In that file, you’ll want to change three settings. The defaults are as follows, which pull updates through the Internet from Red Hat’s servers:
noSSLServerURL=http://xmlrpc.rhn.redhat.com/XMLRPC
serverURL=https://xmlrpc.rhn.redhat.com/XMLRPC
sslCACert=/usr/share/rhn/RHNS-CA-CERT
You’ll want to change these parameters. For example, my proxy server has a FQDN of enterprise3d.example.com, so I’ve changed the following parameters in my version of /etc/sysconfig/rhn/up2date:
noSSLServerURL=http://enterprise3d.example.com/XMLRPC
serverURL=https://enterprise3d.example.com/XMLRPC
sslCACert=/usr/share/rhn/RHN-ORG-TRUSTED-SSL-CERT
You can configure updates remotely through the Red Hat Network. Details are beyond the scope of this book. However, the general procedure is straightforward:
Log into your Red Hat Network account.
Configure the systems that you want to administer in one group.
Click Systems, followed by System Groups.
Select the group you’ve configured for this purpose.
Select Work With Group.
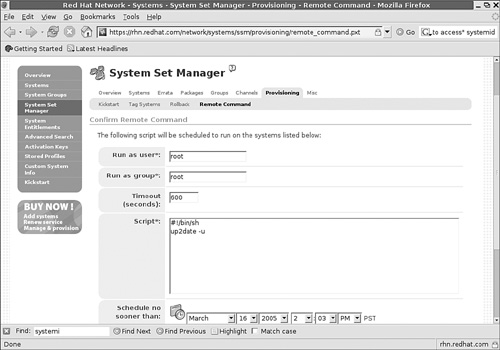
Click Provisioning, followed by Remote Command, which takes you to the screen shown in Figure 2-12.
Enter the commands of your choice. As you can see in the figure, I’ve entered the
up2date -ucommand; as soon as each system in this group checks in, it’ll automatically update the system per the latest requirements.
If there are problems after you’ve followed the instructions described in this chapter, there are a number of things that you can do.
Run the
up2date -ucommand from the client command line interface. Check for error messages in the output.Inspect the log files in the
/var/log/rhndirectory. Therhn_proxy_broker.logfile notes attempted connections, with possible errors. Therhn_proxy_redirect.logfile notes requests that are actually redirected to the Red Hat Network.If you don’t see expected entries in the
rhn_proxy_broker.logfile, there may be a problem on your LAN, at least between your Proxy Server and client.Make sure the services associated with the Proxy Server are running with the
service rhn-proxy statuscommand. You should see services associated with the Web server(httpd), the Proxy Server(squid), and the Jabber router(jabberd).Try accessing the Proxy Server Web site. Open a browser from a client, and navigate to the Proxy Server FQDN or IP address. You should see a page similar to Figure 2-11.
Try a
rhn_checkcommand from your Proxy Server computer. If it successfully connects upstream to a Satellite or the Red Hat Network, it’ll run any pending commands that you may have configured through your Red Hat Network account.Rerun the configuration commands described in this chapter. You might find that you’ve installed the SSL certificate on the wrong computer.
While this is far from a comprehensive list, I’ve personally run into a few problems during this process:
Connection problems noted on a client should have a corresponding message in the
/var/log/rhn/rhn_proxy_broker.logfile. A connection refused message might indicate problems with the SSL keys that you’ve installed on the Proxy Server’s/etc/httpd/confdirectory or the SSL key on the client’s/usr/share/rhndirectory.If there’s a problem in
rhn_proxy_broker.log, it should be associated with anERRORmessage in this file. The Web server needs read access to the/etc/sysconfig/rhn/systemidfile; you might need to change ownership or permissions to this file. If there’s a problem accessing the upstream Red Hat Network (or Satellite) server, you’ll see it here, and you might have a network problem on the Proxy Server computer.A successful connection to the Proxy Server should be shown in the
/var/log/rhn/rhn_proxy_redirect.logfile.
As discussed in Chapter 1, there are a number of groups that have built their own distributions (without the Red Hat trademarks) from RHEL source code. As they’ve built from source code published by Red Hat, their distributions are known as rebuilds. When Red Hat releases an update, it releases updated source code. In most cases, you can build your own packages from Red Hat source code and update your rebuild distribution.
However, this isn’t always true. The rebuild groups do not have access to the same tools as the developers at Red Hat. There are often subtle differences in the resulting distributions, which go beyond the trademarks.
For example, when I loaded the source code associated with a rebuild kernel, there were dependencies. I had two choices. I could have searched for the packages built for the rebuild which would satisfy those dependencies. Instead, I had the packages built by Red Hat handy and used those instead. That did not work. The source code for the rebuild distribution would not install until I included dependent packages as customized for that distribution.
In other words, if you administer patch management on a network with rebuild distributions, it’s important to configure your updates for repositories with packages built for the rebuild distribution.
Just to give you a feel for this process, I describe how you can configure updates from two of the RHEL rebuilds to the right repositories. Naturally, because the rebuilds do not offer subscriptions to the Red Hat Network, one other major difference is their techniques for patch management. The process is similar to that you learned about in Chapter 1 for Fedora Linux.
Unlike with the other sections in this chapter, I do not describe how you can create a local patch management repository for your LAN. You can learn about this process with the apt and yum tools in the last half of this book.
In the following sections, I’ll show you how you can keep two of the “rebuild” distributions up to date; one uses yum; the other user apt. You can use the techniques described in Chapters 4 through 7 to create apt or yum repositories as needed for these rebuild distributions.
My personal favorite rebuild version of RHEL is CentOS-4. This popular rebuild goes by a number of names. The proper name of the group is The cAos Foundation. CentOS 2, 3, and 4 are rebuilds of RHEL 2.1, 3, and 4 (with Red Hat trademarks removed).
The basic steps are as follows:
Identify your Update Agent configuration files; they are associated with files in the
/etc/sysconfig/rhndirectory.In addition, if you want to configure
yumupdates you can do so in the files in the/etc/yum.repos.ddirectory.Find one or more preferred mirror sites for downloads.
Identify the repositories that you want to keep up to date.
Revise your
yumconfiguration files to point to those repositories.
If you want to use up2date, as with Fedora or RHEL, you can cite or add repositories to the /etc/sysconfig/rhn/sources file.
Alternatively, the cAos rebuilds are configured to use their yum repositories. As of this writing, the default version of CentOS-4’s yum.conf configuration file cites the repositories in /etc/yum.repos.d/CentOS-base.repo file. Some older versions of CentOS linked yum.conf to centos-yum.conf for repository lists.
As with Fedora Linux, it is in your best interest to revise your yum or sources configuration files to point to mirrors closer to your location. First, because cAos is a volunteer organization, they’ve had to ask for contributions to pay for all the downloads from their servers. Second, for the reasons described in Chapter 1, downloads from servers physically closer to your network are faster. You’ll have to wait for Chapters 5 and 7 for instructions on how to create apt or yum repositories on your networks.
Before you revise your yum configuration files, find one or more preferred mirrors. The cAos list of mirrors is available from www.caosity.org/download/mirrors. Their “Tier 1” mirrors connect to the Internet at OC3, which corresponds to about 155Mbps. Naturally, this bandwidth is shared with others who may be downloading simultaneously.
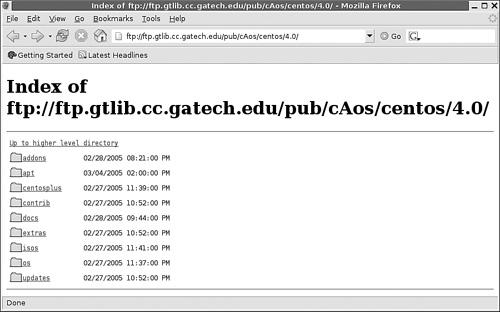
As an example, inspect the mirror shown in Figure 2-13. The URL is the start of what you can enter as a baseurl in your /etc/yum.repos.d/CentOS-Base.repo file. The $releasever is 4.0. The subdirectories are as shown, and you can (and should) double-check that what you enter corresponds to an available directory on your selected mirror.
If you want to use the up2date commands, you’ll also want to modify the yum commands in /etc/sysconfig/rhn/sources to configure updates from the mirror of your choice.
After you select a mirror, select the repositories that you want to keep up to date. The standard settings in /etc/yum.conf refer to .repo files in the /etc/yum.repos.d directory. For example, for the Georgia Tech updates repository, you can navigate to
ftp://ftp.gtlib.cc.gatech.edu/pub/cAos/centos/4.0/updates/i386/
You should find RPMS, headers, and repodata subdirectories in each repository. The $relserver, as defined from the centos-release RPM package, is 4.0. The $basearch comes from the uname -i command. Thus, you could edit the [update] stanza in your CentOS-Base.repo file to read
baseurl=ftp://ftp.gtlib.cc.gatech.edu/pub/cAos/centos/$releasever/upda
tes/$basearch/
You can add URLs from additional [update] mirrors below this line, such as
http://caos.oregonstate.edu/centos/$releasever/updates/$basearch/
When complete, you can use the yum command to keep your system updated. Alternatively, if you want to use up2date, you’ll want to select an appropriate mirror for /etc/sysconfig/rhn/sources. For example, you could replace the default Base channel:
yum centos4-Base http://mirror.centos.org/centos/4/os/$ARCH/
yum centos4-Base http://caos.oregonstate.edu/centos/4/os/$ARCH/
and make parallel changes to the other channels listed in this file.
Of all the available RHEL rebuild distributions, I’ve included Lineox as a contrast to CentOS. I do not claim that Lineox or CentOS are any better in quality or support when compared to other RHEL rebuilds. However, Lineox provides a nice contrast. They are based in Europe, offer paid levels of support, and configure their updates using apt.
One unique feature of Lineox is their paid support for updates and local patch management mirrors. Their patch management system is configured by default to synchronize your repositories on a daily basis. Lineox actually omits the Red Hat Update Agent from its Lineox 4 rebuild distribution.
We’ll describe the apt patch management process in Chapters 4 and 5. However, you can configure your /etc/apt/sources.list file using basic methods described in Chapter 1 for Debian Linux. But remember, distributions related to Red Hat use a different package format, the RPM. So the default commands in the /etc/apt/sources.list file include the rpm command, including
rpm http://www.raimokoski.com/ pub/lineox/4.0/updates/i386 updates
rpm-src http://www.raimokoski.com/ pub/lineox/4.0/updates/i386 updates
You may not want to use the default URL unless you’re physically located near the home of Lineox, which is Finland. Lineox makes other options available in various files in the /etc/apt/sources.list.d directory.
As suggested in Chapter 1, there is a wide variety of rebuild distributions created from RHEL source code. There are almost as many variations on patch management as there are rebuilds. But they almost invariably rely in some way either on the yum or apt commands. And you can learn more about these commands and associated repositories in the second half of this book.
Patch management is an important tool for keeping Red Hat and related clients up to date. There are a variety of related tools associated with Red Hat patch management updates.
In this chapter, you learned basic patch management techniques on clients that are running Red Hat and related distributions. You can create your own Fedora repositories; however, their frequent updates and new releases make patch management of Fedora clients more problematic. RHEL client subscriptions support patch management through a Red Hat Network account. You can even create your own local Proxy Server repository of patches, which minimizes the load on your network’s Internet connection and speeds updates to most RHEL clients on your LAN. Finally, you learned a bit about how patch management varies on rebuild distributions that use RHEL source code.
In the next chapter, you’ll learn about SUSE’s patch management systems and how they can be adapted for SUSE and RHEL clients.