
Chapter 2
Creating the Perfect Linux Desktop
Using Linux as your everyday desktop system is becoming easier to do all the time. As with everything in Linux, you have choices. There are full-featured GNOME or KDE desktop environments or lightweight desktops such as LXDE or Xfce. There are even simpler standalone window managers.
Once you have chosen a desktop, you will find that almost every major type of desktop application you have on a Windows or Mac system will have equivalent applications in Linux. For applications that are not available in Linux, you can often run a Windows application in Linux using Windows compatibility software.
The goal of this chapter is to familiarize you with the concepts related to Linux desktop systems, and then give you tips for working with a Linux desktop. You will:
- Step through the desktop features and technologies that are available in Linux
- Tour the major features of the GNOME desktop environment
- Learn tips and tricks for getting the most out of your GNOME desktop experience
To use the descriptions in this chapter, I recommend you have a Fedora system running in front of you. You can get Fedora in lots of ways, including:
- Running Fedora from a live CD—Refer to Appendix A for information on downloading and burning a Fedora Live CD so you can boot it live to use with this chapter.
- Installing Fedora permanently—Install Fedora to your hard disk and boot it from there (as described in Chapter 9, “Installing Linux”).
Because the current release of Fedora uses the GNOME 3 interface, most of the procedures described here will work with other Linux distributions that have GNOME 3 available. If you are using Red Hat Enterprise Linux (which, as of RHEL 6, uses GNOME 2), I have added descriptions of GNOME 2 that you can try as well.
Understanding Linux Desktop Technology
Modern computer desktop systems offer graphical windows, icons, and menus that are operated from a mouse and keyboard. If you are under 30 years old, you might think there's nothing special about that. But the first Linux systems did not have graphical interfaces available. Also, today, many Linux servers tuned for special tasks (for example, serving as a web server or file server) don't have desktop software installed.
Nearly every major Linux distribution that offers desktop interfaces is based on the X Window System (http://www.x.org). The X Window System provides a framework on which different types of desktop environments or simple window managers can be built.
The X Window System (sometimes simply called X) was created before Linux existed and even predates Microsoft Windows. It was built to be a lightweight, networked desktop framework.
X works in a sort of backward client/server model. The X server runs on the local system, providing an interface to your screen, mouse, and keyboard. X clients (such as word processors, music players, or image viewers) can be launched from the local system or from any system on your network that the X server gives permission to do so.
X was created in a time when graphical terminals (thin clients) simply managed the keyboard, mouse, and display. Applications, disk storage, and processing power were all on larger centralized computers. So, applications ran on larger machines but were displayed and managed over the network on the thin client. Later, thin clients were replaced by desktop personal computers. Most client applications ran locally, using local processing power, disk space, memory, and other hardware features, while not allowing applications that didn't start from the local system.
X itself provides a plain gray background and a simple “X” mouse cursor. There are no menus, panels, or icons on a plain X screen. If you were to launch an X client (such as a terminal window or word processor), it would appear on the X display with no border around it to move, minimize, or close the window. Those features are added by a window manager.
A window manager adds the capability to manage the windows on your desktop and often provides menus for launching applications and otherwise working with the desktop. A full-blown desktop environment includes a window manager, but also adds menus, panels, and usually an application programming interface that is used to create applications that play well together.
So, how does an understanding of how desktop interfaces work in Linux help you when it comes to using Linux? Here are some ways:
- Because Linux desktop environments are not required to run a Linux system, a Linux system may have been installed without a desktop. It might offer only a plain-text, command-line interface. You can choose to add a desktop later. Once it is installed, you can choose whether to start up the desktop when your computer boots or start it as needed.
- For a very lightweight Linux system, such as one meant to run on less powerful computers, you can choose an efficient, though less feature-rich, window manager (such a twm or fluxbox) or a lightweight desktop environment (such as LXDE or Xfce).
- For more robust computers, you can choose more powerful desktop environments (such as GNOME and KDE) that can do such things as watch for events to happen (such as inserting a USB flash drive) and respond to those events (such as opening a window to view the contents of the drive).
- You can have multiple desktop environments installed and you can choose which one to launch when you log in. In this way, different users on the same computer can use different desktop environments.
Many different desktop environments are available to choose from in Linux. Here are a few examples:
- GNOME—GNOME is the default desktop environment for Fedora, Red Hat Enterprise Linux, and many others. It is thought of as a professional desktop environment, focusing on stability more than fancy effects.
- K Desktop Environment—KDE is probably the second most popular desktop environment for Linux. It has more bells and whistles than GNOME, and offers more integrated applications. KDE is also available with Fedora, RHEL, Ubuntu, and many other Linux systems.
- Xfce—The Xfce desktop was one of the first lightweight desktop environments. It is good to use on older or less powerful computers. It is available with RHEL, Fedora, Ubuntu, and other Linux distributions.
- LXDE—The Lightweight X11 Desktop Environment (LXDE) was designed to be a fast-performing, energy-saving desktop environment. Often, LXDE is used on less-expensive devices, such as netbook computers, and on live media (such as a live CD or live USB stick). It is the default desktop for the KNOPPIX live CD distribution. Although LXDE is not included with RHEL, you can try it with Fedora or Ubuntu.
GNOME was originally designed to resemble the MAC OS desktop, while KDE was meant to emulate the Windows desktop environment. Because it is the most popular desktop environment, and the one most often used in business Linux systems, most desktop procedures and exercises in this book use the GNOME desktop. Using GNOME, however, still gives you the choice of several different Linux distributions.
Starting with the Fedora GNOME Desktop Live CD
A live CD is the quickest way to get a Linux system up and running so you can start trying it out. With a Linux live CD, you can have Linux take over the operation of your computer temporarily, without harming the contents of your hard drive.
If you have Windows installed, Linux will just ignore it and use Linux to control your computer. When you are done with the Linux live CD, you can reboot the computer, pop out the CD, and go back to running whatever operating system was installed on the hard disk.
To try out a GNOME desktop along with the descriptions in this section, I suggest you get a Fedora Live CD (as described in Appendix A). Because a live CD does all its work from the CD and in memory, it will run slower than an installed Linux system. Also, although you can change files, add software, and otherwise configure your system, by default, the work you do disappears when you reboot, unless you explicitly save that data to your hard drive or external storage.
The fact that changes you make to the live CD environment go away on reboot is very good for trying out Linux, but not that great if you want an ongoing desktop or server system. For that reason, I recommend that if you have a spare computer, you install Linux permanently on that computer's hard disk to use with the rest of this book (as described in Chapter 9).
Once you have a live CD in hand, do the following to get started:
You can now proceed to the next section, “Using the GNOME 3 Desktop” (which includes information on using GNOME 3 in Fedora and other operating systems). The section following that covers the GNOME 2 desktop.
Using the GNOME 3 Desktop
The GNOME 3 desktop offers a radical departure from its GNOME 2.x counterparts. Where GNOME 2.x is serviceable, GNOME 3 is elegant. With GNOME 3, a Linux desktop now appears more like the graphical interfaces on mobile devices, with less focus on multiple mouse buttons and key combinations and more mouse movement and one-click operations.
Instead of feeling structured and rigid, the GNOME 3 desktop seems to expand as you need it to. As a new application is run, its icon is added to the Dash. As you use the next workspace, a new one opens, ready for you to place more applications.
After the computer boots up
For a live CD, you should be booted right to the desktop with Live System User as your username. For an installed system, you see the login screen, with user accounts on the system ready for you to select and enter a password. Figure 2.1 is an example of the login screen for Fedora.
Figure 2.1 Log in to the GNOME desktop from Fedora.
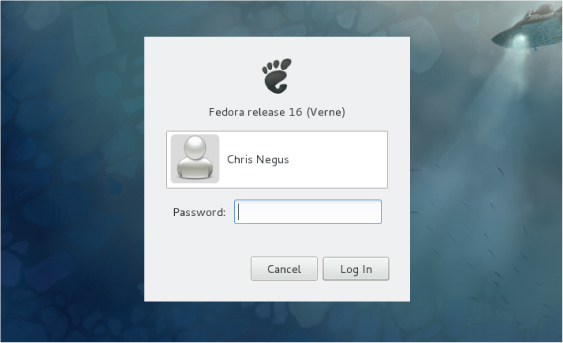
There is very little on the GNOME 3 desktop when you start out. The top bar has the word “Activities” on the left, a clock in the middle, and some icons on the right for such things as adjusting audio volume, checking your network connection, and viewing the name of the current user.
Navigating with the mouse
To get started, try navigating the GNOME 3 desktop with your mouse:
- Scroll—To see icons representing applications that are not on the screen, use the mouse to grab and move the scrollbar on the right. If you have a wheel mouse, you can use that instead to scroll the icons.
- Application groups—Select an application group on the right (Accessories, Games, Graphics, and so on) to see applications that are in only that group.
- Launching an application—To start the application you want, left-click on its icon to open the application in the current workspace. If you have a middle mouse button, you can click it on an application to open it in a new workspace. Right-click to open a menu displaying open instances of this application you can select, an option to open a New Window selection, and an option to add or remove the application from Favorites (so the application's icon appears on the Dash). Figure 2.4 shows an example of the menu.
- Application icon—Click any application icon to open that application.
- Drop Dash icons on workspace—From the Windows view, you can drag any application icon from the Dash by holding the Ctrl key and dragging that icon to any of the miniature workspaces on the right.
- Minimize—Remove window temporarily from view.
- Maximize—Expand window to maximum size.
- Move—Change window to moving mode. Moving your mouse moves the window. Click to fix the window to a spot.
- Resize—Change the window to resize mode. Moving your mouse resizes the window. Click to keep the size.
- Workspaces selections—Several selections let you use workspaces in different ways. Select to make the window always on top of other windows, visible on every workspace, or only on the current workspace. Or move the window to another workspace, the one above or the one below.
Figure 2.2 Show all windows on the desktop minimized.
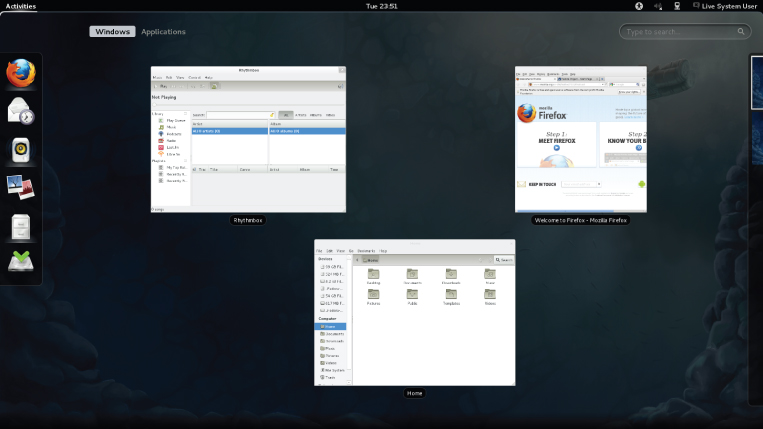
Figure 2.3 Show the list of available applications.
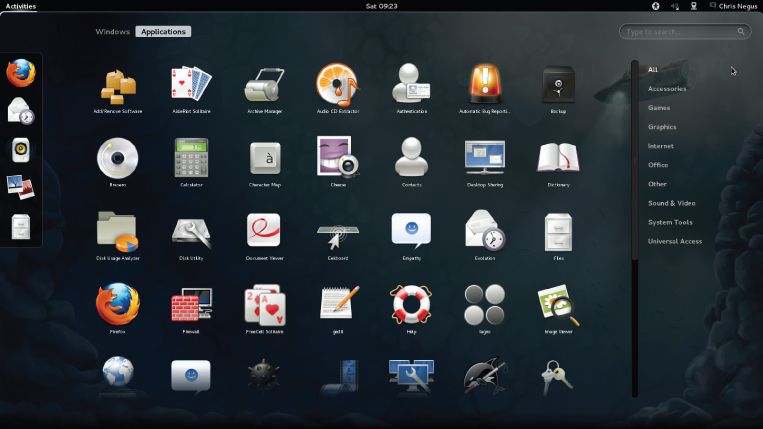
Figure 2.4 Click the middle mouse button to display an application's selection menu.

Figure 2.5 As new desktops are used, additional ones appear on the right.
If you don't feel comfortable navigating GNOME 3 with your mouse, or if you don't have a mouse, the next section helps you navigate the desktop from the keyboard.
Navigating with the keyboard
If you prefer to keep your hands on the keyboard, you can work with the GNOME 3 desktop directly from the keyboard in a number of ways, including the following:
- Windows key—Press the Windows key on the keyboard. On most PC keyboards, this is the key with the Microsoft Windows logo on it next to the Alt key. This toggles the mini-window (Overview) and active-window (current workspace) views. Many people use this key a lot.
- Select different views—From the Windows or Applications view, hold Ctrl+Alt+Tab to see a menu of the different views (see Figure 2.6). Still holding the Ctrl+Alt keys, press Tab again to highlight one of the following icons from the menu and release to select it:
- Top Bar—Keeps the current view.
- Dash—Highlights the first application in the application bar on the left. Use arrow keys to move up and down that menu and press Enter to open the highlighted application.
- Windows—Selects the Windows view.
- Applications—Selects the Applications view.
- Search—Highlights the search box. Type a few letters to show only icons for applications that contain the letters you type. When you have typed enough letters to uniquely identify the application you want, press Enter to launch the application.
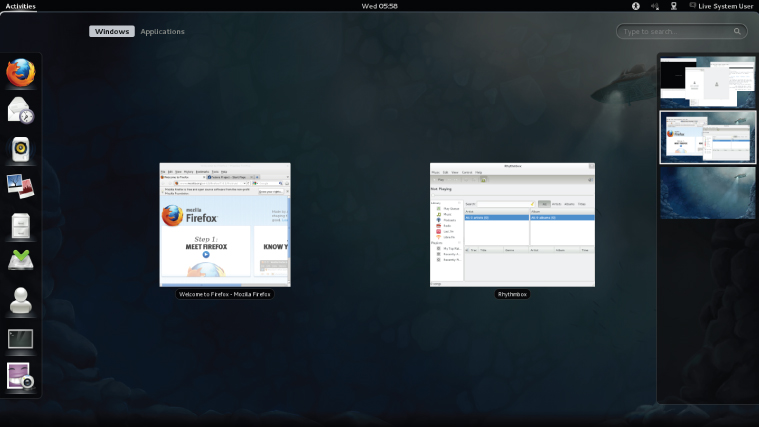
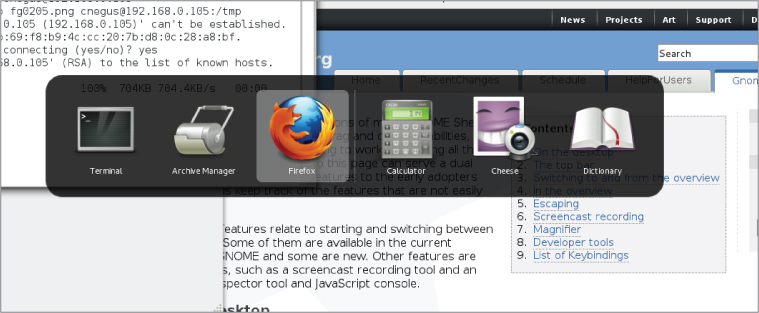
- Select an active window—Return to any of your workspaces (press the Windows key if you are not already on an active workspace). Press Alt+Tab to see a list of all active windows (see Figure 2.7). Continue to hold the Alt key as you press the Tab key (or right or left arrow keys) to highlight the application you want from the list of active desktop application windows. If an application has multiple windows open, press Alt+’ (backtick, located above the Tab key) to choose among those sub-windows. Release the Alt key to select it.
- Launch a command or application—From any active workspace, you can launch a Linux command or a graphical application. Here are some examples:
- Applications—From the Overview screen, press Ctrl+Alt+Tab, and then continue to press Tab until the gears (Applications) icon is highlighted; then release Ctrl+Alt. The Applications view appears, with the first icon highlighted. Use the Tab key or arrow keys (up, down, right, and left) to highlight the application icon you want, and press Enter.
- Command box—If you know the name of a command you want to run, press Alt+F2 to display a command box. Type the name of the command you want to run into the box (try system-config-date to adjust the date and time, for example).
- Search box—From the Overview screen, press Ctrl+Alt+Tab, and then continue to press Tab until the magnifying glass (Search) icon is highlighted; then release Ctrl+Alt. In the search box now highlighted, type a few letters in an application's name or description (type scr to see what you get). Keep typing until the application you want is highlighted (in this case, Screenshot) and press Enter to launch it.
- Dash—From the Overview screen, press Ctrl+Alt+Tab, and then continue to press Tab until the star (Dash) icon is highlighted; then release Ctrl+Alt. From the Dash, move the up and down arrows to highlight an application you want to launch and press Enter.
- Escape—When you are stuck in an action you don't want to complete, try pressing the Esc key. For example, after pressing Alt+F2 (to enter a command), opening an icon from the top bar, or going to an overview page, pressing Esc returns you to the active window on the active desktop.
Figure 2.6 Press Ctrl+Alt+Tab to display additional desktop areas to select.
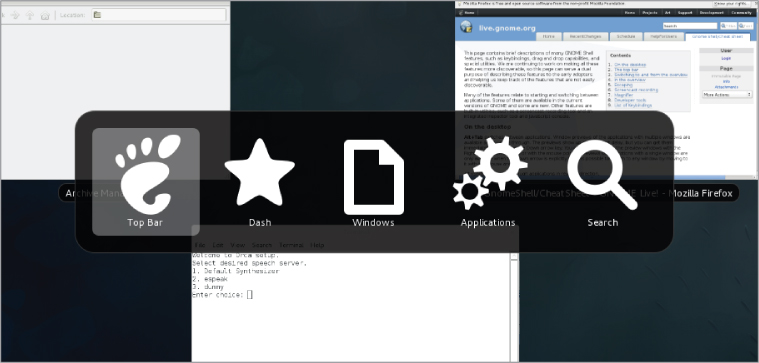
Figure 2.7 Press Alt+Tab to select which running application to go to.
I hope you now feel comfortable navigating the GNOME 3 desktop. Next, you can try running some useful and fun desktop applications from GNOME 3.
Setting up the GNOME 3 desktop
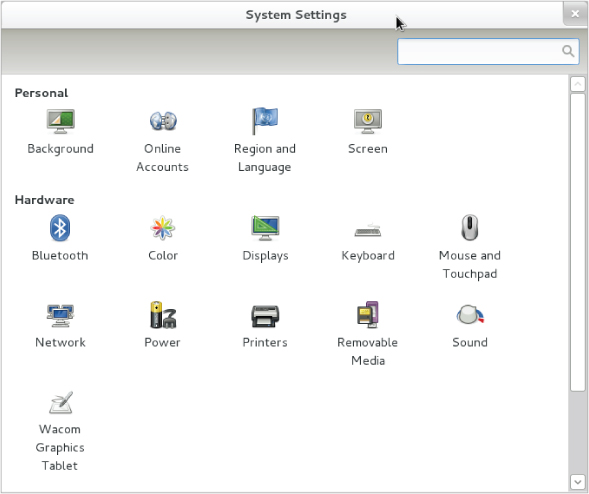
A lot of what you need GNOME 3 to do for you is set up automatically. There are, however, a few tweaks you will want to make to get the desktop the way you want. Most of these setup activities are available from the System Settings window (see Figure 2.8). Open the System Settings icon from the Applications screen.
Figure 2.8 Change desktop settings from the System Settings window.
Here are some suggestions for configuring a GNOME 3 desktop:
- Configure networking—A wired network connection is often configured automatically when you boot up your Fedora system. For wireless, you probably have to select your wireless network and add a password when prompted. An icon in the top bar lets you do any wired or wireless network configuration you need to do. Refer to Chapter 14, “Administering Networking,” for further information on configuring networking.
- Personal settings—Tools in this group let you change your desktop background (Background), use different online accounts (Online Accounts), and set your language and date and currency format based on region (Region and Language) and screen locking (Screen). To change your background, open the System Settings window, select Background, and then select from the available Wallpapers. To add your own Background, download a wallpaper image you like to your Pictures folder, and then click the Wallpapers box to change it to Pictures folder and choose the image you want.
- Bluetooth—If your computer has Bluetooth hardware, you can enable that device to communicate with other Bluetooth devices.
- Printers—Instead of using the System Settings window to configure a printer, refer to Chapter 16, “Configuring a Print server,” for information on setting up a printer using the CUPS service.
- Sound—Click the Sound settings button to adjust sound input and output devices on your system.
- Removable media—To configure what happens when CDs, DVDs, music players, or other removable media are inserted into your computer, select the Removable Media icon. See Chapter 8, “Learning System Administration,” for information on configuring removable media.
Extending the GNOME 3 desktop
If the GNOME 3 shell doesn't do everything you like, don't despair. You can add extensions to provide additional functionality to GNOME 3. There is also a GNOME Tweak Tool that lets you change advanced settings in GNOME 3.
Using GNOME shell extensions
GNOME shell extensions are available to change the way your GNOME desktop looks and behaves. Visit the GNOME Shell Extensions site (http://extensions.gnome.org) from your Firefox browser on your GNOME 3 desktop, and the site tells you what extension you have installed and which ones are available for you to install.
Because the extensions page knows what extensions you have and the version of GNOME 3 you are running, it can present only those extensions that are compatible with your system. Many of the extensions help you add back in features from GNOME 2, including:
- Applications Menu—Adds an Applications menu to the top panel, just as it was in GNOME 2.
- Places Status Indicator—Adds a systems status menu, similar to the Places menu in GNOME 2, to let you quickly navigate to useful folders on your system.
- Window List—Adds a list of active windows to the top panel, similar to the Window List that appeared on the bottom panel in GNOME 2.
To install an extension, simply select the extension from the list to see the extension's page, and then click the button on that page from off to on. Click Install when you are asked if you want to download and install the extension. The extension is then added to your desktop.
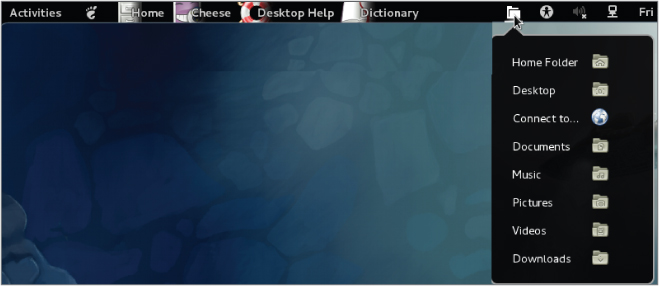
Figure 2.9 shows an example of the Applications Menu (the GNOME foot icon), Window List (showing several active applications icons), and Places Status Indicator (with folders displayed from a drop-down menu).
Figure 2.9 Extensions add features to the GNOME 3 desktop.
More than 100 GNOME shell extensions are available now, and more are being added all the time. Other popular extensions include Notifications Alert (which alerts you of unread messages), Presentation Mode (which prevents the screensaver from coming on when you are giving a presentation), and Music Integration (which integrates popular music players into GNOME 3 so you are alerted about songs being played).
Because the Extension's site can keep track of your extensions, you can click the Installed extensions button at the top of the page and see every extension that is installed. You can turn the extensions off and on from there and even delete them permanently.
Using the GNOME Tweak Tool
If you don't like the way some of the built-in features of GNOME 3 behave, you can change many of them with the GNOME Tweak Tool. This tool is not installed by default with the Fedora GNOME Live CD, but you can add it by installing the gnome-tweak-tool package. (See Chapter 10, “Getting and Managing Software,” for information on how to install software packages in Fedora.)
Once installed, the GNOME Tweak Tool is available by launching the Advanced Settings icon from your Applications screen. Start with the Desktop category to consider what you might want to change in GNOME 3. Figure 2.10 shows the Tweak Tool (Advanced Settings window) displaying Desktop settings.
Figure 2.10 Change desktop settings using the GNOME Tweak Tool (Advanced Settings).
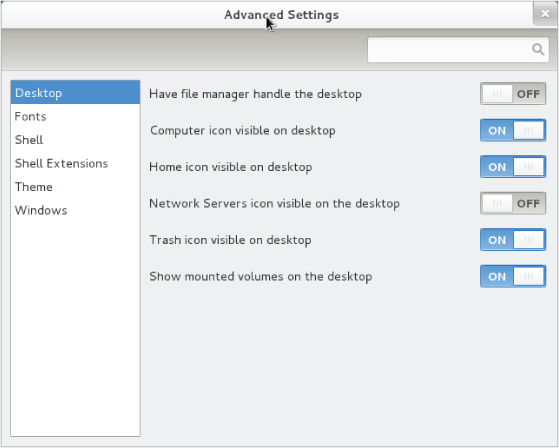
If you are used to putting files and folders on your desktop, you can turn on the Have file manager handle the desktop option. You will immediately be able to open folders and drag-and-drop files to the desktop. If fonts are too small for you, select the Fonts category and drag the Text scaling factor bar to increase the font size. Or change fonts individually for documents, window titles, or monospace fonts.
Under Shell settings, you can change how clock information is displayed in the top bar or set what happens when you close your laptop lid (suspend, hibernate, and so on). To change the look of the desktop, select the Theme category and change the Icon theme and GTK+ theme as you like from drop-down boxes.
Starting with desktop applications
The Fedora GNOME 3 desktop live CD comes with some cool applications you can start using immediately. To use GNOME 3 as your everyday desktop, you should install it permanently to your computer's hard disk and add the applications you need (a word processor, image editor, drawing application, and so on). If you are just getting started, the following sections list some cool applications to try out.
Managing files and folders with Nautilus
To move, copy, delete, rename, and otherwise organize files and folders in GNOME 3, you can use the Nautilus file manager. Nautilus comes with the GNOME desktop and works like other file managers you may use in Windows or Mac.
To open Nautilus, click the Files icon from the GNOME Dash or Applications list. Your user account starts with a set of folders designed to hold the most common types of content: Music, Pictures, Videos, and the like. These are all stored in what is referred to as your Home directory. Figure 2.11 shows Nautilus open to a home directory.
Figure 2.11 Manage files and folders from the Nautilus window.
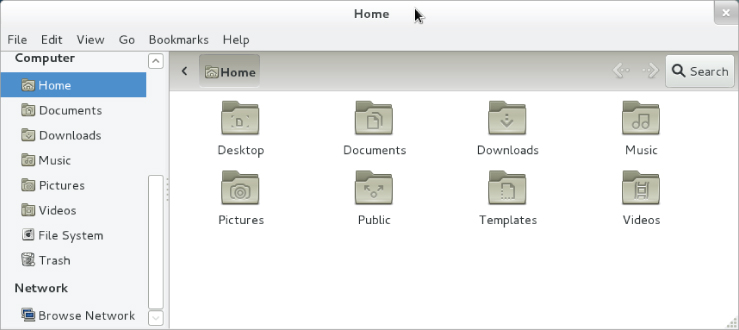
When you want to save files you downloaded from the Internet or created with a word processor, you can organize them into these folders. You can create new folders as needed, drag-and-drop files and folders to copy and move them, and delete them.
Because Nautilus is not much different from most file managers you have used on other computer systems, this chapter does not go into detail about how to use drag-and-drop and traverse folders to find your content. However, I do want to make a few observations that may not be obvious about how to use Nautilus:
- Home folder—You have complete control over the files and folders you create in your Home folder. Most other parts of the filesystem are not accessible to you as a regular user.
- Filesystem organization—Although it appears under the name Home, your home folder is actually located in the filesystem under the /home folder in a folder named after your username—for example, /home/liveuser. In the next few chapters, you will learn how the filesystem is organized (especially in relation to the Linux command shell).
- Working with files and folders—Right-click a file or folder icon to see how you can act on it. For example, you can copy, cut, move to trash (delete), or open any file or folder icon.
- Creating folders—To create a new folder, right-click in a folder window and select Create New Folder. Type the new folder name over the highlighted Untitled Folder and press Enter to name the folder.
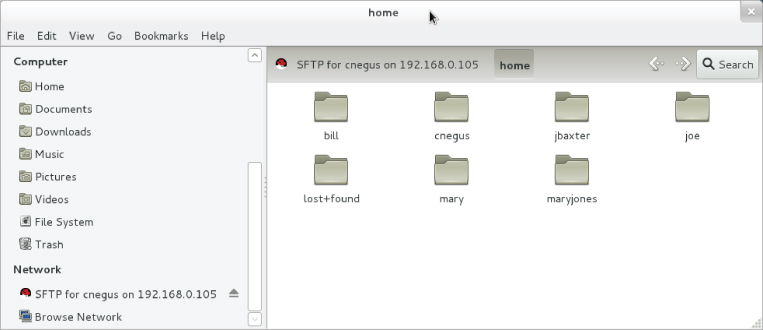
- Accessing remote content—Nautilus can display content from remote servers as well as the local filesystem. In Nautilus, select Connect to Server from the file menu. You can connect to a remote server via SSH (secure shell), FTP with login, Public FTP, Windows share, WebDav (HTTP), or Secure WebDav (HTTPS). Add appropriate user and password information as needed, and the content of the remote server appears in the Nautilus window. Figure 2.12 shows an example of a Nautilus window displaying folders from a remote server over SSH protocol.
Figure 2.12 Access remote folders using the Nautilus Connect to Server feature.
Installing and managing additional software
The Fedora Live CD comes with a web browser (Firefox), a file manager (Nautilus), and a few other common applications. However, there are many other useful applications that, because of their size, just wouldn't fit on a live CD. If you install the live CD to your hard disk (as described in Chapter 9), you almost certainly will want to add some more software.
When Fedora is installed, it is automatically configured to connect your system to the huge Fedora software repository that is available on the Internet. As long as you have an Internet connection, you can run the Add/Remove software tool to download and install any of thousands of Fedora packages.
Although the entire facility for managing software in Fedora (the yum and rpm features) is described in detail in Chapter 10, “Getting and Managing Software,” you can start installing some software packages without knowing much about how the feature works. Begin by going to the applications screen and opening the Add/Remove Software window.
With the Add/Remove Software window open, you can select the applications you want to install by searching (type the name into the Find box), choosing a category, or sorting packages and selecting from a list (by collections, newest packages, or selected packages). Figure 2.13 shows a search for the LibreOffice Writer package, with the package selected and ready to install.
Figure 2.13 Download and install software from the huge Fedora repository.
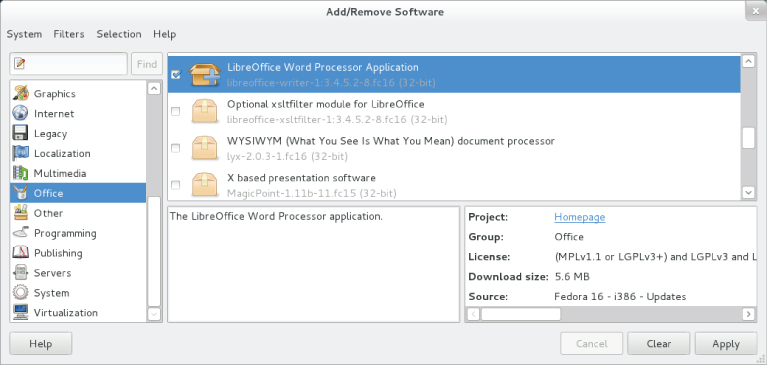
With the packages you want selected, you can read a description of the package and even go to the package's homepage to read more about it. When you are ready, click Apply to install the package and any dependent packages needed to make it work.
By searching for and installing some common desktop applications, you should be able to start using your desktop effectively. Refer to Chapter 10 for details on how to add software repositories and use yum and rpm commands to manage software in Fedora and RHEL.
Playing music with Rhythmbox
Rhythmbox is the music player that comes on the Fedora GNOME Live CD. You can launch Rhythmbox from the GNOME 3 Dash, and then immediately play music CDs, podcasts, or Internet radio shows. You can import audio files in WAV and Ogg Vorbis formats, or add plug-ins for MP3 or other audio formats.
Figure 2.14 shows an example of the Rhythmbox window with several audio CDs imported.
Figure 2.14 Play music, podcasts, and Internet radio from Rhythmbox.
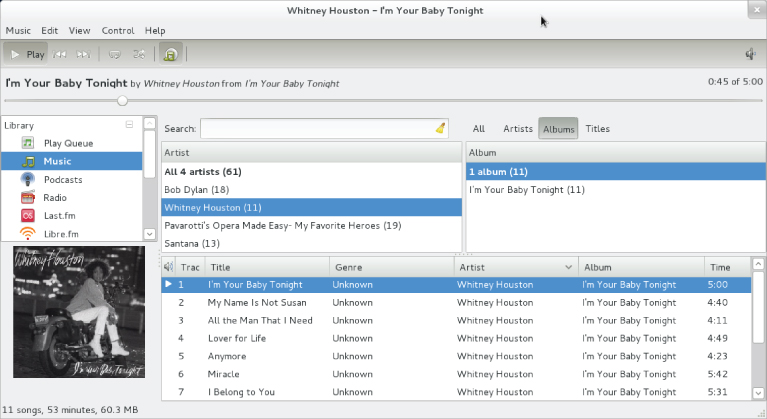
Here are a few ways you can get started with Rhythmbox:
- Radio—Double-click on the Radio selection under Library. Then choose a radio station from the list that appears to the right.
- Podcasts—Search for podcasts on the Internet and find the URL for one that interests you. Right-click the Podcasts entry and select New Podcast Feed. Paste or type in the URL to the podcast and click Add. A list of podcasts from the site you selected appears to the right. Double-click on the one you want to listen to.
- Audio CDs—Insert an audio CD and press Play when it appears in the Rhythmbox window. Rhythmbox also lets you rip and burn audio CDs.
- Audio files—Rhythmbox can play WAV and Ogg Vorbis files. By adding plug-ins, you can play many other audio formats, including MP3. Because there are patent issues related to the MP3 format, the ability to play MP3s is not included with Fedora. In Chapter 10, I describe how to get software you need that is not in the repository of your Linux distribution.
Plug-ins are available for Rhythmbox to get cover art, show information about artists and songs, add support for music services (such as Last.fm and Magnatune), and fetch song lyrics.
Stopping the GNOME 3 desktop
When you are done with your GNOME 3 session, select the User button in the upper-right corner of the top bar. From there, you can choose to Log Out, Suspend your session, or switch to a different user account without logging out.
Using the GNOME 2 Desktop
The GNOME 2 desktop is the default desktop interface used up through Red Hat Enterprise Linux 6. It is well known, stable, and perhaps a bit boring.
GNOME 2 desktops provide the more standard menus, panels, icons, and workspaces. If you are using a Red Hat Enterprise Linux system up to RHEL6 or an older Fedora or Ubuntu distribution, you are probably looking at a GNOME 2 desktop. So, this section provides a tour of GNOME 2, along with some opportunities for sprucing it up a bit.
As of this writing, GNOME 2.38 is the most recent version available in Red Hat Enterprise Linux, although the distribution you are using may or may not include this version. Recent GNOME releases include advance in 3D effects (see “3D effects with AIGLX” later in this chapter) and improved usability features.
To use your GNOME desktop, you should become familiar with the following components:
- Metacity (window manager)—The default window manager for GNOME 2.2 is Metacity. Metacity configuration options let you control such things as themes, window borders, and controls used on your desktop.
- Compiz (window manager)—You can enable this window manager in GNOME to provide 3D desktop effects.
- Nautilus (file manager/graphical shell)—When you open a folder (by double-clicking the Home icon on your desktop, for example), the Nautilus window opens and displays the contents of the selected folder. Nautilus can also display other types of content, such as shared folders from Windows computers on the network (using SMB).
- GNOME panels (application/task launcher)—These panels, which line the top and bottom of your screen, are designed to make it convenient for you to launch the applications you use, manage running applications, and work with multiple virtual desktops. By default, the top panel contains menu buttons (Applications, Places, and System), desktop application launchers (Evolution e-mail and Firefox web browser), a workspace switcher (for managing four virtual desktops), and a clock. Icons appear in the panel when you need software updates or SELinux detects a problem. The bottom panel has a Show Desktop button, window lists, a trash can, and workspace switcher.
- Desktop area—The windows and icons you use are arranged on the desktop area, which supports drag-and-drop between applications, a desktop menu (right-click to see it), and icons for launching applications. A Computer icon consolidates CD drives, floppy drives, the filesystem, and shared network resources in one place.
GNOME also includes a set of Preferences windows that enable you to configure different aspects of your desktop. You can change backgrounds, colors, fonts, keyboard shortcuts, and other features related to the look and behavior of the desktop. Figure 2.15 shows how the GNOME 2 desktop environment appears the first time you log in, with a few windows added to the screen.
Figure 2.15 The GNOME 2 desktop environment
The desktop shown in Figure 2.15 is for Red Hat Enterprise Linux. The following sections provide details on using the GNOME 2 desktop.
Using the Metacity window manager
The Metacity window manager seems to have been chosen as the default window manager for GNOME because of its simplicity. The creator of Metacity refers to it as a “boring window manager for the adult in you” and then goes on to compare other window managers to colorful, sugary cereal, whereas Metacity is characterized as Cheerios.
There really isn't much you can do with Metacity (except get your work done efficiently). You assign new themes to Metacity and change colors and window decorations through the GNOME preferences (described later). A few Metacity themes exist, but expect the number to grow.
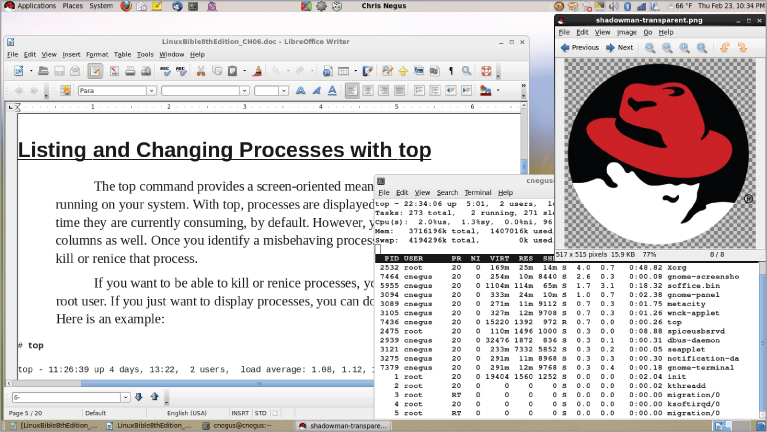
Basic Metacity functions that might interest you are keyboard shortcuts and the workspace switcher. Table 2.1 shows keyboard shortcuts to get around the Metacity window manager.
Table 2.1 Keyboard Shortcuts
| Actions | Keystrokes |
| Cycle backward, without pop-up icons | Alt+Shift+Esc |
| Cycle backward among panels | Alt+Ctrl+Shift+Tab |
| Close menu | Esc |
There are many other keyboard shortcuts you can use with the window manager as well. Select System ⇒ Preferences ⇒ Keyboard Shortcuts to see a list of shortcuts such as the following:
- Run Dialog—To run a command to launch an application from the desktop by command name, press Alt+F2. From the dialog box that appears, type the command and press Enter. For example, type gedit to run a simple graphical text editor.
- Lock Screen—If you want to step away from your screen and lock it, press Ctrl+Alt+L. You will need to type your user password to open the screen again.
- Show Main Menu—To open an application from the Applications, Places, or System menu, press Alt+F1. Then use the up and down arrow keys to select from the current menu or right and left arrow keys to select from other menus.
- Print Screen—Press the Print Screen key to take a picture of the entire desktop. Press Alt+Print Screen to take a picture of the current window.
Another Metacity feature of interest is the workspace switcher. Four virtual workspaces appear in the Workspace Switcher on the GNOME 2 panel. You can do the following with the Workspace Switcher:
- Choose current workspace—Four virtual workspaces appear in the Workspace Switcher. Click any of the four virtual workspaces to make it your current workspace.
- Move windows to other workspaces—Click any window, each represented by a tiny rectangle in a workspace, to drag-and-drop it to another workspace. Likewise, you can drag an application from the Window List to move that application to another workspace.
- Add more workspaces—Right-click the Workspace Switcher and select Preferences. You can add workspaces (up to 32).
- Name workspaces—Right-click the Workspace Switcher and select Preferences. Click in the Workspaces pane to change names of workspaces to any names you choose.
You can view and change information about Metacity controls and settings using the gconf-editor window (type gconf-editor from a Terminal window). As the window says, it is not the recommended way to change preferences, so when possible, you should change the desktop through GNOME 2 preferences. However, gconf-editor is a good way to see descriptions of each Metacity feature.
From the gconf-editor window, select apps ⇒ metacity, and then choose from general, global_keybindings, keybindings_commands, window_keybindings, and workspace_names. Click each key to see its value, along with short and long descriptions of the key.
Changing GNOME appearance
You can change the general look of your GNOME desktop by selecting System ⇒ Preferences ⇒ Appearance. From the Appearance Preferences window, select from three different tabs:
- Theme—Entire themes are available for the GNOME 2 desktop that change the colors, icons, fonts, and other aspects of the desktop. Several different themes come with the GNOME desktop, which you can simply select from this tab to use. Or click Get more themes online to choose from a variety of available themes.
- Background—To change your desktop background, select from a list of backgrounds on this tab to have the one you choose immediately take effect. To add a different background, put the background you want on your system (perhaps download one by selecting Get more backgrounds online and downloading it to your Pictures folder). Then click Add and select the image from your Pictures folder.
- Fonts—Different fonts can be selected to use by default with your applications, documents, desktop, window title bar, and for fixed width.
Using the GNOME panels
The GNOME panels are placed on the top and bottom of the GNOME desktop. From those panels, you can start applications (from buttons or menus), see what programs are active, and monitor how your system is running. There are also many ways to change the top and bottom panels—by adding applications or monitors or by changing the placement or behavior of the panel, for example.
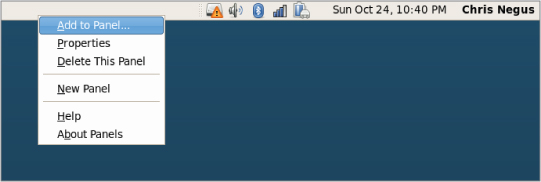
Right-click any open space on either panel to see the Panel menu. Figure 2.16 shows the Panel menu on the top.
Figure 2.16 The GNOME Panel menu
From GNOME's Panel menu, you can choose from a variety of functions, including:
- Use the menus
- The Applications menu displays most of the applications and system tools you will use from the desktop.
- The Places menu lets you select places to go, such as the Desktop folder, home folder, removable media, or network locations.
- The System menu lets you change preferences and system settings, as well as get other information about GNOME.
- Add to Panel—Add an applet, menu, launcher, drawer, or button.
- Properties—Change the panel's position, size, and background properties.
- Delete This Panel—Delete the current panel.
- New Panel—Add panels to your desktop in different styles and locations.
You can also work with items on a panel. For example, you can:
- Move items—To move an item on a panel, right-click it, select Move, and then drag-and-drop it to a new position.
- Resize items—You can resize some elements, such as the Window List, by clicking an edge and dragging it to the new size.
- Use the Window List—Tasks running on the desktop appear in the Window List area. Click a task to minimize or maximize it.
The following sections describe some things you can do with the GNOME panel.
Using the Applications and System menus
Click Applications on the panel, and you see categories of applications and system tools that you can select. Click the application you want to launch. To add an item from a menu so that it can launch from the panel, drag-and-drop the item you want to the panel.
You can add items to your GNOME 2 menus. To do that, right-click on any of the menu names, and then select Edit Menus. The window that appears lets you add or delete menus associated with the Applications and System menus. You can also add items to launch from those menus by selecting New Item and typing the name, command, and comment for the item.
Adding an applet
You can run several small applications, called applets, directly on the GNOME panel. These applications can show information you may want to see on an ongoing basis or may just provide some amusement. To see what applets are available and to add applets that you want to your panel, perform the following steps:
Figure 2.17 shows (from left to right) eyes, system monitor, weather report, terminal, and Wanda the fish.
Figure 2.17 Placing applets on the panel makes accessing them easy.
After an applet is installed, right-click it on the panel to see what options are available. For example, select Preferences for the stock ticker, and you can add or delete stocks whose prices you want to monitor. If you don't like the applet's location, right-click it, click Move, slide the mouse until the applet is where you want it (even to another panel), and click to set its location.
If you no longer want an applet to appear on the panel, right-click it, and then click Remove From Panel. The icon representing the applet disappears. If you find that you have run out of room on your panel, you can add a new panel to another part of the screen, as described in the next section.
Adding another panel
If you run out of space on the top or bottom panels, you can add more panels to your desktop. You can have several panels on your GNOME 2 desktop. You can add panels that run along the entire bottom, top, or side of the screen. To add a panel, do the following:
After you've added a panel, you can add applets or application launchers to it as you did to the default panel. To remove a panel, right-click it and select Delete This Panel.
Adding an application launcher
Icons on your panel represent a web browser and several office productivity applications. You can add your own icons to launch applications from the panel as well. To add a new application launcher to the panel, do the following:
To launch the application you just added, simply click the icon on the panel.
If the application you want to launch is not on one of your menus, you can build a launcher yourself as follows:
- Type—Select Application (to launch a regular GUI application) or Application in Terminal. Use Application in Terminal if the application is a character-based or ncurses application. (Applications written using the ncurses library run in a Terminal window but offer screen-oriented mouse and keyboard controls.)
- Name—A name to identify the application (this appears in the tooltip when your mouse is over the icon).
- Command—The command line that is run when the application is launched. Use the full pathname, plus any required options.
- Comment—A comment describing the application. It also appears when you later move your mouse over the launcher.
The application should now appear in the panel. Click it to start the application.
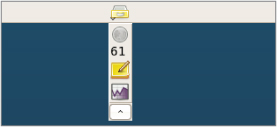
Adding a drawer
A drawer is an icon that you can click to display other icons representing menus, applets, and launchers; it behaves just like a panel. Essentially, any item you can add to a panel you can add to a drawer. By adding a drawer to your GNOME panel, you can include several applets and launchers that together take up the space of only one icon. Click on the drawer to show the applets and launchers as if they were being pulled out of a drawer icon on the panel.
To add a drawer to your panel, right-click the panel and select Add to Panel ⇒ Drawer. A drawer appears on the panel. Right-click it, and add applets or launchers to it as you would to a panel. Click the icon again to retract the drawer.
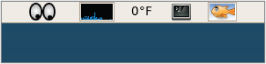
Figure 2.18 shows a portion of the panel with an open drawer that includes an icon for launching a weather report, sticky notes, and stock monitor.
Figure 2.18 dd launchers or applets to a drawer on your GNOME 2 panel.
Changing panel properties
You can change the orientation, size, hiding policy, and background properties of your desktop panels. To open the Panel Properties window that applies to a specific panel, right-click on an open space on the panel and choose Properties. The Panel Properties window that appears includes the following values:
- Orientation—Move the panel to different locations on the screen by clicking on a new position.
- Size—Select the size of your panel by choosing its height in pixels (48 pixels by default).
- Expand—Select this check box to have the panel expand to fill the entire side, or clear the check box to make the panel only as wide as the applets it contains.
- AutoHide—Select whether a panel is automatically hidden (appearing only when the mouse pointer is in the area).
- Show Hide buttons—Choose whether the Hide/Unhide buttons (with pixmap arrows on them) appear on the edges of the panel.
- Arrows on hide buttons—If you select Show Hide Buttons, you can choose to have arrows on those buttons.
- Background—From the Background tab, you can assign a color to the background of the panel, assign a pixmap image, or just leave the default (which is based on the current system theme). Click the Background Image check box if you want to select an Image for the background, and then select an image, such as a tile from /usr/share/backgrounds/tiles or another directory.
3D effects with AIGLX
Several different initiatives have made strides in recent years to bring 3D desktop effects to Linux. Ubuntu, openSUSE, and Fedora used AIGLX (http://fedoraproject.org /wiki/RenderingProject/aiglx).
The goal of the Accelerated Indirect GLX project (AIGLX) is to add 3D effects to everyday desktop systems. It does this by implementing OpenGL (http://opengl.org) accelerated effects using the Mesa (http://www.mesa3d.org) open source OpenGL implementation.
Currently, AIGLX supports a limited set of video cards and implements only a few 3D effects, but it does offer some insight into the eye candy that is in the works.
If your video card was properly detected and configured, you may be able to simply turn on the Desktop Effects feature to see the effects that have been implemented so far. To turn on Desktop Effects, select System ⇒ Preferences ⇒ Desktop Effects. When the Desktop Effects window appears, select Compiz. (If the selection is not available, install the compiz package.)
Enabling Compiz does the following:
- Starts Compiz—Stops the current window manager and starts the Compiz window manager.
- Enables the Windows Wobble When Moved effect—With this effect on, when you grab the title bar of the window to move it, the window will wobble as it moves. Menus and other items that open on the desktop also wobble.
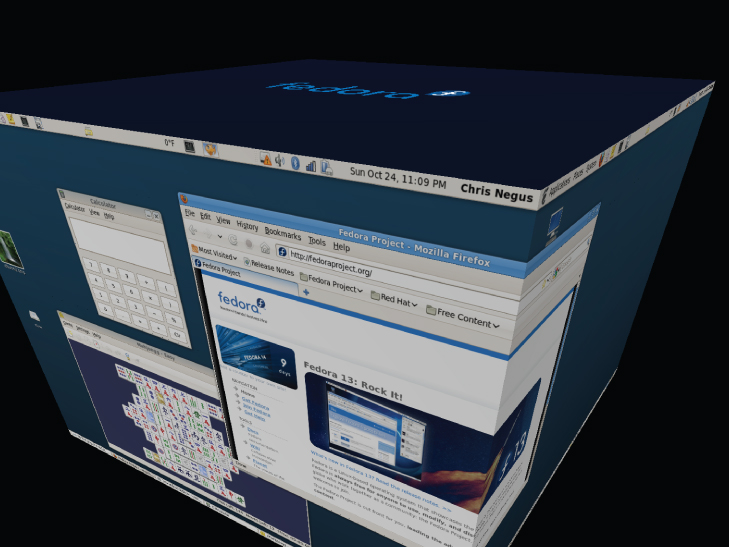
- Enables the Workspaces on a Cube effect—Drag a window from the desktop to the right or the left and the desktop will rotate like a cube, with each of your desktop workspaces appearing as a side of that cube. Drop the window on the workspace where you want it to go. You can also click on the Workspace Switcher applet in the bottom panel to rotate the cube to display different workspaces.
Other nice desktop effects result from using the Alt+Tab keys to tab among different running windows. As you press Alt+Tab, a thumbnail of each window scrolls across the screen as the window it represents is highlighted.
Figure 2.19 shows an example of a Compiz desktop with AIGLX enabled. The figure illustrates a web browser window being moved from one workspace to another as those workspaces rotate on a cube.
Figure 2.19 Rotate workspaces on a cube with AIGLX desktop effects enabled.
The following are some interesting effects you can get with your 3D AIGLX desktop:
- Spin cube—Hold Ctrl+Alt keys and press the right and left arrow keys. The desktop cube spins to each successive workspace (forward or back).
- Slowly rotate cube—Hold the Ctrl+Alt keys, press and hold the left mouse button, and move the mouse around on the screen. The cube will move slowly with the mouse among the workspaces.
- Scale and separate windows—If your desktop is cluttered, hold Ctrl+Alt and press the up arrow key. Windows will shrink down and separate on the desktop. Still holding Ctrl+Alt, use your arrow keys to highlight the window you want and release the keys to have that window come to the surface.
- Tab through windows—Hold the Alt key and press the Tab key. You will see reduced versions of all your windows in a strip in the middle of your screen, with the current window highlighted in the middle. Still holding the Alt key, press Tab or Shift+Tab to move forward or backward through the windows. Release the keys when the one you want is highlighted.
- Scale and separate workspaces—Hold Ctrl+Alt and press the down arrow key to see reduced images of the workspace shown on a strip. Still holding Ctrl+Alt, use the right and left arrow keys to move among the different workspaces. Release the keys when the workspace you want is highlighted.
- Send current window to next workspace—Hold Ctrl+Alt+Shift keys together and press the left and right arrow keys. The next workspace to the left or right, respectively, appears on the current desktop.
- Slide windows around—Press and hold the left mouse button on the window title bar, and then press the left, right, up, or down arrow keys to slide the current window around on the screen.
If you get tired of wobbling windows and spinning cubes, you can easily turn off the AIGLX 3D effects and return to using Metacity as the window manager. Select System ⇒ Preferences ⇒ Desktop Effects again and toggle off the Enable Desktop Effects button to turn off the feature.
If you have a supported video card, but find that you are not able to turn on the Desktop Effects, check that your X server started properly. In particular, make sure that your /etc/X11/xorg.conf file is properly configured. Make sure that dri and glx are loaded in the Module section. Also, add an extensions section anywhere in the file (typically at the end of the file) that appears as follows:
Section "extensions"
 Option "Composite"
EndSection
Another option is to add the following line to the /etc/X11/xorg.conf file in the Device section:
Option "XAANoOffscreenPixmaps"
The XAANoOffscreenPixmaps option will improve performance. Check your /var/log/Xorg.log file to make sure that DRI and AIGLX features were started correctly. The messages in that file can help you debug other problems as well.
Summary
The GNOME desktop environment has become the default desktop environment for many Linux systems, including Fedora and RHEL. The GNOME 3 desktop (used now in Fedora) is a modern, elegant desktop, designed to match the types of interfaces available on many of today's mobile devices. The GNOME 2 desktop (used through RHEL 6) provides a more traditional desktop experience.
Besides GNOME desktops, there are other popular and useful desktop environments you can try out. The K Desktop Environment (KDE) offers many more bells and whistles than GNOME and is used by default in several Linux distributions. Netbooks and live CD distributions sometimes use the LXDE or Xfce desktops.
Now that you have a grasp of how to get and use a Linux desktop, it's time to start digging into the more professional administrative interfaces. Chapter 3 introduces you to the Linux command-line shell interface.
Exercises
Use these exercises to test your skill in using a GNOME desktop. You can use either a GNOME 2.x (Red Hat Enterprise Linux up until RHEL 6.x) or GNOME 3.x (Fedora 16 or later or Ubuntu 11.10 or later) desktop. If you are stuck, solutions to the tasks are shown for both the GNOME 2 and GNOME 3 desktops in Appendix B.