
Chapter 3
Using the Shell
Before icons and windows took over computer screens, you typed commands to interact with most computers. On UNIX systems, from which Linux was derived, the program used to interpret and manage commands was referred to as the shell.
No matter which Linux distribution you are using, you can always count on the fact that the shell is available to you. It provides a way to create executable script files, run programs, work with file systems, compile computer code, and manage the computer. Although the shell is less intuitive than common graphic user interfaces (GUIs), most Linux experts consider the shell to be much more powerful than GUIs. Shells have been around a long time, and many advanced features have been built into them.
The Linux shell illustrated in this chapter is called the bash shell, which stands for Bourne Again Shell. The name is derived from the fact that bash is compatible with the one of the earliest UNIX shells: the Bourne shell (named after its creator Stephen Bourne, and represented by the sh command).
Although bash is included with most distributions, and considered a standard, other shells are available, including the C shell (csh), which is popular among BSD UNIX users, and the Korn shell (ksh), which is popular among UNIX System V users. Ubuntu uses the dash shell, by default, which is designed to perform faster than the bash shell. Linux also has a tcsh shell (an improved C shell) and an ash shell (another Bourne shell look-alike).
The odds are strong that the Linux distribution you are using has more than one shell installed by default and available for your use. This chapter, however, focuses primarily on the bash shell. That is because the Linux distributions featured in this book, Fedora and Red Hat Enterprise Linux, both use the bash shell by default.
The following are a few major reasons to learn how to use the shell:
- You will know how to get around any Linux or other UNIX-like system. For example, I can log in to my Red Hat Enterprise Linux Web server, my home multimedia server, or my wife's Mac and explore and use any of those computer systems from a shell. I can even log in and run commands on my Android phone. All of them run Linux or similar systems on the inside.
- Special shell features enable you to gather data input and direct data output between commands and the Linux file system. To save on typing, you can find, edit, and repeat commands from your shell history. Many power users hardly touch a graphical interface, doing most of their work from a shell.
- You can gather commands into a file using programming constructs such as conditional tests, loops, and case statements to quickly do complex operations that would be difficult to retype over and over. Programs consisting of commands that are stored and run from a file are referred to as shell scripts. Most Linux system administrators use shell scripts to automate tasks such as backing up data, monitoring log files, or checking system health.
The shell is a command language interpreter. If you have used Microsoft operating systems, you'll see that using a shell in Linux is similar to — but generally much more powerful than — the interpreter used to run commands in DOS or in the CMD command interface. You can happily use Linux from a graphical desktop interface, but as you grow into Linux you will surely need to use the shell at some point to track down a problem or administer some features.
How to use the shell isn't obvious at first, but with the right help you can quickly learn many of the most important shell features. This chapter is your guide to working with the Linux system commands, processes, and file system from the shell. It describes the shell environment and helps you tailor it to your needs.
About Shells and Terminal Windows
There are several ways to get to a shell interface in Linux. Three of the most common are the shell prompt, Terminal window, and virtual console, which you learn more about in the following sections.
To start using this section, boot up your Linux system. On your screen you should either see a plaintext login prompt similar to the following:
Red Hat Enterprise Linux Workstation Release 6.1 (Santiago
Kernel 2.6.32-131... on X86
joe login:
Or you will see a graphical login screen.
In either case, you should log in with a regular user account. If you have a plain-text login prompt, continue to the “Using the shell prompt” section. If you log in through a graphical screen, go to the “Using a terminal window” section to see how to access a shell from the desktop. In either case, you can access more shells as described in the “Using virtual consoles” section.
Using the shell prompt
If your Linux system has no graphical user interface (or one that isn't working at the moment), you will most likely see a shell prompt after you log in. Typing commands from the shell will probably be your primary means of using the Linux system.
The default prompt for a regular user is simply a dollar sign:
$
The default prompt for the root user is a pound sign (also called a hash mark):
#
In most Linux systems, the $ and # prompts are preceded by your username, system name, and current directory name. For example, a login prompt for the user named jake on a computer named pine with /usr/share/ as the current working directory would appear as
[jake@pine share]$
You can change the prompt to display any characters you like and even read in pieces of information about your system — for example, you can use the current working directory, the date, the local computer name, or any string of characters as your prompt. To configure your prompt, see the section “Setting your prompt” later in this chapter.
Although a tremendous number of features are available with the shell, it's easy to begin by just typing a few commands. Try some of the commands shown in the remainder of this section to become familiar with your current shell environment.
In the examples that follow, the dollar ($) and pound (#) symbols indicate a prompt. While a $ indicates that the command can be run by any user, a # typically means you should run the command as the root user — many administrative tools require root permission to be able to run them. The prompt is followed by the command that you type (and then you press Enter). The lines that follow show the output resulting from the command.
Using a terminal window
With the desktop GUI running, you can open a terminal emulator program (sometimes referred to as a Terminal window) to start a shell. Most Linux distributions make it easy for you to get to a shell from the GUI. Here are two common ways to launch a Terminal window from a Linux desktop:
- Right-click the desktop. In the context menu that appears, if you see Open in Terminal, Shells, New Terminal, Terminal Window, Xterm, or some similar item, select it to start a Terminal window. (Some distributions have disabled this feature.)
- Click on the panel menu. Many Linux desktops include a panel at the top or bottom of the screen from which you can launch applications. For example, in some systems that use the GNOME desktop, you can select Applications ⇒ System Tools ⇒ Terminal to open a Terminal window.
In all cases, you should be able to type a command as you would from a shell with no GUI. Different terminal emulators are available with Linux. In Fedora, Red Hat Enterprise Linux (RHEL), and other Linux distributions that use the GNOME desktop, the default Terminal emulator window is the GNOME Terminal (represented by the gnome-terminal command).
GNOME Terminal supports many features beyond the basic shell. For example, you can cut and paste text to or from a GNOME Terminal window, change fonts, set a title, choose colors or images to use as background, and set how much text to save when text scrolls off the screen.
To try some GNOME Terminal features, start up a Fedora or RHEL system and log in to the desktop. Then follow this procedure:
If you are using Linux from a graphical desktop, you will probably most often access the shell from a Terminal window.
Using virtual consoles
Most Linux systems that include a desktop interface start multiple virtual consoles running on the computer. Virtual consoles are a way to have multiple shell sessions open at once in addition to the graphical interface you are using.
You can switch between virtual consoles by holding the Ctrl and Alt keys and pressing a function key between F1 and F7. For example, in Fedora, press Ctrl+Alt+F1 (or F2, F3, F4, and so on up to F7 on most Linux systems) to display one of seven virtual consoles. The first virtual workspace in Fedora is where the GUI is and the next six virtual consoles are text-based virtual consoles. You can return to the GUI (if one is running) by pressing Ctrl+Alt+F1. (On some systems the GUI runs on the virtual console 7 or 5. So you'd return to the GUI by pressing Ctrl+Alt+F5 or Ctrl+Alt+F7.)
Try it right now. Hold down the Ctrl+Alt keys and press F3. You should see a plain-text login prompt. Log in using your username and password. Try a few commands. When you are done, type exit to exit the shell. Then press Ctrl+Alt+F1 to return to your graphical desktop interface. You can go back and forth between these graphical consoles as much as you like.
Choosing Your Shell
In most Linux systems, your default shell is the bash shell. To find out what your default login shell is, type the following commands:
$ who am i
chris   pts/0        2011-11-26 07:19 (:0.0)
$ grep chris /etc/passwd
cnegus:x:13597:13597:Chris Negus:/home/cnegus:/bin/bash
The who am i command shows your username, and the grep command (replacing chris with your name) shows the definition of your user account in the /etc/password file. The last field in that entry shows that the bash shell (/bin/bash) is your default shell (the one that starts up when you log in or open a Terminal window).
It's possible, although not likely, that you might have a different default shell set. To try a different shell, simply type the name of that shell (examples include ksh, tcsh, csh, sh, dash, and others, assuming they are installed). You can try a few commands in that shell, and then type exit when you are done to return to the bash shell.
You might choose to use different shells for the following reasons:
- You are used to using UNIX System V systems (often ksh by default) or Sun Microsystems and other Berkeley UNIX–based distributions (frequently csh by default), and you are more comfortable using default shells from those environments.
- You want to run shell scripts that were created for a particular shell environment, and you need to run the shell for which they were made so you can test or use those scripts from your current shell.
- You simply prefer features in one shell over those in another. For example, a member of my Linux Users Group prefers ksh over bash because he doesn't like the way aliases are used with bash.
Although most Linux users have a preference for one shell or another, when you know how to use one shell, you can quickly learn any of the others by occasionally referring to the shell's man page (for example, type man bash). The man pages (described later in the “Getting Information About Commands” section) provide documentation for commands, file formats, and other components in Linux. Most people use bash just because they don't have a particular reason for using a different shell. The rest of this section describes the bash shell.
Bash includes features originally developed for sh and ksh shells in early UNIX systems, as well as some csh features. Expect bash to be the default shell in most Linux systems you are using, with the exception of some specialized Linux systems (such as some that run on embedded devices) that may require a smaller shell that needs less memory and requires fewer features. Most of the examples in this chapter are based on the bash shell.
Running Commands
The simplest way to run a command is to just type the name of the command from a shell. From your desktop, open a Terminal window. Then type the following command:
$ date
Sat Nov 26 08:04:00 EST 2011
Typing the date command, with no options or arguments, causes the current day, month, date, time, time zone and year to be displayed as just shown. Here are a few other commands you can try:
$ pwd
/home/chris
$ hostname
mydesktop
$ ls
Desktop    Downloads  Pictures  Templates
Documents  Music      Public    Videos
The pwd command shows your current working directory. Typing hostname shows your computer's hostname. The ls command lists the files and directories in your current directory. While many commands can be run by just typing command names, it's more common to type more after the command to modify its behavior. The characters and words you can type after a command are called options and arguments.
Understanding command syntax
Most commands have one or more options you can add to change the command's behavior. Options typically consist of a single letter, preceded by a hyphen. However, you can group single-letter options together or precede each with a hyphen, to use more than one option at a time. For example, the following two uses of options for the ls command are the same:
$ ls -l -a -t
$ ls -lat
In both cases, the ls command is run with the -l (long listing), -a (show hidden dot files), and -t options (list by time).
Some commands include options that are represented by a whole word. To tell a command to use a whole word as an option, you typically precede it with a double hyphen (--). For example, to use the help option on many commands, you enter --help on the command line. Without the double hyphen, the letters h, e, l, and p would be interpreted as separate options. (There are some commands that don't follow the double hyphen convention, using a single hyphen before a word, but most commands will use double hyphens for word options.)
Many commands also accept arguments after certain options are entered or at the end of the entire command line. An argument is an extra piece of information, such as a filename, directory, username, device, or other item that tells the command what to act on. For example, cat /etc/passwd displays the contents of the /etc/passwd file on your screen. In this case, /etc/passwd is the argument. Usually, you can have as many arguments as you want on the command line, limited only by the total number of characters allowed on a command line.
There are times when an argument is associated with an option. In that case, the argument must immediately follow the option. With single-letter options, the argument typically follows after a space. For full-word options, the argument often follows an equal sign (=). Here are some examples:
$ ls --hide=Desktop
Documents  Music     Public    Videos
Downloads  Pictures  Templates
In the previous example, the --hide option tells the ls command to not display the file or directory named Desktop when listing the contents of the directory. Notice that the equal sign immediately follows the option (no space) and then the argument (again, no space).
Here's an example of a single-letter option that is followed by an argument:
$ tar -cvf backup.tar /home/chris
In the tar example just shown, the options say to create (c) a file (f) named backup.tar that includes all the contents of the /home/chris directory and its subdirectories and show verbose messages as the backup is done (v). Because backup.tar is an argument to the f option, backup.tar must immediately follow the option.
Here are a few commands you can try out. See how they behave differently with different options:
$ ls
Desktop  Documents  Downloads  Music  Pictures  Public  Templates  Videos
$ ls -a
.              Desktop     .gnome2_private  .lesshst       Public
..             Documents   .gnote           .local         Templates
.bash_history  Downloads   .gnupg           .mozilla       Videos
.bash_logout   .emacs      .gstreamer-0.10  Music          .xsession-errors
.bash_profile  .esd_auth   .gtk-bookmarks   Pictures       .zshrc
.bashrc        .fsync.log  .gvfs            Pictures
$ uname
Linux
$ uname -a
Linux myhost.example.com 2.6.32-131.17.1.el6.x86_64 #1 SMP Thu Sep 29
10:24:25 EDT 2011 x86_64 x86_64 x86_64 GNU/LinuxLinux
$ date
Sun Dec  4 09:08:38 EST 2011
$ date +'%d/%m/%y'
04/12/11
$ date +'%A, %B %d, %Y'
Sunday, December 04, 2011
The ls command, by itself, shows all regular files and directories in the current directory. By adding the -a, you can also see the hidden files in the directory (those beginning with a dot). The uname command shows the type of system you are running (Linux). When you add -a, you also can see the hostname, kernel release, and kernel version.
The date command has some special types of options. By itself, date simply prints the current day, date, and time as shown above. But the date command supports a special + format option, which lets you display the date in different formats. Type date --help to see different format indicators you can use.
Try the id and who commands to get a feel for your current Linux environment, as described in the following paragraphs.
When you log in to a Linux system, Linux views you as having a particular identity, which includes your username, group name, user ID, and group ID. Linux also keeps track of your login session: It knows when you logged in, how long you have been idle, and where you logged in from.
To find out information about your identity, use the id command as follows:
$ id
uid=501(chris) gid=501(chris) groups=105(sales), 7(lp)
In this example, the username is chris, which is represented by the numeric user ID (uid) 501. The primary group for chris also is called chris, which has a group ID (gid) of 501. It is normal for Fedora and Red Hat Enterprise Linux users to have the same primary group name as their username. The user chris also belongs to other groups called sales (gid 105) and lp (gid 7). These names and numbers represent the permissions that chris has to access computer resources.
You can see information about your current login session by using the who command. In the following example, the -u option says to add information about idle time and the process ID and -H asks that a header be printed:
$ who -uH
NAME      LINE    TIME             IDLE     PID   COMMENT
chris     tty1    Jan 13 20:57     .        2013
The output from this who command shows that the user chris is logged in on tty1 (which is the first virtual console on the monitor connected to the computer), and his login session began at 20:57 on January 13. The IDLE time shows how long the shell has been open without any command being typed (the dot indicates that it is currently active). PID shows the process ID of the user's login shell. COMMENT would show the name of the remote computer the user had logged in from, if that user had logged in from another computer on the network, or the name of the local X display if that user were using a Terminal window (such as :0.0).
Locating commands
Now that you have typed a few commands, you may wonder where those commands are located and how the shell finds the commands you type. To find commands you type, the shell looks in what is referred to as your path. For commands that are not in your path, you can type the complete identity of the location of the command.
If you know the directory that contains the command you want to run, one way to run it is to type the full, or absolute, path to that command. For example, you run the date command from the /bin directory by typing
$ /bin/date
Of course, this can be inconvenient, especially if the command resides in a directory with a long pathname. The better way is to have commands stored in well-known directories and then add those directories to your shell's PATH environment variable. The path consists of a list of directories that are checked sequentially for the commands you enter. To see your current path, type the following:
$ echo $PATH
/usr/local/bin:/usr/bin:/bin:/usr/local/sbin:/usr/sbin:/sbin:/sbin:
/home/cn/bin:/sbin
The results show a common default path for a regular Linux user. Directories in the path list are separated by colons. Most user commands that come with Linux are stored in the /bin, /usr/bin, or /usr/local/bin directories. The /sbin and /usr/sbin directories contain administrative commands (some Linux systems don't put those directories in regular users' paths). The last directory shown is the bin directory in the user's home directory.
Unlike some other operating systems, Linux does not, by default, check the current directory for an executable before searching the path. It immediately begins searching the path, and executables in the current directory are run only if they are in the PATH variable or you give their absolute (such as /home/chris/scriptx.sh) or relative (for example, ./scriptx.sh) address.
The path directory order is important. Directories are checked from left to right. So, in this example, if there is a command called foo located in both the /bin and /usr/bin directories, the one in /bin is executed. To have the other foo command run, you either type the full path to the command or change your PATH variable. (Changing your PATH and adding directories to it are described later in this chapter.)
Not all the commands that you run are located in directories in your PATH variable. Some commands are built into the shell. Other commands can be overridden by creating aliases that define any commands and options that you want the command to run. There are also ways of defining a function that consists of a stored series of commands. Here is the order in which the shell checks for the commands you type:
To find out where a particular command is taken from, you can use the type command. (If you are using a shell other than bash, use the which command instead.) For example, to find out where the bash shell command is located, type the following:
$ type bash
bash is /bin/bash
Try these few words with the type command to see other locations of commands: which, case, and return. If a command resides in several locations, you can add the -a option to have all the known locations of the command printed. For example, the command type -a ls should show an aliased and file system location for the ls command.
If a command is not in your PATH variable, you can use the locate command to try to find it. Using locate, you can search any part of the system that is accessible to you (some files are only accessible to the root user). For example, if you wanted to find the location of the chage command, you could type the following:
$ locate chage
/usr/bin/chage
/usr/sbin/lchage
/usr/share/man/fr/man1/chage.1.gz
/usr/share/man/it/man1/chage.1.gz
/usr/share/man/ja/man1/chage.1.gz
/usr/share/man/man1/chage.1.gz
/usr/share/man/man1/lchage.1.gz
/usr/share/man/pl/man1/chage.1.gz
/usr/share/man/ru/man1/chage.1.gz
/usr/share/man/sv/man1/chage.1.gz
/usr/share/man/tr/man1/chage.1.gz
Notice that locate not only found the chage command, but also found the lchage command and a variety of man pages associated with chage for different languages. The locate command looks all over your file system, and not just in directories that contain commands.
In the coming chapters you learn to use additional commands. For now, I want you to become more familiar with how the shell itself works. So I talk next about features for recalling commands, completing commands, using variables, and creating aliases.
Recalling Commands Using Command History
Being able to repeat a command you ran earlier in a shell session can be convenient. Recalling a long and complex command line that you mistyped can save you some trouble. Fortunately, some shell features enable you to recall previous command lines, edit those lines, or complete a partially typed command line.
The shell history is a list of the commands that you have entered before. Using the history command in a bash shell, you can view your previous commands. Then, using various shell features, you can recall individual command lines from that list and change them however you please.
The rest of this section describes how to do command-line editing, how to complete parts of command lines, and how to recall and work with the history list.
Command-line editing
If you type something wrong on a command line, the bash shell ensures that you don't have to delete the entire line and start over. Likewise, you can recall a previous command line and change the elements to make a new command.
By default, the bash shell uses command-line editing that is based on the emacs text editor. (Type man emacs to read about it, if you care to.) If you are familiar with emacs, you probably already know most of the keystrokes described here.
To do the editing, you can use a combination of control keys, meta keys, and arrow keys. For example, Ctrl+F means to hold the Ctrl key and type f. Alt+F means to hold the Alt key and type f. (Instead of the Alt key, your keyboard may use a Meta key or the Esc key. On a Windows keyboard, you can use the Windows key.)
To try out a bit of command-line editing, type the following:
$ ls /usr/bin | sort -f | less
This command lists the contents of the /usr/bin directory, sorts the contents in alphabetical order (regardless of case), and pipes the output to less. The less command displays the first page of output, after which you can go through the rest of the output a line (press Enter) or a page (press spacebar) at a time. Simply press q when you are done). Now, suppose you want to change /usr/bin to /bin. You can use the following steps to change the command:
As you edit a command line, at any point you can type regular characters to add those characters to the command line. The characters appear at the location of your text cursor. You can use right Ø and left ⇒ arrows to move the cursor from one end to the other on the command line. You can also press the up ≠ and down ⇒ arrow keys to step through previous commands in the history list to select a command line for editing. (See the “Command-line recall” section for details on how to recall commands from the history list.)
There are many keystrokes you can use to edit your command lines. Table 3.1 lists the keystrokes that you can use to move around the command line.
Table 3.1 Keystrokes for Navigating Command Lines
| Keystroke | Full Name | Meaning |
| Ctrl+F | Character forward | Go forward one character. |
| Ctrl+B | Character backward | Go backward one character. |
| Alt+F | Word forward | Go forward one word. |
| Alt+B | Word backward | Go backward one word. |
| Ctrl+A | Beginning of line | Go to the beginning of the current line. |
| Ctrl+E | End of line | Go to the end of the line. |
| Ctrl+L | Clear screen | Clear screen and leave line at the top of the screen. |
The keystrokes in Table 3.2 can be used to edit command lines.
Table 3.2 Keystrokes for Editing Command Lines
| Keystroke | Full Name | Meaning |
| Ctrl+D | Delete current | Delete the current character. |
| Backspace | Delete previous | Delete the previous character. |
| Ctrl+T | Transpose character | Switch positions of current and previous characters. |
| Alt+T | Transpose words | Switch positions of current and previous words. |
| Alt+U | Uppercase word | Change the current word to uppercase. |
| Alt+L | Lowercase word | Change the current word to lowercase. |
| Alt+C | Capitalize word | Change the current word to an initial capital. |
| Ctrl+V | Insert special character | Add a special character. For example, to add a Tab character, press Ctrl+V+Tab. |
Use the keystrokes in Table 3.3 to cut and paste text on a command line.
Table 3.3 Keystrokes for Cutting and Pasting Text from within Command Lines
| Keystroke | Full Name | Meaning |
| Ctrl+K | Cut end of line | Cut text to the end of the line. |
| Ctrl+U | Cut beginning of line | Cut text to the beginning of the line. |
| Ctrl+W | Cut previous word | Cut the word located behind the cursor. |
| Alt+D | Cut next word | Cut the word following the cursor. |
| Ctrl+Y | Paste recent text | Paste most recently cut text. |
| Alt+Y | Paste earlier text | Rotate back to previously cut text and paste it. |
| Ctrl+C | Delete whole line | Delete the entire line. |
Command-line completion
To save you a few keystrokes, the bash shell offers several different ways of completing partially typed values. To attempt to complete a value, type the first few characters, and then press Tab. Here are some of the values you can type partially from a bash shell:
- Command, alias, or function — If the text you type begins with regular characters, the shell tries to complete the text with a command, alias, or function name.
- Variable — If the text you type begins with a dollar sign ($), the shell completes the text with a variable from the current shell.
- Username — If the text you type begins with a tilde (∼), the shell completes the text with a username. As a result, ∼username indicates the home directory of the named user.
- Hostname — If the text you type begins with an at (@) sign, the shell completes the text with a hostname taken from the /etc/hosts file.
Here are a few examples of command completion. (When you see <Tab>, it means to press the Tab key on your keyboard.) Type the following:
$ echo $OS<Tab>
$ cd ∼ro<Tab>
$ fing<Tab>
The first example causes $OS to expand to the $OSTYPE variable. In the next example, ∼ro expands to the root user's home directory (∼root/). Next, fing expands to the finger command.
Pressing Tab twice offers some wonderful possibilities. There are times when several possible completions for the string of characters you have entered are available. In those cases, you can check the possible ways text can be expanded by pressing Tab twice at the point where you want to do completion.
The following shows the result you would get if you checked for possible completions on $P:
$ echo $P<Tab><Tab>
$PATH $PPID $PS1 $PS2 $PS4 $PWD
$ echo $P
In this case, there are six possible variables that begin with $P. After possibilities are displayed, the original command line returns, ready for you to complete it as you choose. For example, if you typed another P, and then hit Tab again, the command line would be completed with $PPID (the only unique possibility).
Command-line recall
After you type a command line, the entire command line is saved in your shell's history list. The list is stored in the current shell until you exit the shell. After that, it is written to a history file, from which any command can be recalled to run again at your next session. After a command is recalled, you can modify the command line, as described earlier.
To view your history list, use the history command. Type the command without options or followed by a number to list that many of the most recent commands. For example:
$ history 8
 382 date
 383 ls /usr/bin | sort -a | more
 384 man sort
 385 cd /usr/local/bin
 386 man more
 387 useradd -m /home/chris -u 101 chris
 388 passwd chris
 389 history 8
A number precedes each command line in the list. You can recall one of those commands using an exclamation point (!). Keep in mind that when using an exclamation point, the command runs blind, without presenting an opportunity to confirm the command you're referencing. There are several ways to run a command immediately from this list, including the following:
- !n — Run command number. Replace the n with the number of the command line, and that line is run. For example, here's how to repeat the date command shown as command number 382 in the preceding history listing:
$ !382
date
Fri Oct 29 21:30:06 PDT 2011
- !! — Run previous command. Runs the previous command line. Here's how you would immediately run that same date command:
$ !!
date
Fri Oct 29 21:30:39 PDT 2012
- !?string? — Run command containing string. This runs the most recent command that contains a particular string of characters. For example, you can run the date command again by just searching for part of that command line as follows:
$ !?dat?
date
Fri Oct 29 21:32:41 PDT 2011
Instead of just running a history command line immediately, you can recall a particular line and edit it. You can use the following keys or key combinations to do that, as shown in Table 3.4.
Table 3.4 Key Strokes for Using Command History
| Key(s) | Function Name | Description |
| Arrow keys (ä and ⇒) | Step | Press the up and down arrow keys to step through each command line in your history list to arrive at the one you want. (Ctrl+P and Ctrl+N do the same functions, respectively.) |
| Ctrl+R | Reverse incremental search | After you press these keys, you enter a search string to do a reverse search. As you type the string, a matching command line appears that you can run or edit. |
| Ctrl+S | Forward incremental search | Same as the preceding function but for forward search. (This may not work in all instances.) |
| Alt+P | Reverse search | After you press these keys, you enter a string to do a reverse search. Type a string and press Enter to see the most recent command line that includes that string. |
| Alt+N | Forward search | Same as the preceding function but for forward search. (This may not work in all instances.) |
Another way to work with your history list is to use the fc command. Type fc followed by a history line number, and that command line is opened in a text editor (vi by default, type :wq to save and exit or :q! to just exit if you are stuck in vi). Make the changes that you want. When you exit the editor, the command runs. You can also give a range of line numbers (for example, fc 100 105). All the commands open in your text editor, and then run one after the other when you exit the editor.
After you close your shell, the history list is stored in the .bash_history file in your home directory. Up to 1,000 history commands are stored for you by default.
Connecting and Expanding Commands
A truly powerful feature of the shell is the capability to redirect the input and output of commands to and from other commands and files. To allow commands to be strung together, the shell uses metacharacters. A metacharacter is a typed character that has special meaning to the shell for connecting commands or requesting expansion.
Metacharacters include the pipe character (|), ampersand (&), semicolon (;), right parenthesis ( ) ), left parenthesis ( ( ), less than sign (<) and greater than sign (>). The next sections describe how to use metacharacters on the command line to change how commands behave.
Piping between commands
The pipe (|) metacharacter connects the output from one command to the input of another command. This lets you have one command work on some data and then have the next command deal with the results. Here is an example of a command line that includes pipes:
$ cat /etc/passwd | sort | less
This command lists the contents of the /etc/passwd file and pipes the output to the sort command. The sort command takes the usernames that begin each line of the /etc/passwd file, sorts them alphabetically, and pipes the output to the less command (to page through the output).
Pipes are an excellent illustration of how UNIX, the predecessor of Linux, was created as an operating system made up of building blocks. A standard practice in UNIX was to connect utilities in different ways to get different jobs done. For example, before the days of graphical word processors, users created plain-text files that included macros to indicate formatting. To see how the document really appeared, they would use a command such as the following:
$ gunzip < /usr/share/man/man1/grep.1.gz | nroff -c -man | less
In this example, the contents of the grep man page (grep.1.gz) are directed to the gunzip command to be unzipped. The output from gunzip is piped to the nroff command to format the man page using the manual macro (-man). The output is piped to the less command to display the output. Because the file being displayed is in plain text, you could have substituted any number of options to work with the text before displaying it. You could sort the contents, change or delete some of the content, or bring in text from other documents. The key is that, instead of all those features being in one program, you get results from piping and redirecting input and output between multiple commands.
Sequential commands
Sometimes you may want a sequence of commands to run, with one command completing before the next command begins. You can do this by typing several commands on the same command line and separating them with semicolons (;):
$ date ; troff -me verylargedocument | lpr ; date
In this example, I was formatting a huge document and wanted to know how long it would take. The first command (date) showed the date and time before the formatting started. The troff command formatted the document and then piped the output to the printer. When the formatting was done, the date and time were printed again (so I knew how long the troff command took to complete).
Another useful command to add to the end of a long command line is mail. You could add the following to the end of a command line.
; mail -s "Finished the long command" [email protected]
Then, for example, a mail message is sent to the user you choose after the command completes.
Background commands
Some commands can take a while to complete. Sometimes you may not want to tie up your shell waiting for a command to finish. In those cases, you can have the commands run in the background by using the ampersand (&).
Text formatting commands (such as nroff and troff, described earlier) are examples of commands that are often run in the background to format a large document. You also might want to create your own shell scripts that run in the background to check continuously for certain events to occur, such as the hard disk filling up or particular users logging in.
The following is an example of a command being run in the background:
$ troff -me verylargedocument | lpr &
Don't close the shell until the process is completed, or that will kill the process. Other ways to manage background and foreground processes are described in Chapter 6, “Managing Running Processes.”
Expanding commands
With command substitution, you can have the output of a command interpreted by the shell instead of by the command itself. In this way, you can have the standard output of a command become an argument for another command. The two forms of command substitution are $(command) and 'command’ (backticks, not single quotes).
The command in this case can include options, metacharacters, and arguments. The following is an example of using command substitution:
$ vi $(find /home | grep xyzzy)
In this example, the command substitution is done before the vi command is run. First, the find command starts at the /home directory and prints out all files and directories below that point in the file system. The output is piped to the grep command, which filters out all files except for those that include the string xyzzy in the filename. Finally, the vi command opens all filenames for editing (one at a time) that include xyzzy. (If you run this and are not familiar with vi, you can type :q! to exit the file.)
This particular example is useful if you want to edit a file for which you know the name but not the location. As long as the string is uncommon, you can find and open every instance of a filename existing beneath a point you choose in the file system. (In other words, don't use grep from the root file system or you'll match and try to edit several thousand files.)
Expanding arithmetic expressions
There may be times when you want to pass arithmetic results to a command. There are two forms you can use to expand an arithmetic expression and pass it to the shell: $[expression] or $(expression). The following is an example:
$ echo "I am $[2012 - 1957] years old."
I am 55 years old.
The shell interprets the arithmetic expression first (2012 - 1957) and then passes that information to the echo command. The echo command displays the text, with the results of the arithmetic (55) inserted.
Here's an example of the other form:
$ echo "There are $(ls | wc -w) files in this directory."
There are 14 files in this directory.
This lists the contents of the current directory (ls) and runs the word count command to count the number of files found (wc -w). The resulting number (14 in this case) is echoed back with the rest of the sentence shown.
Expanding variables
Variables that store information within the shell can be expanded using the dollar sign ($) metacharacter. When you expand an environment variable on a command line, the value of the variable is printed instead of the variable name itself, as follows:
$ ls -l $BASH
-rwxr-xr-x 1 root  root  625516 Dec 5 11:13 /bin/bash
Using $BASH as an argument to ls -l causes a long listing of the bash command to be printed.
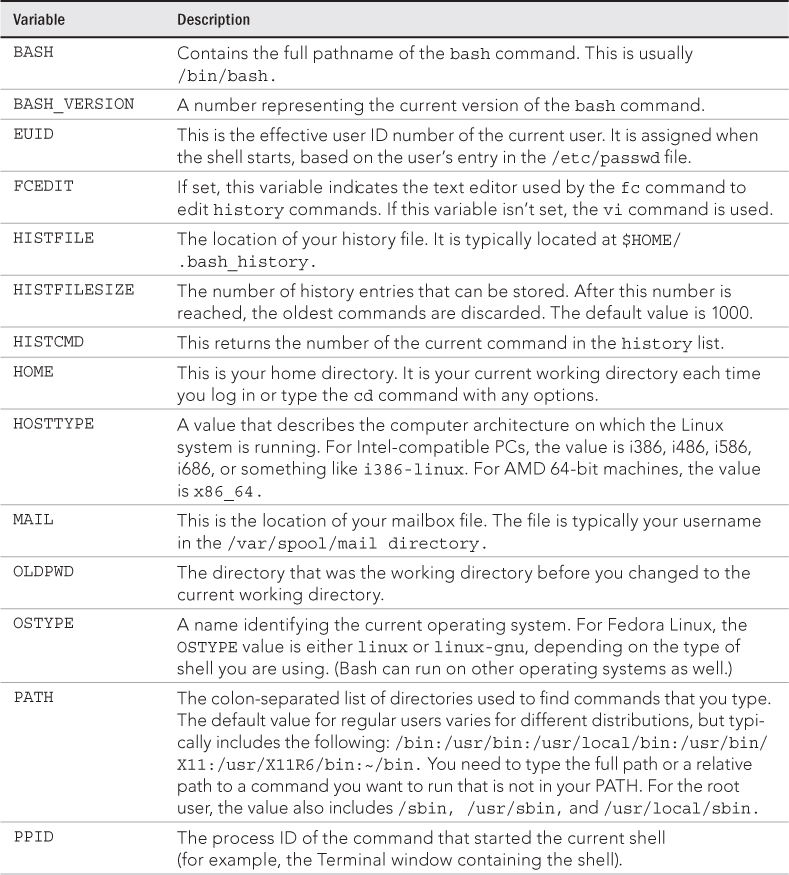
Using Shell Variables
The shell itself stores information that may be useful to the user's shell session in what are called variables. Examples of variables include $SHELL (which identifies the shell you are using), $PS1 (which defines your shell prompt), and $MAIL (which identifies the location of your mailbox).
You can see all variables set for your current shell by typing the set command. A subset of your local variables are referred to as environment variables. Environment variables are variables that are exported to any new shells opened from the current shell. Type env to see environment variables.
You can type echo $VALUE, where VALUE is replaced by the name of a particular environment variable you want to list. And because there are always multiple ways to do anything in Linux, you can also type declare to get a list of the current environment variables and their values along with a list of shell functions.
Besides those that you set yourself, system files set variables that store things such as locations of configuration files, mailboxes, and path directories. They can also store values for your shell prompts, the size of your history list, and type of operating system. You can refer to the value of any of those variables by preceding it with a dollar sign ($) and placing it anywhere on a command line. For example:
$ echo $USER
chris
This command prints the value of the USER variable, which holds your username (chris). Substitute any other value for USER to print its value instead.
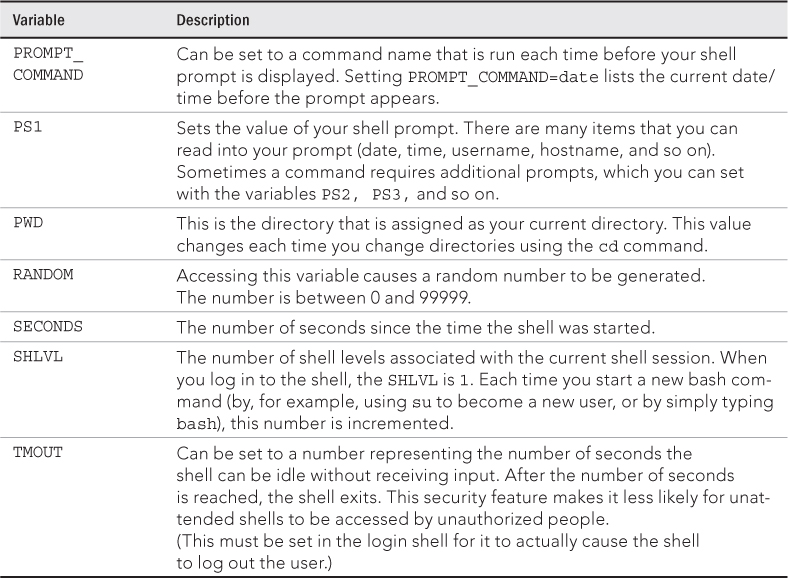
When you start a shell (by logging in via a virtual console or opening a Terminal window), many environment variables are already set. Table 3.5 shows some variables that are either set when you use a bash shell or that can be set by you to use with different features.
Table 3.5 Common Shell Environment Variables
Creating and using aliases
Using the alias command, you can effectively create a shortcut to any command and options you want to run later. You can add and list aliases with the alias command. Consider the following examples of using alias from a bash shell:
$ alias p='pwd ; ls –CF'
$ alias rm='rm -i'
In the first example, the letter p is assigned to run the command pwd, and then to run ls -CF to print the current working directory and list its contents in column form. The second example runs the rm command with the -i option each time you simply type rm. (This is an alias that is often set automatically for the root user. Instead of just removing files, you are prompted for each individual file removal. This prevents you from automatically removing all the files in a directory by mistakenly typing something such as rm *.)
While you are in the shell, you can check which aliases are set by typing the alias command. If you want to remove an alias, type unalias. (Remember that if the alias is set in a configuration file, it will be set again when you open another shell.)
Exiting the shell
To exit the shell when you are done, type exit or press Ctrl+D. If you go to the shell from a Terminal window, and you are using the original shell from that window, exiting causes the Terminal window to close. If you are at a virtual console, the shell exits and returns you to a login prompt.
If you have multiple shells open from the same shell session, exiting a shell simply returns you to the shell that launched the current shell. For example, the su command opens a shell as a new user. Exiting from that shell simply returns you to the original shell.
Creating Your Shell Environment
You can tune your shell to help you work more efficiently. You can set aliases to create shortcuts to your favorite command lines and environment variables to store bits of information. By adding those settings to shell configuration files, you can have the settings available every time you open a shell.
Configuring your shell
Several configuration files support how your shell behaves. Some of the files are executed for every user and every shell, whereas others are specific to the user who creates the configuration file. Table 3.6 shows the files that are of interest to anyone using the bash shell in Linux.
Table 3.6 Bash Configuration Files
| File | Description |
| /etc/profile | Sets up user environment information for every user. It is executed when you first log in. This file provides values for your path, in addition to setting environment variables for such things as the location of your mailbox and the size of your history files. Finally, /etc/profile gathers shell settings from configuration files in the /etc/profile.d directory. |
| /etc/bashrc | Executes for every user who runs the bash shell, each time a bash shell is opened. It sets the default prompt and may add one or more aliases. Values in this file can be overridden by information in each user's ∼/.bashrc file. |
| ∼/. bash_profile | Used by each user to enter information that is specific to his or her use of the shell. It is executed only once, when the user logs in. By default, it sets a few environment variables and executes the user's .bashrc file. This is a good place to add environment variables because, once set, they are inherited by future shells. |
| ∼/. bashrc | Contains the information that is specific to your bash shells. It is read when you log in and also each time you open a new bash shell. This is the best location to add aliases so that your shell picks them up. |
| ∼/. bash_logout | Executes each time you log out (exit the last bash shell). By default, it simply clears your screen. |
To change the /etc/profile or /etc/bashrc files, you must be the root user. Users can change the information in the $HOME/.bash_profile, $HOME/.bashrc, and $HOME/.bash_logout files in their own home directories.
Until you learn to use the vi editor, described in Chapter 5,“Working with Text Files,” you can use a simple editor called nano to edit plaintext files. For example, type the following to edit and add stuff to your $HOME/.bashrc file:
$ nano $HOME/.bashrc
With the file open in nano, move the cursor down to the bottom of the file (using the down arrow key). Type in the line you want (for example, you could type alias d="date +%D"). To save the file, press Ctrl+O (the letter O) and to quit press Ctrl+X. The next time you log in or open a new shell, you will be able to use the new alias (in this case, just type d). To have the new information you just added to the file available from the current shell, type the following:
$ source $HOME/.bashrc
The following sections provide ideas about items to add to your shell configuration files. In most cases, you add these values to the .bashrc file in your home directory. However, if you administer a system, you may want to set some of these values as defaults for all of your Linux system's users.
Setting your prompt
Your prompt consists of a set of characters that appear each time the shell is ready to accept a command. The PS1 environment variable sets what the prompt contains and is what you interact with most of the time. If your shell requires additional input, it uses the values of PS2, PS3, and PS4.
When your Linux system is installed, often a prompt is set to contain more than just a dollar sign or pound sign. For example, in Fedora or Red Hat Enterprise Linux, your prompt is set to include the following information: your username, your hostname, and the base name of your current working directory. That information is surrounded by brackets and followed by a dollar sign (for regular users) or a pound sign (for the root user). The following is an example of that prompt:
[chris@myhost bin]$
If you change directories, the bin name would change to the name of the new directory. Likewise, if you were to log in as a different user or to a different host, that information would change.
You can use several special characters (indicated by adding a backslash to a variety of letters) to include different information in your prompt. Special characters can be used to output your terminal number, the date, and the time, as well as other pieces of information. Table 3.7 provides some examples (you can find more on the bash man page).
Table 3.7 Characters to Add Information to bash Prompt
| Special Character | Description |
| ! | Shows the current command history number. This includes all previous commands stored for your username. |
| # | Shows the command number of the current command. This includes only the commands for the active shell. |
| $ | Shows the user prompt ($) or root prompt (#), depending on which user you are. |
| W | Shows only the current working directory base name. For example, if the current working directory was /var/spool/mail, this value simply appears as mail. |
| [ | Precedes a sequence of nonprinting characters. This can be used to add a terminal control sequence into the prompt for such things as changing colors, adding blink effects, or making characters bold. (Your terminal determines the exact sequences available.) |
| ] | Follows a sequence of nonprinting characters. |
| \ | Shows a backslash. |
| d | Displays the day name, month, and day number of the current date. For example: Sat Jan 23. |
| h | Shows the hostname of the computer running the shell. |
| Causes a newline to occur. | |
| nn | Shows the character that relates to the octal number replacing nnn. |
| s | Displays the current shell name. For the bash shell, the value would be bash. |
| Prints the current time in hours, minutes, and seconds (for example, 10:14:39). | |
| u | Prints your current username. |
| w | Displays the full path to the current working directory. |
To make a change to your prompt permanent, add the value of PS1 to your .bashrc file in your home directory (assuming that you are using the bash shell). There may already be a PS1 value in that file that you can modify. Refer to the Bash Prompt HOWTO (http://www.tldp.org/HOWTO/Bash-Prompt-HOWTO) for information on changing colors, commands, and other features of your bash shell prompt.
Adding environment variables
You might want to consider adding a few environment variables to your .bashrc file. These can help make working with the shell more efficient and effective:
- TMOUT — Sets how long the shell can be inactive before bash automatically exits. The value is the number of seconds for which the shell has not received input. This can be a nice security feature, in case you leave your desk while you are still logged in to Linux. So as not to be logged off while you are working, you may want to set the value to something like TMOUT=1800 (to allow 30 minutes of idle time). You can use any terminal session to close the current shell after a set number of seconds — for example, TMOUT=30.
- PATH — As described earlier, the PATH variable sets the directories that are searched for commands you use. If you often use directories of commands that are not in your path, you can permanently add them. To do this, add a PATH variable to your .bashrc file. For example, to add a directory called /getstuff/bin, add the following:
PATH=$PATH:/getstuff/bin ; export PATH
- WHATEVER — You can create your own environment variables to provide shortcuts in your work. Choose any name that is not being used and assign a useful value to it. For example, if you do a lot of work with files in the /work/time/files/info/memos directory, you could set the following variable:
M=/work/time/files/info/memos ; export M
- You could make that your current directory by typing cd $M. You could run a program from that directory called hotdog by typing $M/hotdog. You could edit a file from there called bun by typing vi $M/bun.
Getting Information About Commands
When you first start using the shell, it can be intimidating. All you see is a prompt. How do you know which commands are available, which options they use, or how to use advanced features? Fortunately, lots of help is available. Here are some places you can look to supplement what you learn in this chapter.
- Check the PATH — Type echo $PATH. You see a list of the directories containing commands that are immediately accessible to you. Listing the contents of those directories displays most standard Linux commands. For example:
$ ls /bin
arch     dd            fusermount   loadkeys   mv              rnano     taskset
awk      df            gawk         login      nano            rpm       tcsh
basename dmesg         gettext      ls         netstat         rvi       touch
bash     dnsdomainname grep         lsblk      nice            rview     true
cat      domainname    gtar         lscgroup   nisdomainname   sed       umount
chgrp    echo          gunzip       lssubsys   ping            setfont   uname
chmod    ed            gzip         mail       ping6           setserial unlink
chown    egrep         hostname     mailx      ps              sh        usleep
cp       env           ipcalc       mkdir      pwd             sleep     vi
cpio     ex            kbd_mode     mknod      readlink        sort      view
csh      false         keyctl       mktemp     red             stty      zcat
cut      fgrep         kill         more       redhat_lsb_init su        zsh
dash     find          link         mount      rm              sync
date     findmnt       ln           mountpoint rmdir           tar
- Use the help command — Some commands are built into the shell, so they do not appear in a directory. The help command lists those commands and shows options available with each of them. (Type help | less to page through the list.) For help with a particular built-in command, type help command, replacing command with the name that interests you. The help command works with the bash shell only.
- Use --help with the command — Many commands include a --help option that you can use to get information about how the command is used. For example, if you type date --help | less, the output shows not only options, but also time formats you can use with the date command. Other commands simply use a –h option, like fdisk -h.
- Use the info command — The info command is another tool for displaying information about commands from the shell. The info command can move among a hierarchy of nodes to find information about commands and other items. Not all commands have information available in the info database, but sometimes more information can be found there than on a man page.
- Use the man command — To learn more about a particular command, type man command. (Replace command with the command name you want.) A description of the command and its options appears on the screen.
Man pages are the most common means of getting information about commands, as well as other basic components of a Linux system. Each man page falls into one of the categories listed in Table 3.8. As a regular user, you will be most interested in man pages in section 1. As a system administrator, you will also be interested in sections 4 and 8, and occasionally section 4. Programmers will be interested in section 2 and 3 man pages.
Table 3.8 Manual Page Sections
| Section Number | Section Name | Description |
| 1 | User Commands | Commands that can be run from the shell by a regular user (typically no administrative privilege is needed). |
| 2 | System Calls | Programming functions used within an application to make calls to the kernel. |
| 3 | C Library Functions | Programming functions that provide interfaces to specific programming libraries (such as those for certain graphical interfaces or other libraries that operate in user space). |
| 4 | Devices and Special Files | File system nodes that represent hardware devices (such as terminals or CD drives) or software devices (such as random number generators). |
| 5 | File Formats and Conventions | Types of files (such as a graphics or word processing file) or specific configuration files (such as the passwd or group file). |
| 6 | Games | Games available on the system. |
| 7 | Miscellaneous | Overviews of topics such as protocols, file systems, character set standards, and so on. |
| 8 | System Administration Tools and Daemons | Commands that require root or other administrative privileges to use. |
Options to the man command enable you to search the man page database or display man pages on the screen. Here are some examples of man commands and options:
$ man -k passwd
...
passwd               (1)  - update user's authentication tokens
passwd               (5)  - password file
$ man passwd
$ man 5 passwd
Using the -k option, you can search the name and summary sections of all man pages installed on the system. There are about a dozen man pages that included “passwd” in the name or description of a command.
Let us say that the two man pages I am interested in are the passwd command (in section 1 of the man pages) and the passwd file (in section 5) man pages. Because just typing man password displayed the section 1 page, I would need to explicitly request the section 5 man page if I wanted to see that instead (man 5 passwd).
While you are displaying a man page, you can view different parts of the file using Page Down and Page Up keys (to move a page at a time). Use the Enter key or up and down arrows to move a line at a time. Press a forward slash (/) and then type a term to search the document for that term. Press n to repeat the search forward or N to repeat the search backward. To quit the man page, type q.
Summary
To become an expert Linux user, you must be able to use the shell to type commands. This chapter focuses on the bash shell, which is the one that is most commonly used with Linux systems. In this chapter you learned how commands are structured and how many special features, such as variables, command completion, and aliases are used.
The next chapter describes how to move around the Linux file system from the shell command line.
Exercises
Use these exercises to test your knowledge of using the shell. These tasks assume you are running a Fedora or Red Hat Enterprise Linux system (although some tasks will work on other Linux systems as well). If you are stuck, solutions to the tasks are shown in Appendix B (although in Linux, there are often multiple ways to complete a task).
$ cat /etc/passwd
$ ls $HOME
$ date
- Use the command-line recall feature to recall the cat command and change /etc/passwd to /etc/group.
- Recall the ls command, determine how to list files by time (using the man page), and add that option to the ls $HOME command line.
- Add format indicators to the date command to display the date output as month/day/year.