In the previous chapters, we learned about the important building blocks of the container framework, like namespaces, cgroups, and layered file systems. In this chapter, we use that knowledge to build a simple container framework and learn how these building blocks make up the container framework.
Since we have covered the basics of what constitutes a container, it is time to look at how to write your own simple container. By end of this chapter, you will have created your own simple container using namespace isolation.
Let’s get started.
I have tested the commands mentioned in the chapter on Ubuntu 19.04 with Linux Kernel 5.0.0-13.
The first command we explore is called unshare. This command allows you to unshare a set of namespaces from the host.
The UTS Namespace
We will enter a new uts namespace and change the hostname within that namespace.
root@osboxes:~# unshare -u /bin/bash
root@osboxes:~# hostname test
root@osboxes:~# hostname
test
root@osboxes:~# exit
exit
root@osboxes:~# hostname
osboxes
When we entered the UTS namespace, we changed the hostname to test and this is what is reflected within that namespace. Once we exit and re-enter the host namespace, we get the host namespace.
The command unshare -u /bin/bash creates the uts namespace and executes our process (/bin/bash) within that namespace. The careful reader might observe that if we don’t change the hostname after entering the namespace, we still get the hostname of the host. This is not desirable, as we need a way to set this before executing our program within the namespace.
This is where we will explore writing a container using Golang (also called Go) and then set up namespaces before we launch the process within the container. We will be writing the container in Golang, so we need to have Golang installed on the VM or on the machine on which we are working. (For Golang installation, visit https://golang.org/doc/install.)
Golang is the most common systems programming language around. It is used to create container runtimes like Docker, as well as container orchestration engines like Swarm and Kubernetes. Apart from that, it has been used in various other systems programming settings. It’s a good idea to have a decent understanding of Golang before you delve into the code in this chapter.
To check if Go (Golang) is installed properly, you can run this command:
root@osboxes:~# go version
If the installation was successful, you should see the following output:
Now we will build a container with only a namespace and then keep modifying the program to add more functionalities, like shell support, rootfs, networking, and cgroups.
Building a Container with a Namespace
Let’s revisit Linux namespaces briefly before we build the container. Namespaces are in the Linux kernel, similar to sandbox kernel resources like file systems, process trees, message queues, and semaphores, as well as network components like devices, sockets, and routing rules.
Namespaces isolate processes within their own execution sandbox so that they run completely isolated from other processes in different namespaces.
There are six namespaces:
PID namespace: The processes within the PID namespace have a different process tree. They have an init process with a PID of 1.
Mount namespace: This namespace controls which mount points a process can see. If a process is within a namespace, it will only see the mounts within that namespace.
UTS namespace: This allows a process to see a different namespace than the actual global namespace.
Network namespace: This namespace gives a different network view within a namespace. Network constructs like ports, iptables, and so on, are scoped within the namespace.
IPC namespace: This namespace confines interprocess communication structures like pipes within a specific namespace.
User-namespace: This namespace allows for a separate user and group view within the namespace.
We don’t discuss the cgroup namespace here, which also allows the cgroups to be scoped into their own namespaces.
Now let’s get our hands dirty and create a Go class called myuts.go. Copy the following snippet and use go build myuts.go to get the myuts binary. Also execute the myutsbinary as the root user.
package main
import (
"fmt"
"os"
"os/exec"
"syscall"
)
func main() {
cmd := exec.Command("/bin/bash")
// The statements below refer to the input, output and error streams of the process created (cmd)
cmd.Stdin = os.Stdin
cmd.Stdout = os.Stdout
cmd.Stderr = os.Stderr
//setting an environment variable
cmd.Env = []string{"name=shashank"}
// the command below creates a UTS namespace for the process
cmd.SysProcAttr = &syscall.SysProcAttr{
Cloneflags: syscall.CLONE_NEWUTS,
}
if err := cmd.Run(); err != nil {
fmt.Printf("Error running the /bin/bash command - %s
", err)
os.Exit(1)
}
}
This is a simple Go program that executes a shell, sets up the I/O streams for the process, and then sets one env variable. Then it uses the following command:
cmd.SysProcAttr = &syscall.SysProcAttr{
Cloneflags: syscall.CLONE_NEWUTS,
}
It then passes the CLONE flags (in this case, we just pass UTS as the Clone flag). The clone flags control which namespaces are created for the process.
After that, we build and run this Golang process. We can see whether the new namespace was created by using the proc file system and checking the proc/<<pid>>/ns:
root@osboxes:~/book_prep# ls -li /proc/self/ns/uts
We have the namespaces this container belongs to. Now we see that the ownership belongs to nobody. This is because we also used a user-namespace as a clone flag. The container is now within a new user-namespace. User-namespaces require that we map the user from the namespace to the host. Since we have not done anything yet, we still see nobody as the user.
We now add user mapping to the code:
package main
import (
"fmt"
"os"
"os/exec"
"syscall"
)
func main() {
cmd := exec.Command("/bin/bash")
cmd.Stdin = os.Stdin
cmd.Stdout = os.Stdout
cmd.Stderr = os.Stderr
cmd.Env = []string{"name=shashank"}
//command below creates the UTS, PID and IPC , NETWORK and
// USERNAMESPACES and adds the user and group mappings.
cmd.SysProcAttr = &syscall.SysProcAttr{
Cloneflags: syscall.CLONE_NEWNS |
syscall.CLONE_NEWUTS |
syscall.CLONE_NEWIPC |
syscall.CLONE_NEWPID |
syscall.CLONE_NEWNET |
syscall.CLONE_NEWUSER,
UidMappings: []syscall.SysProcIDMap{
{
ContainerID: 0,
HostID: os.Getuid(),
Size: 1,
},
},
GidMappings: []syscall.SysProcIDMap{
{
ContainerID: 0,
HostID: os.Getgid(),
Size: 1,
},
},
}
if err := cmd.Run(); err != nil {
fmt.Printf("Error running the /bin/bash command - %s
", err)
os.Exit(1)
}
}
You can see that we have UidMappings and GidMappings. We have a field called ContainerID, which we are setting to 0. This means we are mapping the uid and gid 0 within the container to the uid and gid of the user who launched the process.
There is one interesting aspect I would like to touch upon in the context of user-namespaces. We don’t need to be the root on the host in order to create a user-namespace. This provides a way to create namespaces and thereby containers without being the root on the machine, which means it’s a big security win as providing root access to a process can be hazardous. If programs are launched as the root, any compromise to those programs can give root privileges to the attacker. In turn, the whole machine gets compromised.
We can technically be non-root on the host and then create a user-namespace and other namespaces within that user-namespace. Mind you, all the other namespaces, if launched without a user-namespace, will need root access.
If we take the previous example, where we are passing all the flags together, the system first creates a user-namespace and places all the other namespaces within that user-namespace.
I cannot cover the user-namespace topic in its entirety here, but it is an interesting area for curious readers to explore. One area I can mention straightaway is the area of Docker builds, wherein we need root access to build an image within a container. This is necessary for many reasons, as we need some layered file systems mounted within the container and creating a new mount requires root privilege.
The same holds for setting up virtual network devices like veth pairs in order to wire containers to the host. Having said that, there has been momentum in the area of rootlesscontainers, which allow developers to run containers without the root. If you want to read about this in more detail, you can explore this topic at the following: https://rootlesscontaine.rs/ and https://github.com/rootless-containers.
What we have achieved thus far is the ability to launch a process within a set of namespaces. But we definitely need more. We need a way to initialize these namespaces before we launch the container.
Back to the program we created. Let’s build and run it:
root@osboxes:~/book_prep# ./myuts
root@osboxes:/root/book_prep# whoami
root
root@osboxes:/root/book_prep# id
uid=0(root) gid=0(root) groups=0(root)
Now we see that the user within the container is the root.
The program checks the first argument. If the first command is run, then the program executes /proc/self/exe, which is simply saying execute yourself (/proc/self/exe is the copy of the binary image of the caller itself).
One might ask why we need to execute /proc/self/exe. When we execute this command, it launches the same binary with some arguments (in our case, we pass fork as the argument to it). Once we are into different namespaces, we need some setup for the namespaces, like setting the hostname, before we launch the process within the container.
Executing /proc/self/exe gives us the opportunity to set up the namespaces like so:
1.
Set the hostname.
2.
Within the mount namespace, we do a pivot root, which allows us to switch the root file system. It does this by copying the old root to some other directory and making the new path the new root. This pivot root has to be done from within the mount namespace, as we don’t want to move the rootfs off the host. We also mount the proc file system. This is done because the mount namespace inherits the proc of the host and we want a proc mount within the mount namespace.
3.
Once the namespaces are initialized and set up, we invoke the container process (in this case, the shell).
Running this program launches the shell into a sandbox confined by the proc, mount, and uts namespace.
Now we work on initializing the namespaces before launching the process within the container. In the following example, we will have a different hostname in the uts namespace. In the following code, we make the required changes.
We have a function parent that:
1.
Clones the namespaces.
2.
Launches the same process again via /proc/self/exe and passes a child as the parameter.
Now the process is called again. Checks in the main function lead to invocations of the child function. Now you can see that we cloned the namespaces. All we do now is change the hostname to myhost within the uts namespace. Once that is done, we invoke the binary passed as the command-line parameter (in this case, /bin/bash).
Launching a Shell Program Within the Container
In previous sections, we explained how to create different Linux namespaces. In this section, we explain how to enter those namespaces. Entering the confines of the namespaces can be done by launching a program/process within the namespaces. The following program launches a shell program within these namespaces.
package main
import (
"fmt"
"os"
"os/exec"
"syscall"
)
func main() {
switch os.Args[1] {
case "parent":
parent()
case "child":
child()
default:
panic("help")
}
}
// the parent function invoked from the main program which sets up the needed namespaces
func parent() {
cmd := exec.Command("/proc/self/exe",
append([]string{"child"}, os.Args[2:]...)...)
cmd.Stdin = os.Stdin
cmd.Stdout = os.Stdout
cmd.Stderr = os.Stderr
cmd.Env = []string{"name=shashank"}
cmd.SysProcAttr = &syscall.SysProcAttr{
Cloneflags: syscall.CLONE_NEWNS |
syscall.CLONE_NEWUTS |
syscall.CLONE_NEWIPC |
syscall.CLONE_NEWPID |
syscall.CLONE_NEWNET |
syscall.CLONE_NEWUSER,
UidMappings: []syscall.SysProcIDMap{
{
ContainerID: 0,
HostID: os.Getuid(),
Size: 1,
},
},
GidMappings: []syscall.SysProcIDMap{
{
ContainerID: 0,
HostID: os.Getgid(),
Size: 1,
},
},
}
must(cmd.Run())
}
// this is the child process which is a copy of the parent program itself.
func child () {
cmd := exec.Command(os.Args[2], os.Args[3:]...)
cmd.Stdin = os.Stdin
cmd.Stdout = os.Stdout
cmd.Stderr = os.Stderr
//the command below sets the hostname to myhost. Idea here is to showcase the use of UTS namespace
must(syscall.Sethostname([]byte("myhost")))
// this command executes the shell which is passed as a program argument
must(cmd.Run())
}
func must(err error) {
if err != nil {
fmt.Printf("Error - %s
", err)
}
}
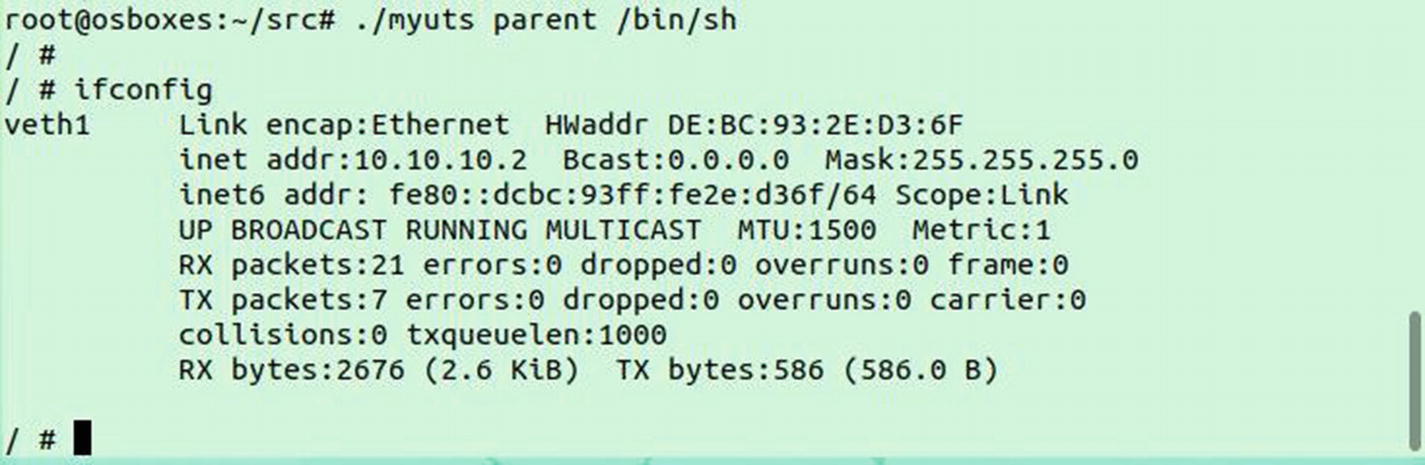
Upon executing the program, we can launch the binary within the new namespaces. Also note that the hostname is set to myhost:
After the uts namespace, it’s time to get more adventurous. We now will work on initializing the mount namespace.
One thing to understand here is that all mounts from the host are inherited within the mount namespace. Therefore, we need a mechanism to clear the mounts and only make mounts for the mount namespace visible within that namespace.
Before we move ahead, one of the things to understand conceptually is the system call pivot_root. This system call allows us to change the root file system for the process. It mounts the old root to some other directory (in the following example, the author used pivot_root as the directory to mount the old root on) else and mounts the new directory on /. This allows us to clear all the host mounts within the namespace.
Again, we need to be inside the mount namespace before we do the pivot_root. Since we already have a hook on namespace initialization (via the /proc/self/exe hack), we need to introduce a pivot root mechanism.
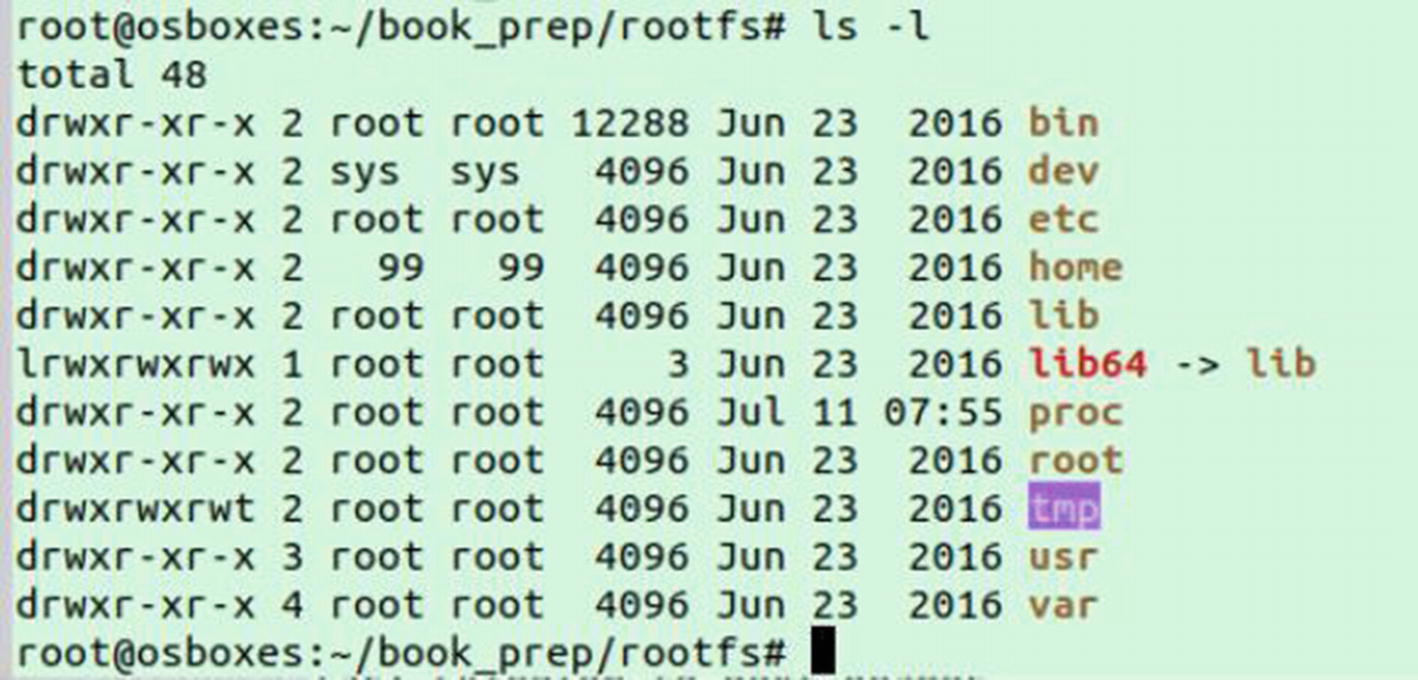
After downloading busybox.tar, extract it to /root/book_prep/rootfs in your system. This location is referred to in this code as the location of rootfs. As shown in Figure 6-1, the contents of the /root/book_prep/rootfs should look the same on your system.
Figure 6-1
The contents of the /root/book_prep/rootfs path
After extracting the rootfs, we can see the directory structure under the rootfs directory.
The following program does a pivot root to the rootfs within the mount namespace.
The mount namespace becomes important, as it allows us to sandbox the file system mounts. This is one way to get an isolated view of the file system hierarchy and see what is present on the host or on different sandboxes running on the same host.
As an example, assume there are two sandboxes—sandboxA and sandboxB—running on the host. When sandboxA gets its own mounts, its file system sees a different and isolated mount from what sandboxB sees, and neither can see the mounts of the host. This provides security at the file system level, as individual sandboxes cannot access files from different sandboxes or from the host.
//providing rootfile system
package main
import (
"fmt"
"os"
"os/exec"
"path/filepath"
"syscall"
)
func main() {
switch os.Args[1] {
case "parent":
parent()
case "child":
child()
default:
panic("help")
}
}
func pivotRoot(newroot string) error {
putold := filepath.Join(newroot, "/.pivot_root")
//bind mount newroot to itself - this is a slight hack needed to satisfy the
//pivot_root requirement that newroot and putold must not be on the same
if err := pivotRoot("/root/book_prep/rootfs"); err != nil
{ fmt.Printf("Error running pivot_root - %s
",
err) os.Exit(1)
}
must(cmd.Run())
}
func must(err error) {
if err != nil {
fmt.Printf("Error - %s
", err)
}
}
After executing the following program:
We can see the directories under rootfs and see that the hostname has changed. We can also see the uid as 0 (the root within the container).
We still have a problem. The proc mount is not there. We need the proc mount to provide information about different processes running within the namespace and as an interface to the kernel for other utilities, as explained in the pseudo file systems in earlier chapters. We need to mount the proc file system within the mount namespace.
The Mount Proc File System
We add the new mountProc function to the program:
package main
import (
"fmt"
"os"
"os/exec"
"path/filepath"
"syscall"
)
func main() {
switch os.Args[1] {
case "parent":
parent()
case "child":
child()
default:
panic("help")
}
}
func pivotRoot(newroot string) error {
putold := filepath.Join(newroot, "/.pivot_root")
// bind mount newroot to itself - this is a slight hack needed to satisfy the
// pivot_root requirement that newroot and putold must not be on the same
//make a call to mountProc function which would mount the proc filesystem to the already
//created mount namespace
must(mountProc("/root/book_prep/rootfs"))
must(syscall.Sethostname([]byte("myhost")))
if err := pivotRoot("/root/book_prep/rootfs"); err != nil
{ fmt.Printf("Error running pivot_root - %s
",
err) os.Exit(1)
}
must(cmd.Run())
}
func must(err error) {
if err != nil {
fmt.Printf("Error - %s
", err)
}
}
// this function mounts the proc filesystem within the
// new mount namespace
func mountProc(newroot string) error {
source := "proc"
target := filepath.Join(newroot, "/proc")
fstype := "proc"
flags := 0
data := ""
//make a Mount system call to mount the proc filesystem within the mount namespace
os.MkdirAll(target, 0755)
if err := syscall.Mount(
source,
target,
fstype,
uintptr(flags),
data,
); err != nil {
return err
}
return nil
}
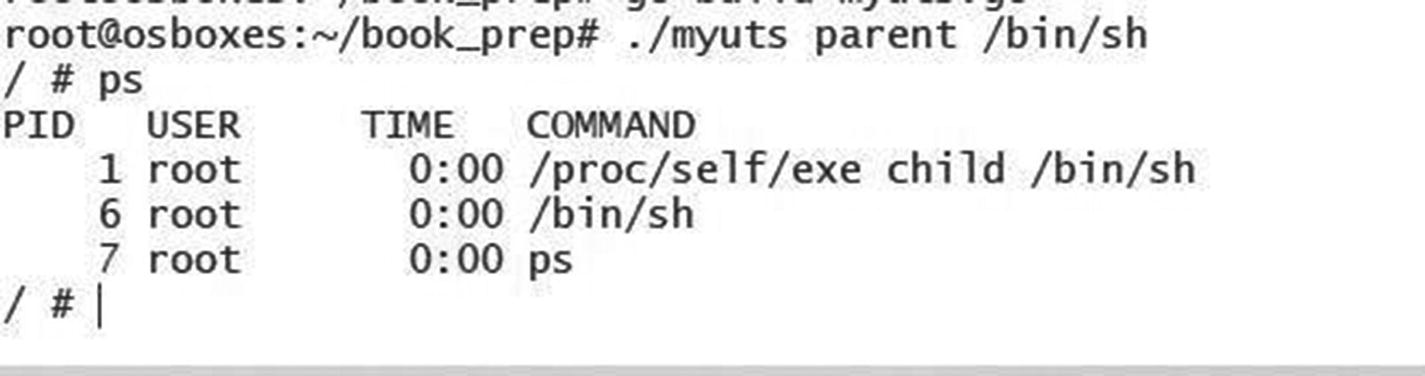
Now, when we run ps inside the container to list the processes running within the sandbox, we get the output shown here. The reason for this is that ps uses the /proc file system.
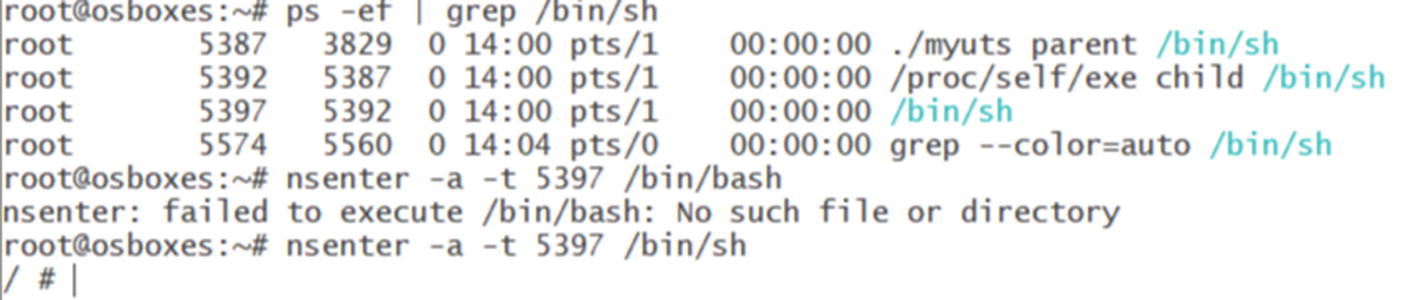
We can use the nsenter command to enter the created container namespaces. To try that, let the created container be in the running state and open another Linux terminal. Then run this command:
ps -ef | grep /bin/sh
You should see the output shown here. In my case, my container’s PID is 5387. Users should use the PIDs on their machines.
Executing nsenter -a -t 5387 /bin/sh allows this shell to be created in the namespaces of the process with the PID 5387, as shown.
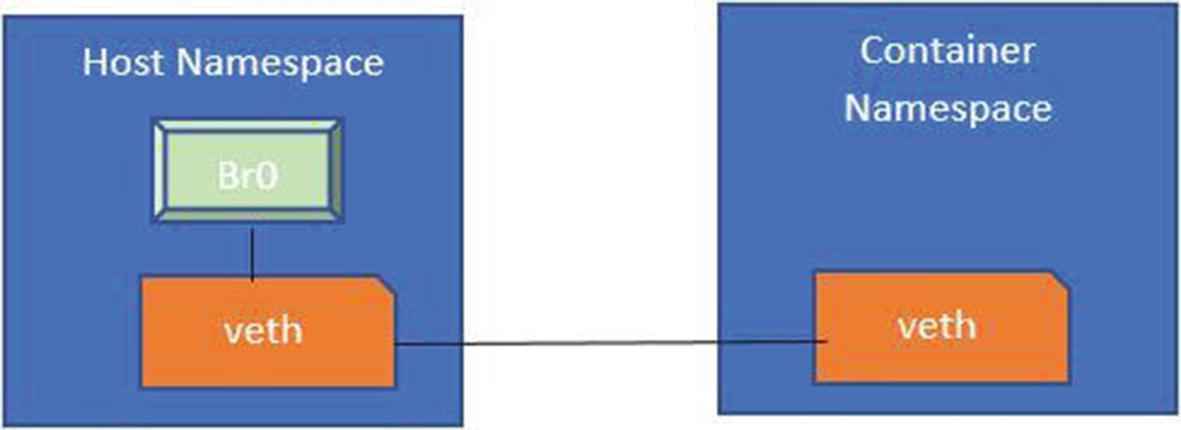
Enabling the Network for the Container
In previous sections, we created a container with uts, PID, and mount namespaces. We didn’t add the network namespace. In this section, we discuss how to set up network namespaces for the container.
Before we delve into the networking topic, I will provide a small primer on virtual devices in Linux, which are essential for understanding container-based networks, or for that matter any virtual networking.
Virtual Networking a Small Primer
In a virtualized world, there is a need to send packets across virtual machines to the actual physical devices, between virtual machines, or between different containers. We need a mechanism to use virtualized devices in this way. Linux provides a mechanism to create virtual network devices, called tun and tap. The tun device acts at Layer 3 of the network stack, which means it receives the IP packets. The tap device acts at Layer 2, where it receives raw Ethernet packets.
Now one might ask, what are these devices used for? Consider a scenario where containerA needs to send packets outbound to another container. The packets from one packet are transmitted to the host machine, which smartly uses a tap device to pass the packet to a software bridge. The bridge can then be connected to another container.
Let’s see how these tap devices work with a simple example. Here, I create two tap devices, called mytap1 and mytap2:
Listing the tap devices, we can see there are two network interfaces:
We assign IP addresses to these devices:
Running a simple ping from one device to other results in the following:
In these examples, we explicitly created two tap devices and tried a ping between the two.
We can also use veth pairs, which can be thought of as virtual cables that connect the virtual devices. They are used in openstack to connect software bridges.
First, we create a veth pair as follows:
This creates two tap interfaces, called firstap and secondtap.
Now, we add IP addresses to the tap devices and run a ping:
With a basic understanding of tun and tap devices, let’s move on to how the networking set up should work between the namespace created for the container and the host’s namespace. For that process, we follow these steps:
1.
Create a Linux bridge on the host.
2.
Create a veth pair.
3.
One end of veth pair must be connected to the bridge.
4.
The other end of the bridge must be connected to the network interface on the container namespace.
fmt.Printf("Error waiting for network - %s
", err)
os.Exit(1)
}
if err := cmd.Run(); err != nil {
fmt.Printf("Error starting the reexec.Command - %s
", err)
os.Exit(1)
}
//must(cmd.Run())
}
func must(err error) {
if err != nil {
fmt.Printf("Error - %s
", err)
}
}
There are a few aspects that are worth considering here. In the earlier code examples, we initialized namespaces (like changing the hostname and pivot root) in the child method. Then we launched the shell (/bin/sh) within the namespaces.
This mechanism worked because we just needed to initialize the namespaces, and that was being done within the namespaces themselves. When it comes to the network namespace, we need to carry out certain activities like the following:
Create a bridge on the host.
Create the veth pair and make one end connect to the bridge on the host and the other end within the namespace.
The problem with the current way is that when we launch the shell, we remain in the namespace until we purposely exit it. So, we need a way to return the code immediately in the API so we can execute the network setup on the host and join the veth pairs.
Fortunately, the cmd.Run command can be broken into two parts.
Cmd.Start() returns immediately.
Cmd.Wait() blocks until the shell is exited.
We use this to our advantage in the parent method. We execute the cmd.Start method, which returns immediately.
After the start method, we use a library called netsetgo created by Ed King from Pivotal. It does the following.
1.
Creates the bridge on the host.
2.
Creates the veth pair.
3.
Attaches one end of the veth to the bridge.
4.
Attaches the other end to the network namespace. This is interesting, as we now have access to the host side and the network side until we block.
Follow the instructions to download and install netsetgo:
fmt.Printf("Error waiting for reexec.Command - %s
", err)
os.Exit(1)
}
Once this is done, we use cmd.Wait(), which relaunches the program (/proc/self/exe). Then we execute the child process and go ahead with all the other initializations. After the initializations, we can launch the shell within the namespaces.
Next, we should verify the network communication from the host to the container and from the container to the host. First run this program:
/myuts parent /bin/sh
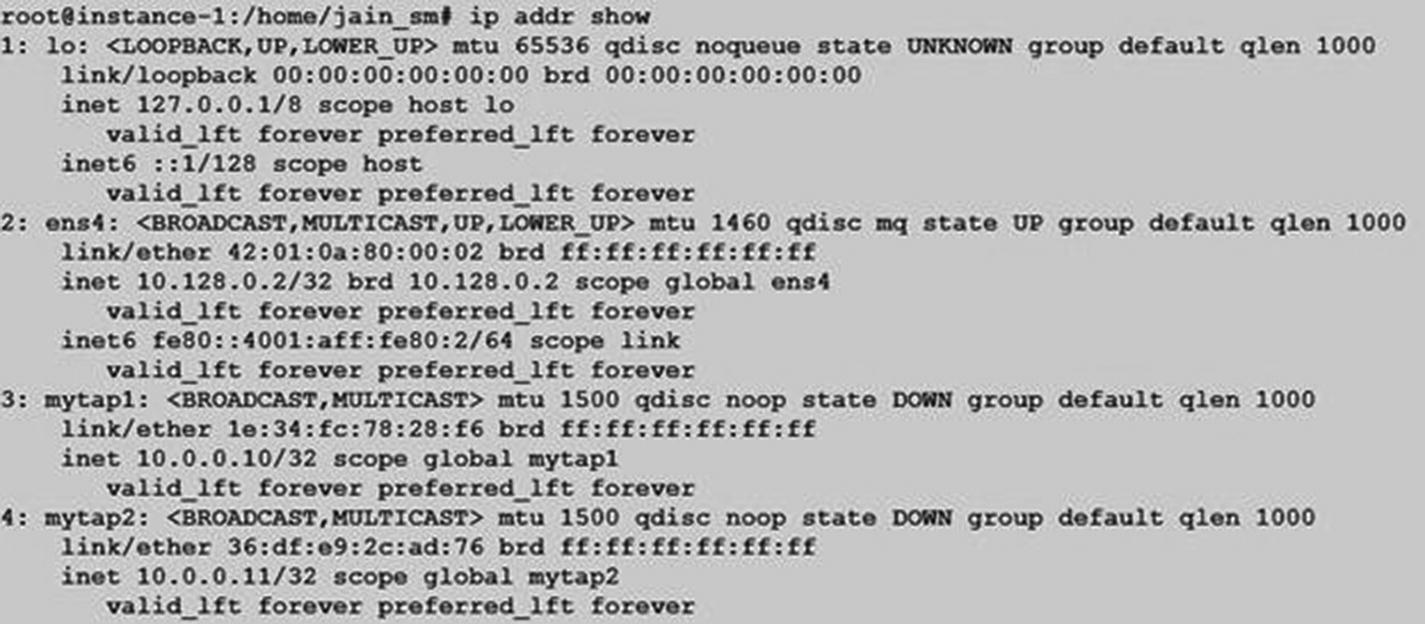
Within the container shell, run the ifconfig command. You should see the container’s IP address, as shown here.
Keep the container running and open another terminal (a bash shell) on the host. Run the following command, which pings the container’s IP:
ping 10.10.10.2
Note that we are able to ping the container’s IP address from the host.
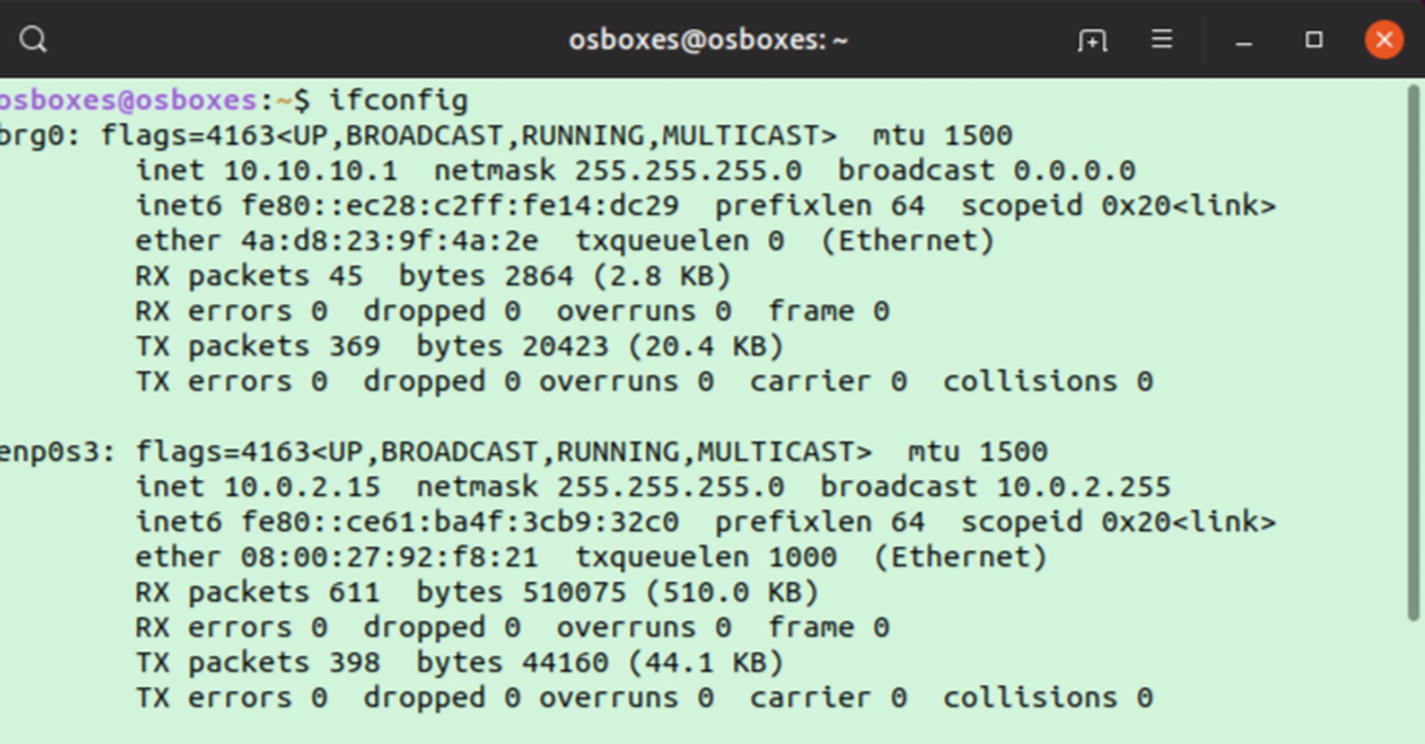
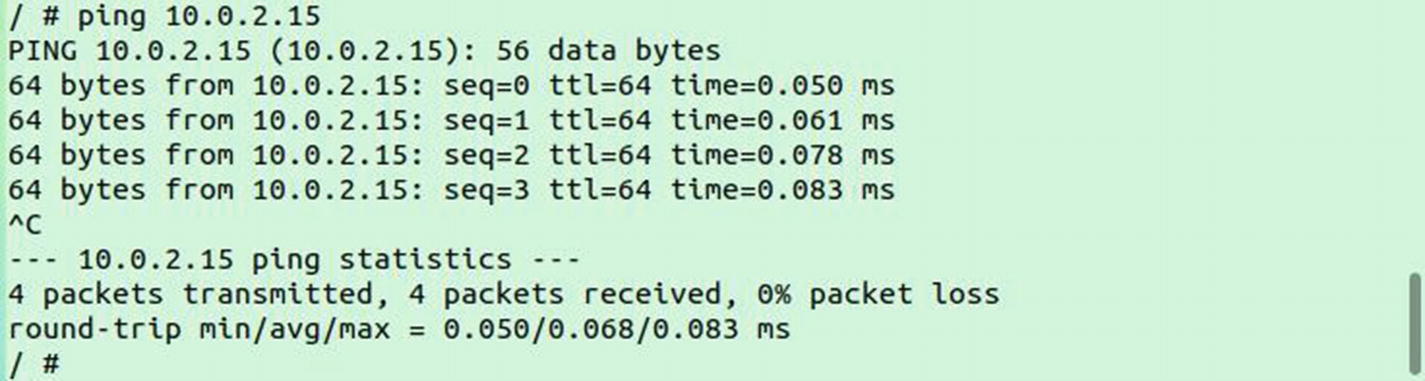
Now try the pinging the host IP address from the container. First, get the host IP address by running the ifconfig command. As you can see here, my host IP address is 10.0.2.15:
Now ping this host IP from the container:
As you can see, we could ping from the container to the host as well as from the host to the container, so networking communication is working both ways.
Let’s recap what we have achieved thus far.
We created a container with unshare and demonstrated the ability to change the hostname within a uts namespace.
We created a container with Golang with namespaces like UTS and user-namespaces.
We add mount namespaces and demonstrated how a separate proc file system can be mounted within the namespace.
We added network capabilities to the namespace, which allow us to communicate between the container namespaces and the host namespace.
Enabling Cgroups for the Container
We earlier mounted a cgroup on /root/mygrp. We created a directory child within it. Now we will put our process within the cgroup and cap its maximum memory.
In this code snippet, we add the PID of the process we create within the container (/bin/sh) to the cgroup.procs file and cap the maximum memory for the process to 2MB.
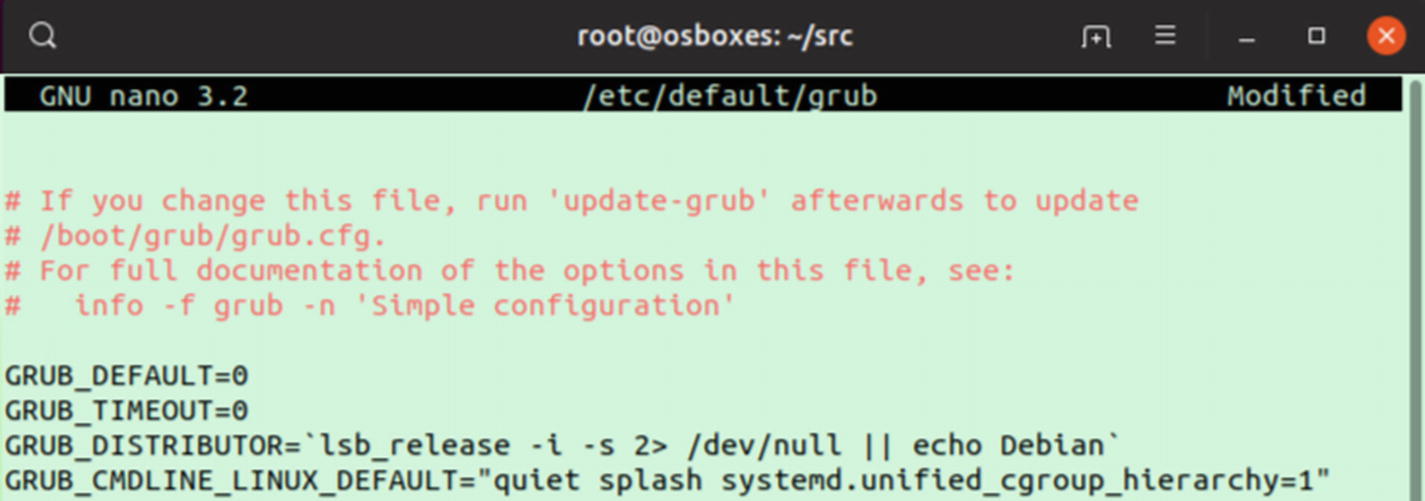
Before executing this code, you need to make one configuration change to the OS. Open the /etc/default/grub file using Nano or your favorite editor:
nano /etc/default/grub
In this file, you have to modify the GRUB_CMDLINE_LINUX_DEFAULT key to add systemd.unified_cgroup_hierarchy=1. Refer the following image for clarification.
fmt.Printf("Error waiting for network - %s
", err)
os.Exit(1)
}
if err := cmd.Run(); err != nil {
fmt.Printf("Error starting the reexec.Command - %s
", err)
os.Exit(1)
}
//must(cmd.Run())
}
func must(err error) {
if err != nil {
fmt.Printf("Error - %s
", err)
}
}
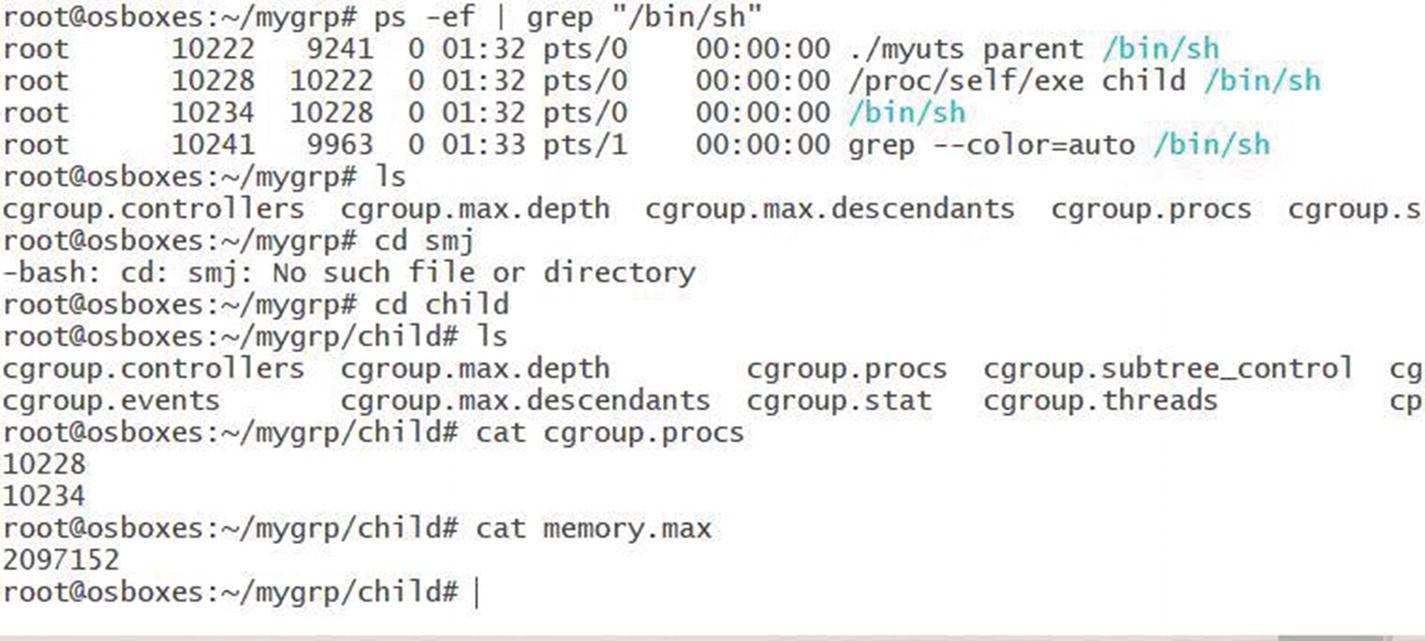
Figure 6-3 shows the process PID added to the cgroup and the value stored in the memory.max file, which we defined in the program.
Figure 6-3
The process PID added to the cgroup and the value stored in the memory.max file
Summary
In the book, we covered the basics of virtualization. We delved into how virtualization works and the basic techniques used to achieve it. We covered different packet flow scenarios, as to how communication happens from a VM to a hypervisor.
The book covered the specifics of Linux containers (namespaces, cgroups, and union file systems) and how containers are realized within the Linux kernel. We took a stab at writing a Linux container and saw how, with some simple programming, we can create a simple container runtime like Docker.
You are advised to go over each exercise and try different combinations of the code. As an example, you could do the following:
1.
Try a new rootfs rather than busybox.
2.
Try container-to-container networking.
3.
Play with more resource controls.
4.
Run an HTTP server within one container and an HTTP client within other container and establish a communication over HTTP.
You should now have a decent idea as to what happens under the hood within a container. Therefore, when you use different container orchestrators like Kubernetes or Swarm, you’ll more easily understand what is actually happening.