Since Oracle announced Automatic Storage Management (ASM) as a new feature in Oracle Database 10g, advocates of Oracle technology quickly realized that the filesystem as they knew it for storing database files may be replaced by ASM. DBAs and system administrators alike asked the same question: What is the benefit of ASM? You should consider ASM for your corporate infrastructure for a number of reasons. ASM, in a nutshell, provides an integrated filesystem and volume management in the database kernel. Here are the most important reasons why you should consider ASM:
Raw device performance
Logical volume management
Consolidation of storage management
Mirroring/triple mirroring equivalence
Striping
Mirroring across heterogeneous storage arrays
Mirroring across different storage vendors
Real application cluster support
ASM over the years has become a gray area between system administrators and database administrators. Because ASM involves SQL*Plus, system administrators often take minimal ownership over this technology stack. At the same time, DBAs lack knowledge in the storage administration and often struggle with setup, configuration, and/or performance issues. ASM, although introduced as a DBA topic, often requires savvy system administration and knowledge.
Often storage vendors portray a negative image of ASM. Storage vendors lose revenue when ASM replaces the license cost associated with the vendor's logical volume management software. Furthermore, storage vendors also lose out on revenue associated with disk management and monitoring.
Obviously, we cannot cover all of ASM in a single chapter. This chapter focuses on core ASM components applicable to the Linux environment. This chapter will cover ASMLIB, how to install and configure ASM, and then how to migrate to ASM from the operating system. Finally, we'll cover the ASM command-line interface to demonstrate how you can master ASM outside SQL*Plus.
You want to install packages for Oracle's ASM libraries (ASMLIB). During the installation, you encounter dependency errors as you attempt to apply ASMLIB Linux packages.
Installing Oracle's ASMLIB has dependency requirements. You must install the RPMs in the following order:
oracleasm-supportoracleasmoracleasmlib
If you attempt to apply RPMs in a different order than listed here, you will encounter the "Error: Failed dependencies" message. In the following example, ASMLIB RPMs will be installed and configured in the correct dependency order:
[root@gc oracle]# rpm -ihv oracleasm-support-2.0.3-1.i386.rpm
Preparing... ########################################### [100%]
1:oracleasm-support ########################################### [100%]

[root@gc oracle]# rpm -ihv oracleasm-2.6.9-55.0.2.EL-2.0.3-1.i686.rpm
Preparing... ########################################### [100%]
1:oracleasm-2.6.9-55.0.2.########################################### [100%]

[root@gc oracle]# rpm -ihv oracleasmlib-2.0.2-1.i386.rpm
Preparing... ########################################### [100%]
1:oracleasmlib ########################################### [100%]
Oracle announced ASMLIB as a generic storage management interface concept to address disk management, discovery, and provisioning. ASMLIB was intended as an API for storage and operating system vendors to extend their storage core strengths and features such as performance and greater data integrity. Since the introduction of ASMLIB, Oracle released Oracle's ASMLIB libraries only for the Linux operating system. ASMLIB is available for the following flavors of Oracle Unbreakable Linux:
SUSE Linux Enterprise Server 10
Red Hat Enterprise Linux 5 AS
Red Hat Enterprise Linux 4 AS
SUSE Linux Enterprise Server 9
Red Hat Enterprise Linux 3 AS
SUSE Linux Enterprise Server 8 SP3
Red Hat Advanced Server 2.1
The ASMLIB software is composed of three essential RPMs:
oracleasmlib, which is the core packageoracleasm-support, which provides the command-line interfacesoracleasm, which is the kernel driver and is dependent on the version of the Linux kernel
The simplistic implementation would be to list all three RPMs in a single command, as shown here:
[root@gc oracle]# rpm -ihv oracleasm-2.6.9-55.0.2.EL-2.0.3-1.i686.rpm
oracleasmlib-2.0.2-1.i386.rpm
oracleasm-support-2.0.3-1.i386.rpm

Preparing... ########################################### [100%]
1:oracleasm-support ########################################### [ 33%]
2:oracleasm-2.6.9-55.0.2.########################################### [ 67%]
3:oracleasmlib ########################################### [100%]
By listing all the RPMs on a single command-line syntax, administrators do not have to be cognitive of dependency order.
We recommend that RPMs for ASMLIB 2.0 be downloaded from Oracle's website: http://www.oracle.com/technology/software/tech/linux/asmlib/index.html. When downloading RPMs, administrators must carefully select the appropriate RPMs specific for their Linux kernel version and architecture. You can use the `uname -r` command to determine the exact version of the Linux kernel specific to your environment. You can download RPMs specific to Red Hat 4 from the following website:
http://www.oracle.com/technology/software/tech/linux/asmlib/rhel4.html
You are licensed for Oracle Enterprise Linux and want to take advantage of the up2date feature to download and install the ASMLIB RPMs from Oracle's Unbreakable Linux Network.
Here's the command and output to install the latest ASM libraries on your system:
# up2date -i oracleasm-support oracleasmlib oracleasm-`uname -r`

Fetching Obsoletes list for channel: el5_i386_latest...

Fetching Obsoletes list for channel: el5_i386_ocfs2...
########################################

Fetching Obsoletes list for channel: el5_i386_oracle...
########################################

Fetching rpm headers...
########################################

Name                                    Version        Rel
----------------------------------------------------------
oracleasm-2.6.18-53.el5                 2.0.4          1.el5             i686
oracleasm-support                       2.0.4          1.el5             i386
oracleasmlib                            2.0.3          1.el5             i386


Testing package set / solving RPM inter-dependencies...
########################################
oracleasm-2.6.18-53.el5-2.0 ########################## Done.
oracleasm-support-2.0.4-1.e ########################## Done.
oracleasmlib-2.0.3-1.el5.i3 ########################## Done.
Preparing              ########################################### [100%]

Installing...
   1:oracleasm-support      ########################################### [100%]
   2:oracleasm-2.6.18-53.el5########################################### [100%]
   3:oracleasmlib           ########################################### [100%]
You must subscribe to the "Oracle Software for Enterprise Linux" channel to install the oracleasmlib RPM.
If you are deploying Oracle Enterprise Linux, you can take advantage of up2date to download and install the ASMLIB RPMs just like any other RPMs. Once you successfully register the database server with the Unbreakable Linux Network (ULN), you can subscribe to the "Oracle Software for Enterprise Linux" channel and leverage up2date to download the ASM libraries.
Note
If you are upgrading your Linux operating system, you must update the oracleasm package since it is kernel-version-specific. You can upgrade the oracleasm package using the up2date -u command.
For Real Application Cluster (RAC) databases, the ASM instance autostarts fine after a server reboot. For non-RAC implementations, the ASM instance does not start when the system is bounced for maintenance activities or during a planned outage window.
Oracle does not provide scripts to start the ASM instance during the reboot processes. You can take advantage of the dbstart shell script in $ORACLE_HOME/bin since this script has been redesigned to start the ASM instance first. For non-RAC databases, executing dbstart will start the ASM instance and all the databases listed in the /etc/oratab file with the autostart flag set to Y.
Customers can customize the system autostartup scripts in the /etc/rc[x].d directory since requirements may vary from system to system. Autostartup scripts are typically configured with the chkconfig command in Linux. As best practices, the driver script that initiates the autostartup scripts should be placed in the /etc/init.d directory.
Here's a simple script, /etc/init.d/dbora, that will restart the ASM instance and database after a server reboot:
#!/bin/sh
# chkconfig: 345 99 10
# Description: Oracle auto start-stop script.
# Name:  dbora
#
DB_HOME=/apps/oracle/product/11.1.0/DB
OWNER=oracle
export DB_HOME OWNER

case "$1" in
'start')
  # -- Sleep for 120 per Oracle Bug #:  3458327
  sleep 120;
  su - $OWNER -c "$DB_HOME/bin/dbstart $DB_HOME" > /tmp/dbstart.log 2>&1
  su - $OWNER -c "export ORAENV_ASK=NO; export ORACLE_SID=DBAPROD;. oraenv;
                  lsnrctl start" > /tmp/listener_start.log 2>&1
  ;;
'stop')
  # Stop the Oracle databases:
su - $OWNER -c "export ORAENV_ASK=NO; export ORACLE_SID=DBAPROD;. oraenv;
lsnrctl stop" > /tmp/listener_stop.log 2>&1
su - $OWNER -c $DB_HOME/bin/dbshut >/tmp/dbshut.log 2>&1
;;
esacThe dbora script can potentially satisfy the majority of the company's database startup requirements. The dbora script simply executes the dbstart script from $ORACLE_HOME/bin when the server starts and executes the dbshut script prior to the system shutdown process. Oracle's dbstart script loops through the /etc/oratab twice. In the first iteration, entries that start with a + sign are filtered out since the + sign denotes an ASM instance. If the ASM instance has a Y flag at the end of the colon-delimited parameters, the dbstart script will start the ASM instance. During the second loop iteration of the /etc/oratab file, dbstart starts all the databases that are designated to autostartup.
Despite efforts to autostart the databases, ASM instances will not autostart because of reported bug number 3458327. MetaLink Note 264235.1, which is titled "ORA-29701 On Reboot When Instance Uses Automatic Storage Management (ASM)," indicates that the dbstart script will not start the ASM instance. Indeed, the ASM instance will result in the following error:
ORA-29701 unable to connect to Cluster Manager.
The workaround to address this problem is to move the last line of the /etc/inittab file that respawns the init.cssd daemon between rc2 and rc3, as shown here:
l2:2:wait:/etc/rc.d/rc 2
h1:35:respawn:/etc/init.d/init.cssd run >/dev/null 2>&1 </dev/null
l3:3:wait:/etc/rc.d/rc 3
l4:4:wait:/etc/rc.d/rc 4
l5:5:wait:/etc/rc.d/rc 5
l6:6:wait:/etc/rc.d/rc 6
You want to take full advantage of Oracle ASMLIB since you are running Linux. After successfully installing all the required packages for the ASMLIB, you want to configure ASMLIB to address disk permissions, to start the Oracle ASM library, and to set the disk ownership to oracle during system boot processes.
After you have successfully installed all the required RPMs, you can initiate ASMLIB configuration by issuing the /etc/init.d/oracleasm configure command. The oracleasm shell script will prompt you to do the following:
Set up the ASMLIB driver owner
Set up group permissions
Set up driver boot options
Load the
oracleasmmodule into the kernelScan the header of the disk to search for
oracleasmdisk members
The following example displays the configuration steps:
[root@rac3 init.d]# ./oracleasm configure
Configuring the Oracle ASM library driver.

This will configure the on-boot properties of the Oracle ASM library
driver.  The following questions will determine whether the driver is
loaded on boot and what permissions it will have.  The current values
will be shown in brackets ('[]').  Hitting <ENTER> without typing an
answer will keep that current value.  Ctrl-C will abort.

Default user to own the driver interface [oracle]: oracle
Default group to own the driver interface [dba]: dba
Start Oracle ASM library driver on boot (y/n) [n]: y
Fix permissions of Oracle ASM disks on boot (y/n) [n]: y
Writing Oracle ASM library driver configuration:           [  OK  ]
Loading module "oracleasm":                                [  OK  ]
Mounting ASMlib driver filesystem:                         [  OK  ]
Scanning system for ASM disks: [ OK ]When you successfully install the RPMs required for ASMLIB, the primary command-line interface shell script called oracleasm is installed in the /etc/init.d directory. The oracleasm script is designed to start the ASM library, load the oracleasm kernel module, fix the disk permissions, mount the oracleasmfs filesystem, and scan the disk headers of each ASM disk. Executing /etc/init.d/oracleasm with the configure option prompts the administrator to respond to the values designated in brackets, as in []. When responding to the oracleasm script, you should designate the owner of the driver interface to be the oracle user and set the default group ownership to be dba. Likewise, the startup of the Oracle ASM library should be set to start on system reboot and to correct the permissions for the Oracle ASM disks.
All the ASMLIB parameters and configuration information is recorded in the /etc/sysconfig/oracleasm file. Here are the parameters defined in the oracleasm configuration file:
#
# This is a configuration file for automatic loading of the Oracle
# Automatic Storage Management library kernel driver.  It is generated
# By running /etc/init.d/oracleasm configure.  Please use that method
# to modify this file
#
# ORACLEASM_ENABELED: 'true' means to load the driver on boot.
ORACLEASM_ENABLED=true

# ORACLEASM_UID: Default user owning the /dev/oracleasm mount point.
ORACLEASM_UID=oracle

# ORACLEASM_GID: Default group owning the /dev/oracleasm mount point.
ORACLEASM_GID=dba

# ORACLEASM_SCANBOOT: 'true' means fix disk perms on boot
ORACLEASM_SCANBOOT=true

# ORACLEASM_CLEARBOOT: 'true' means clean old disk perms on boot
ORACLEASM_CLEARBOOT=true

# ORACLEASM_SCANORDER: Matching patterns to order disk scanning
ORACLEASM_SCANORDER=

# ORACLEASM_SCANEXCLUDE: Matching patterns to exclude disks from scan
ORACLEASM_SCANEXCLUDE=
As you can see, answers that were supplied during the /etc/init.d/oracleasmm configure command are captured in this file. This library configuration file is read during the automatic loading of the ASMLIB kernel driver.
After the storage administrator provides you with the disk for the database and presents the disk to the server, you want to stamp the disks as ASMLIB disks using the oracleasm createdisk command.
Let's start with creating the ASMLIB disk. You invoke the same /etc/init.d/oracleasm script to create an ASMLIB disk. The createdisk command accepts two arguments: the disk name that you want to assign, which is limited to 30 characters, and the fully qualified device path name. In the following example, you will create four ASMLIB disks, DATA1 to DATA4:
[root@rac3 dev]# /etc/init.d/oracleasm createdisk DATA1 /dev/sdc1
Marking disk "/dev/sdc1" as an ASM disk:                   [  OK  ]
[root@rac3 dev]# /etc/init.d/oracleasm createdisk DATA2 /dev/sdc2
Marking disk "/dev/sdc2" as an ASM disk:                   [  OK  ]
[root@rac3 dev]# /etc/init.d/oracleasm createdisk DATA3 /dev/sdc3
Marking disk "/dev/sdc3" as an ASM disk:                   [  OK  ]
[root@rac3 dev]# /etc/init.d/oracleasm createdisk DATA4 /dev/sdc4
Marking disk "/dev/sdc4" as an ASM disk:                   [  OK  ]
Once the disks are presented to the database server, you can create ASMLIB disks by marking the disk header with the oracleasm shell script. Marking the disk involves writing ASMLIB information on the disk header of the disk.
ASMLIB is concerned with only two portions of the disk header: the disk marker (also referred to as the tag) and the label. Successful creation of the DATA1 disk via ASMLIB will stamp the tag ORCLDISK and add the label DATA1 to the disk header.
Note
The tag ORCLDISK can be stamped by ASMLIB or by the ASM instance after the disk becomes a member of a diskgroup. All ASM disks will have the tag ORCLDISK on the disk header. The tag ORCLDISK indicates that the disk is provisioned for use by ASM or is already a member of an ASM diskgroup.
When ASMLIB scans the disks after a reboot, ASMLIB will detect the tag ORCLDISK and the label DATA1.
You can take advantage of the od command to dump the disk header information to retrieve the ASM disk label and/or diskgroup information. Using the dd command to extract just the 128 bytes of the disk header and piping the output to the od command to dump the output in octal format, you can view the named characters with the "--format=a" option. The od output should resemble something similar to what you see here:
[root@rac4 ˜]# dd if=/dev/sdc1 bs=128 count=1 |od --format=a
1+0 records in
1+0 records out
0000000 nul nul nul nul nul nul nul nul nul nul nul nul   u   A   T   A
0000020 nul nul nul nul nul nul nul nul nul nul nul nul nul nul nul nul
0000040   O   R   C   L   D   I   S   K   D   A   T   A   1 nul nul nul
0000060 nul nul nul nul nul nul nul nul nul nul nul nul nul nul nul nul
*
0000200
You will notice that the disk header of /dev/sdc1 is marked with ORCLDISKDATA1 to denote that this is tagged as an ASM or ASMLIB disk and has a label called DATA1. When you assign the ASM disk to a diskgroup in recipe 12-15, additional information will be marked in the disk header.
ASM can discover ASMLIB disks by scanning the disk header. Even if the device name changes after a reboot, ASM still identifies the disk as an ASMLIB disk by reading the disk header. For example, what is /dev/hdc1 after a reboot may become /dev/sdh1. With ASMLIB, ASM does not care about device names surviving a reboot.
If a raw or block device is not configured to be an ASMLIB disk, the disk will not have a label at all. The label will in essence have an empty value . When ASMLIB scans a non-ASMLIB disk, it may detect the disk as an ASM disk if it has the ORCLDISK tag but will not recognize it as an ASMLIB disk since it has no label.
In a RAC configuration, you will execute only the oracleasm createdisk command on one RAC node. The remaining nodes will scan the disk header and pick up the label information using the oracleasm scandisks command.
You want to delete the existing ASM disk label. You want to redistribute the disk for other purposes.
Before you delete the ASM disk label, you need to drop the disk from the ASM diskgroup. You can leverage the /etc/init.d/oracleasm deletedisk command to remove the disk header information. The oracleasm deletedisk command accepts one parameter, the ASM disk name. To delete the DATA2 ASM disk label, here's the syntax:
[root@rac4 ˜]# /etc/init.d/oracleasm deletedisk data2
Removing ASM disk "DATA2":                                 [  OK  ]
Note
All options to the oracleasm script that are not read-only actions require root privileges to execute. Such options include commands to configure, create, delete, and rename.
Theoracleasm deletedisk command deletes the disk label that identifies the disk as the ASMLIB disk. Before deleting the DATA2 disk label, you can see the DATA2 disk label on the header of the disk, as shown here:
[root@rac4 ˜]# dd if=/dev/sdc2 bs=128 count=1 |od --format=a
1+0 records in
1+0 records out
0000000 nul nul nul nul nul nul nul nul nul nul nul nul   v   A   T   A
0000020 nul nul nul nul nul nul nul nul nul nul nul nul nul nul nul nul
0000040   O   R   C   L   D   I   S   K   D   A   T   A   2 nul nul nul
0000060 nul nul nul nul nul nul nul nul nul nul nul nul nul nul nul nul
*
0000200
After issuing the oracleasm deletedisk command, the disk header dump shows that the ORCLDISKDATA2 disk header is changed to ORCLCLRD:
[root@rac4 ˜]# dd if=/dev/sdc2 bs=128 count=1 |od --format=a
1+0 records in
1+0 records out
0000000 nul nul nul nul nul nul nul nul nul nul nul nul   v   A   T   A
0000020 nul nul nul nul nul nul nul nul nul nul nul nul nul nul nul nul
0000040   O   R   C   L   C   L   R   D nul nul nul nul nul nul nul nul
0000060 nul nul nul nul nul nul nul nul nul nul nul nul nul nul nul nul
*
0000200
You can also use the dd command to clear out the headers of the ASM disks. A simple way is the write over the headers plus some extra space by copying over the /dev/zero special file. Here's an example of the dd command to clear out the first 10MB of the disk header:
$ sudo dd if=/dev/zero of=/dev/sdc1 bs=10240000 count=1
1+0 records in
1+0 records out
rac4.dbaexpert.com:/home/oracle
[ ... ]
rac4.dbaexpert.com:/home/oracle
+ASM > sudo dd if=/dev/zero of=/dev/sdc4 bs=10240000 count=1
1+0 records in
1+0 records out
You can use the force-renamedisk option to change the disk label of a disk. The force-renamedisk option can be leveraged to migrate from a block device to an ASMLIB disk. You can execute the /etc/init.d/oracleasm shell script, provide the script with the force-renamedisk option, and provide two parameters: the block device name and the ASM disk name you want to name it to. In the following example, we will rename the /dev/sdc4 block device to the FRA_1 ASM disk:
$ sudo /etc/init.d/oracleasm force-renamedisk /dev/sdc4 FRA_1
Renaming disk "/dev/sdc4" to "FRA_1":                      [  OK  ]
Likewise, you can rename an ASMLIB disk using the force-renamedisk option, as shown here:
$ sudo /etc/init.d/oracleasm force-renamedisk data1 data10
Renaming disk "data1" to "DATA10":                         [  OK  ]
If you have not implemented ASMLIB, you may want to migrate to ASMLIB to take advantage of native features such as device persistency, device ownership, and permissions management. To migrate to ASMLIB, you must change the label of your existing disks by renaming the disks to an ASMLIB disk.
When you rename a block device or an ASM disk, you are simply altering the disk header information. You can rename a block device or an ASM disk but may not migrate a raw device to an ASMLIB disk. If you want to migrate a raw device, you must associate the block device rather than the raw device as the parameter to the force-renamedisk option. Attempting to directly migrate a raw device will yield an error message similar to what you see here:
# /etc/init.d/oracleasm force-renamedisk /dev/raw/raw1 data1
asmtool: Unable to open device "/dev/raw/raw1": Block device required
Renaming disk "/dev/raw/raw1" to "DATA1":                  [FAILED]
Note
You should rename a disk only while the ASM instance is down. If you attempt to rename a disk while the ASM instance is up and running, you assume the risk of data corruption.
Most ASM administrators will first initiate the renaming of the ASM disk with the renamedisk option. The renamedisk operation will fail and will prompt you to use the force-renamedisk command instead, as shown here:
$ sudo /etc/init.d/oracleasm renamedisk /dev/sdc4 FRA_1
WARNING: Changing the label of an disk marked for ASM is a very dangerous
         operation.  If this is really what you mean to do, you must
         ensure that all Oracle and ASM instances have ceased using
         this disk.  Otherwise, you may LOSE DATA.
If you really wish to change the label, rerun with the force-renamedisk command.
Renaming disk "/dev/sdc4" to "FRA_1": [FAILED]You want to view all the disks incorporated into ASMLIB and correlate the ASMLIB disks to the block devices.
To view a list of all your ASMLIB disks, simply execute the /etc/init.d/oracleasm listdisks command. You can see in the example here that the oracleasm listdisks command provides an output of all the ASMLIB disks:
$ sudo /etc/init.d/oracleasm listdisks
DATA10
DATA3
FRA1
FRA2
FRA3
FRA4
Querying the disks individually using the oracleasm querydisk command provides the major and minor numbers of the device name. For example, querying the ASMLIB disk labeled DATA10 produces the following output:
$ sudo /etc/init.d/oracleasm querydisk DATA10
Disk "DATA10" is a valid ASM disk on device [8, 33]
Every disk created using the oracleasm createdisk command will create an entry in the /dev/oracleasm/disks directory. ASM disk entries in the /dev/oracleasm/disks directory correlate to the major and minor numbers in the /dev directory:
[root@rac4 ˜]# ls -l /dev/oracleasm/disks
total 0
brw-rw----  1 oracle dba 8, 33 May 22 23:01 DATA10
brw-rw----  1 oracle dba 8, 35 May 22 17:19 DATA3
brw-rw----  1 oracle dba 8, 49 May 22 17:13 FRA1
brw-rw----  1 oracle dba 8, 50 May 22 17:13 FRA2
brw-rw----  1 oracle dba 8, 51 May 22 17:13 FRA3
brw-rw----  1 oracle dba 8, 52 May 22 17:13 FRA4
Simply executing an ls command against the /dev directory, you can match the ASM disk to the block device. For example, ASM disk DATA10 maps to /dev/sdc1, as shown here:
[root@rac4 ˜]# ls -l /dev |grep "8,  33"
brw-rw----  1 root   disk     8,  33 May 22 17:13 sdc1
Alternatively, you can leverage oracleasm querydisk using the device name. Instead of providing the ASMLIB disk as the parameter, you can specify the device name, and the script will return the ASMLIB disk associated with the device name. Querying the device name /dev/sdc1, you will notice the correlation back to DATA10:
$ sudo /etc/init.d/oracleasm querydisk /dev/sdc1
Disk "/dev/sdc1" is marked an ASM disk with the label "DATA10"
If you query a device name that is not an ASMLIB disk, you will get a message indicating that the disk is not marked as an ASMLIB disk:
$ sudo /etc/init.d/oracleasm querydisk /dev/sdc4
Disk "/dev/sdc4" is not marked an ASM disk
Another way to check the identity of the ASMLIB disk is to query the V$ASM_DISK view. You will notice that the V$ASM_DISK view has a LIBRARY, a LABEL, and a PATH column:
1  select path, label, library from v$asm_disk
  2* order by 1,2
SQL> /

PATH        LABEL     LIBRARY
----------- --------- ------------------------------
/dev/sdc4             System
ORCL:DATA10 DATA10    ASM Library - Generic Linux, v
                      ersion 2.0.2 (KABI_V2)

[...]
ORCL:FRA4   FRA4      ASM Library - Generic Linux, v
                      ersion 2.0.2 (KABI_V2)
7 rows selected.
You can clearly see that the device /dev/sdc4 is not an ASMLIB disk. You will also see that all ASMLIB disks have path names that start with ORCL: followed by the label name.
For some unexpected reason, you encounter error(s) while trying to configure Oracle ASMLIB, or you cannot create a diskgroup using the ASMLIB disks.
If you have issues loading the oracleasm module, you will see errors in the /var/log/messages file that look similar to what is shown here:
Apr 24 22:24:42 gc modprobe: FATAL: Module oracleasm not found.
Apr 24 22:24:42 gc oracleasm: Unable failed
Unfortunately, many DBAs and system administrators do not realize the significance of ASMLIB. Because ASMLIB is an optional feature, administrators often do not spend a lot of time resolving ASMLIB issues. When complications arise while configuring ASMLIB, administrators tend to bypass ASMLIB and create ASM diskgroups using block devices. If you are deploying RAC and/or ASM environments on a Linux operating system, we strongly recommend that you implement ASMLIB. ASMLIB is an alternative interface to discover and access block devices. ASMLIB provides native features such as device naming and permission persistency.
The database is able to read and write to the ASM instance through the oracleasmfs filesystem. As part of the ASMLIB configuration process, ASMLIB creates an entry in the /proc/filesystems file and mounts the oracleasmfs filesystem. To confirm, you can view the contents of the /proc/filesystems file to ensure an entry exists for oracleasmfs:
# cat /proc/filesystems |grep -i asm
nodev  asmdisk
nodev  oracleasmfs
Next, you can confirm that the oracleasm filesystem is successfully mounted to /dev/oracleasm using the df -ha command, as shown here:
# df -ha
Filesystem            Size  Used Avail Use% Mounted on
/dev/hda1              16G  3.8G   11G  26% /
none                     0     0     0   -  /proc
[...]
/dev/hda2              31G   26G  3.6G  88% /apps
none                 1014M  166M  849M  17% /dev/shm
/dev/hda5             4.0G   41M  3.7G   2% /tmp
/dev/mapper/vgmax-lvolsoft
                      126G  101M  120G   1% /soft
oracleasmfs              0     0     0   -  /dev/oracleasm
Note
The -h option designates a human-readable format that typically yields output in gigabytes instead of kilobytes. The -a option designates the output to display dummy filesystems that include empty filesystems (those with zero blocks).
The last line of the output should have the virtual oracleasmfs filesystem mounted to /dev/oracleasm. You can also check the files created in /dev/oracleasm/disks and make sure the ownership and permissions on the files are set to oracle:dba.
Another troubleshooting effort is to confirm that the oracleasm kernel module loaded successfully using the lsmod command:
# lsmod |grep -i asm
oracleasm              48020  1
At times, the oracleasm kernel module must be loaded manually. To load the oracleasm kernel module, change your directory to the /lib/modules/$(uname -r) directory, and issue the find command, as shown here:
# find . -name 'oracleasm.*'
./kernel/drivers/addon/oracleasm/oracleasm.ko
# insmod ./kernel/drivers/addon/oracleasm/oracleasm.ko
Once the kernel module is successfully loaded, you can continue with the ASMLIB configuration steps.
You can check the status of ASMLIB by specifying the oracleasm status command:
[root@rac4 ˜]# /etc/init.d/oracleasm status
Checking if ASM is loaded:                                 [  OK  ]
Checking if /dev/oracleasm is mounted:                     [  OK  ]
You can make sure that the ASMLIB is enabled at boot time:
[root@rac4 ˜]# /etc/init.d/oracleasm enable
Writing Oracle ASM library driver configuration:           [  OK  ]
Scanning system for ASM disks:                             [  OK  ]
The command oracleasm status checks to see that the ASM kernel module is loaded and confirms that the /dev/oracleasm filesystem is mounted. The oracleasm enable command simply writes to the configuration file to autostart ASMLIB. You can disable ASMLIB as part of the reboot process by using the oracleasm disable command.
The steps involved to install ASM software do not differ from installing the database software. You install the base software version first and then upgrade the software to the latest release of Oracle. For example, to install Oracle version 10.2.0.3/10.2.0.4, you would have to download and install the Oracle release 10.2.0.1 software binaries from OTN and then upgrade to Oracle release 10.2.0.3 or 10.2.0.4 downloaded from MetaLink. To download the latest software release from MetaLink, you must have a valid CSI number and registration.
Note
We recommend installing ASM in a separate Oracle Home from your Oracle Database software. Allocating a separate Oracle Home just for ASM is considered a best practice and prepares your implementation for future rolling upgrades.
This solution will focus on Oracle Database 11g. To install Oracle Database 11g software in preparation for using it to run an ASM instance, you can follow the detailed steps outlined here:
First, as the
rootuser, create a Unix group calledasmadminusing thegroupaddcommand:# groupadd asmadmin
Assign the
oracleuser as a member of theasmadmingroup in the/etc/groupfile, as shown here:[...] dba:x:500: oinstall:x:501:oracle screen:x:84: asmadmin:x:502:oracle
If the
oracleuser is already logged in the Linux server, log out and log back in. If you print the user identify information with theidcommand, you should see theasmadmingroup assignment:$ id uid=500(oracle) gid=500(dba) groups=500(dba),501(oinstall),502(asmadmin)
Set
DISPLAY=IP_ADDRESS:0.0orHOSTNAME:0.0of the valid X server.Execute
./runInstallerto install Oracle version 11.1.0.6.If you meet the minimal prerequisite requirements such as validation of 80MB availability in temp space, 150MB availability in swap space, and minimum 256 colors support, the Oracle Universal Installer screen will display on the designated X server.
On the Select Installation Method screen, you have the option to choose either Basic Installation or Advanced Installation.
Select the Advanced Installation option, and click the Next button.
On the Select Installation Type screen, choose the installation type based on what you are licensed for at your environment. The majority of the customers will choose Enterprise Edition (3.18GB). If you want to customize the product to be installed, choose the Custom radio button.
Click the Next button.
On the Install Location screen, your
ORACLE_BASEfield should already be populated. If you did not specify the$ORACLE_BASEenvironment variable prior to the installation, it will be set to theHOMEdirectory of the Oracle user.Set
ORACLE_BASEto/apps/oracle(if you want to modify it).Specify a name for your
ORACLE_HOME. For example, enter 11gASMHome.Set the path for the ORACLE_HOME. For example, enter /apps/oracle/product/11.1.0/ASM.
Click the Next button.
On the Product-Specific Prerequisite Checks screen, the Oracle Universal Installer will validate that the minimum system requirements for installing Oracle Database 11g including the kernel parameters, swap space requirements, physical memory,
glibcversion, package requirements, PATH andLD_LIBRARY_PATHenvironment variable checks, validation of the Oracle base location, and network configuration requirements. You should correct all the errors on this screen. After all the issues are resolved, the very last line should read as follows:Check complete. The overall result of this check is: Passed.
Once you pass the system requirement checks, click the Next button.
On the Select Configuration Option screen, you have the option to create a starter database, configure ASM, or install software only. Choose the Install Software Only option, and click the Next button.
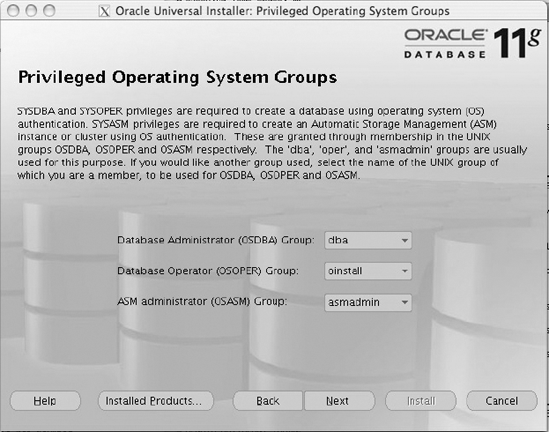
On the Privileged Operating System Groups screen, you will see the options to set the
sysdbaandsysoperprivileges you're familiar with. Oracle now recommends you create the new system privilege calledsysasmfor enabling the management of ASM. Oracle also recommends you create a new Unix/Linux group, calledasmadmin, for ASM administrators. Your screen should resemble Figure 12-1.Click the Next button to be routed to the Summary screen. On the Summary screen, the Oracle Universal Installer summarizes the components of the installation. Review the software components, and click the Install button.
On the Install page, you'll see the progress of the installation. Once the installation finishes successfully, as
root, executeroot.sh, and accept all default options.Navigate back to the Oracle Universal Installer, and exit it by first clicking Exit and then clicking Yes.
As
root, executelocalconfig addfrom the$ORACLE_HOME/bindirectory. Executing thelocalconfig addcommand will create the Oracle Cluster Registry (OCR) keys, copy scripts to the/etc/init.dand/etc/rcdirectories, and initialize the Clusterware Synchronization Services (CSS) daemon (which is a lightweight, scaled-down version of the Oracle Clusterware software). The output of this script should look like this:/apps/oracle/product/11.1.0/ASM/bin [root@rac3 bin]# ./localconfig add Successfully accumulated necessary OCR keys. Creating OCR keys for user 'root', privgrp 'root'.. Operation successful. Configuration for local CSS has been initialized
Cleaning up Network socket directories
Setting up Network socket directories
Adding to inittab
Startup will be queued to init within 30 seconds.
Checking the status of new Oracle init process...
Expecting the CRS daemons to be up within 600 seconds.
Cluster Synchronization Services is active on these nodes.
        rac3
Cluster Synchronization Services is active on all the nodes.
Oracle CSS service is installed and running under init(1M)
Once this script executes successfully, you will be able to create an ASM instance in a non-RAC environment. The CSS services must be up in order for the database instances to be able to communicate with the ASM instance. For RAC environments, this step is not needed since the CSS daemon is started as part of the cluster.
To check to see whether the CSS daemon is up and running, you can use the crsctl command from the $ORACLE_HOME/bin directory:
+ASM > ./crsctl check cssd
Cluster Synchronization Services appears healthy
The ASM software is the same set of binaries that's installed with the Oracle Database Home. You do not have to create a separate Oracle Home for ASM, and in fact, you can optionally share the same binaries from the Oracle Database Home. However, we strongly recommend installing the ASM binaries to a separate Oracle Home rather than sharing the binaries from the Oracle Database Home.
You should separate the Oracle database software binaries from your ASM software binaries, for several compelling reasons. The primary reason for separating the Database Home from the ASM Home is to be able to apply patches without disturbing all the databases that share the same Oracle Home. Starting in Oracle Database 11g, you can perform rolling upgrades for ASM. The ability to perform rolling upgrades is available only for Oracle Database 11g and newer databases.
All the disks are set up using ASMLIB or as block devices. You want to create the ASM instance.
Basically, you can create the ASM instance in two ways: by setting up Database Control using the Database Configuration Assistant (DBCA) or by creating an initialization file and manually starting the instance. This recipe will focus on how to create an ASM instance from the operating system command-line interface. To start the ASM instance, set up the initialization file or spfile located in the $ORACLE_HOME/dbs directory. You can set up the ASM instance by simply creating a file $ORACLE_HOME/dbs/init+ASM.ora for a stand-alone non-RAC implementation. Here's a sample initialization file:
##############################################################################
# ASM Init.ora parameter
##############################################################################

###########################################
# Diagnostics and Statistics
###########################################
background_dump_dest=/apps/oracle/admin/+ASM/bdump
core_dump_dest=/apps/oracle/admin/+ASM/cdump
user_dump_dest=/apps/oracle/admin/+ASM/udump

##############################################
# Instanct Type
# There are two possible instance types:
# ASM or RDBMS (regular database)
##############################################
instance_type=asm

###########################################
# Pools
###########################################
large_pool_size=12M

###########################################
# Security
###########################################
remote_login_passwordfile=exclusive

#  The default asm_diskstring is null
#  A null asm_diskstring actually specifies the combination of
#    '/dev/raw/*' and 'ORCL:*' values
#asm_diskstring='/dev/raw/raw*','/dev/sdc*'

#  When you first start your ASM instance, you should specify the asm_diskgroup
#  with a null value.  If you have two diskgroups such as DATA and FRA, you need
#  to separate them with commas enclosed by single apostrophes
#  Here's an example:
#  asm_diskgroups='DATA','FRA'
#asm_diskgroups=''
To start the ASM instance, you connect with the SQL*Plus tool using the sysasmrole. To connect to the ASM instance, you would simply type the following:
sqlplus / as sysasm
Note
In Oracle Database 10g, you would log on to the ASM instance using sqlplus / as sysdba. For ASM, the sysdba role is deprecated in Oracle Database 11g. You can continue to log on using the sysdba role, but error messages in the alert log file will appear indicating that the sysdba role is deprecated.
Once you have connected using SQL*Plus, you can issue the command startup nomount or startup mount. The startup mount command will result in an error because the initialization parameter file does not have the asm_diskgroups parameter set.
Simply stated, the ASM instance is composed of memory structures and background processes similar to the logical volume manager daemons. The ASM instance is configured using the initialization file and has background processes that make it appear like a database instance. Contrary to what many DBAs believe, the ASM instance does not have a database to write records to. What differentiates an ASM instance from a database instance is the INSTANCE_TYPE initialization parameter. Two acceptable values for the INSTANCE_TYPE parameter are ASM and RDBMS.
The primary background processes that make up the ASM instance include the following:
ARBn is responsible for performing the rebalance of data extents by moving extents. There can be numerous ARB0, ARB1, and so on, processes running at one time.
ASMB (ASM background) primarily runs on the database instance that has one or more open ASM diskgroups. ASMB also runs on the ASM instances and manages storage and provides statistics.
GMON is the diskgroup monitor and maintains disk memberships in the ASM diskgroups.
RBAL (ASM rebalance master) runs on both database and ASM instances. RBAL performs a global open of ASM disks for the database instances. RBAL also coordinates rebalance activity for diskgroups on the ASM instance.
In addition to these background processes, the ASM instance also runs the standard database background processes, database writer process (DBWn), log writer process (LGWR), Process Monitor process (PMON), and System Monitor process (SMON).
You want to log in and manage an ASM instance on a remote server. You do not want to have to log on to remote servers to manage your ASM instances.
You can connect to a remote node's ASM instance using SQL*Plus. You can connect using Oracle's so-called easy connect naming method. The easy connect naming method does not require an entry in the TNSNAMES.ORA file. Here's how you can connect to an ASM instance using the easy connect naming method:
$ sqlplus /nolog

SQL*Plus: Release 11.1.0.6.0 - Production on Mon Oct 6 22:53:10 2008

Copyright (c) 1982, 2007, Oracle.  All rights reserved.

SQL> connect sys/oracle123@rac3:1521/+ASM AS SYSASM
Connected.
SQL>
The syntax for the easy connect naming method is as follows:
CONNECT username/password@host[:port][/service_name]
Note
If your SQL*Plus client or target ASM instance is Oracle Database 10g, you must specify the connection with the "as sysdba" syntax since the sysasm role is available starting in Oracle Database 11g.
Once you are connected as sys on the ASM instance through the sysasm role, you can perform all the maintenance tasks as if you were connected locally. You can perform maintenance tasks such as mounting diskgroups:
SQL> alter diskgroup data mount;

Diskgroup altered.

SQL> alter diskgroup fra mount;

Diskgroup altered.
You can log on remotely to another ASM instance if the password file is set up correctly on the remote ASM instance. You must set up the password file using the orapwd executable from the $ORACLE_HOME/bin directory. The orapwd executable writes the file to the $ORACLE_HOME/dbs directory if the file name does not have a fully qualified path to the location of the password file. The following example creates a password file with the password of oracle123 for the sys user account:
$ > orapwd file=orapw+ASM entries=25 ignorecase=true password=oracle123
The ignorecase option is a new feature for Oracle Database 11g that specifies whether the passwords can be case sensitive. A value of true specifies that the password will revert to the Oracle Database 10g specification, making the passwords case insensitive. In addition to the password file, the ASM instance must be participating as a service on the local database listener.
You can create a diskgroup called DATA using the ASMLIB disks. The create diskgroup syntax looks like this:
SQL> create diskgroup data
  2  external redundancy
  3  disk
  4  'ORCL:DATA1', 'ORCL:DATA2',
  5  'ORCL:DATA3', 'ORCL:DATA4';

Diskgroup created.
Notice the reference to the ORCL:DATA1 to ORCL:DATA4 disks. Remember that ASMLIB disk names start with ORCL:. If you have not set up ASMLIB disks, you can qualify the block device names instead. The syntax to create the DATA diskgroup using block device names resembles something like this:
1  create diskgroup PRDATA external redundancy
  2  disk
  3  '/dev/sdc1', '/dev/sdc2',
  4* '/dev/sdc3', '/dev/sdc4'
SQL> /

Diskgroup created.
Once the ASM diskgroup(s) are created, please make sure to modify the ASM_DISKGROUPS initialization parameter so that the diskgroup will automount when the ASM instance is started.
A diskgroup is a logical collection of disks and is equivalent to the LVM's volume group. An ASM's filesystem layer exists within the diskgroup. There are three kinds of ASM diskgroups: external redundancy (no redundancy at the ASM layer), normal redundancy (mirroring by ASM), and high redundancy (triple mirroring or twice mirroring by ASM). Normal and high redundancy requires additional disk space. Normal redundancy requires double the amount of raw disk space. The amount of usable space will equate to exactly half the allocated raw space. Similar logic applies to high redundancy. With high redundancy, you will have to provide triple the amount of raw disk space.
When you define a diskgroup and specify the keywords external redundancy, you are telling ASM that you are relying on your storage array to provide disk protection. All SAN arrays nowadays support the common protection levels that are widely used in the database community: RAID 1 (mirroring) and RAID 5 (parity-bit protection).
Normal and high redundancies require failure groups to be set up. Failure groups can be on the local SAN array or on a separate SAN array. Failure groups can also be on different SAN arrays too. For example, the primary diskgroup can be on an EMC Symmetrix, while the failure group can be on a Hitachi USP 1000. With Oracle Database 11g preferred read capability, the failure groups can also be located miles away at the remote site. Each site can read a local copy of the failure group instead of having to go across the WAN. This technology will greatly enhance what is known in the RAC community as stretch clusters. The syntax to create a diskgroup with normal redundancy is slightly different. The code example here uses the keywords normal redundancy and failgroup to specify additional mirrored disks:
1  create diskgroup nrdata
  2  normal redundancy
  3    failgroup fg1 disk
  4     'ORCL:NRDATA1A' name ndata1a,
  5     'ORCL:NRDATA1B' name ndata1b
  6    failgroup fg2 disk
  7     'ORCL:NRDATA2A' name nrdata2a,
  8*    'ORCL:NRDATA2B' name nrdata2b
SQL> /

Diskgroup created.
The majority of the ASM implementations can be managed by two diskgroups, one for data and the other for the flash recovery area (FRA). When different hard drive speeds or different-sized disks or LUNs are introduced, you will have to create additional diskgroups. You should never mix different-sized disks or a different speed of disks in the same diskgroup. When you have multiple RAID levels, you will have additional diskgroups. For example, you should not mix RAID 5 with RAID 1 or RAID 5 with RAID 1+0 in a single diskgroup. You should place all RAID 5 disks in their own diskgroup and all RAID 1+0 disks on their own diskgroup.
Having two diskgroups provides you with the level of protection you need. The controlfiles should be placed on both the DATA and FRA diskgroups. Online redo logs should also be multiplexed in the DATA and FRA diskgroups. The FRA diskgroup can be designated for archive logs, flashback logs, and backup area. The DATA diskgroup can house all the data and index datafiles. Since ASM provides even I/O distribution, you do not have to worry about placing the datafiles on a separate filesystem or diskgroup and placing the index datafiles on a separate filesystem or diskgroup.
Your monitoring scripts or Grid Control sends you an alert that the DATA diskgroup is about to run out of space. You need to add space to the DATA diskgroup.
Adding disk space to an existing diskgroup is straightforward using the alter diskgroup command, as shown here:
1  alter diskgroup fra
  2  add disk
  3  'ORCL:FRA3', 'ORCL:FRA4'
  4* rebalance power 11 wait
SQL> /

Diskgroup altered.
Executing the alter diskgroup command, you specify the new disks that you want to add to an existing diskgroup. The last line (line 4) becomes an important line if you are dealing with a very large database (VLDB). If you are adding large amount of disk space, we recommend you shut down the ASM instance and manually force the rebalance of extents using a power limit setting of 5 or greater. The power limit setting specifies the intensity of the disk extent rebalancing. The default setting for the power limit parameter is 1. The higher the power limit setting, the more CPU and I/O utilization will be noticed on your server. The last option, wait, specifies to ASM not to relinquish control back to the client until the rebalance activity is done. If you add multiple terabytes to an existing diskgroup, the rebalance activity can take up to half a day or more.
You realized that you created too many diskgroups. You want to drop the diskgroup called FRA2 because you already have a diskgroup designated as the flashback recovery area and want to reallocate the dropped disks to other diskgroups or to other ASM instances.
To drop an existing diskgroup, you simply execute the drop diskgroup command, as shown here, with the diskgroup name:
SQL> drop diskgroup fra2;

Diskgroup dropped.
You must satisfy two requirements to be able to connect to asmcmd in interactive mode. First, your ORACLE_SID must point to a valid ASM instance such as +ASM or +ASM# for RAC implementations. In a RAC environment, you will have one ASM instance per RAC node. The first RAC node will call the ASM instance +ASM1; the second ASM instance will be called +ASM2. Second, your ORACLE_HOME must point to an ORACLE_HOME that houses the asmcmd executable. To connect to the asmcmd command-line interface, you simply type asmcmd from the operating system. asmcmd has one special parameter, the -p parameter, which is equivalent to the PS1 environment variable in Linux.
Let's connect to the ASM instance using asmcmd. If not already, you should have the +ASM instance entry in the /etc/oratab file that looks something like this:
+ASM:/apps/oracle/product/11.1.0/ASM:Y
You can source the oraenv file and change your environment to the +ASM instance, as shown here:
$ . oraenv
ORACLE_SID = [DBATOOLS] ? +ASM
$
Now that your environment variables point to the +ASM instance, you can connect to the ASM instance using the asmcmd shell. Using the -p option, you will connect to the ASM instance:
$  asmcmd -p
ASMCMD [+] >
As the ASM administrator, you do not want to have to log in to SQL*Plus or have to log in to Grid Control to view ASM disk or diskgroup information. In addition, you want to maximize your usage of the ASM command shell, which is invoked through the asmcmd command.
Note
You can create an alias, asmcmd='asmcmd -p', so that every time you type asmcmd, the -p option will always be set.
You can display the online manual pages with the help command at the ASMCMD [+] > prompt. The output of the help command will list all the commands available for the asmcmd command-line interface, as shown here:
ASMCMD [+] > help
        asmcmd [-v] [-a <sysasm|sysdba>] [-p] [command]

        The environment variables ORACLE_HOME and ORACLE_SID determine the
        instance to which the program connects, and ASMCMD establishes a
        bequeath connection to it, in the same manner as a SQLPLUS / AS
        SYSDBA.  The user must be a member of the SYSDBA group.

        [...]

        Type "help [command]" to get help on a specific ASMCMD command.

        commands:
        --------
        help

        cd
        cp
        du
        find
        ls
        lsct
        lsdg
        mkalias
        mkdir
        pwd
        rm
        rmalias

        md_backup
        md_restore

        lsdsk
        remap
The help command without any other parameters will list all the commands available to the asmcmd utility. You can pass a parameter, the command you want help on, to the help command. For example, let's obtain some help on the rm command:
ASMCMD [+] > help rm
        rm [-rf] <name1 name2 . . .>

        If <nameN> is an empty directory, then rm removes it.  It is equivalent
        to ALTER DISKGROUP <dg_name> DROP DIRECTORY <name1, name2, . . .> in
        SQL.  Note that rm cannot remove system-created or non-empty
        directories.  Otherwise, rm treats <nameN> as files and deletes them,
        removing both system-created filenames and user-defined aliases.
        It is equivalent to ALTER DISKGROUP <dg_name> DROP FILE
        <name1, name2, . . .> in SQL.

        If using a wildcard, then rm deletes all matches with the exception
        of system-created directories and non-empty directories.

        If using the -r flag, then all entries under the specified <nameN> are
        deleted recursively.  Note that rm does not specifically issue the
        DROP DIRECTORY SQL command to drop system-created directories.  However,
        these are removed automatically by ASM once they are empty.

        If using the -r flag or wildcard matching, then rm prompts the user to
        confirm the deletion before proceeding, unless the user also specifies
        the -f flag.

        Warning!  Removing an user-defined alias removes the system-created
        filename as well, and vice versa.  This rule applies even when you
        use wildcard or the -r option!  The wildcard needs to match only one
        of the two, and both are deleted.  For -r, only one of the two needs
        to be under the directory to be deleted, and both are deleted.

        For instance, if you have an user-defined alias "+dg/dir1/file.alias"
        that points to "+dg/ORCL/DATAFILE/System.256.1", doing a
        "rm -r +dg1/dir1" will remove System.256.1 as well, even though it
is not technically under "+dg/dir1".The help command is similar to the man pages available in the Unix operating system. You can obtain help for just about every command available in the asmcmd command-line interface. The asmcmd command-line interface is similar to the Korn shell or Bourne Again shell (Bash). Lots of the commands that are available in the Unix shell are available in the asmcmd command-line interface. Although not complete in terms of providing a shell access, asmcmd does provide a substantial amount of interaction to the ASM filesystem. Table 12-1 lists the majority of the commands provided by asmcmd.
Table 12.1. ASM Commands
Command | Description |
|---|---|
| Changes the current directory to the specified directory. |
| Displays the total disk space occupied by ASM files in the specified ASM directory and all its subdirectories, recursively. |
| Lists the paths of all occurrences of the specified name (with wildcards) under the specified directory. |
| Lists the contents of an ASM directory, the attributes of the specified file, or the names and attributes of all diskgroups. |
| Lists information about current ASM clients. |
| Lists all diskgroups and their attributes. |
| Creates an alias for a system-generated file name. |
| Creates ASM directories. |
| Displays the path of the current ASM directory. |
| Deletes the specified ASM files or directories. The |
| Deletes the specified alias, retaining the file to which the alias points. |
| Lists disks visible to ASM. |
| Creates a metadata backup of all the mounted diskgroups. |
| Restores diskgroups from a backup. |
| Creates an alias for system-generated file names. |
| Repairs a range of physical blocks on a disk. |
| Copies files into and out of ASM:ASM diskgroup to OS filesystemOS filesystem to ASM diskgroupASM diskgroup to another ASM diskgroup on the same serverASM disk group to ASM diskgroup on a remote server |
You can remove database files or directories using the rm command. Here's an rm example to delete all the files associated with the DBADEV database:
ASMCMD> cd +data
ASMCMD> rm -rf DBADEV
ASMCMD> cd +fra
ASMCMD> rm -rf DBADEV
The rm command also accepts wildcards to delete files or directories. In the next example, you will see in action the rm command prompting a response from the administrator while deleting a file with a wildcard:
ASMCMD [+data/dbatools/datafile] > ls
TOOLS.270.655646559
docs_d_01.dbf
ASMCMD [+data/dbatools/datafile] > rm docs*
You may delete multiple files and/or directories.
Are you sure? (y/n) y
The rm command in asmcmd is similar to the rm command in the Unix operating system. You can specify the -f option to force delete files. Similarly to the Unix counterpart command, you can specify the -r option to remove subdirectories.
Note
The rm command is particularly important when you run out of space in the archivelog destination. You can cd to the archivelog destination and remove old or backed-up archivelogs from the ASM instance. Here's another way to delete all the archive logs for a specific day and for a specific thread from the operating system:
asmcmd rm +DATA/DBATOOLS/archivelog/2008_03_10/thread_1*
Another useful command in the asmcmd command-line interface is the du command. The du command will display the disk usage information for a specified directory. For example, if you want to know how much space is consumed for the DBATOOLS database in the +DATA diskgroup, you can view that information like this:
ASMCMD [+] > du +data/dbatools
Used_MB      Mirror_used_MB
    102                 102
You can specify the full path of the subdirectory with the du command to determine the sizes of the tempfile(s) for a database, the size of all the datafiles for a database, or the size of the controlfile(s) for a database. In the following examples, the du command checks the size of the tempfiles, datafiles, and controlfile in the +DATA diskgroup:
ASMCMD [+data/dbadev] > du +data/dbadev/tempfile
Used_MB      Mirror_used_MB
   4002                4002

ASMCMD [+data/dbadev] > du +data/dbadev/datafile
Used_MB      Mirror_used_MB
   6312                6312

ASMCMD [+data/dbadev] > du +data/dbadev/controlfile
Used_MB      Mirror_used_MB
24 24The du command reports the total space used for files in a specified directory. The default is the current directory. The command reports two values: the megabytes of used space and the megabytes of used space in a normal or high redundancy diskgroup. If you have implemented the external redundancy, the values from both of these columns will always be the same.
You want to search for files in a directory structure from the asmcmd command-line interface.
You can exploit the find command in the ASM command-line interface to search for files. The find command has the following pattern:
find [-t <type>] <dir> <pattern>
The -t option specifies the type of file and is queried from the TYPE column in the V$ASM_FILE view. You can also specify the starting directory for the find command to search from. The last option is the pattern for the find command to match on. You can use either the percent sign (%) or the asterisk (*) as a wildcard character. Let's take a look at the find command to locate all the files in the data diskgroup that have the file names sys somewhere in the file name:
ASMCMD [+] > find -t datafile +data *sys*
+data/DBADEV/DATAFILE/SYSAUX.257.655588275
+data/DBADEV/DATAFILE/SYSTEM.258.655588211
If you want to locate all the online redo logs in the +DATA diskgroups, you can use the -t option and specify onlinelog as the parameter with the * wildcard for the pattern, as shown here:
ASMCMD [+] > find -t onlinelog +data *
+data/DBADEV/ONLINELOG/group_1.264.655587995
+data/DBADEV/ONLINELOG/group_2.263.655588025
+data/DBADEV/ONLINELOG/group_3.262.655588055
+data/DBADEV/ONLINELOG/group_4.261.655588099
+data/DBADEV/ONLINELOG/group_5.260.655588129
+data/DBADEV/ONLINELOG/group_6.259.655588177
You can use the find command to locate all the files associated with a database for a given diskgroup. You can specify a subdirectory to the find command with a wildcard for the pattern, as you can see here:
find +data/DBADEV %
The find command is a powerful utility in the Unix arena and is also a powerful command in the asmcmd command-line interface. The find command in the asmcmd command-line interface does not have all the options you will find in Unix. The -t option for the find command allows you to search for types of files. To see all the types of files, you can query for distinct values from the TYPE column in the V$ASM_FILE view.
You can execute the lsct command in the ASM command interface to view all the database clients. In the example here, you can see that the DBATOOLS and DBADEV databases are connected to the ASM instance:
ASMCMD [+] > lsct -g
Instance_ID  DB_Name   Status     Software_Version  Compatible_version
  Instance_Name  Disk_Group
          1  DBADEV    CONNECTED        11.1.0.6.0          11.1.0.0.0  DBADEV
         DATA
          1  DBADEV    CONNECTED        11.1.0.6.0          11.1.0.0.0  DBADEV
         FRA
          1  DBATOOLS  CONNECTED        11.1.0.6.0          11.1.0.0.0  DBATOOLS
DATAYou want to view the diskgroup properties of an ASM instance from the asmcmd command-line interface.
The lsdg command will list all the diskgroup information from the V$ASM_DISKGROUP view. The -g parameter, available in Oracle Database 11g, will list the instance ID information, as shown here:
ASMCMD [+] > lsdg -g
Inst_ID  State    Type    Rebal  Sector  Block       AU  Total_MB  Free_MB
  Req_mir_free_MB  Usable_file_MB  Offline_disks  Name
      1  MOUNTED  EXTERN  N         512   4096  1048576     61056    48729
                0           48729              0  DATA/
      1  MOUNTED  EXTERN  N         512   4096  1048576     61056    59169
0 59169 0 FRA/The lsdg command lists all diskgroups and their attributes. The lsdg command can be an important ally when you are looking for space utilization information. The lsdg command also provides a Rebal column to inform the DBAs if a rebalance activity is taking place. The information produced from the lsdg command is extracted from the V$ASM_DISKGROUP_STAT or V$ASM_DISKGROUP view.
You want to view all the disk properties of an ASM instance from the asmcmd command-line interface.
Starting in Oracle Database 11g, you can utilize the lsdsk command to list the disks available for an ASM instance. Here's the output of the lsdsk command without any parameters:
ASMCMD [+] > lsdsk
Path
ORCL:DATA1
ORCL:DATA2
ORCL:DATA3
ORCL:DATA4
ORCL:FRA1
ORCL:FRA2
ORCL:FRA3
ORCL:FRA4
If you type lsdsk without any parameters, the output will display all the disks in the ASM instance. In the next example, you can specify a -d option to limit the output to a specific diskgroup:
ASMCMD [+] > lsdsk -d data
Path
ORCL:DATA1
ORCL:DATA2
ORCL:DATA3
ORCL:DATA4
The -k option displays the TOTAL_MB, NAME, FAILGROUP, and PATH column information from the V$ASM_DISK view in the output:
ASMCMD [+] > lsdsk -k
Total_MB  Free_MB  OS_MB  Name   Failgroup  Library
                  Label  UDID  Product  Redund   Path
   15264    12180  15264  DATA1  DATA1      ASM Library - Generic Linux, version
 2.0.2 (KABI_V2)  DATA1                 UNKNOWN  ORCL:DATA1
   15264    12184  15264  DATA2  DATA2      ASM Library - Generic Linux, version
 2.0.2 (KABI_V2)  DATA2                 UNKNOWN  ORCL:DATA2
   15264    12184  15264  DATA3  DATA3      ASM Library - Generic Linux, version
 2.0.2 (KABI_V2)  DATA3                 UNKNOWN  ORCL:DATA3
   15264    12181  15264  DATA4  DATA4      ASM Library - Generic Linux, version
 2.0.2 (KABI_V2)  DATA4                 UNKNOWN  ORCL:DATA4
   15264    14791  15264  FRA1   FRA1       ASM Library - Generic Linux, version
 2.0.2 (KABI_V2)  FRA1                  UNKNOWN  ORCL:FRA1
   15264    14795  15264  FRA2   FRA2       ASM Library - Generic Linux, version
 2.0.2 (KABI_V2)  FRA2                  UNKNOWN  ORCL:FRA2
   15264    14790  15264  FRA3   FRA3       ASM Library - Generic Linux, version
 2.0.2 (KABI_V2)  FRA3                  UNKNOWN  ORCL:FRA3
   15264    14793  15264  FRA4   FRA4       ASM Library - Generic Linux, version
 2.0.2 (KABI_V2)  FRA4                  UNKNOWN  ORCL:FRA4
The -t option provides important information in terms of when the disk was added to the diskgroup, when it was mounted, how long the repair timer is, and the path of the disk. Here's an output of the lsdsk command with the -t option:
ASMCMD [+] > lsdsk -t
Create_Date  Mount_Date  Repair_Timer  Path
24-MAY-08    25-MAY-08   0             ORCL:DATA1
24-MAY-08    25-MAY-08   0             ORCL:DATA2
24-MAY-08    25-MAY-08   0             ORCL:DATA3
24-MAY-08    25-MAY-08   0             ORCL:DATA4
24-MAY-08    25-MAY-08   0             ORCL:FRA1
24-MAY-08    25-MAY-08   0             ORCL:FRA2
24-MAY-08    25-MAY-08   0             ORCL:FRA3
24-MAY-08    25-MAY-08   0             ORCL:FRA4
You can take advantage of the -s option to view statistical information about each of the disks. You can view read time, write time, bytes read, and bytes written to at the disk level. You can correlate the output from the -s option to find busy disks. Here's an output of the lsdsk command with the -s option:
ASMCMD [+] > lsdsk -s
Reads  Write  Read_Errs  Write_Errs  Read_time  Write_Time  Bytes_Read
Bytes_Written  Path
 2790   1622          0           0     14.507       5.644    27713536
ORCL:DATA1
 2614    754          0           0     13.302       5.912    30078976
ORCL:DATA2
 3959   1694          0           0     10.938       8.385    51269632
ORCL:DATA3
 4539    869          0           0     12.748       6.782    64300544
ORCL:DATA4
  700   1015          0           0       .696       2.312     2864128
ORCL:FRA1
  688    347          0           0       .636       2.361     2814464
ORCL:FRA2
  702    336          0           0       .819       4.097     2871808
ORCL:FRA3
  692    263          0           0       .767       2.135     2823680
ORCL:FRA4
The lsdsk command lists all the visible disks for an ASM instance and is new to Oracle Database 11g. Valid options for lsdsk are as follows:
lsdsk [-ksptcgHI] [-d <diskgroup_name>] [pattern]
The pattern keyword restricts the output to only those disks that match the pattern. Wildcard characters and slashes (/ or ) can be part of the pattern.
Your company decided to standardize on ASM. Now, you want to migrate to ASM in as painless and safe a way as possible.
Two options are available to migrate from the filesystem to ASM. The first method, and the one we recommend, involves using RMAN and is applicable to Oracle Database 10g. Oracle Database 10g updated the copy command to be able to back up at the database level. Instead of copying files or tablespaces, you can back up the entire database using the backup as copy database syntax.
Note
The backup as copy command is available starting in Oracle Database 10g. For Oracle 9i, you can use the copy command to make image copies at the tablespace and datafile levels. The copy command has been deprecated as of Oracle Database 10g in favor of the new backup as copy command. The new backup as copy syntax allows the DBAs to make images copies at the database level.
You can specify the format to the location of the diskgroup while allocating a channel to the data disk group. The following code example demonstrates how to perform an image copy of the database to the DATA diskgroup:
RMAN> @backup_copy_asm.sql
RMAN> run
2> {
3> allocate channel d1 type disk format '+data';
4> backup as copy database;
5> release channel d1;
6> }
allocated channel: d1
channel d1: SID=154 device type=DISK

Starting backup at 12-MAY-08
channel d1: starting datafile copy
input datafile file number=00001 name=/data/oracle/DBATOOLS/system01.dbf
output file name=+DATA/dbatools/datafile/system.256.654520605
tag=TAG20080512T111635 RECID=2 STAMP=654520833
channel d1: datafile copy complete, elapsed time: 00:03:56
channel d1: starting datafile copy
[...]
input datafile file number=00004 name=/data/oracle/DBATOOLS/users01.dbf
output file name=+DATA/dbatools/datafile/users.261.654521041
tag=TAG20080512T111635 RECID=7 STAMP=654521042
channel d1: datafile copy complete, elapsed time: 00:00:01
Finished backup at 12-MAY-08

released channel: d1

RMAN>
RMAN> **end-of-file**
After the successful database backup, you must update the controlfile to point to the new location of the datafiles. The easiest way to update the controlfile is to use the switch command, as shown here:
RMAN> switch database to copy;
datafile 1 switched to datafile copy "+DATA/dbatools/datafile/system.256.654520605"
[..]
datafile 5 switched to datafile copy "+DATA/dbatools/datafile/example.258.654521005"
Although you successfully migrated the database files to ASM, your work is not complete yet. You still have controlfiles, temporary tablespaces, and online redo logs to migrate to ASM. Again, you have two options to migrate the controlfile to ASM:
Rebuilding the controlfile from trace
Restoring the controlfile using RMAN
Note
Using RMAN is the recommended approach to migrating the controlfiles to ASM. In this chapter, we will demonstrate how you can migrate controlfiles to ASM using RMAN.
To start the migration of controlfiles to ASM, you need to shut down the database and restart the instance in nomount mode. Once the database is up in nomount mode, you will perform the restore twice, once to the DATA diskgroup and the second time to the FRA diskgroup, as shown here:
RMAN> restore controlfile to '+data' from '/data/oracle/DBATOOLS/control01.ctl';
RMAN> restore controlfile to '+fra' from '/data/oracle/DBATOOLS/control01.ctl';
Starting restore at 12-MAY-08
using channel ORA_DISK_1

channel ORA_DISK_1: copied control file copy
Finished restore at 12-MAY-08
Restoring the controlfiles to the two alternate locations adheres to ASM best practices and provides additional redundancy.
Notice that the RMAN output does not include the location of the restored controlfiles. To locate the controlfiles, leverage the asmcmd command-line interface, execute the find command, and traverse through the +DATA and +FRA diskgroups to find the controlfile types using the -t option, as shown here:
ASMCMD> find -t controlfile + *
+DATA/DBATOOLS/CONTROLFILE/current.260.654527045
+FRA/DBATOOLS/CONTROLFILE/current.256.654527065
Note
The -t option specifies the type of file. The + sign indicates the command to start from the root directory. The + by itself is equivalent to doing a find /.
You located the controlfiles in ASM, so now you must modify either the init.ora file or the spfile file. Either way, the CONTROL_FILES initialization parameter must reflect the changes, as you see here:
control_files='+DATA/DBATOOLS/CONTROLFILE/current.260.654527045',
              '+FRA/DBATOOLS/CONTROLFILE/current.256.654527065'
Once you make the necessary change, you must bounce the database for the changes to take effect. Once the database is available, you can confirm the new location of the controlfiles:
SQL> show parameter control_file

NAME                              TYPE      VALUE
--------------------------------- --------- ------------------------------
control_file_record_keep_time     integer   7
control_files                     string    +DATA/dbatools/controlfile/cur
                                            rent.260.654527045, +FRA/dbato
                                            ols/controlfile/current.256.65
                                            4527065
The next task will be to move the temporary tablespace to ASM. The steps involved in moving the temp tablespace are relatively straightforward:
Create a staging temp tablespace (
temp2).Set the new database default to the staging temp directory (
temp2).Drop the original temp tablespace (
temp).Create the original temp tablespace in ASM (
temp).Set the new database default to
temp.Drop the staging
temptablespace.
You can use the following code example to migrate your temp tablespace from the operating system to ASM:
create temporary tablespace temp2 tempfile '+data' size 4g autoextend on;
alter database default temporary tablespace temp2;
drop tablespace temp;
create temporary tablespace temp tempfile '+data' size 4g autoextend on;
alter database default temporary tablespace temp;
drop tablespace temp2;
Last but not least, you must move the online redo logs to ASM. To move the online redo logs, you can add log file groups, as shown here:
1* alter database add logfile group 10 ('+data', '+fra') size 100m
SQL> /

Database altered.
Since you started with four redo groups, you need to create three more groups. You can repeat the alter database add logfile command three more times for group numbers 11, 12, and 13. Once the additional online redo logs are added, you can delete all the members that reside on the operating system filesystem. To find the group number to delete the online redo logs, you can query the V$LOGFILE dictionary view, as you see here:
1* select group#, member from v$logfile
SQL> /

    GROUP# MEMBER
---------- -------------------------------------------------------
        4 /data/oracle/DBATOOLS/redo04.log
        3 /data/oracle/DBATOOLS/redo03.log
        2 /data/oracle/DBATOOLS/redo02.log
        1 /data/oracle/DBATOOLS/redo01.log
       10 +DATA/dbatools/onlinelog/group_10.262.654528555
       10 +FRA/dbatools/onlinelog/group_10.257.654528555
       11 +DATA/dbatools/onlinelog/group_11.264.654528583
       11 +FRA/dbatools/onlinelog/group_11.258.654528583
       12 +DATA/dbatools/onlinelog/group_12.263.654528599
       12 +FRA/dbatools/onlinelog/group_12.259.654528599
       13 +DATA/dbatools/onlinelog/group_13.266.654528613
       13 +FRA/dbatools/onlinelog/group_13.260.654528623

12 rows selected.
Before you start dropping redo groups, switch through all the redo logs as displayed here:
alter system archive log current;
alter system switch logfile;

SQL> alter database drop logfile group 1;

Database altered.
Repeat the alter database drop logfile syntax for group numbers 2, 3, and 4. Now, everything is in ASM!
RMAN continues to be the proven method to move datafiles in and out of ASM as of Oracle Database 11g Release 1. Although you can use the DBMS_FILE_TRANSFER PL/SQL APIs to move datafiles to ASM from the operating system, the PL/SQL APIs do not compare to the performance of RMAN. Additional options to move the datafiles to ASM include the WebDAV ftp and http. You can move the datafiles using either FTP or HTTP, but a staging database with XMLDB enabled must be online and must own all the database-related files. The newest approach, the asmcmd copy command (cp), is available starting in Oracle Database 11g. We will discuss the new asmcmd cp approach in the next section.
An alternative approach to migration is to use the asmcmd command-line interface to copy files from your operating system's filesystem into ASM. Your target directory in ASM will be +data/dbatools/datafile. Before starting the copy to the +data/dbatools/datafile directory, create the subdirectories, since you have not placed any files there yet.
ASMCMD [+data] > mkdir dbatools
ASMCMD [+data] > cd dbatools
ASMCMD [+data/dbatools] > mkdir datafile
Next, you will copy the docs_d_01.dbf file to the DATA diskgroup after you put the docs_d tablespace offline. You will start by offlining the docs_d tablespace:
SQL> alter tablespace docs_d offline;

Tablespace altered.
Next, you will copy the docs_d_01.dbf file from the operating system to the +data diskgroup:
ASMCMD [+] > cp '/data/oracle/DBATOOLS/docs_d_01.dbf' '+data/dbatools/datafile'
source /data/oracle/DBATOOLS/docs_d_01.dbf
target +data/dbatools/datafile/docs_d_01.dbf
copying file(s)...
copying file(s)...
copying file(s)...
copying file(s)...
file, +DATA/dbatools/datafile/docs_d_01.dbf, copy committed.
Note
The DBMS_DISKGROUP package provides APIs to copy datafile(s) out of ASM. You can add the DBMS_DISKGROUP package to your arsenal to even manually extract a raw block from a datafile stored in the ASM diskgroup. The ASM cp command in Oracle Database 11g leverages the DBMS_DISKGROUP package.
The multiple lines of copying file(s)... output is a progress bar of the copy process. Once the datafile is copied, you must rename the datafile using the alter database rename file command, as shown here:
SQL> alter database rename file '/data/oracle/DBATOOLS/docs_d_01.dbf' to
     '+data/dbatools/datafile/docs_d_01.dbf';

Database altered.
In this last step, you will put the tablespace back online:
SQL> alter tablespace docs_d online;

Tablespace altered.
Since the system tablespace cannot be offlined, you can shut down the database and put the database in mount mode. While in mount mode, you can copy the system tablespace datafile(s) to an ASM diskgroup and rename the system datafile with the same syntax as what was provided to rename the docs_d_01.dbf datafile.
The cp command is a command that the DBA community has been waiting for since ASM was introduced in Oracle Database 10g Release 1. You can copy all the files that ASM supports: datafiles, online redo logs, archive logs, flashback logs, controlfiles, temporary files, tracking files, data pump exports, and spfile files. The caveat is that ASM will create an alias for the copied file. You can think of an alias as like a symbolic link in the Unix world. In the world of ASM, though, if you delete the alias, ASM will also delete the original file to which the alias is pointing.
In Oracle Database 11g Release 1, the copied file will belong to the ASMTESTING database identifier for the database subdirectory. You can see here that the docs_d_01.dbf datafile that was copied earlier is an alias to the TESTING file in the ASMTESTING/DATAFILE subdirectory:
ASMCMD [+DATA/DBATOOLS/DATAFILE] > ls -ltr
Type      Redund  Striped  Time             Sys  Name
DATAFILE  UNPROT  COARSE   MAY 28 10:00:00  Y    TOOLS.270.655646559
                                            N    docs_d_01.dbf =>
+DATA/ASMTESTING/DATAFILE/TESTING.271.655899281
Note
Notice the TESTING file name and ASMTESTING directory name for the database instance. The file and directory names are reported as a bug (Bug 5998102), which is supposed to be fixed in the 11.2 release. The next release should reflect the correct database instance instead of the ASMTESTING and file alias of TESTING.
If aliases for ASM copied files are acceptable, you can migrate from the filesystem to ASM using the asmcmd cp command. Additionally, you can use the cp command to copy files from ASM to the filesystem, from ASM to a remote ASM diskgroup, or from one diskgroup to another.
You need to create a database and place all its files within ASM. You want to create the database using the create database script.
In this solution, you will see how to create a database using custom scripts. Before you create the database, you need to perform some preliminary tasks. First, the initialization parameter file needs to be created. Second, the Optimal Flexible Architecture (OFA)-compliant directory structures must be created in advance on the filesystem that comply with the initialization parameters. Here's a comprehensive example of the create database script:
create database  DBADEV
user sys identified by oracle123
user system identified by oracle123
  maxdatafiles  1021
    maxinstances  4
    maxlogfiles   16
    character set WE8MSWIN1252
    national character set AL16UTF16
    datafile
        '+DATA'      size 1000M
        autoextend off extent management local
    sysaux datafile '+DATA' size 1000m
    default temporary tablespace temp
    tempfile '+DATA' size 4000m
    uniform size 1m
    undo tablespace undo_rbs
    datafile '+DATA' size 4000m
    logfile
        ('+DATA'
         ,'+FRA')         size 300M,
        ('+DATA'
         ,'+FRA')         size 300M,
         ('+DATA'
         ,'+FRA')         size 300M,
        ('+DATA'
,'+FRA') size 300M;When you create a database, you can place all the files in the DATA and FRA diskgroups. We recommend you multiplex your online redo logs to the DATA and FRA diskgroups. Even though you may already be mirroring at the hardware level, we recommend you multiplex your redo logs again. Also, we recommend you have at least one controlfile in each diskgroup for added protection.
The create database script in this solution places all the datafiles in the DATA diskgroup. The only components of the database at database creation time that is strategically placed in the FRA diskgroup are the mirrored redo logs and controlfiles. The file sizes for the SYSTEM, SYSAUX, TEMP, and UNDO tablespaces are sized for the larger databases.
After the database is created, you can run additional scripts such catalog.sql, catproc.sql, and catexp.sql from the $ORACLE_HOME/rdbms/admin directory. You may opt to execute additional scripts depending on your specific database requirements.
To create a tablespace, you can simply type the following command:
create tablespace [tablespace_name];
By default, Oracle will create a 100MB datafile in the DB_CREATE_FILE_DEST location since the datafile clause is not specified. To add 1GB of space to an existing tablespace, you can issue the following syntax:
alter tablespace [tablespace_name] add datafile '+data' size 1g;
The Oracle Managed File (OMF) feature was introduced in Oracle 9i. The primary purpose of OMF was to simplify the administration of Oracle database files. To use ASM intrinsically means you have to use OMF. All files will be managed by OMF even if you try to create a database file with a fully qualified name. The OMF concept can be a major challenge for DBAs who have religiously practiced OFA with fully qualified file names on the filesystems. If DBAs plan to implement ASM, they had better plan to accept OMF naming conventions.
Several initialization parameter influence how files are placed in the ASM diskgroup. The following initialization parameters are the key parameters that DBAs should be interested in relative to databases with ASM:
*.control_files='+DATA/visk/controlfile/control1.ctl',
                '+FRA/visk/controlfile/control2.ctl'
*.db_create_file_dest='+DATA'
*.db_create_online_log_dest_1='+DATA'
*.db_recovery_file_dest='+FRA'
*.log_archive_dest_1='LOCATION=USE_DB_RECOVERY_FILE_DEST'
*.log_file_name_convert='+DATA/VISKDR','+DATA/VISK'  ## added for Data Guard
The parameter db_create_file_dest='+DATA' specifies that all new datafiles will be created in the DATA diskgroup if the datafile clause is not specified. This parameter makes creating datafiles simple. If you want to specify a larger file, you can use the datafile clause to specify the location and size parameters. For example, if you want to create a 4GB datafile for the docs_i tablespace, here's how you would create the tablespace in the DATA diskgroup:
SQL> create tablespace docs_i datafile '+data' size 4g;
For DBAs who have to add an enormous amount of space to an existing tablespace, being on OMF really pays off. For example, say you have to add 200GB of a datafile for a given tablespace. And imagine that your company standard stipulates a maximum size of a database file to be 10GB. Based on the calculations, the DBA has to create twenty 10GB datafiles. With the db_create_file_dest parameter set to the DATA diskgroup, you merely have to issue the following command:
alter tablespace docs_i add datafile '+data' size 10g;
You can create the remaining 190GB of datafiles by typing the / command followed by the Enter key 19 times.
The parameter db_create_online_log_dest_1='+DATA' specifies that the online redo logs will be created in the DATA diskgroup if the location is not specified. Here's an example of creating the online redo group to the default ASM diskgroup:
SQL> alter database add logfile group 11;
The parameter *.db_recovery_file_dest='+FRA' will place flashback logs and backups to the FRA diskgroup. Last, the parameter *.log_archive_dest_1='LOCATION=USE_DB_RECOVERY_FILE_DEST' will place all the archive logs in the FRA diskgroup. We recommend you place the archive logs in the FRA diskgroup for additional redundancy. By placing the archive logs, flashback logs, and backup sets in the FRA, the database will have extra layer of protection just in case you happen to lose the DATA diskgroup. You will have everything you need in the FRA to restore and roll forward the database to the exact point in time before the database crash.
In the earlier example, we created a tablespace called doc_i and added a 10GB datafile. The datafiles that were created reside in the OMF-compliant +DATA/DBATOOLS/DATAFILE directory. Here's the naming convention to which the directory structure adheres:
+DATAis theDATAdiskgroup.DBATOOLSis the name of the database.DATAFILEis the type of file this file is.
Note
Other directories can be CHANGETRACKING, CONTROLFILE, ONLINELOG, TEMPFILE, FLASHBACK, PARAMETERFILE, AUTOBACKUP, BACKUPSET, and ARCHIVELOG.
Let's change the directory to the location of the datafiles. Listing all the files, the output looks like this:
ASMCMD [+DATA/DBATOOLS/DATAFILE] > ls -ltr
Type      Redund  Striped  Time             Sys  Name
DATAFILE  UNPROT  COARSE   MAY 28 10:00:00  Y    TOOLS.270.655646559
                                            N    docs_d_01.dbf =>
 +DATA/ASMTESTING/DATAFILE/TESTING.271.655899281
DATAFILE  UNPROT  COARSE   MAY 28 13:00:00  Y    DOCS_I.273.655912167
DATAFILE  UNPROT  COARSE   MAY 28 14:00:00  Y    DOCS_I.274.655913213
You will notice a strange naming convention for the files. Obviously, you can recognize the tablespace name embedded in the file names. The tablespace name portion of the file name is also referred to as the tag name of the datafile. Other tag names include group_# for online redo logs and log_# for flashback logs. Following the tag name, the first set of numbers correspond to the FILE_NUMBER column of the V$ASM_FILE view. The second set of numbers is known as the incarnation number and is a derivative of the timestamp when the file was created.
Archive logs follow a different naming convention. Archive logs are created in the date stamp subdirectory typically in the format of +FRA/[DB]/ARCHIVELOG/YYYY_MM_DD. Each day a new subdirectory is created following this format. The naming convention of the archive logs is the thread number followed by the sequence number followed by the file number followed by the incarnation number.
A sample listing of the archive log directory looks like this:
ASMCMD [+fra/dbadev/ARCHIVELOG/2008_05_28] > ls
thread_1_seq_4.263.655919409
thread_1_seq_5.264.655919415