An intricate part of every Oracle DBA's job involves dealing with files and directories. Therefore, database administrators must be experts with manipulating files. Your job requires skills such as implementing database security, performing backups and recovery, monitoring, and troubleshooting performance issues. These critical tasks are all dependent on a command-line knowledge of managing files. Expert DBAs must know how to administer files and navigate within the filesystem.
The basic building block of a Linux system is a file. A file is a container for information stored on disk. You access a file by its file name. We use the terms file and file name synonymously in this book. File names can be up to 256 characters long and can contain regular letters, numbers, and the ., _, and - characters.
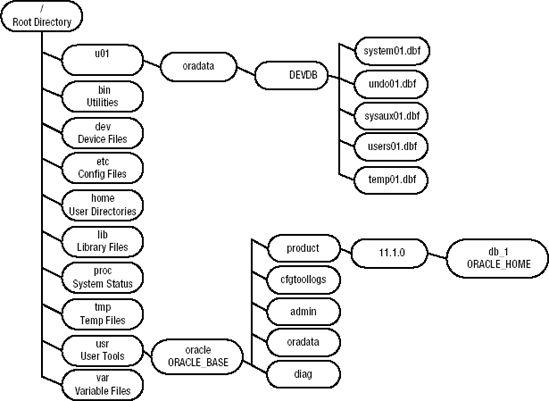
A directory is like a folder; its purpose is to provide a logical container that facilitates working with groups of files. Every Linux system has a root directory indicated by a forward slash (/); think of the forward slash as a tree falling forward from left to right. This is the topmost directory on every Linux server. The / directory is like an upside-down tree where the trunk is the root directory and the branches of the tree are subdirectories. Figure 5-1 shows some of the more common subdirectory structures used on a Linux database server.
Be aware that Figure 5-1 shows only a fraction of the directories typically created. The main point of the diagram is to give you an idea of the treelike directory structure that is used for a Linux database server. Because of the complexity of the directory structures, database administrators must be fluent with command-line directory navigation and file manipulation.
This chapter shows common problems and solutions you'll encounter when working with files and directories. It starts with the basics such as viewing directory structures and then progresses to more complicated topics such as finding certain types of files.
Use the pwd (print working directory) command to display the full path name of your current working directory:
$ pwd
/home/oracle
From the previous output, /home/oracle is the current working directory.
Note
If you're a Windows user, the Linux pwd command is similar to the DOS cd command when issued with no options. The DOS cd command without any options will simply print the current working directory.
In Linux, the directory you are working in is defined to be your current working directory. The pwd command isn't very complicated; it simply prints the current working directory. As simple as it is, you'll find yourself using it all the time. DBAs constantly use this command to verify that they are in the correct directory. Before you manipulate directories or files, it's wise to verify that you are where you think you should be.
The pwd command has two interesting options: -L and -P. The -L option prints the logical path and is the default. The -L option always prints the value of the operating system PWD variable. For example, the following two commands always display the same directory:
$ echo $PWD
/home/oracle
$ pwd
/home/oracle
The -P option prints the actual physical path. These options are useful if you're working on systems that have directories that have been navigated to via a symbolic link (see recipe 5-33 for a discussion on soft links). The -L option will print the directory name as defined by the symbolic link. The -P option will display the directory as defined by the actual physical path.
An example will help illustrate the value of knowing when to use the -P option. On a database server, we have a symbolic link defined to be oradev that exists under the root directory. Here is an example of the long listing of the symbolic link:
$ ls -altr /oradev
lrwxrwxrwx  1 root root 9 Apr 15 19:49  oradev -> /oradisk2
First you navigate to the directory via the symbolic link and issue a pwd command with the -L option:
$ cd /oradev
$ pwd -L
/oradev
Now without changing directories, you use the pwd command with the -P option:
$ pwd -P
/oradisk2
If you work in environments that use symbolic links, then it's important to understand the difference between the -L and -P options of the pwd command.
Use the cd (change directory) command to navigate within the filesystem. The basic syntax for this command is as follows:
cd <directory>
This example changes the current working directory to /oracle/product/10.2:
$ cd /oracle/product/10.2
It's usually a good idea to use the pwd command to verify that the cd command worked as expected:
$ pwd
/oracle/product/10.2
You can also navigate to a directory path that is stored in an operating system variable. The next set of commands displays the contents of the TNS_ADMIN variable and then navigates to that directory:
$ echo $TNS_ADMIN
/oracle/product/10.2/network/admin
$ cd $TNS_ADMIN
$ pwd
/oracle/product/10.2/network/admin
If you attempt to navigate to a directory doesn't exist, then you'll receive an error similar to this:
No such file or directory
Also, for any directories that you own, you must minimally have execute permission on the directory before you can navigate to it. For example, listed next are the permissions for a scripts directory that oracle owns:
$ ls -ld scripts
d---rwxrwx  2 oracle oinstall 4096 Jul 30 19:26 scripts
You receive this error when attempting to navigate to the scripts directory:
$ cd scripts
-bash: cd: scripts: Permission denied
If you modify the directory to include the owner execute permission, you can now navigate to it successfully:
$ chmod 100 scripts
$ cd scripts
The cd command is a powerful utility that you'll use often in your DBA life. The following sections contain techniques to make you more effective when using this command.
If you don't supply a directory to the cd command, then by default the directory will be changed to the value in the variable of HOME. The next example demonstrates this concept by viewing the current directory and then by displaying the value of HOME and using cd to navigate to that directory:
$ pwd
/oracle/product/10.2
Next, display the contents of the HOME variable:
$ echo $HOME
/home/oracle
Now change directories to the value contained in HOME by not supplying a directory name to the cd command:
$ cd
$ pwd
/home/oracle
In the Bash and Korn shells, the tilde (˜) character is a synonym for the value contained in the HOME operating system variable. The following two lines of code will also change your directory to the HOME directory:
$ cd ˜
$ cd $HOME
The .. (two periods) directory entry contains the value of the parent directory of the current working directory. If you want to change your directory to the parent directory, then use the following syntax:
$ cd ..
You can navigate up as many parent directories as there are in a given path by separating the .. strings with a forward slash character. For example, to navigate up three directories up, use this command syntax:
$ cd ../../..
You can also use the .. directory entry to navigate up a directory tree and then down to a different subdirectory. In the following example, the current working directory is /home/oracle/scripts, and the cd command is used to navigate to /home/oracle/bin:
$ pwd
/home/oracle/scripts
$ cd ../bin
$ pwd
/home/oracle/bin
To navigate to a subdirectory, specify the directory name without a forward slash in front of it. This example first prints the current working directory, then navigates to the admin subdirectory, and finally verifies success with the pwd command:
$ pwd
/home/oracle
$ cd admin
$ pwd
/home/oracle/admin
You can also use the wildcard asterisk (*) character with the cd command to navigate to other directories. In this next example, the current working directory is /oracle, and the product subdirectory is the target directory:
$ cd p*
$ pwd
/oracle/product
When navigating to a subdirectory, you must specify enough of the directory to make its name unique to any other subdirectories beneath the current working directory. If multiple directories match a wildcard string, depending on your version of Linux, you may or may not get the desired directory navigation. Always verify your current working directory with the pwd command.
You can also use the Tab key to complete keystroke sequences. For example, if you have only one subdirectory that starts with the letter p, you can cd to it as follows:
$ cd p<Tab>
In this example, there is only one subdirectory beneath the current working directory that starts with a p, so you now see the following on the terminal:
$ cd product/
Now you can press the Enter or Return key to complete the command. This is a feature of the Bash shell and is known as tab completion (see recipe 2-2 for more details).
The hyphen (-) character is commonly used to navigate to the previous working directory. In the next example, the current working directory is /oracle01, and the previous working directory is /oracle02. To navigate to /oracle02, provide - to the cd command, as shown here:
$ cd -
The OLDPWD variable contains the location of the previous directory. To navigate to the most recently visited directory, you can change directories, as shown here:
$ cd $OLDPWD
You desire to store your SQL scripts in a special directory. To do this, you first need to create a directory.
Use the mkdir (make directory) command to create a new directory. This example creates the directory named scripts underneath the /home/oracle directory:
$ cd /home/oracle
$ mkdir scripts
Now use the cd and pwd commands to verify that the directory exists:
$ cd scripts
$ pwd
/home/oracle/scripts
When navigating to another directory, if the directory doesn't exist, then you'll receive an error message similar to this:
No such file or directory
Before you create a directory, you must have write permission on the parent directory in order to create a subdirectory. If you attempt to create a directory and don't have write permission on either the user or group level, you'll receive an error. This example attempts to create a directory named oradump under the / directory:
$ mkdir /oradump
mkdir: cannot create directory `/oradump': Permission denied
The permissions on the / directory show that only the root user has write permissions (and is therefore the only user who can create a directory under /):
$ ls -altrd /
drwxr-xr-x  29 root root 4096 Apr 15 19:49 /
If you don't have root access, then you'll need to work with your system administrator to create any desired directories under the / directory. See recipe 3-11 for examples of obtaining access to root privileges.
Sometimes you'll find it convenient to create several directories in a path with one command. This example uses the -p (parent) option to create the directory backups and any parent directories that don't already exist in the path:
$ mkdir -p /oradump/db/dev/backups
The previous directory creation technique is extremely handy when you need to create long complex directory structures and you don't want to create them one directory at a time.
Use the ls -l command in combination with grep to list only directories. The following example lists directories beneath the current working directory:
$ ls -l | grep '^d'
The previous command instructs ls to print a long listing of files and then pipe the output to grep, which looks for files that begin with the d character. The caret (^) character is a regular expression that tells the grep command to match the d character at the beginning of the string.
DBAs will typically create an alias or a function to facilitate typing the command shown in the "Solution" section of this recipe. This command creates an alias named lsd that can be used to list directories:
$ alias lsd="ls -l | grep '^d'"
After the alias is created, you simply type lsd, and it will run the ls and grep commands. See recipe 2-7 for details on creating aliases and functions.
Another way to view directories is to use ls -p and grep for the forward slash character. The next example uses ls -p, which instructs Linux to append a / on the end of every directory. The output of ls -p is piped to grep, which searches for the / character:
$ ls -p | grep /
Sometimes when trying to locate a directory, it's convenient to use a wildcard character. For example, say you want to determine all directories and files that are in the ORACLE_HOME directory that begin with the b character. To determine this, you attempt to issue this command:
$ ls $ORACLE_HOME/b*
The output of this command may not be what you expect. If a wildcard matches a directory name, the entire contents of the directory (not the directory name) will be listed. In this example, the output contains all the files listed in the ORACLE_HOME/bin directory; here's a short snippet of the output:
adapters                emutil          lxegen           oraxml
agentok.sh              emwd            lxinst           oraxsl
agtctl                  emwd.pl         makerootca.sh    osdbagrp
To avoid this behavior, use ls -d to list directories and not their contents. The following command lists all directories that begin with the letter b that are beneath ORACLE_HOME:
$ ls -d $ORACLE_HOME/b*
/oracle/product/11.0/bin
Use the rmdir command to remove a directory. This command can be used only to remove directories that don't contain other files. In this example, the rmdir command is used to remove a directory named scripts that exists beneath the current working directory:
$ rmdir scripts
If the directory isn't empty, you'll see an error similar to this:
rmdir: scripts: Directory not empty
If you want to remove directories that contain files, then use the rm -r (remove recursively) command. In practice, the rm -r command is used much more than the rmdir command. The following example removes the directory scripts plus any files and subdirectories that exist beneath the scripts directory:
$ rm -r scripts
If the rm -r command encounters any files that don't have write permission enabled, a message like this will be displayed:
rm: remove write-protected regular file '<file name>'?
If you want to remove the file, type y (for yes). If many files are write-protected (such as in oracle-owned directories), then typing y over and over again can get tedious.
You can instruct rm to remove write-protected files without being prompted with the -f (force) option. This example removes all files beneath the subdirectory scripts without prompting for protected files:
$ rm -rf scripts
Sometimes when you're removing old database installations, it's convenient to use the rm -rf command. This will wipe out entire directory trees without asking for confirmation when deleting write-protected files. Make sure you know exactly what you're removing before running this command.
Warning
Use the rm -rf command judiciously. This command will recursively remove every file and directory beneath the specified directory without prompting you for confirmation.
Use the ls (list) command to list the files (and directories) in a specified directory. This next line of code uses the ls command without any options to list the files in the current working directory:
$ ls
Here is a partial listing of the output:
alert.log        gcc-3.4.6-3.1.x86_64.rpm  ora01     ss.bsh
anaconda-ks.cfg  install.log               ora02     test
The ls command without any options is not very useful and will display only a limited amount of file information. One of the more useful ways to use ls is to list all the files, protections, ownership, sizes, and modification times, all sorted from most recently created to last. This is achieved with the -altr options:
$ ls -altr
Here is a partial listing of the output:
-rwxr-x---   1 oracle oinstall   92 Oct 17  2007 dbaFunk.bash
-rw-r--r--   1 oracle oinstall  142 Jan  1 18:43 kill.sql
-rw-r--r--   1 oracle oinstall   22 Mar 16 15:54 freesp.sql
drwx------  20 oracle oinstall 4096 May  3 10:43 ..
drwxr-xr-x   2 oracle oinstall 4096 May  3 11:02 log
lrwxrwxrwx   1 oracle oinstall   22 May  3 11:10 oraset -> /var/opt/oracle/oraset
drwxr-xr-x   3 oracle oinstall 4096 May  3 11:10 .
The -a (all) option specifies that all files should be listed, including hidden files. The -l (long listing) option displays permissions, ownership, size, and modification time. The -t (time) option will cause the output to be sorted by time (newest first). To have the latest file modified listed at the bottom, use the -r (reverse) option. Table 5-1 shows how to interpret the long listing of the first line of the previous output.
Table 5.1. Interpreting Long Listing Output
Type and Permissions | Number of Links | Owner | Group | Size in Bytes | Modification Date | File Name |
|---|---|---|---|---|---|---|
| 1 |
|
| 92 | Oct 17 2007 |
|
The first column of Table 5-1 has ten characters. The first character displays the file type. Characters 2 through 10 display the file permissions. The characters r, w, and x indicate read, write, and execute privileges, respectively. A hyphen (-) indicates the absence of a privilege. The following output summarizes the first-column character positions and meanings of the long listing of a file:
File Type           User Perms   Group Perms   Other Perms
Column 1            2   3   4    5   6   7     8   9   10
-, d, l, s, c, b    r   w   x    r   w   x     r   w   x
In the first character of the first column of output, the hyphen indicates that it is a regular file. Similarly, if the first character is a d, then it's a directory. If the first character is an l, then it's a symbolic link. Table 5-2 lists the different file types on Linux systems.
Table 5.2. Long Listing First Character File Type Meanings
File Type Character | Meaning |
|---|---|
| Regular file |
| Directory |
| Symbolic link |
| Socket |
| Character device file |
| Block device file |
The ls command may vary slightly between versions of Linux. This command typically has more than 50 different options. Use the man ls command to view all features available on your system.
You're setting up Oracle RMAN backups. You want to quickly create a file so that you can test whether the oracle user has the correct permissions to write to a newly created directory.
Use the touch command to quickly create a file. This example uses touch to create a file named test.txt:
$ touch test.txt
Now use the ls command to verify that the file exists:
$ ls -al
-rw-r--r--  1 oracle oinstall 0 Dec 28 15:15 test.txt
From the output, the file is created and has nothing in it (indicated by a 0-byte size).
Note
See Chapter 4 for details on how to edit a text file.
Sometimes you'll find yourself in a situation where you just need to create a file to test being able to write to a backup location or check the functionality of some aspect of a shell program. You can use the touch command for this purpose. If the file you are touching already exists, then the touch command will update the file's last-modified date.
If you touch a file that already exists, then its access time and modification time will be set to the current system time (this includes a date component). If you want to modify only the access time, use the -a option of touch. Similarly, the -m option will update only the modification time. Use the --help option to display all options available with touch on your version of Linux.
There are many techniques for quickly creating a file. For example, you can also quickly create a file using the following cat command:
$ cat /dev/null> test.txt
Be careful when running the previous command; if the file already exists, concatenating /dev/null to a file will erase anything contained within the file.
Use the chmod command to alter a file's permissions. This example changes the permission of the scrub.bash file to 750:
$ chmod 750 scrub.bash
A quick check with the ls command shows that the permissions are set correctly:
$ ls -altr scrub.bash
-rwxr-x---  1 oracle oinstall 0 May  3 10:43 scrub.bash
The previous output indicates that the owner has read, write, and execute permissions; the group has read and execute; and the rest of the world has no permissions (see recipe 5-6 for a discussion on file permissions listed by the ls command).
Note
You must have root access or be the owner of the file or directory before you can change its permissions.
DBAs often use the chmod command to change the permissions of files and directories. It's important that you know how to fluently use this command. Correct file access is critical for database security. In many circumstances, you will not want to grant any public access to files that contain passwords or other sensitive information.
You can change a file's permissions either using the numerical format (like 750) or using letters. When using the numerical format, the first number maps to the owner, the second number to the group, and the third number to all other users on the system. The permissions of 750 are translated to indicate read, write, and execute for the owner; read and execute for the group; and no permissions for other users. Inspect Table 5-3 for the translations of the numeric permissions.
Table 5.3. Meanings of Numeric Permissions
Numerical Digit | Permissions | Octal Number | Letter Format |
|---|---|---|---|
0 | No permissions | 000 |
|
1 | Execute only | 001 |
|
2 | Write only | 010 |
|
3 | Write and execute | 011 |
|
4 | Read-only | 100 |
|
5 | Read and execute | 101 |
|
6 | Read and write | 110 |
|
7 | Read, write, and execute | 111 |
|
You can also change a file's permissions by using letters. Sometimes this is more intuitive to new Linux users. When using letters, keep in mind that the o permission doesn't designate "owner"; rather, it specifies "other." Table 5-4 lists the meanings of to whom the permissions are applied.
Table 5.4. To Whom the Permissions Are Applied
Who Letter | Meaning |
|---|---|
| User (owner) |
| Group |
| Other (all others on the system) |
| All (user, group, and other) |
This next example makes the file executable by the user (owner), group, and other:
$ chmod ugo+x mvcheck.bsh
The next line of code takes away write and execute permissions from the group (g) and all others (o) for all files that end with the extension of .bsh:
$ chmod go-wx *.bsh
You can use three operands to apply permissions: +, -, and =. The plus (+) character adds permissions, and the minus (-) character takes away privileges. The equal (=) sign operand assigns the specified permissions and removes any not listed. For example, the following two lines are equivalent:
$ chmod 760 mvcheck.bsh
$ chmod u=rwx,g=rw,o= mvcheck.bsh
A quick listing of the file verifies the permissions are set as expected:
$ ls -altr mvcheck.bsh
-rwxrw----  1 oracle oinstall 0 May  8 07:58   mvcheck.bsh
You can also recursively change permissions of files in a directory and its subdirectories. Sometimes this is desired when installing software. The following bit of code recursively changes the permissions for all files in the current directory and any files in subdirectories to 711 (owner read, write, execute; group execute; other execute):
$ chmod -R 711 *.*
You can also use the chmod utility to change the permissions of files to match the settings on an existing file. This example changes all files ending with the extension of .bsh in the current directory to have the same permissions as the master.bsh file:
$ chmod --reference=master.bsh *.bsh
Default permissions are assigned to a file upon creation based on the umask setting. The file creation mask determines which permissions are excluded from a file. To view the current setting of your file creation mask, issue umask with no options:
$ umask
0022
You can also view the character version of the umask settings by using the -S option:
$ umask -S
u=rwx,g=rx,o=rx
When you create a regular text file, the permissions are set to the value of 0666 minus the umask setting. If the umask setting is 0022, then the permissions of the file are set to 0644, or -rw-r--r--.
Another concept related to the chmod command is the setuid permission (sometimes referred to as suid). Inspect the permissions of the oracle binary file:
$ cd $ORACLE_HOME/bin
$ ls -l oracle
-rwsr-s--x   1 oracle   dba      126812248 Jun 12 15:24 oracle
Notice that the owner and group executable setting is an s (and not an x). This indicates that the setuid permission bit has been set. This means that when somebody runs the program, they run it with the permissions of the owner of the file and not the permissions of the process running the file. This allows a user to run the oracle binary file as if it had the permissions of the oracle user. Therefore, server processes can execute the oracle binary file as if they were the owner (usually the oracle operating system user) to read and write to database files.
To set the setuid permission, you must specify a preceding fourth digit to the numeric permissions when changing file permissions with chmod. If you want to enable the setuid permission on both the user and group level, then use a preceding 6, as shown here:
$ chmod 6751 $ORACLE_HOME/bin/oracle
$ ls -l oracle
-rwsr-sr-x   1 oracle   dba      118965728 Jun 16  2006 oracle
If you want to enable the setuid permission only at the owner level, then use a preceding 4, as shown here:
$ chmod 4751 $ORACLE_HOME/bin/oracle
$ ls -l oracle
-rwsr-x--x   1 oracle   dba      118965728 Jun 16  2006 oracle
As a DBA, it's important to be aware of the setuid permission because depending on the release of Oracle, you may have to troubleshoot file permission issues. For example, see MetaLink Note 271598.1 for issues related to Enterprise Manager Grid Control and setuid dependences. Additionally, you can run into Oracle accessibility issues when there are non-oracle users on the same server as the database software. In these situations, it's important to understand how the setuid permission affects file access.
You need to change a file's file ownership and group membership so that it is owned by the oracle operating system user and its group is dba.
You need root privileges to change the owner of a file. Use the chown (change owner) command to change a file's owner and its group. This first example changes the owner on the /var/opt/oracle directory to oracle and its group to dba:
# chown oracle:dba /var/opt/oracle
The file listing now shows the directory owner is the oracle user and the group it belongs to is dba:
$ ls -altrd /var/opt/oracle
drwxr-xr-x  2 oracle dba 4096 Dec 28 10:31 /var/opt/oracle
If you want to change only the group permissions of a file, then use the chgrp command. You must be the file owner or have root privileges to change the group of a file. This example recursively changes (in the current directory and all subdirectories) the group to dba for all files with the extension of .sql:
$ chgrp -R dba *.sql
When setting up or maintaining database servers, sometimes it's required to change the ownership on a file or directory. The following lines show the chown syntax for changing various combinations of the owner and/or group:
chown user file
chown user:group file
chown :group file
If you have root access, then you can directly change file ownership yourself. If you don't have root privileges, sometimes system administrators will grant you access to commands that require the root privilege through the sudo utility (see recipe 3-11 for details).
You can also change the ownership or the group of a file based on the settings of an existing file. This next line of code recursively changes the ownership and group of all files in a directory tree based on the ownership and group of the current working directory:
$ chown -R --reference . *
You want to view the contents of a text file, but you don't want to open the file with an editor (like vi) because you are afraid you might accidentally modify the file.
Use either the view, less, or more command to only view (and not modify) a file's contents. The view command will open a file using either the vi or vim editor in read-only mode. When you open a file in read-only mode, you are prevented from saving the file with the vi editor :wq (write and then quit) command. The following example views the init_BRDSTN.ora file:
$ view init_BRDSTN.ora
The view command is the same as running the vi -R command or the vim -R command (see Chapter 4 for more details about vi). To exit the view utility, enter the command of :q. We should point out that when viewing a file, you can force a write when exiting with the :wq! command.
If you want to display the contents of a file one page at a time, then use a paging utility such as more or less. This example uses less to view the init_BRDSTN.ora file:
$ less init_BRDSTN.ora
The less utility will display a : (colon) prompt at the bottom-left corner of the screen. You can use the spacebar to go to the next page and the up and down arrows to scroll through the documentation line by line. Enter q to exit less.
This next example uses the more command to page through the file:
$ more init_BRDSTN.ora
Like the less utility, use the spacebar to display the next page and q to exit more.
The more and less utilities are referred to as pagers because they display information on the screen one page at a time. These utilities have similar features, and one could argue that they are . . . more or less the same. For the way that DBAs use these utilities, that's mostly true. For hardcore Linux users, the less utility is a bit more robust than more. Use the man less and man more commands to view all options available with these utilities.
When using either more or less, you can use vi commands to navigate within the displayed output. For example, if you want to search for a string, you can enter a forward slash and a string to search for text within the more or less output. This example searches for the string sga_max_size within the output of less:
$ less init_BRDSTN.ora
/sga_max_size
We should point out that you can also use the cat command to quickly display the contents of a file to your standard output (usually your screen). This example dumps the output of the init_BRDSTN.ora file to the screen:
$ cat init_BRDSTN.ora
Using cat to display the contents of files works fine when you have small files. However, if the file is large, then you'll just see a large amount of text streaming by too fast to make any sense. It's almost always better to use view, less, or more (rather than cat) to view a file's contents. These commands allow you to quickly inspect a file's contents without risking accidental modifications.
You're trying to load text strings from a file into the database with a utility such as SQL*Loader, but the data appears to be corrupted after it is inserted into the target table. You want to view any control characters that may be embedded into the file.
Use the cat -v command to view nonprinting and control characters. This example displays nonprinting and control characters in the data.ctl file:
$ cat -v data.ctl
Note
The cat -v command will not display linefeed or Tab characters.
Sometimes when dealing with data being loaded into the database from text files, you might find your SQL queries don't behave as expected. For example, you might search for a string, and yet the SQL query doesn't return the expected data. This might be because of nonprinting characters being inserted into the database. Use the cat -v command as described in this recipe to troubleshoot these kinds of data issues.
To illustrate the viewing of nonprinting characters, you spool the following output from a SQL*Plus session:
SQL> spool out.txt
SQL> select chr(7) || 'ring the bell' from dual;
SQL> exit;
Here you use cat to display the contents of the file out.txt:
$ cat out.txt

SQL> select chr(7) || 'ring the bell' from dual;
CHR(7)||'RINGT
--------------
ring the bell

SQL> exit;
Notice the ^G ASCII ring bell or beep control character in the last line of the output when you use the -v option:
$ cat -v out.txt

SQL>  select chr(7) || 'ring the bell' from dual;
CHR(7)||'RINGT
--------------
^Gring the bell

SQL> exit;
Viewing Hidden Files
You want to view the names of hidden configuration files and/or hidden directories in your home directory.
Use the ls command with the -a (all) option. This next bit of code lists all files using a long listing format and sorted in the reverse order in which they were modified:
$ ls -altr $HOME
Here is a sample of part of the output:
drwxr-xr-x  3 root   root     4096 Sep 29 13:30 ..
-rw-r--r--  1 oracle oinstall  124 Sep 29 13:30 .bashrc
-rw-r--r--  1 oracle oinstall   24 Sep 29 13:30 .bash_logout
-rw-r--r--  1 oracle oinstall  223 Sep 29 13:53 .bash_profile
drwxr-xr-x  2 oracle oinstall 4096 Oct  2 17:55 db
drwxr-xr-x  2 oracle oinstall 4096 Oct 15 08:33 scripts
drwx------  2 oracle oinstall 4096 Oct 15 08:34 .ssh
-rw-------  1 oracle oinstall 6076 Oct 15 13:19 .bash_history
-rw-------  1 oracle oinstall 5662 Oct 15 13:41 .viminfo
drwx------  5 oracle oinstall 4096 Oct 15 13:55 .
Any of the files in the previous listing that begin with a . (dot or period) are classified as hidden files. When using the Bash shell, common hidden files in your home directory are .bash_profile, .bashrc, .bash_logout, and .bash_history (see recipe 2-5 for uses of these files).
The only difference between a hidden file and a nonhidden file is that the hidden file begins with a . (dot or period) character. There isn't anything secretive or secure about hidden files. Hidden files are usually well-known files with distinct purposes (such as storing environment configuration commands).
You may not want to muddle the output of an ls command with every file in a directory. The default behavior of the ls command is not to list hidden files. The -a option specifically tells the ls command to list all files, including hidden files. If you want to list all files except the . and .. files, then use the -A option:
$ ls -A
Note
The . file is a special file that refers to the current working directory. The .. file refers to the parent directory of the current working directory.
Use the ls command with the -F option to display the file name and file type. This example lists file names and file types within the current working directory:
$ ls -F
Here is a partial listing of some sample output:
alert.log        gcc-3.4.6-3.1.x86_64.rpm  ora01/     ss.bsh*
anaconda-ks.cfg  install.log               ora02/     test/
The ls -F command will append to the file name a special character to indicate the file type. In the previous output, the file names appended with / are directories, and the file name appended with * is an executable file.
Tip
Another method of determining file type is to use the ls --color command. This will colorize the file depending on its type.
You can also use the file command to display characteristics of a file. This command will display whether the file is an ASCII file, a tar file, or a details executable file. For example, one way that DBAs use the type command is to tell whether the oracle binary file is 32-bit or 64-bit. The following shows that the oracle binary file on this Linux server is 32-bit:
$ file $ORACLE_HOME/bin/oracle
/oracle/product/10.2/bin/oracle: setuid setgid ELF 32-bit LSB executable, Intel
80386, version 1 (SYSV), for GNU/Linux 2.2.5, dynamically linked (uses shared libs),
not stripped
You can display an indicator for a file by using the -F option of the ls command. Table 5-5 describes the different file name type indicators. File type indicators allow you to filter the output and look for a certain file type. For example, to list all directories, search the output of the ls -F command for the / character:
$ ls -F | grep /
DBAs often encapsulate strings of commands like this within aliases or functions. This allows you to create shortcuts to long commands (see recipe 2-7 for details).
Table 5.5. File Type Indicator Characters and Meanings
Indicator Character | Description |
|---|---|
/ | The file is a directory. |
* | The file is an executable. |
= | The file is a socket (a special file used in process to process communication). |
@ | The file is a symbolic link (see recipe 5-33 for more details). |
| | The file is a named pipe (a special file used in process to process communication). |
Tip
Use the type command to determine the characteristics of a Linux command file. This will show whether the command is a Linux utility, a built-in command, an alias, or a function.
The stat command is another useful command for displaying file characteristics. This command prints in human-readable format the contents of an inode. An inode (pronounced "eye-node") is a Linux data structure that stores information about the file. The next example displays the inode information for the oracle binary file:
$ stat $ORACLE_HOME/bin/oracle
Here is the corresponding output:
File: `/oracle/product/10.2/bin/oracle'
  Size: 93300099        Blocks: 182424     IO Block: 4096   regular file
Device: 802h/2050d      Inode: 23281668    Links: 1
Access: (6751/-rwsr-s--x)  Uid: (  500/  oracle)   Gid: (  500/oinstall)
Access: 2008-05-03 12:01:06.000000000 −0600
Modify: 2007-10-02 17:36:16.000000000 −0600
Change: 2007-10-02 17:52:21.000000000 −0600
Some of the previous output you can obtain from the ls command. However, notice that the stat output also contains information such as the number of blocks allocated; the inode device type; and the last time a file was accessed, the last time a file was modified, or when its status was changed.
You have two databases that were supposed to be set up identically. You want to see any differences in the initialization files.
Use the diff (difference) command to identify differences in files. The general syntax for this command is as follows:
$ diff <file1> <file2>
This example uses diff to view the differences between two files named initDEV1.ora and initDEV2.ora:
$ diff initDEV1.ora initDEV2.ora
Here is some sample output showing the differences in the files:
6,7c6,7
< sga_max_size=400M
< sga_target=400M
---
> sga_max_size=600M
> sga_target=600M
20a21
> # star_transformation_enabled=true
The key to understanding the output from diff is that it is providing you with instructions on how to make file1 look like file2. The output tells you how to append, change, and delete lines. These instructions are signified by an a, c, or d in the output.
Lines preceded by < are from file1. Lines preceded by > are from file2. The line numbers to the left of an a, c, or d apply to file1. The line numbers to the right of an a, c, or d apply to file2.
From the previous output in this recipe's solution, the first line, 6,7c6,7, is translated to mean change lines 6 and 7 in file1 to lines 6 and 7 in file2. The The second to last line of the output is 20a21. That means after line 20 in file1, append line 21 from file2.
The output of diff is known as a difference report. This difference report can be used in conjunction with the patch command to make file1 look like file2. Before you can use the patch command, you first have to save the difference report output in a file. The following example stores the difference output in a file named init.diff:
$ diff initDEV1.ora initDEV2.ora > init.diff
To convert initDEV1.ora to initDEV2.ora, use the patch command with the difference report output:
$ patch initDEV1.ora init.diff
You can also use the sdiff (side-by-side) utility to display file differences. The sdiff output is usually easier to interpret than the diff command because differences are juxtaposed visually in the output. The following example uses sdiff to display the differences between two files:
$ sdiff initDEV1.ora initDEV2.ora
Here is a snippet of the side-by-side differences:
sga_max_size=400M               | sga_max_size=600M
sga_target=400M                 | sga_target=600M
                                >#star_transformation_enabled=true
Tip
Use the diff3 utility to compare the differences between three files.
You want to ensure that two different directories have identical contents in terms of the number of files, the file names, and the file contents.
You can use the diff command to display any differences in two directories in terms of file names and file contents. This example compares the files in the /ora01/upgrade directory with the files in the /cvsroot/prod_scripts directory:
$ diff /cvsroot/prod_scripts /ora01/upgrade
If there are no differences, then you won't see any output. If there's a file that exists in one directory but not the other directory, then you'll see a message similar to this:
Only in /ora01/upgrade: tab.sql
If there are differences in any files in each directory, then you'll see a message similar to this:
22c22
< # cd to udump
---
> # cd to udump directory.
See recipe 5-14 for details on interpreting the output of the diff utility.
Occasionally you may need to compare the contents of directories when maintaining database environments. In these situations, use the diff command to compare the contents of one directory with another.
If you want to recursively look in subdirectories and compare files with the same name, you can use the -r option. This example recursively searches through subdirectories and reports any differences in files that have the same name:
diff -r /cvsroot/prod_scripts /ora01/upgrade
You can also use the long listing of the recursive option to achieve the same result:
diff --recursive /cvsroot/prod_scripts /ora01/upgrade
Use the cp (copy) command to replicate a file. The following example uses the cp command to make a backup of the listener.ora file:
$ cp listener.ora listener.old.ora
You can verify that the copy worked with the ls command:
$ ls listener*.ora
listener.old.ora listener.ora
DBAs often need to create copies of files. For example, the cp utility provides a method to create backups of files or quickly replicate directories. The cp command has this basic syntax:
cp [options] source_file target_file
Be careful when copying files. If the target file exists prior to issuing the copy command, it will be overwritten with the contents of the source file. If you'd like to be warned before overwriting an existing file, then use the -i (interactive) option. In this example, there already exists a file named init.old.ora:
$ cp -i init.ora init.old.ora
cp: overwrite `init.old.ora'?
Now you can answer y or n (for yes or no, respectively) depending on whether you want the target file overwritten with the source. Many DBAs create a shortcut command for cp that maps to cp -i (see recipe 2-7 for details on how to create shortcuts). This helps prevent you from accidentally overwriting previously existing files.
You can also copy files directly into an existing directory structure using this syntax:
cp [options] source_file(s) directory
If the destination is a directory, the cp command will copy the file (or files) into the directory. The directory will not be overwritten. The next example copies all files in the current working directory with the extension .sql to the scripts directory:
$ cp *.sql scripts
When you copy a file, the original timestamp and file permissions may differ between the original file and the file newly created by the copy command. Sometimes it's desirable to preserve the original attributes of the source file. For example, you may want to make a copy of a file but for troubleshooting purposes want to still be able to view the original timestamp and ownership. If you want to preserve the original timestamp, ownership, and file permissions, use the -p (preserve) option:
$ cp -p listener.ora listener.old.ora
You can also use the cp utility to create the directory structure associated with the source file by using the – parents option. For this command to work, the destination must be a directory. This example creates a network/admin/log directory and copies any files ending with the extension of .ora to a directory beneath the destination ˜/backup directory:
$ cp --parents network/admin/*.ora ˜/backup
Any files with the extension of .ora in the source directory should now exist in the ˜/backup/network/admin destination directory.
Use the cp command with the -r option to recursively copy all files in a directory and subdirectories. This example copies all files in the /orahome/scripts directory tree to the /orahome/backups directory:
$ cp -r /orahome/scripts /orahome/backups
The /orahome/backups directory now should have an identical copy of the files and subdirectories in the /orahome/scripts source directory. Be aware that if the /orahome/backups directory already exists before you issue the cp command, it will be overwritten with the source of the copy. If you want to be prompted before you issue the cp command, use the -i (interactive) option.
Sometimes DBAs need to synchronize directories between disparate servers. You might need to do this if you are remotely installing software or if you just want to ensure you have a backup of files copied to a remote box.
You can accomplish this task in a couple of ways. If you need to securely copy files, use the scp (secure copy) command.
The basic syntax for scp is as follows:
scp [options] sourcefile[...] destinationfile
The source and destination files can be directories. The destination file in the prior syntax line can take one of the following general forms:
file
host:file
user@host:file
Use the -r and -p options of the scp command to recursively copy and preserve the file modification time, access time, and mode. This example recursively copies the scripts directory from the local box to a remote box named rmougdev2 as the oracle user:
$ scp -rp scripts oracle@rmougdev2:/home/oracle/scripts
If you just want to copy a file to a remote server and have it placed in the remote user's HOME directory, specify a . for the destination file location. To illustrate this concept, here we copy a file named initRMUG.ora to the remote rmougdev2 box and place the file in the oracle user's HOME directory.
$ scp initRMUG.ora oracle@rmougdev2:.
Another powerful utility used to synchronize directories is the rsync command. The basic syntax for rsync is as follows:
rsync [options] sourcefiles destinationfile
If the source and destination are on the same server, then ordinary file and directory names can be used. If the source and destination files are on remote servers, then they take the following general form:
user@host:port/filename
The rsync utility has an extensive set of options for copying directory trees. Use the -r and -a options to recursively copy a directory tree and preserve permissions and ownership. This example recursively copies the contents of the contents of the local scripts directory to the remote rmougdev2 server:
$ rsync -ra --progress scripts rmougdev2:/home/oracle/scripts
The --progress option will interactively show the work that the rsync command is performing. By default, the rsync tool will transfer only the differences that it finds between the source and destination. This makes it a very fast and efficient method to synchronize a local directory tree with a remote server directory.
Use the mv (move) command to relocate a file or rename it. This example renames a file from initdw.ora to a new name of initDWDB.ora:
$ mv initdw.ora initDWDB.ora
You can also use the mv command to relocate a file to a different directory. This next bit of code moves a file from the current working directory to its parent directory:
$ mv scrub.sql ..
Quite often you'll encounter the need to move a file from the current working directory to a subdirectory. This example moves a file from the current working directory to a subdirectory named scripts:
$ mv scrub.sql scripts
In the previous line of code, if the scripts subdirectory didn't exist, then you would end up renaming the scrub.sql file to a file named scripts. In other words, the destination subdirectory must exist before you issue the mv command (otherwise you'll end up renaming the file).
It's also possible to relocate directories. The following example moves the scripts directory to the sqlscripts directory:
$ mv scripts sqlscripts
In the previous line of code, if the sqlscripts directory already exists, then the scripts directory is created as a subdirectory beneath the sqlscripts directory. This might seem a little confusing if you're not expecting this behavior. One way to think of this is that the mv command does not overwrite directories if they already exist.
The mv command is used to relocate or rename a file or a directory. The mv utility uses the following syntax:
mv [options] source(s) target
Be aware that the mv command will unceremoniously overwrite a file if it already exists. For example, say you have the following two files in a directory:
$ ls
initdw.ora init.ora
If you move initdw.ora to the name of init.ora, it will overwrite the contents of the init.ora file without prompting you. To protect yourself against accidentally overwriting files, use the -i (interactive) option:
$ mv -i initdw.ora init.ora
mv: overwrite `init.ora'?
You can now enter a y or a n to indicate a yes or no answer, respectively. You can easily implement the mv command as mv -i via a function or an alias to protect yourself against erroneously overwriting files (see recipe 2-7 for details on command shortcuts). Table 5-6 describes the various results of the mv operation depending on the status of the source and target.
Table 5.6. Results of Moving File(s) and Directories
Source | Target | Outcome |
|---|---|---|
File | File doesn't exist. | Source file is renamed to target. |
File | File exists. | Source file overwrites target. |
File(s) | Directory exists. | Source file(s) moved to target directory. |
Directory | Directory doesn't exist. | Source directory renamed to target. |
Directory | Directory exists. | Source directory created as a subdirectory beneath target directory. |
In Linux, you have to use the mv (move) command to rename a file. For example, the following line of code renames a file from credb1.sql to credatabase.sql:
$ mv credb1.sql credatabase.sql
You can also rename a directory. The following renames a directory from dev to test:
$ mv dev test
Be aware that when renaming directories, if you attempt to rename a directory to the name of an existing directory, a new directory will be created as a subdirectory beneath the already existing directory. See Table 5-6 for details on the behavior of the mv command.
Linux also has a rename command that can be used to change the name of files. The rename utility has the following syntax:
rename oldname newname files
This has a big advantage over the mv command in that it allows you to rename several files at once. For example, here is how you would rename all files in a directory that end with the extension of .trc to the new extension of .trace:
$ rename .trc .trace *.trc
You can also use rename to change the name of just one file. Here we rename the file initDEV.ora to initTEST.ora:
$ rename initDEV.ora initTEST.ora initDEV.ora
We recommend that you compare the uses of rename command described in this recipe to the application of the mv utility described in recipe 5-18.
First use the ls command to identify the files you want to remove. In this example, we display any files with the extension of .trc:
$ ls -altr *.trc
After visually verifying the files you want to remove, then use the rm command to permanently delete files:
$ rm *.trc
Be very careful using the rm command. Once the files have been removed, the only way to get them back is from a backup (if there is one). DBAs can get themselves in a lot of trouble by accidentally removing files. DBAs typically are logged on to a server as the oracle operating system user. This special user is usually the owner of all the critical database files. This means this user can remove database files, even if they are currently in use.
Because the rm command doesn't prompt you for confirmation, we recommend you always use the ls command to verify which files will be removed.
If you want confirmation before removing a file, use the -i option:
$ rm -i *.trc
You will now be prompted for confirmation before each file is deleted:
rm: remove regular file `rmdb1_j001_11186.trc'?
Type y to have the file removed or n if you want to keep the file. This method takes longer but provides you with some reassurance that you're deleting the correct files.
Another technique for preventing the accidental deletion of the wrong files is to use the !$ variable. The !$ character contains the last string entered on the command line. For example, to use !$ to remove files, first use the ls command to list the files targeted for deletion:
$ ls *.trc
Now the value *.trc is stored in the !$ parameter. This allows you to use rm to remove the files listed by the previous ls command:
$ rm !$
If you're ever unsure of the contents of the !$ variable, use the echo command to display its contents:
$ echo !$
You want to remove all the files associated with an old installation of the database. However, when you issue the rm (remove) command, you are presented with this prompt:
rm: remove write-protected regular empty file
You wonder whether you can run the rm command without being prompted.
There are two techniques for removing write-protected files: rm -f and yes. This next example uses rm -rf (remove, recursive, force) to recursively remove all files beneath a directory without being prompted:
$ rm -rf /oracle/product/8.0
The next example uses the yes command to recursively remove all files beneath a directory without being prompted:
$ yes | rm -r /oracle/product/8.0
If you type the yes command without any options, the subsequent output will be a repeating y on your screen until you press Ctrl+C. You can pipe the output of the yes command to another command that is expecting a y or n as input for it to proceed.
Be very careful when using the removal methods described in the "Solution" section of this recipe. These techniques allow you to easily remove entire directories and subdirectories with one command. Use these techniques only when you're absolutely sure you don't need a directory's contents. Consider using tar or cpio to recursively back up a directory tree before you delete it (see Chapter 6 for details)
Somehow a file was created with the odd name of -f and apparently cannot be removed with the rm (remove) command. You wonder how you can remove it using the rm command.
First use the ls command to view the oddly named file:
$ ls
-f
You next attempt to remove the file with the rm command:
$ rm -f
However, the rm command thinks -f is an argument to the command and does nothing with the -f file. To remove the file, specify the current path with the file name, as shown here:
rm ./-f
Files with odd names are sometimes created by accident. Sometimes you can type a command with the wrong syntax and end up with a file with an undesirable name. For example, the following will create a file name of -f:
$ ls > "-f"
Now when you list the contents of the directory, you'll see a file named -f:
$ ls
-f
Worse yet, you might have a malicious user on your system who creates a file like this:
$ ls > "-r home"
Be extremely careful in this situation. If you attempt to remove the file without specifying a path, the command will look like this:
$ rm -r home
If you happen to have a directory named home in the current directory, then that command will remove the home directory. To remove the file, use the current path ./, as shown here:
$ rm "./-r home"
In the previous command, you need to enclose the path and file name in quotes because there is a space in the file name. Without quotes, the rm command will attempt to remove a file named ./-r and another file named home.
Use the find command to search for a file. The most basic way to search for a file is to instruct find to look for a file recursively in the current working directory and any of its subdirectories. The following command looks in the current directory and any subdirectories for any file that begins with the string alert and ends with the extension of .log:
$ find . -name "alert*.log"
Here's some sample output indicating the location of the found file relative to the current working directory:
./RMDB1/admin/bdump/alert_RMDB1.log
It's well worth the effort to spend some time getting to know the find command. This command will allow you to easily search for files from the command line. Because this utility is used in so many different ways, we decided to include individual recipes to document these tasks. The next several recipes of this chapter show examples of how DBAs use the find command.
If your operating system account doesn't have correct access permissions on a directory or file, then find will display an error message. This example changes directories to the / directory and issues a find command:
$ cd /
$ find . -name "alert*.log"
Here is a partial listing of output indicating that there is not access to certain directories:
find: ./proc/11686/task/11686/fd: Permission denied
find: ./proc/11688/task/11688/fd: Permission denied
find: ./proc/15638/task/15638/fd: Permission denied
To eliminate those error messages, send the error output to the null device:
$ find . -name "alert*.log" 2>/dev/null
You want to search for a string in a text file that could be located somewhere beneath a given directory path.
Use a combination of the find, xargs, exec, and grep commands to search for a string that exists in a file in a directory tree. The first example uses find to locate all SQL files beneath a directory and pipes the output to xargs, which executes the grep command to search for a string of create table:
$ find . -name "*.sql" | xargs grep -i "create table"
You can also use the find command with exec, grep, and print to search for strings within files. The following command searches for the string error in any files ending with the extension of .trc. This command will search the current working directory and all its subdirectories:
$ find . -name "*.trc" -exec grep -i "error" '{}' ; -printIn the previous line of code, the find command finds all files in a directory tree with the extension of *.trc. The output is passed to the -exec '{}' command, which feeds each file found to the grep -i command. The ; marks the end of the -exec command, and -print displays any files found.
The example in the "Solution" section of this recipe will display a line for every string that it finds that matches in the file. If you want to display only the first occurrence of the string in the file, then use the -q option. This example displays only one line per file that the string is in:
$ find . -name "*.trc" -exec grep -qi "error" '{}' ; -printNote
On some systems, the -q option may not be available. For example, the similar functionality would be implemented with the -l option. Use man grep to display all options available on your server.
Sometimes you want to search for the incidence of two or more strings in a file. Use grep with the -e option to accomplish this. This command searches for the strings of error or ora-:
$ find . -name "*.trc" -exec grep -ie "error" -e "ora-" '{}' ; -printOccasionally you might run into the need to look in a binary file for a certain string. You might have a system core file or a database file that you want to inspect. Use the strings command to search a binary file for printable text. This example uses the strings command and pipes the output to more to view the contents of a system core file:
$ strings core | more
If you want to search for a specific string, then pipe the output of strings to the grep command. This example searches the users01.dbf file for the string of denver:
$ strings users01.dbf | grep -i Denver
This next example peeks inside the system01.dbf datafile for undo segment information:
$ strings system01.dbf | grep _SYSSMU | cut -d $ -f 1 | sort -u
Here is a partial listing of the output:
_SYSSMU1
_SYSSMU1
_SYSSMU10
_SYSSMU2
_SYSSMU2
_SYSSMU3
_SYSSMU3
In certain database recovery scenarios involving a corrupted UNDO tablespace, you may have to use this technique to identify undo segments. This is just one example of how an Oracle DBA might have to use the strings command; the important thing to keep in mind is that this utility provides you with a way to look for text strings in binary files.
You recently created a file but can't remember where on the server it is located. You want to find any files with a recent creation date.
Use the find command with the -mmin (modified minutes) option to find very recently modified files. This example finds any files that have changed in the last 30 minutes beneath the current working directory:
$ find . -mmin −30
To find all files that were modified more than 30 minutes ago, use the + sign instead of the - sign:
$ find . -mmin +30
The find command with a time-related option is useful for locating files that have recently been updated or changed. This command can be useful when you can't remember where you've placed recently modified or downloaded files.
If you're using a version of find that does not support the -mmin option, then try the -ctime option instead. The following command locates any files that have changed on the server in the last day beneath the /home/oracle directory:
$ find /home/oracle -ctime −1
Many options are available when trying to find a file. For example, use the -amin (access minutes) option to find a file based on when it was last accessed. This next line of code finds all files that were accessed beneath the current working directory exactly 60 minutes ago:
$ find . -amin 60
Table 5-7 describes a subset of time-related options commonly used with the find command.
Table 5.7. Commonly Used Time-Related Options to Find Files
Option | Description |
|---|---|
| Finds files accessed more than |
| Finds files accessed more than |
| Finds files changed more than |
| Finds files changed more than |
| Finds files modified more than |
| Finds files modified more than |
| Finds files modified more recently than |
A plethora of options are available with the find command. Use the man find command to display the options available on your Linux system.
Use the find command to locate files older than a certain age. Once the old files are identified, use the rm command to remove them. The following example identifies files greater than 14 days old and removes them all with one line of code:
$ find . -type f -mtime +14 -exec rm -f {} ;The previous command finds all files (the option -type f indicates a regular file) in the current working directory and its subdirectories that are older than 14 days. The rm command is executed (-exec) once for each file name located by the find command. The function of {} is to insert each file returned (by find) into the rm -f command line. When using the -f (force) option, you will not be prompted if you really want to remove write-protected files (files without write permission enabled). The ; denotes the end of the exec command line.
The Oracle Database will regularly produce trace files as part of its normal operations. These files often contain detailed information about potential problems or issues with your database. Usually you don't need to keep trace and audit files lying around on disk forever. As these files grow older, the information in them becomes less valuable.
DBAs will typically write a small shell script to clean up old files. This shell script can be run automatically on a periodic basis from a utility such as cron. See Chapter 7 for details on shell scripting and Chapter 11 for techniques for automating tasks through cron.
Your database is experiencing availability issues because a disk is 100 percent full. You want to locate the largest files in a directory tree.
Use the find command to locate files recursively in a directory tree. The following command sends the output of the find operation to the sort and head commands to restrict the output to just the five largest files located in any directory beneath the current working directory:
$ find . -ls | sort -nrk7 | head −5
Here is a sample of the output:
6602760 820012 -rw-r-----   1 oracle   oinstall 838868992 Jan 21 14:55
./RMDB1/undotbs01.dbf
6602759 512512 -rw-r-----   1 oracle   oinstall 524296192 Jan 21 14:55
./RMDB1/system01.dbf
6602758 51260 -rw-r-----   1 oracle   oinstall 52429312 Jan 20 22:00
./RMDB1/redo03a.log
6602757 51260 -rw-r-----   1 oracle   oinstall 52429312 Jan 19 06:00
./RMDB1/redo02a.log
6602756 51260 -rw-r-----   1 oracle   oinstall 52429312 Jan 21 14:55
./RMDcB1/redo01a.log
The -nrk7 option of previous sort command orders the output numerically, in reverse order, based on the seventh position. As shown in the output, the output is sorted largest to smallest. The top listing shows that largest file is about 800MB in size.
You can also use the find command to look for certain types of files. To look for a file of a particular extension, use the -name option. For example, the following command looks for the largest files beneath the current working directory and subdirectories that have an extension of .log:
$ find . -name "*.log" -ls | sort -nrk7 | head
DBAs often create shortcuts (via shell functions or aliases) that encapsulate long strings of commands. Command shortcuts can save time and prevent typing errors. See recipe 2-7 for details on creating functions and aliases.
You're running out of disk space, and you want to recursively locate all files beneath a directory that exceed a certain size.
Use a combination of the find command with the -size option to accomplish this task. This example uses the -size option to find any files more than 100MB in the current working directory and any subdirectories:
$ find . -size +100000k
Here's a small snippet of the output:
./RMDB1/sysaux01.dbf
./RMDB1/temp01.dbf
You can use the -size option of the find command in a number of useful ways. For example, if you want to find a file less than a certain size, then use the - minus sign. This next line of code finds any files less than 20MB beneath the directory named /home/oracle:
$ find . -size −20000k
If you want to find a file of an exact size, then leave off the plus or minus sign before the size of the file designator. This example finds all files with the size of 16,384 bytes:
$ find . -size 16384c
The ls -alS command will display the long listing of all files sorted from largest to smallest. The following example combines ls with the head command to display the largest files in the current working directory:
$ ls -alS
Here is a sample of the output:
total 4001584
-rwxr----- 1 oracle oinstall 2039488512 Jan 21 16:39 o1_mf_undotbs1_3gpysv9n_.dbf
-rwxr----- 1 oracle oinstall  983834624 Jan 21 16:37 o1_mf_sysaux_3gpystwj_.dbf
-rwxr----- 1 oracle oinstall  775954432 Jan 21 16:39 o1_mf_system_3gpysttv_.dbf
-rwxrwxr-x 1 oracle oinstall  176168960 Jan 21 02:31 o1_mf_temp_3gpz8s70_.tmp
If there are many files in a directory, you can combine ls and head to just list the "top n" files in a directory. The following example restricts the output of ls to the first five lines:
$ ls -alS | head −5
Note
On some older Linux versions, the -S option may not be available. On older systems, use the ls -al | sort -rk5 command. The sort column may differ depending on the long listing of the output.
You have a mount point that is out of space, and you need to identify which directories are consuming the most space.
Use the du (disk usage) command to report on disk free space. The following example will report the top five directories consuming the most disk space beneath the current working directory:
$ du -S . | sort -nr | head −5
The -S (do not include size of subdirectories) option instructs du to report the amount of space used in each individual directory. Here's a sample of the output:
4001576 ./DB11G_BLLNX1/datafile
1500152 ./DB1TEST/datafile
307592  ./DB11G_BLLNX1/onlinelog
153800  ./DB1TEST/onlinelog
12044   ./DB11G_BLLNX1/controlfile
By default, the output of space used is reported in kilobytes. In the previous output, the largest directory beneath the current working directory is ./DB11G_BLLNX1/datafile, which uses 4GB of space.
If you want to report the sum of space consumed by a directory and its subdirectories, then leave off the -S option:
$ du . | sort -nr | head −5
Here is a sample of the output when aggregating the amount by directory and each directory's subdirectories:
5984872 .
4321220 ./DB11G_BLLNX1
4001576 ./DB11G_BLLNX1/datafile
1663604 ./DB1TEST
1500152 ./DB1TEST/datafile
When not using the -S option, the top directory will always report the most consumed space because it is an aggregate of its disk space plus any spaced used by its subdirectories.
Note
On some Unix systems, there may not be an -S option. For example, on Solaris the -o option performs the same feature as the Linux -S option. Use man du to list all options available on your database server.
The du command recursively lists the amount of disk space used by directory and every subdirectory beneath it. If you don't supply a directory name as an argument, then du will by default start with the current working directory. The du command will report on one line the amount of space consumed and the name of the directory.
The du command has a plethora of useful options. For example, the -s (summary) option is used to report a grand total of all space used beneath a directory and its subdirectories. This command reports on the total disk space used beneath the /orahome directory:
$ du -s /orahome
3324160 /orahome
You can also use the -h option to make the output more readable:
$ du -sh /orahome
3.2G /orahome
You have a large trace file that is being written to by a database process. You know that the trace file doesn't contain anything that needs to be retained. The trace file has filled up a disk, and you want to make the size of the file 0 bytes without removing the file because you know that a database process is actively writing to the file.
Copy the contents of /dev/null to the file. You can use either the cat command or the echo command to accomplish this. This example uses the cat command to make an existing log file 0 bytes in size:
$ cat /dev/null > listener.log
The other way to zero out the file is with the cp command. This example copies the contents of /dev/null to the trace file:
$ cp /dev/null listener.log
One of us recently had a database that hung because one of the mount points was full and prevented Oracle from writing to disk and subsequently hung the database. Upon further inspection, it was discovered that an Oracle Net trace file had grown to 4GB in size. The file had grown large because a fellow DBA had enabled verbose tracing in this environment and had forgotten to monitor the file or inform the other DBAs about this new level of tracing.
In this case, there was an Oracle Net process actively writing to the file, so we didn't want to simply move or remove the file because we weren't sure how the background process would react. In this case, it's safer to make the file 0 bytes. The /dev/null device is colloquially called the bit bucket. It is often used for a location to send output when you don't need to save the output. It can also be used to make a file 0 bytes without removing the file.
Warning
Zeroing out a file will permanently delete its contents. Use the techniques in this recipe only if you're certain you do not need the information contained within the file.
Use the wc (word count) command to count the number of lines and words in a file. This example counts the number of words in the rmanback.bash shell script:
$ wc rmanback.bash
434 1697 16260 rmanback.bash
The previous output indicates that there are 434 lines, 1,697 words, and 16,260 characters in the file.
When performing a new install of the Oracle binaries, your initialization parameter file is located in an Oracle Flexible Architecture (OFA) directory such as /ora01/admin/DBS/pfile. When starting a database, Oracle will by default look for the initialization file in the ORACLE_HOME/dbs directory.
You don't want to maintain the initialization file in two separate directories. Instead, you want to create a link from the OFA directory to the default directory.
Use the ln -s command to create a soft link to another file name. The following creates a soft link for the physical file in /ora01/admin/DEV/pfile/initDEV.ora to the link of /ora01/product/10.2.0/dbs/initDEV.ora:
$ ln -s /ora01/admin/DEV/pfile/initDEV.ora /ora01/product/10.2.0/dbs/initDEV.ora
A long listing of the soft link shows it pointing to the physical file:
$ ls -altr /ora01/product/10.2.0/dbs/initDEV.ora
lrwxrwxrwx    1 oracle dba    39    Apr 15 15:58 initDEV.ora ->
/ora01/admin/DEV/pfile/initDEV.ora
A soft link (also referred to as a symbolic link) creates a file that acts as a pointer to another physical file. Soft links are used by DBAs when they need a file to appear as if it is in two separate directories but physically resides in only one location.
The technique described in the solution of this recipe is commonly used by Oracle DBAs to manage the initialization file. This allows DBAs to view and edit the file from either the soft link name or the actual physical file name.
You want to physically move a datafile to a different disk location without having to change any of the Oracle metadata.
Use soft links to make a directory look like it exists, when it is really just a pointer to a physical location. This example shows how to move a tablespace datafile from one mount point to another, without having to change the datafile's name as it appears in the data dictionary. In this example, the datafile will be moved from /oradisk1/DBS to /oradisk2/DBS.
On this server, the following physical mount points exist:
/oradisk1/DBS
/oradisk2/DBS
A long listing shows the ownership of the mount points as follows:
$ ls -altrd /oradisk*
drwxr-xr-x  3 oracle oinstall 4096 Apr 15 19:17 /oradisk2
drwxr-xr-x  3 oracle oinstall 4096 Apr 15 19:19 /oradisk1
First, create the following soft link as the root user:
# ln -s /oradisk1 /oradev
Here's a simple test to help you understand what is happening under the hood. Change directories to the soft link directory name:
$ cd /oradev/DBS
Notice that if you use the built-in Bash pwd command, the soft link directory is reported:
$ pwd
/oradev/DBS
Compare that to the use of the Linux /bin/pwd command, which will report the actual physical location:
$ /bin/pwd
/oradisk1/DBS
Note
You can also make the Bash built-in pwd command display the physical location by using the -P (physical) option (see recipe 5-1 for more details).
Next create a tablespace that references the soft link directory. Here is an example:
SQL> CREATE TABLESPACE td01
     DATAFILE '/oradev/DBS/td01.dbf'
     SIZE 50M
     EXTENT MANAGEMENT LOCAL
     UNIFORM SIZE 128k
    SEGMENT SPACE MANAGEMENT AUTO;
A query from V$DATAFILE shows the soft link location of the datafile:
SQL> select name from v$datafile;
Here's the output pertinent to this example:
/oradev/DBS/td01.dbf
Next, shut down your database:
SQL> shutdown immediate;
Now move the datafile to the new location:
$ mv /oradisk1/DBS/td01.dbf /oradisk2/DBS/td01.dbf
Next (as root) remove the previously defined soft link:
# rm /oradev
Now (as root) redefine the soft link to point to the new location:
# ln -s /oradisk2 /oradev
Now (as oracle) restart the database:
SQL> startup
If everything goes correctly, your database should start. You have physically moved a datafile without having to change any data dictionary metadata information.
Using soft links on directories gives you some powerful options when relocating datafiles. This technique allows you to make Oracle think that a required directory exists when it is really a soft link to a different physical location.
The techniques in the "Solution" section of this recipe are useful when duplicating databases to a remote server using RMAN. In this situation, you can use symbolic links to make the auxiliary database server look similar to the source database server filesystem. This provides a method for relocating databases to servers with different mount points from the original server in which you can make a mount point or directory look like it exists to Oracle when, in reality, it is a soft link.