
Chapter 8
Malware Detection
The term malware encompasses a large range of unwelcome software that is designed to damage a computer. A partial list of malware might, for example, include viruses, spyware, Trojan horses, and worms. The rapid proliferation of such software is enough to concern users of all levels, from novices to seasoned administrators. The impact of malware ranges from essentially harmless pranks to the theft of personal information, such as banking details, or a denial of service.
Although the level of scaremongering in the news ebbs and flows, every good sysadmin knows that there's no such thing as a completely secure system. Despite the massive number of virus and malware threats that target Windows machines, all users of Unix-type machines should remember that these threats also exist for their systems.
One popular, sophisticated software package called Linux Malware Detect (LMD), from R-fx Networks (https://www.rfxn.com), helps to mitigate malware threats on Linux systems. Let's look at how you can effectively protect Linux machines against malware using the LMD package, which only focuses on malware, unlike other more diluted solutions.
Getting Started
Before we begin with looking at LMD itself, let's consider some potentially less obvious aspects of what's needed to successfully keep your malware software functioning correctly.
Definition Update Frequency
It is critical that malware signature updates be performed frequently; in fact, your system may be vulnerable if you have missed the latest update. The architecture of the detection software itself is of little value if current threats are not detected. Fortunately, LMD frequently pulls in its updates, from which it generates signatures, from community data, user submissions, and the firewall data of active malware threats.
The LMD website offers an up-to-date RSS feed of the latest threats, and also provides a commercial version, which is another incentive for updates to be current and relevant. The feed, which is brimming with LMD's current malware findings, can be found at https://www.rfxn.com/feed/.
LMD states that signatures receive an update approximately once a day, or more often if a flurry of activity is reported.
Malware Hash Registry
A well-respected security website called Team Cymru provides a Malware Hash Registry (www.team-cymru.org/MHR.html), which provides a lookup service to compare malware infections. According to LMD, over 30 major antivirus companies use this data to populate their databases. From the LMD website, you can see the current number of reported threats as follows:
DETECTED KNOWN MALWARE: 1951
% AV DETECT (AVG): 58
% AV DETECT (LOW): 10
% AV DETECT (HIGH): 100
UNKNOWN MALWARE: 6931
The LMD website then continues and explores some of the scoring used to measure successful hits and misses by other malware products, resulting in a worrying conclusion.
Using the Team Cymru malware hash registry, we can see that of the 8,883 malware hashes shipping with LMD 1.5, … 6,931 or 78% of threats … went undetected by 30 commercial anti-virus and malware products. The 1,951 threats that were detected had an average detection rate of 58% with a low and high detection rate of 10% and 100% respectively. There could not be a clearer statement to the need for an open and community driven malware remediation project that focuses on the threat landscape of multi-user shared environments.
As you can see from this LMD website excerpt, there are a significant number of failures among commercial malware products. LMD aims to plug the market gap where possible, but is an advocate of open discussions and collaboration, sharing known threat details between vendors.
Prevalent Threats
At the time of writing, LMD claims to hold 10,822 malware signatures within its database. Looking at the contents of Figure 8.1, you can see a list of the top 60 most prevalent threats within the LMD database. As you might expect, the world's most popular server-side scripting language, PHP (https://www.php.net), is a common attack vector. The powerful Perl language also features heavily.
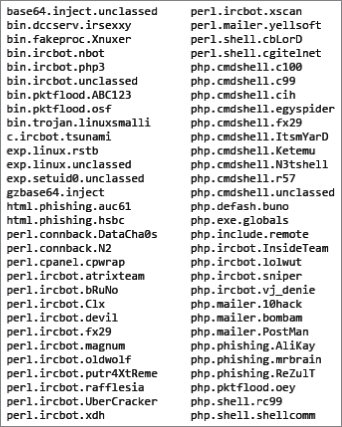
Figure 8.1 The top 60 most prevalent attacks according to LMD
LMD Features
The LMD feature set is far from trivial. In Figure 8.2 you can see the features listed in its documentation.
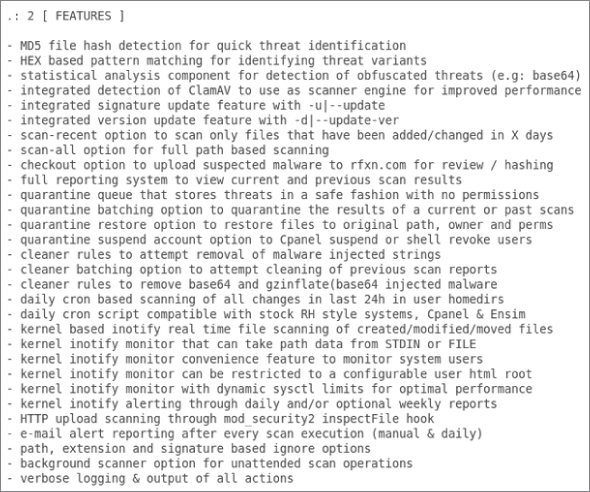
Figure 8.2 The sizeable list of features that LMD offers
You can tell that in addition to its clever threat detection, LMD manages to combine comprehensive reporting and the quarantining of threats, among many other features. The ability to receive summary reports on a daily basis through e-mail via a cron job is clearly useful to make sure the detection system is running as expected. In addition, LMD's ability to plug into Apache and directly monitor file uploads from users is something that I will touch on later. If this is the only way that a user can get files onto a system, then it is clearly a bulletproof choice.
Monitoring Filesystems
One modern method of watching for changes on filesystems is by using inotify. You need a compatible kernel for this functionality to work correctly. Fear not, because inotify is reportedly included in kernels from version 2.6.13 and after, so most Linux builds will have this capability.
The sophisticated inotify can monitor, in real time, both single files and entire directories for changes, alerting configured software if any changes are discovered. If a piece of user-space software is caught making changes, then inotify will consider it an event and report it immediately.
By creating a watch list, inotify can keep track of unique watch descriptors that it associates to each item on its watch list. Although inotify won't pass on details about the user or process that has changed a file or directory, the fact that a change has taken place is enough to satisfy most applications. If inotify isn't available, then the older approach of polling a filesystem or manually running scans will usually apply. In the case of checking for changes on networked filesystems, any configured software will need to resort to polling the filesystem using a predetermined frequency. This is because remote filesystems are harder to keep track of.
Unfortunately, the pseudo filesystems, which include /proc, /sys, and /dev/pts, aren't visible to inotify. This shouldn't be of too much concern, however, because “real” files don't exist in these paths, but rather the ephemeral workings of a system, which change frequently.
Installation
Let's now look at installing LMD on both Debian and Red Hat derivatives. First, you will check that the wget package is installed with the following command on Red Hat:
# yum install wgetThe alternative on Debian is the following command:
# apt-get install wgetMany distributions include wget by default, so this may not be needed.
To get the most out of LMD, you can also install inotify-tools if you want LMD to interface with inotify directly; you can read more and also download inotify-tools from https://github.com/rvoicilas/inotify-tools/wiki.
However, to install it from your package manager, if you're lucky and using an offspring of Red Hat, you can use the following command:
# yum install inotify-toolsAnd, for machines following Debian's lineage, you should be able to run the following command:
# apt-get install inotify-toolsIf that doesn't work on your Debian flavor, try the following procedure. I know this works because I wanted to see how easy LMD would be to install on Ubuntu 14.04 LTS. I needed to add the Universe repository, in order to successfully install the inotify-tools package to my /etc/apt/sources.list file, as follows:
deb http://us.archive.ubuntu.com/ubuntu trusty main universeYou can swap the word “trusty” with “precise” or another Ubuntu release code name if you are running other flavors. You can then update your package lists with the following command:
# apt-get updateThen, the final Ubuntu command would simply be as follows:
# apt-get install inotify-toolsI will leave you to experiment with Debian repositories in the same way (replacing “trusty” with your Debian version name).
Because the LMD package itself is not found in package repositories as of this writing, you can download and install the package as follows:
# cd /usr/local/src/
# wget http://www.rfxn.com/downloads/maldetect-current.tar.gz
# tar -xzf maldetect-current.tar.gz
# cd maldetect-*
# sh ./install.sh
Once you've run the install.sh script, as shown on the last line of these commands, you should be presented with output containing content that includes the following:
Linux Malware Detect v1.5
            (C) 2002-2015, R-fx Networks <[email protected]>
            (C) 2015, Ryan MacDonald <[email protected]>
This program may be freely redistributed under the terms of the GNU GPL
installation completed to /usr/local/maldetect
config file: /usr/local/maldetect/conf.maldet
exec file: /usr/local/maldetect/maldet
exec link: /usr/local/sbin/maldet
exec link: /usr/local/sbin/lmd
cron.daily: /etc/cron.daily/maldet
maldet(6617): {sigup} performing signature update check…
maldet(6617): {sigup} local signature set is version 2015112028602
maldet(6617): {sigup} latest signature set already installed
Your chosen installation paths might vary, of course, if you have edited the install.sh script (the inspath variable in particular). As you can see, you also receive a note of how up-to-date your LMD signatures are.
Monitoring Modes
Now that you have installed your package, let's look at what LMD can monitor for you on a system. A good place to start is if you consider LMD's monitoring modes.
LMD offers a number of monitoring modes that can be configured to check different parts of the filesystem. As you will see, LMD uses the binary executable called Maldet, short for “malware detect.”
To monitor a system component, you can use the -m option, also written as --monitor. What LMD can monitor may be broken down into users, files, and paths. The website gives you the following example of how the three modes might look on the command line:
# maldet --monitor users
# maldet --monitor /root/monitor_paths
# maldet --monitor /home/mike,/home/ashton
By using the first option, --monitor users, LMD will monitor any unique identifiers (UIDs) on the system that are above a minimum UID setting. (The config option that can be set in the config file is called notify_minuid.)
The second monitoring example is a file, spaced by new lines, that can contain the files you want to monitor. In this case, the list of files is located in the file /root/monitor_paths.
For the third option, you could potentially create a very long command line by adding a comma-separated list of filesystem paths to keep an eye on.
Figure 8.3 shows the output from running the following command:
# maldet -m /home/ubuntu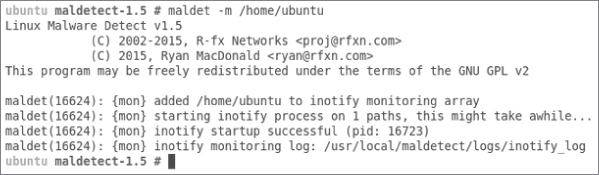
Figure 8.3 What you see when you ask LMD to monitor a specific path
Configuration
The main config file for LMD is /usr/local/maldetect/conf.maldet. It's well commented and is useful for understanding how LMD prefers to be set up.
One word of warning before you continue, however: the LMD config file doesn't use an asterisk for wildcard characters, but instead, a question mark. Therefore, you should use ? characters instead of * to replace multiple characters in a config option. Other than that minor caveat, it's relatively smooth sailing.
Exclusions
Let's look at how to set up LMD. The documentation starts you off by asking you to consider the elements of the system that you want to ignore. In the same style as the monitoring modes that you have just looked at, there are files that you can populate to achieve this. Each entry in the following config files should be on its own line.
You can add full file paths, which you don't want to be checked by LMD, to this file: /usr/local/maldetect/ignore_paths.
You can also exclude a particular file extension globally by putting an entry like .jpg in this file: /usr/local/maldetect/ignore_file_ext.
Certain LMD signatures might lead to unnecessary and unhelpful logging entries and alerts for one reason or another. You can disable certain signatures by adding a signature, such as php.mailer.10hack, to this file: /usr/local/maldetect/ignore_sigs.
The last exclusion option means that you can use sophisticated regular expressions (regex) to match multiple filesystem paths at once. You simply add a list to this file, /usr/local/maldetect/ignore_inotify, which uses a format like this:
∧/home/premium-user-$Clearly, by using regex, the file-matching possibilities are endless, and it can be used to avoid making manual changes to your config whenever a new user is allowed to log in to your server. This regex example hopefully points out that you could name a specific set of users with a username format along the lines of premium-user-123456.
Running from the CLI
The Command Line Interface (CLI) options for LMD are well considered and relatively easy to follow. I will leave you to explore all of them, but you will look at some of the key options now.
As I have already mentioned, the executable binary for LMD is called maldet. Let's begin by running LMD in the background while it checks a particular filesystem path. You can see from this example in the documentation how to run potentially large scans in the background as follows, using -b:
# maldet -b -r /home/?/public_html 7In this example, -b is used for background scanning and checking files that have been changed or modified in the last seven days, set by the 7 character being appended. The syntax and optional way of running this command is --scan-recent PATH DAYS.
Reporting
Let's have a quick look at how LMD generates its reports. Figure 8.4 shows a produced report.
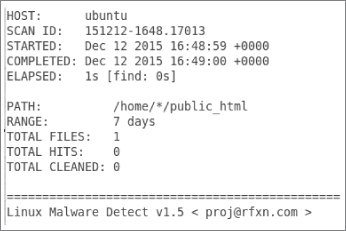
Figure 8.4 A report of a scan from LMD using the maldet --report command
To query specific reports, you need a SCANID. This is a unique reference that can be seen near the top of Figure 8.4, where this command runs to give you a report on the last LMD command that was run:
# maldet --reportOnce you have that ID, you can also manually e-mail the report to yourself as follows:
# maldet -e, --report SCANID [email protected]To query a specific SCANID, with a formatted time stamp included within its name (010116 as the date in this example, and the rest of the name being the time), your command might look like this:
# maldet --report 010116-1111.21212These options might also be helpful if used with the --log or -l option:
# maldet --logYou should see LMD logging events by running this command. In my case, despite having only run a few commands so far, there is a relatively substantial amount of detail on my log file. With that command, you are shown the last fifty lines from the file /usr/local/maldetect/logs/event_log. You can query that file further if you need to discover information not found in those 50 lines. In my opinion, the level of detail logged by LMD is another indication of a sophisticated, well-written package.
Quarantining and Cleaning
The documentation makes a point of saying that by default, LMD will not act when it finds evil-looking files. It is therefore important to understand that, in most cases, you need to quarantine your malware manually.
If you're certain that you want to enable automatic quarantining, then it's possible to do so by setting the configuration option quar_hits=1 within the main config file, which resides at /usr/local/maldetect/conf.maldet by default.
If you wanted to quarantine all malware from a specific scan, then you would use the -q option, which is also the same as --quarantine SCANID, as follows:
# maldet -q 010116-1111.21212If you feel that you've made a mistake, then you can restore quarantined files from a specific SCANID by using the following command, which is the same as the --restore function:
# maldet -s 010116-1111.21212You will see an error such as this one if there's nothing to restore:
maldet(18748): {restore} could not find a valid hit list to restore.If you want LMD to try to fix malware infections that it discovers, then you can use the --clean command, which is also written as the -n option. Here is an example command of cleaning malware that you found in a particular SCANID:
# maldet -n 010116-1111.21212For a cleaning to be considered a success, the resulting scan after cleaning a malware infection must pass without registering a HIT of a problem file.
If you begin to doubt results or you're not sure that your config changes have been picked up correctly, then you can purge all of your existing session data, logs, and temporary files with the following command:
# maldet -pThe result should be similar to this output:
maldet(19219): {glob} logs and quarantine data cleared by user request (-p)Updating LMD
As I said from the outset, the updating of LMD's signatures is of paramount importance. To manually run an update, you use the -u command option. In case you're wondering, by doing so you connect to the rfxn.com website to retrieve the data. Try it manually yourself with -u, or its equivalent --update, as follows:
# maldet -uThe expected output would be similar to this:
maldet(19278): {sigup} performing signature update check…
maldet(19278): {sigup} local signature set is version 2015112028602
maldet(19278): {sigup} latest signature set already installed
There is also a clever mechanism for updating the currently installed version, again from rfxn.com, as follows:
# maldet --update-verThis can also be abbreviated to -d if you want, and the results of this command might look like this:
maldet(19357): {update} checking for available updates…
maldet(19357): {update} hashing install files and checking against server…
maldet(19357): {update} latest version already installed.
Scanning and Stopping Scans
In Figure 8.1 you saw the results of monitoring a particular path with the -m or --monitor option. Let's expand on that for a moment.
Imagine that you want to monitor two particular filesystem partitions, because your users potentially have the ability to write data there. You would monitor the paths as follows:
# maldet -m /usr/local,/homeNote the comma that is separating the paths. The output for running this command is shown in Figure 8.5. Remember that large scans can use the -b background option, as you saw earlier.
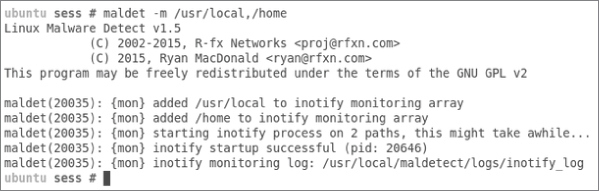
Figure 8.5 What you see when LMD starts monitoring two filesystem partitions with inotify enabled
Let's consider how to manually scan a directory and its subdirectories without using background mode. Imagine you have users uploading files via FTP or SFTP to an upload directory:
# maldet -a /home/?/uploadsIn this example, you use LMD to scan the uploads directory for all users with a home directory (remember that the question mark is the wildcard character in LMD, not the asterisk).
Having run the scanning command, you are also offered a SCANID for future reference, as you can see from the data it generates:
maldet(28566): {scan} scan of /home/*/uploads (1 files) in progress…
maldet(28566): {scan} 1111/1111 files scanned: 0 hits 0 cleaned
maldet(28566): {scan} scan completed on /home/*/uploads: files 1111, malware hits 0, cleaned hits 0, time 11s
maldet(28566): {scan} scan report saved, to view run: maldet --report 151212-1724.28566
If any of your scans take longer than expected, then LMD can accommodate this scenario too. The kill switch or -k option (also written as --kill) will stop any inotify instance in its tracks. If machine load is too high or you think something isn't behaving as it should, then this is a useful addition to the available options.
Cron Job
LMD comes with a daily cron job, which is located at /etc/cron.daily/maldet. This will update signatures and clean up scan data so that it's kept for up to fourteen days, as well as run a daily scan using the config that you have specified.
Note that session data and temporary files are kept between cron job executions. As a result, you need to run the -p option that I mentioned earlier to purge those files if you think your results aren't accurate.
You should set up the e-mail configuration parameters in order to receive daily reports every morning. The daily update is valuable for e-mail archival reasons and for making sure that your scans are taking place every day and haven't failed.
Reporting Malware
You've seen how sophisticated and well-constructed LMD is, and it should therefore come as no surprise that LMD provides a simple mechanism for uploading suspicious files for analysis. If they prove to be infected with an unknown variety of malware, then new signatures may be created and added to LMD's known threats in order to identify malware for other users. The method to send files back to LMD for checking is as follows, using the --checkout feature, which is also written as the -c option:
# maldet -c suspicious_file.gzWhen you execute this command, your file will be submitted to rfxn.com and checked in due course.
Apache Integration
Earlier in the chapter, I briefly alluded to a clever feature that is included with LMD. This feature is the ability to integrate LMD with the Apache mod_security2 module. The LMD documentation explains that it uses the malleable Apache module's inspectFile hook functionality to enable you to run a validation script that can determine if an upload is to pass or fail. So, for example, inside your Apache config file, you might see this entry, taken from the documentation:
SecRequestBodyAccess On
SecRule FILES_TMPNAMES "@inspectFile /usr/local/maldetect/hookscan.sh"
                "id:'999999',log,auditlog,deny,severity:2,phase:2,t:none"
By design, each upload of a file by a user can be scanned automatically, which should significantly reduce the number of threats on a system, especially where many users are uploading files frequently.
The documentation includes details of how performance and accuracy have been considered in the default options. If you're interested in this feature, then I would encourage you to check out the bundled README file for more information.
Summary
In addition to looking at LMD, I touched upon the inotify mechanism that it uses to check for filesystem changes in real time. The clever and efficient inotify allows real-time checks for malware without significant system load being introduced.
With Android smartphones currently accounting for over 80 percent of the global market, there is little doubt that the malware written to exploit vulnerabilities in those devices will appear to a greater extent on Linux user devices as well as servers in the future.
By enabling real-time filesystem checks alongside sophisticated tools such as LMD, you should reduce your risk of a malware infection significantly. LMD was initially designed for servers offering shared hosting because the author felt the user-account attack vector was being missed by other products, which usually focused on kernel and rootkit infections.
Having tried installing LMD in a test environment first, however, and having become familiar with how it operates, I believe that LMD is definitely worth considering for use on your production machines.