
Chapter 2
Digitally Fingerprint Your Files
There are a number of good reasons to keep an eye on your server security. Few sysadmin types absorb the necessary security knowledge required to keep their infrastructure safe without enthusiasm and effort. If you're anything like me, there have been a few bumps along the way, such as when I had a server compromised around the turn of the millennium thanks to a nasty PHP bug, or when I was faced with and repelled two relatively significant DDoS attacks.
This chapter will cover another attack vector, rootkits, and a fantastic piece of software called Rootkit Hunter (you may know it as rkhunter). You will start off, however, by exploring how to monitor your filesystem's important files, such as its executables.
Filesystem Integrity
Many years ago I used Tripwire (http://sourceforge.net/projects/tripwire). It's now referred to as Open Source Tripwire, thanks to the availability of other products. Tripwire ran periodically (overnight using cron) and used cryptographic hashing to monitor any file changes on your system.
By generating and recording the hashes of any files visible on the filesystem initially, during its first run, Tripwire was able to alert the administrator if any hashes didn't match those it had recorded on each subsequent run. If the file had been altered in any way the hash would be changed. It's a clever approach, despite being I/O resource intensive on older hardware, and has since given birth to great grandchildren. One example is the popular AIDE (Advanced Intrusion Detection Environment), which is described as “a file and directory integrity checker” at http://aide.sourceforge.net. I would certainly recommend trying AIDE or Tripwire on a development virtual machine if you get the chance. Be warned, however, that if you are lax with the initial configuration, then you will be bombarded with false positives.
This type of security often appears under the umbrella of host-based intrusion detection systems, or HIDS, and it was reportedly one of the first types of software-based security because mainframes had few externally risky interactions over networks.
If you don't want to run nightly filesystem checks or you aren't in a position to receive daily system reports, then that's not a problem. You can opt to go for an older approach where you only scan your filesystem once, after you have built your server, in order to collect information about what files are installed on the filesystem. I will explain why this is useful in a moment.
You might be surprised that a tool you've almost certainly used for another purpose can be easily used as a security assistant.
Step forward the md5sum command. When downloading Unix-type files in the past, you have probably been offered the option to check the integrity of your potential download by verifying the MD5sums for those files. For example, the MD5sums are usually present on the website that you get your Linux installation ISO file image from.
As you can see in Figure 2.1, this is what you're faced with when downloading Debian Jessie from this Dutch mirror: http://ftp.nl.debian.org/debian/dists/jessie/main/installer-amd64/current/images/.

Figure 2.1 You can download Debian Jessie from the website and also check your MD5sums for security.
If you open up the file MD5SUMS, then you can see the contents of Figure 2.1, which contains hashes for each file.
Within Listing 2.1, in the left column, you can see the MD5sum of each file and the relevant filename to the right. This is to prevent someone else from sneaking a file into the place of a legitimate one, which could infect your clean operating system (OS) installation.
MD5sums first compute and then check against MD5 digests. You might think (in a relatively sophisticated way) that by checking MD5sums you are effectively creating a digital fingerprint for each file, which can be queried later.
You can easily try using MD5sums yourself (the MD5sum command is bundled within the package coreutils on my machine and should be readily available to almost all distributions). Try a command like this one:
# md5sum /home/chrisbinnie/debbie-and-ian.pdfThe response you receive might be something like this:
3f19f37d00f838c8ad16775293e73e76 debbie-and-ian.pdf
Now back to the files listed next to your Linux distribution. Download the MD5SUMS file into the same directory as the main ISO file (ISO is named after the ISO 9660 file system if you're wondering). By doing so, you can save yourself the trouble of manually checking each file on the installation media that you're using. This is because that file includes all MD5sums for the files in that directory. Now that you have the MD5sums for all the files, you can check them for validity with the following command (-c also stands for --check):
# md5sum -c MD5SUMSListing 2.2 shows the results from running the -c option. You might say that MD5sums are binary: results are either OK or not OK.
What should you look out for if a file didn't match its original MD5sum? In Listing 2.3 you can see that an alarm bell is ringing (with a FAILED warning) and that you are also informed of a problem at the end of the results.
It should go without saying that, without making these checks when you're installing your OS from a downloaded ISO or from a magazine's DVD, you are gambling with the integrity of your files and therefore risking your system's integrity.
Now that you've been reminded of how you can check if there's been any tampering with your freshly downloaded files, let's look at how to use the powers of cryptographic hashes to help you tell if an installed system has been compromised.
Whole Filesystem
Once you're happy with your OS installation and have run through the requisite postinstall fine-tuning, you should consider recording the MD5sums of your key system files. You do this in order to have a reliable record to compare against during a suspected compromise.
Of course, doing this with the md5sum command probably isn't going to be very easy without writing a shell script; this is because it's difficult to get full directory trees of files working with the md5sum command.
Fear not, though: someone clever has addressed this problem with an efficient piece of software called md5deep (http://md5deep.sourceforge.net). According to its website, in addition to the functionality you can expect from MD5sum, you can also enjoy the following features:
You can
- Ignore certain file types (which is very useful when you want to ignore temporary files and so on).
- If you're inspecting a massive number of files (which you would on a fresh OS installation), then md5deep offers a very helpful ETD (Estimated Time of Delivery)—in other words, how long a command will take to complete.
- You can run md5deep in recursive mode to effortlessly pick up the numerous hidden subdirectories on your filesystem, which would otherwise be arduous (if not impossible to do accurately) to record manually.
- With compatibility in mind, you also import different types of hashes (for example, from EnCase, the National Software Reference Library, ILook Investigator, and HashKeeper).
I'm sure you'll agree that's exactly what you're looking for. Having completed your new machine's build, you can simply install md5deep and run it across your entire filesystem (or at least parts of it). One serious caveat is to keep the resulting hash list somewhere else than on the server. This is for obvious reasons. If your server is compromised, then it's very easy for an attacker to overwrite your MD5sum list with new, illegitimate MD5sums and deceive you.
If for some reason you can't get hold of md5deep (because you're working in a closed environment, for example), then it would be worth running the md5sum command over directories containing key binaries, such as this (nonexhaustive) list:
/bin, /sbin, /usr/bin, /usr/sbin, /etc
Rootkits
Let's now move onto a different approach to file fingerprinting.
If you're interested in protecting your files against rootkits (which contain code that allows someone else to access or control one of your machines), then you should consider an excellent tool called RootKit Hunter (also called rkhunter; http://rkhunter.sourceforge.net).
At install time, the RootKit Hunter manual warns that if you're trying to run the software on a presumably compromised system and the following standard commands or utilities aren't present, then you probably won't be able to run it successfully: cat, sed, head, or tail.
I'm pointing this out for good reason: these commands might be corrupt or missing on a compromised machine. If you've installed RootKit Hunter to hunt down evil files and you discover that your system has been compromised, then you really need to rebuild your machine. Don't assume that the remedial work you do from that point onward will make your machine secure enough for ongoing use. It's simply not worth it due to the time you will spend repairing the machine again in the future.
In other words, use software to identify successful attacks for exactly that purpose: identification. Also, always assume that you're going to need to run through a full rebuild afterward. I know from experience that these insidious rootkits are like filesystem limpets. You might find (as I have in the past) that you spend more time chasing your tail attempting to clean the system than a rebuild would actually take.
Lectures aside, let's look at using Rootkit Hunter. Once you have installed this sophisticated software, using the following commands, you can continue easily without any problem.
On Debian derivatives:
# apt-get install rkhunterOn Red Hat derivatives:
# yum install rkhunterAssuming that your installation didn't throw up any errors, you can run a few simple commands to get started. The following command populates the file properties database with data about the files on your machine:
# rkhunter—propupdNext, in order to scan any new software being installed and to trigger after software updates have occurred, you should enable the APT_AUTOGEN option to yes in the file /etc/default/rkhunter. I have only verified this on Debian derivatives with Apt Package Manager; there might be a different option on Red Hat derivatives.
Having made that change, you're now ready to make your first run of RootKit Hunter, as follows:
# rkhunter—checkNote that there are subtle differences between versions or distributions, so try adding -c or --checkall if errors appear.
Periodically you can also update your rkhunter threat list with the following command (you could create a specific cron job if you like) to keep track of the latest threats:
# /usr/local/bin/rkhunter—updateFigure 2.2 shows an abbreviated output that is generated after running this command. The output details the initial checks that the software makes.

Figure 2.2 An abbreviated display of the output from running rkhunter--checkall
As you can see, Rootkit Hunter is paying attention to the key directories that contain executable files (/usr/sbin in this example). These are exactly the types of binary files (among many others) that become infected by a rootkit.
Think for a moment of the Greeks and the Trojan horse allegory. In addition to those rootkits that immediately infect binaries, a piece of code can remain dormant for any period of time until executed by a legitimate user or on a schedule. Following that, a system compromise takes place.
Configuration
To configure Rootkit Hunter, you can edit its long config file, which can be found at /etc/rkhunter.conf.
To receive overnight reports on the integrity of your machine, you just need to edit two config parameters, one defining the e-mail address of the recipient and the latter of which is adjustable if the standard mail command won't work on your system by default.
Once inside the config file, look for these salient lines, uncomment them, and adjust them to your needs:
#MAIL-ON-WARNING=me@mydomain   root@mydomain
#MAIL_CMD=mail -s "[rkhunter] Warnings found for ${HOST_NAME}"
The first line, once uncommented, specifies where to send the reports (multiple addresses can be separated by a space). The second line deals with the mail command and the subject line for the e-mail reports sent to those addresses.
Simply re-run the software with rkhunter—check to test if these changes work correctly and check your e-mail inbox.
To inspect the cron job that helps schedule when these reports will be generated, you can look in the file /etc/cron.daily/rkhunter. By default, cron.daily will generally run between 0100 hours and 0500 hours each morning on many distributions.
If you want to change how the e-mails look, then you can search for the following lines in the cron.daily file:
if [ -s "$OUTFILE" -a -n "$REPORT_EMAIL" ]; then
          (
            echo "Subject: [rkhunter] $(hostname -f)—Daily report"
            echo "To: $REPORT_EMAIL"
As ever, it might be prudent to create a copy of this file before altering it.
Back to the results that I generated from running Rootkit Hunter. In Figure 2.3 you can see some of the rootkits that Rootkit Hunter searched for.
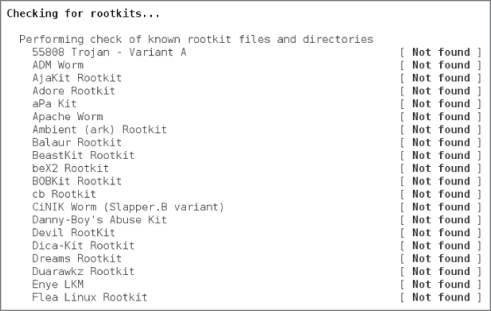
Figure 2.3 A partial list of some of the rootkits that Rootkit Hunter searches for
As you can see in Figures 2.3 and 2.4, there are a number of facets that Rootkit Hunter looks for; the checks are very comprehensive.
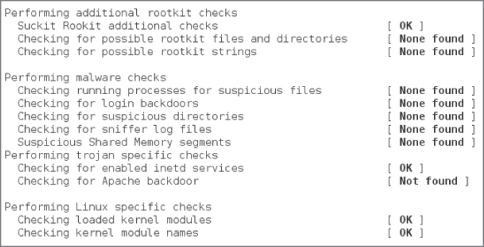
Figure 2.4 Another example of a comprehensive Rootkit Hunter search
False Positives
If you receive any false positives, then you can whitelist them within the config file /etc/rkhunter.conf.
If the volume of false alarms is a problem, then you can do this by uncommenting a config line that matches an entire directory within that main config file like this:
ALLOWHIDDENDIR=/dev/.initramfsIf Rootkit Hunter incorrectly suspects that one of your binaries has been replaced by a script, then you can remove the warning with this option:
SCRIPTWHITELIST="/usr/sbin/lsof"For individual files you can also use this config setting:
ALLOWDEVFILE="/dev/.udev/rules.d/99-root.rules"
Keep in mind that any hidden files or directories (those with names beginning with a dot) are almost always suspicious to filesystem scanners. In Figure 2.5 you can see another part of the Rootkit Hunter scan results that refers to checking for any malicious hidden files.

Figure 2.5 Part of the Rootkit Hunter scan involves the /dev partition and hidden files and directories.
It's clear that the comprehensive checks made by Rootkit Hunter are well considered. Along with the filesystem and the process table, it also checks for networking anomalies, as you can see in Figure 2.6.
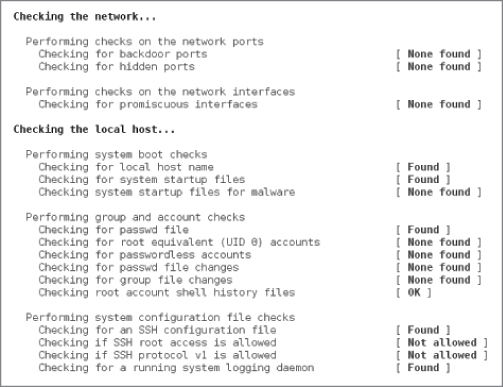
Figure 2.6 The trusty Rootkit Hunter also makes a number of network checks.
Well Designed
The Rootkit Hunter developers describe it as a “host-based, passive, post-incident, path-based tool.” If you're wondering, the “passive” reference means that you need to schedule the software or run it manually. The “path-based” description means it just deals with files and doesn't operate heuristically like a virus checker might.
There is a section at the bottom of the documentation included with rkhunter that I enjoyed reading. It's a well-written primer for anyone who is new to online security or any experienced users who just need a refresher.
It first notes that before an attack is attempted, there is always some form of reconnoitering, so you should pay close attention to your log files. I remember having a script that watched out for traceroutes and ICMP traffic on one of my servers.
Again, repeating my earlier point, the manual goes on to say that this tool isn't a substitute for increasing the security of your machine. Don't treat it as one, but instead as a tool that helps to identify issues.
Interestingly, the Rootkit Hunter documentation also points you to one of their competitors, the excellent chkrootkit tool, which is an older incarnation. The manual suggests that only using one tool within a class of tools is sometimes not enough to gain all the information you need. Therefore, for the sake of completeness, you should benefit from the overlap that running both chkrootkit and rkhunter offers. That's a good point that should apply across all security facets.
Finally, the manual discusses what to do if you discover a compromise and you don't have the required skills to deal with a successful exploit. Along with going to www.cert.org, you may want to go to www.linuxsecurity.com.br/info/IDS/intruder_detection_checklist.html, which offers a list of steps for how to react to an online attack.
You are told by those with experience of such attacks that you should consider which authorities you can report the exploit to, and submit a report as soon as possible—instead of waiting weeks or months—in case something can be done to prevent other compromises. As ever, common sense applies.
Summary
You're now armed with the ability to digitally fingerprint the files on your filesystem. As a result, you can quickly compare former MD5sums to see if your files have been altered, and also run Rootkit Hunter, either every night or periodically. The nice thing about rootkit checkers is that they also offer peace of mind by having a scheduled scan point out a config mistake that you've made. You can then hopefully remedy the mistake before it causes you further security issues.
From what I have covered, there are two rules that you should keep in mind:
- Always keep your recorded MD5sums (or any other hashes) somewhere safe (encrypted and password protected) and far away from the server.
- Don't rely on rootkit tools to reduce your efforts postevent; just use them to identify the issue. From there, figure out how a compromise was possible before you set about rebuilding your machine. There's no point in spending a lot of time rebuilding a machine only to have the same security hole exploited again later. You might be shocked to hear how often this occurs.
When running less critical services, with a little forethought, the securing of a machine connected to the Internet usually doesn't involve too much work. And that's even when, inevitably, some time-consuming overheads are introduced, such as when overnight reporting is added on changes to your system. By taking precautions initially with your machine builds, hackers on the Internet can be held at bay so that you can get on with your work in peace.