
7 Performance and scaling
- Tuning Fluentd to maximize resources using workers
- Deploying Fluentd with fan-in and -out patterns
- Using deployment patterns for scaling
- Implementing high availability and deployments
- Using Fluentd with microservice patterns
In previous chapters, we worked with just a single Fluentd instance. Still, we live in a world of distribution, virtualization, and containerization, which typically needs more than a single instance. In addition to distribution considerations, we need to support elasticity through scaling up (adding more CPUs or memory to a server to support more processes and threads) and scaling out (deploying additional server instances to have workload distributed via load balancing) to meet fluctuating demands (along with the reverse scale down and in). Enterprises demand resilience to handle failure and disaster scenarios. To provide good availability, we should at least have an active server and a standby server deployed, with both servers using configuration files that are kept synchronized. Configuration synchronization makes it possible to start up the standby server on short notice if the first instance fails (active-passive). In the more demanding cases, active-active deployments are needed with servers spread across multiple data centers; this is very conventional as a deployment pattern. A single server solution in the enterprise space is a rarity.
This chapter will explore the techniques and features available to let us scale Fluentd up using worker processes and resource management, and scale out with multiple Fluentd nodes. With scaling out, we can also factor in increased options for resilience. As Fluentd needs only a small footprint, we can implement some of the techniques and features to scale Fluentd on our desktop.
7.1 Threading and processes to scale with workers
One of the ways we can scale a Fluentd deployment is to use its ability to spawn additional child processes (workers) to exploit the fact that modern machines have multiple CPU cores available to run concurrent processes. Before configuring any scaling, it is vital to understand how Fluentd is impacted by its implementation with Ruby and how Ruby handles threads. Ruby has a Global Interpreter Lock (GIL), which means that while a process is not I/O bound, it will block other jobs (see appendix E for more detail on GIL and Ruby threading). Therefore, any computationally intensive tasks are best performed in separate OS processes and use the OS to provide more effective resource sharing. Some plugins do this for you (e.g., the AWS S3 plugin when using gzip compression), but not all, so we must be very mindful of this for performance optimization. Without that separation, the Fluentd process will effectively be locked until the process has completed or released the thread. Generally, Fluentd as a vehicle for routing log events is more likely to be I/O bound—whether that I/O is network-based or is ultimately storage (even if that is indirectly through physical storage for a database of some sort).
Fluentd addresses the thread locking constraint by launching separate processes, known as workers. By default, Fluentd has one worker and one controller process, but we can configure the number of workers. This effectively takes advantage of the fact that the OS typically allocates processes to CPUs and swaps between processes to give them a fair proportion of the CPU’s compute capacity. As shown in figure 7.1, each worker will pick up and execute source, filter, and match directives, depending upon the configuration.
NOTE When there are more processes than CPU cores, the processor will swap between the processes. More processes will mean more swapping. The activity of swapping requires a small amount of effort. If you have too many running processes, you’ll spend more effort swapping processes than performing any meaningful work.

7.1.1 Seeing workers in action
The best way to understand the behavior of worker processes is to configure an example and see what actually happens. The most straightforward way to illustrate workers is to create a variation of the Hello World configuration. We will establish multiple workers and attribute to the workers the application of the dummy source plugin. Using the dummy source plugin means the source doesn’t have I/O dependencies impacting behavior. The relevant match directives then push the output to stdout. Using a filter, we can inject into the log event which worker was involved in the process, building on what we learned in the previous chapter.
Let’s define how many workers we will use and add this into the system directive alongside the log_level attribute we have been setting. This is done by setting the attribute workers in the system directive.
To define explicitly what each worker does, we wrap the directives in a directive of <worker x> where x represents the numeric worker ID that will execute the directives. For example, <worker 2> would use the third worker (IDs start at 0). If we want to effectively allocate more resources (i.e., workers) to a specific set of directives, we can specify a range of workers in the directive. For example, <worker 1-3> would allocate workers 1, 2, and 3 to perform the same activities. All workers will get directives not assigned. So worker 0 in our configuration would process only these directives.
In listing 7.1, we have defined four workers and have deliberately left the subsequent directives outside of the worker configuration. The result of this is that every worker will pick up the configuration. This means we can share a common output—but this has to be handled with care, as it can have undesirable side effects. These side effects can range from losing events to storage corruption, such as the problem of multiple processes trying to write to the same file. In our example, we’re just applying a filter to extract the worker_id, add it to the log event, and send it to stdout (console).
Listing 7.1 Chapter7/Fluentd/dummy-stdout-multiworker.conf—illustrating workers
<system>
  log_level info
  workers 4                                           ❶
</system>

<worker 0>                                            ❷
  <source>
    @type dummy
    tag w0
    auto_increment_key counter
    dummy {"hello":"from worker 0"}
  </source>
</worker>

<worker 1-2>                                          ❸
  <source>
    @type dummy
    tag w1
    auto_increment_key counter
    dummy {"hello":"from worker 1-2"}
  </source>
</worker>

<worker 3>
  <source>
    @type dummy
    tag w2
    auto_increment_key counter
    dummy {"hello":"from worker 3"}
  </source>
</worker>

<source>                                              ❹
  @type dummy
  tag w-any
  auto_increment_key counter
  dummy {"hello":"from workerless"}
</source>

<filter *>
  @type record_transformer
  enable_ruby
  <record>
    worker_id ${ENV['SERVERENGINE_WORKER_ID']}        ❺
  </record>
</filter>

<match *>
  @type stdout
</match>
❶ Declares the number of workers
❷ Activities specific to worker 0
❸ Defines activities for two workers
❹ Defines a source outside of the workers—we should see this being picked up by all workers.
❺ Uses a filter to add the ID of the worker involved in that log event
This configuration can be started up with the command
Before examining the stdout console, it is worth seeing what is happening in terms of processes. With a command console in Windows or a Linux shell, the following appropriate command should be run:
These commands will show you the Ruby processes, which will include Fluentd processes. As a result, you should see five processes listed if Fluentd is the only Ruby solution running. If other Ruby solutions are running, we can differentiate them, as the Fluentd processes will have identical or very nearly identical start times. The processes are made up of four workers and one controller process.
TIP We can make processes easier to identify by using the process_name attribute in the <system> configuration (e.g., process_name Fluentd).
With the Fluentd processes having been run for a while, we’ll want to shut things down. This is a little more complex to do now, as we have multiple processes. For Windows, this can be done with the command line taskkill /IM Ruby.exe /F, and the Linux equivalent is pkill -f ruby as long as you don’t have any other Ruby processes running. If you have other Ruby processes running, you’ll have to isolate the processes and manually kill each one.
Looking through the stdout results from having run Fluentd with the dummy -stdout-multiworker.conf configuration file, you should be able to see that the following has occurred (but be aware there is a level of arbitrary behavior):
-
Log events with the tag
w-anywill appear with any of theworker_identries. -
Logs linked to tag
w0(including"hello":"from worker 0") will only be linked to"worker_id":"0". -
Logs linked to tag
w1(including"hello":"from worker 1-2") will only be linked to"worker_id":"1"or"worker_id":"2".
7.1.2 Worker constraints
When using workers, there are some constraints that need to be considered. This relates to how processes can share (or not) resources such as file handles. So if you allocate multiple workers to a Fluentd configuration that writes to file output, the file needs to be separated, as only one worker can use one file properly. We can solve this by setting the file path to include the worker_id; for example, path "logs/#{worker_id}/${tag}/%Y/%m/%d/logfile.out.
Sharing ports among workers can be realized when the plugin uses the server helper plugin or when the plugin can natively handle the sharing of ports. The forward plugin is an example of native port management. As each process cannot use the same port, a reliable mechanism to overcome this and select suitable ports is needed. When the server helper plugin is used, it will then allocate consecutive ports to each worker. So if we had specified the use of four workers and then defined the use of a monitor_agent plugin with a port set to 30000, then worker 0 uses port 30000, worker 1 uses 30001, worker 2 uses 30002, and so on. If you are using workers, ensure that the ports being used are well separated. Separating the ports will avoid potential port collisions because the algorithm assigns the same port to different plugin instances across multiple workers. For example, specifying ports 30000 and then 30002 to different plugins, but then introducing four workers, would see ports 30002 and 30003 trying to be used by two different plugins.
7.1.3 Controlling output plugin threads
The threading behavior of output plugins can be controlled through the use of a property called num_threads. This value defaults to one. Increasing the number of threads can potentially increase the performance, as it allows context switching between threads to occur when a thread is blocked. As a result, any in-process latency can be used more effectively. But this won’t overcome the constraints of GIL.
You could consider using such a configuration for output plugins where the configuration distributes the workload to several different destinations, as one thread works until it ends or has to stop for I/O. Then the next thread, not I/O bound, will be allowed to work. This all means we gain performance—rather than waiting for the I/O to release and the execution to continue, we swap the thread being executed to where work can be done.
Tuning the use of threads is difficult, as you must know how processes perform in order to recognize the potential for threads to wait on something such as I/O. With the thread switching overhead, there is a point at which it is more effective to wait on I/O rather than swap threads. This can also be compounded by the potential level of process switching at the OS level. Correctly tuning threads can often come down to running realistic workloads and measuring performance, then comparing test runs with different threading configurations to see where performance actually starts to drop off.
7.1.4 Memory management optimization
Another area that can be tuned is the Ruby VM layer. This means tuning the garbage collection and memory block allocation. To tune at this level, you need to have a good understanding of the specifics of the Ruby implementation, along with tooling to help you analyze how the configuration is impacting performance. In appendix E, we provide resources that can help with Ruby.
7.2 Scaling and moving workloads
Chapter 4 looked at the output plugins’ ability to work with buffers, which will provide us with a means to optimize the performance around each I/O activity, particularly with the memory buffer. Beyond buffers and the tuning of threads and workers, the scaling options are about workload distribution. This could be achieved by
-
Feeding the log events to an event stream technology like Kafka.
-
Using tools such as Redis or Memcached for large-scale caches.
-
Taking advantage of Fluentd’s ability to pass log events to other Fluentd nodes. This ability provides the opportunity to move the workload to dedicated Fluentd nodes, either fanning out if the workload needs a lot of additional computing power, or, more likely, fanning in, bringing lots of log events from many smaller nodes down to one or two Fluentd instances.
In the following sections, we’ll look at the fan-in (sometimes referred to as concentrator or aggregator networks) and fan-out deployments, as they are implemented using the same core set of plugins.
Fluentd’s compute footprint is so small, we can run some configurations to illustrate the setup on a single machine.
7.2.1 Fan-in/log aggregation and consolidation
The most likely scenario for deploying multiple Fluentd and Fluent Bit nodes is supporting concentrator networks (fan-in), particularly in a containerized environment. This model describes two or more Fluentd nodes collecting log events and passing the events to a central Fluentd/Fluent Bit instance. For example, as we’ll see later in this section, log events may originate at the Fluentd nodes at the tip of each “spine” of the fan. The log events are filtered as needed, and then events flow down the spine to the center of the fan—hence the name fan-in or concentrator.
Let’s first start with log aggregation in a more generic form relevant to traditional virtualized or native hardware environments, which can also work in a containerized deployment. Then we’ll see how this can vary with containers.
Fan-in relation to application architecture and deployment
Environments that handle high volumes and/or need a high level of resilience will see application software distributed across multiple servers. We can configure servers so a single Fluentd instance can see every server’s log files or deploy a Fluentd (or Fluent Bit) instance on each server. Opening a server so parts of the file system can be accessed from another server creates challenges with security. Each server having a Fluentd node is a more robust and secure model to adopt. The better security comes from the fact that data flows outward from Fluentd to locations it knows about and with log events determined okay to share. This is illustrated in figure 7.2.

Figure 7.2 Illustrating scaling using the full-stack model, where each server has all the features deployed. As a result, call sequences are more likely to remain within a server.
Scaling out can be implemented by the following:
-
Each server holding a complete solution stack (presentation layer, mid-tier, and sometimes even the backend storage).
When this occurs, you are likely to track a single request and response from end to end within the logs of a single server. But linking multiple request responses from a single client to the same backend (known as server affinity) can bias workload to specific servers. This can impact the effectiveness of dynamic scaling, as the new node(s) only taking on new clients.
-
Segmenting the solution into logical parts and allocating parts to one or more specific servers. We often talk about this as an N-tier model with servers dedicated to running a tier, such as the presentation tier; other servers deployed with business logic tier; and other servers for persistence tier; and so on. We can see in figure 7.3 an N-tier or three-tier deployment. Each of the different-colored verticals represents a tier—UI or presentation tier on the left, mid-tier in the middle (typically a business tier when there are three tiers), and in this case, a reporting tier on the right. Server affinity for user sessions is likely to be less of an issue, so the same server may see the same user sessions for their fragment of a user event.

Figure 7.3 In this situation, the services are grouped by a common purpose to target scaling more efficiently. However, following the invocations, end to end is more complex.
Ultimately, tracking the activities of a user’s session end to end will require us to bring all the logs together to see the complete picture. Sometimes the complete picture isn’t handled until all the logs reach an analytics platform and are periodically processed. This is fine, but we’ve already highlighted that we may wish to quickly react or be proactive and trigger actions from the log event processing. Bringing the logs through a centralized node presents several benefits:
- Dedicated node(s) for handling a workload allows resources to be tuned for that job.
- When configuration becomes complex, it’s easier if the logic is more centralized, as deploying improvements and refinements involves a smaller number of deployments—even with automation, fewer nodes are generally better.
- Rather than lots of nodes needing credentials and access to a repository of credentials (such as Vault), we keep the access to such details restricted to a smaller set of servers. Therefore, it is harder for the details to be exploited. This is essential if storing credentials (or certificates when using mutual Transport Layer Security [TLS]) is handled in a less-sophisticated manner than Vault.
- It can be easier to demonstrate security if the number of points of origin for data is controlled. This is particularly true if the final destination of logs is outside the network, as it means the number of servers needing outbound access is constrained. It also makes it easier to handle when outbound proxy servers are involved.
Figure 7.4 illustrates how such a configuration could be deployed with the application servers having a relatively small-footprint Fluentd node. The outermost (top) instances of Fluentd are capturing log events (and maybe filtering out some of the low-value/unneeded log events) before passing log events onto an inner node (shown at the bottom) being fed by multiple Fluentd nodes.

Figure 7.4 An example concentrator network deployment with multiple Fluentd instances feeding a central Fluentd instance on a dedicated server doing the majority of the work
It is common to illustrate a fan-in configuration with a single server in the middle; however, this could be a cluster of servers, particularly when considering hyperscale environments. What continues to characterize the model as fan-in is that the number of log event sources is far greater than those at the center doing the core log event processing.
Fluentd configuration for fan-in
Let’s walk through the setup of this kind of concentrator network configuration. We will need two Fluentd configuration files, one of which will work for as many source servers as we want to represent using the forward plugin as an output. A second configuration uses forward as an input to process and direct traffic to a final destination. To keep things simple, we’ll use the dummy source plugin rather than running the simulators. To make the origin node easy to identify, we need to incorporate something into the log event. Normally we could do that with the node hostname, but since we’re running everything on a single machine, that doesn’t help us. Another approach to this is to retrieve an environmental variable and use it for the tag name. As long as the environment variable scope is restricted to the scope of the shell used to launch the Fluentd instance, this will work. Figure 7.5 illustrates the configuration in more detail.

Figure 7.5 A detailed view of how multiple Fluentd nodes running the same configuration feed a single instance
To get the environment variable into the payload, we’ve added a filter into the source, which takes the tag value and is set using the Ruby command "#{ENV["NodeName"]}"; this retrieves the value of NodeName.
Listing 7.2 Chapter7/Fluentd/dummy-foward1.conf—illustrating forward out
<system>
  log_level info
</system>

<source>
  @type dummy
  tag "#{ENV["NodeName"]}"       ❶

  auto_increment_key counter
  dummy {"hello":"world"}
</source>

<filter *>
  @type stdout
  <inject>                       ❷
    tag_key fluentd_tag
  </inject>
</filter>

<match *>
    @type forward                ❸
    buffer_type memory
    flush_interval 2s            ❹

    <server>                     ❺
      host 127.0.0.1
      port 28080
    </server>

  <secondary>                    ❻

    @type stdout
  </secondary>
</match>
❶ Here, we are grabbing the environment variable to make each instance distinct.
❷ Puts the tag into the log event record
❸ Declares the forward plugin output
❹ Buffers up events before sending; for convenience, we’re limiting this. In the real world, you’d probably consider a longer duration.
❺ Defines the target server to direct the log event to
❻ If we can’t communicate with the central Fluentd instance, we need to send the log events somewhere. In this configuration, we’re just sending the events to the console if they can’t be handled. You’ll probably want to do something more robust in a production scenario, like writing events to a file.
Before starting Fluentd, the shell used to run Fluentd will need to set or export (Windows or Linux) NodeName=Node1. Each source node has a new number in the assignment. Then we can start up Fluentd with
Repeat the steps of starting a shell, setting the environment variable, and launching the source Fluentd node to get a second Fluentd node generating log events and sending them to the central Fluentd node.
NOTE If the environment variable is not set up, and if Fluentd is showing its configuration (at the info log level), you can see if the value has been properly inserted. If the value is absent, depending on the attribute, you’ll observe a startup error at best; at worst, things will start up but not appear to do anything. This comes from the fact that a default value may be defined and taken. For example, the port attribute will be 0.
We have used a filter to ensure that the tag is captured into the log event. In addition, we can also utilize the stdout plugin so the console from the sender will show us the log events that we should receive in the central node. Ideally, we need to run several shells and set the environment variable accordingly. Depending on how long it takes to start up the central (consuming) node, periodic network errors will be reported on the source nodes, as there is no response to the network calls.
This brings us to the consuming configuration, which is simply accepting the forwarded events and pushing them out to the console. We’ve seen much of this before, although the use of the forward plugin is new. For Fluentd to receive the events, we need to define a Fluentd source, which binds to a network address and port. This obviously needs to match the sender’s configuration. We can see all of this in the following listing.
Listing 7.3 Chapter7/Fluentd/forward-stdout.conf—illustrating forward as a source
<system>
  log_level info
</system>

<source>             ❶
  @type forward
  port 28080         ❷

  bind 127.0.0.1
</source>

<match *>            ❸
  @type stdout
</match>
❶ Defines the use of the input forward plugin
❷ Network address to bind to (DNS or IP)—in our case localhost. This needs to match the sender.
❸ Shows on the console what log events have been sent
With the consuming Fluentd node defined, we can fire up a single instance (for the more common concentrator network). Once all the Fluentd nodes are communicating, we’ll see all the log events in this node’s console. So, let’s start up the consumer node with the command
When you look at the console output now being generated, you should see that the node name included in the console output will vary. The variation reflects that the log events are from two different Fluentd nodes, as we made the tag values dynamic in the configuration.
NOTE The application of the msgpack plugin will help reduce network traffic, as a formatter can be set to msgpack for the forward plugin. The receiving forward plugin can recognize msgpack-formatted events and automatically unpack them. As a result, Fluentd-to-Fluentd traffic is transmitted very efficiently.
7.2.2 Fan-out and workload distribution
We can see how we can increase the compute effort available to Fluentd processes by offloading work from a node collocated with the application workload to one or more dedicated Fluentd servers, as figure 7.6 illustrates. If we’re simply offloading work, it may be worth using Fluent Bit as the application’s collocated log collector. Fluent Bit is smaller, and if it can collect the log events (remember Fluent Bit is more restricted in plugin options), it can easily forward to Fluentd. We then use the downstream Fluentd to do the hard work of processing the log events. Revisit chapter 1 to review Fluent Bit’s differences from Fluentd.

Figure 7.6 Deployment options for work distribution allow the allocation of more compute power to Fluentd’s processing of log events without impacting the originating application(s), as we can route log events to more servers with dedicated capacity for Fluentd.
The application of a fan-out pattern is unusual, at least in our experience. If you find yourself using unusual configurations, it is worth reviewing the situation to ensure there isn’t a larger issue. For example, restrictive default resource allocation forces the need to fan out, but easing or removing the restrictions could eliminate some distribution complexity.
Fluentd configuration for fan-out
With both fan-out and high-availability deployments, we need to have the ability to send workload to potentially multiple nodes. In the context of high availability, sending traffic to a different node will be triggered by communication loss, and in fan-out, the connectivity is driven by workload sharing. Let us examine both requirements, as there is some commonality in the configuration. As shown in figure 7.7, this time we will deploy only one node with the dummy source generator, but route log events to multiple consumer nodes that will output to the console.

Figure 7.7 Our example configuration of Fluentd fan-out with one node passing log events to multiple nodes to process
The key difference between this and the previous source node configuration is that the configuration of the forward plugin will now need multiple servers specified. In high availability, which node should be considered the primary and which should be the standby must be addressed. For fan-out, we may want to weigh the workload in favor of one node over another. All of this can be done within the configuration through properties. For multiple servers, as shown in listing 7.4, we can simply declare multiple contiguous blocks of attributes for the server helper plugin <server>. As this is a basic fan-out, we have added a weight attribute to establish a ratio of workload between the servers. In our case, that ratio is 10:1. If unspecified, then all the nodes get the same weighting applied.
Listing 7.4 Chapter7/Fluentd/dummy-forward2.conf—illustrating forward to multiple servers
<source>
  @type dummy
  tag dummy-fanout-source
  auto_increment_key counter
  dummy {"hello":"world"}
</source>

<filter *>
  @type stdout
  <inject>
    tag_key fluentd_tag
  </inject>
</filter>

<match *>
    @type forward
    buffer_type memory
    flush_interval 2s
    <server>               ❶

      host 127.0.0.1
      port 28080
      weight 10            ❷

    </server>
    <server>
      host 127.0.0.1
      port 38080           ❸
      weight 1             ❹
    </server>

  <secondary>
    @type stdout
  </secondary>
</match>
❶ First server definition with its differing ports so we can run on the same host
❷ Defining the weighting, which will favor the first server configuration. If unset, this value defaults to 60.
❹ Weighting set to bias traffic away from this server
As we’re running everything on the same machine, the Fluentd instances forming the fan side will need to be configured to operate on different network ports to avoid conflicts. A production-like environment with the Fluentd instances is configured to run on separate servers but using the same network port. Utilizing the naming trick we saw in listing 7.2, we can make the value configuration-driven and avoid needing multiple configuration files with different values. As a result, each node will need an environment variable called NodePort, defining one of the ports used on the source side of the node configuration, as shown in the following listing.
Listing 7.5 Chapter7/Fluentd/forward-stdout2.conf
<source>
  @type forward
  port "#{ENV["NodePort"]}"       ❶
  bind 127.0.0.1
</source>

<match *>
  @type stdout
</match>
❶ Setting the port number up dynamically allows us to run the same configuration twice.
Let’s see what happens with this configuration of nodes. Start the source node with the command
Then we need to configure a shell with the command set NodePort=28080 for Windows or export NodePort=28080 in a Linux-based environment. Once this is set, we can start the Fluentd instance with the command
We then repeat the steps again, replacing 28080 with 38080 in the set/export step.
Once everything is running, the log events should appear on the consoles of the Fluentd instances running the dummy-forward2.conf configuration. With the ratio set, we should see that the logs are heavily biased to the node running on port 28080. But if you count how many updates go to one console over the other, you’re not guaranteed to see every output on the server using the 38080 port and ten on the other, as the ratio is calculated every time we want to send an output. The calculation then yields a value that will dictate on which side of the ratio it will fall.
Another way of distributing the workload is to leverage the roundrobin plugin. This plugin is a core Fluentd output plugin that works with the store helper plugin. This is illustrated in the following listing, with a roundrobin rotating the outputs to each individually identified server. As this is for a fan-out implementation, each store block will use a forward plugin, but that isn’t mandatory.
Listing 7.6 Chapter7/Fluentd/dummy-forward3.conf—illustrating the use of roundrobin
<source>
  @type dummy
  tag dummy-fanout-source
  auto_increment_key counter
  dummy {"hello":"world"}
</source>

<filter *>
  @type stdout
  <inject>
    tag_key fluentd_tag_roundrobin
  </inject>
</filter>

<match *>
    @type roundrobin          ❶

    <store>                   ❷

      @type forward
      buffer_type memory
      flush_interval 1s
      <server>                ❸
        host 127.0.0.1
        port 28080
      </server>
    </store>
    <store>
      @type forward
      buffer_type memory
      flush_interval 1s
      <server>
        host 127.0.0.1
        port 38080            ❹
      </server>
    </store>

  <secondary>
    @type stdout
  </secondary>
</match>
❶ To get the roundrobin behavior, we need to use it as the output plugin. It will then use each store helper plugin in turn, in the same way as the copy plugin uses all the store helpers.
❷ Declares the store configuration, but as we want the roundrobin to use each target equally, the configuration for a store can have only one server.
❸ The server definition for the destination
❹ The second server configured to be using a different port
Let’s look at how the roundrobin behaves in comparison to the weighting. We need to start up as before; if the console for the two fan nodes doesn’t have the variable set for NodePort, we need to reestablish the settings. We then start the event source Fluentd instance with the command
Then start the two instances of the fan node using the same command:
This time the output will consistently go to the alternate console outputs as the roundrobin deliberately ensures the allocation is consistently even. The use of the weight attribute can also be applied, but this does undermine the roundrobin behavior.
7.2.3 High availability
The configuration for the high-availability arrangement is not that different from the fan-out. Rather than using the weight attribute to distribute the workload, we use the standby attribute and set one node to have the value true and the other false. An example of the server part of a match plugin can be seen here:
    <server>
      name myserver1
      host 127.0.0.1
      port 28080
      standby false
    </server>
    <server>
      name myserver2
      host 127.0.0.1
      port 38080
      standby true
    </server>
As the fragment shows, we have defined two servers; for example, using the forward output plugin would be two instances of Fluentd to send log events to. When the Fluentd instance with this configuration starts up, it will try to send the log events using the server named myserver1, as it is marked as not being the standby. However, if this Fluentd instance experiences communication issues with myserver1, it will send the log events to the standby called myserver2.
In this fragment, we have used the name attribute. The name is normally used only for Fluentd logging and certificate verification. But as you can see, using the name attribute can also help you determine which server is which, particularly when IP addresses rather than meaningful DNS names are being used.
7.2.4 Putting a high-availability comparison into action
Your customer wants to see how a high-availability configuration differs in setup and behavior. Your team has agreed that configuration files Chapter7/Fluentd/dummy-forward2.conf and Chapter7/Fluentd/forward-stdout2.conf should be refactored to provide the comparison.
Once the configuration has been refactored, run the two configurations and shut down individual instances of Chapter7/Fluentd/forward-stdout2.conf. Note the resultant behavior to show the customer the differences.
The configuration to illustrate high availability based upon Chapter7/Fluentd/dummy-forward2.conf and Chapter7/Fluentd/forward-stdout2.conf can be found in Chapter7/ExerciseResults/dummy-forward2-Answer.conf and Chapter7/ExerciseResults/forward-stdout2-Answer.conf.
The only change of importance in the configuration is removing the weight attribute and introducing the attribute standby set to true or false in the relevant server configuration. The difference can be observed as soon as the nodes have started (it’s best to start dummy-forward2-Answer.conf node using port 38080, so it doesn’t immediately think the primary destination node is down and switch to the reserve). The console output will only show up on the node listening to port 28080. However, when this node is shut down, the log events will pass to the Fluentd instance working on port 38080.
7.3 Fluentd scaling in containers vs. native and virtual environments
So far, we’ve looked at how we can scale Fluentd from a pure Fluentd node-to-node perspective. In most cases where you’re working in a virtualized or native hardware environment, you can use the configurations as shown with Fluentd or Fluent Bit instances deployed. These deployments can be described as having Fluentd collocated with the application running on a VM or server. Each node is capturing the application log events along with those from the host OS. As a result, scaling out the VMs or native servers will drive the scale-out of Fluentd.
We have more options and considerations for containerized environments such as Kubernetes, as containers are typically more finely grained (therefore, more containers are needed for a complete solution). We have an additional abstraction layer in the form of pods, and the orchestration is far more sophisticated. While we’ll focus on Kubernetes, the principles aren’t very different for OpenShift and other related products.
7.3.1 Kubernetes worker node configuration
Not only do your applications need to log content, but so, too, does the orchestration layer, such as Kubernetes, Apache Mesos, Docker Swarm, and others (including the container engine itself). As a result, the Kubernetes engine creates special services that it uses on each worker node. The deployment would then look as shown in figure 7.8. All the log events in the individual containers must be directed to stdout for this deployment to work.

Figure 7.8 Illustration of Fluentd deployed as a daemon service in a Kubernetes context. Fluentd collects all the pod stdout and stderr outputs.
7.3.2 Per-cluster configuration
The per-cluster model looks a lot like the worker node configuration but is a little more structured. The structure is due to the containers writing to a defined location via mapping rather than simply trusting stdout and stderr and hoping something is listening in. It is also a little easier to segment the different types of logs and infer some meaning as a result. The containers now just need to mount the cluster-wide file system and write their logs to files as they would if running locally (mapping the local filesystem to shared storage is a Kubernetes configuration issue).
With logs being written to the filesystem, a pod with a Fluentd container simply uses the tail plugin(s) to capture and process the log files. With good directory and/or file naming, we can define specific details about the log file format. Knowing the log file origin determines the kind of things that are particularly important. This approach is illustrated in figure 7.9.

Figure 7.9 Kubernetes cluster shared log capture, where pods write to the file system and a Fluentd pod then gathers the files and processes
In figure 7.9, we reference SAN (storage attached network), which would be ideal for on-premises deployments. It will give you disk redundancy and, typically, storage allocating the physical disks, giving high performance. In a cloud context, you would implement this with block or file style storage and trust the quality of service and performance controls the cloud provider offers.
7.3.3 Container as virtualization
This reflects the simple idea of taking an existing environment and configuring it within a container, converting a virtual machine with its own OS to a container that delegates OS work to the shared host. So, a logical deployment could look like figure 7.10, with each container hosting the application and Fluentd, or, more preferably, Fluent Bit if it has the right adaptors and a smaller footprint.

7.3.4 Sidecar pattern
Container-based technologies such as Kubernetes have pod design patterns, such as the sidecar (http://mng.bz/nYNK). The idea of the sidecar pattern is that within the pod of containers, there are containers added to provide support services; this can include a proxy layer supplying security to logging. This would mean a container with Fluentd or Fluent Bit would exist supporting all the other containers within the pod, as illustrated in figure 7.11. This is the most flexible and, for Fluentd, the easiest to configure but does require more sophistication in the configuration of containers and pods.
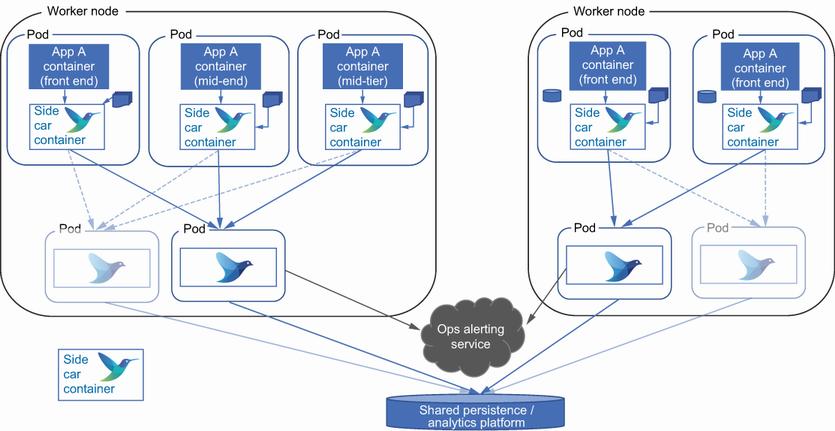
Figure 7.11 Make Fluentd available to all the containers in a pod using the sidecar pattern illustrated here.
7.3.5 Options comparison
Having looked at the different deployment models, we should take the time to understand the pros and cons of the different approaches. In table 7.1, we’ve taken each of the patterns described and pulled out the pros and cons of both Fluentd and Fluent Bit.
Table 7.1 Fluentd deployment options in a containerized environment
7.4 Securing traffic between Fluentd nodes
When communicating between Fluentd nodes, you’ll likely want to provide some level of security. Using unsecured network traffic can result in credentials being exposed, not only as part of authenticating between Fluentd nodes, but also between Fluentd and source or targets such as Elasticsearch. We have made it very easy for someone to acquire the credentials when listening to network traffic. Not only are credentials exposed, but the communicated log information will also provide an attacker with the means to work out how your solution may work, harvesting sensitive data if the log events are for auditing, and so on. Using HTTPS encryption with TLS, the successor to SSL (Secure Sockets Layer), can mitigate these issues.
If your log events include PII data, a proactively secure configuration will be needed for the application and the log events during transmission and when stored. You have all of these considerations in addition to the possibility that log events may be communicated between clouds and data centers over insecure networks (i.e., the internet). But security should not come down to just adopting TLS or, better still, mutual TLS (mTLS), as we’ll see shortly.
Setting up TLS is not the scary black art that it once was, possibly in part because we’ve moved past the idea of SSL/TLS termination at the network edge, and the compute overhead of encrypting and decrypting is not seen as being so onerous now. But configuring SSL/TLS is still rather context-sensitive and does require some basic understanding of TLS ideas (a subject addressed in depth in other books, such as Securing DevOps by Julien Vehent, available at www.manning.com/books/securing-devops). So rather than a lengthy process of going through a TLS configuration that will work for everyone, we’ll take a brief look at the support provided. (Appendix E provides links to a range of resources that can help you apply TLS yourself.) With contemporary security approaches adopting a trust-no-one stance, it is worth investing time in establishing TLS security.
7.4.1 TLS configuration
When it comes to configuring network transport, we can provide a set of transport configurations. Some adaptors leverage the helper plugin directly, and as a result, sometimes offer slightly different attribute names. For example, secure_forward uses tls_version in the server part of its configuration. In contrast, the attribute is called version when using the transport helper directly (which can be provided in source, filter, and match directives). The transport construct is represented in the configuration within XML brackets and includes an element indicating the type of transport (udp, tcp, tls). For example:
While we’ve been focusing on TLS and the plugins that abstract more of the network, we can process TCP (Transmission Control Protocol) or UDP (User Datagram Protocol) traffic. Still, these require more configuration effort to use.
The version of TLS that can be supported can be controlled through the Fluentd configuration. TLS 1.3 (published as RFC 8446; https://tools.ietf.org/html/rfc8446 in August 2018) is presently the latest version of the standard published. Currently, TLS 1.2 is the default version used by Fluentd, reflecting that TLS 1.2 is the most widely adopted. Industry practice recommends using the latest version of TLS possible (as it is the most secure) and accomodating lower versions only where necessary. The TLS compatibility and cipher options can be managed via the version and ciphers attributes.
Specialized forward plugin for SSL/TLS
There is a secured version of the forward plugin for both in and out actions, as previously referenced. This can be deployed like all plugins using gem. For example:
This version of the plugin still requires certificates but simplifies the configuration and masks the transport layer configuration section.
7.4.2 TLS not just for encryption
Using TLS isn’t just for providing an encryption key but can and should be verified as an authentic certificate from a certificate authority (CA) for the server using it. Typically, part of the handshake is when the client and server connect. If the effort in confirming a certificate’s authenticity with the certificate authority is harming latency, then you might consider disabling the check if you’re entirely within a trusted network environment (e.g., a physical private data center network, but not a cloud-hosted network). Switching such checks off does go against the concepts of security in-depth, so consider what risks this may bring. You’ll need to go further if you use self-signed certificates, as there is no CA involved. Additional attributes—tls_insure_mode and tls_allow_self_signed_cert—are needed to prevent Fluentd from checking the certificate with a CA.
7.4.3 Certificate and private key storage
To use a certificate, we obviously need to be able to store it and the private key. This information is defined as several attributes and includes accommodating Windows store options (for more info, see http://mng.bz/vo6M).
Regardless of where the certificate is stored, we need to tell Fluentd where the certificate is located via cert_path (e.g., cert_path ./myFluentd.crt) along with the private key location, via private_key_path (e.g., private_key_path ./myFluentd.key). Ideally, certificates are provided by a public or private CA, which can be contacted to confirm the authenticity of a certificate being used. We can tell Fluentd whether or not it should make that verification via the client_cert_auth attribute (true or false). With a self-signed setup, this has to be false.
7.4.4 Security is more than certificates
Securing communications is more than simply the application of TLS. Some organizations will require more, such as passing a username, password, and tokens. The use of attributes like this and token IDs can provide additional assurance. If we’re going to pass sensitive values like this, then the use of TLS should be considered mandatory.
7.5 Credentials management
We have the challenge that the Fluentd configuration doesn’t have the means to encrypt and decrypt credentials in its configuration file. So, a username and password needs to appear in the configuration when Fluentd starts in cleartext. Any system administrator (sysadmin) aware of a file with cleartext credentials will not be happy, and if you work with an IT security officer, they will be even more concerned. Some strategies are available to limit this risk; these are the ones we’ve seen or adopted. The list is ordered in increasing strength of security:
-
Lock down the Fluentd file so access is very tightly restricted. Remember, this also means blocking or restricting the use of the Fluentd UI (illustrated in chapter 2), as well as the UI’s credentials. This approach is really the bare minimum, and if sensitive data such as PII is involved, it is probably not seen as acceptable.
This is likely to need localhost users to be set up and run Fluentd or Fluent Bit. Such a setup brings a range of other administrative considerations.
-
Use inclusions to separate the core configuration from the credentials. Then just the inclusion files need to be subject to the aggressive file access controls. This is an improvement, as it allows you to work with the configuration more freely. But this will prove to be fiddly if there are lots of credentials to handle and is unlikely to be considered acceptable if PII data is involved.
-
Wrap the Fluentd startup with a script that, before starting Fluentd, loads the credentials into environmental variables within the OS session and then start Fluentd. The Fluentd configuration then incorporates access to the environment variables, as we’ve previously illustrated. As a result, the configuration file has no sensitive values until Fluentd parses the file. But we can incorporate into the script a means to source and decrypt the environment variable. This allows you to then utilize standard OS security features. In a containerized environment, this may get messy, and in a world of multiple OS types, this means potentially different configurations. Indeed, different scripts load the required credentials into memory.
-
Another component typically associated with the more cloud-native approach that can be equally applied in traditional deployment environments is the use of Vault (www.vaultproject.io) from HashiCorp. Vault comes in a free (open source) version and an enterprise edition with additional features (synchronized distributed vaults). We can then embed it into the configuration file and call the Vault to retrieve the credentials needed using the Vault CLI or API. This alleviates the issue of needing to load into the OS environment beforehand. We won’t go into the detailed specifics of aligning application roles to credentials available in Vault, as the documentation provides an excellent explanation at www.vaultproject.io/docs/auth/approle.
If you’re working within a Kubernetes environment, then, of course, you have an additional option in terms of using Kubernetes secrets (more about this at http://mng.bz/4j4V). Vault has a raft of plugins to work with other native credentials frameworks such as Kubernetes’s Secrets, those from cloud vendors, or older standards like LDAP (Lightweight Directory Access Protocol).
7.5.1 Simple credentials use case
We can define username and password credentials as part of a security configuration between Fluentd nodes. This allows a Fluentd node receiving forwarded log events to have an increased level of trust.
The credentials are obviously associated with a server, so in the forward output configuration, we provide the attributes username and password in the server attributes set. In the following listing, we have taken the dummy-forward.conf and extended it to include the credentials.
Listing 7.7 Chapter7/Fluentd/dummy-user-forward1.conf with user credentials
<source>
  @type dummy
  tag "#{ENV["NodeName"]}"
  auto_increment_key counter
  dummy {"hello":"world"}
</source>

<filter *>
  @type stdout
  <inject>
    tag_key fluentd_tag
  </inject>
</filter>

<match *>
    @type forward
    buffer_type memory
    flush_interval 2s
    compress gzip

    <security>                                    ❶

      shared_key hello
      self_hostname source_host
    </security>

    <server>
      host 127.0.0.1
      port 28080
      username hello-this-is-a-long-username      ❷
      password world-of-security-likes-long-passwords
    </server>

  <secondary>
    @type stdout
  </secondary>
</match>
❶ Mandatory attributes need to be provided for security, which include a logical name and a common key.
❷ Provides the user credentials
Building on forward-stdout.conf, the consumer side also needs the same credentials to verify against. In listing 7.8, we show the additional attributes involved. The consumer side will need the username and password specified and an explicit indication in the security structure using the attribute user_auth. The server logical name should expect the forwarded log event to be defined using the attribute self_ hostname and mandatory security attribute shared_key.
Listing 7.8 Chapter7/Fluentd/forward-user-stdout.conf receiving with credentials
<source>
  @type forward
  port 28080
  bind 127.0.0.1
  <security>                                    ❶
    user_auth true                              ❷
    self_hostname destination_host              ❸
    shared_key hello
    <user>                                      ❹
      username hello-this-is-a-long-username
      password world-of-security-likes-long-passwords
    </user>
  </security>
</source>

<label @FLUENT_LOG>
  <match fluent.*>
    @type stdout
  </match>
</label>

<match *>
  @type stdout
</match>
❶ Starts the security configuration
❷ Tells Fluentd that we must apply user authentication
❸ Declares how this node should be addressed by the client
❹ Declares the credentials expected to arrive
We can run this configuration with one shell running:
Along with this, we need another Fluentd running. Before starting Fluentd, the shell used to run Fluentd will need to set or export (Windows or Linux) NodeName =Node1. Each source node has a new number in the assignment. Then we can start up Fluentd with
Everything should run as it did when we ran without the user credentials. However, we are validating credentials on the consumer side. Stop the client side, change the password, and restart that Fluentd instance. This will now fail with reported password issues.
7.5.2 Putting certification into action
Your company needs the Fluentd deployment to span multiple data centers so that the security team can use their preferred monitoring tool across the WAN. Your chief security officer (CSO) is pleased that an element of security is applied for internode communication. But they are not happy that credentials could be communicated in cleartext. The CSO has approved the use of Fluentd nodes spanning the company-wide network as long as you can provide SSL/TLS configuration to encrypt the traffic. The data centers do not have direct internet connectivity to enable validating and direct distribution of certificates from a public CA. There isn’t an internal CA at present, although there are discussions about one in the future. The infrastructure team has said that they will distribute self-signed certificates for you. Therefore, we will need to configure Fluentd using self-signed certificates. To demonstrate that the infrastructure team can meet certificates requirement and that they understand what is needed, it has been agreed that dummy-user-forward1.conf and forward-user-stdout.conf will be modified to include the use of self-signed certificates to prove the process.
Proof that the solution will work can be achieved by running the Fluentd nodes by replacing the certificate or key file with a dummy file. This should cause the data exchange to fail.
The example configuration can be found in the configuration files Chapter7/ExerciseResults/dummy-user-forward1-Answer.conf and Chapter7/ExerciseResults/forward-user-stdout1-Answer.conf. We have referenced dummy certificate files within the Fluentd configurations (if used, this will trigger a failure). For this to work, you will need to replace these files with proper certificates. As the certificates take details and have a lifetime, you should create your own certificates and replace the dummy file with the certificates you generate. This is because certificates can be linked to identities and have defined lifetimes. Guidance on how to do this using OpenSSL (www.openssl.org) can be found in the liveBook version of Understanding API Security by Justin Richer and Antonio Sanso (Manning, 2017) at http://mng.bz/QWvj.
An alternative approach is to adopt Let’s Encrypt, which will provide an automated mechanism to renew certificates (https://letsencrypt.org/).
In the configuration, you’ll note that we have opted to switch from the standard forward plugin to the secure forward plugin, so we don’t explicitly need to set the transport layer attributes. We have also assumed that the passphrase used in creating the key and certificate is your_secret. To change the configuration-held passphrase to align with what was used, you’ll need to modify the forward-user-stdout1 -Answer.conf, which contains an attribute called ca_private_key_passphrase that will need the correct value.
To run the configuration, we’d need to start the Fluentd nodes with the commands
fluentd -c Chapter7/ExerciseResults/forward-user-stdout1-Answer.conf
fluentd -c Chapter7/ ExerciseResults /dummy-user-forward1-Answer.conf
As we’ve seen, Fluentd is very flexible for implementing scaling, distribution, and resilience. But with that comes the use of network connectivity. We should protect our network traffic as much as we work to secure individual servers or containers. This does mean handling certificates both for authentication and encryption. Certificate use can make things more challenging, but such issues will become a lot easier if a well-thought-out strategy is adopted, not just for monitoring but for the application communications as well.
Summary
-
Fluentd performance can be tuned by using workers running individual CPU processes or through thread management constrained by how Ruby works.
-
Workers do require some careful consideration to avoid mistakes like putting log events out of sequence. There are strategies to help determine how to configure workers so they don’t introduce new problems.
-
Workloads can be distributed using fan-out and fan-in patterns to distribute or concentrate the processing of log events.
-
High availability can be implemented using a distributed deployment of Fluentd nodes.
-
The same basic distribution principles can be applied within a microservices environment. The use of Kubernetes allows several different ways of deploying and using Fluentd.
-
Communication between different Fluentd and Fluent Bit instances should be made secure by using SSL/TLS certificates and should be further enhanced with the use of credentials or tokens.
-
Security should not only address communication between Fluentd nodes but should also extend to sending and retrieving the log events to other services, such as a Mongo database or Elasticsearch.