
Lesson 1. Producing Music with Logic Now!
Lesson Files: None
Time: This lesson takes approximately 150 minutes to complete.
Goals: Perform scene triggering in the Live Loops grid
Produce a one-minute instrumental piece using prerecorded media
Explore the Logic Pro main window interface
Navigate and zoom the workspace
Move, copy, loop, trim, and transpose regions in the workspace
Mix down and export the project
Let’s get right to the heart of the matter and start producing music immediately. In this lesson, we’ll go straight to the fun part of using Logic Pro. You will first use Logic’s Live Loops grid to create scenes and trigger multiple loops in real time while keeping them playing in sync. Later in this lesson, you will create a one-minute Modern Rock instrumental in the Tracks view while gaining familiarity with Logic Pro, its main window, and many of its features.
Creating a Logic Pro Project
After installing Logic, you can find it in the Applications folder in the Finder. Let’s find Logic, open it, create your first project, and save it.
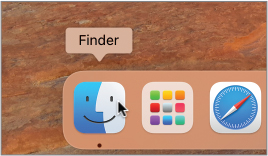
In the Dock, click the Finder icon.
More Info

If you have questions or need help, ask the author of this book, David Nahmani, on his Logic user community forum: www.logicprohelp.com/forum
Choose Go > Applications (or press Command-Shift-A).
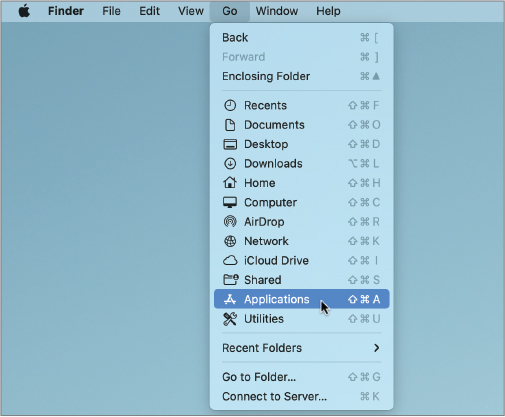
A Finder window opens, displaying the contents of your Applications folder. To quickly find a file in a folder, you can start typing the first few letters of the file’s name.
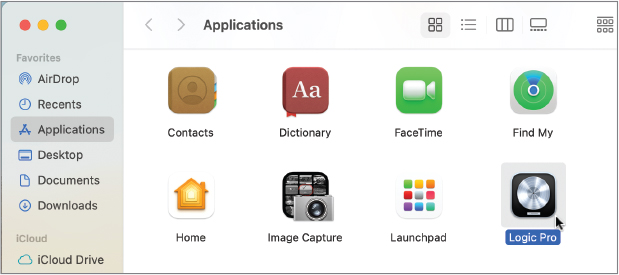
Type the first few letters of “Logic,” and double-click the Logic Pro icon.
Depending on your Logic usage history on your Mac, you may see various messages pop up.
Note
If you have used Logic Pro before on your Mac, some of the messages described in the following steps may not appear. In order to prepare your Logic workstation, make sure you follow the instructions in the Getting Started section of this book.
If a Welcome to Logic Pro window asks how you would like to use the app, click Complete Mode.

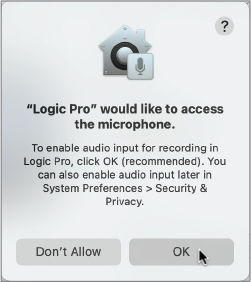
If Logic Pro would like to access the microphone, click OK.
If you are asked to download all available sounds, click Continue.

Logic will download the sounds in the background. Later when the sounds are downloaded, you will be prompted to enter your password to finish installing the software.

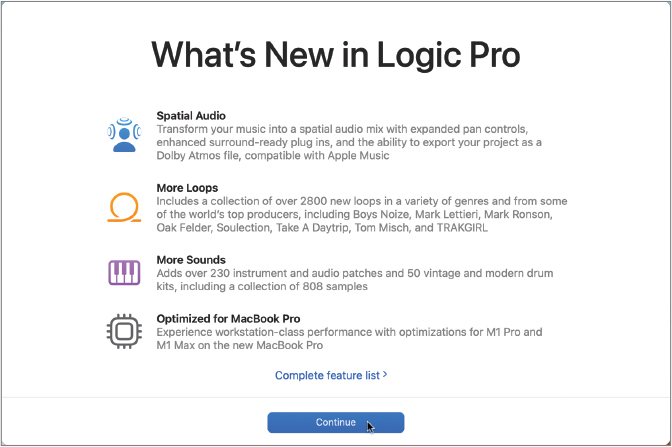
If a What’s New in Logic Pro window opens, click Continue.
Logic Pro opens, and after a moment, the Project Chooser opens. (If the Project Chooser does not open, close the current project, if any, and then choose File > New from Template. If “New from Template” is not in the File menu, choose File > New.)
Tip
To add Logic Pro to the Dock, drag its icon from the Finder window into the Dock. The next time you want to open Logic Pro, you can click its icon in the Dock.
In the Project Chooser, double-click the Live Loops project template.

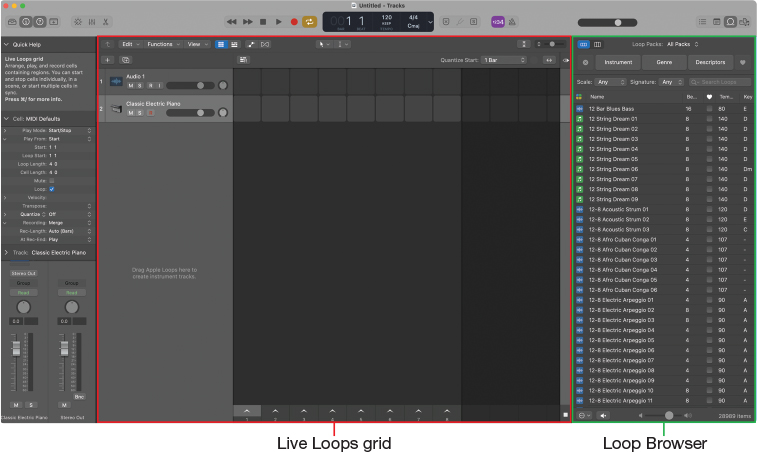
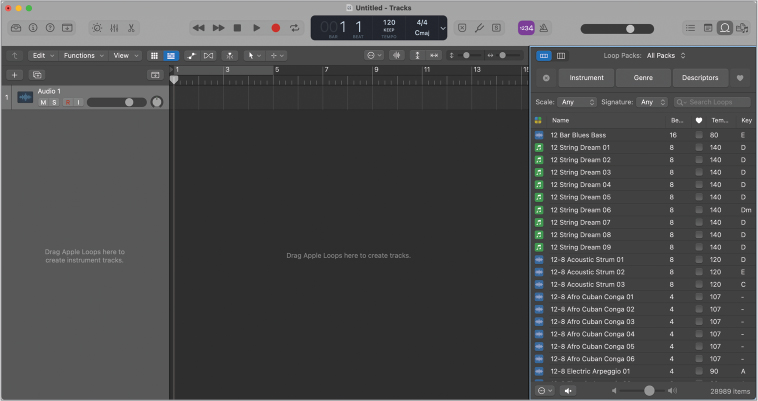
A new project is created with the Live Loops grid displayed. Two empty tracks are created: one audio track (Audio 1) and a software instrument track (Classic Electric Piano). On the right, the Loop Browser lists all the Apple Loops available on your Mac.
Note
The first time you open the Loop Browser, you may have to wait for Logic to index the loops before you can use it.
Saving your new project before you start working on it is always a good idea. That way, you won’t have to worry later about picking a name and a location when inspiration strikes.
Choose File > Save (or press Command-S).
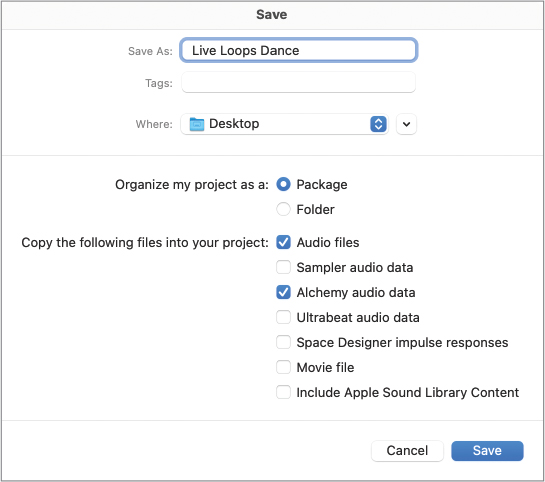
You’re saving this project for the first time, so a Save dialog appears. The first time you save a file, you must provide:
 A filename
- A location on the hard drive where you want to save the file
In the Save As field, type your project name, Live Loops Dance, and from the Where pop-up menu, choose Desktop (or press Command-D).
Note
If you’ve enabled the Desktop and your Document folder to sync to iCloud, do not save your Logic projects to your Desktop. Choose another location that is not synced to iCloud, such as the Logic folder within your Music folder.
Click Save (or press Return).
The project is now saved on your desktop, and its name is displayed at the top of the Logic Pro window. To avoid losing your work, save your project often.
Note
Logic Pro automatically saves your project while you’re working on it. If the application unexpectedly quits, the next time you reopen the project, a dialog prompts you to reopen the most recent manually saved version or the most recent autosaved version.
You’ve now set up your new project. With a blank canvas ready, you can start being creative.
Creating a new project in Logic opens the main window, which will be your main work area. In the next exercise, you will add Apple Loops to start creating a new song.
Perform in Real Time with Live Loops
You will now start previewing and combining Apple Loops, which are prerecorded music snippets that automatically match the tempo and key of your project and are designed to be repeated seamlessly.
Professional producers use Apple Loops all the time to create video soundtracks, to add texture to a beat, to create unexpected effects, and so on. Several major hit songs were produced using Apple Loops. The Apple Loops included with Logic Pro (and earlier versions of Logic or GarageBand) are royalty free, so you can use them in professional projects without worrying about licensing rights.
Let’s get right into the fun of playing music by triggering Apple Loops using the Live Loops grid, which allows you to trigger loops automatically in sync.
Browsing and Previewing Loops
To start using the Live Loops grid, you need to preview loops and choose which ones to use. The Loop Browser is the perfect tool for this job. It allows you to browse loops by instrument, genre, mood, and other attributes. You do not need the Classic Electric Piano track for this song, so let’s delete it.
Note ![]()
Depending on the Logic content installed on your Mac, some loops may not yet be downloaded and appear dimmed. You can click the button to the right of any dimmed loop name to download and install the Loop Pack that contains that loop.
If the Classic Electric Piano track is not already selected, click its header to select it.

Choose Track > Delete Track (or press Command-Delete).

The track is deleted, leaving only one track in your project, Audio 1.
Let’s find the loops you’ll use for this song.
In the Loop Browser, click the Instrument button.

In order to see more keyword buttons, you’ll resize the keyword area.
Drag down the divider at the bottom of the keyword area.
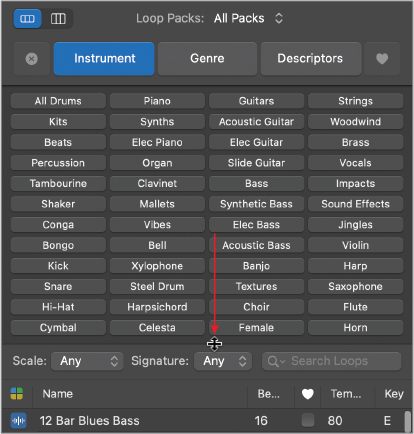
You can see more keywords.
Click the Kick keyword button.

Click the Genre button, and then click the Electronic Pop keyword button.

In the results list, you can see the 17 Apple Loops playing a kick in the Electronic Pop genre.
Click the first loop (Cosmic Cruise Kick).

The loop is selected, its blue loop icon turns into a speaker, and the loop plays. When a loop is playing, its waveform is displayed at the bottom of the Loop Browser. To preview different sections of the loop, you can click anywhere on the waveform to move the playhead. At any time, you can click another loop to preview it, or click the currently playing loop to stop playback. You can also use the Up Arrow or Down Arrow keys to play the previous or next loop in the list.
Press the Down Arrow key.
Tip
When multiple panes are open and the same key command can have different functions in different panes, the pane that has focus (indicated by a blue frame around the pane) reacts to the key command. Click the background of a pane to give it focus, or press Tab or Shift-Tab to cycle focus forward or backward through the panes.
Drag Je Danse Kick to the first cell on the first track (Audio 1).
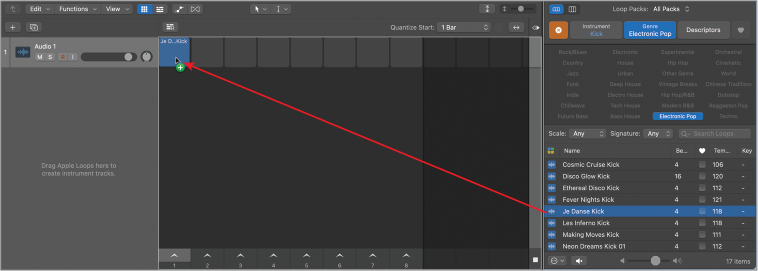
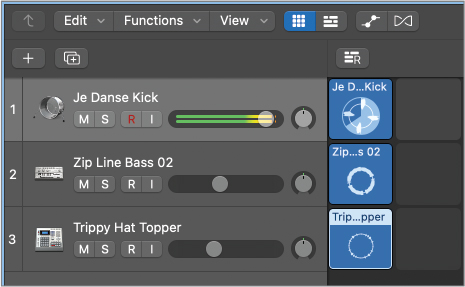
The track name and icon are updated to reflect the loop name (Je Danse Kick) and icon (a kick drum). The volume fader is adjusted to +3.9 to automatically adjust the volume of the loop. In the LCD display at the top, the tempo is set to 118 bpm, the tempo of the loop (you’ll change that tempo in an upcoming exercise).
Tip
To reverse an action for example because you made a mistake, choose Edit > Undo [name-of-last-action], or press Command-Z.
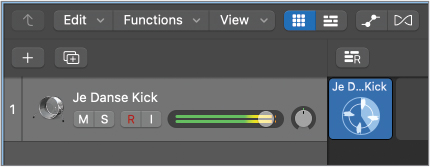
In the Live Loops grid, move your pointer over the loop, and click the Play button that appears.

The loop starts playing, and the Play button turns into a Stop button. A circular indicator in the middle of the cell indicates the current playback position within the loop.
Move your pointer over the loop and click the Stop button that appears.
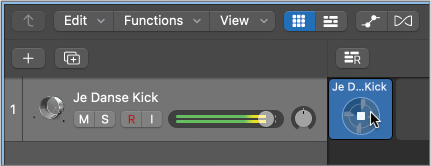
The loop continues playing until the end of the current bar and stops.
Choose File > Save (or press Command-S).
You have started a new project with the Live Loops grid and used the Loop Browser to import your first Apple Loop into the first cell on the grid. You’re off to a great start!
Adding Loops to a Scene
In the Live Loops grid, you organize your loops in columns called scenes so that you can easily trigger all the loops inside a scene at the same time. You will now add more loops to the first scene you started with the kick drum loop, and then populate more scenes with different loops to play different song sections.
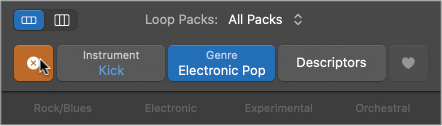
In the Loop Browser, at the upper left, click the X button to reset all keyword buttons.
Click the Instrument button, then click the Synthetic Bass keyword button.
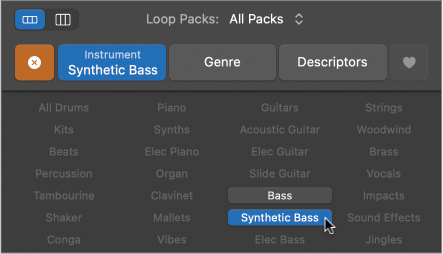
Click the Genre button, and then click the Modern R&B keyword button.

In the Live Loops grid, click the center of the kick drum loop to start playback.
The loop waits for the beginning of a new bar and starts playing back.
In the Loop Browser result list, click the first bass loop to preview it.

After an instant, the bass loop plays in sync with the kick drum loop.
In the control bar, click the Stop button (or press the Space bar).

Playback stops immediately, and the Je Danse Kick loop in the grid flashes to indicate it is queued (meaning it will automatically start playback the next time you play the project).
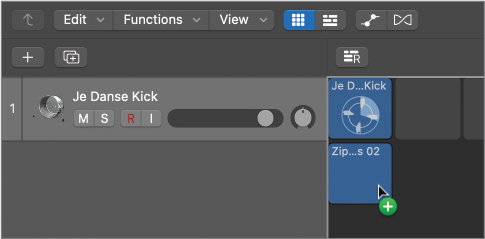
Scroll all the way down in the Loop Browser, and drag Zip Line Bass 02 to the first cell to the grid below the kick drum loop.
Let’s add a hi-hat to this first scene.
In the Loop Browser, click the X button to reset the keyword buttons.
In the search field, type trippy.
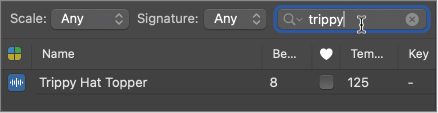
A single loop stays in the result list, Trippy Hat Topper.
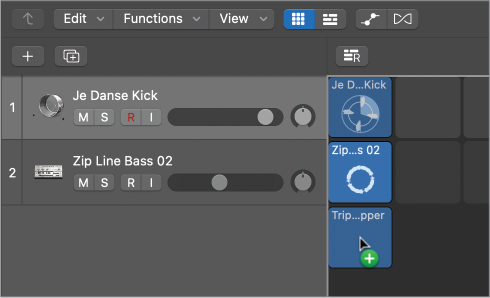
Drag Trippy Hat Topper below the bass loop on Track 2.
Choose File > Save (or press Command-S).
As you work in Logic, keep saving your project at regular intervals to avoid losing any of your work.
You have created your first scene out of a four-on-the-floor kick drum, a grooving bass line, and a trippy hi-hat topper.
Playing Loops and Scenes
The Live Loop grid ensures that all your cells can play back in sync at all times, while giving you real-time control over which loops you want to start or stop. The cells are organized in columns that constitutes scenes that can represent different song sections.
Move the pointer to the center of the kick loop on Track 1, and click the Play button that appears.
The kick loop starts playing.
Click the Play button on the bass loop on Track 2.
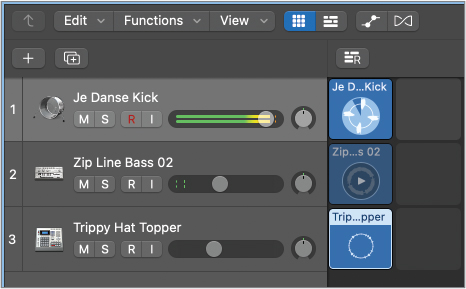
The bass loop flashes to indicate that it is queued. It waits for the beginning of the next bar to start playback in sync with the kick loop. Another way to queue a loop for playback is to select the loop and then press Return.
On Track 3, make sure the hi-hat loop is still selected (or click its name to select it).

The loop is highlighted to indicate it is selected. Let’s queue it using a key command.
Press Return.
The hi-hat loop is queued, and at the beginning of the next bar, it starts playing in sync with the kick loop and the bass loop.
Tip
In Lesson 6 you will use MIDI controllers or the Logic Remote app on the iPad to queue and trigger cells and scenes.
The three loops are great together and form a solid basis for your song; however, the groove would benefit from being played at a faster tempo.
In the control bar, drag the tempo value up from 118 to 127 bpm.

Tip
You can change numerical values in Logic Pro two ways: drag the value up or down to increase or decrease it, or double-click the value and enter the desired number.
The new, faster tempo makes the song more energized. Let’s stop both the kick and the hi-hat loops at the same time, leaving only the bass. The hi-hat loop is still selected, so you only have to Shift-click the kick loop to add it to the selection.
On the kick loop on Track 1, Shift-click the name of the loop to select the loop.

Both the kick loop on Track 1 and the hi-hat loop on Track 3 are selected. To stop the playback of the selected loops simultaneously, you can dequeue them using the Return key. You will stop the two loops exactly when the bass line starts playing a new four-bar pattern.
Wait for the circle on the bass loop to almost complete, and press Return.

The kick and hi-hat loops flash to indicate they are dequeued. On the beginning of the next bar, they stop playing, while the bass keeps playing on its own.
To play all the loops in a scene together, you can click the Scene trigger.
At the bottom of the Live Loops grid, click the Scene trigger for Scene 1.
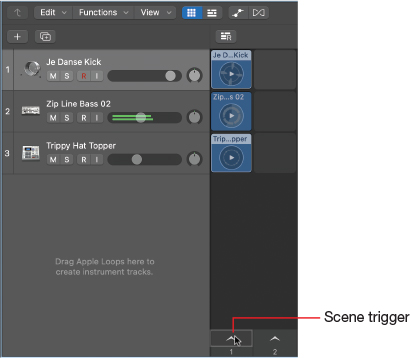
All three loops in Scene 1 are queued and start to play at the beginning of the next bar.
Click the Stop button (or press the Space bar).
Playback stops immediately, but all the cells flash to indicate they’re still queued. To unqueue all cells, you can click the Grid Stop button.
At the lower right of the Live Loops grid, click the Grid Stop button.
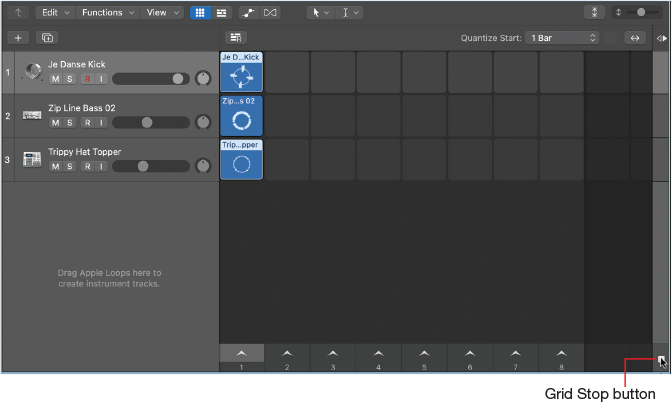
All the loops stop flashing, indicating they’re no longer queued.
You have stacked three loops vertically on the grid to form a scene. You used the Return key to queue and dequeue individual loops or groups of loops so that they start or stop playback at the beginning of the next bar, and you have used the Scene trigger button. In the next exercise, you’ll create more scenes to create more song sections.
Duplicating and Editing a Scene
As you’ve started working on a section, chances are you’ll want to keep some of the loops you used for the next section. An easy way to start creating a new scene is to duplicate the scene you have, and in the new scene, delete some of the loops, and add some new ones.
At the bottom of the Live Loops grid, Control-click the first scene number (1), and choose Duplicate.
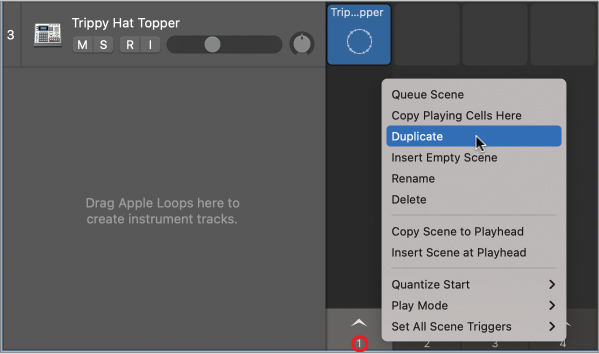
A new scene is created (Scene 2) that contains the same loops as Scene 1.

Let’s edit Scene 2 to add some synthesizer loops. Because you used the Zip Line Bass loop, you can search for loops with a similar name that were produced to be played together.
In the Loop Browser search field, type zip line.
Drag Zip Line Synth Pad below the three loops in Scene 2.

Let’s add a melodic loop for that scene.
In the Loop Browser search field, type yearning guitar.
Drag Yearning Synth Guitar below the four loops in Scene 2.

Let’s hear Scene 2.
At the bottom of the Live Loops grid, click the Scene 2 trigger (2).
Between the bass, the synth, and the guitar, the harmony is a little busy in that scene. Let’s remove the bass to make this section breathe a little.
On Track 2, click the bass loop name to select the loop.
Press Delete to delete the loop.
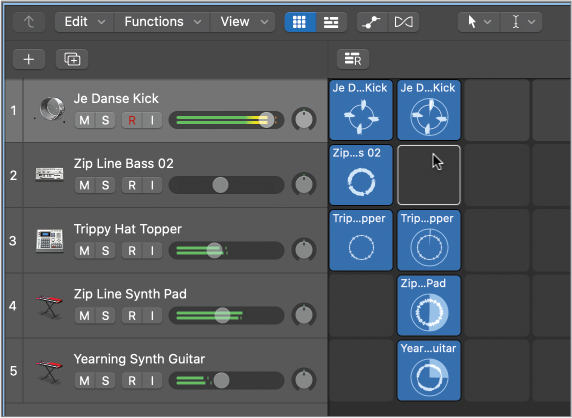
This combination of loops sounds much clearer, and it provides a departure from the simple drum and bass section created in Scene 1.
After a few bars, when you feel like you want to change a section, click the Scene 1 trigger.
Continue clicking the Scene trigger buttons for scenes 1 and 2 to go from one song section into the next.
Click the Grid Stop button at the lower right of the grid.
Choose File > Save (or press Command-S).
You have duplicated a scene and customized the new one to give it a different vibe from the first. You used the Scene trigger buttons to trigger the desired song section while keeping all cells playing in sync on the Live Loops grid. Let’s finish the song.
Creating More Scenes
To build more song sections and finish this song, you will now populate a few more scenes. Scene 3 will drop the kick drum and feature a riser, a sound that very slowly rises in pitch that is typical of when a DJ in a nightclub drops the beat and makes the energy slowly build up over several bars, until he brings back the beat—which you will do in Scene 4. Finally, Scene 5 will feature a single reverberated snare hit that will provide a way to finish the song with a bang.
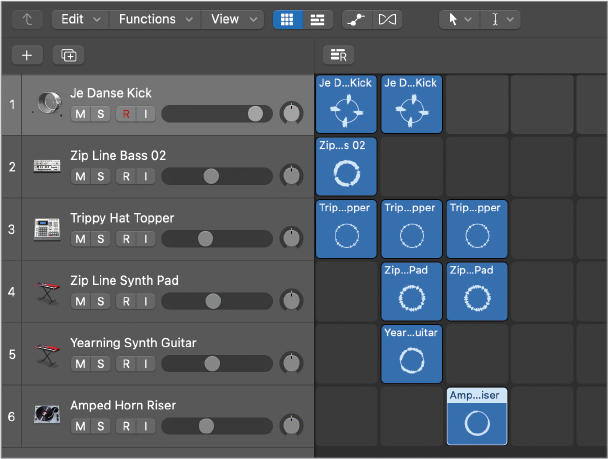
At the bottom of the Live Loops grid, Control-click the Scene 2 number, and choose Duplicate.
In Scene 3, delete the kick and guitar loops.
In the Loop Browser, search for Amped Horn Riser, and drag it to the bottom of the grid in Scene 3.
For Scene 4, you will take your inspiration from the simple drum and bass combination you used in Scene 1.
Control-click the Scene 1 number, and choose Duplicate.
Scene 1 is duplicated to Scene 2; however, you want to position this new scene at the end of the grid.
Drag Scene 2 after Scene 4.

The scenes are reordered and renumbered in the order they’re displayed.
Let’s change the bass line in Scene 4. Some loops offer alternative loops from the same collection that are accessible by clicking at the upper left of the loop itself. This saves you a trip to the Loop Browser.
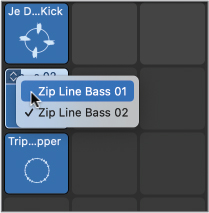
Move the pointer over the bass line in Scene 4, and click the double-arrow icon that appears at the upper left of the loop.

In the pop-up menu, choose Zip Line Bass 01.
Let’s create one final scene with a reverberated single snare hit to end the song.
In the Loop Browser search field, type epic snare.
Drag Epic Snare Space 06 to the first track in Scene 5.

The song is now complete! You have five scenes that you can trigger in real time in any order you want.
Click the different Scene triggers to play the five scenes in the order you want.
Pay close attention to the exact moment in time when you trigger a scene. When you click a Scene trigger, Logic waits for the next bar to switch playback from the current scene to the one you click. If a cell contains a four-bar loop, it may sound unmusical to switch to another scene before the four bars are finished playing. In Scene 3, for example, the Amped Horn Riser will sound great if you play it for its entire 16-bar duration. Watch the progress circle that appears on the loop while it’s playing, and get ready to trigger the next scene a little before the circle completes.
Remember that while a scene is playing, you can toggle the playback of individual loops or groups of loops by selecting them and pressing Return to queue or dequeue them.
In the control bar, click Stop (or press the Space bar).
Choose File > Save (or press Command-S).
Choose File > Close Project (or press Command-Option-W).
With a little experience, you can easily get good at triggering the scenes at the optimal time to get the requested effect. Now that you have a feel for how things work in Logic Pro, you will stop working with Live Loops for this lesson (you will go more in depth using Live Loops in upcoming lessons).
Exploring the Interface
When working with Logic Pro, you spend most of your time in the main window. You will now explore the interface of the main window in more detail to become familiar with the different tools it has to offer and use the Tracks view to build a song by organizing Apple Loops along a timeline. Developing the ability to quickly and effortlessly reach for the tools necessary to accomplish the tasks you need to advance your song will allow you to free up your mind and focus on your music. Let’s practice!
Choose File > New.
A new empty project is created, and the New Tracks dialog opens.
In the New Tracks dialog, click Audio, and then click Create (or press Return).

A new audio track is created in your project.

In its default configuration, the main window has three areas:
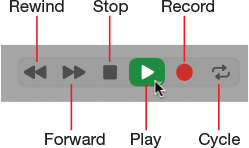
- Control bar—The control bar contains buttons to toggle areas on and off; transport buttons to control playback operations (such as play, stop, rewind, and forward); an LCD display to indicate the playhead position, project tempo, time, and key signatures; and mode buttons such as Count-in and Metronome.
- Inspector—The inspector provides access to a contextual set of parameters. The specific parameters displayed depend on the selected track or region, or the area in key focus.
- Tracks view—In the Tracks view, you build your song by arranging regions on tracks on a timeline. The Tracks view can be toggled to display the Live Loops grid, where you trigger individual loops or scenes that automatically sync to the beat in real time as you did in the previous exercises.
In the control bar, click the Inspector button (or press I).
The inspector closes, which allows you to see more of the Tracks view.
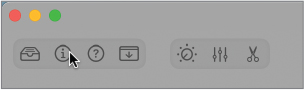
Click the Quick Help button (or press Shift-/).

A Quick Help floating window pops up. As you hover the pointer over elements of the Logic Pro interface, the Quick Help window describes that element.
On the main window, position the pointer over a button.
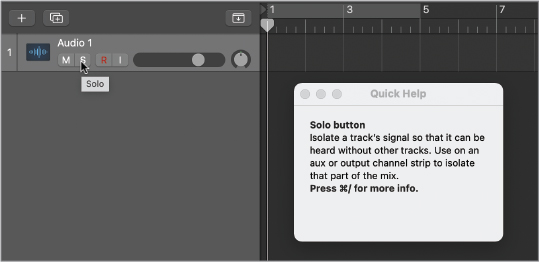
The Quick Help window displays the function’s name, defines what it does, and sometimes offers extra information. Whenever you’re not sure what an interface element does, use Quick Help.
More Info
To learn more, read the Logic Pro Help documentation within the free Logic Remote iPad app. The documentation automatically displays the section relevant to the Logic Pro area where you place the pointer. You will learn more about Logic Remote in Lesson 6.
Click the Quick Help button to close the Quick Help window (or press Shift-/).
Click the Show/Hide Live Loops Grid button.
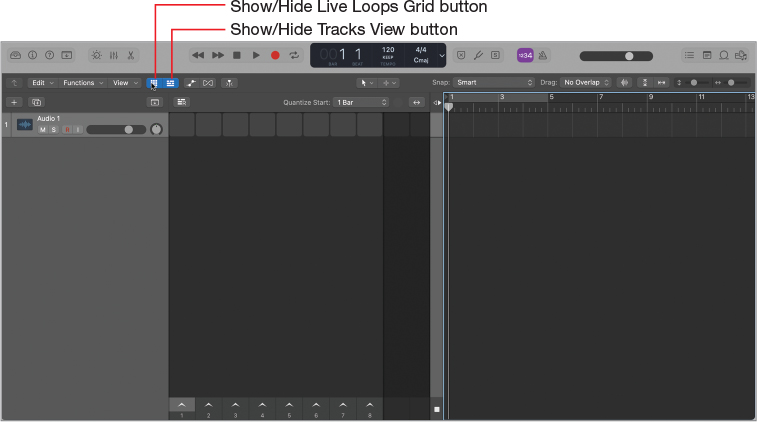
The Live Loops grid area opens on the left of the Tracks view.
Click the Show/Hide Tracks View button.
The Tracks view is hidden, and only the Live Loops grid is visible, the way it was in the previous section where you worked with Live Loops. Let’s make only the Tracks view visible.
Option-click the Show/Hide Tracks View button.
The Live Loops area is hidden, and the Tracks view appears.
Click the Mixer button (or press X).
The Mixer opens below the Tracks view.

After viewing the tools in the Mixer, click the Mixer button again (or press X) to close it.
In the control bar, click the Apple Loops button (or press O).
The Loop Browser opens to the right of the Tracks view.
You now have the control bar at the top, the Tracks view to the left, and the Loop Browser to the right, which is the perfect layout for the next exercise.
Choose File > Save (or press Command-S).
The Save dialog opens.
In the Save As field, enter Rocking Beat. Click the Where pop-up menu, choose Desktop (or press Command-D), and click Save (or press Return).

You’re already gaining familiarity with the Logic Pro interface. By showing only the panes needed for the task at hand, you make your work easier and faster, allowing you to focus on the creative side. And talking about creative side, let’s write a new song, this time in the Tracks view.
Navigating and Building the Project
You’ll now start building a new song by positioning Apple Loops on a grid in the Tracks view. Compared to the Live Loops grid you used earlier in this lesson, the Tracks view allows you more flexibility to position the loops on a timeline and to edit them—for example, to play only specific portions of some of them or to repeat them throughout a section of the song. Seeing your loops laid out from left to right in the order they are played back in the song lets you determine where each loop (or section of a loop) starts and stops playing back with great precision. This representation also makes it extremely easy to jump to a specific part of the song, start playback, quickly return to the beginning, or continuously repeat a section. Along with that flexibility comes the responsibility to make sure the loops are placed in the right positions so that they play together in sync.
Logic offers many ways to navigate your project. In the following two exercises, you’ll use the transport buttons and their key commands, and you’ll learn how to continuously repeat a section of the project, which will allow you to keep playing the drum loop while you preview bass loops.
Using Transport Buttons and Key Commands
When you’re producing music, time is of the essence. Because many producing tasks are repetitive, you may find yourself playing, stopping, and positioning the playhead every few seconds. Minimizing the time it takes to perform these basic operations will greatly improve your workflow and save valuable time.
Although you may initially find it easier to click transport buttons with the mouse, moving a mouse with your hand while keeping your eyes on the screen is actually a time-consuming task. Using key commands to control playback can significantly reduce that time, increasing your workflow efficiency as your fingers build up muscle memory.
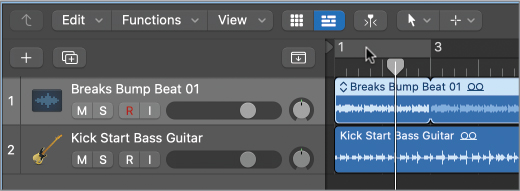
In the Loop Browser, search for Breaks Bump Beat 01, and drag it to Track 1 in the workspace, making sure the help tag reads Position: 1 1 1 1.

The workspace is the area below the ruler and to the right of the track headers, where regions are arranged to build a song.
The loop is imported as an audio region that is placed on the audio track at the very beginning of the project. In the LCD display, the project tempo is automatically set to that of the loop, 135 bpm.
In the control bar, click the Play button (or press the Space bar).
In the Tracks view, playback begins, the plwayhead starts moving, and you can hear the Breaks Bump Beat 01 loop on Track 1 for the first two bars. At bar 3, the playhead continues moving, but because there are no regions, you hear nothing.
In the control bar, click the Stop button (or press the Space bar).
Playback stops, the playhead stops moving, and the Stop button is replaced with a Go to Beginning button.

In the control bar, click the Go to Beginning button (or press Return).
The playhead returns to the beginning of the project.
Click the Forward button, or press . (period) a few times.
The playhead jumps one bar forward each time.
Click the Rewind button, or press , (comma) a few times.
The playhead jumps one bar backward each time.
Tip
To fast-forward eight bars at a time, press Shift-. (period); to fast-rewind eight bars at a time, press Shift-, (comma).
You can also position the playhead precisely where you want it by clicking in the ruler.
Tip
To position the playhead, you can Shift-click an empty space in the workspace.
In the lower half of the ruler, click bar 5 to move the playhead to that location.

Tip
To start or stop playback at a specific location, double-click the lower half of the ruler.
You know the basic navigation techniques for positioning the playhead using the ruler or key commands, starting and stopping playback, and returning the playhead to the beginning of the project. Let’s continue building the song.
Continuously Repeating a Section
Sometimes when you are working on a specific section of your project, you may want to repeat a section multiple times without stopping playback. As you’re working, the beat keeps going, and you no longer have to manually relocate the playhead.
You’ll continue building your project by adding a few more instruments to your drums: a bass guitar and a few guitar tracks. To determine which bass loop works best with your drums, you’ll use Cycle mode to continuously repeat the drum loop on Track 1 as you preview bass loops in the Loop Browser.
To adjust the cycle area so that it spans the same length as the drum loop on Track 1, you need to make sure the region is selected. Let’s see how to deselect or select regions in the workspace.
Click an empty space in the workspace.

The region is blue with a white title; it is not selected.
Click the drum region.

The region is highlighted to indicate that it is selected. You can now easily create a cycle area for the length of the selection.
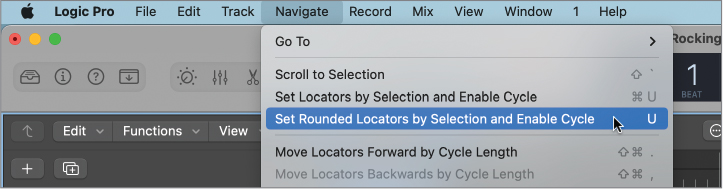
Choose Navigate > Set Rounded Locators by Selection and Enable Cycle (or press U).
Tip
When choosing a menu command, the corresponding key command usually appears to the right.

In the control bar, the Cycle button is turned on, and in the ruler, the cycle area turns yellow, indicating that Cycle mode is enabled.

The cycle area shows the section of the song that will repeat. The start and end position of the cycle area—called left and right locators—match the start and end of the selected region, and the cycle area goes from bar 1 to bar 3. When you choose “Set Rounded Locators by Selection and Enable Cycle,” the locators are always rounded to the nearest bar, so repeating the cycle area keeps the groove going.
Press the Space bar to start playback.
The playhead starts moving, and your drums play. When the playhead reaches bar 3, it immediately jumps back to the beginning of bar 1 and continues playback. The tempo is a bit fast.
In the LCD display, drag the tempo down to 128 bpm.
While your drums continue playing, you can preview some bass loops.
In the Loop Browser, clear the search field and enter kick sta.

In the results list, click the Kick Start Bass Guitar loop.
After a moment, Logic syncs the loop with the project, and you can hear it playing, grooving along with the drums in your project.
Kick Start Bass Guitar is listed in the results list as a 32-beats loop, but right now your cycle area is playing only two bars (at the current 4/4 time signature, 2 bars = 8 beats), so you’re hearing only a portion of the bass loop. Let’s add it to the project to audition the entire loop.
In the control bar, click the Stop button (or press the Space bar) to stop playback.
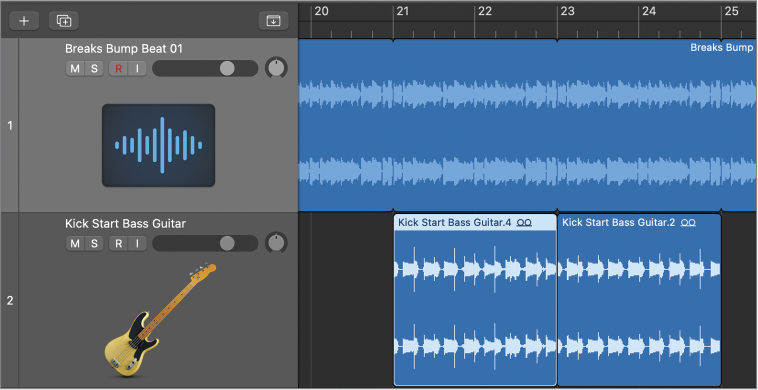
Drag Kick Start Bass Guitar to the workspace below the drum loop, making sure the position in the help tag reads 1 1 1 1.
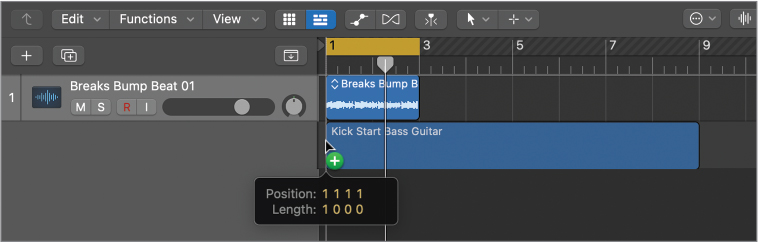
A new track is automatically created for the new Kick Start Bass Guitar region. That region is eight bars long, so let’s loop the drum loop on Track 1 so that the drums continue playing throughout the bass loop. First, you will open your Region inspector.
In the control bar, click the Inspector button (or press I).
In the inspector, if the Region inspector is closed, click the disclosure triangle to open it.

The Kick Start Bass Guitar region you recently dragged from the Loop Browser to the workspace is still selected, so the Region inspector is titled Kick Start Bass Guitar and shows the parameters for that region.
On Track 1, click the Breaks Bump Beat 01 region to select it.
The Region inspector shows the parameters for Breaks Bump Beat 01.
In the Region inspector, select the Loop checkbox (or press L).

In the workspace, Breaks Bump Beat 01 is now looping until the end of the project.
In the ruler, click the yellow cycle area to turn off Cycle mode (or press C).
In the control bar, click the Go to Beginning button (or press Return).
Press the Space bar to start playback.
The drum loop and the bass loop play together. You can now hear the entire bass line, which is more melodic than the limited preview you heard previously.
Press the Space bar again to stop playback.
Press Return to go back to the beginning.
Choose File > Save (or press Command-S).
Setting locators to adjust the cycle area is a technique you’ll use often throughout your production to focus on part of a project. And if you work with other musicians in your studio, they will love you for not interrupting the playback (and ruining their creative flow) every few bars!
Building the Song and Setting the Key
All the material you use for a project is contained in regions that are on tracks in the workspace. Creating an arrangement is a little like playing with building blocks—moving, copying, or repeating regions as needed to determine at which points specific instruments start and stop playing.
In this exercise, you’ll move the bass loop so that it comes in later in the song, add more instruments to the song, and then change the song key.
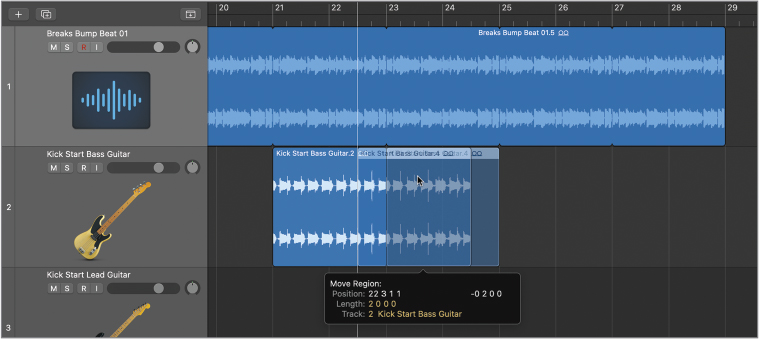
In the workspace, drag the Kick Start Bass Guitar region to bar 5.
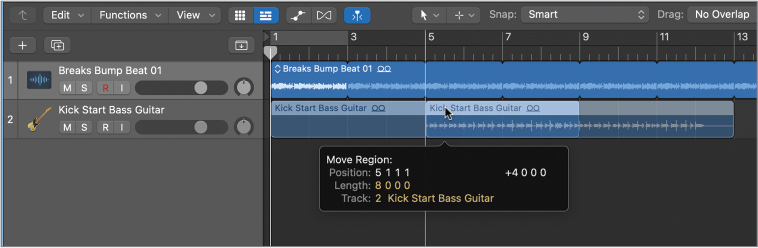
As you drag the region, the help tag shows:
- Move Region—The action you’re performing.
- Position: 5 1 1 1—Where the region is moved to.
- +4 0 0 0—The region is moved exactly four bars later.
- Length: 8 0 0 0—Length of the clicked region.
- Track: 2 Kick Start Bass Guitar—Track number and name.
The help tag displays positions and lengths in bars, beats, divisions, and ticks. When you work in the Tracks view, you refer to a position or a length with those four numbers.
- The bar consists of several beats (four beats in the 4/4 time signature here).
- The beat is the denominator in the time signature (quarter note here).
- The division determines how the grid is subdivided in the ruler when zoomed in horizontally (sixteenth note here).
- A clock tick is 1/960 of a quarter note. A sixteenth note contains 240 ticks.
Note that by default, in the control bar, the LCD displays the position of the playhead using only the first two units, bars and beats.
Tip
To work more efficiently, remember to hide those areas you don’t need to see. For the next few exercises, in the control bar, click the Inspector button (or press I) and click the Apple Loops button (or press O) to turn those two areas on and off as needed.
You’ll now layer a few guitar loops to go with the Kick Start Bass Guitar loop. Loops with similar names often follow the same chord progression and were produced to be combined together. The Loop Browser should still show you loops including Kick Start in their names. Note the key of the Kick Start loops: the loops were originally produced in the key of E, which means they probably sound better in that key. You’ll change the project’s key later in this exercise.
Click Kick Start Lead Guitar to select it.
The Kick Start Lead Guitar loop is selected and starts playing. To add loops to a selection, hold the Shift key while clicking the loops.
Shift-click the Kick Start Rhythm Guitar.
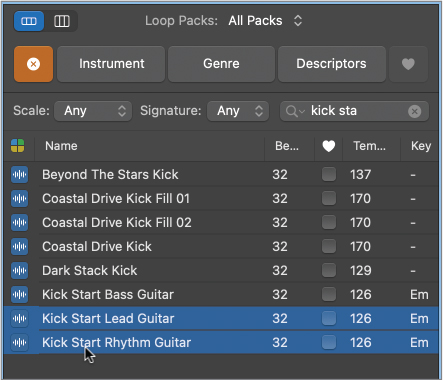
The first loop stops playing back, and the two guitar loops are selected.
Drag the selection to the bottom of the workspace below the bass loop at 5 1 1 1.

Next to the Pointer tool and the green + symbol, you see a red number 2, indicating you’re adding two loops to the workspace.
Take great care in making sure the help tag reads 5 1 1 1 before releasing the mouse button. For your regions to play in sync in the Tracks view, you often want them to start exactly on the first beat of a bar, which means the help tag reads a bar number followed by 1 1 1.
Because you’re adding multiple files, an alert pops up that asks what you want to do with the files.
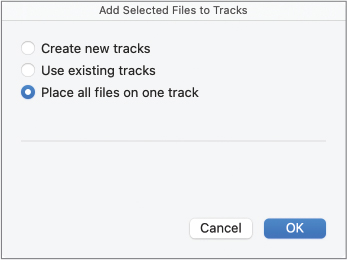
Select “Create new tracks,” and click OK.

Each guitar loop is placed on a new track. You’ll add one more guitar loop.
In the Loop Browser, clear the search box and type Bender.
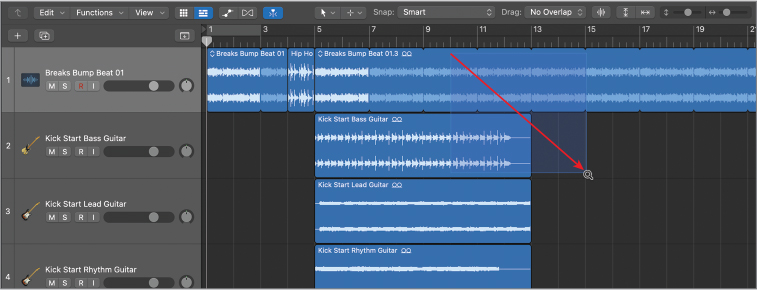
From the results list, drag Pitch Bender Electric 04 to bar 5 below guitar regions in the workspace.

That region is only one bar long and needs to be looped to match the length of the eight-bar-long guitar regions on the tracks above.
Bring the Pointer tool to the upper right of the Pitch Bender Electric 04 region.

The Loop tool appears.
Drag the Loop tool to 13 1 1 1.

Pitch Bender Electric 04 is now looping throughout the entire duration of the guitar loops and stops at the same position (bar 13).
Choose File > Save (or press Command-S).
In the control bar, click the Go to Beginning button (or press Return).
In the control bar, click the Play button (or press the Space bar).
From bar 1 to bar 5, an intro section introduces only the drums; then at bar 5 the bass and the three guitars join in to complete the groove and the harmony. In the next exercise, you’ll make the intro section a bit more exciting.
Except for the Pitch Bender Electric 04 loop, which is pitched really high, the guitars sound a little low played back at the current C major key signature, so let’s change the key of the song.
Press the Space bar to stop playback.
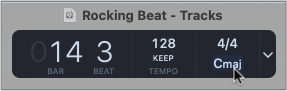
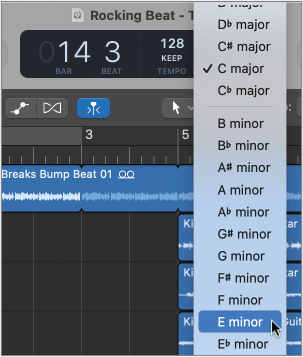
In the LCD display, click the key signature.
In the key signature pop-up menu, choose E minor.
Listen to the song in the new key.
The guitars sound like they are playing in their natural range.
It’s time to practice your navigation chops! You can click the Play and Stop/Go to Beginning buttons in the control bar, click and double-click the lower half of the ruler, Shift-click an empty space in the workspace, or use the following key commands:
Spacebar | Play/Stop |
Return | Go to beginning |
. (period) | Forward |
, (comma) | Rewind |
You’ve added a few loops and moved them to the right place to create two different song sections, using the help tag to determine the exact position where the loops stop and start in the workspace. You’ll now improve the introduction by creating a drum break, and then create a couple more sections.
Copying Regions to Edit the Intro
Your project starts with a four-bar intro in which only the Breaks Bump Beat 01 region on Track 1 plays the beat. It feels sparse, but the beat is original enough to capture attention, which is the role of an intro. Then at bar 5 the bass and guitar regions on Tracks 2, 3, 4, and 5 come in, making the beat sound complete and introducing the melody.
To accentuate the starting impact of the new regions at bar 5, you will create a couple of unexpected edits at the end of the intro that are bound to make the listener’s head turn. To make the intro a little more exciting, you’ll start by copying the Pitch Bender Electric 04 guitar on Track 5 to bar 1.
Option-drag the Pitch Bender Electric 04 region to bar 1.

When Option-dragging to copy regions, always make sure you release the mouse button first and the Option key last. If you try to release both at the same time, you may sometimes release the Option key slightly before the mouse button without noticing, and then the region is moved instead of copied.
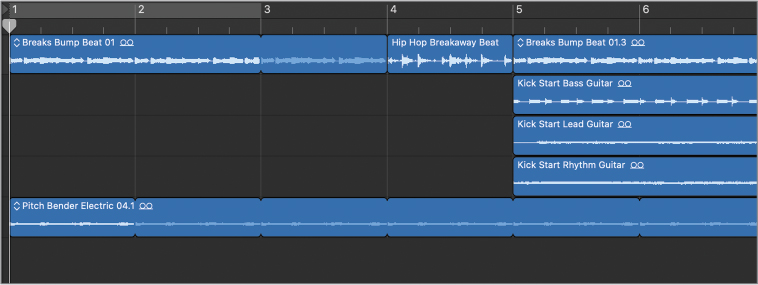
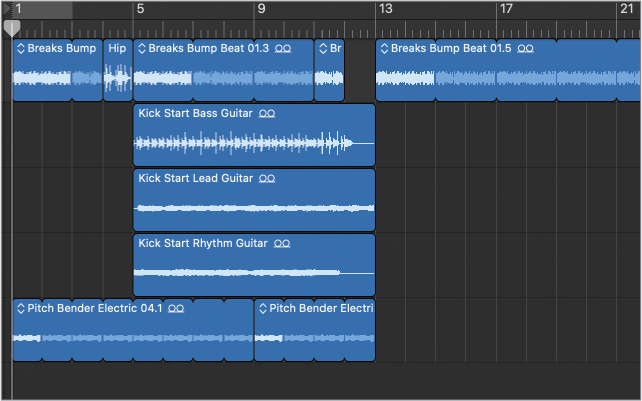
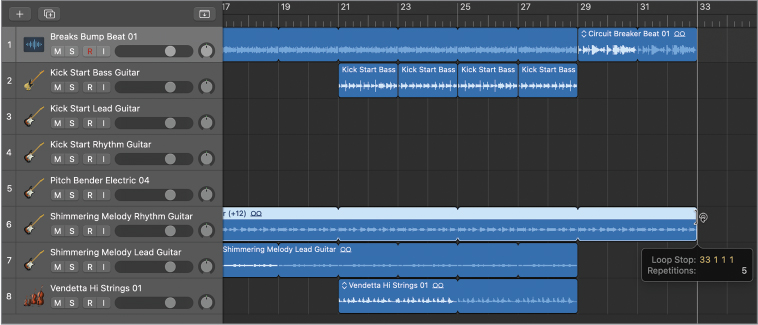
If you copied the Pitch Bender Electric 04 region successfully, your workspace will look like this:

If you’ve accidentally moved the region rather than copying it, reverse your last action: choose Edit > Undo Drag (or press Command-Z), and then try again.
Listen to your intro.
The new Pitch Bender Electric 04.2 region at bar 1 fills the entire introduction. It brings a little excitement to that section, adding harmony to the drum loop, before the bass and all the guitars come in at bar 5. To make the transition even more noticeable, you are going to use a different drum loop in bar 4.
In the Loop Browser search field, type breakaway.
Drag Hip Hop Breakaway Beat to Track 1 at bar 4.

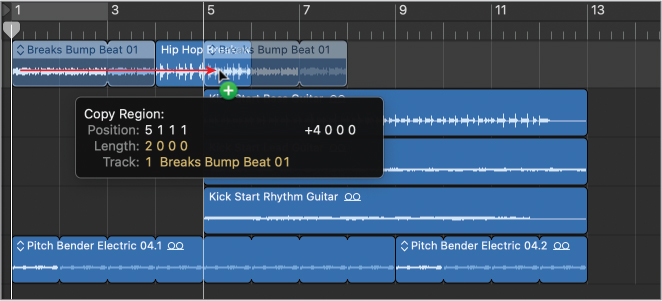
The new loop stops the previous loop on the track (Breaks Bump Beat 01) from looping at bar 4. It’s also two bars long so that it spills over in the next section at bar 5. To clean up this drum track, let’s copy Breaks Bump Beat 01 to bar 5.
Option-drag Breaks Bump Beat 01 to bar 5.
Listen to your intro.
The drum loop is layered with the hypnotic guitar on Track 5 for three bars, then it stops at bar 4 while a hip hop beat plays for only one bar with the metallic resonance of an unnatural reverb effect. At bar 5, the original drums come back, this time seconded by a groovy bass line and a few distorted guitars that bring a rock vibe to the song until bar 13, where only the drums continue looping until the end.
You have copied regions in the workspace and adjusted their number of loops to create an exciting introduction. In the next exercise, you’ll create a couple more sections to finish this short song.
Zooming the Workspace
You’ll now look closer at the end of your current arrangement to see how you could create a break that would help the transition into a new section you’ll create later. To determine how much of the workspace you can see and how big your regions appear, you can zoom in or out using the zoom sliders at the upper right of the Tracks view or their equivalent key commands (Command-Arrow keys).
When zooming, it’s important to determine which positions of the workspace will stay anchored on the screen while the rest of the workspace is zoomed in or out. When no regions are selected, positioning the playhead allows you to anchor a horizontal position that won’t budge while zooming horizontally.
Press Return.
The playhead goes to the beginning of the song.
Click the background of the workspace (or press Shift-D).
All regions are deselected.
You are about to work on the end of the current arrangement around bars 12–13. Let’s first zoom in horizontally so that you can clearly see that area of the workspace.
At the upper right of the Tracks view, drag the horizontal zoom slider to the right (or press Command-Right Arrow a few times).

The playhead stays at the same position on your screen while the regions and the grid expands on the right. If you’ve zoomed in too far, you may no longer see bar 13, which is where you’ll start creating a new section in the next exercise.
Press Command-Left Arrow a few times until bar 13 comes back in view.

Note
When zooming horizontally using the zoom sliders or Command-Arrow key combinations, the playhead stays at the same position on your screen, unless a region is selected and the playhead is not within that region’s borders. In that case, the left edge of the region stays at the same position on your screen. When the playhead is offscreen, the content to the left of the workspace stays at the same position on your screen.
Let’s zoom in vertically to make the regions a little taller, which will make the waveforms easier to see.
Note
When zooming vertically with the zoom sliders or Command-Arrow keys, the selected region stays at the same position on your screen. If no regions are selected, the selected track stays at the same position on your screen.
Make sure Track 1 is selected and drag the vertical zoom slider to the right (or press Command-Down Arrow a few times).

The workspace is zoomed in vertically. Being able to see taller waveforms helps you better identify the audio content in each region. You can now clearly see that the waveforms inside the Kick Start Bass Guitar and Kick Start Rhythm Guitar regions stop for the last bar (bar 12). To accent this break and intensify the transition into the next section, let’s stop the drums from playing at that position.
To make it more comfortable to edit the drum track, you’ll zoom in on it around bar 12 using the Zoom tool. To use the Zoom tool, hold down Control and Option and then drag to draw a blue highlight rectangle over the area you want to magnify. The size of the rectangle you draw determines how far you will zoom in: the smaller the rectangle that you draw, the closer you’ll zoom in. To keep some context when editing the drums, you’ll want to be able to see a few bars before and after your edit, and you’ll also want to see the waveform of the bass guitar below on Track 2.
Control-Option-drag to draw a blue rectangle around Tracks 1 and 2 around bars 10 through 15.
The area you highlighted expands to fill the workspace, and you can see a more precise ruler and more details on the waveforms inside the regions.

Zooming in and out efficiently to see exactly what you need takes practice, and at first you may not see exactly what you want after zooming in. Let’s zoom out.
Control-Option-click anywhere in the workspace.
The workspace returns to your previous zoom level.
Control-Option-drag again around Tracks 1 and 2 around bars 10 through 15.
Feel free to try zooming in and out a few times to see different parts of your song to practice your zooming skills. Make sure you end up zoomed in to comfortably see Track 1 at bar 12 so that you are ready for editing the drums in the next exercise.
Tip
If you’re happy with your workspace view but feel that you should zoom in even closer, zoom in again. You can Control-Option-drag to zoom in multiple times and Control-Option-click the workspace multiple times to zoom back out through the same zoom levels.
You’re becoming familiar with a few different zooming methods: the zoom sliders and the corresponding Command-Arrow key commands to zoom incrementally, and Control-Option-dragging to draw the area you want to expand. Be patient; zooming to see exactly what you want can sometimes prove challenging at first. If you take your time practicing your zooming skills as you edit regions in the workspace, you’ll be rewarded. It will soon become second nature for you to see precisely what you need, and you’ll be able to focus on your creative decision making.
Editing Regions in the Workspace
Until now, selecting and layering loops and determining where they start and stop helped you lay out the groundwork of the arrangement. Now you will need to edit smaller sections of your tracks without being limited by the region boundaries. In the following exercises, you’ll create silent gaps in looped sections to create drum breaks and rearrange groups of bass notes and transpose them to customize the bass line’s melody.
Editing with Mouse Tools
At the end of the current arrangement (bar 13), the drum loop is continuously looping. To create a gap in the drum track, you can’t just click a single region with the Pointer tool to select and delete it. Instead, you’ll use a new tool, the Marquee tool, to select only the section of the looped region you wish to remove. As you become more proficient with region editing in the workspace, the Marquee tool will quickly become your second-best friend, closely behind the ubiquitous Pointer tool you’ve been using so far.
At the top of the Tracks view, look at the tool menus:

The menu to the left corresponds to the tool assigned to the pointer.
The menu to the right corresponds to the tool assigned to the pointer when holding down Command.
Currently, the Left-click tool is assigned to the Pointer tool (arrow icon) and the Command-click tool is assigned to the Marquee tool (crosshair icon). You don’t need to change those assignments, but if you’re curious, feel free to click one of the tool menus to open it and see what’s available. Click it again to close it.
Hold down the Command key.
The pointer turns into a crosshair, symbolizing the Marquee tool.
On Track 1, Command-drag from 12 1 1 1 to 13 1 1 1.

The area you dragged with the Marquee tool is highlighted to indicate that it is selected.
If you’re not happy with your marquee selection, click outside the selection with the Pointer tool to clear the selection, and try again.
Tip
Command-Shift-drag a marquee selection edge to adjust its position.
Press Delete.

The section of the loops selected by the Marquee tool is deleted. Some loops are turned into regions before and after the empty space, so the track stops and resumes playing at the beginning (bar 12) and end (bar 13) of the removed section.
Control-Option-click the workspace to zoom out.
Click the lower half of the ruler at bar 10.
The playhead is located at bar 10.
Listen to the end of your arrangement.
The drums stop along with the bass guitar on Track 2 and the rhythm guitar on Track 4 while the lead guitar on Track 3 and the Pitch Bender guitar on Track 5 continue playing. Then at bar 13, all bass and guitars stop playing as the drums resume the beat, which will allow you to start a new section in the next exercise.
You have punched a hole in the drum track at the end of a section using the Tracks view’s Command-click tool, the Marquee tool. Whenever you need to perform an edit without being tied to region boundaries, you can resort to using the Marquee tool. This silence in the drum track will lead nicely into a new song section starting at bar 13 that you are about to create.
Creating a New Song Section
At bar 13, you’ll bring a few new loops to create a new section with more harmonic movement. Using the Transpose parameter, you’ll make sure loops play in the right octave so that they blend together well. Make sure you continue scrolling and zooming the workspace as needed to make it comfortable for you to edit the regions.
In the Loop Browser search field, type Shimmering.
Drag Shimmering Melody Rhythm Guitar to the bottom of the workspace at bar 13.

Drag Shimmering Melody Lead Guitar to the bottom of the workspace at bar 17.
Clear the Loop Browser search field and type Vendetta.
Drag Vendetta Hi Strings 01 to the bottom of the workspace at bar 21.
In the workspace, drag to select the three new regions you’ve just added.

The Region inspector title displays “Region: 3 selected.” The parameters you adjust in the Region inspector will apply to all three selected regions.
In the Region inspector, click the Loop checkbox (or press L).
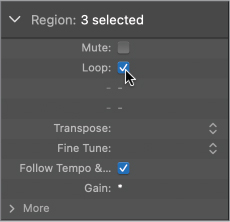
In the workspace, the three selected regions are looped. Let’s make them stop looping at bar 29 to end the song.
Move the pointer to the upper part of the loops on Track 1.
The pointer turns into a Loop tool. You can click or drag the Loop tool where you want a region’s loops to end. Dragging offers the advantage of seeing the exact position in a help tag.
Drag the Loop tool to bar 29 on Track 1.

The drums stop playing at bar 29.
Repeat the same process to stop the guitars on Tracks 6 and 7 and the strings on Track 8 at bar 29.

Move the playhead to bar 9 and listen to the transition and the new section you’ve just created.
At bar 13, while the drums keep playing, the bass and distorted guitars stop to leave ample room for a clean rhythm electric guitar that plays an uplifting chord progression. After four bars, the lead guitar joins in with a hypnotic repetitive melody. Another four bars later, the strings add a syncopated riff that adds texture and energy to the final section of the song.
The clean rhythm guitar that starts at bar 13 sounds too low for this arrangement. Having that guitar play one octave higher would perk it up and give this section a more joyful feeling. Let’s transpose it.
In the workspace, click the Shimmering Melody Rhythm Guitar region at bar 13.
In the Region inspector, next to the Transpose label, click the little double-arrow symbol to the far right.

A menu pops up, allowing you to transpose the region one octave (12 semitones) at a time.
In the pop-up menu, choose +12.
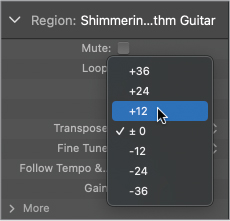
In the workspace, the transposition value is displayed in parentheses next to the region name (+12).
Listen to the new section with the rhythm guitar transposed.
The guitar plays one octave higher, giving it more of a funky feel, which brings more energy to this song section.
You added a new section to your song, which is a departure from the distorted guitars. The new lighthearted chord progression creates a stark contrast to the monotonous harmony of the first section and takes the listener on a voyage. In the next exercise, you’ll tie it all together by bringing back the bass guitar to that last section.
Cutting Regions to Edit a Bass Line
To make the last section where the strings join in (at bar 21) fuller, you’ll now create a bass line. In this exercise, you’ll copy the bass line from the first section and perform some careful edits to make the melody of the bass follow the chord progression of the rhythm guitar.
On Track 2, Option-drag the Kick Start Bass Guitar region to bar 21.
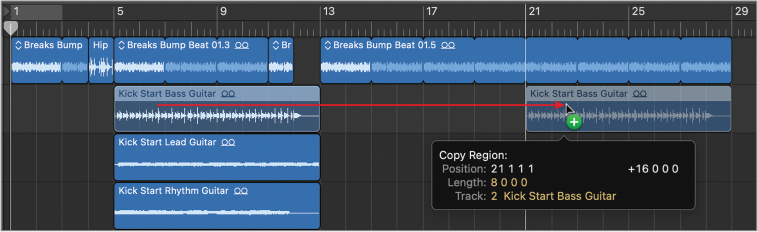
Locate the playhead a little before bar 21 and listen to the last section that starts at bar 21.
When the bass joins in at bar 21, it plays in the same key as the other loops. At bar 22, the rhythm guitar on Track 6 switches to another chord, but the bass doesn’t follow this new chord progression.
First let’s zoom in on the Kick Start Bass Guitar region using the Zoom tool.
Control-Option-drag to draw a rectangle around the entire Kick Start Bass Guitar region at bar 21.
To create a new bass line, you’ll first cut two bar sections at the beginning of the Kick Start Bass Guitar region. You can cut a region by double-clicking the Marquee tool (your Command-click tool).
Command-double-click the Kick Start Bass Guitar region at bar 23.

Command-double-click the Kick Start Bass Guitar region at bar 25.
You’ll not need the selected bass region that starts at bar 25. When you cut a region, the new region to the right of the cut is selected, making it easy to delete.
Press Delete.
The second region follows a chord progression that would match perfectly the beginning of the rhythm guitar chord progression. Let’s switch the two region positions. To easily swap the positions of two regions, you can use one of the Shuffle drag modes.
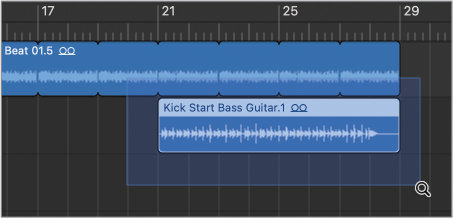
In the Tracks view menu bar, click the Drag pop-up menu and choose Shuffle L.

In Shuffle mode, positioning a region so that it overlaps with another makes them swap positions. Look at your region names: the first region (at bar 21) is Kick Start Bass Guitar.2, and the second (at bar 23) is Kick Start Bass Guitar.4 (if your regions have other names, just remember their names so that in the next step, you can double-check that you’ve successfully swapped their positions).
Drag the second region toward the left so that it overlaps the first region (by any amount) and let go of the mouse button.
The two regions switch positions.
Don’t forget to go back to a No Overlap mode or you’ll end up getting unexpected behavior later when trying to position regions in the Tracks view.
In the Tracks view menu bar, click the Drag mode pop-up menu and choose No Overlap.

Listen to the section.
The first region follows the chord progression of the guitar; however, the second region plays the wrong chord: the guitar chord is a fifth (7 semitones) lower than the bass. Let’s fix this.
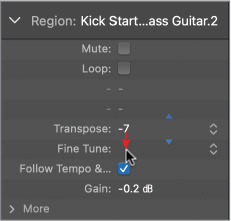
Select the second Kick Start Bass Guitar region at bar 23.
In the Region inspector, click the empty space directly to the right of the Transpose label and drag down to –7 (semitones).
Listen to the section.
The bass guitar follows the chord progression of the guitar perfectly. To get a better sense of the overall song structure, let’s zoom back out.
Control-Option-click to zoom out.
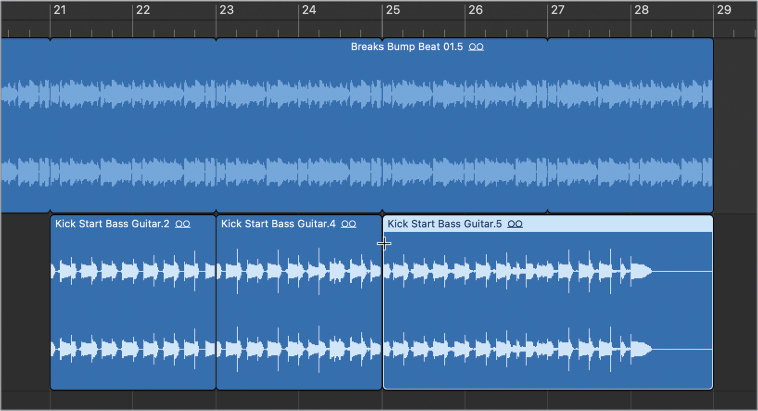
For the bass to play the entire last section, you need to repeat the entire bass line one more time.
Drag to select both bass regions.
Choose Edit > Repeat Once (or press Command-R).

The bass guitar plays for the entire eight-bar section from bar 21 to bar 29.
Your region editing skills are sharpening! You’ve used the Marquee tool to cut a region in two, switched to a Shuffle drag mode to swap two region positions, and used the Transpose parameter in the Region inspector to make loops play in the desired key. Your song is nearly complete.
Ending the Song
To end the song, you’ll add a new half-time drum loop, which will bring down the energy while the rhythm guitar plays the cheerful chord progression one last time. Then you’ll punctuate the outro with an echoing crash cymbal.
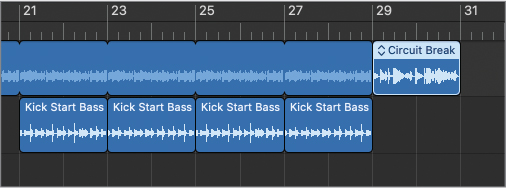
In the Loop Browser search field, type circuit and drag Circuit Breaker Beat 01 to Track 1 at bar 29.
Tip
If when you let go of the mouse button the loop jumps to an earlier position in the track, make sure you set your Drag mode pop-up menu to No Overlap in the Tracks view menu bar as explained in the previous exercise.
Move the pointer to the upper right of the Circuit Breaker Beat 01 region to use the Loop tool.
Drag the Loop tool to loop Circuit Breaker Beat 01 once so that it repeats once and ends at bar 33.

You’ll lengthen the rhythm guitar loop to have it continue playing throughout this outro section.
On Track 6, use the Loop tool to lengthen the rhythm guitar’s loops to bar 33.
To end the song with a bang, you’ll add one last cymbal hit loop.
In the Loop Browser, search for the loop Angelic Crash FX and drag it to Track 1 at bar 33.

Listen to your entire song.
You have arranged your first song. Using only a few Apple Loops, you’ve built a simple one-minute song that starts with an intriguing intro and then transitions into a section with layered distorted guitars and a bouncy bass line. Then, an energetic rhythm guitar introduces a brighter chord progression. You’ve edited and transposed the bass line so that it follows the new chord progression when it is reintroduced at bar 21. With your newly found editing skills, you created gaps and breaks to strengthen the transitions between song sections, and you ended the song with a half-time outro. Really nice! You’ll now quickly mix the song and later export it to share it.
Mixing the Song
Now that you have arranged your regions in the workspace, you can focus on the sound of each instrument and how they sound as an ensemble. You can adjust each instrument’s loudness and its position in the stereo field, and even modify its timbre so all the instruments blend harmoniously.
Choosing Names and Icons for Tracks and Channel Strips
A little preparation goes a long way, so before you start adjusting the sounds, you’ll take a moment to visually clean up your project, choosing appropriate names and icons that will help you identify tracks and channel strips.
In the control bar, click the Mixer button (or press X).

At the bottom of the main window, the Mixer opens.

The channel strips are named after the Apple Loops that you previously dragged to the workplace. Most names are too long to be displayed in full, so they’re abbreviated and difficult to read. To more easily determine which instruments they control, you can give the channel strips simpler, more descriptive names.
To edit the name on a track header and on its corresponding channel strip, you can double-click either and type the new name.
At the bottom of the first channel strip, double-click the Breaks Bump Beat 01 name.

A text entry box appears, and the current name—Breaks Bump Beat 01—is selected.
Type Drums, and press Return.
Both the first channel strip in the Mixer and Track 1 in the Tracks view are renamed Drums. Renaming tracks in the track header is often easier because the names aren’t abbreviated, and you can quickly identify instruments by looking at the regions you’ve been arranging.
In the control bar, click the Mixer button again (or press X) to close the Mixer.
In Track 2’s track header, double-click the Kick Start Bass Guitar name.

A text entry box opens. This time you’ll enter a name and open the text entry box of the next track with a single key command.
Type Bass, and press Tab.
Track 2 is renamed Bass. A text entry box opens on Track 3’s name, ready to be edited.
Type Lead Gtr, and press Tab.
Track 3 is renamed Lead Gtr, and Track 4 is ready to be renamed.
Type Rhythm Gtr, and press Tab.
Type High Gtr, and press Tab.
Type Funky Gtr, and press Tab.
Type Melody Gtr, and press Tab.
Type Strings, and press Return.
Tip
In the Mixer, you can also press Tab to enter a name and open the text entry box of the next channel strip. Should you enter a name incorrectly, press Shift-Tab to open the text entry box of the previous track or channel strip.
Notice that Track 1 has only a generic audio waveform icon. That’s because the track was created upon creating the project, before you dragged the Breaks Bump Beat 01 loop to it at the very beginning of this lesson.
In the Tracks view, Control-click the icon in Track 1’s track header.

A shortcut menu displays icons organized in categories.
In the shortcut menu, click the Drums category.
A collection of various drum icons appears.
Click an icon representing a drum kit.

The icon is now visible in the track header. The same icon is also assigned to the corresponding channel strip in the Mixer, as you will see in a moment.
During mixing, when your creative juices are flowing and you just want to make a quick adjustment to the sound of an instrument, wasting time looking for the correct track or channel strip can be frustrating. Or worse, you could become a victim of the classic mistake: turning knobs and faders but not hearing the sound reacting to your adjustments, until you realize you were adjusting the wrong instrument!
Taking a minute to assign your tracks and channel strips descriptive names and appropriate icons can accelerate your workflow and avoid potentially costly mistakes.
Adjusting Volume and Stereo Position
With new names and icons assigned, your Mixer is ready. You’ll now open it and adjust some of the instruments’ volume levels and stereo positions. When adjusting instrument volume levels, it’s generally recommended to avoid turning volume faders up to avoid overloading the mix. Instead, determine which instruments you want to stay loud in the mix and lower the others to your taste. In this song, you’ll keep the drums and bass loud and clear as they form the foundation of the groove, and you’ll lower the guitars and strings so that they don’t compete with the drum and bass.
In the control bar, click the Mixer button (or press X) to open the Mixer.
You can see your new names at the bottom of the channel strips and the new icon on the Drums channel strip.
Tip
To resize the Mixer, position the pointer at the top of the Mixer pane to see the Resize pointer and drag up or down.

The channel strips in the Mixer have a lot of options, but don’t worry. Just because you have many tools available doesn’t mean you have to use them all. You’ll learn about those options as needed.
Note
Depending on the size of your display, you may not be able to open up the Mixer all the way. In that case, you can drag the vertical scrollbar to the right of the Mixer to scroll up and see all the options.
Listen to your song.
The High Guitar adds a repetitive melodic pattern that adds a mysterious and hypnotic vibe to the drums. It doesn’t need to be up front in the mix, so you can lower it.
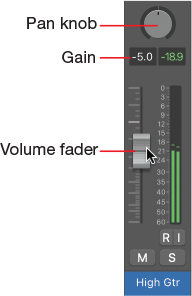
On the High Guitar channel strip, drag down the Volume fader so that the Gain display reads –5.0.
Note
When space does not permit, negative Level and Gain values are displayed without the – (minus sign).
Continue adjusting the Volume fader until the Gain display reads –5.0. The Volume fader affects how much gain is applied to the audio signal flowing through the channel strip and, therefore, controls how loudly that instrument plays. The hypnotic guitar melody is now softer and lets the drum loop be strong and center.
After the intro, let’s dial the Lead Gtr and Rhythm Gtr to more subtle levels.
On the Lead Gtr channel strip, drag the Volume fader down to –2.0 dB.
On the Rhythm Gtr channel strip, drag the Volume fader down to –2.9 dB.
You’ll now adjust the Pan knobs on the Lead Gtr and Rhythm Gtr tracks to spread them farther apart in the stereo image. To adjust a pan knob, click the center of the knob and drag up to turn the knob to the right, or down to turn the knob to the left.
On the Lead Gtr channel strip, drag the Pan knob all the way down to –22.
The guitar is panned a little to the left of the stereo field.
On the Rhythm Gtr channel strip, drag the Pan knob up to +15.

The guitar is panned a little to the right of the stereo field.
Tip
If you have trouble hearing a difference when you adjust a parameter, try exaggerating the effect by exaggerating the adjustment at first. As your ear becomes more acute to the effect of adjusting a specific parameter, you’ll be better able to dial in more reasonable values.
The two guitars are sitting nicely on either side of the center, giving dimension to the mix by spreading out the instruments in the stereo field.
Continue listening to the song to mix the next section.
On the Funky Gtr channel strip, drag down the volume fader to –3.0 dB.
Let’s widen the mix in this section as well by balancing out the Melody Gtr on one side and the Strings on the other.
On the Melody Gtr channel strip, drag up the pan knob to +24.
On the Strings channel strip, drag down the pan knob to –46 and drag down the Volume fader to –5.0 dB.

Listen to the entire song.
The mix is well balanced, spreading a couple of instruments on either side of the center in each one of the two main sections to give the song a dimension in the stereo field. The drum and bass lay a solid groove while the guitars are dialed in at just the right level to bring a sonic texture as well as melodic and harmonic elements to the song.
In the inspector, look at the peak level display on the Output channel strip. When a part of a mix is too loud, the Output channel strip peak level display shows a positive value and turns red, indicating that the audio signal is distorted. In this project, the highest peak in the song is under 0 dB FS, and no distortion is created.
Now that you have carefully balanced the instruments levels and stereo positions in your mix, your work in Logic is finished, and the song is ready to be exported.
Mixing Down to a Stereo File
The last step is to mix down the music to a single stereo audio file so that anyone can play it on consumer-level audio software or hardware. In this exercise, you will bounce the project to a stereo audio file. By first selecting all your regions, you avoid the need to manually adjust the bounce start and end positions.
Make sure the Tracks view has key focus, and choose Edit > Select > All (or press Command-A) to select all regions.
In the main menu bar, choose File > Bounce > Project or Section (or press Command-B) to open the Bounce dialog.

You can choose one or more Destination formats and adjust parameters for each format.
You’ll bounce an MP3 format file that you can easily email or upload to a website.
Deselect the PCM checkbox, and select the MP3 checkbox.

Below the Destination box, notice that the End position is correctly adjusted to the end of the regions in the workspace (bar 37), when the crash cymbal stops echoing. That’s because you selected all the regions in your workspace at the beginning of this exercise.
In the Bounce dialog, click OK (or press Return).
A Bounce dialog opens. Bouncing creates a new stereo audio file on your hard drive.
You’ll save the new MP3 file to your desktop. The Save As field is populated with the Logic project name, Rocking Beat.
From the Where pop-up menu, choose Desktop (or press Command-D).
Click Bounce (or press Return).

A Bouncing progress bar opens, and when it completes, your MP3 file is ready on your desktop.
Choose Logic Pro > Hide Logic Pro (or press Command-H).
Logic Pro is hidden, and you can see your desktop.
Tip
If you have multiple apps open and you want to hide them all in order to see your desktop, click the Finder icon in the Dock (or press Command-Tab to select the Finder) and choose Finder > Hide Others (or press Command-Option-H). To unhide an app, press Command-Tab to select it.
On your desktop, move your pointer over Rocking Beat.mp3, and click the play button that appears.

Your file starts playing. You can now share that MP3 file with all your friends and family!
In a relatively short time, you have produced a one-minute instrumental song with eight tracks, edited the regions in the workspace to build an arrangement, and adjusted the volume levels and pan positions of the instruments in the Mixer. You now have a piece of music that would work fine, for example, during the credits of a radio or TV show or as a music bed for a TV ad.
Key Commands
Keyboard Shortcuts
Panels and Windows | |
|---|---|
I | Toggles the inspector |
X | Toggles the Mixer |
O | Toggles the Loop Browser |
Shift-/ | Toggles the Quick Help window |
Navigation | |
Space bar | Plays or stops project |
, (comma) | Rewinds one bar |
. (period) | Forwards one bar |
Shift-, (comma) | Rewinds eight bars |
Shift-. (period) | Forwards eight bars |
Return | Returns to beginning of project |
U | Sets rounded locators by selection and enables cycle |
C | Toggles Cycle mode on and off |
Zooming | |
Control-Option-drag | Expands the dragged area to fill the workspace |
Command-Left Arrow | Zooms out horizontally |
Command-Right Arrow | Zooms in horizontally |
Command-Up Arrow | Zooms out vertically |
Command-Down Arrow | Zooms in vertically |
General | |
Command-Z | Undoes the last action |
Command-Shift-Z | Redoes the last action |
L | Toggles Loop parameter on and off for the selected region(s) |
Command-A | Selects all |
Command-R | Repeats the selection once |
Command-B | Bounces the project |
Command-S | Saves the project |
Tab | Cycles key focus forward through open panes |
Shift-Tab | Cycles key focus backward through open panes |
macOS | |
Command-D | Selects Desktop from Where pop-up menu in Save dialog |
Command-H | Hides current application |
Command-Option-H | Hides all other applications |
Command-Tab | Cycles forward through open applications |
Shift-Command-Tab | Cycles backward through open applications |