Lesson 5
Using Patches and Recording MIDI
Lesson Files
Logic Pro X Files > Lessons > 05 Dub Beat
Time
This lesson takes approximately 90 minutes to complete.
Goals
Use patches from the Library
Create Track Stacks
Save layered synthesizer patches
Map and assign Smart Controls
Save layered synthesizer patches
Record MIDI performances
Quantize MIDI recordings
Merge a MIDI recording with an existing MIDI region
Record MIDI in take folders
MIDI (Musical Instrument Digital Interface) was created in 1983 to standardize the way electronic musical instruments communicate. Today, MIDI is extensively used throughout the music industry to record and program synthesizers and samplers. Many TV and film composers use MIDI to sequence large software sound libraries, getting ever closer to realizing the sound of a real orchestra.
MIDI sequences can be compared to piano rolls, the perforated paper rolls once used by mechanical player pianos. Like the punched holes in piano rolls, MIDI events do not contain audio. They contain note information such as pitch and velocity. To turn MIDI data into sound, MIDI events are routed to a software instrument or to an external MIDI instrument.
There are two basic types of MIDI events: MIDI note events, which trigger musical notes, and MIDI continuous controller (MIDI CC) events, which control parameters such as volume, pan, or pitch bend.
For example, when you press C3 on a MIDI controller keyboard, the keyboard sends a “note on” MIDI event. The note on event contains the pitch of the note (C3) and the velocity of the note (which indicates how fast the key was struck, thereby showing how hard the musician pressed the key).
By connecting a MIDI controller keyboard to Logic, you can use Logic to route the MIDI events to a virtual software instrument or to an external MIDI instrument. The instrument reacts to the note on event by producing a C3 note, and the velocity typically determines how loud the note sounds.
When a MIDI controller keyboard is connected to your computer, and its driver is properly installed (some devices are class-compliant and don’t require a driver installation), you can use that keyboard to record MIDI in Logic. Logic automatically routes all incoming MIDI events to the record-enabled software instrument or external MIDI track.
NOTE ▶
When connecting certain MIDI controllers, Logic opens a dialog asking if you want to automatically assign its controls. To follow the exercises in this lesson, click No. If you’ve clicked Auto Assign before in this dialog, choose Logic Pro X > Control Surfaces > Preferences, click the MIDI Controllers tab, and deselect the Auto checkbox for all listed controllers.
TIP ▶
If you don’t have a MIDI controller keyboard, choose Window > Show Musical Typing (or press Command-K) to turn your Mac keyboard into a polyphonic MIDI controller. Pressing the Z and X keys allows you to choose the octave range, and pressing C and V lets you adjust the note velocities. Keep in mind that you may need to close the Musical Typing window (or press Command-K) to access some of the Logic key commands.

TIP ▶
You will apply the Logic Remote app to use your iPad as a wireless MIDI controller in Appendix A, “Controlling Logic with an iPad Using Logic Remote.”
Using a Patch from the Library
When working with software instruments in Logic, the MIDI events can be recorded, created, and edited inside MIDI regions placed on the track. The MIDI events generated by playing your MIDI keyboard are routed to the record-enabled track in the Tracks area. From the track, those real-time events from your keyboard, or the events played back from MIDI regions on the tracks, are routed to the top of the channel strip. They can be preprocessed by MIDI effect plug-ins before the MIDI data is passed to the instrument plug-in. The instrument produces an audio signal that can be further processed using audio effect plug-ins. The audio can then be adjusted with the Volume fader and Pan knob before being routed to the output destination.
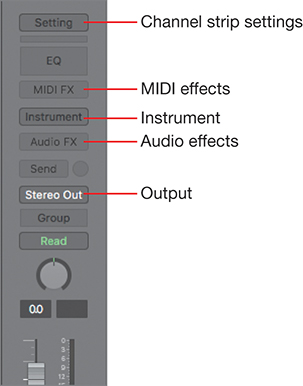
The Setting button at the top of a channel strip allows you to load or save channel strip settings, which contain all the plug-ins inserted on a channel strip and their individual settings.
The Library lets you load or save patches, channel strip settings, or plug-in settings. A patch can be a single channel strip setting, or multiple channel strips and their channel strip settings.
TIP ▶
To see a plug-in’s settings in the Library, click to the left of the plug-in on the channel strip in the inspector. A blue triangle and a white frame indicate which plug-in’s settings the Library is currently displaying.
In this exercise, you will create a software instrument track, choose a patch from the Library, and examine the channel strips created in the Mixer.
1 Choose File > New (or press Command-Shift-N).
If a project was already open, an alert asks if you want to close the current project. Click Close (a Save dialog then prompts you to save it).
2 In the New Track dialog, click Software Instrument. From the Instrument pop-up menu, choose Empty Channel Strip, and make sure all checkboxes are deselected. Click Create.

A new, empty software instrument track is created.
3 In the control bar, click the Mixer button (or press X).

The Mixer opens and shows three channel strips that are, from left to right:
► The software instrument channel strip you just created (Inst 1)
► The Stereo Out channel strip
► The Master channel strip
You will now load a patch for the selected software instrument track while watching what happens in the Mixer.
4 In the control bar, click the Library button (or press Y).
The Library opens to the left of the inspector.
5 In the Library, choose Piano > Steinway Grand Piano.
TIP ▶
In the Library, you can press the Up and Down Arrow keys to select categories or patches in a list, and press the Left and Right Arrow keys to navigate to the left and right columns.
6 Play a few keys on your MIDI keyboard to hear the piano sound.
7 In the Mixer, look at the channel strips.
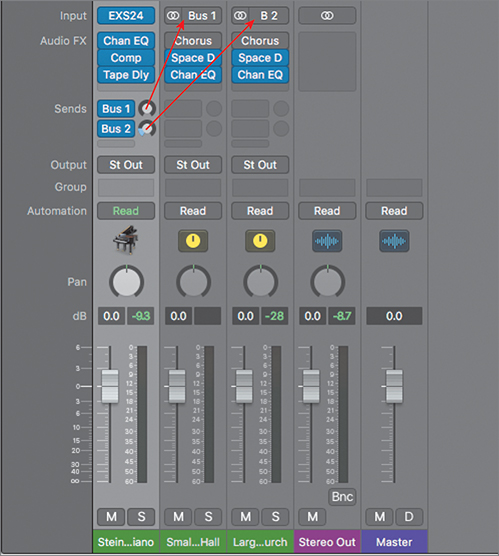
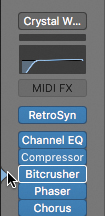
On the software instrument channel strip (Steinway Grand Piano), a channel strip setting is loaded, containing an EXS24 (the Logic sampler) instrument plug-in and three audio effect plug-ins: a Channel EQ, a Compressor, and a Tape Delay.
Two new auxiliary channel strips are also created (Small Hall/1.3s Diffuse Hall and Large Hall/6.6s Botta Church), each one with its own channel strip setting. The software instrument channel strip has two bus sends that route the audio signal to the inputs of the two auxiliaries, set to Bus 1 and Bus 2 (B 2). Together, the software instrument channel strip setting, along with the two auxiliaries and their channel strip settings, make up the Steinway Grand Piano patch.
In a Mixer, a bus transports the audio signal from one channel strip to another. Here, Bus 1 and Bus 2 route the stereo audio signal of the piano to two different reverberation effects on the two auxiliaries.
TIP ▶
In Logic, a single bus can transport a mono, stereo, or surround audio signal.
8 On the Steinway Piano channel strip, next to the Bus 1 send, drag the bus Send Level knob all the way up.
Play the piano with your MIDI keyboard. You can hear the reverberation sound of a smaller room.
9 Next to the Bus 1 send, lower the Send Level knob all the way down.
The piano now has a small amount of reverb that comes from the Bus 2 send.
10 Next to the Bus 2 send, lower the send level all the way down.
The piano now sounds completely dry with no reverberation.
11 Next to the Bus 2 send, raise the send level all the way up.
You can hear the reverb of the second auxiliary, which sounds like a much bigger room. Notice that this reverb sustains for a longer time than the first one.
12 Continue adjusting the bus send levels to compare the sound of the two reverbs, and then set them to a level that sounds good to you.
TIP ▶
To load a patch without its bus sends and auxiliary channel strips, start with an empty software instrument channel strip. At the lower left of the Library, from the Action menu, choose Enable Patch Merging. Then deselect the Sends button.
13 Close the Mixer.
Now that you know how to choose a patch from the Library, and how to adjust the amount of reverb using the bus Send Level knobs, you will create and save your own custom patch.
Creating a Layered Sound Patch
Well before recording was invented, composers used instrumental sound layering to thicken sounds. In a classical orchestra, you often hear multiple musicians playing the same part at the same time. When all the violins play a melody together, you hear a rich warm tone and the emotional level is raised.
Sound layering is a common technique used by music producers to make just about any instrument sound thicker, or to mix the timbres of different sounds. For example, many vocals on commercial songs are doubled (that is, the singer records two identical performances that are played back simultaneously), and dance music producers often layer multiple kick drum samples, such as combining a kick drum with a strong percussive attack and another that has a boomy sustain.
In Logic, Track Stacks allow you to combine a group of tracks and control them as a single track. Track Stacks can be used to organize tracks you want to group together (such as drum tracks or backup vocal tracks). They can also be used to group software instrument tracks, so that the MIDI notes on a single track can trigger all of the instruments in the Track Stack.
In this exercise, you will create a Track Stack for two different synthesizer patches and save the Track Stack as a new patch.
1 Choose File > New (or press Command-Shift-N), and when prompted, close but don’t save the existing project.
2 In the New Tracks dialog, choose Software Instrument. Set “Number of tracks” to 2, and click Create.

Two empty software instrument tracks are created.
3 Click the Library button (or press Y) to open the Library.
4 In the Tracks area, select the first track, and in the Library, choose Synthesizer > Lead > Nightlife Lead.
5 Play your MIDI keyboard.
The synth sounds modern; it is quite edgy and buzzy. Try playing a bass line in the C1–C2 range. This modern bass has a lot of character, but it lacks the body and thickness of an older analog synth.
6 In the Tracks area, select track 2, and in the Library, choose Synthesizer > Lead > 70s Analog Lead.
That synth is more rounded and warm. Plus, it has more low frequencies, which will bring body to the layered sound. Let’s select both tracks and create a Track Stack for them.
TIP ▶
To hear both sounds layered before you create the Track Stack, record-enable both track headers and play your MIDI keyboard.
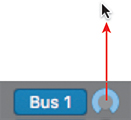
7 Shift-click the unselected track header to select both track headers.

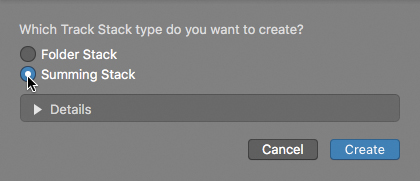
8 Choose Track > Create Track Stack (or press Command-Shift-D).
A dialog lets you choose between a folder stack or a summing stack. To group software instruments and work with the MIDI data on the main track of a Track Stack, you must use a summing stack.
9 Choose Summing Stack, and click Create.
In the Tracks area, the main track of the new summing stack appears at the top, and the two original software instrument tracks become subtracks of the Track Stack.
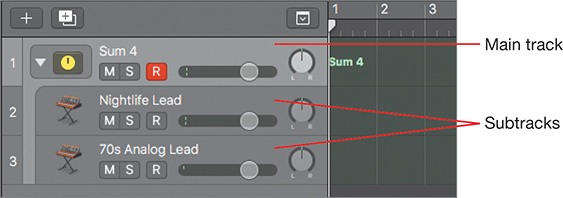
In the workspace, the main track and the subtracks have a green background to indicate that they all belong to a summing stack.
10 Make sure the main track of the Track Stack is record-enabled, and play your MIDI keyboard.
You can now hear the layered sound combining both the Nightlife Lead and the 70s Analog Lead patches.
11 Try muting either subtrack inside the Track Stack.
Muting a subtrack allows you to determine exactly what each subtrack adds to the layered sound. When you mute Nightlife Lead, the sound loses its edge and buzzy quality. When you mute 70s Analog Lead, the sound loses body and warmth.
12 Unmute both subtracks.
Let’s assign the main track an icon that will be saved along with the patch.
13 On the main track, Control-click the icon, and choose a keyboard icon.
14 At the bottom of the Library, click Save.

15 In the Save dialog, type a filename for the patch, such as Thick Bass, and save it to the default location.

In the Library, a new User Patches category is created in the left column and your new patch is selected inside it.
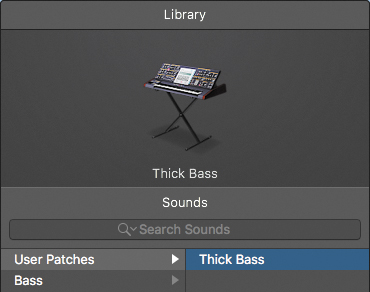
In the workspace, the main track in the Track Stack is renamed after the patch you saved.

16 On the Track Stack’s main track header, click the disclosure triangle next to the icon.

The Track Stack is now closed and appears as a single track. It retains all functionality, and as long as the Track Stack is record-enabled, you can continue playing or recording the layered patch from your MIDI keyboard.
Now that you have saved your custom patch in the Library, it will be available in any project you open in Logic whenever a track of the same type (a software instrument track) is selected. Selecting the Thick Bass patch from the Library will replace the selected software instrument track with the summing stack and its two subtracks.
Mapping Controller Knobs to Plug-in Parameters
In Lesson 4, you used Smart Controls as a one-stop shop for adjusting multiple parameters, such as a bus send level, parameters of the instrument plug-in, and parameters of the channel EQ plug-in.
This time you will map a Smart Control knob to a plug-in parameter, and assign a real knob or fader on your MIDI controller to that Smart Control knob. Finally, you’ll save your custom Smart Control layout within the patch.
Opening the Plug-Ins for Mapping
In this exercise, you’ll select a patch in the Library and open the plug-in you want to control. In the Smart Controls pane, you will map one of that plug-in’s knobs to a screen control.
1 Drag the track header of the main track into the inspector to delete the track.
The New Track dialog opens.
2 Create one new software instrument track.
3 Open the Library, and select Synthesizer > Bass > Dirty Fifth.
4 Play your MIDI keyboard.
The synth sounds thick and gritty. Wouldn’t it be fun to make its timbre evolve while you play some notes? To do so, you will first open the plug-in windows that have parameters you can map to screen controls.
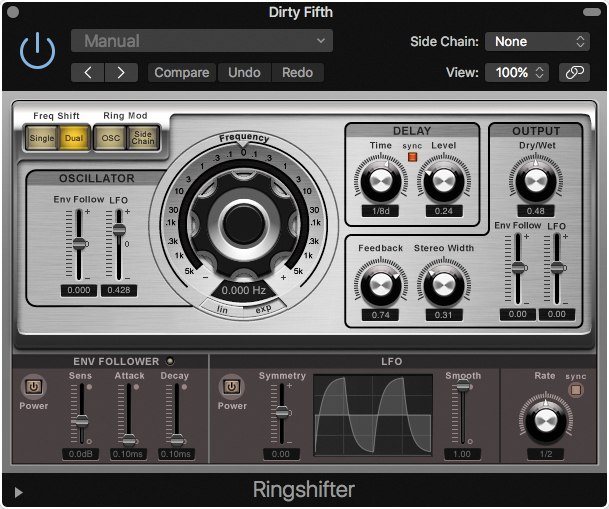
5 In the inspector, click in the middle of the Ringshifter plug-in slot to open the plug-in.
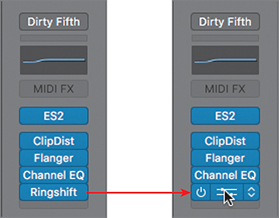
The Ringshifter plug-in window opens.
TIP ▶
If the presence of plug-in windows hinders your ability to interact with the main window, press V to toggle all plug-in windows on and off.
TIP ▶
To resize a plug-in window, drag its lower-right corner or use the View pop-up menu in the plug-in header.
Mapping Screen Controls to Parameters
Now that you have opened the Ringshifter plug-in, you can use the Smart Controls pane to map a screen control to the Ringshifter’s Frequency knob.
1 In the control bar, click the Smart Controls button (or press B).
The Smart Controls pane opens at the bottom of the main window, displaying a collection of preassigned screen control knobs and buttons.
2 At the upper left of the Smart Controls pane, click the Inspector button.
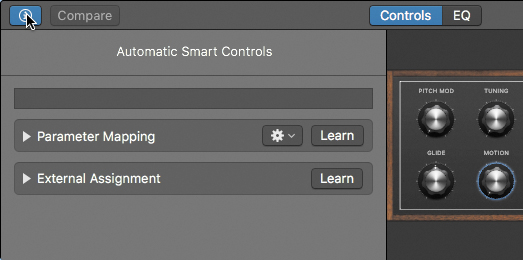
The Smart Controls inspector opens. It shows the parameter assignments for the selected screen control. You will map only one screen control knob, so let’s choose a simpler layout.
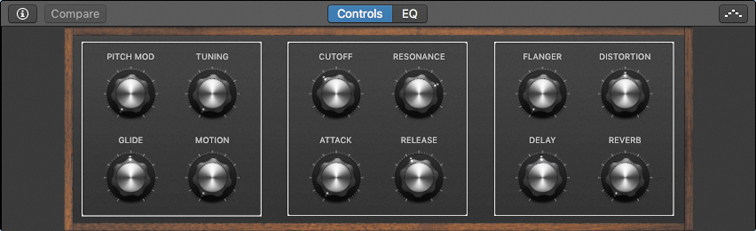
3 At the top of the Smart Controls inspector, click the layout name, and choose Factory Layouts > Soundscape 6.
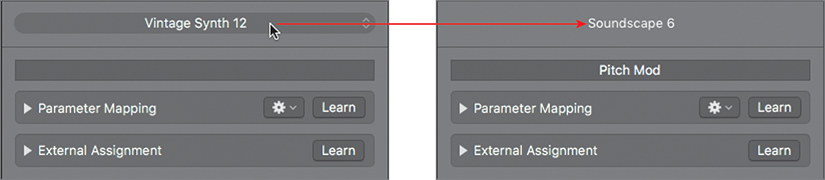
The simpler Soundscape 6 layout appears. It has only six knobs. The first (labeled Pitch Mod) is highlighted in blue to indicate that it is selected. First let’s remove all factory mappings for this patch.
4 In the Parameter Mapping area, from the action menu, choose Delete all Patch Mappings.

All screen controls for the current patch are unmapped.

You now will map the first screen controls knob so that it controls the big Frequency knob in the Ringshifter plug-in.
5 In the Parameter Mapping area, click the Learn button.
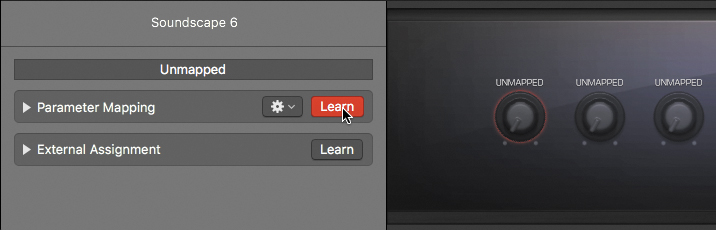
The first screen control knob is highlighted in red, indicating that it is ready to be mapped.
6 In the Ringshifter, click the big Frequency knob.

In the Smart Controls pane, the highlighted screen control is renamed “Frequency.”

7 In the Parameter Mapping area, click the Learn button to turn off Learn mode.
8 Close the Smart Controls inspector.
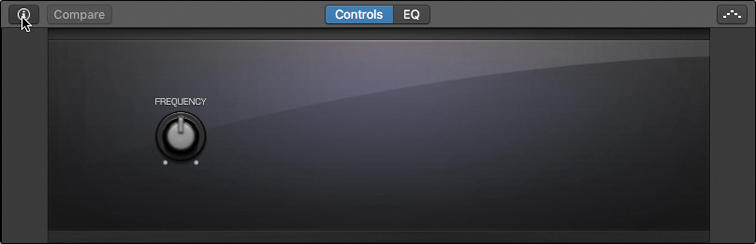
In the Smart Controls pane, the mapped Frequency knob is displayed, and the unmapped knobs are hidden.
9 In the Smart Controls pane, drag the Frequency knob up and down while you play a few notes on your keyboard.
The big Frequency knob in the Ringshifter moves along with the Smart Control knob, and you can hear the Ringshifter effect modulate your synth sound.
10 Close the Ringshifter plug-in window.
You can now save this patch along with your custom Smart Control layout and mappings.
11 At the bottom of the Library, click the Save button.
12 In the Save dialog, name your patch Dirty Fifth Shifter, and click Save.
You have created and saved your own Smart Control layout, with a screen control mapped to a plug-in parameter. Smart Controls allow you to unite all the controls you need in a single pane, which makes it easy to control multiple parameters in multiple plug-ins without opening the plug-in windows.
Assigning MIDI Controller Knobs to Screen Controls
As fun as it is to tweak the frequency of the Ringshifter while playing on your keyboard, it’s not usually practical to have one hand on the mouse tweaking a knob on your computer screen while the other is playing the keyboard. However, most recent MIDI keyboards and MIDI control surfaces have knobs or faders that can send MIDI Continuous Controller data to Logic, so let’s assign a hardware knob to the screen control in the Smart Controls pane.
1 Open the Smart Controls inspector.
2 In the External Assignment area, click the Learn button.
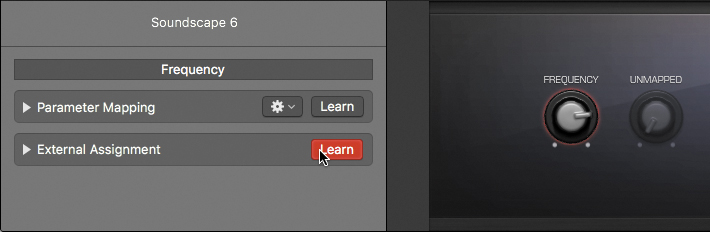
NOTE ▶
When the External Assignment Learn button is on, do not play notes on your keyboard, or touch knobs, faders, or wheels other than the one you intend to assign to the selected onscreen controller. If you do, that unintended action will also be learned as an assignment and may lead to unexpected results.
3 On your MIDI keyboard, turn a knob. Don’t be timid. Move the knob all the way down and all the way up, if necessary. When the knob is assigned, it adjusts the Frequency screen control in the Smart Controls pane (which in turns controls the Ringshifter plug-in’s Frequency parameter).
4 In the External Assignment area, click the Learn button to turn it off.
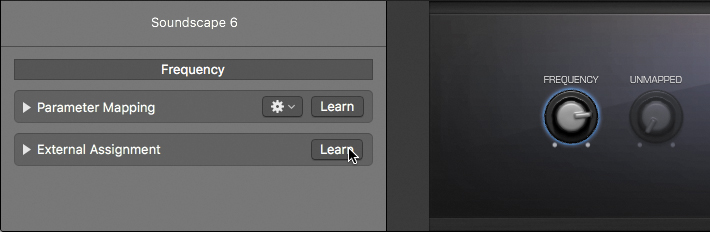
5 Close the Smart Controls inspector.
6 On your MIDI keyboard, play keys while turning the assigned knob.
As you move the knob on your keyboard, the Frequency screen control moves in the Smart Controls pane, and you can hear the Ringshifter effect process the sound.
7 Choose File > Close Project, but do not save the project.
You have assigned a physical knob on your MIDI controller keyboard to the first screen control in the Smart Controls pane of any patch you load. Being able to control Logic’s sound effects remotely from your MIDI Controller allows you to place all of your focus on your musical performance.
Using the Arpeggiator MIDI Plug-In
MIDI effects are plug-ins that can process the MIDI data within a track before it reaches the instrument plug-in, regardless of whether it was generated in real time using your MIDI keyboard or placed in the MIDI regions on the track during playback. A MIDI plug-in may change the pitch and velocity of notes or even create new MIDI note or controller events.
In this exercise, you will hold down a chord on your MIDI keyboard and process the chord using the Arpeggiator MIDI plug-in, which automatically arpeggiates a chord’s notes while staying in sync with the project.
1 Go to Logic Pro X > Lessons and open 05 Dub Beat. This project has two empty software instrument tracks (Inst 1 and Low Down Dub).
2 On the first track, double-click the Inst 1 name, and rename the track Synth.
3 On the Synth channel strip, click the Instrument slot, and choose Retro Synth.

The Retro Synth plug-in opens. This modeling instrument can imitate a wide range of classic synths and their specific synthesis techniques. In the Oscillator section at the upper left, four tabs let you access one of the four synthesizer engines: analog modeling (ANALOG), synchronized oscillators (SYNC), wavetable synthesis (TABLE), and frequency modulation (FM).
4 Play a few notes on your keyboard.
You can hear the Retro Synth play a classic analog synth sound.
TIP ▶
To hear the results of your actions, continue playing your MIDI keyboard as you make adjustments throughout this lesson.
5 In the inspector on the Synth channel strip, click the MIDI FX slot, and choose Arpeggiator.
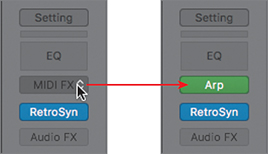
The Arpeggiator opens.
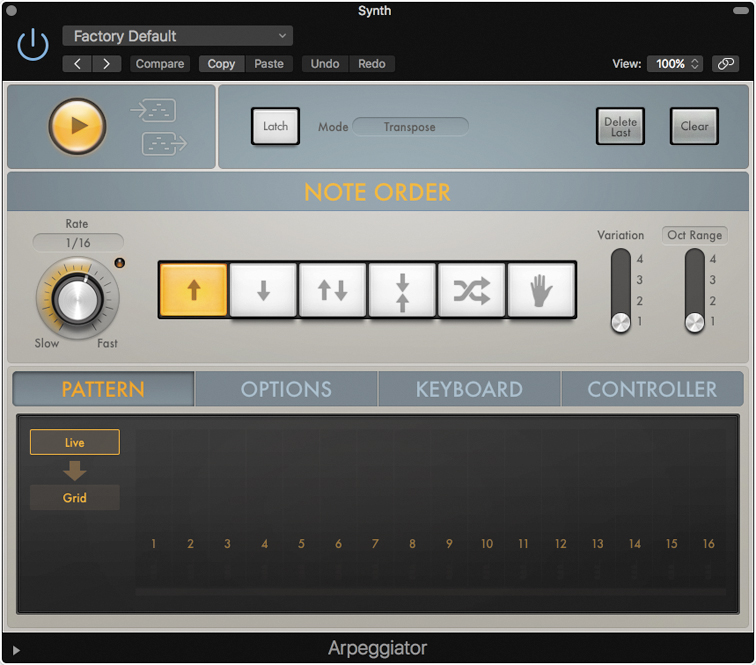
6 Hold down a single note. The Arpeggiator starts repeating it every sixteenth note.
7 Hold down a chord. The Arpeggiator plays one note at a time every sixteenth note, from the lowest note to the highest one.
8 Press the Spacebar.
You can hear the Low Down Dub beat on track 2. Track 2 uses the Ultrabeat instrument plug-in, which has a built-in sequencer. This is why you can hear the instrument play a beat even though you don’t see any MIDI regions on its track.
For the rest of this exercise, feel free to stop and resume playback when you need a break, or when you want to focus on the arpeggiated synth.
9 At the top of the Arpeggiator, click Latch.
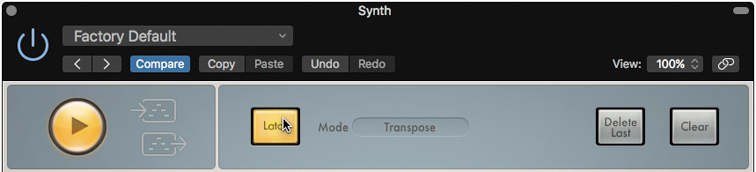
When Latch is enabled, the Arpeggiator memorizes the last chord you played as long as the project continues playing. You can click the Play button at the upper left of the Arpeggiator to stop and start playback.
10 Play a chord and release the keys. The arpeggio continues to play.
11 Play another chord to hear the arpeggiated chord.
Next to the Latch button, notice that Mode is set to Transpose. In that mode, you can use your MIDI keyboard to transpose the arpeggio to a different key.
12 Play a single key on your keyboard.
The previous chord is transposed, so it starts on the pitch of the note you play.
13 In the Note Order section, click the Down button.
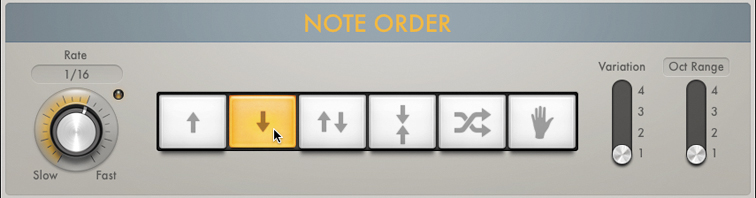
The arpeggio now plays from the highest note to the lowest note.
14 Drag the Oct Range switch to position 3.
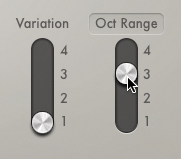
The Arpeggiator repeats over a three-octave range.
15 In Retro Synth, at the lower right, try playing with the amplifier envelope (AMP ENV) by dragging the handles on the display or by adjusting the four parameters around the display: A, D, S, R (for Attack, Decay, Sustain, Release). Try making the sound of the synth evolve from long envelopes to very short ones.

16 In the Arpeggiator, try adjusting the Rate knob to change how fast the chord is arpeggiated.
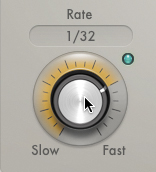
Keep in mind that shorter amp envelopes work best for faster rates.
17 Choose File > Close Project, but do not save your project.
The Arpeggiator MIDI plug-in processes a simple chord played on your keyboard into simple and complex arpeggios. You’ve learned how to choose different note orders and their variations, and to expand the arpeggio over multiple octaves. You also manipulated the synthesizer’s filter and amp envelopes to make the sound evolve while the arpeggio is playing.
MIDI plug-ins give you more tools to process MIDI events in real time. Feel free to continue exploring the possibilities, perhaps by choosing different instruments to arpeggiate.
Recording MIDI
In Logic, the basic techniques used to record MIDI are similar to the techniques you used to record audio in Lesson 2. You will now observe the MIDI In display in the control bar as you send MIDI events to Logic and record a simple piano part.
1 Choose File > New (or press Command-Shift-N).
2 In the New Tracks dialog, choose Software Instrument. Make sure the Instrument pop-up menu is set to Empty Channel Strip, and click Create.
3 In the Control bar, click the Library button (or press Y).
4 In the Library, choose Piano > Steinway Grand Piano.
5 Play a few notes on your MIDI keyboard while observing the LCD display.

A small dot appears at the upper right of the LCD display to indicate that Logic is receiving MIDI events. These small dots can be useful to quickly troubleshoot MIDI connections.
NOTE ▶
When Logic sends MIDI events to external MIDI devices, a small dot appears at the lower right of the LCD display.
6 Play a chord on your MIDI keyboard.

The MIDI input activity monitor displays the chord name.
Logic can provide a more detailed view of the incoming MIDI events.
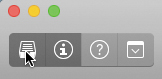
7 To the right of the LCD display, click the small arrow, and choose Custom.

The Custom LCD display appears, with a MIDI input activity monitor that shows incoming MIDI events in more detail.
8 Hold down a key on your MIDI keyboard.

A note icon indicates that the event received is a MIDI note on event. You can also see the MIDI channel number of the MIDI event, the note’s pitch, and its velocity. In the previous image, the event’s MIDI channel is 1, its pitch is D2, and its velocity is 98.
NOTE ▶
MIDI events can be sent on up to 16 different MIDI channels, which allows you to control different timbres on different channels when using multi-timbral instruments.
9 Release the key on your MIDI keyboard.
Depending on your controller, in the LCD display you may see a note on event with a velocity of zero, or you may see a note with a strike through it, which represents a note off event.
NOTE ▶
Pressing and releasing a key on a MIDI keyboard sends two events: a note on event and a note off event. However, most MIDI editors represent the two events as a single note event with a length attribute.
You could start recording a piano part now, but first let’s open the Piano Roll so you can watch the MIDI notes appear on the grid as they are recorded.
10 In the control bar, click the Editors button, and at the top of the Editors pane, ensure that Piano Roll is selected (or press P).
The Piano Roll opens at the bottom of the main window.
11 Make sure the playhead is at the beginning of the project, and click the Record button (or press R).
The LCD display and the playhead turn red to indicate that Logic is recording. The playhead jumps back one bar, giving you a four-beat count-in, and you can hear the metronome.
12 When the playhead appears, play quarter notes for a couple of bars to record a very simple bass line.
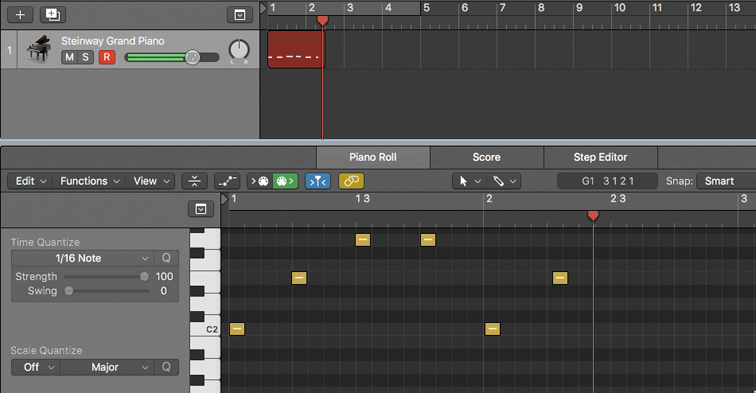
When you play the first note, a red MIDI region appears on the record-enabled track. The region’s length constantly updates to include the most recent MIDI event received.
The MIDI notes appear in the Piano Roll and on the region in the workspace as you record them.
NOTE ▶
If the pitch of the notes you record is outside the range of pitches displayed in the Piano Roll, you will not see the notes as they are recorded.
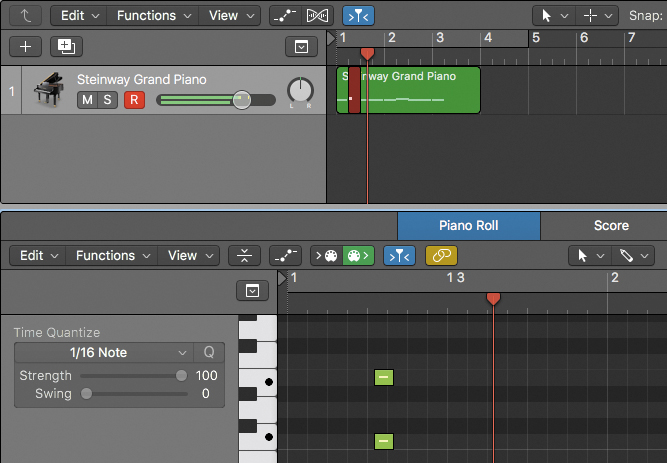
13 Stop recording.
The region is now shaded green. It is named Steinway Grand Piano. You can see the recorded notes in the Piano Roll.
TIP ▶
To see all the notes in the Piano Roll, make sure they are all deselected and press Z.
14 In the Piano Roll, click the Play button at the upper left of the region.

The region starts playback in Solo and Cycle modes. If you are not happy with your performance, you can undo it (Command-Z) and try again.
If you are mostly happy but one or two notes need correction, you can quickly fix them in the Piano Roll:
► Drag a note vertically to change its pitch.
► Drag a note horizontally to change its timing.
► Click a note, and press Delete to remove it.
You will learn how to edit MIDI events in more detail in Lesson 6.
15 Click the region’s Play button again (or press the Spacebar) to stop playback.
Solo and Cycle modes are both turned off.
Correcting the Timing of a MIDI Recording
If you are not happy with the timing of your MIDI performance, you can correct the timing of the notes using a time-correction method called quantization. To quantize a MIDI region, you choose a note value from the Quantize menu in the Region inspector, and inside the region, the notes snap to the nearest absolute value.
Quantizing MIDI Regions
In this exercise, you will quantize the piano passage you recorded in the previous exercise so that the notes are in sync with the metronome.
NOTE ▶
If you were quite happy with the timing of your performance, you may want to undo your previous recording and record again with a less accurate timing so that you can more clearly hear the benefits of quantization.
1 In the workspace, make sure the piano region is still selected.
2 In the Region inspector, click the Quantize value (currently set to off) and choose 1/4 Note while looking at the notes in the Piano Roll.

All the MIDI notes in the piano region snap to the nearest quarter note.
3 In the control bar, click the Metronome button (or press K) to turn it on.
4 Play the piano region. The notes are now perfectly in sync with the metronome.
In Logic, quantizing is a nondestructive operation. You can always revert the notes to their original position.
5 In the Region inspector, set Quantize to off.
In the Piano Roll, the notes return to their original recording positions.
6 In the Region inspector, set Quantize back to 1/4 Note.
The notes are once more in sync with the metronome.
7 Turn off the metronome, and stop playback.
Choosing Default Quantization Settings
You can choose a default MIDI quantization setting so that any new MIDI recording is automatically quantized to that value. This is very useful when you are not completely confident of your timing chops. Because the Quantize setting is nondestructive, you can always adjust it or turn it off for that region after you’re finished recording.
1 In the workspace, click the background.
All regions are deselected, and the Region inspector now displays the MIDI Defaults parameters. The MIDI Defaults settings will be automatically applied to any new MIDI region you record.
2 In the MIDI Defaults parameters, set Quantize to 1/8 Note.

3 In the workspace, click the piano region, and press Delete to delete the region.
4 Move the playhead to the beginning of the project, and click the Record button (or press R).
Record another simple bass line, as you did in the previous exercise. Feel free to play eighth notes this time, since that’s the Quantize value you selected.
5 Stop recording.

In the Piano Roll, the notes immediately snap to the nearest eighth note on the grid. In the Region inspector, the Quantize parameter for the new piano region is set to 1/8 Note. Remember that the Quantize setting is nondestructive, which means that you can still turn it off.
6 In the Region inspector, set Quantize to off. In the Piano Roll, the notes move to their original recorded positions.
7 Set Quantize back to 1/8 Note.
Merging Recordings into a MIDI Region
Sometimes you may want to record a MIDI performance in several passes. For example, when recording piano, you want to record just the left hand, and then record the right hand in a second pass. Or you could record drums in multiple passes, recording the kick drum first, then the snare drum, then the hi-hat, then the crash cymbal, building up a drum beat by focusing on a single piece of the drum kit at a time.
In Logic, when recording MIDI events on top of an existing MIDI region, you can choose to merge the new recording with the existing MIDI region.
Recording into an Existing MIDI Region
In the previous exercise, you recorded a simple bass line onto a piano track. Now you will record chords as you listen to your bass line, merging the new chords with that bass line inside the same MIDI region. First, you will choose the correct recording setting to merge your new recording with the existing region.
1 Make sure Record > Overlapping MIDI Recordings > Cycle Off > Merge is chosen.

From now on the new recordings will be merged with the existing region on the track.
2 Move the playhead to the beginning and start recording.
This time, play only a couple of chords that complement the bass line you previously recorded.
3 Stop recording.
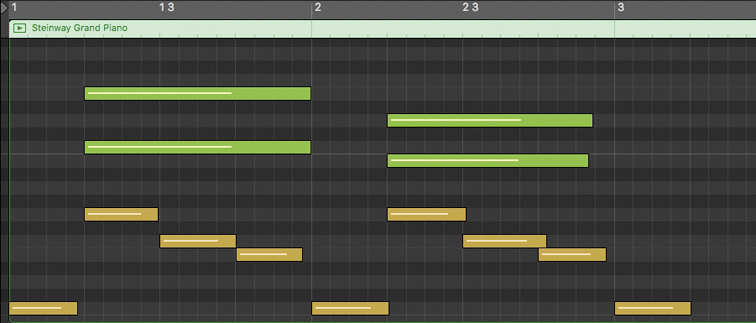
The new notes immediately snap to the nearest eighth note on the grid. On the track, the Steinway Grand Piano MIDI region contains all the notes recorded in this exercise and the previous one.
TIP ▶
You can also use this technique to add MIDI controller events such as pitch bend or modulation to a region after you have recorded the MIDI notes.
Merging Recordings in Cycle Mode
Recording MIDI in Cycle mode allows you to continuously repeat the same section and record new events only when you are ready. This can be very useful when recording a drum pattern. You can loop over a section, building up the drum groove by adding new elements during each pass of the cycle while listening to the drums you have already recorded.
When you are recording MIDI in Cycle mode, notes recorded in all consecutive passes of the cycle are merged into a single MIDI region. In this exercise, you will record drums in Cycle mode, first recording the kick, then the snare, and finally the hi-hat.
First, let’s close the current project and create a new one.
1 Choose File > Close Project (or press Command-Option-W), and when prompted, close but don’t save the existing project.
TIP ▶
When only one window is open in Logic, you can close the project by choosing File > Close (or pressing Command-W).
2 Choose File > New. In the New Tracks dialog, make sure Software Instrument is selected, and click Create.
In a new project, the menu option Record > Overlapping MIDI Recording > Cycle On > Merge is selected by default. Recording in Cycle mode will place all recorded notes in the same region, which is the desired behavior for this exercise.
3 In the control bar, click the Library button (or press Y).
4 In the Library, select Drum Kit > Brooklyn.
The Brooklyn patch is loaded, including a channel strip setting that is loaded for the software instrument channel strip in the inspector. It consists of the Drum Kit Designer instrument plug-in, and the Channel EQ, Compressor, and Multipressor audio effect plug-ins. The channel strip sends to bus 1, and if you open the Mixer, you can see a new auxiliary—and its plug-ins—with its input set to bus 1.
Let’s customize the LCD display so that you can see the detailed MIDI input activity monitor.
5 To the right of the LCD display, click the small arrow, and choose Custom.
Before you start recording, you need to locate the keys that trigger the kick, snare, and hi-hat on your MIDI controller. You will use:
► C1: kick
► D1: snare
► F#1: closed hi-hat
► A#1: open hi-hat
6 Play the lowest C key on your MIDI keyboard while watching the MIDI activity in the LCD display.
If the display doesn’t show a C1, you can use the Octave –/+ buttons on your keyboard to offset the pitch range. Once you’ve found C1, locate D1 (the next white key to the right), F#1, and A#1 (respectively the first and the last keys of the next group of three black keys to the right).
7 In the upper half of the ruler, click the cycle area to turn on Cycle mode.

Since you don’t have a region in the workspace, the Region inspector displays the MIDI Defaults settings.
8 In the Region inspector, set Quantize to 1/16 Note.
You will now record the drums one at a time. Let’s open the Piano Roll to see the notes appear on the grid as you record them.
9 In the control bar, click the Editors button (or press P) to open the Piano Roll.
10 Start recording. You hear a four-beat count-in before the playhead reaches the beginning of the cycle area.
11 Play C1 notes on the first and third beat of every bar.
When the playhead reaches the end of the cycle, it jumps back and starts a new pass. You can hear the kick drum notes that you just recorded. Notice that the notes snap to the nearest sixteenth note because you chose that value as your MIDI Defaults Quantize setting.
You have all the time in the world before you continue to record. As long as you don’t play anything, Logic continues cycling over the existing region, playing back your kick drums. And if you forgot to play one or two kick drum notes, you can record them during one of the subsequent cycle passes.
12 Play D1 notes on the second and fourth beat of every bar. The kick and the snare should alternate on every beat.

13 Play hi-hats on every eighth note using the F#1 (close hi-hat) and A#1 (open hi-hat) keys, playing the open hi-hat only as the last eighth note of some of the bars.
14 Stop recording, click the background of the Piano Roll to deselect the notes, and press Z.
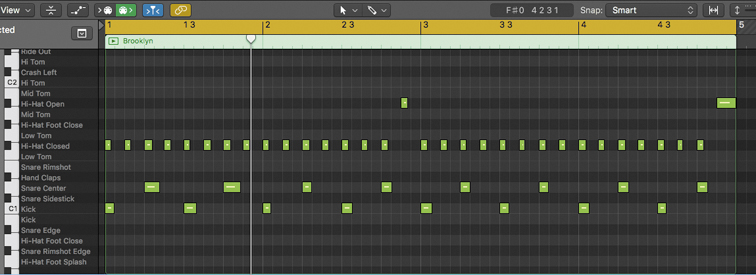
If the Piano Roll vertical zoom level allows, the drum names are displayed in front of the keyboard to the left of the grid. You can see your drum pattern. Now that the notes are not selected, you can see their colors, which vary depending on the note’s velocity.
Joining MIDI recordings as you did in the two previous exercises provides a lot of flexibility and allows you to take your time, recording a single part of a performance at a time. These techniques will help in many situations. For example, consider first recording the notes of a cello melody, and then later recording the movements of the pitch bend wheel to add cello-like vibrato toward the end of sustained notes.
Recording MIDI Takes
When you want to nail a performance or experiment with several musical ideas, you can record multiple takes and later choose the best one. The techniques for recording MIDI takes are similar to the techniques you used to record audio takes in Lesson 2. You can record new takes over an existing region or take folder, or you can record multiple takes in Cycle mode.
Cycle mode should still be turned on from the previous exercise. Let’s record takes in Cycle mode and experiment with using different melodies for a bass line.
1 Choose Record > Overlapping MIDI Recordings > Cycle On > Create Take Folder.
2 Choose Track > New Software Instrument Track (or press Command-Option-S).
3 Open the Library, and choose Bass > Stinger Bass.
4 Start playback and play a few notes on your MIDI keyboard.
You can hear your bass, and you can practice until you find an idea for a simple bass line that will work with the drums you recorded on track 1.
► About Live Mode
Selecting a software instrument track automatically record-enables it, but the instrument is not always in Live mode (for example, when selecting a software instrument track during playback). An instrument in Live mode requires more CPU resources. When an instrument is not in Live mode, the first note you play will take about 100 ms (milliseconds) to trigger the instrument, which is then placed in Live mode.
You can put an instrument in Live mode by sending any MIDI event to it (playing a dummy note, moving the modulation wheel, and so on), by clicking the R button in the track header to make it solid red, or by starting playback.

5 While playback continues, click the Record button (or press R). Logic continues repeating the cycle area, so you don’t lose your groove.
6 When the playhead starts a new pass of the cycle, play a bass melody on the MIDI keyboard.
When you’re done recording the four-bar bass melody, the playhead jumps back to the beginning of the cycle. You can continue recording new takes while staying in Cycle mode, or stop recording and start recording again to record new takes.
7 Record two more takes of the bass.
8 Start playback. You can hear the last take of the bass.
9 In the workspace, from the take folder pop-up menu, choose take 2.
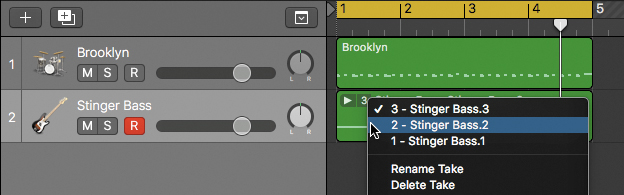
You can hear take 2.
NOTE ▶
Note that there’s no Quick Swipe Comping button next to the take folder pop-up menu. Unlike with audio take folders, you cannot comp sections of takes in a MIDI take folder.
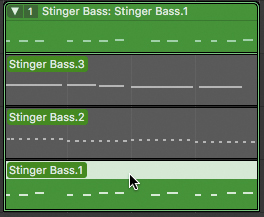
10 Double-click the take folder to open it. Click the first take, at the bottom of the list, to play it.
11 Choose your favorite take, and from the take folder pop-up menu, choose Flatten.

The take folder is flattened, and only the selected bass take remains in a MIDI region.
12 Stop playback.
TIP ▶
If you want to keep a performance you played while Logic was in playback mode, click Stop and press Shift-R (Capture as Recording). A MIDI region containing your last performance is created on the track.
Lesson Review
1. How do you merge a new recording in an existing MIDI region?
2. How can you time-correct a MIDI region?
3. How do you choose default region parameters for new MIDI recording?
4. What type of Track Stack should you create to have MIDI regions on the main track trigger instruments on the subtracks?
5. In the Smart Controls pane, how do you map a screen control to a plug-in parameter?
6. In the Smart Controls pane, how do you assign a screen control to a knob on your MIDI controller?
7. How do you automatically arpeggiate chords?
8. How can you put a track into Live mode?
Answers
1. Choose Record > Overlapping MIDI Recordings > No Cycle > Merge; or if Cycle mode is on when you record, choose Record > Overlapping MIDI Recordings > Cycle > Merge.
2. In the Region inspector, set the Quantize parameter to the desired note length.
3. Deselect all regions in the workspace to access the MIDI Defaults settings in the Region inspector.
4. A summing stack.
5. In the Parameter Mapping area, click Learn. Click a screen control to select it, and click a plug-in parameter to map it to the selected screen control.
6. In the External Assignment area, click Learn. Click a screen control to select it, and turn a knob on your MIDI controller until the screen control moves along.
7. In the MIDI FX slot of the software instrument channel strip, insert the Arpeggiator MIDI effect plug-in.
8. Click its Record-enable button, or, for the selected track, send any MIDI event from your MIDI controller, or start playback.
Keyboard Shortcuts
Project |
|
Command-Shift-N |
Creates a new empty project |
Command-Option-W |
Closes the current project |
Windows and Panes |
|
Command-K |
Opens or closes the Musical Typing window |
P |
Opens the Piano Roll |
B |
Opens the Smart Controls |
V |
Hides or shows all the plug-in windows |
Tracks Area |
|
Command-Option-S |
Creates a new software instrument track |
Command-Shift-D |
Creates a Track Stack for the selected tracks |