
Lesson 7
Editing Pitch and Time
Lesson Files
Logic Pro X Files > Media > Additional Media > Slow Drums.aif
Logic Pro X Files > Lessons > 07 Swing Groove
Logic Pro X Files > Lessons > 07 Little Lady
Time
This lesson takes approximately 90 minutes to complete.
Goals
Match a project tempo to an audio file’s tempo
Create Apple Loops
Add tempo changes and tempo curves
Apply tape or turntable speed-up and slow-down effects
Make one track follow the groove of another track
Use Varispeed effects
Edit the timing of an audio region
Edit note pitches in an audio region
The use of loops and samples has become omnipresent in modern music. New technologies encourage experimentation, and it is more and more common to find, say, a sample of a Middle Eastern instrument in a modern rock song, a sample of classical music in a pop song, or a sample of a pop song in a hip-hop track.
Mixing prerecorded material into a project can lead to exciting results, but the material must be carefully selected to ensure that it seamlessly blends into the project. The first challenge is to match the prerecorded musical material’s tempo with the project’s tempo.
Even when you record your own performances, precisely correcting the pitch and timing of an individual note can help you realize the perfection expected by a demanding audience. You can use note correction to fix imprecisions (or mistakes) in the recording, or you can use it creatively. Furthermore, special effects such as Varispeed and tape speed-up or slow-down can provide new inspiration.
In this lesson, you will match the tempo and groove of audio files to make sure they combine into a musical whole. You’ll manipulate the project tempo to add tempo changes and tempo curves, apply Varispeed and Speed Fade effects, and use Flex editing to precisely adjust the position and length of individual notes and correct the pitch of a vocal recording.
Setting a Project Tempo by Detecting the Tempo of a Recording
While listening to various recordings, you’ve found a recording of drums you like because of the way it grooves at its original tempo. To build a project around it, you need to adjust the project’s tempo to match the recording. When the two tempos match, you can use the grid to edit and quantize regions, or add Apple Loops and keep everything synchronized.
In this exercise, you will import a drums recording into a new project, let Logic detect the tempo of the drums, and set it as the project tempo.
1 Choose File > New, or press Shift-Command-N, and create one audio track.
You will now set up Smart Tempo so that Logic detects the tempo of the audio file that you import, and sets the project tempo accordingly.
2 Click the Project Tempo pop-up menu, and choose ADAPT–Adapt Project Tempo.
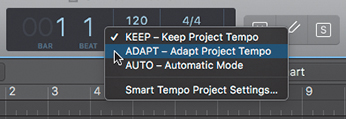
The global tempo track opens so you can easily spot any tempo changes that Logic may create. The tempo curve is orange, and in the LCD display, the project tempo and time signature are also orange, indicating that those parameters are ready to adapt to the audio file you’re about to import.
3 In the control bar, click the Browsers button, or press F.
4 With the All Files tab selected, navigate to Desktop > Logic Pro X Files > Media > Additional Media, and drag Slow Drums.aif to bar 1 on the audio track.
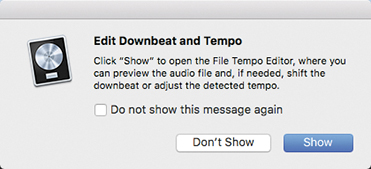
An alert asks if you want to open the File Tempo Editor, which will allow you to refine Logic’s tempo detection. Let’s open it.
NOTE ▶
If Logic has previously analyzed this audio file (for example if you’ve already done this lesson), this alert won’t appear. To remove the analysis information embedded in the audio file, choose Edit > Tempo > Remove Original Recording Tempo from Audio File.
5 Click Show.
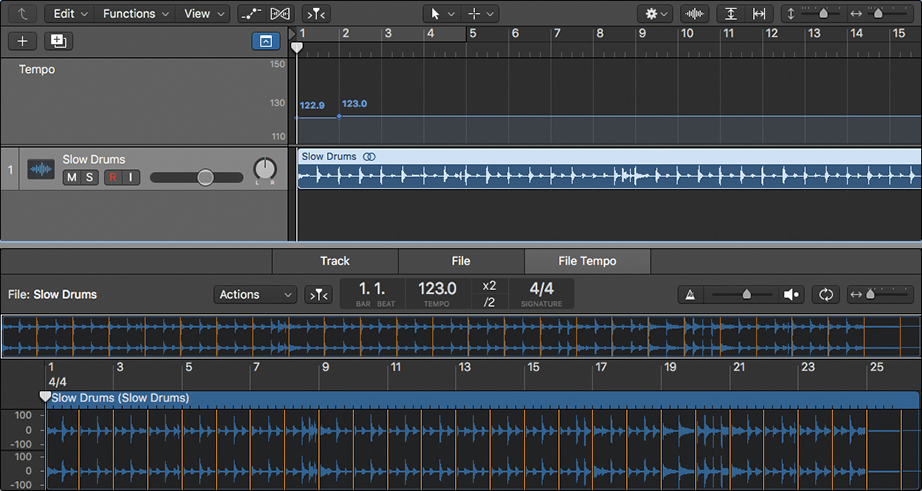
Two tempo changes are created: a tempo change of 122.9996 bpm at bar 1, and another of 123.0011 bpm at bar 2. In the global tempo track, Logic shows rounded tempo values of 122.9 and 123.0.
NOTE ▶
To see the exact tempo value of a section, click the arrow button at the lower-right of the LCD display, and choose Custom. Then locate the playhead in the desired section.
6 In the control bar, click the Metronome button, or press K.
7 Listen to the song.
The drums are in sync with the metronome; however, they actually play at half the speed. You can correct this in the File Tempo editor.
8 In File Tempo editor, click the /2 button.

The global tempo track now displays both tempo changes’ rounded values as 61.5.
9 Listen to the song. Now the drums are perfectly in sync with the metronome.
10 In the Control bar, click the Editors button, or press E, to close the File Tempo editors.
11 In the LCD display, click the Project Tempo mode, and choose KEEP–Keep Project Tempo.

12 Click the Metronome button, or press K, to turn the metronome off.
Now that you’ve set the project tempo to match the drums tempo, you can add Apple Loops and they will automatically match the tempo of your drums. You can also use the grid in the workspace to cut an exact numbers of bars in a region, which you’ll need later in this lesson to cut a drum loop.
Using and Creating Apple Loops
Apple Loops are AIFF or CAF format audio files containing additional information that allows them to automatically match the tempo and key when they’re imported into a Logic project. They also contain descriptive information (such as instrument, mood, genre, and scale) that helps you search the vast library of loops using the Loop Browser.
Using the Loop Browser
You were introduced to the Loop Browser in Lesson 1 when you previewed and chose loops to create a project. You will now use it to add an Apple Loop to your drums track.
1 In the control bar, click the Apple Loops button (or press O).
![]()
2 At the top of the Loop Browser, click the Instrument button.

Let’s try to find a bass loop.
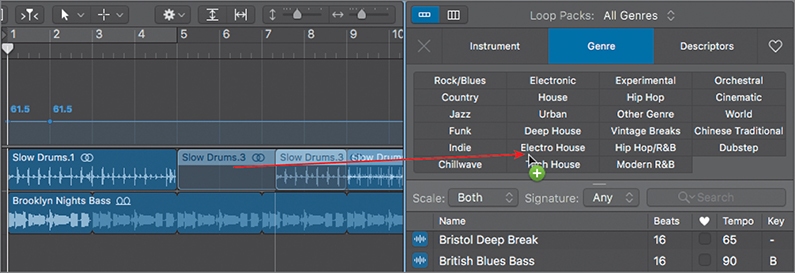
3 Click the Elec Bass keyword button.
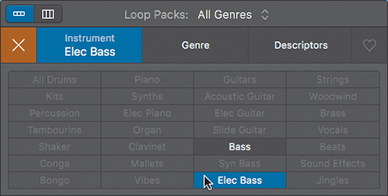
4 At the top of the Loop Browser, click the Genre button.

Your instrument category selection is retained, and you can further refine the search by genre.
5 Click the Chillwave keyword button.
The result lists display only electric bass loops in the Chillwave genre. Feel free to preview a few of the loops before moving on.
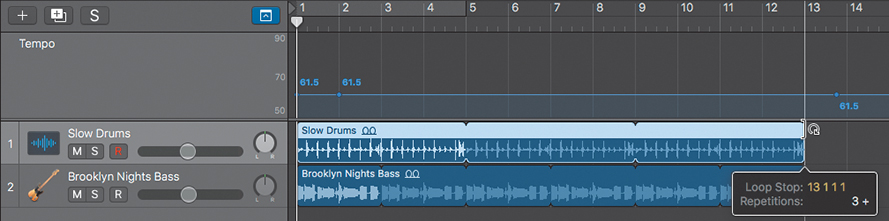
6 Drag Brooklyn Nights Bass to the workspace, below the drums track at bar 1.
7 Place the mouse pointer over the upper-right edge of the Brooklyn Nights Bass region. When the pointer turns into the Loop tool, drag to loop the region until bar 13.
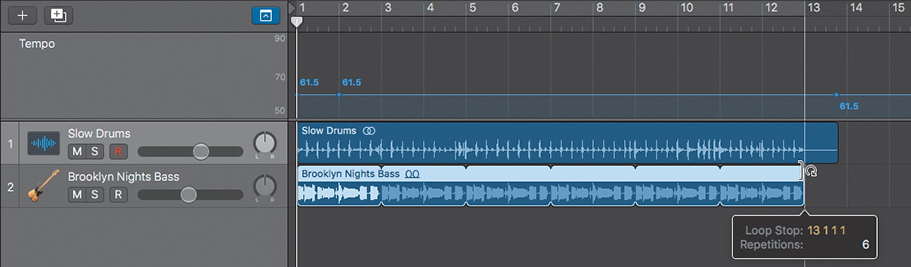
8 Listen to the song. The bass loop plays in sync with the project tempo, which means it’s in sync with the drums. The bass loop is playing in the key of the project, C. In the next exercise you’ll change the project key.
9 At the upper left in the Loop browser, click the X button to reset all keyword buttons.
Setting a Project’s Key Signature
Loops generally sound more natural when they’re played in their original keys. Their sound is closer to their producer’s original intention, and with no transposition to process, the timbre of the loop is closest to the original recording and you hear fewer artifacts (distortion resulting from the time-stretching or pitch-shifting process).
Let’s change the key of the project to E minor, which will make the bass sound a little more defined and less boomy.
1 In the control bar, click the Lists button.
![]()
2 At the top of the Lists area, click the Signature tab.
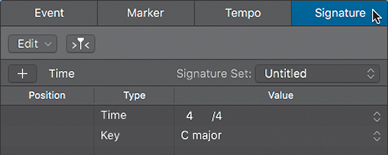
The Signature list shows the Time and Key signatures. The default key signature is C major.
3 In the Value column, click the key signature (C major), and from the pop-up menu, choose E minor.
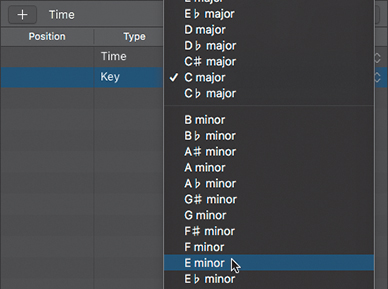
The Key signature is now E minor.
4 Click the Lists button to close the Signature list.
5 Listen to your song. The Brooklyn Nights Bass plays in the new project key, E.
Creating Apple Loops
When you want to catalog a section of an audio recording so you can reuse it in future projects, you can save it as an Apple Loop. The Apple Loop will be indexed in the Loop Browser so that you can easily find it later, and it will automatically match the tempo (and, when appropriate, the key) of the project into which you import the loop.
In the next exercise, you will first divide four bars of drums and then save them as a new Apple Loop.
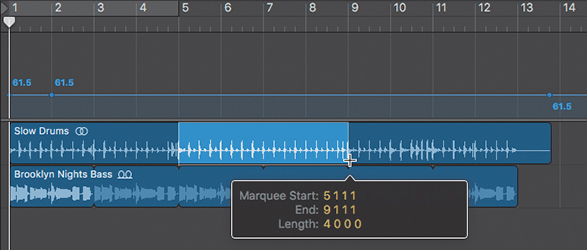
1 Command-drag to select the four bars in the Slow Drums region, from 5 1 1 1 to 9 1 1 1.
2 In the control bar, click the Apple Loops button (or press O) to open the Loop Browser.
3 Using the Pointer tool, drag the selected section of the drums to the Loop Browser.
As soon as you click the marquee selection, it is divided as a new region. When you release the mouse button over the Loop Browser, the “Add Region to Apple Loops Library” dialog opens.
4 In the dialog, enter or choose the following:
► Name: Slow Drums
► Type: Loop
► Scale: Good for Both
► Genre: Rock/Blues
► Descriptors: All Drums > Kits
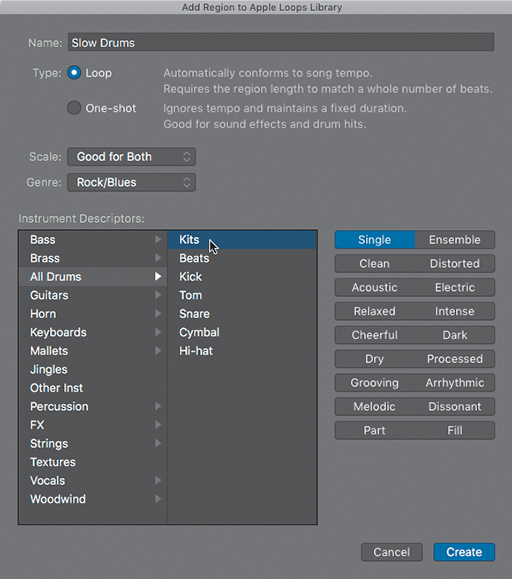
5 Click the Single, Clean, Acoustic, Dry, Grooving, and Part descriptor buttons. Descriptors determine which keyword buttons you’ll later select in the Loop Browser to find that loop.

NOTE ▶
When dragging a region to the Loop Browser, you can create loops only when the number of beats in the region is an integer. This function uses the project tempo to tag the transient positions and works best for audio files that match the project tempo. If the selected region’s number of beats is not an integer, the Type parameter will be set to One-shot and dimmed, and the resulting Apple Loop will not automatically match a project’s tempo and key.
6 Click Create.
Logic bounces the section as a new Apple Loop and indexes it in the Loop Browser. Let’s try to find it.
7 In the Loop Browser, in the search field, type Slow Drums.
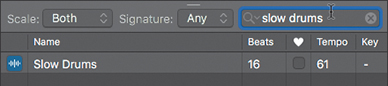
The new Slow Drums Apple Loop that you just created is displayed in the lists result. Let’s use that loop to replace the original drum recording you imported on track 1.
8 Click the Slow Drums track header.

All the regions on your selected track are also selected. Let’s clear the track to make room for the new Apple Loop.
9 Press Delete.
10 Drag the new Slow Drums Apple Loop to the Slow Drums track.

11 Loop the drum loop to bar 13 so it ends at the same position as the bass loop.
12 Play the project.
The drum and bass Apple Loops on both tracks play in sync. The drums stop abruptly at bar 13, so let’s add a cymbal hit to punctuate the ending.
13 In the Loop browser, in the search field, enter cymbal.
14 Drag Long Crash Cymbal 02 below the bass track at bar 13.

15 Close the Loop Browser.
NOTE ▶
You can also drag a MIDI region on a software instrument track to the Loop Browser to create a green Apple Loop. As with the blue Apple Loops you’ve already used, you can apply green Apple Loops as audio regions on audio tracks, or as MIDI regions on software instrument tracks, giving you the additional flexibility of being able to edit the sound of the instrument and the MIDI events.
Matching an Audio File to the Project Key and Tempo
Many current music genres find inspiration in older music, and it’s common for producers to use samples of older recordings, whether for a vocal part or an orchestra hit. Recycling existing material to use in a new song can present a challenge when the existing material has rhythmic and melodic or harmonic content. You have to make sure that the recycled recording plays at the current project’s key signature and tempo.
Beginning with Logic 10.4, Smart Tempo allows you to automatically match the tempo of an imported audio file to the project tempo, while the Transpose parameter in the Region inspector makes it a breeze to change the pitch of that imported file.
1 Choose File > Project Settings > Smart Tempo.
2 Click the ‘Set imported audio files to’ pop-up menu, and choose On. Close the Settings window.
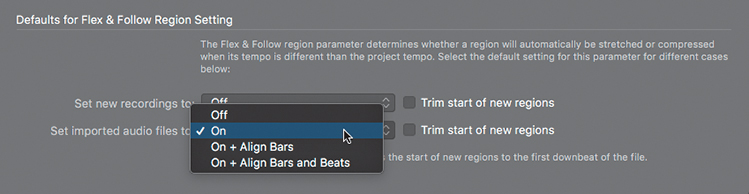
Logic will analyze any audio file you import to detect its original tempo, and time-stretch it, as necessary, to make it play back at the project tempo. Let’s import a guitar part.
3 In the control bar, click the Browsers button, and in the Browser pane, click the All Files tab.

4 Navigate to Logic Pro X Files > Media > Additional Media.
Before importing Groovy Guitar.wav, let’s try to play it along with the project.
5 In the control bar, click the Play button to play the project.
6 In the All Files Browser, select Groovy Guitar.wav, and click the Preview button, or press Option-Spacebar.
It’s pretty obvious that the guitar wasn’t recorded at the same tempo as the current project.
7 Drag Groovy Guitar below the cymbal track at bar 1.
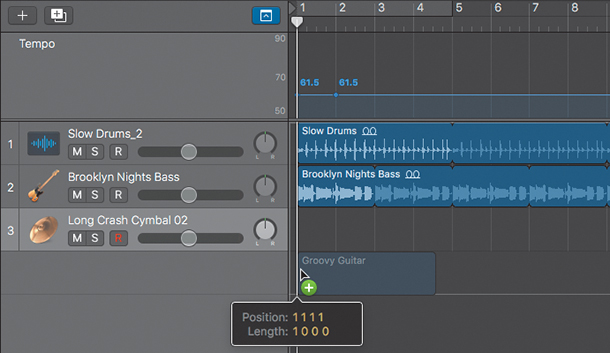
A progress bar appears while Logic analyzes the file, and then an alert asks if you want to show the File Tempo Editor, which allows you to perform more advanced tasks, such as editing the beats detected by Logic in the imported audio file. You won’t need to perform such tasks for this exercise.
8 Click Don’t Show to dismiss the alert.
9 Play the project from the beginning.
The guitar plays in the wrong key! You will fix that later, but for now, let’s focus on the timing of the guitar.
10 In the bass track header (track 2), click the Mute (M) button to mute the track.
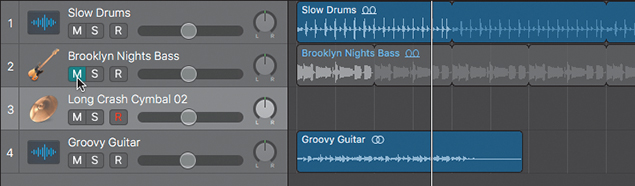
11 Listen to the project.
The guitar and the drums play in time. Let’s now make the guitar play in the right key. The guitar was recorded in D minor, while the current project’s key signature is E minor, so you need to transpose the guitar two semitones up.
12 Makes sure the Groovy Guitar region is selected, and in the Region inspector, double-click to the right of the Transpose parameter.
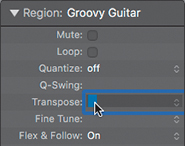
13 Enter 2, and press Return.
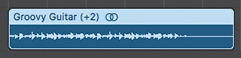
The amount of transposition is indicated to the right of the region name (+2).
14 Unmute the bass track (track 2).
15 Listen to the project.
The guitar now plays at both the correct tempo and key signature. It still ends too early, and in the following exercise you will take care of copying the guitar a few times to make sure it fills up the guitar track.
Adding a Turntable or Tape Slow-Down Effect
When you stop a turntable with the stylus on the record, or stop a tape machine while keeping the playhead in contact with the magnetic tape, the result is a sound that drops in pitch as it slows down. This highly recognizable effect has recently regained popularity along with its opposite—the sound rising in pitch as speed increases when the tape transport or turntable starts.
You will now make copies of the guitar region and apply the turntable stop effect to the end of the guitar track.
1 Option-drag the Groovy Guitar region to bar 5, and then Option-drag it again to bar 9.

To add the turntable stop effect to the end of the last guitar region, you first need to create a volume fade.
2 Control-Shift-drag over the last Groovy Guitar region’s end to create a fade-out starting at bar 13.

Let’s turn that volume fade into a speed fade.
3 Control-click the fade-out and choose Slow Down.
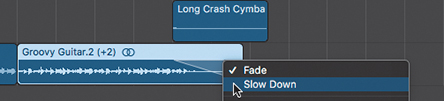
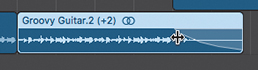
The fade-out turns orange, indicating that it is now a speed fade.
4 Listen to your fade. It sounds just like a turntable stopping!
You can adjust the length and curve of the speed fade just as you would a volume fade.
As you listen, adjust the fade’s curve and length as follows:
5 Control-Shift-drag the middle of the fade to adjust its curve.

6 Control-Shift-drag the left edge of the fade to adjust its length.
7 Choose File > Close Project without saving the project.
You just used a speed fade to create a realistic turntable stop effect, but you can use speed fades for many kinds of effects. Try applying multiple rapid speed fades to short regions to create DJ scratching effects. Or add a speed fade at the end of a kick sample to make it drop in pitch.
Creating Tempo Changes and Tempo Curves
When you want to vary the tempo throughout a project, you can use the Tempo track to insert tempo changes and tempo curves. All MIDI regions and Apple Loops automatically follow the project tempo, even when tempo variations occur in the middle of a region. The Groovy Guitar is not an Apple Loop, but earlier you chose to automatically turn on Flex and Follow Tempo for imported audio files, so that region will also follow the project’s tempo curve.
Creating and Naming Tempo Sets
In this exercise, you will create a new tempo set, and name both the current and new tempo sets. You will create a new tempo curve in the new tempo set, and later switch between the original tempo and the new tempo curve.
1 In the Tempo track header, from the Tempo pop-up menu, choose Tempo Sets > Rename Set.
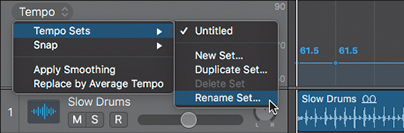
A text field appears on the Tempo track header.
2 Enter Original, and press Return.

3 From the Tempo pop-up menu, choose Tempo Sets > New Set.
A new tempo set is created with a default value of 120 bpm. A text entry field appears, ready for you to enter a name for the new set. In this set, you will make the tempo go gradually faster, so let’s name it Accelerando.
4 Rename the new tempo set Accelerando, and listen to the song.
All tracks in the project play at the new tempo (120 bpm).
Creating Tempo Changes and Tempo Curves
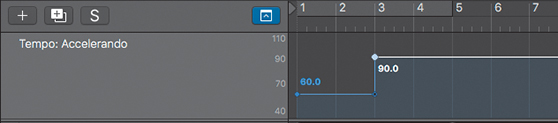
You now have two tempo sets, and you will edit the new one to create a tempo that starts at a 62 bpm tempo and progressively ramps up to about 90 bpm within the first couple of bars.
1 In the Tempo track, drag the tempo line down to 60 bpm.

Although the line seems to stop at the bottom edge of the Tempo track, keep dragging down until you see the desired tempo value displayed in the help tag. When you release the mouse button, the scale in the Tempo track header updates and you can see the new tempo.
Let’s insert a tempo change at bar 3.
2 Click the tempo line at bar 3.

A new tempo point is inserted at bar 3 with the current 60 bpm value.
3 Drag the line that is located to the right of the new tempo change up to a value of 90 bpm. Listen to the tempo change.
NOTE ▶
To reposition a tempo point, drag the tempo point horizontally.
4 Listen to the song.
The tempo changes abruptly at bar 3. To smooth the tempo change, you’re going to accelerate the tempo from 60 bpm at bar 1 to 90 bpm at bar 3.
5 At bar 3, position the mouse pointer on the corner below the 90 bpm tempo point.

6 Drag the tempo point upward and to the left.
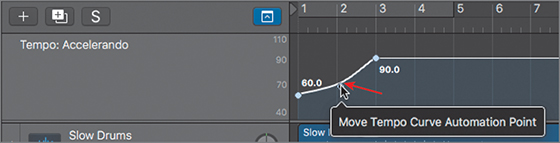
You can precisely adjust the tempo curve by dragging the tempo point farther to the left, up, or in both directions.
7 Listen to the song.
The tempo now ramps up progressively between bar 1 and bar 3.
8 Click the Global Tracks button (or press G) to close the global tracks.
9 Choose File > Close Project, but do not save the project.
You can create complex tempo maps to add excitement to your arrangements. Sometimes, a chorus that’s a bit faster than the rest of the song is all an arrangement needs to really take off. Or you can use tempo curves to create the classic ritardando at the end of a song. All your Apple Loops and MIDI regions will automatically follow the tempo map, and you can use a flex mode for each audio track you want to follow the tempo map.
Making One Track Follow the Groove of Another Track
Playing all tracks at the same tempo is not always sufficient to achieve a tight rhythm. You also need to make sure they play with the same groove. For example, a musician may play slightly late to create a laid-back feel, or he may add some swing to his performance by delaying only the upbeats. On another track, notes may be placed on a rigid grid.
To learn how to get your tracks in the same groove, you will open a new project with a drummer playing a swing groove, and then make a shaker on another track follow the groove of the drummer.
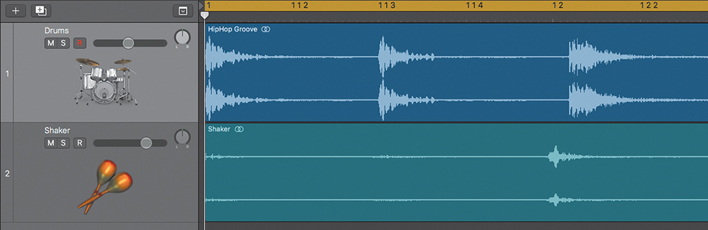
1 Open Logic Pro X Files > Lessons > 07 Swing Groove, and listen to the song.
Even though both tracks play at the same tempo, they are not synchronized. The drums (track 1) are playing a hip-hop shuffle groove while the shaker is playing on a straight sixteenth-note grid. Feel free to solo the individual tracks to clearly hear each instrument’s feel.
Let’s zoom in so you can see the individual drum hits on the waveforms.
2 Press Return to go back to the beginning of the project.
3 Press Command-Right Arrow nine times to zoom in on the first two beats (so you can clearly see 1 and 1.2 in the ruler).
Below the 1.2 grid mark in the ruler, you can clearly see that the waveforms on the two tracks are out of sync.
To make the shaker follow the groove of the drums, you need to set the Drums track as the groove track.
4 Control-click a track header, and from the shortcut menu, choose Track Header Component > Groove Track.
At first glance, nothing seems to have changed in the track headers.
5 Position the mouse pointer over the track number (1) of the Drums track.

A gold star appears in place of the track number.
6 Click the gold star.
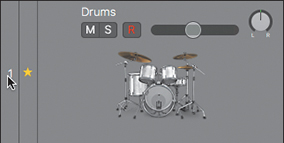
The gold star appears in a new column on the track header to indicate that the Drums track is now the groove track. On the Shaker track header, in the same column, you can select the checkbox to make that track follow the groove track.
7 On the Shaker track, select the Match Groove Track checkbox.

The waveform on the Shaker track updates so that the notes are in sync with the notes on the groove track.
8 Listen to the song. The shaker now follows the groove of the drums, and they play in sync.
9 Solo the Shaker track.
10 While listening to the shaker, deselect and select the Match Groove Track checkbox to compare the original performance with the new groove.
When the checkbox is deselected, the shaker plays straight eighth notes and sixteenth notes.
When the checkbox is selected, the shaker plays the same hip-hop shuffle feel as the drums.
11 Unsolo the Shaker track.
12 Choose File > Close Project without saving the project.
Groove tracks work with all track types (audio, software instrument, and Drummer tracks). Experiment by applying the groove of a sample to your MIDI programming or by making a Drummer track follow the groove of a live bass recording.
Change the Playback Pitch and Speed with Varispeed
In the days of analog tape recording, engineers performed all sorts of tricks by changing the tape speed. Many major albums were sped up ever so slightly during the mixing process to add excitement to tracks by raising their tempos. This simultaneously raised the pitch, giving the impression of the vocalist reaching higher notes in the most emotional passages of the song. On the other hand, engineers would sometimes slow the tape during recording so that a musician could play a challenging passage at a more comfortable tempo. When played back at its regular speed during mixdown, the recording created the illusion of the musician playing faster. DJs are probably the biggest users of Varispeed techniques, which gives them control over the tempo and pitch of a track, allowing for seamless transitions from one track to the next.
Logic takes this concept a step further, offering both the classic Varispeed—which, like a tape or record player, changes both the pitch and the speed—and a Speed Only mode, which allows you to change the speed without changing the pitch.
1 Open Logic Pro X Files > Lessons > 07 Little Lady, and listen to the song. In the LCD display in the control bar, you can see that the song is in the key of A minor and its tempo is 152 bpm.
To use the Varispeed feature, you must add the Varispeed display to the control bar.
2 Control-click an empty space in the control bar, and from the shortcut menu, choose “Customize Control Bar and Display.”

In the dialog’s LCD column, the Varispeed option is dimmed. To turn it on, you first need to choose the custom LCD display.
3 In the LCD column, from the pop-up menu, choose Custom.

4 Below the pop-up menu, select Varispeed, and click OK.
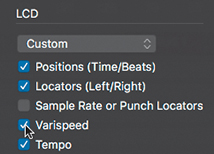
A new Varispeed display appears in the custom LCD display.

5 In the Varispeed display, drag the 0.00% value up to 6.00%.

The Varispeed display is shaded in orange. The tempo value turns orange, too, indicating that the song is no longer playing at its normal tempo due to the Varispeed feature. If your main window is wide enough to display all the buttons to the right of the LCD display, you’ll see the Varispeed button turn orange to indicate that the feature is enabled.

6 Listen to the song.
The song plays faster but retains its original pitch. Let’s check the song’s current tempo.
7 In the Varispeed display, click the % symbol, and from the pop-up menu, choose Resulting Tempo.
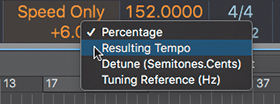
The Varispeed display shows the resulting tempo of 161.120 bpm. You can now use the display to set the desired playback tempo.
8 Double-click the 161.120 tempo value, and enter 140 bpm.
![]()
The song plays slower but still at its original pitch. This would be perfect for practicing a part by playing along with your instrument. You could even record your part at this speed, and then turn off Varispeed to play the whole song (including your newly recorded part) at the normal speed.
Now let’s apply the classic Varispeed effect that changes both the playback speed and pitch.
9 In the Varispeed display, click Speed Only, and from the pop-up menu, choose Varispeed (Speed and Pitch).
![]()
10 Listen to the song.
Now the song plays both slower and lower in pitch. This is the classic Varispeed effect available on tape machines and turntables.
11 In the Varispeed display, click the bpm symbol, and from the pop-up menu, choose Detune (Semitones.Cents).
12 Double-click the –1.42 detune value, and enter –1.00.
![]()
13 Listen to the song.
Now the song plays slower and pitched down by one semitones. If your singer isn’t at the top of her game that day and can’t reach her usual high notes, you could record at this slower speed and later turn off Varispeed to play the whole song at the higher pitch.
14 In the control bar, click the Varispeed button to turn it off.
Editing the Timing of an Audio Region
You were introduced to Flex Time editing in Lesson 3 when you used it to tighten the rhythm of a few dead notes on a guitar. You will now go further and explore other Flex Time editing techniques while examining what happens to an audio waveform “under the hood.”
Time-Stretching the Waveform Between Transient Markers
In this exercise, you will dive deeper into Flex Time editing by using it to correct the timing of a guitar.
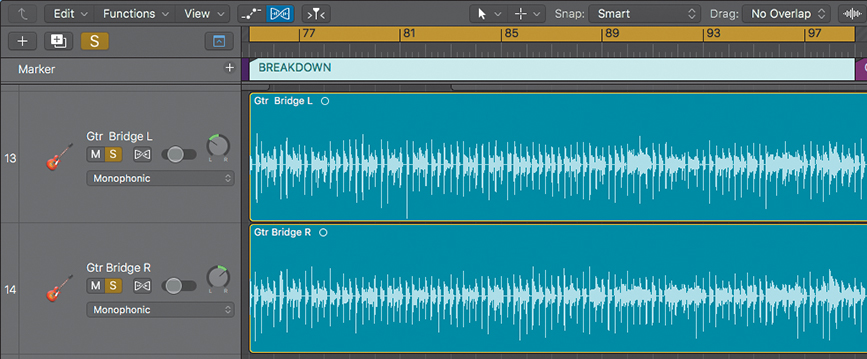
1 From the global Marker track, drag the Breakdown marker (at bar 75) into the upper half of the ruler.
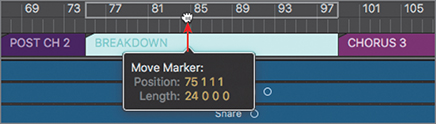
A cycle area is created that corresponds to the Breakdown marker.
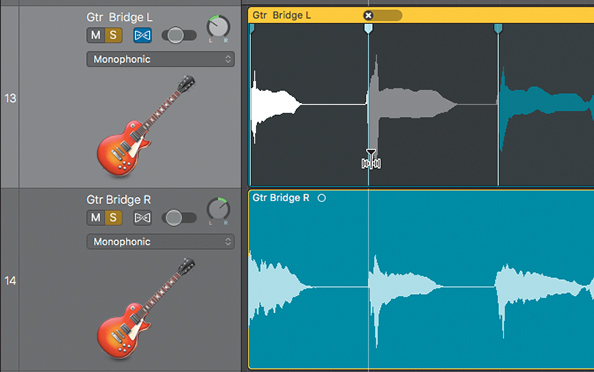
2 Solo the two Gtr Bridge tracks (tracks 13 and 14).
3 Listen to the first three bars of the Breakdown section.
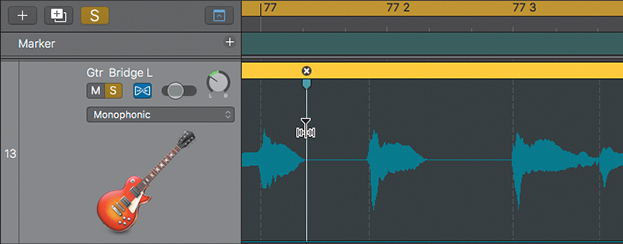
The two guitars on the soloed tracks play the same rhythm, but in two places the guitars are not hitting the notes together (bar 75, beat 2; and bar 77, beat 2).
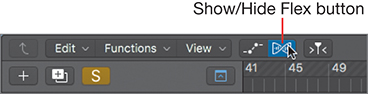
4 In the Tracks area menu bar, click the Show/Hide Flex button (or press Command-F).
The Tracks area is zoomed in vertically, and each track header shows a Track Flex button and a Flex pop-up menu.
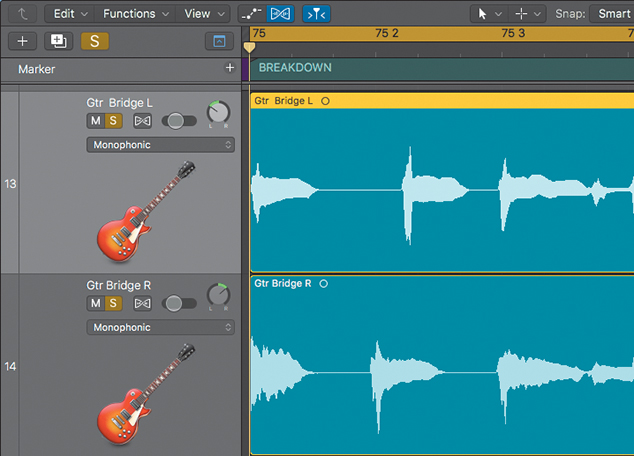
5 Scroll and zoom in to the workspace so you can see the beginning of the Gtr Bridge L region (at bar 75) at the upper left of the workspace, right below the ruler.
6 Click the lower half of the ruler at bar 75 to position the playhead. Click track 13 to select it, and drag the zoom sliders (or press the Command-Arrow keys) to continue adjusting your zoom level so that you can see the first three beats of bar 75 in the ruler (the 75, 75.2, and 75.3 grid marks).
Remember that zooming with the zoom sliders or the Command-Arrow keys keeps the playhead at the same horizontal position in the workspace, and the selected track at the same vertical position in the Tracks area. Here, the beginning of the Gtr Bridge L region stays anchored at the upper left of the workspace.
7 In the Gtr Bridge L track header (track 13), click the Track Flex button.
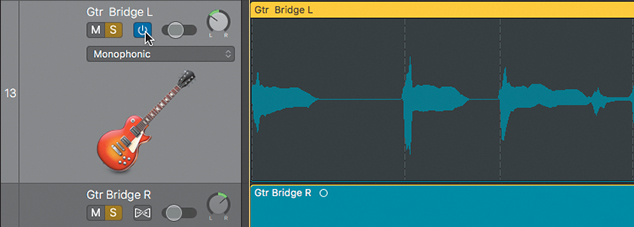
Flex editing is turned on. The region on the track is darker, and transient markers appear where Logic detected the attack of a new note. Logic automatically detects the most appropriate Flex Time mode for the track, which is set to Monophonic.
NOTE ▶
Monophonic mode is intended for instruments that produce only one pitch at a time (vocals, wind). Polyphonic is used with instruments that play chords (piano, guitar), and Slicing is for moving notes without time-stretching any audio (good for drums).
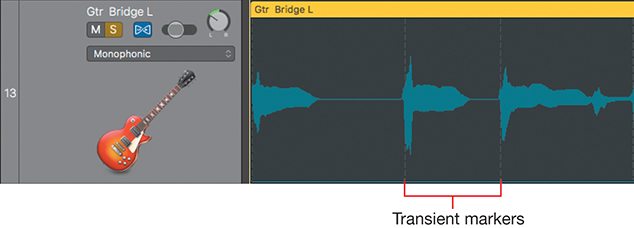
On track 13, the second note in the region is late. It should be in time with the second note of the Gtr Bridge R region on track 14 (under the 75.2 grid mark in the ruler).
8 In the upper half of the waveform, place the mouse pointer over the transient marker of the second note.
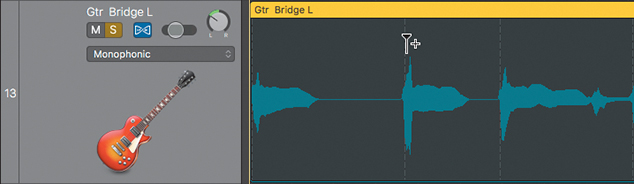
The mouse pointer turns into a Flex tool and looks like a single flex marker with a + (plus sign) next to it. This symbol indicates that clicking or dragging will insert one flex marker on the transient marker. When you drag the flex marker, the waveform is stretched between the region beginning and the flex marker, and between the flex marker and the region end. Let’s try it.
9 Drag the Flex tool to the left to align the flex marker with the second note of the track below.

When the mouse pointer is positioned over a flex marker, a flex drag indicator in the region header above the flex marker shows how the flex marker was moved from its original position. You can click the X symbol inside the flex drag indicator to delete that flex marker (and return the waveform to its original state).
After you release the mouse button, the flex marker looks like a bright vertical line with a handle at the top.
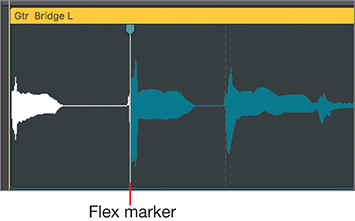
The waveform to the left of the flex marker is white, indicating that it was time compressed. The waveform to the right of the flex marker was time expanded. As a result, all the notes to the right of the flex marker have changed their positions, which is not what’s wanted here.
10 Choose Edit > Undo (or press Command-Z).
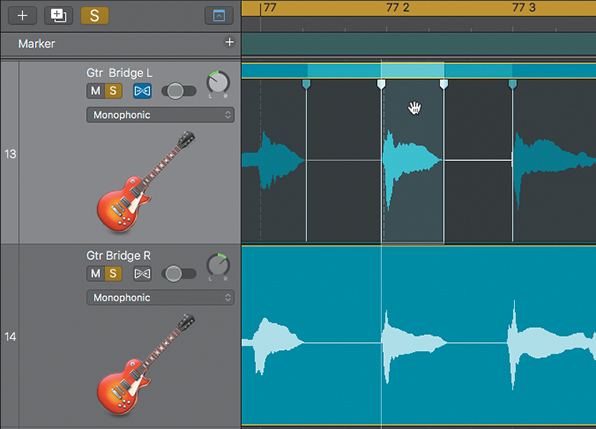
11 In the lower half of the waveform, place the mouse pointer over the transient marker of the second note.
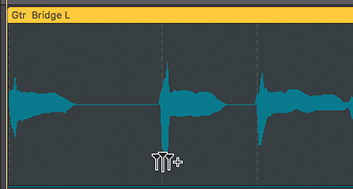
The Flex tool looks like three flex markers with a + (plus sign). Clicking it creates three flex markers, one at each of the following positions:
► On the transient marker you’re about to drag
► On the transient marker before (which will not move)
► On the transient marker after (which will not move)
12 Drag the Flex tool to the left to align the note with the second note of the track below.
The first note is time compressed, the second note is time expanded, and the rest of the region remains unaffected.
13 Listen to the edit.
The timing sounds much better than in the original. However, the first note is now slightly shorter and the second note longer. It’s a subtle difference, but in the next exercise you will use another technique to get a tighter result.
14 Choose Undo > Dragging (or press Command-Z) to undo the change.
Moving Waveform Sections Without Time-Stretching
In the previous exercise, you applied the Flex tool to time-stretch a waveform using either the previous and next transient markers or the region’s beginning and end points as boundaries.
Now you will create a flex marker after the first note so that no time-stretching occurs before that marker. You will then use the Marquee, your current Command-click tool, to select a section of the waveform, and move it without time-stretching the selection.
1 In the Gtr Bridge L region, place your mouse pointer in the upper half of the waveform, away from transient markers.
The cursor looks like a single flex marker with a + (plus sign).
2 Click the upper half of the waveform, after the end of the first note, to create a flex marker.

3 Command-drag the second note, starting on the transient marker.
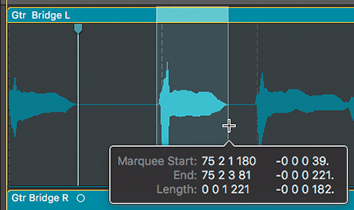
Positioning the mouse pointer in the upper half of a marquee selection turns the pointer into the Hand tool, which lets you move the selected waveform without time-stretching it.
4 Drag the upper half of the marquee selection to align the selected note with the second note in the guitar track below.
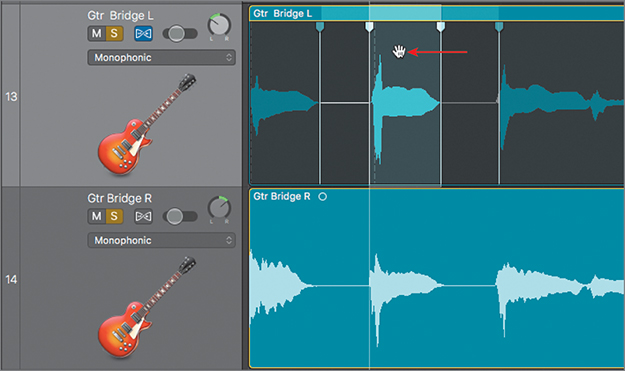
5 Listen to the result. The two guitar tracks sound really tight together until the second note of bar 77, when the Gtr Bridge L plays early.
6 Scroll to the first note of bar 77, and click the upper half of the waveform after the note to create a flex marker.
7 Select the second note of bar 77 using the Marquee tool, and then drag it to the right to align it with the corresponding note on the track below.
8 Click the background of the workspace to clear the marquee selection.
9 Listen to the result. Now both guitars sound tight.
10 Unsolo both guitar tracks.
In the next exercise, you will edit the timing of the bass tracks in the Breakdown section, so keep your current zoom level.
Time-Stretching a Single Note
Let’s use the Flex tool to lengthen a bass note.
1 In the workspace, scroll up to see the two bass tracks (tracks 9 and 10).
You will stretch the single note at bar 79, first in track 9 and then in track 10.
2 Scroll and zoom as necessary so you can see the single bass note at bar 79.
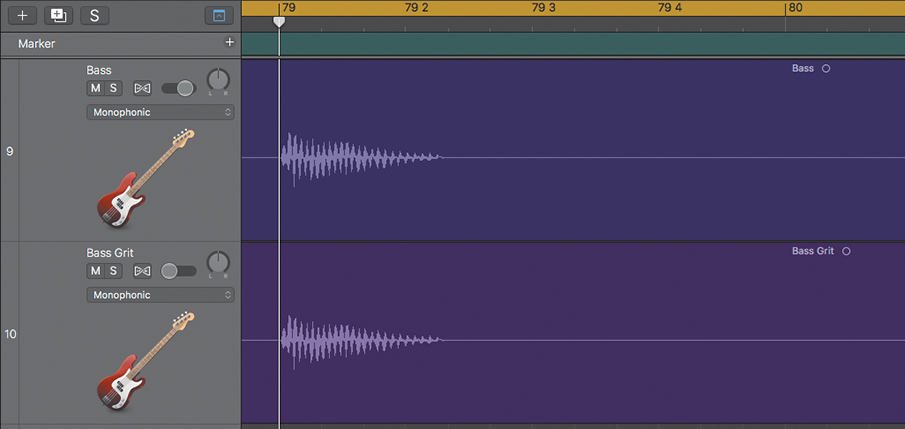
3 In the Bass track header (track 9), click the Track Flex button.

A progress bar appears while the audio file is analyzed for transients. After the analysis is completed, at bar 79, you can see a transient marker at the beginning of the note.
4 Position your mouse pointer in the lower half of the waveform, over the end of the note.
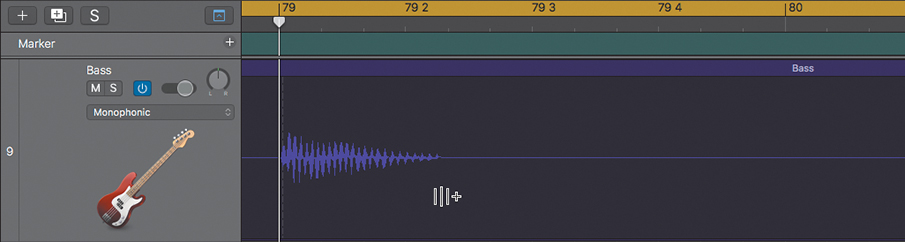
The mouse pointer looks like three vertical lines and a plus sign because it is not located over a transient marker. Clicking creates three flex markers:
► At the location you click
► On the transient marker before (which will not move)
► On the transient marker after (which will not move)
5 Drag the Flex tool to the right to end the note on 79.3.

The three flex markers are created, and the note is lengthened. The flex markers on the transient before (at bar 79) and after (end of bar 82) ensure that the rest of the region before and after the lengthened note stays unaffected.
6 Turn on Flex for the Bass Grit track (track 10), and lengthen the corresponding note by the same amount.

7 Listen to the result.
The bass note at bar 79 is sustained for a longer time. Don’t hesitate to solo the two bass guitar tracks and to turn the Track Flex buttons on and off in the two bass track headers to compare the before and after results.
8 Click the background, and press Z to see the whole song.
Tuning Vocal Recordings
Hitting pitches perfectly on every single note can be a challenge for singers. Tuning software allows you to correct pitches in a recording. It can be useful for saving an emotional take that contains a few off-pitch notes, or even to refine the pitch of a good performance.
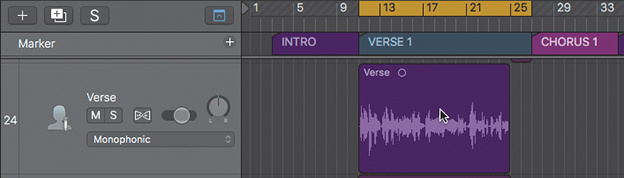
In Logic, Flex Pitch allows you to precisely edit the pitch curve of a single note, along with the amount of vibrato. In this exercise, you will use Flex Pitch to tune the vocals on the Verse track (track 24).
1 Drag the Verse 1 marker into the upper half of the ruler.
Flex Pitch data can be edited in the Tracks area or in the Audio Track Editor.
2 Double-click the Verse region at bar 11 on track 24.
The audio editor opens at the bottom of the main window.
3 At the top of the audio editor, click the Track tab.
4 In the Audio Track Editor menu bar, click the Show/Hide Flex button.
An alert asks you to confirm that you want to turn on Flex for that track.
5 In the alert, click “Turn on Flex.”
6 In the Audio Track Editor menu bar, next to the Show/Hide Flex button, click the Flex pop-up menu, and choose Flex Pitch.

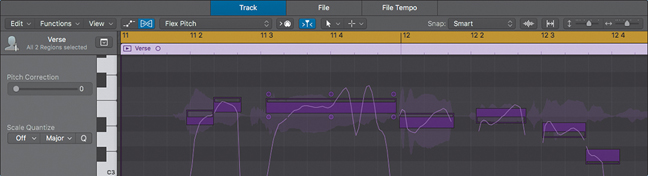
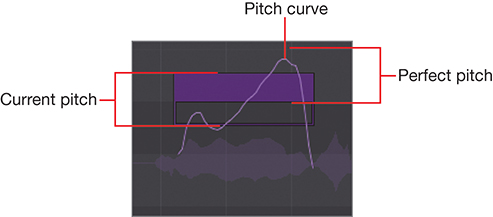
As in the Piano Roll Editor, the note pitches are represented as beams on a grid. (You may need to scroll up or down to see the note beams.) On the grid, light gray lanes correspond to the white keys on the piano keyboard, and dark gray lanes correspond to the black keys. The section of a note beam that intersects with the closest lane is colored, and the height of the hollowed-out section of the beam represents the amount of deviation from the perfect pitch. When a note plays at the perfect pitch, it sits exactly on a lane, and the beam doesn’t have any hollowed-out section.
7 Zoom in to the first four or five notes.
On top of the frame, a light-gray line represents the pitch curve so that you can see pitch drifts and vibrato.
8 Play the first three notes of the verse (“Here you come”).
The first two notes (the words “here you”) are short and their pitches sound good, so you will leave them unchanged.
The third note (“come”) goes a little sharp at the end, and you will fix that.
9 Control-click the beam, and from the shortcut menu, choose “Set to Perfect Pitch.”
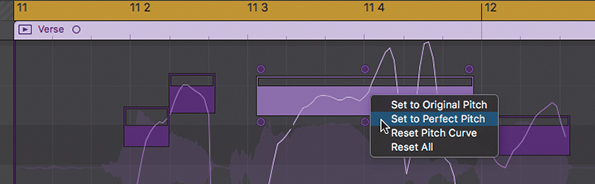
The beam snaps to the closest lane, and the entire beam is colored, indicating that the note plays at the perfect pitch.
Note that at the beginning of the note, the singer raises her pitch to the correct pitch, holds the pitch fairly straight for a short amount of time, adds a wide vibrato, and then drops in pitch at the end.
TIP ▶
To quickly tune an entire region, Control-click the background, and choose “Set all to Perfect Pitch.”
As you position the mouse pointer in the vicinity of the colored beam, hotspots appear around the beam that allow you to perform various adjustments.
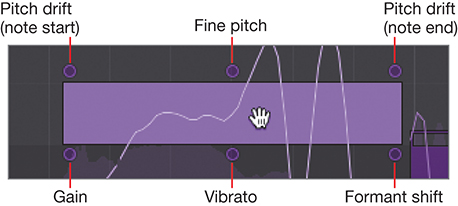
10 Drag the lower-mid hotspot to set Vibrato to 0%.
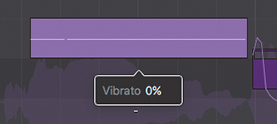
The pitch curve of that note is flatlined.
11 Listen to the result.
The word “come” now has a constant pitch without any drift at the beginning or end, and without any vibrato. The pitch is perfect, but it sounds unnatural.
12 Drag the lower-mid hotspot to set the Vibrato to 50% to halve the pitch deviations around the perfect pitch.
13 Drag the upper-left hotspot to set the Pitch Drift to 0.62 at the note start.

14 Listen to the result.
It sounds as if the singer attacks the note with the correct pitch, which works well if you want a straight pitch. However, for this verse, it sacrifices the bluesy feel imparted by the pitch slurs and wide vibrato.
15 Control-click the note, and choose Reset Pitch Curve from the shortcut menu.
The pitch curve is back to the original, but the note stays on its perfect pitch.
16 In the Tracks area, drag the left edge of the cycle area to bar 17.
17 Listen to a few bars at the beginning of the cycle area.
On the first beat of bar 18, the beginning of the word “sun” is very flat. In fact, the note is so flat that Logic detected its correct pitch as D#3 below, even though the singer meant to reach the E3 above. Setting the note to perfect pitch would force the note to D#3, which would sound even worse, so you will have to tune that note manually.
18 Drag up the upper-mid hotspot to set the Fine Pitch to 0 on an E3 note.

As you drag the Fine Pitch hotspot vertically, you can hear the pitch of the point in the pitch curve at the location of your mouse pointer. In this case, after you click the Fine Pitch hotspot, you can drag to the right about halfway between the middle of the note and the end of the note, where the pitch curve is fairly stable toward the middle of the beam. Then drag up while listening to the pitch.
NOTE ▶
Sometimes, pitch correction can alter the timbre of a sound, especially when you play a note several semitones away from its original pitch. At some point, pitching up a vocal makes the singer sound like a chipmunk, whereas pitching it down makes the singer sound like a hulking monster. Dragging the Formant hotspot up or down helps you adjust the timbre to make it sound more realistic.
19 Feel free to correct more note pitches in the two regions on the Verse track, using the different hotspots around the note beams to adjust the fine pitch, the pitch drifts at the start and end of the note, and the amount of vibrato in the pitch curve.
20 In the Tracks area menu bar, click the Show/Hide Flex button.
The Flex display is hidden, but all your Flex edits remain active.
You now have a large repertoire of techniques you can use to edit the tempo of a project and the timing of its regions, and you can make a track follow the groove of another track. Mastering these techniques will give you the freedom to use almost any prerecorded material in your projects, so keep your ears tuned to interesting material you could sample and loop for your future songs.
Flex Time and Flex Pitch editing can help you correct imperfections in a performance, bringing your material to a new level of precision. Using Varispeed, turntable speed-up and slow-down effects, and Flex Time and Flex Pitch editing techniques, you have a full palette of special effects that can add ear candy to your productions.
Lesson Review
1. How do you adapt the project tempo to the tempo of an audio file that you import?
2. How do you create an Apple Loop that follows the project tempo?
3. How can you add tempo changes and curves?
4. How do you apply a tape or turntable speed-up or slow-down effect?
5. How do you make one track follow the groove of another?
6. How do you turn on Flex editing?
7. How do you time-stretch an audio region using the region’s start and end points as boundaries?
8. How do you time-stretch an audio region using the previous and next transient marker as boundaries?
9. Using Flex Pitch, where can you edit the pitch of notes inside an audio region?
10. When Flex Pitch is turned on for a track, how do you quickly tune an entire audio region in the Audio Track editor?
11. How can you edit the pitch curve?
Answers
1. Set the Project Tempo mode to ADAPT–Adapt Project Tempo then import the audio file.
2. Select a region in the workspace, ensure that its length has an integer number of beats, and drag it to the Loop Browser.
3. Open the global tracks. On the Tempo track, click the tempo line to create a tempo point, and drag the line to the right of the new tempo point up or down. Drag the corner that appears above or below your tempo change to adjust the tempo curve.
4. Add a fade-in or a fade-out, Control-click the fade, and in the shortcut menu, choose Speed Up or Slow Down.
5. Configure the track headers to show groove tracks; then click over the track number to set the groove track, and select the Match Groove Track checkbox in the other track(s).
6. Choose a flex mode for the selected track in the Track inspector, or click the Show/Hide Flex button in the Tracks area menu bar and turn on the Track Flex button for the desired track.
7. Assuming there are no preexisting flex markers in the region, drag the Flex tool on the upper half of the waveform.
8. Drag the Flex tool on the lower half of the waveform.
9. In the workspace, or in the Audio Track Editor
10. Control-click the background of the workspace, and choose “Set all to Perfect Pitch” from the shortcut menu.
11. Using Flex Pitch editing in the Audio Track Editor, drag the six hotspots around a note beam.
Keyboard Shortcuts
Editing |
|
Command-F |
Toggles Flex view on and off |
Windows and Panes |
|
G |
Opens the global tracks |
Option-G |
Configures global tracks |