
Lesson 9
Mixing
Lesson Files
Logic Pro X Files > Lessons > 09 BIG
Time
This lesson takes approximately 120 minutes to complete.
Goals
Use folder and summing stacks
Use screensets
Adjust volume levels and pan positions
Filter frequencies with an equalizer plug-in
Process with bus sends and auxiliary channel strips
Add depth with delay and reverberation plug-ins
Use compressor and limiter plug-ins
Mixing is the art of blending all the instruments and sounds into a sound field. A good mix can make the difference between an amateur demo track and a professional production. Mixing should carefully balance two goals: combining all the elements into a cohesive whole, and at the same time keeping them sufficiently defined so that listeners can distinguish among them. In other words, make the musicians sound as if they are playing in the same room, while ensuring that they don’t mask each other and muddy the mix. A good mix is like a completed puzzle, in which all the pieces (all the instruments) fill their proper places in the sound field without overlapping.
With those goals in mind, you can adjust four parameters of an instrument to define its space in the sound field. You can adjust the instrument’s volume, its lateral position in the sound field, its distance, and its frequency spectrum. Those parameters are interrelated, and changing one often means that you will need to readjust the others.
When mixing, it’s also fundamental to be faithful to the genre of the song. In Lesson 7, you worked with a song (Little Lady) that had a rather dry mix because the indie-rock song genre didn’t call for many effects, and you wanted to stay close to the raw live performance sound of a rock band.
In this lesson, you will work with an indie-folk song in the context of a modern pop production that will benefit from a variety of processing effects. A more complex arrangement with more layered instruments also means that you must pay more attention to each instrument’s place in the mix.
Organizing Windows and Tracks
A little organization can go a long way toward making your mixing session more productive. It can save time by minimizing the need to constantly open and close panes, or zoom and scroll the workspace to locate tracks or navigate the song. The more you streamline your workflow, the easier it will be for you to focus on finding a place in the mix for each specific sound or instrument.
Using Track Stacks to Streamline the Workspace
As you build an arrangement, you may find yourself layering multiple instruments to get a fuller sound. Modern pop productions also often use short sound effects in strategic positions in the song that add ear candy and help renew excitement throughout the arrangement. As the track count increases, the Tracks area becomes bloated, making it increasingly difficult to find the tracks you want to adjust.
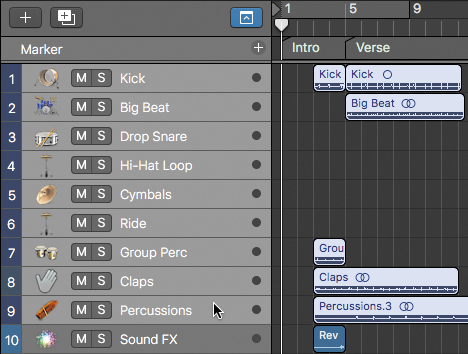
In Logic, Track Stacks allow you to display a group of tracks as a single track in the Tracks area. The stack can be opened when you need to access individual tracks. In the next exercise, you will create a folder stack for all the drums and percussion tracks in the song, freeing the Tracks area of the tracks that don’t need further work.
1 Open Logic Pro X Files > Lessons > 09 BIG.
2 Listen to the song.
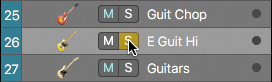
The mix sounds good, but a few instruments need work. Feel free to solo some of the tracks to listen to them in isolation. The electric guitar on the E Guit Hi track (track 25) sounds dry. Adding a guitar amplifier modeling plug-in will give it character. Using a tremolo plug-in to process the acoustic guitars on tracks 16 and 17 will add a bouncy groove to the Interlude section at bar 29.
Later, you’ll mix the vocals (tracks 27 through 31) by adjusting their pans, levels, and EQ settings and by adding delay and reverberation.
The drums and percussion tracks on tracks 1 through 9 are fully mixed and don’t need further attention, so you will now create a Track Stack for them.
3 Make sure the Kick track (track 1) is selected.
4 Shift-click the Percussions track (track 9) to select tracks 1 through 9.
5 Choose Track > Create Track Stack (or press Command-Shift-D).
In the Track Stack dialog, you can choose between a folder stack and a summing stack. Let’s learn the difference.
6 Make sure Summing Stack is selected, and click the disclosure triangle next to Details.
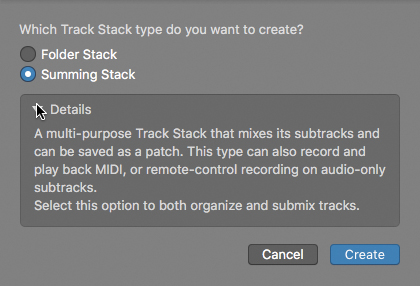
You used a summing stack in Lesson 5 to create a layered synth patch. In a summing stack, all the subtracks are routed to the main track’s auxiliary channel strip, where their submix can be further processed by plug-ins and then routed as desired. In this case, however, you have no need to further process the drums and percussions, and a folder stack is the tool for the job.
7 In the Track Stack dialog, select Folder Stack.
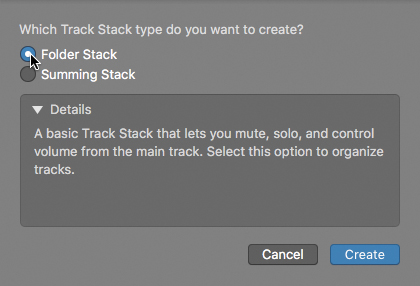
Folder stacks do not affect the routing of the subtracks, which makes them the right choice for organizing tracks that don’t need to be submixed.
8 Click Create.
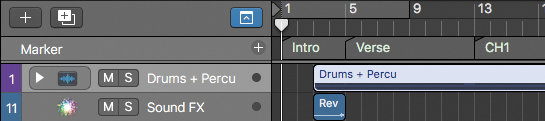
All the selected tracks are placed into a Track Stack on track 1. The Tracks area is streamlined, which will make it easier to find your way around the remaining tracks. In the inspector, note that the Track Stack’s main track channel strip (to the left) shows a Volume fader and Mute and Solo buttons, but has no Audio FX slot. The subtracks inside the folder stack are still routed directly to the Output channel strip, and no audio signal goes through the main track’s channel strip.
Let’s rename this Track Stack.
9 On the folder stack track header (track 1), double-click the Track Stack name, and enter Drums + Percu.
When working with very high track counts, consider creating Track Stacks for groups of instruments (such as drums, guitars, keyboards, and vocals) to streamline your workspace.
Using Screensets to Switch Between the Tracks Area and the Mixer
When first exploring the mixing process in Lesson 1, you may have noticed how much of a challenge navigating the workspace can be when the Mixer pane is open at the bottom of the workspace. In this lesson, you will use two screensets to save different window layouts. One screenset will display your main window, and the other will include your Mixer. As you work on the mix, you can recall each of these screensets using key commands.
Let’s create the two screensets and study their behaviors.
1 At the top of your screen, look at the main menu bar.

The Screenset menu displays the number of the current screenset (1).
2 Click the Screenset menu to open it.
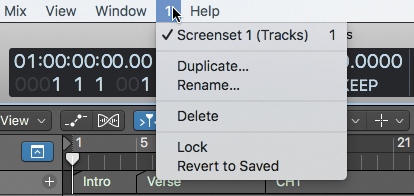
The menu lists only one screenset, with a default name in parentheses, Screenset 1 (Tracks). Let’s create a new one.
3 Close the screenset menu.
4 Press 2.
NOTE ▶
If you use an extended keyboard with a numeric keypad, make sure that you press the 2 key on the alphanumeric keypad. You can use the numerical keypad to go to the markers in the Marker track.
A new screenset is created with a main window of a different size and zoom level from screenset 1.
5 Choose Window > Open Mixer (or press Command-2).
A Mixer window opens on top of the main window. You won’t need the main window in screenset 2, so let’s close it.
6 Click the main window beneath the Mixer window to bring it to the front, and press Command-W to close it.
Let’s make the Mixer window bigger.
7 At the left of the Mixer window title bar, click the window zoom button.

The Mixer window occupies the full width of the screen.
8 Click the Screenset menu.
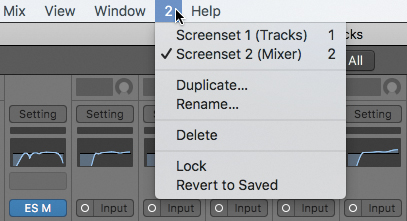
The menu lists the two screensets with an appropriate default name for each.
9 From the Screenset menu, choose Screenset 1 (Tracks), or press 1.
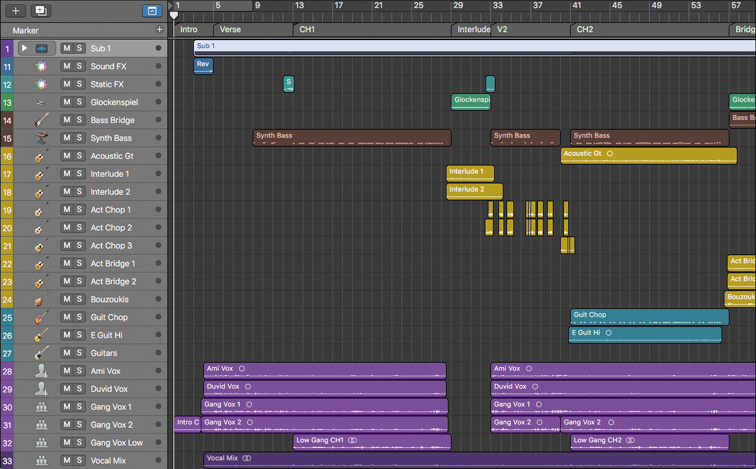
Screenset 1 is recalled, and you can see the main window.
By default, screensets are unlocked. You can open multiple windows, adjust their sizes and positions, open the desired panes, choose different tools, and so on, and the screenset will memorize your layout.
10 Make sure that no regions are selected, and press Z to zoom in on the regions so that they occupy the entire workspace.
11 Press 2 to recall screenset 2, and press 1 to recall screenset 1.
Screenset 1 is recalled with the zoom adjustments you made in step 10.
When you’re happy with the arrangement of a screenset, you can lock it to make sure that it always returns in that state.
12 From the Screenset menu, choose Lock.
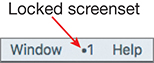
A dot appears next to the Screenset menu to indicate that the current screenset is locked. Let’s observe the behavior of a locked screenset.
13 Zoom in on a region, change the tools in your tool menus, open some panes such as a Browser and an editor, and open some windows from the Window menu.
14 Press 1 to recall screenset 1.
The screenset is recalled in the state it was when you locked it, and all the changes you made in step 13 are lost.
15 Press 2 to recall screenset 2.
16 From the Screenset menu, choose Lock to lock screenset 2.
You have adjusted the layout of two screensets to easily switch between the main window and the Mixer window using the number keys. You’ve also locked those screensets, which gives you a quick way to recall them in their current states.
Customizing a Locked Screenset
In the previous exercise, you learned that locked screensets are always recalled in the state in which you locked them. When you want to customize a screenset that was previously locked, you can unlock it, apply the desired changes, and lock it again.
You will now customize the Mixer window in screenset 2 to display only the tools you need in this lesson.
1 Make sure you are in screenset 2 (the Mixer window), and from the Screenset menu, choose Unlock.
After making a decision during a mixing session, you will want to quickly locate the components you need on the correct channel strip in the Mixer. However, by default, the channel strips in the Mixer window show you nearly all the available channel strip components. Because you won’t need to access some of them, you can hide them.
2 In the Mixer window, choose View > Configure Channel Strip Components.
3 In the shortcut menu, deselect Audio Device Controls, Setting Menu, MIDI Effects, Group, and Automation, and select Track Number.
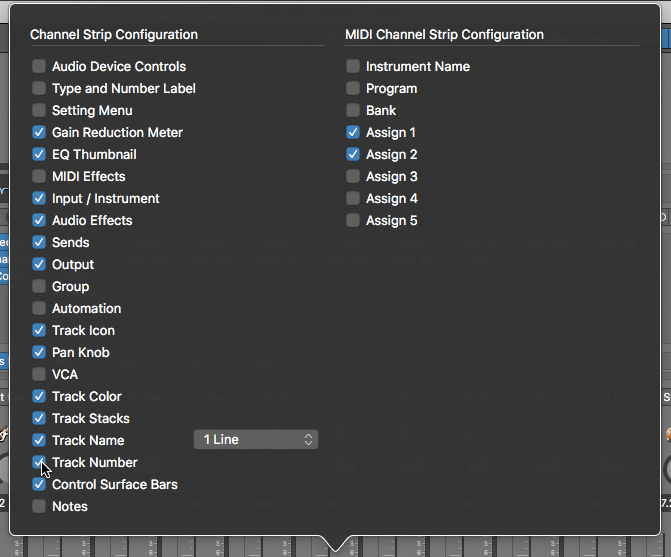
The features you don’t need are now hidden, and track numbers are displayed at the bottom of channel strips, which makes them easier to identify.
4 Click outside the shortcut menu to close it.
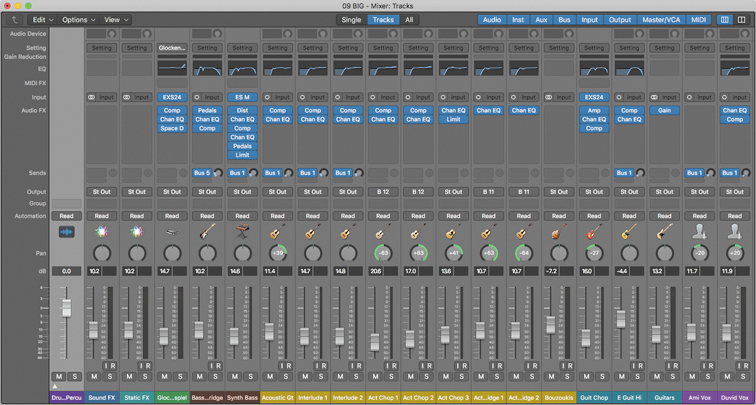
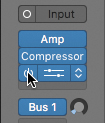
Some of the track, plug-in, and output names are abbreviated to fit the narrow channel strips. For example, the track name on the first channel strip on the left is displayed as “Dru…Percu,” and the Output slot of most channel strips is displayed as “St Out.” You can choose to view wide channel strips, which are easier on the eyes and avoid name abbreviations.
5 In the Mixer, click the Wide Channel Strips button.
![]()
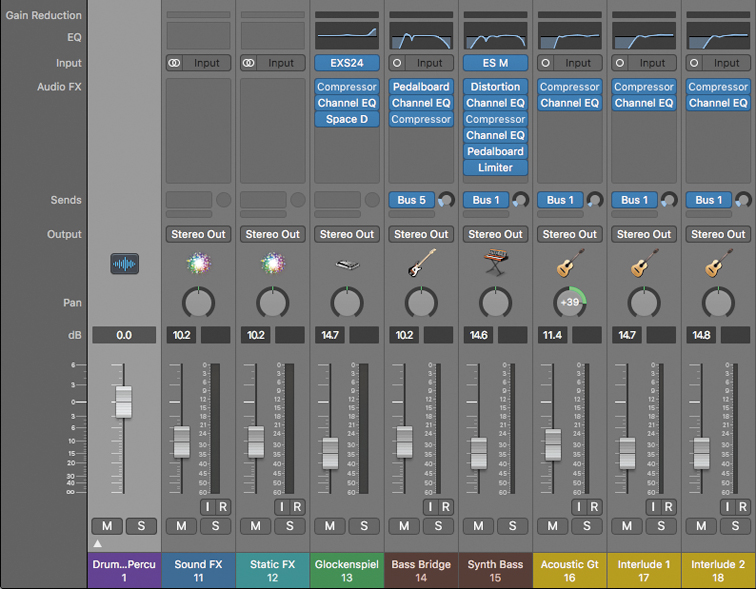
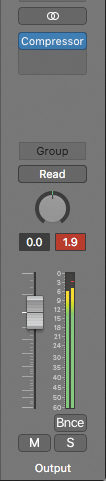
The channel strips grow wider. The first Audio FX insert on channel strip 13 (Glockenspiel) now displays the full plug-in name, “Compressor,” and the outputs of most channel strips now display “Stereo Out.”
To avoid any further changes to this screenset, let’s lock it again.
6 From the Screenset menu, choose Lock to lock screenset 2.
7 Press 1 to recall screenset 1.
You took the time to get rid of the clutter in the Mixer, which will reward you later when you have to quickly identify channel strips, see where they are routed, and adjust their settings.
Using the Amp Designer
You can use audio effect plug-ins to sculpt sound and give it character, and help the various parts find their places in the mix. These plug-ins will also give those parts a different timbre, and later, influence how you adjust their levels or EQ (equalization).
The Amp Designer is a plug-in that emulates the sound of a guitar amp, its speaker cabinet, and the microphone used to record it. The plug-in simulates several amp models, from famous vintage to modern guitar amps, and produces sounds ranging from clean to devastating high-gain distortion, with every nuance in-between.
Inserting a Plug-in at a Specific Point in the Signal Flow
When processing an instrument with multiple plug-ins, the order of the plug-ins influences the resulting sound. A guitar that is EQ’ed and then distorted will not sound the same as a guitar that is distorted and then EQ’ed.
In this song, the electric guitar on track 26 was recorded direct without using a guitar amp. To start your mix, you’ll apply the Amp Designer plug-in to give the guitar a vintage low-gain distortion tone. A couple of plug-ins were already placed on the guitar channel strip, and you will insert the Amp Designer before those two plug-ins so that the guitar is distorted first by the amp and then processed by the other plug-ins.
1 In the Marker track, drag the CH2 marker to the ruler.
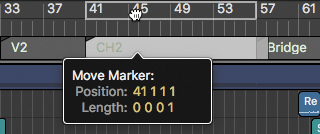
Cycle mode is turned on, and the cycle area corresponds to the CH2 marker where the E Guit Hi track (track 26) plays for the first time in the song.
2 Press the Spacebar to start playback.
The guitar plays a staccato rhythm with short, clean-sounding chords on every beat.
3 Select the E Guit Hi track (track 26), and click its Solo button (or press S) to hear it independently.
The guitar has the really clean and dry sound typical of direct guitar recordings.
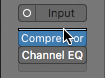
In the inspector, look at the E Guit Hi channel strip. Two plug-ins (Compressor and Channel EQ) are in the audio FX section. At the top of the channel strip, the EQ display shows the rather drastic EQ curve of the Channel EQ plug-in. That EQ will later help give the guitar its place in the mix, but let’s turn it off for now so that you can clearly hear the effect of the Amp Designer.
4 Place the mouse pointer over the Channel EQ plug-in slot, and click the power button that appears to the left.
The frequency range of the guitar is extended. It sounds fuller, but still clean and dry. On the channel strip, the EQ display is dimmed to indicate that the Channel EQ plug-in is turned off.
Let’s insert an Amp Designer plug-in before the compressor.
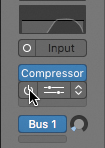
5 Place the Pointer tool at the top of the Compressor plug-in so that you see a white line above the plug-in.
The white line indicates where the plug-in will be inserted in the signal flow of the channel strip.
6 Click the white line, and choose Amps & Pedals > Amp Designer.
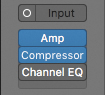
The Amp Designer plug-in opens. On the channel strip, the Amp Designer plug-in (Amp) is inserted at the top of the Audio FX section, which means that the dry guitar sound on the track will be processed by the Amp Designer, then by the Compressor, and finally by the Channel EQ (after you turn it back on).
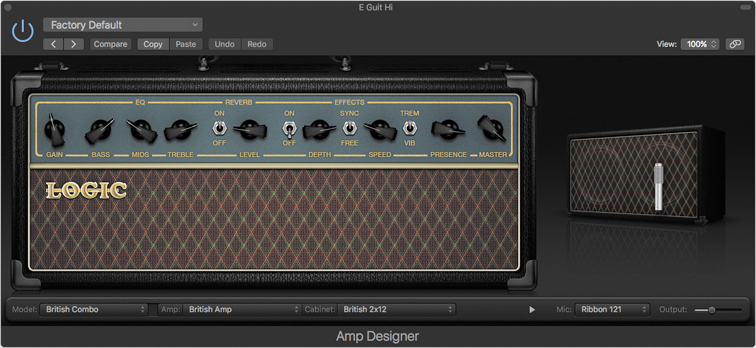
In the Amp Designer graphic interface, you can see the amp and its parameters (Gain, EQ, Reverb, and so on), and to the right, the cabinet and the microphone. At the bottom, pop-up menus allow you to choose a model, and to customize the model by selecting the desired amp, cabinet, and microphone.
TIP ▶
Press V to hide or show all open plug-in windows.
The guitar tone now has the character of a guitar plugged into an amp, and you can hear the amp’s reverb.
7 Press the Spacebar to stop playback.
Inserting an Amp Designer plug-in on your dry guitar track produces a sound that is very close to the sound of a mic’ed guitar amp cabinet. The modeled amp gives you the sound you want (and great flexibility) without the hassle of dealing with high acoustic sound levels.
Customizing an Amp Model
A great way to personalize the sound of a guitar amp is to pair it with a specific guitar cabinet and microphone. To further customize the amp, you can change the amp’s EQ and Reverb types, and adjust the position of the microphone in front of the cabinet.
Throughout this exercise, take time to experiment with various models, and tweak the amp knobs to get a feel for the many sounds that the Amp Designer can produce. As you customize and fine-tune your guitar amp, don’t forget to unsolo the guitar occasionally to hear how your changes affect the perception of the guitar within the entire mix.
1 Press the Spacebar to start playback.
The amp gives the guitar a clean sound. Let’s raise the gain to get a crunchier distortion sound.
2 On the amp, turn the Gain knob all the way up.

The guitar has a nice crunchy distortion. Let’s try another color of reverb.
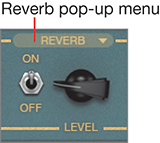
3 From the Reverb pop-up menu, choose Boutique Spring.
The reverb has the biting, high-frequency sound typical of the spring reverb units found on some vintage guitar amps. The guitar sound has a lot of reverberation, which makes it seem far away. Let’s bring the guitar forward a little more.
TIP ▶
From the EQ pop-up menu, you can choose a different EQ model.
4 Turn down the Level knob to a position between 8 and 9 o’ clock.

The volume of the reverb lowers, and it now sounds as if the guitar moves a little closer.
If you are listening on speakers that have an extended frequency range, or on headphones, you may hear a low rumble coming from the guitar amp. At the bottom of the speaker cabinet, look at the Mic pop-up menu. The current microphone, a ribbon mic, has an extended range of frequencies that captures all the low-frequency content coming from the cabinet. A ribbon mic is a good choice when you’re looking for a fuller sound. However, in this busy mix, a full guitar sound would have to fight for attention with the other instruments in the arrangement. A more focused sound will help the guitar find its place in the frequency spectrum of the mix without masking the other instruments.
5 From the Mic pop-up menu, choose Dynamic 57.
![]()
The low rumble is tamed, and the guitar has a sharper sound that more easily cuts through the mix.
At the bottom of the Amp Designer, look at the Model, Amp, and Cabinet pop-up menus. The British Combo model is a combination of a British amp and a British 2x12 cabinet. To create your own hybrid guitar amp model, you’ll choose another cabinet.
6 From the Cabinet pop-up menu, choose Vintage British 4x12.
![]()
The guitar sound becomes a little less aggressive.
You can now further sculpt the sound of the guitar by carefully positioning the microphone in front of the speaker.
7 Place the mouse pointer over the speaker cabinet area.
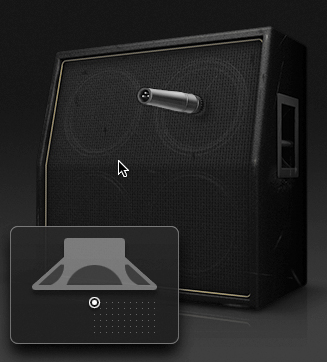
A graphic appears that displays the position of the microphone in front of the speaker (represented as a white dot).
8 Drag the white dot over the graphic while listening to its effect on the guitar sound.
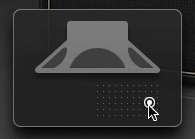
The mic position strongly influences which cabinet-generated frequencies are picked up by the mic. When the mic is aligned with the center axis of the speaker, you hear the maximum level of high frequencies, and the guitar sounds brighter and more present. Moving the mic off-axis tends to scoop the frequency spectrum, lowering the mids and emphasizing the lows.
Try to place your mic slightly off the speaker’s axis and not too close to the speaker, as in the previous figure.
TIP ▶
When you have chosen a speaker cabinet and a mic, and positioned the microphone, you can click the disclosure triangle in front of the Mic menu to work with a smaller Amp Designer window.
You will now adjust the EQ to give the guitar a more focused sound with less low and high frequencies and more mid-range frequencies.
9 In the EQ section, turn down the Bass and Treble knobs, and turn up the Mids knob to the positions shown in the following figure.
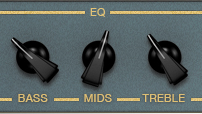
The guitar sound is slightly more rounded and focused, though still quite aggressive. You can tame its brightness with the Presence knob.
10 Option-click the Presence knob.
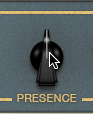
The Presence knob jumps to its middle position (12 o’clock), and the sound loses some of its aggressive bite.
There are two stages of distortion in the Amp Designer. Previously, you used the Gain knob to adjust the level of distortion introduced by the preamp stage. You will now adjust the Master knob to reduce the saturation introduced by the power amp.
11 Drag the Master knob to 1 o’clock.
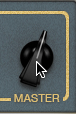
While the guitar still has the nice crunch created by the gain in the preamp stage, it has less of the power amp stage saturation and therefore sounds clearer. Turning down the Master knob also turns down the volume of the amp. To compensate, you can drag the Output slider, which adjusts the output volume of the plug-in without affecting the tone.
12 At the bottom right of the Amp Designer, drag the Output slider up to –2.5 dB.
![]()
13 Close the Amp Designer plug-in window.
14 Stop playback.
The guitar now has a focused, crunchy, distorted sound that faithfully emulates the famous tone of vintage low-gain British amps. It has just enough distortion to thicken the tone, while adding character to the guitar and not muddying the harmony of the chords.
When customizing and adjusting amp settings, remember that all settings interact, and the quest for the ultimate guitar tone is rarely a sequential process. Trying a different mic probably means you’ll have to correct its position, and choosing a new speaker cabinet may require you to readjust the Gain and EQ.
TIP ▶
Don’t restrict the Amp Designer to dry guitar tracks! It can work wonders to add sizzle to a drum track, warm up a digital synth, or give an edge to a vocal track.
Adjusting Levels and Pan
Adjusting the level of each instrument may seem like the most obvious part of the mixing process, and you will usually start setting levels as you build the song. However, the perception of an instrument’s loudness changes during the mixing process, and you will often have to readjust the level of an instrument after you add an effect to it or change its EQ settings, or when you mix other instruments that influence listener perception of that first instrument.
Positioning instruments to the left or the right of the stereo mix is a good way to separate them and make it easier for the listener to distinguish between them.
Now that you’ve adjusted the guitar amp to your desired guitar tone, you will unsolo the guitar track to hear how it interacts with the other instruments in the mix. You’ll turn on the EQ plug-in you turned off earlier, and adjust the guitar’s volume and pan to help it find its place in the mix. Then, you’ll use a Stereo panner to narrow the image of the Glockenspiel and pan it to the left.
1 On track 26, click the Solo button (or press S) to unsolo the guitar, and start playback at the beginning of the CH2 section.
The guitar sounds good, but it’s quite loud and full.
2 In the inspector, place the mouse pointer over the Channel EQ plug-in, and click the power button to turn it on.
The drastic EQ curve completely removed a good part of the low frequencies, helping to focus the guitar sound, which is now thinner and almost nasal. That result wouldn’t sound good for a solo guitar recording, but in a busy mix, it allows the guitar to play at a low volume and still cut through the mix.
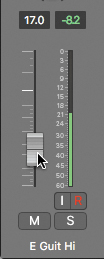
3 On the E Guit Hi channel strip, drag the Volume fader down to −17.0 dB.
You probably feel that the level of the guitar is now so low that it almost disappears. When you spend a lot of time adjusting the sound of an instrument, it can be difficult to detach yourself from it and shift your focus to the song as a whole.
To find the right level for the guitar, turning it all the way down and listening to the whole mix (without the electric guitar) for a while may help. Then slowly raise the level of the electric guitar. (Closing your eyes ensures that you use your ears and are not influenced by any preconceived notion of what value the fader should be.) When you feel that the electric guitar adds texture to the song without taking away from the other instruments (especially the vocals), you’ve found the right level.
4 On the E Guit Hi channel strip, drag the Volume fader all the way down to –∞.
Listen to at least one entire chorus without the guitar to become accustomed to the sound of the instrumentation in that section. Notice that the acoustic guitar (track 16) is panned to the right, leaving room for an equivalent instrument to the left of the stereo field.
5 Slowly drag the Volume fader up to –17.0 dB.
This time you can hear the guitar find its place in the mix. Listen to how it interacts with the vocals. However, every time the singers sing “Big,” they mask the guitar chord. To avoid this issue without raising the volume of the guitar, you can move the electric guitar away from the center position. To complement the acoustic guitar and balance the mix in the stereo field, you’ll pan the electric guitar to the left.
6 Drag the Pan knob down to –55.

The guitar is located on the left of the stereo field, where the vocals no longer mask it. The ostinato rhythmic chord pattern adds energy to the chorus but stays out of the way and lets the vocals shine.
TIP ▶
To undo a channel strip adjustment such as Pan or Volume, open the Mixer pane and choose Edit > Mixer Undo.
Now let’s pan a stereo instrument, the Glockenspiel.
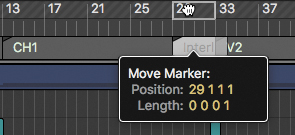
7 In the Marker track, drag the Interlude marker (at bar 29) up to the ruler.
8 Listen to the Interlude.
The two acoustic guitars are narrow and placed in the center. The stereo Glockenspiel sounds wider, but it is also centered in the stereo field and would benefit by being more focused and panned to one side to separate it from the guitars.
9 Select and solo the Glockenspiel track (track 13). Listen to the Interlude section (bar 29).
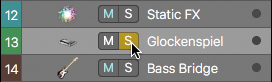
The stereo Glockenspiel sounds nice and wide, but it is centered in the stereo field.
10 In the inspector, Control-click the Glockenspiel channel strip’s Pan knob and choose Stereo Pan.
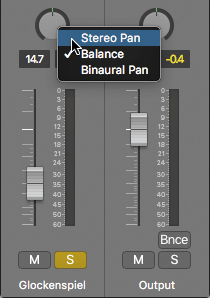
The Stereo Pan knob has two white handles that display where the left and right signals are panned. The green section around the knob represents the width of the signal in the stereo field. Currently, the Left signal is panned all the way to the left, and the Right signal all the way right, so the signal currently occupies the entire width of the stereo field. Let’s narrow the width of the Glockenspiel so you can pan it.
11 On the Stereo Pan knob, drag the right handle up toward the center.
![]()
The Glockenspiel still sounds in stereo, but it is no longer as wide and panned to the left. Let’s bring its image a little closer to the center.
12 Click in the middle of the Stereo Pan knob and drag up to pan the stereo signal toward the right.

On the Stereo Pan knob, both white handles move to the right by the same amount. The Glockenspiel retains the same width, but its image is now panned a little closer to the center of the stereo field.
13 Unsolo the Glockenspiel and listen to the whole mix of the Interlude section.
The Glockenspiel is a little better focused and easier to distinguish from the acoustic guitars.
14 Stop playback.
Submixing Tracks and Processing the Submix
When working with an ensemble of related tracks—such as the elements of a drum kit, an ensemble of backup vocalists, or two guitars doubling the same part—you can submix the signal of the group of tracks and process the submix. Instead of using one plug-in for each individual track, a single plug-in can process the submix. Using one plug-in rather than multiple plug-ins saves CPU resources and lets you adjust the effect more quickly.
Submixing with a Summing Stack
In this exercise, you’ll use a summing stack to submix the two acoustic guitars doubling the same part in the Interlude section, and observe how the Track Stack affects the routing of its subtracks in the Mixer. Your Cycle area should still correspond to the Interlude marker.
1 Listen to the Interlude section.
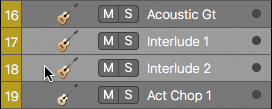
Two acoustic guitars (on tracks 17 and 18) play the same sustained chords. To make this section more exciting, you will later process the guitars through a tremolo plug-in. For now, let’s look at the signal flow of the two guitar channel strips in the Mixer.
2 Press 2 to recall screenset 2.
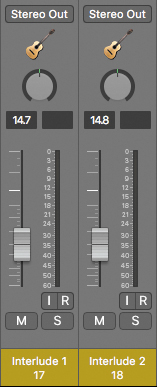
In the Mixer, look at the Interlude 1 and Interlude 2 channel strips (17 and 18). Both of them are routed to the Stereo Output (the Output channel strip located to the right in the Mixer).
NOTE ▶
Double-click an output or send destination on a channel strip to select the corresponding destination channel strip.
Let’s create a summing stack for the two Interlude tracks.
3 Press 1 to recall screenset 1.
4 Select the Interlude 1 track header (track 17).
5 Shift-click the Interlude 2 track header (track 18) to select both Interlude tracks.
6 Choose Track > Create Track Stack (or press Command-Shift-D).
7 In the Track Stack dialog, select Summing Stack and click Create.
8 Press 2 to recall screenset 2.
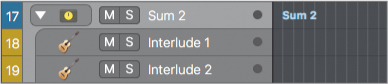
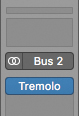
The outputs of the subtracks are set to Bus 2, and their signal is routed to the input of the main track (Sum 2), also set to Bus 2.
Processing the Guitars with a Tremolo Plug-in
You will now insert a Tremolo plug-in on the summing stack to process the submix of the two guitars.
1 Press the Spacebar to start playback.
Playback starts at the beginning of the Interlude section. (You can’t see it currently, but in a previous exercise you created a cycle area corresponding to the Interlude marker.)
2 On the Sum 2 channel strip (17), click the first slot in the Audio FX area, and choose Modulation > Tremolo.
The Tremolo plug-in opens.
The guitar keeps moving in the stereo field. This can be useful when you want an auto-pan effect, but in this case, you want a simple tremolo effect in which the volume of both sides of the guitar’s stereo signal goes up and down simultaneously.
3 At the lower right of the Tremolo plug-in, drag the Phase value down to 0°.
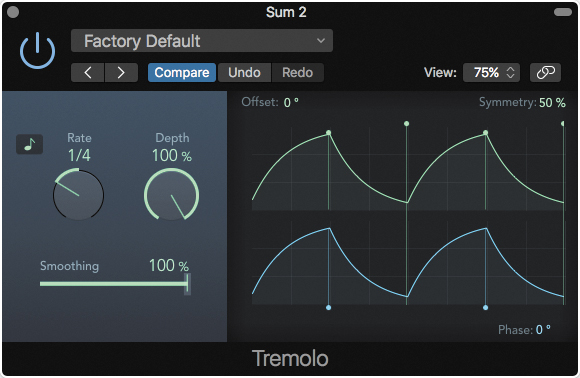
Both sides of the guitar’s stereo signal now simultaneously go up and down in volume, creating a bouncy feel. Let’s speed up the effect.
4 In the Tremolo plug-in, set the Rate to 1/8.
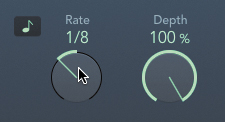
The Tremolo makes the guitar bounce up and down in volume every eighth note, which adds a rhythmic effect to the interlude and novelty to the section. The side effect is that the guitars are now perceived to be softer in the mix. To compensate, you can use the Volume fader of the Sum 2 channel strip.
5 On the Sum 2 channel strip, drag the Volume fader up to 4.0 dB.
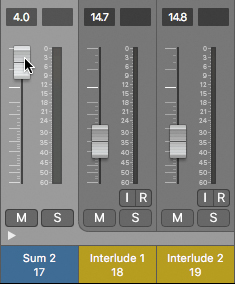
The tremolo effect sounds great, but the two guitars feel confined in the center of the stereo field, along with the Glockenspiel (channel strip 13). Not many instruments are playing during the interlude, so you can spread the guitars apart to add width to their mix.
6 Pan the Interlude 1 channel strip all the way to the left, and pan the Interlude 2 channel strip all the way to the right.
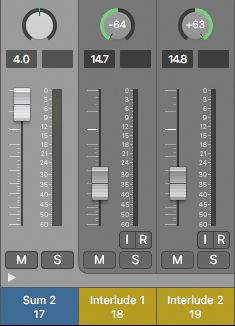
The guitars are spread out to each side of the stereo field, leaving more room in the center for the glockenspiel. The mix is wider, giving an impression of space, and each instrument has its own place in the stereo field.
7 On channel strip 17 (Sum 2), click the disclosure triangle to close the summing stack.
Although you are done working with the Tremolo plug-in, there’s no need to close its window, since you will now recall screenset 1. And because screenset 2 was locked before you opened the Tremolo plug-in, that plug-in will not be reopened the next time you recall screenset 2.
8 Stop playback.
9 Press 1 to recall screenset 1; and click the yellow cycle area, or press C, to turn off Cycle mode.
You used a Track Stack to sum two guitars onto a single channel strip, allowing you to process them as an ensemble. The Tremolo plug-in you added to the Sum 2 channel strip makes the guitars bounce in volume, and spreading the guitars in the stereo field produces a wider stereo mix while giving breathing room to the individual instruments.
Applying an Effect to a Section of a Track
A common way to maintain interest throughout a song is to vary the instrumentation from one section to the next. A break in which a fundamental instrument drops out (such as the drums or bass) can create a lighter section and gives the song some room to breathe.
Another way to change up the song is to apply an effect plug-in to only one section of a track, thereby making that instrument sound different for a short time.
In this exercise, you will combine both techniques for maximum effect. In the CH Break Down section (from bar 71 to bar 79), the bass drops out, reducing the arrangement to vocals and drums. The acoustic guitar (track 16) follows along and plays a percussive part with muted strings. Let’s add a fun effect to that percussive part.
1 Zoom in on the Acoustic Gt region on track 16 at bar 71.
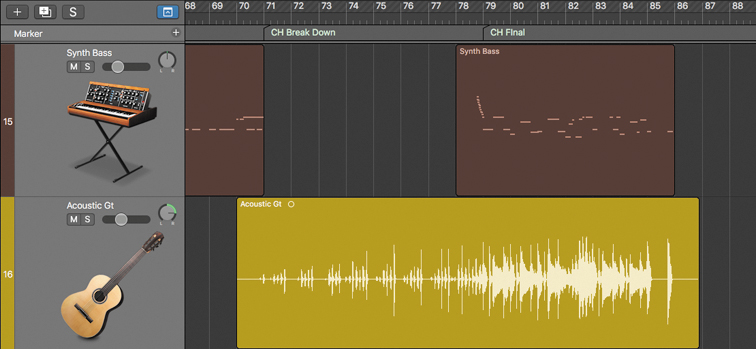
2 Solo the Acoustic Gt track and listen to the CH Break Down section.
The guitar plays a percussive part with muted strings, and in the next section (CH Final), it resumes playing chords. You will select only the percussive part and apply an effect to it.
3 Command-drag to marquee-select the first part of the Acoustic Gt region, and stop at the end of the CH Break Down section (79 1 1 1).
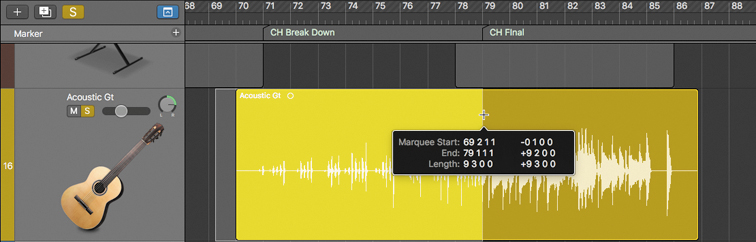
You can now apply plug-ins to this selection.
4 In the Tracks area menu bar, choose Functions > Selection-Based Processing.
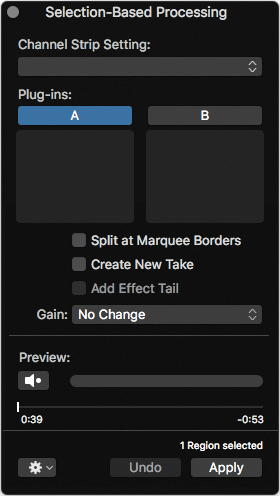
The Selection-Based Processing window opens. Here you can choose a Channel Strip Setting or individual Plug-ins to process your selection.
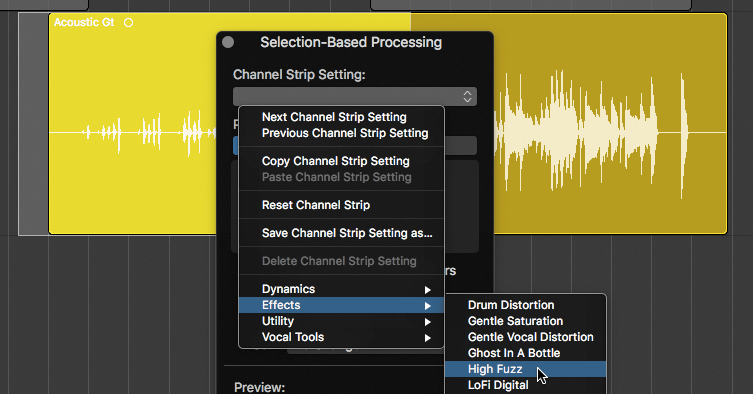
5 From the Channel Strip Setting pop-up menu, choose Effects > High Fuzz.
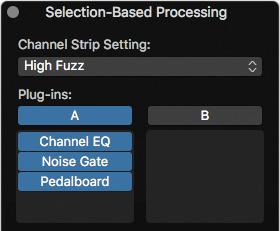
The High-Fuzz Channel Strip Setting is loaded into column A. It contains three plug-ins: Channel EQ, Noise Gate, and Pedalboard.
TIP ▶
To compare two different chains of effects, you can click the B button and choose another Channel Strip Setting, or insert individual plug-ins below the button. You can then click the A or B button to compare them.
6 In the Selection-Based Processing window, click the Preview button.
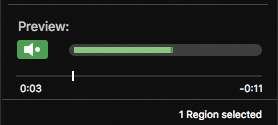
The selected section of the Acoustic Gt track plays with the fuzz effect. It adds character and texture to that percussive part. Let’s apply it.
7 In the Selection-Based Processing window, click the Apply button.
After a moment, the effect is “printed” to the selection, and the waveform is redrawn to represent the processed audio signal.
8 Close the Selection-Based Processing window.
9 Click the background of the workspace to clear the selected section.
10 Press Z to zoom out.
11 Unsolo the Acoustic Gt track.
12 Turn off Cycle mode.
13 Listen to the CH Break Down section going into the CH Final section.
In the CH Break Down section, you hear the processed percussive guitar on the right side of the stereo field. At the beginning of the section, it sounds like an answer to the vocalists singing the song title, “Big.” In the CH Final section, the fuzz effect stops, and the acoustic guitar sounds clean again.
You can now apply plug-ins to selected portions of a track, which is a new tool you can use to add interest to parts of your songs. Feel free to be creative with that technique! Try using selection-based processing, for example, to add delay to only the last word of a sung phrase, or reverb to the last snare of the song.
Using an EQ Plug-in
The sound of an instrument consists of several frequencies mixed together in varying amounts. By applying an EQ plug-in to attenuate or boost certain ranges of frequency, you can alter the timbre of the sound, much as you would change the sound of your music player by tweaking the bass or treble EQ settings.
EQ plug-ins can shape the sound of your instruments, focusing them in a specific frequency range and helping each instrument cut through the mix without boosting the overall level of its channel strip. Equalizing (EQ’ing) an instrument can also decrease unwanted frequencies in its recording and keep it from masking another instrument in the same frequency range.
To shape the frequency spectrum of a vocal track, you will use the Channel EQ plug-in to attenuate some of its low rumbling while boosting some of the high frequencies to give it some air.
1 In the Marker track, drag the V2 marker up to the ruler, and start playback.

Feel free to keep repeating the V2 section throughout the whole exercise, or to stop and restart playback as you choose.
Several layered vocal tracks are located at the bottom of the workspace. You will solo one vocal track that hasn’t yet been processed and EQ it.
2 Select the Ami Vox track (track 29) so that you can see its channel strip in the inspector, and then solo it (or press S).
3 At the top of the Ami Vox channel strip, click the EQ display.
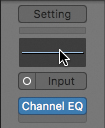
In the Audio FX area, a Channel EQ plug-in is inserted in the first available slot, and the Channel EQ window opens
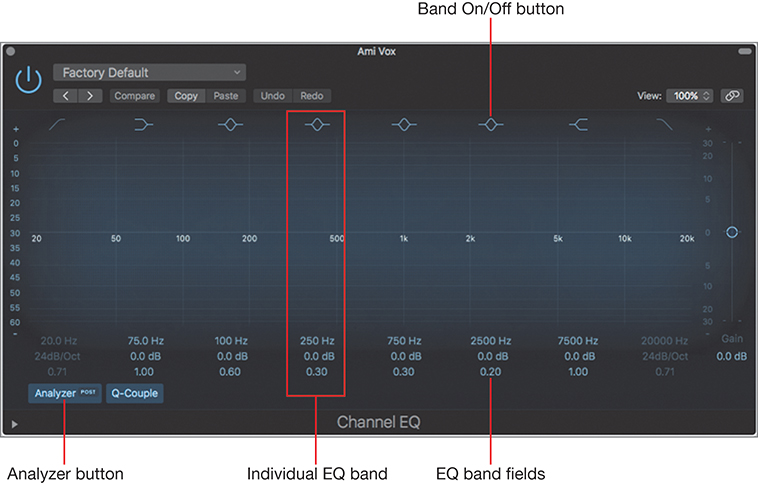
The Channel EQ plug-in allows you to adjust eight bands of EQ. You can toggle a band on and off by clicking the button at the top of that band. By default, the first and last bands are turned off, and all the other bands are turned on. Each band’s settings are shown below the graphic display in the EQ band fields. All the bands that are turned on by default have their Gain parameters set to 0.0 dB, and in the graphic display, the EQ curve is flat, which means that the Channel EQ is not currently affecting the audio signal on the channel strip.
The Analyzer button toggles the frequency analyzer, which displays the frequency spectrum curve of the sound on the graphic display when the track is playing.
NOTE ▶
By default, the frequency analyzer displays the frequency spectrum of the sound at the output of the Channel EQ plug-in. You can click the Post EQ button inside the Analyzer button to switch the frequency analyzer to Pre EQ. It will then display the frequency spectrum of the sound at the input of the Channel EQ, before being processed by the Channel EQ plug-in.
4 Make sure the Analyzer button is on, and listen to the soloed track.
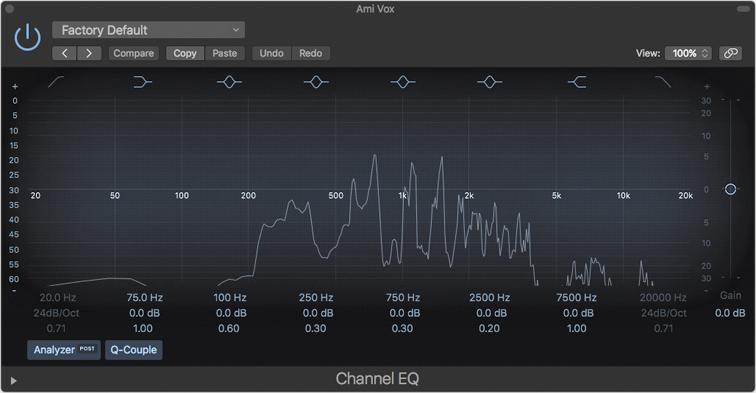
A curve appears in the graphic display, showing the sound’s frequency spectrum in real time. Listen closely to the vocals as you watch the occasional movement in the very low range of frequencies (to the left). Feel free to raise your monitoring volume on your audio interface, or use the Volume fader on the Ami Vox channel strip. You can hear some low-frequency noises in the recording, especially at the beginning of bar 35. In vocal recordings, those low-frequency noises are often generated by the singer accidentally touching the mic stand, or by the mic cable rubbing against the mic stand.
You will filter out those very low frequencies to attenuate the unwanted noises.
5 At the upper left, click the first Band On/Off button to turn on that EQ band.
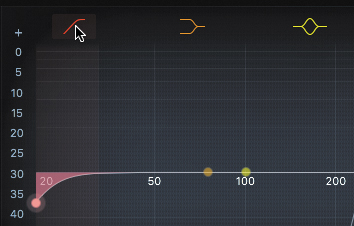
The first EQ band’s shape appears on the graphic display. You can see that the low frequencies are slightly attenuated around 20 Hz.
6 In the EQ band field, drag the Frequency parameter of the first band up to 400 Hz.
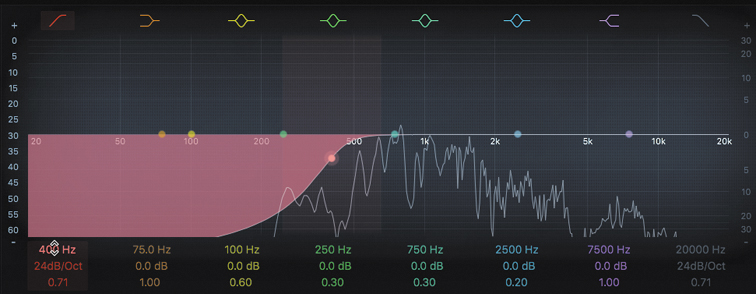
The EQ band shape updates in the graphic display. In the frequency curve displayed by the Analyzer, you can watch the low-frequency content disappear from the vocal signal. You can hear the low-frequency noises completely disappear. However, you’ve changed the timbre of the vocals, and they now sound a bit thinner, almost as if coming from a cheap sound system.
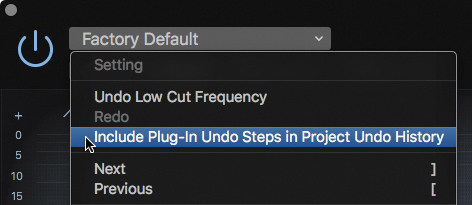
TIP ▶
To undo a plug-in parameter change, from the plug-in window’s Settings pop-up menu, choose Undo. Choose Include Plug-In Undo Steps in Project Undo History when you want to use Command-Z to undo plug-in parameter changes.
You must adjust the Frequency parameter of that first band so that the low-frequency noises are attenuated as much as possible without affecting the vocals.
7 Drag the frequency of the first band down to 220 Hz.
You can hear the full vocal sound, and not the low-frequency noises. Mission accomplished!
Now you will attenuate the low/mid frequencies to remove the “mud” from the vocals. Instead of adjusting the numerical settings in the parameter section, you’ll drag the pointer in the graphic display to adjust the shape of individual bands.
8 Position the mouse pointer over the upper half of the graphic display, and without pressing the mouse button, move the pointer from left to right.
As you move the pointer horizontally, the EQ band fields are shaded in different colors at the bottom of the Channel EQ to show you which EQ band is selected. You can shape the curve of the selected band by dragging in the graphic display:
► To adjust the gain, drag vertically.
► To adjust the frequency, drag horizontally.
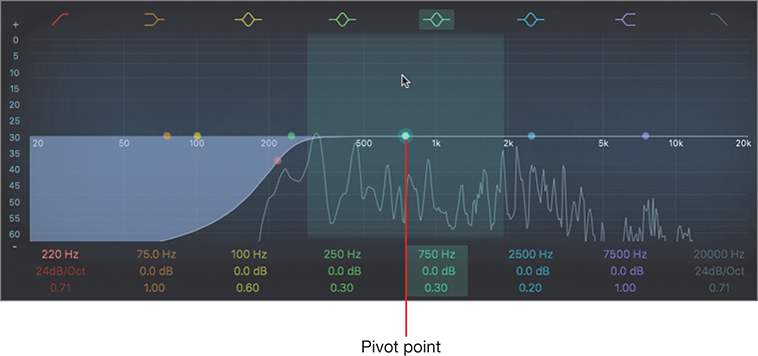
► To adjust the Q (or width, or resonance), vertically Option-Command-drag the pivot point (which appears at that band’s frequency).
You first need to adjust the band’s gain to see its shape on the graphic display.
9 Position the pointer to select the fifth band, which is currently set to a frequency of 750 Hz.
10 Drag down so that the Gain parameter below reads –7.0 dB.
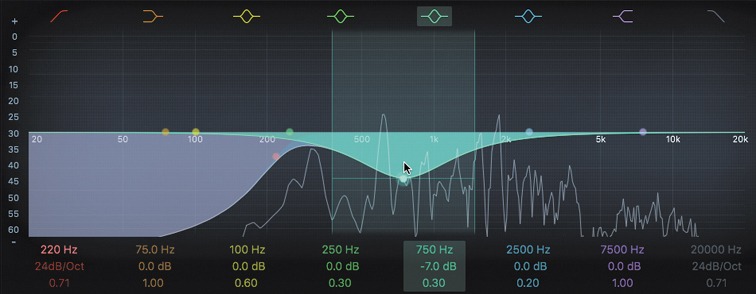
The shape of the selected EQ band appears on the graphic display, and the settings below are adjusted accordingly.
Now, while listening to the vocal, you will adjust both the Q and the frequency of the EQ band you are attenuating.
11 Drag the band to the left to set its frequency to 470 Hz.
12 Option-Command-drag the pivot point down to widen the band of EQ until the Q field for that band reads 0.10.
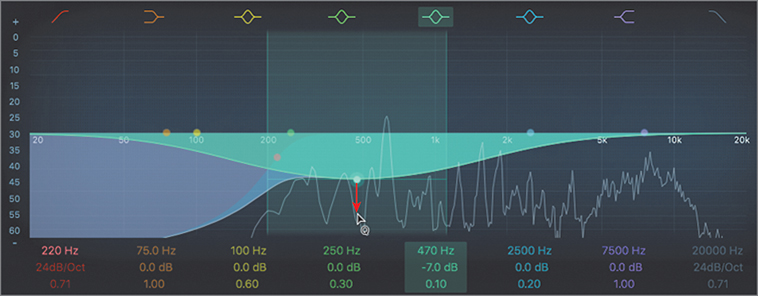
The vocal sounds less muddy already. Remember to click that EQ band’s On/Off button to compare the vocal sound with and without that EQ band applied.
Now you can add some air to the vocal by boosting its high frequencies.
13 Drag the values in the EQ band fields to set the next-to-last EQ band to the following parameters:
► Set the frequency to 6800 Hz.
► Set the gain to +3.0 dB.
► Leave the Q at 1.00.
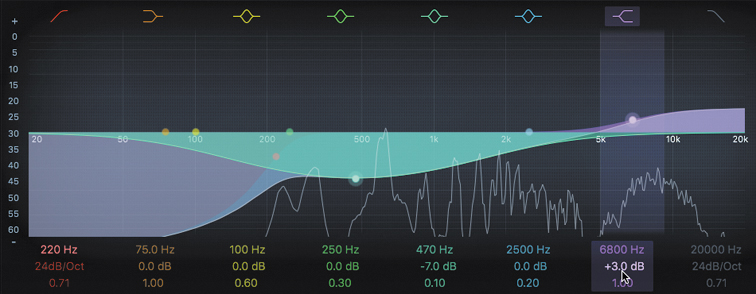
The vocal now sounds a bit less dull, and more present. Let’s compare the sound of the vocal with and without the Channel EQ.
14 In the plug-in header, click the On/Off button.

The button is dimmed to indicate that the Channel EQ is off. On the Channel EQ graphic display, the curve disappears because the audio signal is no longer routed through the plug-in.
You can now hear the unprocessed vocal recording. The low-frequency noises are back, and the vocal is boomy and slightly dull.
15 Turn the Channel EQ on. The noises disappear, and the vocals sound clear and distinct.
16 Press S to unsolo the Ami Vox track.
Let’s now adjust the level of the Ami Vox track.
17 On the Ami Vox channel strip in the inspector, drag the Volume fader all the way down.

Listen to the verse a few times to become familiar with the sound of the mix without the Ami Vox track.
18 Slowly raise the Ami Vox Volume fader to around –9.0 dB.
As you try to find the right level for the vocal you just EQ’ed, you may notice that some words are louder than others. You will later use a compressor to give the vocal a more consistent level.
19 Stop playback.
Instead of closing the Channel EQ window, you can recall the current screenset to return it to its locked state.
20 Press 1 to recall screenset 1.
The screenset is recalled, and the Channel EQ window is no longer open.
By applying an EQ plug-in to the vocal, you shaped its frequency spectrum to eliminate unwanted low-frequency noises and clarify the vocal, establishing its appropriate place in the frequency spectrum of the mix.
Using Delay and Reverberation
In a natural environment, an instrument’s sound is reflected by the floor, walls, and ceiling of the room. Those reflections, combined with the direct sound of the instrument, allow listeners to determine the distance from the instrument to their ears and understand the nature of the acoustic space.
When recording instruments, you can choose to record in an absorbent studio to primarily record the direct sound of each instrument. Then you apply delay and reverberation plug-ins to create artificial reflections, giving you total control over the apparent placement and depth of the instruments.
Adding Delay to the Vocals
Delay can be applied so you can clearly hear the distinct repeats of the sound echoing, or it can be applied with shorter delay times to create an ambience similar to a reverb.
You will now add a Tape Delay plug-in to a vocal track to create a classic slap-back delay, a vintage effect popularized by the Beatles, who often used it liberally on John Lennon’s voice.
1 In the Tracks area, select the Duvid Vox track (track 30) to show its channel strip in the inspector, and solo it.

2 Start playback.
3 On the Duvid Vox channel strip, in the Audio FX area, click below the Compressor, and choose Delay > Tape Delay.
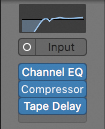
The Tape Delay plug-in is inserted, and its window opens.
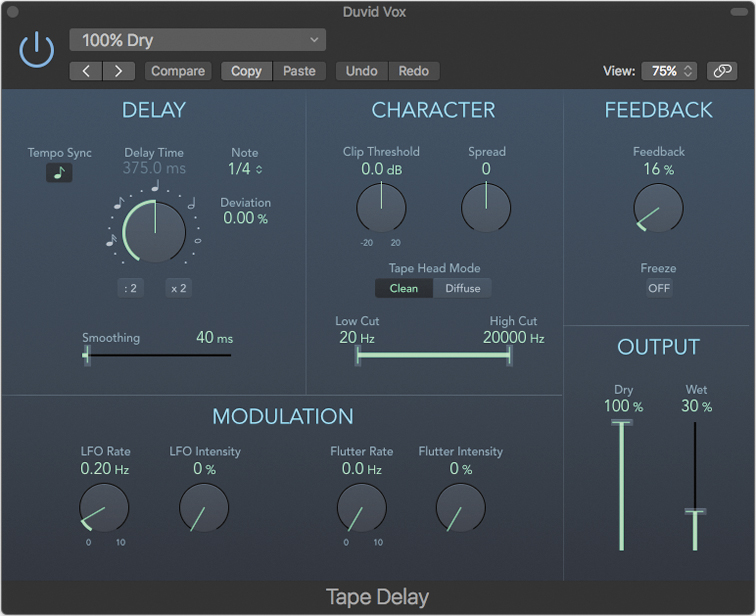
You hear the reflections applied to the vocals as an echo. By default, the Tape Delay is automatically synchronized to the project tempo so that reflections are produced every quarter note. To get a slap-back effect, you needn’t synchronize the delay to the grid, and you want the repeats to occur faster.
4 Click the Tempo Sync button to disable it.
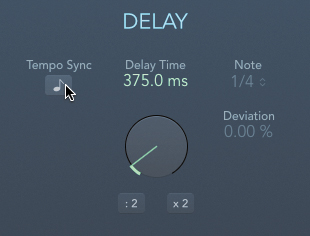
To the right of the Tempo Sync button, the Delay Time is now highlighted, indicating that you can change its value directly in the Delay Time field.
5 Double-click the Delay Time field, and enter 90 ms.
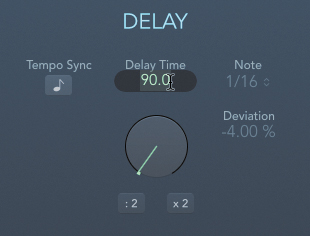
The delay is now very short, and you can no longer hear distinct repeats. Instead the delay creates an ambiance similar to recording the vocal in a very small reflective room.
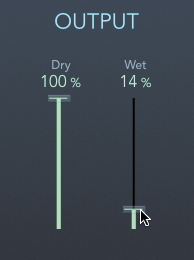
You can drag the two Output sliders on the bottom right to adjust the level balance between Dry (the sound not affected by the plug-in) and Wet (the reflections generated by the plug-in). You will bring the Dry signal all the way up to its maximum level so that you maintain the same level of direct sound as you had before inserting the plug-in.
6 Make sure the Dry slider is up to 100%.
You can now adjust the level of the delay effect with the Wet slider. Let’s make the effect a little subtler.
7 Drag the Wet slider down to 14%.
Here again, because you were focused on the sound of the delay, you may feel as if you just turned the effect down so much that you don’t hear it any more. To fully hear the effect of the Tape Delay, let’s toggle that plug-in on and off.
8 In the plug-in header, click the On/Off button to turn off the plug-in. The vocal sounds much drier.
9 Turn the plug-in back on. The Tape Delay adds a little bit of slap-back echo, creating an ambience while keeping the vocal sound fairly natural.
10 Keep the Duvid Vox track soloed, and stop playback.
11 Close the Tape Delay plug-in window.
Adding Reverb Using Bus Sends
You could insert a reverb plug-in directly into the channel strip of the instrument you want to process, just as you inserted a delay plug-in in the previous exercise. However, when you use reverb to simulate the sound of instruments in a room, applying an individual reverb plug-in for each instrument would require a lot of processing power. You would also have to readjust the parameters of each reverb plug-in every time you wanted to change the acoustics of your artificial room.
Instead, you can use a bus send to route some of the signal from a channel strip to a new auxiliary channel strip. When you have set up an aux channel strip with the desired reverb plug-in, you can add reverberation to any instrument by sending some of its signal to that aux for processing.
In this exercise, you will use a bus send to route a vocal track to an aux, and insert the reverberation plug-in on the aux channel strip. Later you’ll send another vocal track to the same aux to give it the same reverb sound.
A track is still soloed from the previous exercise. To unsolo it and solo a new track, you can Option-click the new track’s Solo button.
1 Select the Gang Vox 1 track (track 31) and Option-click its Solo button. The Duvid Vox track is unsoloed, and the Gang Vox 1 track is soloed.
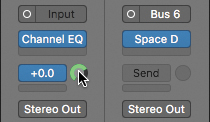
2 On the Gang Vox 1 channel strip, click the Send slot, and choose Bus > Bus 6.
When you click a Send slot and choose an available bus, a new aux channel strip is added to the Mixer. In the inspector, the channel strip to the right shows the new Aux 6 channel strip, and you can see the signal path from the lead vocal channel strip to the aux channel strip. At the top of the Aux 6 channel strip, the input is set to Bus 6.
TIP ▶
On the left channel strip, click the desired Send or Output slot to display the corresponding output or auxiliary channel strip on the right in the inspector. When you click a send, make sure that you click the right area of the Send slot to avoid toggling its On/Off button.
Let’s insert the reverb plug-in on the aux.
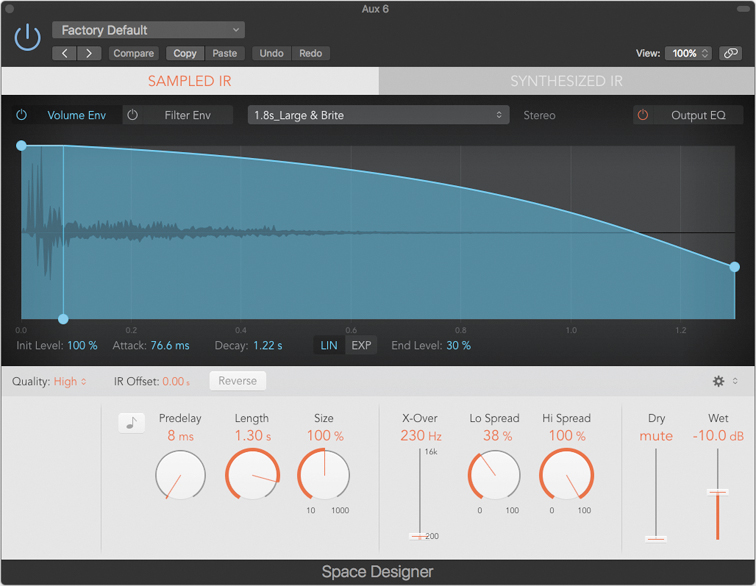
3 On the Aux 6 channel strip, click the top of the Audio FX section, and choose Reverb > Space Designer to insert that plug-in.
4 In the Marker track, drag the CH2 marker up into the ruler, and start playback.
The vocals sound dry, and no movement appears on the Aux 6 channel strip’s meter. On the Gang Vox 1 channel strip, you need to raise the Send level knob to determine how much of the vocal signal you’re sending to Aux 6 for processing by the reverb.
5 On the Gang Vox 1 channel strip, Option-click the Send Level knob next to Bus 6.
The Bus 6 send briefly displays the send level, 0.0 (dB), and you can hear the reverb. Let’s choose a bigger reverb sound.
6 In the Space Designer plug-in header, from the Settings pop-up menu, choose Large Spaces > Rooms > 02.3s Clean Room.
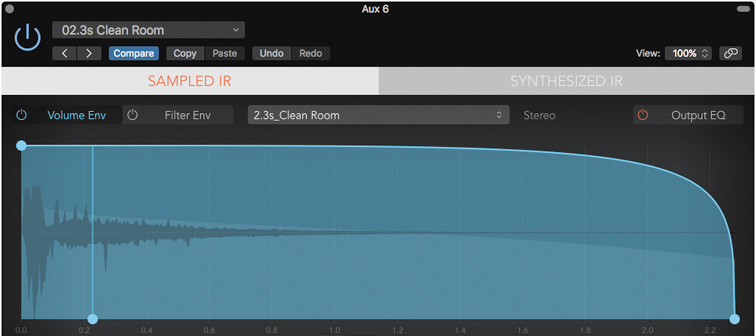
The reverb sound is bigger. In fact, you now have too much reverb. You’ll need to adjust the send level on the Gang Vox 1 channel strip to determine how much of the dry vocal sound is routed to the reverb plug-in.
7 On the Gang Vox 1 channel strip, drag the Bus 6 Send Level knob down to around –12.0 (dB).
You can now send the audio signal from any channel strip to Bus 6 to route it to Aux 6 and add the same reverb effect to its sound. The Gang Vox 1 track was doubled on the Gang Vox 2 track, so let’s open the Mixer and send the Gang Vox 2 track to the same reverb.
8 Press 2 to recall screenset 2.
Because you previously selected the Gang Vox 1 track in the Tracks area, the Gang Vox 1 channel strip (31) is selected in the Mixer, making it easy to locate.
9 Option-click the Gang Vox 2 channel strip’s Solo button. Gang Vox 1 is unsoloed, and Gang Vox 2 is soloed. You can hear the dry recording.
10 On the Gang Vox 2 channel strip (32), click the top Send slot, and choose Bus > Bus 6 → Aux 6.
11 Double-click the Send Level knob and enter –12.0 (dB).
Let’s hear both tracks together.
12 Click the Solo button at the bottom of the Gang Vox 1 channel strip.
Both tracks and their reverbs sound as if they are located in the center of the stereo field. Let’s spread them out to widen the ensemble.
13 Pan the Gang Vox 1 to the left and the Gang Vox 2 to the right, choosing Pan values around –40 and +40.
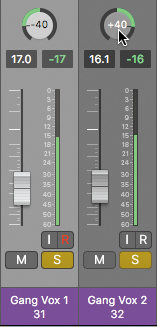
The vocals are spread out in the stereo field and sound closer to you. However, the reverb stayed in the center. Let’s look at the Aux 6 channel strip to see what happened.
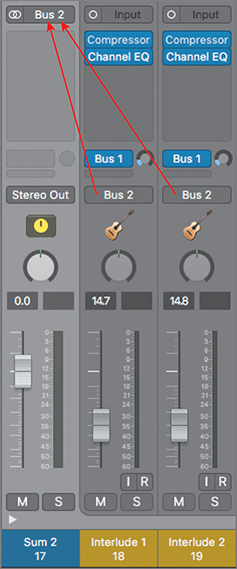
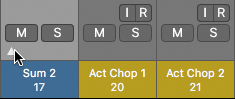
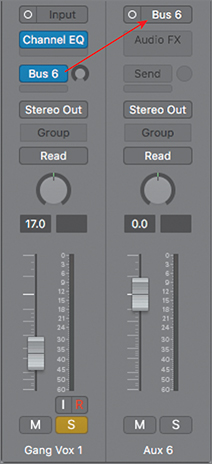
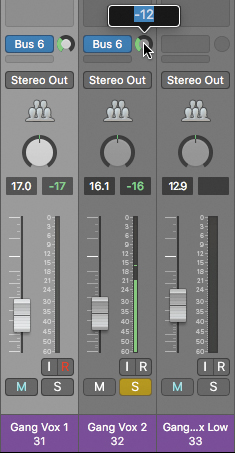
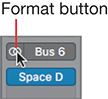
14 Place the mouse pointer over a Bus 6 send on one of the Gang Vox channel strips, and double-click the 6.
![]()
The Aux 6 channel strip is selected (and if necessary, the Mixer scrolls to show it). At the top of the channel strip, the Format button next to the input (Bus 6) shows a single circle, indicating a mono input. Let’s change this channel’s input format to stereo.
15 On the Aux 6 channel strip, click the Format button.
The reverb of each track is positioned according to the track’s panning in the stereo field, and the reverb now sounds wider.
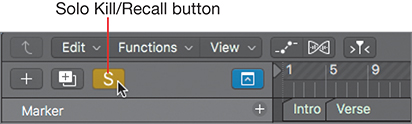
You can click the Solo Kill/Recall button in the Tracks area to toggle the soloed state of currently soloed tracks.
16 Press 1 to recall screenset 1.
17 At the top of the track headers, click the Solo Kill/Recall button (or press Control-Command-Option-S).
Both Gang Vox tracks are unsoloed, and you can hear the entire mix. If you feel that the Gang Vox tracks require further attention, you can easily solo them again.
18 Click the Solo Kill/Recall button.
Both Gang Vox tracks are soloed again.
19 Click the Solo Kill/Recall button to unsolo all tracks.
Using Dynamic Processing Plug-ins
The dynamic range of a recording is the difference between the quietest and loudest parts of the recording. Sometimes too much dynamic range in a recording can be a problem because the loudest parts become too loud and the quietest parts drop to barely audible levels. You can use dynamic processing plug-ins such as a compressor or a limiter to adjust the dynamic range of an audio signal, usually to make the audio signal level more consistent over time.
Dynamic processing can be applied to a single channel strip, to a submix of a group of instruments, or to an entire mix.
Using the Compressor
When recording an instrument, the musician rarely plays all the notes at the same volume. Singers need more energy to reach higher pitches, and they relax to sing low pitches, resulting in uneven loudness throughout a melody line. This variation can become a challenge when mixing, because some of the notes stick out and others are buried in the mix.
A compressor attenuates a signal when its level reaches a specific threshold. You can use it to lower the volume of loud notes and then raise the overall level of the instrument to increase the volume of softer notes.
In this exercise, you will apply a compressor plug-in to even out the dynamic range of a vocal track, making sure that you can hear all the words at the same level.
1 In the Tracks area, drag the V2 marker up to the ruler.
2 Select and solo the Ami Vox track (track 29).
3 Start playback.
The level of the vocal recording fluctuates as the singer hits different pitches. On the level meter in the Ami Vox channel strip, you can see higher notes reach higher levels than lower notes.
4 On the Ami Vox channel strip, click below the Channel EQ plug-in, and choose Dynamics > Compressor.
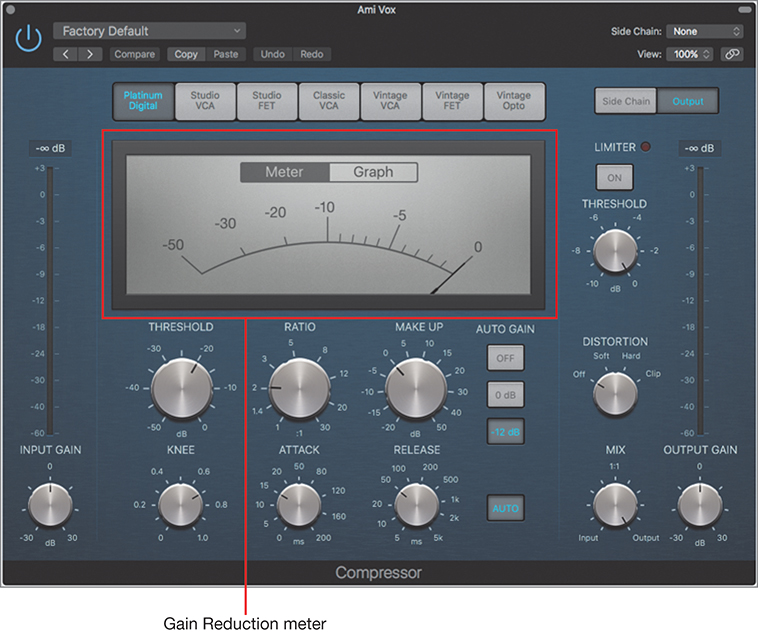
The Gain Reduction meter shows by how many decibels the Compressor is attenuating the audio signal. The little bit of activity on the meter indicates that the Compressor is barely attenuating the vocals.
NOTE ▶
On channel strips, you can also use the Gain Reduction meter (below the Setting button) to see how much gain reduction is applied by the Compressor plug-in, or any other dynamic plug-in inserted in the Audio FX section.
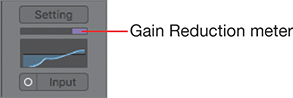
TIP ▶
Click the Gain Reduction meter on a channel strip to open the first compressor or limiter plug-in in the Audio FX section of that channel strip. When no dynamic plug-in is present, clicking the Gain Reduction meter inserts a compressor plug-in in the first available Audio FX slot.
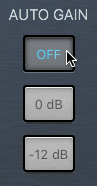
Although the Compressor plug-in has many parameters, you will adjust only the most important parameters, which are located below the Gain Reduction meter: the Threshold, Ratio, and Make Up knobs, and the Auto Gain buttons. The Make Up and Auto Gain parameters help compensate for the gain reduction by applying a constant gain at the output of the Compressor. To focus only on the gain reduction applied by the Compressor, let’s eliminate all gain applied at the output.
5 Ensure that the Make Up knob is set to 0.0 dB, and click the Auto Gain Off button.
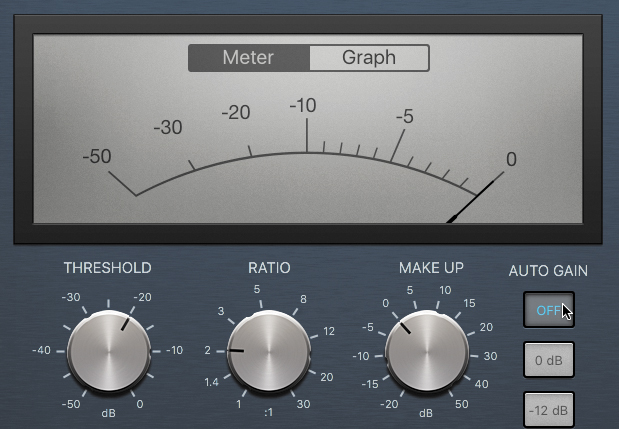
The Compressor can now apply only gain reduction, so it can only turn down the volume when the vocals reach levels higher than the Threshold parameter. Remember to turn the Compressor on and off as you adjust it to compare the sound of the vocal with and without the compression effect.
Above the Gain Reduction meter, you can choose from different models based on vintage hardware compressors. Except for Platinum, which is a transparent compressor, each circuit type adds its own color to the signal.
6 Click the Vintage Opto button.
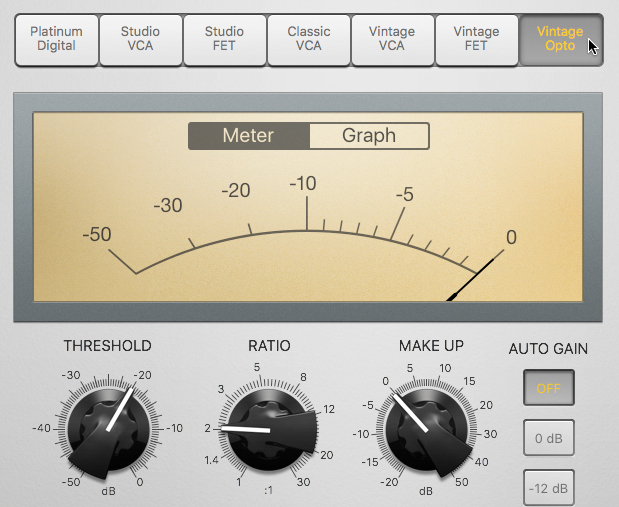
The graphic interface of the Compressor changes to adopt the look of the classic analog compressor that the Vintage Opto mode is modeled after: the Universal Audio LA-2A.
The Gain Reduction meter is inactive. Right now, the Compressor isn’t having any effect on the vocals. You will now adjust the threshold so that all notes trigger the Compressor.
7 Drag the Threshold knob down to –34.5 dB.

On the Gain Reduction meter, you can see the Compressor being triggered by all the notes, working harder on higher-pitched notes, while barely attenuating the lower-pitched notes.
You can adjust the amount of compression with the Ratio knob, which changes the ratio by which the signal is reduced when it exceeds the threshold.
8 Ensure that the Ratio knob is set to 2.0:1.
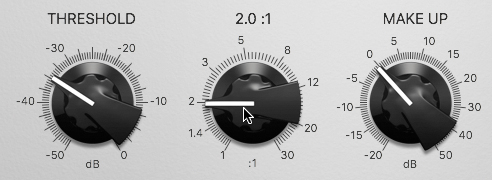
The vocal level sounds more consistent. You can clearly hear the singer even when he sings lower pitches, and higher-pitched notes no longer jump out.
Don’t hesitate to experiment using higher ratio values to increase the amounts of compression. Be aware, however, that high ratio values may attenuate the high-pitched notes too much and produce an unnatural-sounding result.
Now that the Compressor is reducing the gain, the vocal sounds lower in volume, so you can apply some make-up gain.
9 Drag the Make Up knob up to 2.5 dB.

The vocals have roughly the same overall loudness as when you first started compressing them, making it easy to hear the effect of the Compressor by toggling it on and off.
10 Stop playback.
11 Unsolo the Ami Vox track, turn off Cycle mode, and close the Compressor plug-in window.
Compressing and Limiting the Mix
On a professional project, you would usually send your final mix to a mastering engineer, who would put a final polish on the audio file using subtle amounts of EQ, compression, reverb, or other processing.
When you don’t have the budget to hire a mastering engineer, you can master your own mix by inserting plug-ins on the Stereo Out channel strip, as in this exercise. You will start by using a compressor to make the mix level more consistent throughout the song, and then apply a limiter to raise the perceived loudness without clipping the Stereo Out channel strip audio.
1 Start playback at the beginning of the song.
2 On the Output channel strip, click the Audio FX area, and choose Recent > Compressor.
This time you will use a setting designed to emulate the soft compression of analog tape recorders.
3 In the Compressor, from the Setting menu, choose Compressor by Type > Platinum Analog Tape.
NOTE ▶
If you’ve adjusted the volume of the song using the Volume slider that appears in the control bar or the Volume fader on the Master channel strip in the Mixer, make sure you Option-click it now to return it to 0 dB.
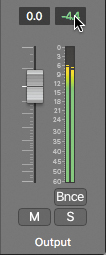
The Output channel strip is clipping, as indicated by the red peak level display. In the Compressor window, the gain reduction shows a few decibels of gain reduction, but the Auto Gain parameter applies enough make-up gain to make the mix clip.
4 In the Compressor, click the Auto Gain Off button.
The peak level display continues to display the most recent maximum peak value. You need to reset it to determine if the new compressor setting still clips the mix.
5 On the Output channel strip, click the peak level display to reset it. The mix is no longer clipping.
You will now insert a limiter after the Compressor to raise the gain without clipping the output. A limiter works similarly to a compressor, but attenuates the signal so that the output signal never exceeds a specific volume level.
6 On the Output channel strip, click below the Compressor, and choose Dynamics > Adaptive Limiter.
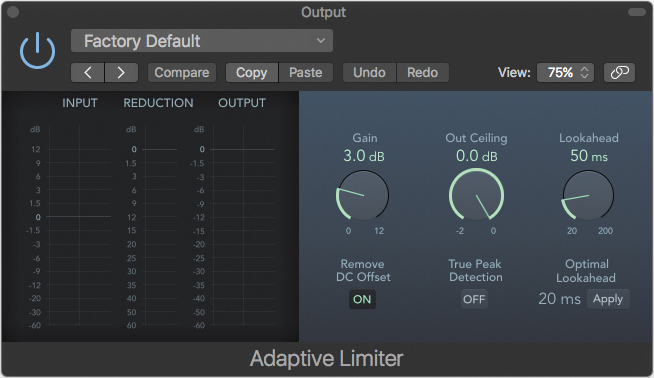
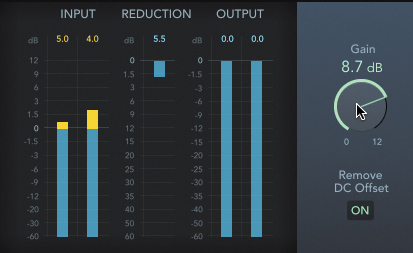
The Input meters display the signal level at the input of the plug-in; the Reduction meters display the level of gain attenuation applied by the limiter; the OUTPUT meters display the signal level at the output of the plug-in. The Out Ceiling knob is set to 0.0 dB, ensuring that the audio signal will never go over 0 dBFS on the Stereo Out channel strip.
To adjust the Adaptive Limiter, dial the Gain knob to your taste: the more gain you apply, the louder it will sound, but also the more distortion will be generated by the limiter. Deciding on the right balance between loudness and acceptable distortion can be influenced by many factors, like the music genre (jazz or pop?) or how the music will be distributed (movie theater or Internet streaming?).
7 Drag the gain up to 8.7 dB.
Keep playing the song, and make sure you don’t hear any unwanted distortion.
TIP ▶
At the top of the Input and Output meters, you can click the red orange warnings to reset them.
8 In the inspector, on the Output channel strips, click the Compressor’s and the Adaptive Limiter’s On/Off buttons to toggle them on and off. You can also drag down on the two buttons to quickly toggle both plug-ins.
The Compressor makes your mix sound more consistent. The Adaptive Limiter gives you a nice gain boost on the whole mix and ensures that no clipping occurs at the output.
You have finished your mix using effect plug-ins and adjusting the four main parameters of the instrument sounds (volume levels, pan position, frequency, and distance) to give each sound its own place in the stereo sound field.
Using a Few Tips and Tricks
As with any other art, mixing requires a combination of skill, experience, and talent. It takes practice to learn how to apply mixing techniques efficiently, and even more practice to learn to listen. Here are a few tips and tricks that will help you perfect your craft and become better at mixing your projects.
Take a Break
After you mix for a while, listening to the same song for the hundredth time, you can lose your objectivity and experience ear fatigue. Take frequent short breaks while mixing, and return to the mix with rested ears. You will be able to better judge your results.
Listen to Your Mix Outside the Studio
When you feel that your mix is pretty advanced and you are happy with the way it sounds in your studio, copy it to a portable music player and listen to it in another room or, even better, in your car while driving. You will probably hear things you didn’t notice in your studio, and miss things you could hear clearly in your studio. You can take notes and return to your studio to rework the mix. Obviously, the mix will never sound the same in the studio and in the car, but it’s the mixing engineer’s job to make sure that all the instruments can be heard in most situations.
Compare Your Mix with Commercial Mixes
Compare your mix with commercial mixes you like. Build a small library of good-sounding mixes in the same genre of music as the songs you are mixing. You can open a new Logic project, and place your mix on one track and a professional mix on another track so that you can solo and compare them.
Lesson Review
1. Identify the four main instrumental sound components you can adjust to give each instrument its place in a mix.
2. For what purpose do you use a bus send?
3. How can you make a group of tracks appear as one track in the Tracks area without changing its audio routing?
4. How can you submix a group of tracks to, for example, process the submix with audio effect plug-ins?
5. What does a compressor do?
6. What does a limiter do?
7. In the inspector, how can you choose which channel strip is displayed in the right channel strip?
8. How do you change the mono or stereo format of the input of a channel strip?
9. How can you toggle the soloed state of currently soloed tracks?
10. How can you set up Logic to use Command-Z to undo plug-in parameter changes?
Answers
1. Volume level, pan position, frequency spectrum, and distance
2. You use a bus send to route some of the signal from a channel strip to an aux channel strip, usually to be processed by plug-ins.
3. Select the tracks, choose Track > Create Track Stack, and choose Folder Stack.
4. Select the tracks, choose Track > Create Track Stack, and choose Summing Stack.
5. It attenuates the level of a signal after that signal goes over a certain threshold, giving the signal a more consistent level.
6. It works in a similar fashion to a compressor, but it makes sure that the signal is attenuated so it never goes over a specific output ceiling.
7. On the left channel strip, click any Send slot or the Output slot to display the corresponding channel strip on the right.
8. Click the Format button in the Input slot.
9. At the top of the track headers, click the Solo Kill/Recall button.
10. In a plug-in window, from the Settings pop-up menu, choose Include Plug-In Undo Steps in Project Undo History.
Keyboard Shortcuts
Tracks |
|
Command-Shift-D |
Creates a Track Stack |
Control-Option-Command-S |
Toggles all soloed tracks’ solo buttons |
S |
Solos the selected track |
Windows |
|
Command-2 |
Opens a Mixer window |
Number keys |
Recalls the corresponding screenset (on alphanumeric keypad) |
V |
Hides or shows all plug-in windows |