
Chapter 10
Keeping Things Safe: Time Machine and Security

Backing up your precious files is something that every Lion user should take seriously. After all, there are two kinds of hard drives: those that have already failed, and those that will. The point is that all hard drives eventually fail; and while technologies like solid state drives (SSD) may give us the impression that our hard drives are impervious to failure, that is not the case. Happily, Apple has developed multiple solutions to the problem of making sure that you have copies of your data in a place other than your Mac.
There are thousands of technologies and software applications available that are designed to back up your data. That said, most of these applications focus on allowing you to back up and retrieve your data in a way that does not permit you to view the contents of what it is you have chosen to back up. Furthermore, these applications do not give you the amount of control necessary to search and retrieve your files as if they were still in the exact same location that you originally saved them. For example, most backup applications do not store or remember the exact file and folder structure of your hard drive. Instead, they simply duplicate your data, and store it in the best way they know how. Fortunately there is a solution to this available to all Mac users: Time Machine.
Time Machine Overview
Time Machine separates itself from all other backup programs by offering its users a granular backup application with unparalleled flexibility for both backing up and retrieving data. Time Machine works on the premise that people can best remember where a file is when they are able to go back to the exact same place that they first witnessed or stored that file. Time Machine allows you to literally search through your periodic backups in the exact same manner that you would look for a file on your hard drive in normal use cases.
As a consequence, Time Machine can dramatically reduce the amount of time it takes to search and retrieve files that you need to restore. It also offers a very flexible range of ways to store your data. In the upcoming sections, we’ll take a closer look at how to use Time Machine, so that you can start taking advantage of secure local and remote backups for your Mac.
NOTE: Time Machine’s performance is dependent on the medium and the type of storage used to save your data. You should make sure you have a strong and speedy wireless connection if you plan on using wireless technologies to back up your data using Time Machine. You should also be sure that you back up your data to a decently sized hard drive. The rule of thumb for choosing a hard drive is to select one that is at least quadruple the size of your computer’s hard drive. This will enable you to maintain and retrieve a long history of the files you intend to back up. Finally, be sure to store your backup media in a safe place, so that it is not readily visible to just anyone. Remember: All of your files are on this backup hard drive, so you need to be extremely vigilant when allowing access to this device.
Setting up Time Machine
Using Time Machine is quite easy, so much so that it requires no learning curve to use it proficiently. To start using this utility, follow these steps:
- Open the Preferences application for your Mac (see Figure 10–1).

Figure 10–1. The Preferences icon
- Select the Time Machine icon (see Figure 10–2).

Figure 10–2. The Time Machine icon in the Preferences menu
- You will now see a window prompting you to turn on Time Machine (see Figure 10–3). This window also allows you to select the media that you want to use for backups, as well as to specify certain folders and files that you do not want included in your backups.

Figure 10–3. The Time Machine window prompt
- After selecting your Time Machine–compatible device of choice (see Figure 10–4), all you need to do is make sure that your backup device is connected to your Mac thereafter, so that your future backups can take place.

Figure 10–4. Time Machine’s backup selection dialog
Believe it or not, that’s all there is to it. Apple wanted to make it easy for even the most novice Mac users to back up their files remotely (or locally), without sacrificing performance or usability.
Using Time Machine
Time Machine will recognize compatible media, such as USB hard drives, external SATA, and FireWire hard drive enclosures. It will also recognize Mac-compatible network attached storage (NAS) devices without requiring that you do anything at all. Simply plug in a blank or newly formatted hard drive, and you will be asked whether you would like to use it as a Time Machine backup disk (see Figure 10–5).

Figure 10–5. Time Machine’s backup media prompt
This prompt is how you tell your Mac that you wish to use a disk as a Time Machine–backup device. As noted previously, Time Machine is not limited to local media that you have to carry around with you and plug into your computer. Time Machine also works with networked media. For example, there are third-party NAS (Network Attached Storage) devices that work with Time Machine, enabling you to back up your computer to your wireless device. However, Apple has also created its own network device specifically intended for Time Machine. This device, called a Time Capsule, takes very little time to set up, and you can have it backing up your wireless network in mere minutes.
Using Time Capsule for Network Storage
Time Capsule devices come with hard drives built into them, so you do not have to put any effort into looking for the right type of or size of hard drive. At the time of writing, these devices come in 2 TB and 3 TB sizes, which is more than enough to keep several months of files in your backup archive. Your Mac will automatically detect your Time Capsule and ask you if you would like to use it as a backup device immediately after you give it power and attach it to your Mac via Wi-Fi. Simply say Yes to initiate this process. If for some reason you are not automatically prompted, you can use the Set Up Time Capsule option located in Time Machine’s Preferences window to initiate this process (see Figure 10–6).


Figure 10–6. Time Capsule’s Set Up Time Capsule button
After clicking the Set Up Time Capsule button, you simply select the desired Time Capsule device and proceed to back up your data.
NOTE: Your first backup will take a very, very long time over wireless, so be patient. Successive backups will only take minutes or even seconds to complete.
Retrieving Data
Retrieving data with Time Machine is dead simple. For example, suppose you need to retrieve a file you have lost or one that has been corrupted. Simply follow these steps to do so:
- Select the Time Machine icon from your Mac’s main menu and choose the Enter Time Machine option (see Figure 10–7).

Figure 10–7. The Enter Time Machine menu option
- After choosing the Enter Time Machine menu option, you will be presented with a window that looks identical to the Finder window you use in your day-to-day computing (see Figure 10–8).

Figure 10–8. Browsing with the Time Machine utility
- From here, simply select the time and date you wish to go back to by using the date slider located on the right side of the window (see Figure 10–9).
- Next, drill down to or search for (yes, search also works here) the file you wish to retrieve, and then restore it with a simple right-click.

- After you restore the file, you’re done. Time Machine then moves out of the way, so you can continue working. Note that this is exactly how Apple intends for this technology to work.
Time Machine should be used as your first line of backup because it provides you with an easy and fool-proof way to back up your files without being an IT expert.
NOTE: Be sure to lock your Time Machine preferences after you configure the utility, and then select the checkbox that allows you to access Time Machine from your Mac’s main menu (see Figure 10–10).
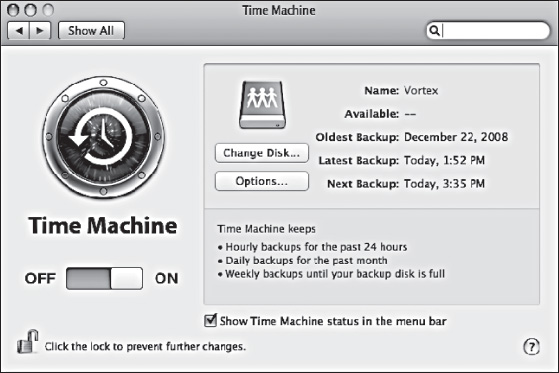
Figure 10–10. The Time Lock and Status bar options
Time Machine is a breeze to use and even the most non-savvy computer user can leverage this utility to its full potential. That said, there are a couple of alternatives to this software that I would also recommend: Super Flexible Backup and Carbon Copy Cloner. Both of these utilities are intended to give you an instant data recovery solution that does not require file restoration to get you up and running again. We’ll review both of these backup options later in this chapter. First, however, let’s look at another useful feature in Apple’s Lion OS: Versions.
Versions
Time Machine is a great way to keep multiple versions of a single file (or group of files); however, it is not the only way to achieve file redundancy. Lion also ships with Versions, a feature that allows you to control the snapshots taken of a single file from within certain applications. This feature helps you eliminate two known issues users commonly have with Time Machine.
First, it eliminates the need to use alternative storage as a means of keeping multiple backups of your files. Time Machine requires a hard drive other than the drive that Lion is installed on to do this. This means you must acquire some extra hardware and spend a bit more money in the process.
This extra hardware requirement is also the principle cause of the second problem the Versions feature eliminates: connectivity. To use Time Machine, you must be within a certain proximity to your backup source. This severely limits mobility for those who are on the go, but still require access to previous versions of their files.
Versions eliminates this restriction by giving you immediate control of the snapshots taken for file backup. Versions is always aware of the changes you’ve made to a document, and it allows you to create a copy of the document at hand with your new changes intact. Versions also keeps up with you by taking automatic snapshots when you open, save, lock, rename, or duplicate a file. Thus, this feature provides a very good safety net for anyone who wants to go back in time to retrieve the version of a file from ten minutes ago. (Note that Time Machine backs up your files at hourly intervals, so restoring a file to its state ten minutes ago probably wouldn’t be possible with that app.)
Using Versions is relatively easy because it is built into some of the more recent native Lion applications, such as iWork. Another plus: You can use Versions without buying any extra hardware. While Versions is not featured in every Lion application or in most third-party applications, it is integrated into enough native Lion applications to make it a very useful tool for backing up your information. Let’s take a closer look at how this feature works.
Using Versions
Using Versions is rather simple. To access Versions, simply open an application that supports it, such as Pages from the iWork suite, and then navigate to the very top of the document screen after you have saved the file at least once. Figure 10–11 shows four different options enabled by the Versions feature: Lock, Duplicate, Revert to Last Saved Version, and Browse All Versions...

Figure 10–11. Accessing Versions from the menu bar
Versions can also be accessed from the Mac’s main File menu, as shown in Figure 10–12.

Figure 10–12. Accessing Versions from your Mac’s File menu
Locking a Document
Locking a document prevents you or anyone else from making any changes to it. This is useful if you want to make a master template document that is used as a source for feeding other documents you make. You might also use this feature to ensure that a perfectly made document stays that way! For example, you might want to use this feature on a resume you have created, guaranteeing that no accidental changes can be introduced into the document before you send it off to a potential employer.
Duplicating a Document
The Duplicate function creates an exact copy of the current document. It allows you to do so without having to revert to a former version of the file in the Finder or without having to use the contextual menu to create another saved file (albeit one with a different name). Duplicating a document is the equivalent of taking a snapshot of the file. Doing so puts a working copy of the file on your hard disk for later retrieval, should you need it. Using the Duplicate option gives you the choice of creating a new duplicate or reverting to a previously created duplicate (see Figure 10–13).

Figure 10–13. Versions’ duplication options
For example, the Duplicate and Revert option allows to you to go back to a previous duplicate copy of your file. This is actually the core function of the Versions feature. It allows you to take a snapshot or make a duplicate of a file, and then restore to that snapshot or duplicate later (should that be necessary). I recommend that you use the Duplicate feature heavily when working with important, time-sensitive documents.
Reverting to the Last Saved Version of a Document
The Revert option allows you to go back and retrieve a file that has been previously worked on (see Figure 10–14). The primary difference here is that this option reverts to the last saved version of your file, rather than the last duplicate version you made. This option retrieves the file from your local hard disk, taking it from its at-rest state. It then replaces your current working document with the last saved version of it, making that the new active document. This is a quick way to take a single step backwards and return to an earlier version of the document you are working on. You can also use this feature to retrieve older versions of the same previously saved file.

Figure 10–14. Reverting to a prior saved version of a document
Should you decide to revisit older versions of your document, you will be shown a Time Machine–like window that lets you specify specific points in time that you can return to in a given document’s history (see Figure 10–15).

Figure 10–15. Restoring an older version of a file
Using Versions can save you time and money compared to Time Machine. Although Versions uses your local hard disk, it consumes a minimal amount of space. This is a good trade off in terms of convenience compared to the more heavy-handed approach of an alternative like Time Machine. Use Versions often and you may see that you can travel back in time without a Time Machine.
Time Machine and Versions are both useful native features provided by Apple in Lion; however, you also have a number of third-party options you can turn to if the native applications included with Lion don’t meet all your needs.
Backup Alternatives
If you’re considering backup alternatives to Time Machine and Versions, I recommend that you take a long look at Super Flexible Backup. In my opinion, this is the most effective and secure piece of backup software that exists today. (Later in this chapter, we’ll also cover Carbon Copy Cloner, which is another suitable choice for backing up the files on your hard drive.)
Super Flexible Backup
Super Flexible Backup has so many options that writing about them all would require a book longer than this one! For all its features, Super Flexible Backup is easy and intuitive enough for novices to use—yet powerful enough for IT professionals to consider.
When you first launch Super Flexible Backup, the app presents you with a wizard-type interface. If you prefer, you can click the Switch to Advanced Mode link in the upper-right corner of this initial screen to see the program’s more advanced options (see Figure 10–16).

Figure 10–16. Super Flexible Backup’s wizard
Once you select an option, the appropriate wizard will walk you through the process of completing the selected task. Like Time Machine, Super Flexible Backup can perform both standard and encrypted backups. And like Carbon Copy Cloner (which we’ll discuss next), Super Flexible Backup can perform drive image-based backups, as well. In short, Super Flexible Backup is a single easy-to-use application that duplicates the features of both Time Machine and Carbon Copy Cloner. Super Flexible Backup can also handle multiple tasks at once, and it offers you a clean view of exactly what is taking place right now in your backup, as well as a view of what has already taken place (see Figure 10–17).

Figure 10–17. Super Flexible Backup’s processing view
Super Flexible Backup can run in the background or the foreground; it can also be set in motion and left alone once you have programmed it to do what you want it to. There is no backup software quite like it, and I highly recommend it to Lion users looking for a simple, all-in-one solution that completely backs up all their files over both local and remote media, but without compromising performance or security. You can find Super Flexible Backup at www.superflexible.com/.
Carbon Copy Cleaner
Carbon Copy Cleaner literally allows you to swap drives (if necessary) and/or to boot from another drive without making any other changes. In the next couple sections, we’ll delve into why this is a fantastic piece of software for backing up files. We’ll also cover how it complements the features of Time Machine quite well.

This chapter’s earlier discussion on Time Machine noted that that program lets you back up your files by putting duplicate copies of them onto another media device for later retrieval; however, this is not the same thing as replicating your Lion hard drive. Time Machine does not keep an exact replica of every file on your hard drive. Rather, it keeps the files needed to restore your system completely by copying the files to a designated location after the system has been repaired, or by restoring individual files to a specified location should they be lost or corrupted. Carbon Copy Cloner takes this idea one step further.
Carbon Copy Cloner literally makes a mirror image of your hard drive, not just duplicates of your files. Every byte is duplicated, so that you essentially have two working hard drives at the same time.
Carbon Copy Cloner is an excellent utility for disaster recovery because it allows you to simply swap out one hard drive for another or even to boot from either hard drive should the need arise. There is no need to perform a restoration (although this is fully supported). You also don’t need to worry about missing files because the backup does a one-to-one backup of every single byte on your primary hard drive.
Using Carbon Copy Cloner
You have heard me say this time and time again; however, it is relevant each time I say it: like most Mac applications, Carbon Copy Cloner is extremely easy to use. To use this app, simply download it from www.bombich.com/ and install it. When you first launch it, you will be prompted to select the backup source and the target for your backup process (see Figure 10–18).

Figure 10–18. Carbon Copy Cloner’s Source Disk and Target Disk selectors
Be sure to choose the option to copy everything from the source to the target. Also be sure to select the Erase the target volume option if this is your first backup (see Figure 10–19).

Figure 10–19. Carbon Copy Cloner’s copy options
Once you have selected the appropriate hard drives for the source and target devices, simply click the Clone button. You will then see your files being copied between the two drives (see Figure 10–20).

Figure 10–20. Copying files with Carbon Copy Cloner
Like any good backup utility, Carbon Copy Cloner also allows you to copy your files on a schedule. To enable this feature, simply follow the aforementioned steps, choose your source and target hard drives, and then click the Save Task button to fire up the app’s scheduler (see Figure 10–21). There is one catch to using the scheduler. Carbon Copy Cloner backs up to hard drives, so it will only work when the two hard drives are connected physically to the same Mac.
External USB drives work great with Carbon Copy Cloner, and I recommend you use them as your primary media type when backing up your hard drive with this application. USB hard drives are easy to connect and remove; they are also light enough to be carried around with a MacBook, if need be.

Figure 10–21. Carbon Copy Cloner’s Scheduler
In any case, Carbon Copy Cloner is an extremely powerful backup utility, and it offers Lion users an easy way to make disaster recovery a one-step process. It does not get much easier than that.
Securing Your Lion
We have discussed security in many of this book’s chapters, emphasizing the need to make protecting your computer’s security an essential part of your computing habits. In the remainder of this chapter, we will look at a few things you can do to make backing up your Mac a secure process, making it even tougher for would-be cyber criminals to acquire your all-important data. Specifically, we’ll take a brief look at a few applications and practices that can help you maintain copies of your data, but do so in a safe and secure manner.
Cloud Storage and Physical Security
There is no better defense against theft than knowing where your information is physically being stored; of course, that also includes knowing where your Mac is at all times. Following these principles is your first line of defense in protecting your Mac, whether you are performing backups or just trying to keep your private information private.
You may have heard about a buzz word in IT called cloud storage. This is a great technology that allows you to offload the storage responsibility of your hard drives to service providers who store your information online (i.e., in the cloud) as a premium service. The rule of thumb here is to use common sense. You should only use vendors that have a proven track record for security, vendors that are well-known and respected throughout the computing community.
If you decide to use remote storage for backup or file storage, be sure that you encrypt your data. Service providers that do not encrypt your data cannot guarantee that others who have privilege rights to their storage facility will not look at your data. Nor can they offer you any security in the event that they are compromised and your data is stolen.
Again, just use common sense. This means you need to read up on any storage provider you’re considering subscribing to. The goal when looking up a vendor is to see whether you can uncover any holes in the legitimacy of their claims; that is, you want to make sure that they aren’t doing anything that might compromise the safety of your data. Cloud storage is a great technology, and I encourage its use wholeheartedly. That said, it’s also critical that you know the who, what, and how related to any vendor you might select.
Summary
In this chapter, we explored some of the ways you can keep your data copied and safe. We also took a deep look at some of the applications and practices that best serve the security-aware user, and then looked at how to best implement strategies that can keep your computer information safe, but without that safety being a burdensome task. Your Lion is a caged beast, with the potential to let you create anything you can think of. Like any beast, however, it needs to be watched. Computing with common sense requires heeding the lessons that have been hard-learned by other computer users. Specifically, you must take steps to embrace beneficial technologies, but take equally strong measure to avoid what is harmful. Neglecting backup and security when you use a computer is like putting your Lion on a leash and expecting others not to notice. Be aware that others are aware of you. Compute responsibly and enjoy your Mac.