
So far, we have achieved what we set out to do, that is, inferring what the user is trying to draw and providing them with suggestions that they can swap their sketch with. But our solution currently falls short of understanding the user. Sure, it may predict correctly and provide the correct category of what the user is drawing, but it dismisses any style or details of the user's drawing. For example, if the user is drawing, and only wanting, a cats head, our model may predict correctly that the user is drawing a cat but ignore the fact that their drawing lacks a body. It is likely to suggest images of full-bodied cats.
In this section, we will look at a technique to be more sensitive with respect to the user's input, and provide a very rudimentary solution but one that can be built upon. This approach will attempt to sort images by how similar they are with the user's sketch. Before jumping into the code, let's take a quick detour to discuss similarity metrics, by looking at how we can measure the similarity between something in a different domain, such as sentences. The following are three sentences we will base our discussion on:
- "the quick brown fox jumped over the lazy dog"
- "the quick brown fox runs around the lazy farm dog"
- "machine learning creates new opportunities for interacting with computers"
This exercise will be familiar to those withttps://packt-type-cloud.s3.amazonaws.com/uploads/sites/1956/2018/06/B09544_08_14.pngal representation. Here, we will create a vocabulary with all words that exist in our corpus (the three sentences, in this instance) and then create vectors for each sentence by incrementing the sentences words with their corresponding index in the vocabulary, as shown in the following screenshot:

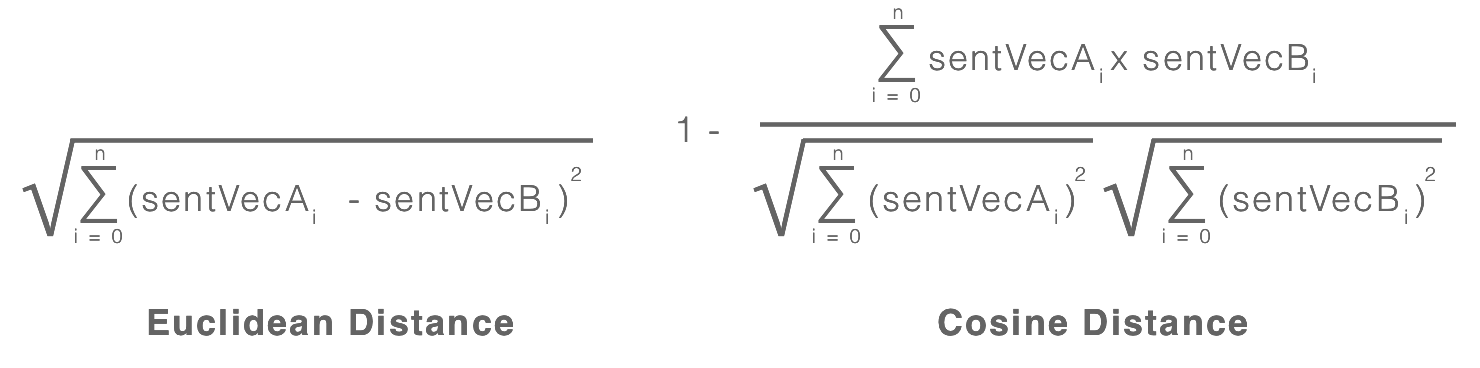
With our sentences now encoded as vectors, we can measure the similarity between each sentence by performing distance operations such as Euclidean Distance and Cosine Distance. The equations for each of these are as follows:
Let's now calculate the distances between each of the sentences and compare the results. See the following screenshot for the results:

As you would expect, the sentences "the quick brown fox jumped over the lazy dog" and "the quick brown fox ran around the lazy farm dog" have a smaller distance between them compared to that for the sentence "machine learning creates new opportunities for interacting with computers". If you were to build a recommendation engine, albeit a naive one, you would likely rank the sentences with more words in common higher than the ones with less words in common. The same is true for images, but unlike sentences, where we are using words as features, we use the features derived from layers of the network.
Recall that our network for classifying sketches consists of a stack of convolution layers, with each layer building higher level patterns based on the patterns from the layers below it. Intuitively, we can think of these higher level patterns as our words (features) and the fully connected network as the sentences representing what words are present for a given image. To make this clearer, a simple illustration is shown here:

Examining the figure, we can see the set of feature maps on the left, which can be thought of as convolutional kernels used to extract horizontal, vertical, left, and right diagonal edges from the images.
In the middle are the samples from which we will be extracting these features. Finally, on the far right, we have the extracted features (histogram) of each of the samples. We use these extracted features as our feature vectors and can use them to calculate the distance between them, as we saw in the previous figure.
So, if we are able to extract this type of feature vector from an image, then we will also be able to sort them relative to the user's sketch (using its extracted feature vectors). But how do we get this feature vector? Recall that we already have a network that has learned high-level feature maps. If we are able to obtain a vector indicating which of these features are most active for a given image, then we can use this vector as our feature vector and use it to calculate the distance between other images, such as the user's sketch and downloaded images. This is exactly what we will do; instead of feeding the network through a softmax activation layer (to perform prediction on the classes), we will remove this layer from our network, leaving the last fully connected layer as the new output layer. This essentially provides us with a feature vector that we can then use to compare with other images. The following figure shows how the updated network looks diagrammatically:

If you compare this with the network presented in the previous section, you will notice that the only change is the absence of the fully connected layer. The output of this network is now a feature vector of size 512. Let's make this concept more concrete by playing with it.
I assume you have already pulled down the accompanying code from the repository https://github.com/packtpublishing/machine-learning-with-core-ml. Navigate to the Chapter7/Start/QuickDraw/ directory and open the playground FeatureExtraction.playground. This playground includes the generated code and compiled model described earlier, along with some views and helper methods that we will make use of; all should be fairly self-explanatory. Let's begin by importing some dependencies and declaring some variables by adding the following code to the top of the playground:
import Accelerate
import CoreML

let histogramViewFrame = CGRect(
    x: 0, y: 0,
    width: 600, height: 300)

let heatmapViewFrame = CGRect(
    x: 0, y: 0,
    width: 600, height: 600)

let sketchFeatureExtractor = cnnsketchfeatureextractor()
let targetSize = CGSize(width: 256, height: 256)
let context = CIContext()
Here, we declare two rectangles; they will determine the frame of the views we will create later and, most importantly, instantiate our model, which we will use to extract features from each image. Talking about this, if you expand the Resources folder on the left-hand panel, then again in the Images folder, you'll see the images we will be using, as shown here:

As we discussed, we want to be able to sort the images so that the suggested images closely match what the user is drawing. Continuing on from our example from the user drawing just a cat's head, we want a way to sort out the images so that those with just a cat's head show up before those with a cat and its body. Let's continue on with our experiment; add the following methods, which we will use to extract the features from a given image:
func extractFeaturesFromImage(image:UIImage) -> MLMultiArray?{
    guard let image = CIImage(
        image: image) else{
        return nil
    }
    return extractFeaturesFromImage(image: image)
}

func extractFeaturesFromImage(image:CIImage) -> MLMultiArray?{
    guard let imagePixelBuffer = image.resize(
        size: targetSize)
        .rescalePixels()?
        .toPixelBuffer(context: context,
                       gray: true) else {
        return nil
    }

    guard let features = try? sketchFeatureExtractor.prediction(
        image: imagePixelBuffer) else{
        return nil
    }

    return features.classActivations
}
Most of the code should look familiar to you; we have an overloaded method for handling UIImage, which simply creates a CIImage instance of it before passing it to the other method. This will handle preparing the image and finally feed it into the model. Once inference has been performed, we return the model's property classActiviations as discussed previously. This is the output from the last fully connected layer, which we'll use as our feature vector for comparison.
Next, we will load all of our images and extract the features from each of them. Add the following code to your playground:
var images = [UIImage]()
var imageFeatures = [MLMultiArray]()
for i in 1...6{
    guard let image = UIImage(named:"images/cat_(i).png"),
        let features = extractFeaturesFromImage(image:image) else{
            fatalError("Failed to extract features")
    }

    images.append(image)
    imageFeatures.append(features)
}
With our images and features now available, let's inspect a few of the images and their feature maps. We can do this by creating an instance of HistogramView and passing in the features. Here is the code to do just that:
let img1 = images[0]
let hist1 = HistogramView(frame:histogramViewFrame, data:imageFeatures[0])

let img2 = images[1]
let hist2 = HistogramView(frame:histogramViewFrame, data:imageFeatures[1])

// cat front view
let img3 = images[2]
let hist3 = HistogramView(frame:histogramViewFrame, data:imageFeatures[2])

let img4 = images[3]
let hist4 = HistogramView(frame:histogramViewFrame, data:imageFeatures[3])

// cats head
let img5 = images[4]
let hist5 = HistogramView(frame:histogramViewFrame, data:imageFeatures[4])

let img6 = images[5]
let hist6 = HistogramView(frame:histogramViewFrame, data:imageFeatures[5])
You can manually inspect each of them by clicking on the eye icon within the preview view associated with the state, as shown in the following screenshot:

Inspecting each of them individually doesn't provide much insight. So in this figure, I have presented three images that we can inspect:

Without too much focus, you get a sense that the cat heads' feature vectors are more closely aligned than the feature vector of the side on view of the cat, especially on the right-hand of the plot.
Let's further explore this by calculating the cosine distance between each of the images and plotting them on a heat map. Start by adding the following code; it will be used to calculate the cosine distance:
func dot(vecA: MLMultiArray, vecB: MLMultiArray) -> Double {
    guard vecA.shape.count == 1 && vecB.shape.count == 1 else{
        fatalError("Expecting vectors (tensor with 1 rank)")
    }

    guard vecA.count == vecB.count else {
        fatalError("Excepting count of both vectors to be equal")
    }

    let count = vecA.count
    let vecAPtr = UnsafeMutablePointer<Double>(OpaquePointer(vecA.dataPointer))
    let vecBPptr = UnsafeMutablePointer<Double>(OpaquePointer(vecB.dataPointer))
    var output: Double = 0.0

    vDSP_dotprD(vecAPtr, 1, vecBPptr, 1, &output, vDSP_Length(count))

    var x: Double = 0

    for i in 0..<vecA.count{
        x += vecA[i].doubleValue * vecB[i].doubleValue
    }

    return x
}

func magnitude(vec: MLMultiArray) -> Double {
    guard vec.shape.count == 1 else{
        fatalError("Expecting a vector (tensor with 1 rank)")
    }

    let count = vec.count
    let vecPtr = UnsafeMutablePointer<Double>(OpaquePointer(vec.dataPointer))
    var output: Double = 0.0
    vDSP_svsD(vecPtr, 1, &output, vDSP_Length(count))

    return sqrt(output)
}
The details of the equation were presented before and this is just a translation of these into Swift; what is important is the use of the vector Digital Signal Processing (vDSP ) functions available within iOS's Accelerate framework. As described in the documentation, the vDSP API provides mathematical functions for applications such as speech, sound, audio, video processing, diagnostic medical imaging, radar signal processing, seismic analysis, and scientific data processing. Because it's built on top of Accelerate, it inherits the performance gains achieved through single instruction, multiple data (SIMD) running the same instruction concurrently across a vector of data—something very important when dealing with large vectors such as those from neural networks. Admittedly, at first it seems unintuitive, but the documentation provides most of what you'll need to make good use of it; let's inspect the magnitude method to get a feel for it.
We use the vDSP_svsD function to calculate the magnitude of our feature vectors; the function is expecting these arguments (in order): a pointer to the data (UnsafePointer<Double>), strides (vDSP_Stride), a pointer to the output variable (UnsafeMutablePointer<Double>), and finally the length (vDSP_Length). Most of the work is in preparing these arguments, as shown in this code snippet:
let vecPtr = UnsafeMutablePointer<Double>(OpaquePointer(vec.dataPointer))
var output: Double = 0.0
vDSP_svsD(vecPtr, 1, &output, vDSP_Length(vec.count))
After this function returns, we will have the calculated the magnitude of a given vector stored in the output variable. Let's now make use of this and calculate the distance between each of the images. Add the following code to your playground:
var similarities = Array(repeating: Array(repeating: 0.0, count: images.count), count: images.count)

for i in 0..<imageFeatures.count{
    for j in 0..<imageFeatures.count{
        let sim = cosineSimilarity(
            vecA: imageFeatures[i],
            vecB: imageFeatures[j])
        similarities[i][j] = sim
    }
}
Here, we are iterating through each of the images twice to create a matrix (multi-dimensional array, in this case) to store the distances (similarities) between each of the images. We will now feed this, along with the associated images, to an instance of HeatmapView, which will visualize the distances between each of the images. Add the following code and then expand the view by clicking on the eye icon within the results panel to see the result:
let heatmap = HeatmapView(
    frame:heatmapViewFrame,
    images:images,
    data:similarities)
As mentioned previously, by previewing the view, you should see something similar to the following figure:

This visualization shows the distance between each of the images; the darker the cell, the closer they are. For example, if you look at cell 1 x 1, cell 2 x 2, and so on, you will see that each of these cells are darker (a distance of 0 because they are the same image). You'll also notice another pattern form: clusters of four cells diagonally down the plot. This, consequently, was our goal—to see whether we could sort sketches by their similarities, such as cats drawn front on, cat heads, and cats drawn side on.
Armed with our new knowledge, let's return to the iPhone project QuickDraw.xcodeproj, where we will copy this code across and implement sorting.
With the QuickDraw project now open, locate the feature extractor model from the project repositories folder /CoreMLModels/Chapter7/cnnsketchfeatureextractor.mlmodel. With the model selected, drag it onto your Xcode project, leaving the defaults for the import options.
With the model now imported, select the file QueryFacade.swift from the left-hand panel (within Xcode) to bring it up in the editor area. With the class open, add an instance variable to the top of the QueryFacade class, as shown here:
let sketchFeatureExtractor = cnnsketchfeatureextractor()
Next, copy across the methods extractFeaturesFromImage, cosineSimilarity, dot, and magnitude from your playground to the QueryFacade class, as shown here:
func extractFeaturesFromImage(image:CIImage) -> MLMultiArray?{
    // obtain the CVPixelBuffer from the image
    guard let imagePixelBuffer = image
        .resize(size: self.targetSize)
        .rescalePixels()?
        .toPixelBuffer(context: self.context, gray: true) else {
        return nil
    }

    guard let features = try? self.sketchFeatureExtractor
        .prediction(image: imagePixelBuffer) else{
        return nil
    }

    return features.classActivations
}

func cosineSimilarity(vecA: MLMultiArray,
                                  vecB: MLMultiArray) -> Double {
    return 1.0 - self.dot(vecA:vecA, vecB:vecB) /
        (self.magnitude(vec: vecA) * self.magnitude(vec: vecB))
}

func dot(vecA: MLMultiArray, vecB: MLMultiArray) -> Double {
    guard vecA.shape.count == 1 && vecB.shape.count == 1 else{
        fatalError("Expecting vectors (tensor with 1 rank)")
    }

    guard vecA.count == vecB.count else {
        fatalError("Excepting count of both vectors to be equal")
    }

    let count = vecA.count
    let vecAPtr = UnsafeMutablePointer<Double>(
        OpaquePointer(vecA.dataPointer)
    )
    let vecBPptr = UnsafeMutablePointer<Double>(
        OpaquePointer(vecB.dataPointer)
    )
    var output: Double = 0.0

    vDSP_dotprD(vecAPtr, 1,
                vecBPptr, 1,
                &output,
                vDSP_Length(count))

    var x: Double = 0

    for i in 0..<vecA.count{
        x += vecA[i].doubleValue * vecB[i].doubleValue
    }

    return x
}

func magnitude(vec: MLMultiArray) -> Double {
    guard vec.shape.count == 1 else{
        fatalError("Expecting a vector (tensor with 1 rank)")
    }

    let count = vec.count
    let vecPtr = UnsafeMutablePointer<Double>(
        OpaquePointer(vec.dataPointer)
    )
    var output: Double = 0.0
    vDSP_svsD(vecPtr, 1, &output, vDSP_Length(count))

    return sqrt(output)
}
With our methods now it place, it's time to make use of them. Locate the method sortByVisualSimilarity(images:[CIImage], sketchImage:CIImage); this method is already called within the queryCurrentSketch method, but currently it just returns the list that was passed in. It's within this method that we want to add some order by sorting the list so that the images most similar to the user's sketch are first. Let's build this up in chunks, starting with extracting the image features of the user's sketch. Add the following code to the body of the sortByVisualSimilarity method, replacing its current contents:
guard let sketchFeatures = self.extractFeaturesFromImage(
    image: sketchImage) else{
    return nil
}
Next, we want the features of all the other images, which we do simply by iterating over the list and storing them in an array. Add the following code to do just that:
var similatiryScores = Array<Double>(
    repeating:1.0,
    count:images.count)

for i in 0..<images.count{
    var similarityScore : Double = 1.0

    if let imageFeatures = self.extractFeaturesFromImage(
        image: images[i]){
        similarityScore = self.cosineSimilarity(
            vecA: sketchFeatures,
            vecB: imageFeatures)
    }

    similatiryScores[i] = similarityScore

    if self.isInterrupted{
        return nil
    }
}
As we did previously, after each image, we check whether the process has been interrupted by checking the property isInterrupted, before moving on to the next image. Our final task is to sort and return this images; add the following code to the body of the method sortByVisualSimilarity:
return images.enumerated().sorted { (elemA, elemB) -> Bool in
    return similatiryScores[elemA.offset] < similatiryScores[elemB.offset]
    }.map { (item) -> CIImage in
        return item.element
}
With that implemented, now is a good time to build and run your project to see that is everything is working, and compare the results with the previous build.
And this concludes the chapter; we will briefly wrap up in the summary before moving on to the next chapter.