
The book was written by Viktor Khliupko1 in a collaboration with the Firebear team. Andrii Pechatkin, Demyd Maiornykov, Rita Aloshkina, Konstantin Sokolov, Oleg Pomjanski, and Andrey Nikolaev contributed much to make this happen. They shared their ideas and edited my thoughts. The following are the members of our team:
Andrii Pechatkin2 - lead editor, co-author
Rita Aloshkina3 - editor
Demyd Maiornykov4 - editor
Oleg Pomjanski5 - art direction, design
Konstantin Sokolov6 - consulting, editor
Andrey Nikolaev7 - Magento consulting
Jewgeni Faktorov8 - business support
Ewgenij Sokolov - legal advisor
The Magento platform is constantly changing, so it is impossible to create a book that will cover all of its aspects. Therefore, go to the Firebear blog9 and sign up for updates. All the latest news, reviews, and advice on Magento 1 and Magento 2 are available there.
The next thing I’d like to mention is the release of Magento 2. Although the new version of the ecommerce platform offers a plethora of improvements, it won’t outperform 1.x within the next few years. This time is required for the creation of an ecosystem with all the necessary extensions, themes, third-party software solutions, and developers. Thus, I recommend that you start your ecommerce business with the latest available version of Magento 1.x, as it is the most robust tool for online retail. When Magento 2 is mature, you will be able to migrate from your current version without any headaches.
As for Magento setup, it is a very complex procedure that starts with downloading and installation. Then you should set up the server and hosting. The next two big stages are related to the proper use of templates and extensions. Once you have completed these steps, you can start importing product and other data into your new website.
At this point, you have a complete ecommerce store, but it is still far from launch. The next essential stages include performance improvements, security implementation, and SEO optimization. If you think that it is the end of the setup procedure, however, you are mistaken. The last important step is a pre-launch.
In this chapter, I show you how to pass all the aforementioned stages with maximum efficiency, and at the same time, with minimal headaches. Let’s start with downloading and installation.
Downloading and Installation
When it comes to the Magento download, you should first check the official source at https://goo.gl/IdSktD .
On this page, you will find the latest version of Magento Community Edition, the open source ecommerce platform. It also has the latest patches, which you should download and install separately. That’s why I also recommend checking FireGento’s GitHub mirrors with the latest patched version of the platform at https://goo.gl/fssCe6 . It already includes all the patches and improvements. The benefit is obvious: you have a single installation and download procedure combined instead of two separate processes.
When you know where Magento Community Edition is situated, I can tell you a few useful things about the installation. You can utilize local hosting during development (it is described next). It helps you to reduce costs and get the necessary experience. According to the official guide (you can find it here: http://goo.gl/wwVZZm ), you need to create the prerequisites found here: http://goo.gl/4bls9m .
You should also set up your server. I appeal to the official guide once more: http://goo.gl/EJvYwA .
Now you can run the installation procedure; see http://goo.gl/Pp0Zzq .
Be proud of yourself. You’ve just installed Magento! Your ecommerce website is still far from being finished, but one of the most responsible and complicated stages is already behind you. If you have any questions, I recommend checking the following resources:
Official wiki ( http://goo.gl/PSveyi )
Official forums ( http://goo.gl/jn27KR )
Magento Stack Exchange ( http://goo.gl/u87Uer )
The official resource list ( http://goo.gl/A5KL1Y )
You can also read more about the Magento community on Firebear Studio10, “The power of Real Magento Community,” at http://goo.gl/sznMw1 .
And of course, I’d like to mention the official Magento user guide. The Magento Community Edition User Guide should be your number-one handbook. You can find information on it at http://goo.gl/VpV5dm .
Server/Hosting
In this part of the chapter, I tell you about the crucial aspects of the Magento setup, such as the server and hosting. Here, you will find the best solutions optimized for Magento.
Good Magento optimized hosting guarantees a fast and stable store. In the article at http://goo.gl/hNXFnO you can find the best 16 solutions optimized for Magento, but I recommend that you pay attention to Nexcess.
Nexcess ( https://goo.gl/8NeYTe ) offers secure, stable, and scalable built-in hosting solutions for Magento. The company provides several solutions called the Secure Isolated Platform (SIP). Each SIP is a fine-tuned, self-contained ecommerce hosting environment. Each platform includes a ready-to-launch optimized Magento website. Nexcess provides complete Magento hosting options only in the United States, the United Kingdom, and Australia. But it is still a reliable solution for other regions.
The cheapest solution is SIP 100. Its price starts at $19.95 per month if you pay for the whole year, but if you pay monthly, an additional $5 per month are charged. SIP 100 offers 2x Quad Core E5620, 7.5GB of free space, 16GB RAM, 75GB of data per month, one IP, nine additional stores, and 30 accounts per server.
I recommend that you not waste time and use SIP 200 instead, as it is the most powerful and reliable Magento-optimized server solution, at $75 per month. It provides enough resources for running a robust mid-sized ecommerce store. You can launch demos of all the proposed platforms to compare with other Nexcess solutions, but SIP 200 is the optimum solution .
CloudWays11 offers reliable cloud hosting that is optimized for Magento. Being both fast and secure, it offers the following features:
Installation focused on performance
The ability to install unlimited number of websites
Daily managed backups
Dedicated servers
Firewall
Reliable support and monitoring 24/7
Git and SSL
The cheapest plan starts at $5 per month.
EboundHost12 offers managed Magento-dedicated servers. The cheapest CE server costs $99 per month and offers Intel Xeon E5-2630; 50GB SSD (RAID) 4 CPU Cores, 4GB of RAM, and JetRails™ Lite. EboundHost provides 24/7 support, lightning-fast SSD storage, and various optimizations specific to Magento.
Local Hosting
Local Magento web development is another important step in your ecommerce setup. With local hosting, you can install Apache, PHP, MySQL, and other useful tools right on your computer and use it like a web server. Thus, you will be able to install a Magento store right on your PC. You just need one of the following tools.
These are the benefits of local hosting:
First, you can get enough practical skills before releasing your store on hosting.
Second, an essential aspect is the ability to reduce costs required during development, as you don’t need hosting during this stage.
MAMP ( https://goo.gl/k5HAxM ) provides a bunch of technologies composed of free, open source, and proprietary commercial solutions. MAMP is the acronym for Mac OS X (but it also works on Windows), Apache, MySQL, and PHP, Python, and Perl. The solution is based on a similar software set for Linux, called LAMP. There are also various AMP packages for different operating systems. MAMP is designed for all CMS platforms, so you can set up a local development environment with ease. You can get MAMP for free ; the Pro version costs EUR 39.00.
XAMPP ( https://goo.gl/qRNcm3 ) is a free and open source cross-platform web server solution that consists of Apache HTTP Server, MySQL database, and scripts interpreters written in PHP and Perl. The X means cross-platform. The development tool allows programmers to test their projects on computers without any Internet access by creating a corresponding development environment. In addition, XAMPP provides support for creating databases in SQLite and MySQL. You can download XAMPP for Windows, OS X, and Linux.
Magento Templates
Magento themes and templates offer a huge boon to your online business. By installing the correct product, you will provide your customers with a rich shopping experience. Created by professional and experienced web designers and developers, Magento themes and templates can bring your online store to an absolutely new level.
A good design increases the conversion rate, turns visitors into buyers, and buyers into regular customers. That’s why it is important to understand the latest design trends: this knowledge will help you choose the right template. Note that template developers often provide support. It can be both free or paid, so you should check the information on every template.
I wouldn’t recommend that you create your own template, because it is unreasonably expensive. You can utilize the existing templates instead, since it is possible to enhance them with corporate identity features related to your business. So what are the best sources of Magento themes and templates?
There are numerous theme marketplaces all over the Internet. You can spend days searching for the right source of content. Therefore it is necessary to know the major websites with themes and templates. They are all listed next.
Marketplaces
ThemeForest is the number-one marketplace for themes and templates. It offers premium content for Magento and other platforms. You can easily build your ecommerce store after having visited this marketplace, as ThemeForest offers more than 500 different Magento templates and themes.
Magento Themes on ThemeForest
ThemeForest Themes reviewed in our Blog13
Another reliable source of Magento templates is TemplateMonster. There are dozens of different ecommerce themes and templates within this marketplace. TemplateMonster provides its customers the ability to choose between different categories. Of course, this feature is also available at ThemeForest, but TemplateMonster provides more precise search options.
Buy Magento Templates at TemplateMonster
TemplateMonster Themes reviewed in our Blog14
Magento Connect is the official Magento marketplace. In addition to Magento extensions, you can also purchase themes and templates here. To find the best free options, sort them by price from lowest to highest (Price: Lowest - Highest), or choose Free among All, Free, and Paid themes.

Figure 1-1. Magento Connect
Install Magento Themes from Magento Connect
RocketTheme offers an extensive collection of modern Magento themes. Take into account that the right one will help you engage your customers and showcase products in an attractive way. All the Magento themes available at RocketTheme were crafted with elegance and efficiency in mind. At the same time, they are powerful and easy to use. RocketTheme’s library of Magento templates is constantly growing. Currently, there is only one free solution.
Download Magento Themes from RocketTheme
Unlike previous marketplaces, Ubertheme offers a developer package, all Magento themes, for $350. As a developer, you will get one-year access to the package. Moreover, the solution includes free complimentary extensions and the unlimited domain installation. There are more than 70 themes at Ubertheme, including two free solutions.
Get Magento themes and templates at Ubertheme
EMThemes is another source of premium themes for Magento. If you are looking for free solutions, EMThemes has four absolutely free themes in its library. Moreover, the company organizes giveaways, so you have chances to get a premium template for free.
Download Magento Templates from EMThemes
You can also check the selection of the best Magento templates on the Firebear blog here: http://goo.gl/Bc5BJG .
Top eCommerce Website Design Trends
Every successful ecommerce web developer or ecommerce website designer tries to follow the top web design trends. As an ecommerce store owner, you should do this because understanding the latest innovations is also crucial for your business growth. Everyone benefits from following the new standards: developers and designers provide competitive services and produce high-quality websites; ecommerce website owners get a better understanding of how to catch new customers and make the existing audience more loyal. Next, I tell you about the top ecommerce website design trends of 2015, so get ready for a long journey into the world of innovation. After reading this part of the chapter, you will be able to select a Magento template that will become the best solution for your ecommerce needs.
New Requirements for the Responsive Design
Responsive design is among the most essential elements of web design. Thousands of different smartphones, tablets, and phablets require a unique approach to provide customers with maximum accessibility on whatever devices they use. The difference between 2015 and previous years is in the appearance of new devices and platforms. Smart watches and home appliances, smart TVs, and smart glasses make the definition of responsive design much broader than before.
Scrolling over Clicking
With the popularization of smartphones and tablets, scrolling became more popular than clicking. Compared to clicking, it is more convenient and takes less time for a page to load because you get everything within one page and don’t need to open additional elements on new pages. Thus, scrolling also provides users with the ability to get all the information they need without any unnecessary actions on additional screens and windows.
The Importance of Typography
Content was always extremely important, but every year customers, search engines, and competition provide stricter requirements and new trends. It is obvious that in 2015, typography will play a more essential role in ecommerce website design. Simplicity, bold elements, and large images are going to be among dominating design trends this year. We can even speak of responsive typography,” a new approach to typography with strong emphasis on a responsive design. Typographic flexibility and webkits are other key features of typography as an ecommerce website design trend.
Ghost Buttons
Ghost buttons have a chance to become a new favorite web element. They are nice, minimal, and useful. Ghost buttons look good and attract shopper’s attention in a subtle way. They are not really a call to action but a useful addition to every ecommerce website. You can see the example of ghost buttons in the image (Mission, Play, Touch).
Material Design by Google
Mobile commerce also has its own trends. Material design is a design direction that Google implemented. It relies on skeuomorphism and entirely flat design. Material design covers different platforms and has its influence on ecommerce website design.
Microinteractions
“Microinteractions are contained product moments that revolve around a single use case—they have one main task. Every time you change a setting, sync your devices, set an alarm, log in, or “like” something, you are engaging with a microinteraction.” They revolve around a single use case, when a customer interacts with a website. Microinteractions are incorporated in the improvement of customer engagement. During 2015, we will see more useful and sophisticated microinteractions.
Card Design
Card design is an integral part of responsive websites. The card approach to ecommerce website design provides the ability to organize and arrange things more effectively. In addition, cards allow visitors to get more information easier than any other solutions. Card design is simple, clear, and informative.
Background Images and Videos
The background is always among the most attractive parts of every website. Keep in mind that great content looks better over a stunning background image. That’s why background images and videos are always important. They have become a trend with ecommerce website design.
Hidden Menus
The popularization of mobile devices has a great influence on the design of websites. Because of small screens, smartphones require some site elements to be hidden, but a user can always reach them. That’s why global or product navigation is absent in its full size until you hit a special button. Thus, hidden menus are becoming more popular. These elements are widely used, even on relatively larger screens. Still, many people don’t understand the meaning of hamburger menu icon, so there is a possibility that ecommerce website designers will use it in a tandem with the word menu.
Large Photography
Large images always had a negative impact on the site speed, so website designers tried to avoid using them in recent years. But everything has changed with an improved responsive design. New techniques and adaptive images make it possible to serve fast-loading even with large images. Of course, better content can help ecommerce websites sell more; therefore, the community expects larger images on home and product detail pages.
Nearly Flat Design
Thanks to Google, Apple, and Microsoft flat design occupied major mobile platforms. Of course, this idea isn’t new, but it is fresh for ecommerce websites. The trend continues to expand its influence, because flat design is more pleasing to the customers and easier to understand, develop, and make it responsive. Another advantage of the flat design is the focus towards the content. The core principles of skeuomorphism make such elements as call-to-action buttons unobtrusive. The same holds for the use of shadows. With the flat design, ecommerce web developers can bring an element to the front of the screen and make it an integral part of the site. The “less is more” principle continues to enhance its influence, becoming one of the leading ecommerce website design trends.
Device Agnostic
Modern ecommerce website should be device agnostic . It’s unacceptable to design web pages for particular devices. They must function properly on all screen sizes. Today, ecommerce web developers must take into account the amount of screen resolution variations, all the possible input methods, connection speeds, and browser requirements to create a universal experience for every visitor. With device-agnostic design visitors will leave the ecommerce website wanting to return. Users will be able to navigate through the site and complete the checkout without any need to pinch the screen or aim at buttons.
Tile Navigation
Images always were more time-saving and captivating than text boxes. The “less is more” principle lies at the heart of modern navigation. Instead of the standard bar, ecommerce websites are implementing tile navigation. By using image tiles instead of lists, web designers provide users with a preview of what they’re going to see. Keep in mind that tile navigation is more user-friendly than any ordinary solution. It has a huge potential to grab the attention of visitors after the first few seconds of interaction with an ecommerce website. Tailed navigation recreates the feel of walking into a brick and mortar store, so visitors stay entertained as long as possible.
Parallax Scrolling
You have probably already seen websites with tantalizing background animation or parallax effect . It can be very impressive, but there is a problem when parallax turns into distraction. The ecommerce website loses its main goal, and instead of presenting products it demonstrates impressive design effects. Keep in mind that design should be beautiful and at the same time useful. Animations, images, and effects should support sales, not overshadow products.
The following websites provide examples of the most inspiring ecommerce web designs. They illustrate the most modern, beautiful, and practical solutions.
Webdesign Inspiration
Awwwards
Inspirational shops
Now, when you are familiar with ecommerce design trends and know major marketplaces, you can look for the Magento template, but don’t spend too much time on choosing the right solution, next I will tell you about the must-have extensions and how to install them.
Magento Extensions
Developing Magento extensions is not for everyone, but regardless of coding experience everyone can utilize the end product of this complicated process. It’s just important to know which Magento extensions to choose and how to install them correctly. Next, I cover the best Magento modules and teach how to install them. The modules are divided into six groups: performance, SEO, front end, UI, usability, loyalty and referral campaigns, system back end, and marketing and sales. The installation procedure is described in three different ways: via Magento Connect, FTP, and SSH.
You can get a free support with paid extensions. Such services often have time limits, but you can always get a consultation from specialists. Don’t be afraid to ask them!
But why do we use extension s?
Extensions
Magento extensions or modules offer tons of extra features and opportunities. Magento provides a lot (out of the box), but the default functionality is not enough for running a successful ecommerce business. That’s why there are tons of both paid and free modules on Magento Connect, GitHub, and other websites. The following extensions introduce the basic level of improvements. They are just an example of what to use. Of course, you can choose your own modules.
The Magento extensions described next are not enough for receiving the maximum return from your ecommerce website. Check the other sections of this chapter to find out how more reliable improvements look like. For instance, there are sections dedicated to SEO and performance.
Performance
Being a part of customer relationships, good performance is the key to a growing revenue and profit. This significant aspect positively affects customer loyalty and search engines ranking, and as a result your cash flows. You can improve your Magento store performance by using proper settings and extensions.
If Magento store is not set up correctly, it becomes slow and alienates customers. Sometimes even experienced web developers could miss some settings, so it is necessary to monitor if everything is set up correctly. The probability for correct settings can be increased with the help of extensions. Several correct extensions can dramatically change the speed of your Magento store. The most reliable solutions will be discussed next.
Fooman Speedster is your performance tool number one. It combines multiple JavaScript files into a single one. The same holds also CSS files. As a result, you get shorter page load time. The other feature of the Fooman Speedster extension is the ability to reduce the total size of all the files required for loading empty and primed caches. In addition, Fooman Speedster reduces the number of HTTP requests. The extension doesn’t require any gzip support on the server; therefore, all files are compressed without any additional tunings. Fooman Speedster is fully automated, supports multistore capabilities, and uses the Minify library. You can install Fooman Speedster here for free.

Figure 1-2. Fooman Speedster
Lesti::Fpc is another useful module designed for performance improvements. It is an internal full page cache for Magento, which works with events. One of the most important features of Lesti::Fpc is its simplicity: the extension doesn’t need any external software. Being an internal cache, Lesti::Fpc replaces dynamic blocks before sending a response to a customer. You can find more information on the extension and install Lesti::Fpc here.

Figure 1-3. Lesti_Fpc
More Performance Extensions15
CloudFlare is a world-leading content delivery network that is optimized for Magento. With the Control for CloudFlare Magento extension, you are able to integrate your store with this service. As a result, dozens of JavaScript, CSS, and image files loaded from your server during every page view (even if you use Full Page Cache and minification) are loaded from distributed servers around the world. This will dramatically reduce server load and provide your customers with an amazing page load speed. The additional features of this extension include resource caching, DDoS protection, additional forms and files security, and async JS load. You can download the Magento extension here: Control for CloudFlare. And don’t forget to check CloudFlare’s plans. There is a free one.
SEO
According to Wikipedia, SEO is the process of affecting the visibility of a website in a search engine’s organic search results. The earlier and the more frequently your Magento store appears in the list of search results, the more visitors come to your website. That is why SEO optimization is crucial for your ecommerce business. There is a SEO guide discussed in this chapter, but nevertheless, at this point I will explicitly discuss the key SEO extensions. Magento is SEO-friendly right out of the box, but you can always enhance the default capabilities with the help of proper modules.
Creare SEO for Magento adds a lot of new features to your ecommerce Magento store. By installing this extension, you will enhance your website with the following features: HTML sitemap; Noindex on category filters; unique category headings; default metadescriptions and page titles for products and categories; config-editable .htaccess and robots.txt; 301 redirects for discontinued products; Twitter cards for product pages; the ability to disable keywords and metadescription tags; an SEO checking page in the admin; a performance cleanup script; a breadcrumbs schema; XML sitemap fix; canonical product redirect; a product attribute validator; and duplicate product button removal. You can install Creare SEO for free here.
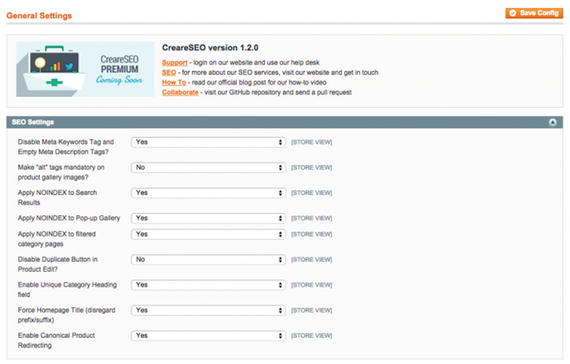
Figure 1-4. CreareSEO
Schema.org is another must-have tool for SEO optimization. The extension adds metadata to the product pages of your ecommerce store. The product name, its description, price, stock status, ratings, and a non-cached image path are used in addition to the default information about every product page of your website. The extension is compatible with such search engines as Google, Bing, and Yahoo!. Check this page for additional information.
With SEO Pagination extension, you can provide search engines the ability to properly understand the structure of your Magento store. This leads to a higher keyword ranking in search results. The extension allows you to implement Google recommendations to target pagination issues in SEO with rel="prev" and rel="next" markup tags. It means that the category pages of your Magento store will be optimized for most search engines robots. Having installed the extension, search engines will receive a strong hint to treat pagination within the category pages as a logical sequence. By providing search engines with the information on how to work with the pages of your webstore, SEO Pagination helps to avoid duplicate content issues. You can download SEO Pagination here.
More SEO Extensions16
Front End, UI, Usability
The front end, user interface, and overall usability are closely related. Since the front end is responsible for collecting data from the visitors, think of it as of an interface between your customers and the back end. The user interface is the place where interaction between customers and the store occurs. As you can see, front end and UI are closely connected and have significant influence on overall usability. By using the following extensions, you can improve the front end, the UI, and the usability of your Magento store. The following modules are designed to improve the usability of your ecommerce store. They add lots of new features, making the user experience better.
One Page Checkout Magento module significantly reduces the steps required during the checkout. In ecommerce, fewer steps mean that your customers are more likely to complete the full checkout process. Thus, One Page Checkout extension allows users to checkout without any hesitation. Moreover, the extension provides numerous configurations, so the new checkout process can be modified to fit your webstore needs. Learn more about One Page Checkout.
Social Connect is another important Magento extension. It adds Google, Facebook, and Twitter buttons to your login page. As a result, customers experience a much faster login and registration options. They just have to hit one button to complete login or registration. Information from their Google, Facebook, or Twitter accounts is used. Thus, the overall process becomes easier and dramatically faster. You can find more information about Social Connect Magento extension here.

Figure 1-5. Social Connect
Toogas Featured Popup extension provides you with fully customizable options for pop-ups. All of these options appear in Magento’s admin. With this module, you make the pop-up windows within your ecommerce store nice and friendly. The corresponding image and its dimensions, the associated store views, and several other settings, such as opacity and priority, are offered by this extension. Toogas Featured Popup is absolutely free and you can download it here.
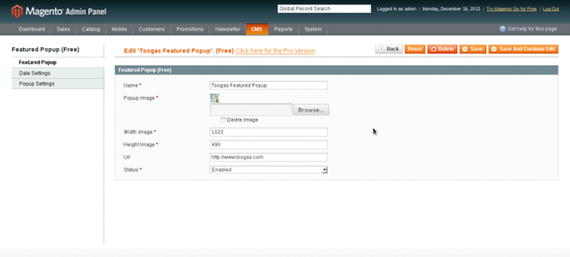
Figure 1-6. Toogas Featured Popup
Improved Navigation : the name of this extension speaks for itself. The default navigation within Magento store is far from being top-notch, but with Improved Navigation by Amasty you will make your store much more user-friendly. Your customers will easily find the way from the main page of your Magento store to the products they are looking for. Thus, you will be able to increase revenue and customers loyalty. Improved Navigation offers such features as SEO-layered and Ajax-layered navigation, navigation filters, advanced menu categories, price slider, and so forth. For additional information, look here.

Figure 1-7. Improved Layered Navigation
By installing the AddThis extension, you enhance the usability of your Magento store with the help of a sharing tool. Thus, your customers are able to share content from your ecommerce website to more than 350 social media services. You can even see some sharing stats with an AddThis account. The tool provides information on the number of shares among your visitors, services used for sharing, shared content, and even copied text. You can install AddThis extension from here.

Figure 1-8. AddThis
The Easy Lightbox extension is a special tool designed for installing a Lightbox widget for your Magento website. It replaces the default product image zoomer with an attractive lightbox window. With the extension you can install and configure Lightbox within five minutes. The process is free and extremely easy, since no coding experience is required. Moreover, you don’t even have to replace the existing files. Hit this link for additional information.
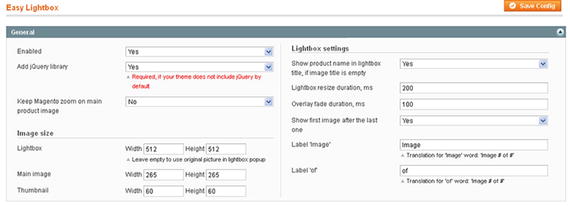
Figure 1-9. Easy Lightbox
Quick Contact extension provides your customers with the ability to leave feedbacks about your ecommerce website. Using this module, you will be closer to your customers. Furthermore, you will always know why your visitors are dissatisfied. The tool is absolutely free, upgradable, customizable, and easy to install. You can download Quick Contact extension here.

Figure 1-10. Quick Contact - Free Extension
Banner Slider extension is the most powerful banner management tool among all similar Magento modules, since it offers 36 available positions for displaying banners and slideshows. The extension supports ten banner rotator effects and a customizable slider. Banner Slider provides an easy banner management due to the following parameters: URL, showing time, image, appearing order, and so forth. You can download Banner Slider here.

Figure 1-11. Banner Slider
Applying the Advanced Product Options module, you can specify the available number of every standard custom option offered on Magento. The extension also provides the ability to upload images for all these options, so you can represent your goods in a more convenient and affordable way. The Advanced Product Options Magento module is used by thousands of ecommerce merchants all over the world. It is a time-tested reliable solution designed to make your store more user-friendly. Visit this page to purchase the extension.
More Frontend Improvements17
Loyalty and Referral Campaigns
It is extremely important to increase visitor loyalty to turn buyers into returning customers and create buzz within social networks. When different stores sell similar products, loyalty means almost everything, since the growing loyalty paves the way to an increase in sales. Posts from random users on Facebook or Twitter have become one of the most trusted forms of advertising. Thus, there is no question of whether to start a referral campaign. The question is how to do it with maximum output. I recommend that you begin with the following extensions.
Sweet Tooth Loyalty and Reward Points Magento extension provides you with the ability to create reward points programs developed to increase loyalty, and as a result, sales. Sweet Tooth offers tons of customizations and unique features. You will be able to turn your visitors into buyers, buyers into returning customers, and returning customers into brand advocates that bring friends to your ecommerce store. Note that Sweet Tooth is available on a monthly subscription basis. For additional information, go here.

Figure 1-12. Sweet Tooth
Refer a Friend by aheadWorks is another reliable tool when it comes to loyalty and referral campaigns. As you might have guessed by its name, it is established to stimulate customers to invite other people to your ecommerce website. A buyer gets a reward for every new invited customer. It can be a percentage or flat discount on a purchase. While you are getting new customers, your revenue is growing. You can get more information about Refer a Friend by aheadWorks here .
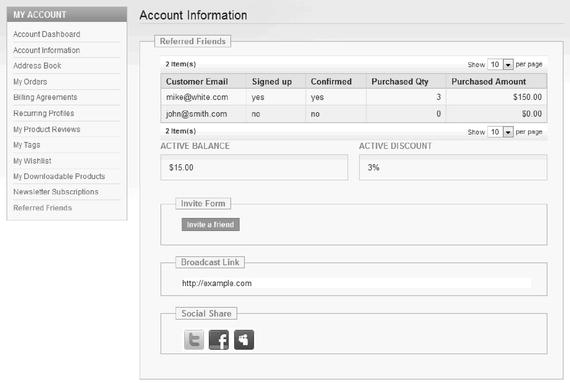
Figure 1-13. Refer a Friend
By using the Unirgy_Giftcert Magento extension, you provide your customers with the ability to use gift certificates within your store. Moreover, these gift certificates support custom gift messages. There are no transactional fees or other hidden payments. For more information, visit this page.
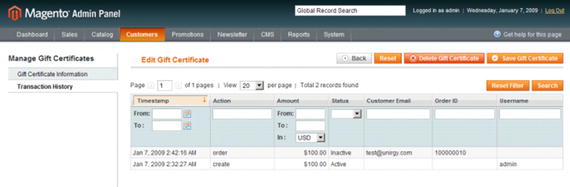
Figure 1-14. Unirgy_Giftcert
By installing the Gift Registry module, you can help your customers get the gifts they want. The extension allows them to create and manage gift registries with the information about their wishes for special occasions. Of course, these gift registries are often posted on social networks in order to inform friends about the desired gifts. As a result, you get lots of new visitors and additional buyers. You can purchase the Gift Registry extension here.

Figure 1-15. Gift Registry
More Loyalty Tools18
System and Back End
There are also some extensions developed for system and back-end enhancements. Usually, they simplify the work of administrators, providing some new features and extra customizations. As a result, you spend less time on different routine processes. Thus, you can concentrate on other vital aspects of your ecommerce business. Next, I show you the most reliable solutions, which can make the back end of your store better.
By installing the Enhanced Admin Grids Magento extension, you obtain extra customization options for most admin grids. As a result, administrators receive many new useful features, new columns, and a powerful editor. The module provides the ability to edit values directly in grids, shows hidden columns, and offers several rendering options. With the Enhanced Admin Grids Magento extension, you are able to customize such column base values as header, width, and alignment. Moreover, the module’s drag-n-drop feature simplifies the columns order modifications. You can find more information about the Enhanced Admin Grids (+ Editor) module here.
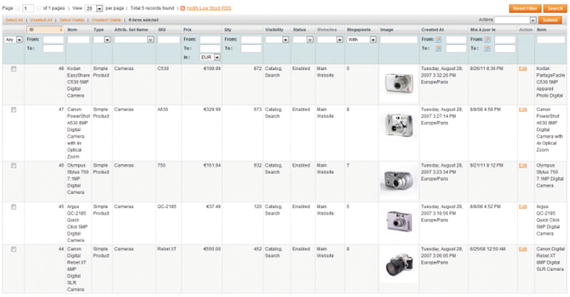
Figure 1-16. Enhanced Admin Grids
The Pulse Storm Launcher is a Magento analog of the Spotlight app. This extension is designed to save countless hours previously spent on traveling through the Admin menus. It is a free, fast, and highly productive tool for the Magento admin console. Get one-click access to the system with the Pulse Storm Launcher. You will be able to save your time and money. For more information, look here.

Figure 1-17. Pulse Storm Launcher
The Improved Import extension enhances the ability of the default Magento import procedure. By installing this module, you will add the most requested import features to your ecommerce store. The extension works with the out-of-the-box Magento Dataflow import/export from CSV files. It allows you to import multiple product images from external URLs along with product custom options and tier prices. Check this page for the full list of features.
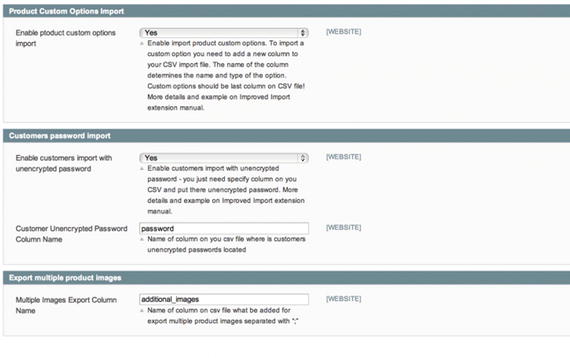
Figure 1-18. Improved Import
The Seamless Delete Order module features the easiest way to delete orders on the back end. It adds a new option into the Action drop-down box from the native Order Manager. As a result, you get a fast and seamless option for deleting orders. Hit this link for additional information.
n98-magerun is the most robust CLI tool for Magento developers. It provides a large set of tested commands that save hours simplifying common processes. All commands are extendable via a module API.
More Backend Modules22
Marketing and Sales
There are also Magento extensions that can be used in various marketing campaigns. They have different purposes, but the same final goal. Such extensions are aimed at the implementation of a successful marketing campaign and a sales increase.
For instance, Ebizmarts provides many opportunities for the email marketing, since it is an official extension for Mandrill and MailChimp integration. With the aid of this Magento module, you will be able to utilize Mandrill to send transactional emails—up to 12,000 per month for free. Additionally, you will obtain such features as an email Autoresponder and Abandoned Carts Recovery. The extension is absolutely free and you can download it here.

Figure 1-19. Mandrill and MailChimp integration
Improved Newsletter is another reliable marketing tool. It is designed for collecting customer emails. With the aid of this module, you can easily create a large database required for a successful email marketing strategy, as well as autosubscribe customers to your newsletter with their registration. In addition, the tool can detect unsubscribed customers and subscribe them while they are placing orders. The module is really powerful. You can purchase it here.

Figure 1-20. Improved Newsletter
Another important group of marketing extensions is represented by Advanced Reports. This module creates a complete picture of your ecommerce business. It provides reports related to sales, customers, and other marketing data. The default Magento solution is limited, so I strongly recommend that you use this third-party solution. You can find more information on Advanced Reports here.

Figure 1-21. Advanced Reports
LUKA Google AdWords Conversion Tracking is developed for seamless integration with Google AdWords. By installing this module, you will be able to add Google conversion tracking codes to every page of your store. The extension is absolutely free. Take a look at this page for additional information.
Blog is another core tool for your ecommerce business. You can post recent news, promotions, and information about upcoming products. The Blog extension by aheadWorks not only provides your customers with this data, but it also brings new visitors to your Magento website and helps with search engine optimizations by building relevant SEO-friendly text links. The Blog module provides wide opportunities for building successful sales strategies. In addition, it can be used for gathering feedbacks from your customers. You can find more information here.

Figure 1-22. Blog
Related Products Manager is a special Magento extension that uses existing shopper data to generate related items, cross-sells, and up-sells for your ecommerce store. This is another must-have module for your ecommerce store. It not only gains sales, but also helps with growing a customer loyalty. The tool is free, but for shops with more advanced needs, there is a paid version. You can get the Related Products Manager extension here.
More Marketing Extensions23
Magento Hackathon Extensions
And don’t forget about Magento Hackathon extensions . Magento Hackathon is a series of community-driven events where Magento community enthusiasts create amazing open source Magento extensions and tools within just a couple of days. The core aspect of all Magento Hackathon events is intensive team collaboration: the best specialists develop top-notch solutions during short periods of time. The most prominent results of such cooperation are listed next. Please note that all Hackathon extensions have been tested by a broad Magento community, so you can easily use them not only during development, but also in production (if a project is stable, of course).
Magento Hackathon Extensions24
Installation
Congratulations! Now you know which extensions to install, so it’s time to show you how to do it. Next, I have described three different types of installation. The second one is the easiest, but it can only be used with free extensions. The other installations are more complex, but that shouldn’t frighten you. Let’s start with a manual installation via FTP.
How to Install Magento Extensions Manually via FTP (Six Universal Steps and Troubleshooting)
The following FTP (File Transfer Protocol) guide is designed for basic webserver setup: MySQL, Apache, and PHP. For a server with a more advanced setup, you have to adjust these steps. Ask your system admin about the details. You can also automate the installation process with the help of a command-line equivalent.
I strongly recommend that you use a test site to install modules. You might get into trouble even with the best Magento extensions, so you should check how they work without doing any harm to your live store. Therefore, install your modules in a test environment first. If everything is OK, repeat the installation on a live site.
Now I’ll explain how to install Magento extensions while avoiding Magento Connect. I have described the most common problems with a manual installation and show how to fix them. The following are the six universal FTP steps:
Turn off compilation.
Turn on cache.
Perform installation.
Refresh cache.
Re-enter back end.
Turn on compilation .
Turn off Compilation
If your Magento compilation mode is enabled, you have to turn it off; otherwise, your ecommerce store and its admin could be inaccessible after you install an extension. To disable the Magento compilation procedure, go to System ➤ Tools ➤ Compilation.
If you prefer working with the command line, you should use this equivalent:
1 php -f shell/compiler.php -- clearIn addition, I recommend that you create a backup of all Magento files. Thus when something goes wrong, you will be able to fix all problems with ease. You can also refresh the cache and check if your website works well. Don’t start the installation if there are issues with your ecommerce website.
An optional step is a database backup. You should create it for additional safety purposes. You can take your website offline or keep it live. In the second case, you will have to re-add orders manually after you create the backup.
Turn on Cache
Now, you have to turn on the configuration cache to prevent an early installation, as it could be the reason of errors. Go to System ➤ Cache Management.
Perform Installation
When you’ve found an extension that is necessary for your ecommerce website, you have to read its installation instructions first. That way, you get all the essential information for a successful installation. Don’t ignore this advice.
When you know all the nuances, you can download a Magento extension and unzip it into a separate folder.
You have to upload the unzipped content to a server via SFTP or FTP. Connect to your Magento server. Go to the root directory. Upload the appropriate files to the root folder. The root folder includes such subfolders as app, downloader, errors, and so forth.
One of the best free FTP tools is Filezilla. You can freely use it to simplify the installation.
Note that the uploaded files have to be readable by a web server. This means that they must have the same permissions as the existing ones.
Refresh Cache
Now you should go to System ➤ Cache Management once again and refresh Magento’s cache. This step is necessary for providing Magento with the ability to register a new extension.
Re-enter the Back End
To prevent the Access Denied error, you have to re-enter the back end. Log in with a full administrator account to get new permissions.
Check whether your ecommerce website works as always. If you’ve turned off the store, you should bring it online.
Turn on Compilation
If you are using the compilation mode, which was previously disabled, you have to turn it on. Go to System ➤ Tools ➤ Compilation and hit the Run Compilation Process button.
You could also use the command line instead:
1 php -f shell/compiler.php -- compileWarning!
In order to prevent potential conflicts, you have to install only one extension at a time.
Troubleshooting
Next, I explain how to fix the most common errors related to the Magento extension installation.
I have done everything as described but I can’t find my extension.
There is a possibility that Magento will not be able to read the Name.xml file, which has to be associated with the module’s name or developer.
First, check System ➤ Configuration ➤ Advanced ➤ Disable Modules Output. If the extension is not there, you have two more ways to fix the problem.
Check the permissions of the uploaded files one more time. They must be readable by Magento.
Flush the cache and delete the contents of var/cache (in rare cases, this content can be cached in the tmp/ folder).
An error page with a reference number at the bottom occurs.
This number corresponds to a file from a server. The file is situated in <MAGENTO_- ROOT_FOLDER>/var/report/.
To get more information about the error, you have to open this file. If files from the includes/src folder are mentioned in the report, it’s likely that you’ve failed in the first step of the guide. Now you do not have an access to your admin.
Luckily, you can fix the problem by editing the includes/config.php file. Change the following:
1 define('COMPILER_INCLUDE_PATH', dirname( FILE ).DIRECTORY_SEPARATOR.'src');to this:
1 #define('COMPILER_INCLUDE_PATH', dirname(__FILE__).DIRECTORY_SEPARATOR.'src'); The Magento back end should be functional again, so you can rerun the compilation process, as described in the sixth step.
If this doesn’t help, contact the extension developer.
I’ve refreshed the cache but there are still no new configuration options
Once again, check whether Magento can read the permissions of the uploaded files. Flush the cache and delete the contents of var/cache.
I see a white page after the installation
This is a fatal error that occurred while the page was loading. You have to check the details of this problem in the server’s error log. It is often necessary to contact the extension developers and show them this log in order to fix the issue.
How to Disable a New Extension
The following explains how to disable a new extension .
Go to the app/etc/modules folder.
Change the file name ending .xml in <companyname>_<extensionname>.xml to .off, for instance. You should get the following result: <companyname>_<extensionname>.off.
Refresh the Magento cache. Go to the var/cache folder and delete its content.
You can always re-enable an extension by renaming the file name to end with .xml. Take into account that the Disable Modules Output option disables a block output only, so uninstall extensions in a proper way .
Now you know how to install extensions via FTP. As you can see, this process is not difficult, but it requires some attention. Next, I discuss an even simpler procedure—installation via Magento Connect.
How to Install Free Extensions via Magento Connect
Please note that you must use the previous guide for commercial extensions.
Some specialists don’t recommend using Magento Connect. Although it is the easiest way to install an extension, there are several drawbacks:
By using the same key at different installations, you can install the wrong version of a module.
It is unsafe to use Magento Connect Downloader with the 777 permission.
You don’t have any ability to inspect code.
By using Magento Connect Manager, you can accidentally trigger the upgrade of the Magento core.
If these aspects don’t deter you, then you should perform the following steps:
Go to the profile of a preferred extension.
Check supported versions of the platform.
Select your platform (e.g., Community).
Hit the Install Now button.
Choose the Magento Connect channel: 1.0 for Magento CE 1.4.x and below; 2.0 for Magento CE 1.4.2.0 beta; CE 1.5+; EE 1.9.0.0-RC2+.
Don’t forget to check the license agreement box.
Get an extension key .
Copy the key by clicking Select Key.
Log in to the admin of your Magento store.
Go to System ➤ Magento Connect ➤ Magento Connect Manager.
Paste the key into the appropriate field.
Click the Install button.
Now you can cancel or proceed to the installation. Click Proceed.
A console box will appear. It shows the installation process and displays issues (if there are any).
Hit the Refresh button to finish the installation.
Troubleshooting
If there is any trouble with the Magento Connect Manager installation, you should make sure that the correct extension key was used. Stability is another discrepancy factor. It is impossible to install beta extensions if your system is set to Stable. The following explains how you should change your stability settings in Manager:
Go to your admin panel and choose System ➤ Configuration.
Enter your Magento Connect account.
Hit Settings.
Choose the necessary option from the pull-down menu.
You can select among stable, alpha, or beta.
Click Save.
Read the Magento Connect FAQ for help with other issues and troubleshooting. That was easy. Follow these steps for uninstallation :
Open the Magento Connect Manager.
Go to the Manage Existing Connections section.
Choose an extension.
Choose Uninstall from the drop-down menu under the Actions column.
Hit the Commit Changes button.
End the process with the help of Refresh.
Next, I shed light on more complicated methods. The previous two are enough for running an ecommerce store successfully, so you can skip the following guides. If you want to get more advanced knowledge, see the following tutorials.
How to Install Magento Extensions via SSH
Another installation method is based on using SSH (Secure Shell). It is a little complicated, but you can still utilize it.
Go to the directory with your installed Magento.
Run these commands:
1 chmod +x mage2 ./mage mage-setup .3 ./mage config-set preferred_state stable4 ./mage install http://connect20.magentocommerce.com/REPO PACKAGE_NAME
Note that you must replace REPO and PACKAGE_NAME with values related to your extension.
For Magento 1.4.x or earlier use the following commands:
1 chmod +x pear2 ./pear mage-setup .3 ./pear config-set preferred_state stable4 ./pear install EXTENSION_KEY
You have to change EXTENSION_KEY with a new value related to your extension.
Warning!
It is required to install core Magento extensions for Magento 1.4.x or earlier versions of the platform; otherwise, Magento will upgrade your ecommerce website to the latest version.
You can use Magento Connect to check if core Magento extensions are installed. Just log in to get this information.
How to Install Magento Extensions with Composer
I also recommend that you check these tools because they significantly simplify the installation: Magento Composer Installer and Composer Installers.
The purpose of Magento Composer Installer is to enable Composer to install modules and integrate them into a Magento installation automatically. It adds Composer’s vendor autoloader ability; as a result, Composer-compatible third-party tools can be used. Read about the project here: Magento Composer Installer25.
Another useful tool is Composer Installers. You can examine it here: Composer Installers26. Composer Installers also simplifies your daily routine by installing extensions or modules on Magento.
If the aforementioned information is not enough, check these manuals on module installation:
Congratulations! Now you can install Magento modules. Now it’s time to choose a payment gateway for your ecommerce website
Payment Gateways
It’s obvious that an ecommerce website should support online payments, but what payment gateways suite best for the needs of your business? There are hundreds of online payment services on the Internet, so it is difficult to choose a right one. Therefore, I will teach you how to select a payment gateway for your business .
It’s critical to understand all nuances related to online payment processing so that you get a solution that is the most suitable for your ecommerce business .
Payment gateways and merchant accounts. A payment gateway approves or declines payments. A merchant account is a place where your money is held before being transferred into a bank account. There are services that provide both tools within one platform, and there are companies that offer only one solution.
Different types of checkout. There are several types of payment gateways. Hosted solutions are gateways that take your customer out of your website during the checkout. Non-hosted solutions let your buyers stay in your store while entering credit card information. In order to cover the needs of all of your customers, you should offer both solutions.
Fees and payments. Every credit card payment gateway charges a different amount of money for its implementation. There are three major types of fees: setup fees, monthly fees, and transactional fees. Some payment services charge only transaction fees, whereas others try to gather as much money as possible. Thus, it is important to know all the fees in the payment gateway of your choice.
Anti-fraud protection. Unfortunately, there are gateways without strong antifraud protection. Take into consideration that these payment solutions are not secure. You should choose gateways that provide data encryption and allow CVV2 verification .
Payment methods. Some gateways are limited to certain payment methods. You should always check if they provide payment methods that are common within your target market.
Prohibited items. Please note that there can be a prohibited items list in every payment gateway. If you sell products from this list, the gateway will not work on your ecommerce website.
High-risk businesses. Features such as high-risk credit card processing or high-risk merchant account maintenance are not provided by all gateways. If you operate in gambling, ebooks, electronic cigarettes, adult content, or other risky sectors, you should check if the chosen payment service will work on your website .
Payment turnarounds. You don’t want to spend several days waiting for your money, right? That’s why you should check payment turnaround. Ideal gateways provide a rapid payment turnaround time, but be prepared for more realistic solutions .
Chargebacks. Chances are that your customers will request chargebacks from time to time. Thus, you should be able to provide them with this opportunity. Keep in mind that this feature must be supported by your payment gateway; otherwise, you will experience a lot of unnecessary issues.
Customer support. Imagine a situation where you have a problem that should be solved immediately, but appropriate customer support doesn’t work. This situation could lead to money loss or even a spoiled reputation, so 24/7 customer service is a must.
Localization. Localization is also vital. Some gateways support multiple languages and currencies, whereas others provide limited opportunities. If your business provides localization, you should offer the same conditions during the checkout. That’s why you need a payment solution that supports localization.
Scalability. Please note that some ecommerce payment gateways have limited transactions and other restrictions. Thus, they can be used with small businesses only. Check whether your chosen gateway is scalable to avoid future problems.
Contract. Beware of a contract! Some companies want you to sign a two-year contract, so you would not be able to change your gateway during this period. Pay close attention to a contract offered by the payment solution that you choose .
Reputation. Don’t forget to first check the reputation of the payment gateway providers that you are considering. Try researching social networks or forums .
You know how to choose a payment gateway, so you can also check our list of the best payment solutions for your website: Best Payment Gateways for Modern eCommerce29.
The leading payment gateways are PayPal, Stripe, and Authorize.net. PayPal is the most popular and reliable solution. It is widely used among ecommerce merchants in all platforms, including Magento. PayPal supports almost all types of payments, as well as related operations: web payments, mobile payments, eBay integration, online invoicing, and so forth.
Stripe is the most prominent gateway among recent market players. Since Stripe is designed for ecommerce websites, online marketplaces, mobile apps, and subscription services, it is a perfect solution for multichannel enterprises. This gateway offers all the features that you will ever need.
Authorize.net is another giant in the payment gateway market. It is the most powerful and well-known payment solution. It offers custom payment forms and extra security.
This section covered market leaders, but you can easily choose another payment solution. Otherwise, let’s go the next stage of the chapter, which covers the core topic of shipping.
Magento Shipping
Shipping is a constant part of every ecommerce business. In order to make this process flawless, you can utilize Magento extensions. Custom Shipping Methods And Rules30 discusses a set of tools that can help you avoid headaches with delivery, rates, and other aspects of custom shipping methods and rules.
Considering the following questions can help you determine the best shipping provider for your specific needs .
Where are you shipping to? Does your provider support these countries?
What types of products are you shipping? What is the average size of your orders?
What is the shipment processing speed offered by your shipping provider?
Does it support tracking?
Are there insurance options?
Does it feature live rates integration?
You should understand your shipping options and needs. For instance, multiple shipping options let your customers choose a provider from among a list of the providers that you work with. There is also free shipping. Customers like this option, so you should think about its implementation. Another key option is flat rate shipping. You can offer it instead of free shipping by charging a flat rate for deliveries for every package. This option can also ranges for various order totals or weights.
Real-time carrier rates are much more complex than other shipping solutions. They depend on various factors, such as package weight and shipping location, but at the same time charges the exact amount of money that your provider will charge you. The customer needs to add a product to his cart to see the most accurate price.
I should mention the click-and-collect option. The concept of click-and-collect or the instore pickup business model is very simple and at the same time counter-intuitive. A customer buys goods on a company’s website and rather than wait for the postman several days later, picks up these goods at a local brick-and-mortar store. More about this option can be found here: Click & Collect (In-store pickup) Magento extensions31.
Note that all the leading market players, such as UPS, DHL, and FedEx, offer all of these options. Moreover, they provide integration with Magento.
With installed extensions, a reliable payment gateway, and convenient shipping options, your store is ready for the data import procedure, which is required if you are not new to ecommerce and already have an ecommerce website on another platform. To get all of your products within the Magento website, read the next part of this chapter .
Data/Product Import
Figure 1-23. Product import
In this section, I explain one of the most advanced tasks of the Magento store management : product import. The following guide includes a description of the CSV file structure and all of its columns, as well as detailed information about product attributes related to the import procedure.
The Magento import is necessary if you are going to migrate from another ecommerce platform. The procedure described next helps transfer products, clients, and orders from an existing online store to a new Magento website. Even if you are not familiar with ecommerce, the following part of the chapter will be useful to you, since it describes core aspects of Magento, but you can easily skip it and return later.
CSV File Structure for the Magento Products Import
For working with CSV (comma-separated values) files, I strongly recommend that you use OpenOffice.
Minimum Required Columns for a Simple Product Import
The easiest way to understand what data is required in a CSV file is to export some products from your Magento store. If you don’t have any ecommerce stores based on this platform, you can always use several products for a test. Fill in all product information, add images, and then try to export them. Just go to Magento admin ➤ System ➤ Dataflow profiles ➤ Export all products. As a result, you will get a CSV file with dozens of columns. Let’s take a closer look at them. Next, I provide a brief description of a CSV file’s parts.
websites. A website entity is associated with a product. In default Magento and in most other cases, it is “base.”
store. A store entity is associated with a product. In default Magento and other cases, it is “admin.”
Warning!
websites and store can be the reason behind a problem when products are not displayed on the front end or the Magento admin panel after your import. So you should check if the values used there are correct. If you are not sure what values to use, you can try the default ones: base and admin (Magento admin ➤ System ➤ Manage stores).
type. The types of a product: simple product, grouped product, configurable product, virtual product, bundle product, downloadable product.
attribute_set. The “default” or another attribute set used for a product. See it in Magento Admin ➤ Catalog ➤ Attributes ➤ Manage Attributes sets.
tax_class_id. Product tax classes: None, Taxable goods, Shipping. You can manage them in Magento Admin ➤ Sales ➤ Tax.
status. The status of a product can be enabled or disabled. If a product is disabled, it will not be displayed on the front end.
weight. The weight of a product; just use 1 if you don’t need it.
sku. A unique product identification.
name. The name of a product.
price. The price of a product.
description. A full description of a product that is displayed on a product page.
short_description. A short description is displayed on a product page and on other pages, depending on template settings.
visibility. The visibility of a product on the front end: Not Visible Individually / Catalog, Search / Catalog / Search.
category_ids. Magento category ids are associated with different products. They are created in Magento admin ➤ Catalog ➤ Categories. To get a category id, check it in Magento admin.
qty. The available quantity of a product. It is used to control the in-stock/out-of-stock status of a product.
is_in_stock. Sets up a default status of a product (boolean value 1 or 0): in stock (1) or out of stock (0). Out-of-stock products are not displayed on the front end and can’t be sold.
image, small_image, thumbnail. First, you have to upload images into the media/import folder in your Magento installation folder, and then enter an image file name prepended with a slash. You can use the same large image for all three types of product images; Magento will scale it to other required sizes.
Tip
Images are required for successful product import in Magento, but if you want to import products without images you can use a trick with the default Magento product image placeholders located at skin/frontend/default/default/images/catalog/product/placeholder. You can find three images there: image.jpg, small_image.jpg, and thumbnail.jpg . Copy and paste them to the media/import folder and use them for your products. Product images can be updated during the next import procedure.
To import multiple product images and galleries, you have to use the Improved Import32 extension, since Magento does not provide this feature out of the box (more extensions follow) .
CSV File sample consists only of the columns described. If you’ve decided to give it a try, you need a category with id=3 and placeholder images copied from skin/fron-tend/default/default/images/catalog/product/placeholder to the media/import folder.
Extended Import with Additional Features
To get the full list of columns, you can just export existing products, as well as imported earlier (as in CSV sample). Appropriate export options are situated in Magento admin ➤ System ➤ Import/Export ➤ Dataflow ➤ Profiles ➤ Export all products.
Now you can get a complete list of default columns used in Magento product import. You can use them for the import procedure which includes column names and example data. In most cases, it is not difficult to understand what data can be placed there.
store, websites, attribute_set, type, category_ids, sku, has_options, name, meta_title, meta_description, image, small_image, thumbnail, url_key, url_path, custom_design, page_layout, options_container, image_label, small_image_label, thumbnail_label, country_of_manufacture, msrp_enabled, msrp_display_actual_price_type, gift_message_available, price, special_price, weight, msrp, status, is_recurring, visibility, enable_googlecheckout, tax_class_id, description, short_description, meta_keyword, custom_layout_update, special_from_date, special_to_date, news_from_date, news_to_date, custom_design_from, custom_design_to, qty, min_qty, use_config_min_qty, is_qty_decimal, backorders, use_config_backorders, min_sale_qty, use_config_min_sale_qty, max_sale_qty, use_config_max_sale_qty, is_in_stock, low_stock_date, notify_-stock_qty, use_config_notify_stock_qty, manage_stock, use_config_manage_stock, stock_status_changed_auto, use_config_qty_increments, qty_increments, use_config_enable_qty_inc, enable_qty_increments, is_decimal_divided, stock_status_changed_automatically, use_config_enable_qty_increments, product_name, store_id, product_type_id, product_status_changed, product_changed_websites, additional_images
Full CSV File sample
Magento Product Import Tips and Tricks
Product Import Custom Options
Unfortunately, default Magento lacks custom options for product impor t. But you can solve this problem by using the Improved Import33 extension. With the help of this module, you can get new options and a new column in a CSV file. This column includes the following specific options: name, type, and price.
Product Attributes
Magento doesn’t provide you the ability to import product attributes and values out of the box. But you can use this solution: Import Product Attributes into Magento34.
Products with Multiple Attribute Values
You can import products with multiple attribute values if you have attributes with values in the Magento admin and you want to associate them with existing imported products.
Import Multiple Product Images and Images from External URLs
By default, you are not able to import multiple product images and images from external URLs, but it’s possible with the Improved Import extension. With this Magento module, you can add as many images as you need in an additional CSV column and upload them to the media/import folder. The same process is suitable for images from external URLs.
Product Tier Prices Import
You can easily import product tier prices from different customer groups with the Improved Import extension.
Product Import Errors and Solutions
The following describes some potential product import errors and their solutions.
Image Does Not Exist
If you’ve got an “Image does not exist” error in any product images required for import, you didn’t properly set that image in the CSV image column in your media/import folder. To solve this problem, you can use the trick described earlier (import everything without images) or use the Improved Import extension to find out which product images are missing.
Products Are Not Displayed on the Front End After Import
If products are not displayed in your front end after import, you must check "columns = values" in your CSV file. Check the following column descriptions:
websites = base
store = admin
status = Enabled
visibility = Catalog, Search
category_ids = NUMBER (must be valid enabled category id in you store)
qty > 1
is_in_stock = 1
Products Are Not Displayed on the Back End (Magento Admin) After Import
Primarily, you have to check "websites = base" and "store = admin" in your CSV file. If everything is alright there, you should go to the next step of this guide and perform some cleanup in Magento.
Strange Stacks and Other Errors
If nothing else helps, use the Magento cleanup tools. Read this article: http://goo.gl/izm1Zo . It shows how to clean up Magento after a failed import process. Before using this method, make sure that you’ve double-checked your CSV files according to the requirements described.
Magmi
Another complex Magento import solution is Magmi, an open source tool with dozens of features and settings that makes Magento import flawless. It is extremely powerful, but not easy to use. You can download Magmi here: http://goo.gl/aF7nd .
Excel Import to Magento with Cobby
Cobby 35 is another useful tool designed with productivity and usability in mind. It connects your Magento website with Excel in real time, so you can edit all of your attributes and add new products without any headaches. Thus, Cobby is one of the most reliable and user-friendly ways of importing data to Magento on a daily basis.
The following are some other import extensions:
Improved Import
Import + Export Bulk Product Attributes / Attribute Sets / Attribute Options / Multiple Attributes
Stock / Inventory Import Module
Custom Bulk Product Import + Export with Tier Pricing / Product Custom Options / Configurable Products / Bundle Products / Grouped Products / Downloadable
Extended Grid / Export - Orders, Invoices, Shipments, Products
Import Products categories, multiple images, and custom options
Fast Products Import
AvS_FastSimpleImport
Bulk Category Import / Export
Import Export Categories Extension
You can find their detailed descriptions here: http://goo.gl/ZFNPB9 .
You are now familiar with Magento downloading and installation, what to do with a server and hosting, which templates and extensions to choose and how to install them, and how to import product data into your Magento store. So, it’s time to talk about a key topic of this chapter: performance.
Performance
Performance is extremely important for every website—and ecommerce web stores are not an exception. Statistics differ from market to market, but the negative impact of slow speed is obvious. According to Summit.co.uk, in 2013, slow websites cost UK online retailers more than £8 billion. At the same time, there is information about the US market’s $3 billion ecommerce sales loss.
Website performance tests by Summit.co.uk showed that over 90% of the 230 leading online retailers were failing to meet the industry’s benchmark of a three-second page load. Furthermore, it took some about eight seconds to display a page. But how does this affect a visitor’s behavior?
Forty-four percent of online customers think that a transaction has failed if the checkout is slow. As a result, many of them (33%) abandon their carts to look for ecommerce stores with better performance. A transaction with a two-second delay results in a high shopping cart abandonment rate, which is more than 80%.
The Metrics
There are new and existing consumers on every ecommerce web store. Thus, we can speak about two types of interaction: first view and repeat views. Both have three specific metrics: time to first byte, render start, and load time.
With time to first byte, you measure the amount of time required for servers to react to a request of a browser to send data. With render start, you measure the amount of time necessary for the first page element to be displayed in a browser. Load time means the total amount of time required to load all elements of a page.
The metrics should be measured under normal and peak loads conditions. You can use Webpagetest.org to do this. A report indicates what is slowing down your ecommerce website. The most common reasons are heavy images and interactive page features, site build shortcuts, a poor hosting environment, and so forth. These are Amazon’s results for the first view:
First byte: 0.285 sec
Render start: 0.944 sec
Load time: 2.071 sec
These are the results for the second view:
First byte: 0.285 sec
Render start: 0.833 sec
Load time: 1.346 sec
Such results are an example of top-page load speed metrics to some extent. Next, I talk about all the solutions designed to optimize Magento ecommerce site performance and to achieve the aforementioned results.
This Magento Performance Ultimate Guide36 is written for all versions of Magento (including Magento 2). It is suitable for the both Community and Enterprise editions. Additionally, it is useful for PHP and MySQL applications.
Magento Server-side Performance
You will find information about Magento server optimization in this section of the chapter. I show all the core aspects of this process.
Magento Optimized Hosting Services
You need to choose a hosting service for your Magento store. With a web hosting service, you make your ecommerce Magento store accessible via the World Wide Web. Th hosting service greatly influences performance. For example, a poor hosting solution can noticeably slow down your website. You can check our “Best Magento optimized hosting” blog post to find out the best solution for you. I would now like to draw your attention to Nexcess and Rackspace.
With Nexcess, you get full hosting options for your Magento website. The basic plan is $19.95 per month, but you have to pay annually if you want this exact price. If you choose a monthly payment, Nexcess costs $24.95 per month. For both solutions, you get one IP, 7.5GB of free space, 16GB RAM, 2x Quad Core E5620, 75GB of data per month, 9 additional stores, and 30 accounts per server. You can launch a demo for all proposed Nexcess plans.
This hosting service is the cheapest and the most stable and reliable among all Magento-optimized hosting services. I highly recommend that you try Nexcess SIP 200 as the perfect Magento hosting solution for both small and middle-sized Magento stores.
Rackspace is another top-notch hosting provider. The company has been on the market since 2008. Today, it includes more than 1,000 Magento clients worldwide. The cheapest Rackspace solution costs $499 per month. It best suits stores with 100 concurrent visitors and 150,000 products. For this money, you will get one quad core processor, 1 x 146GB 10K SAS, 4GB of RAM, Cisco ASA 5505 firewall, and 2TB Bandwidth every month.
Nginx as a Magento Web Server
Magento Nginx configuration
Official manual on Magento wiki
You can always use LAMP as a simple hosting solution for your Magento store, but there are cases when the usage of Apache with mod_php is not the best idea. For instance, when your ecommerce Magento store has dynamic content generated by PHP scripts in addition to static files. For such situations, Nginx with PHP-FPM can be a better idea .
For simultaneous HTTP/HTTPS connections, Apache uses a large quantity of RAM and CPU cycles. The problem is particularly acute for the standard Apache configuration and the mod_php prefork. Since each Apache child process generally requires around 100MB RAM for every request, a dedicated 16GB RAM web server is limited to just 150 concurrent requests.
One of the major advantages of Nginx is its event-based structure (Apache is process based). Thus, Nginx doesn’t require any new process to increase the level of concurrency. As a result, the memory footprint of Nginx is very low. In addition, Nginx exploits asynchronous and nonblocking I/O.
Nginx is operated by a pre-set number of worker processes, and each of them exists in the form of a single isolated process. Due to the event-driven and non-blocking architecture, Nginx allows every single worker process to handle requests from multiple clients.
You can benefit from Nginx even if you aren’t going to handle thousands of requests at the same time. This server solution scales in all directions: from the smallest VPS to servers’ clusters.
Nginx handles about 10,000 HTTP/HTTPS requests per second. It uses just 10MB to 20MB of RAM and averages 10% to 15% of CPU. Notice that in HTTPS, the usage of CPU is higher because of decryption/encryption routines.
The biggest drawback of Nginx is the absence of mod_php or its analogs designed for the direct execution of PHP apps. Being a static content web server and a reverse HTTP/ FastCGI proxy, Nginx can’t run Magento directly. In order to do so, it must utilize other means. The most reliable solution of this problem is PHP-FPM established for running high-load websites with PHP web apps. PHP-FPM consumes a small amount of resident memory and offers some unique features, such as adaptive process spawning, advanced logging with a slow log for slowly executing PHP scripts, the ability to start workers with different php.ini and "uid/gid/chroot/environment", an emergency restart for an accidental opcode cache destruction, real-time data on performance, and server activity.
To use Nginx with your Magento store, you need the front end enhanced with the following :
Caching
Reverse FastCGI proxy, which handles all HTTP/HTTP connections
All static file delivery
PHP-FPM
In this case, Nginx performs as a reverse FastCGI proxy for all dynamic content requests. All of them are proxied to a back-end PHP-FPM app and delivered back to a visitor after a response.
The usage of Nginx as a load balancer (one Nginx front end plus several PHP-FPM back ends) leads to a back-end failover and both high scalability and availability for the Magento installation. And you eliminate the need to utilize a hardware load balancer or any other associated expenses.
Monitoring Tools and Analyzers
A slow page or other negative user experiences could be the reason for leaving a webstore long before getting to checkout. Luckily, there are a lot of different monitoring tools and analyzers designed to identify a problem in time.
New Relic can be used to mark various operations, such as key transactions, for example triggers for custom alerting. Another function of this tool helps observe the slowest queries. Thanks to the “app map” feature, New Relic provides a clear view of the application dependencies that occur on your Magento ecommerce site. This feature also works along with third-party extensions and external services. With the app map feature, you can easily find the “weakest link” in your application chain. However, there are two other features that should be mentioned: Apdex scoring and alerting. With the aid of Apdex scoring, New Relic evaluates how well the Magento app is performing according to industry standards. Since the feature is combined with alerting, you will be always notified when the performance of your Magento store is challenged, due any variety of reasons.
Debugging Magento Performance with New Relic
Magento New Relic Integration on GitHub
Yireo New Relic Magento Extension
With the AppDynamics platform, you get full visibility of Magento-based PHP app performance. The solution provides rapid installation and high scalability. AppDynamics automatically discovers the Magento application topology. The tool provides the ability to customize a monitoring process by choosing which transactions to include or exclude from a real-time view. It also distinguishes web and mobile experiences, and expands visibility from the user to a database by correlating the performance of the database to originating transaction performance metrics. In addition, you are able to monitor root-cause errors and exceptions in real time.
Magento MySQL-Optimized Configuration
Proper MySQL configuration is among the most robust enhancements made to ensure the supreme performance of a Magento store. It requires an understanding of your hardware–primarily the available RAM. Next, I discuss the most reliable solutions elaborated to optimize Magento and that enhance a website’s performance with the help of proper MySQL configurations.
This is an example of proper MySQL configurations:
1 ##########################################################################################2 ####34 ## http://dev.mysql.com/doc/refman/5.6/en/innodb-parameters.html ##56 ## https://raw.githubusercontent.com/rackerhacker/MySQLTuner-perl/master/mysqltuner.pl ##78 ## https://launchpadlibrarian.net/78745738/tuning-primer.sh ##910 ## yum install mytop / apt-get install mytop ##1112 ##########################################################################################13 ####1415 [mysqld]1617 ### MyISAM #1819 key_buffer_size = 16M # keep it low if no myisam data2021 myisam-recover-options = FORCE,BACKUP2223 ### SAFETY #2425 innodb = force2627 max_allowed_packet = 150M2829 max_connect_errors = 1000003031 bind-address = 127.0.0.13233 skip-name-resolve3435 ### CACHES AND LIMITS #3637 back_log = 2003839 interactive_timeout = 72004041 wait_timeout = 72004243 net_read_timeout = 1204445 net_write_timeout = 3004647 sort_buffer_size = 2M4849 read_buffer_size = 2M5051 read_rnd_buffer_size = 16M5253 join_buffer_size = 4M5455 tmp_table_size = 128M5657 max_heap_table_size = 128M5859 query_cache_type = 16061 query_cache_size = 128M6263 query_cache_limit = 4M6465 max_connections = 1506667 thread_cache_size= 326869 open_files_limit = 655357071 table_definition_cache = 40007273 table_open_cache = 40007475 ### INNODB_ #7677 innodb_thread_concurrency = 07879 innodb_lock_wait_timeout = 72008081 innodb_flush_method = O_DIRECT8283 innodb_log_files_in_group = 28485 innodb_log_file_size = 256M8687 innodb_log_buffer_size = 16M8889 innodb_flush_log_at_trx_commit = 29091 innodb_file_per_table = 19293 innodb_io_capacity = 4009495 innodb_read_io_threads = 89697 innodb_write_io_threads = 89899 innodb_buffer_pool_instances = 8100101 innodb_buffer_pool_size = 4G102103 ### LOGGING #104105 #log_error = /var/log/mysql/mysql-error.log106107 #log_queries_not_using_indexes = 1108109 #slow_query_log_file = /var/lib/mysql/mysql-slow.log110111 ### BINARY LOGGING #112113 #log_bin = /var/lib/mysql/mysql-bin114115 #expire_logs_days = 14116117 #sync_binlog = 1
MariaDB Instead of Default MySQL
MySQL is not a necessity, so you can always move out of it. There are two popular alternative solutions: MariaDB and Percona. The first one is a fork of MySQL developed by the Magento community. MariaDB was created under GNU GPL. Its goals are as follows:
Maintain high MySQL compatibility
Ensure a drop-in replacement capability with a binary equivalency
Match with MySQL commands and APIs
MongoGento by Smile Open Source Solutions
There is also an opportunity to use the NoSQL database instead of MySQL. Therefore, all you need is MongoGento by Smile Open Source Solutions. Since this module provides your Magento store with the ability to use MongoDB, you will reduce the size of your database and the Magento EAV model impact. The second reason of these two improvements is heterogeneous catalogues, designed for millions of products. At the same time, you retain the flexibility of a document model.
Another strong point of MongoGento is its performance. The combination of SolR, MageCache, and MongoDB makes both the front end and the back end extremely fast. I need to mention that MongoGento is an open source, scalable, and secure alternative to MySQL that has a quick installation.
The only drawback is a conflict among MongoGento and some other modules. For example, product catalog rules are not able to handle some attributes if you use MongoGento. For more information, go to MongoGento’s GitHub or official web page:
MongoGento on Ecommerce-Performances
MongoGento on GitHub
MySQL and InnoDB Optimized Configuration
The following are the general options in a MySQL and InnoDB optimized configuration :
max_connections: The maximum number of connections to allow. Watch this value: max_used_connections.
thread_cache: Cache to prevent the creation of excessive thread. The good value is 50–100. Watch threads_created.
table_cache/table_open_cache: Opens table instances cache. Multiple entries for single table are possible. Watch this status value: opened_tables and start with 4096.
open_files_limit: Up to two file handlers are required for MyISAM tables. Each connection is file handler. It is safe to set to 65535 for the most systems.
table_definition_cache: Cache table definitions and use only one entry per table. Opened_table_definitions to watch. Set + 10% to the number of tables unless there are 50K+ tables .
back_log: Adjustment for many connections/sec is required. The reasonable value is 2048 .
max_allowed_packet: Sets a limit for the maximum query size and internal string variable size. The good value is 16MB.
max_connect_errors: Prevents password brute force attack. Can be a cause of a Host Blocked error message. The good value is about 1000000.
skip_name_resolve: Helps avoid DNS lookup on connection. Don’t use host names for GRANTs.
old_passwords: This shouldn’t be enabled. It causes the use of insecure password hash.
log_bin: Enable this parameter for replication and point in time recovery. To avoid default naming, you should set it to mysql-bin.
sync_binlog: Make Binlog durable. Set to 1 for RAID with BBU or Flash. It turns slow drives into a performance killer.
expire_log_days: Purges old binary logs after the set number of days. A good value is 14. Don’t forget about weekly backups.
tmp_table_size
max_heap_table_size: Typically set to same value. Created_tmp_disk_tables status variable. BLOB/TEXT fields cause on disk table of any size.
query_cache_size: Enable this parameter only if it is tested to provide considerable gains. It often causes stalls and contention. Remember, you should not set it over 512MB.
sort_buffer_size: Used for sorting in memory buffer. Watch sort_merge_passes. Set within sessions for large queries. Good value is up to 1MB. Larger values hurt small queries performance .
join_buffer_size: Use for better performance of joins with no indexes. But it is better to get rid of such joins. The reasonable value is 8MB.
default_storage_engine: It uses the InnoDB engine for tables if nothing else is specified.
read_rnd_buffer_size: A buffer for reading rows in sorted offer. It specifies the maximum value. Use values around 16MB, because they often make sense. Do not mix with read_buffer_size.
tmpdir: Specifies location of temporary directory. It is often a good choice unless a very large temporary space is needed. tmpdir=/dev/shm.
The following are MyISAM options:
key_buffer_size: Caches MyISAM indexes, but doesn’t cache data. Requires up to 30% of memory if using MyISAM only.
myisam_recover: Automatically repairs corrupted MyISAM tables after crash. The good value is BACKUP,FORCE.
myisam_sort_buffer_size: Buffer used for building MyISAM indexes by Sort. Good values are between 8MB and 256MB
low_priority_updates: This parameter allows higher concurrency for SELECTs. It may starve update queries.
bulk_insert_buffer_size: A buffer for bulk inserts optimization. Values of 1/4 of key_buffer_size make sense. The value is per connection .
The following are the InnoDB memory settings :
innodb_buffer_pool_size: This is the most important setting. About 80% of memory is allocated here.
innodb_buffer_pool_instances: Reduces contention. Set it to 4+ in MySQL 5.5+.
innodb_log_buffer_size: A buffer for log files. Good values are between 4MB and 128MB.
innodb_ibuf_max_size: Controls the size of the insert buffer. 1/2 of buffer pool by default. Smaller values are good for SSD.
The following are the InnoDB IO options :
innodb_flush_log_at_trx_commit: Controls durability. Use 1: flush and sync; 2: flush; 0: neither.
innodb_flush_method: this parameter controls how InnoDB performs IO. O_DIRECT is a good value for most servers.
innodb_auto_lru_dump: Percona Server feature designed for quick warm up. The good value is 300 (seconds).
innodb_io_capacity: Controls InnoDB assumption about disk performance. Increase it for faster drives,
innodb_read_io_threads:
innodb_write_io_threads: Controls the number of threads by doing reads and writes. Since MySQL 5.5 has async IO, very high values might not be needed; 4 is a good default value.
innodb_flush_neighbor_pages: Percona Server feature designed to control how flushing work. Disable it for SSD by setting to 0.
The following are other InnoDB options :
innodb_log_file_size: sizes of redoes log file. Larger logs provide better performance, but with longer recovery.
innodb_log_files_in_group: Leave it at 2.
innodb_file_per_table: Store each InnoDB table in a separate file.
innodb=force: Enable so MySQL is disabled to start if InnoDB could not initialize. Otherwise it might start but with the error on access to all InnoDB tables.
innodb_lock_wait_timeout: Waiting time for row-level locks before bailing out.
innodb_old_blocks_time: Use to make buffer pool scan resistant. Good values are around 1000.
innodb_file_format: Sets the file format that InnoDB will use. The default legacy format is Antelope. Barracuda allows you to use new features.
innodb_stats_on_metadata: Update statistics on metadata access (Information_schema queries). To disable it for more workloads, set to 0. InnoDB will refresh stats when the table changes significantly.
performance_schema: Enables Performance Schema in MySQL 5.5+ and watches potential overhead.
log_slow_queries: Enables Slow Query Log.
long_query_time: With this parameter set to 0 periodically, you can get sample of the load.
log_slow_verbosity=full: more data about queries in Percona Server.
low_warnings=2: Warnings about disconnects in an error log.
userstat_running=1: Advanced Table and Index usage statistics for both Percona Server and MariaDB .
MySQL Settings Optimization with Tuning Primer
The Tuning Primer shell script allows developers to review the MySQL settings of a Magento store and make adjustments to them for database stability and performance increase. The script analyzes MySQL stats and provides recommendations on tuning a MySQL server. The uptime required to correctly work the script is more than 48 hours. The Tuning Primer script is developed for all MySQL versions, starting with version 3.23.
Although there are a lot of articles about Magento performance, I advise you to pay attention to Magento on Steroids. Its author shares his best practices related to his daily work with Magento performance issues; he makes a strong emphasis on Magento server optimization.
Zend PHP Accelerator Configurations (Performance Improvements with OPcache)
As a code caching module, OPcache can significantly improve PHP performance and the performance of an entire store. OPcache uses shared memory to store a precompiled script bytecode, eliminating the need to load and parse scripts on every request, which is common for PHP. Thus by optimizing OPcache settings, you improve the performance of your Magento website. Check the article Enhanced Magento Performance with Optimized OPcache Settings to find out more about the optimization of OPcache settings.
Note that there are several other PHP accelerators developed to improve webstore performance. You can find the most useful and reliable solutions in our blog post The Best PHP Accelerators.
How to Use Redis with Magento
Redis (Remote dictionary server) is an open source, networked, in-memory data structure server that stores keys with optional durability. Being one of the most popular key-value stores, Redis is suitable for Magento. The ecommerce platform currently provides support for various cache back ends with file systems; but most of them cannot cope with a growing number of requests, thus they provide terrible scaling .
Moreover, some of them suffer from other limitations. A good example of such restrictions is the lack of support to group cache entries. To solve this problem, you can tune your Magento to a Redis store.
The current Memcached has no significant advantages over Redis. Both solutions are extremely fast, and all major features of Memcached are now offered by Redis. However, Redis surpasses Memcached. The latest version of Redis offers out-of-the-box clustering. The other useful tools are replication and Sentinel. With this combination, Redis offers a bunch of advantages over Memcached. The following features turn Redis into a real data store (Memcached is just a cache):
Data types with powerful commands: sorted sets, hashes, lists, and so forth
Default persistence to disk
Optimistic locking transactions (WATCH/MULTI/EXEC)
Extremely fast pub/sub
Values are limited to 512MB (1MB per key in Memcached)
Built-in clustering (as of 3.0)
Lua scripting (as of 2.6)
Furthermore, Redis is more flexible than Memcached. It provides higher scalability, availability, and administration. Redis is not only a better solution for use cases associated with Memcached, but it is also suitable for new occasions.
The process of the Redis implementation as a cache and session back end is fully described on Inchoo: Redis cache backend and session storage in Magento.
There is another useful article related to this topic: How to Use Redis with Magento.
Don’t miss this PDF tutorial: Redis as a Cache Backend in Magento.
There are two useful projects on GitHub as well. The first one is Cm_RedisSession. It is a Redis-based session handler designed for Magento. Cm_RedisSession has a lot of useful features.
Go to Cm_RedisSession for a detailed description of this tool. There, you will also find an installation tutorial and an example of configurations .
With Cm_Cache_Backend_Redis, you get a Zend_Cache back end with Redis and tags support. The back end makes it possible to turn every Redis server into a central cache storage. Keep in mind that with Cm_Cache_Backend_Redis, full tags support doesn’t require the use of TwoLevels cache. Thus, this back end is best suited for use in a cluster or on a single machine. Cm_Cache_Backend_Redis works with any Zend Framework project, all versions of Magento are supported as well.
How to Use CDN with Magento
A content delivery network (CDN) is a complex of servers with multiple data centers around the world and across the Internet. The main goal of every content delivery network is to provide content to end users with the highest possible performance and availability. CDNs work with different web objects and store downloadable content. They also provide faster access to apps, streaming media, and social networks. Thus, CDNs play an important role in modern online content delivery. There are dozens of possible solutions, but I would like to draw your attention to CloudFlare.
CloudFlare relies on recent hardware innovations, advanced network routing, and modern web server technology improvements. As a next-gen CDN, CloudFlare works better than its competitors. It is also more affordable and easier to set up. This CDN solution provides your website with a load speed that is twice as fast (regardless of the location of your visitors). I should also mention that CloudFlare works well with both static and dynamic content. Furthermore, the company guarantees that your Magento store will always be online. Last but not least, there is support for IPv6 networks and other CDNs. To set up your web store to use this CDN, you can utilize our CloudFlare control extension.
Get access to CloudFlare CDN37
Control for CloudFlare® Magento extension38
The Best CDN Services 39
Magento Application-side Performance
The speed of your Magento website is among the key aspects of your success in online business. Since speed is taken into account by every search engine, it influences rankings. Thus, sites with better performance have advantages over the slower ones. That’s why Magento’s application-side performance also plays a crucial role.
Full Page Cache Magento Extensions
There are a lot of full page cache Magento extensions designed to improve website speed and reduce page load time. All modules from this group are based on the same principle explained next. Magento automatically generates and delivers pages to first-time visitors. These pages are copied and saved to cache. At some point, all the pages of your Magento store get cached copies, and the necessity to generate new pages from scratch is eliminated. Therefore, the full page cache extension reduces the load from the database and the server, and decreases page load time.
You can find a complete list of the Full Page Cache extensions here: The Best Magento Full Page Cache Extensions40.
The best free solutions among these is Lesti; whereas the most robust paid FPC Magento module is Extendware.
The Lesti::Fpc Magento extension ( https://goo.gl/NHxxDs ) doesn’t require varnish or any other external tools and solutions. It works with events, replaces dynamic blocks before sending a response to the visitor, and caches cms_page_index, cms_index_index, catalog_product_view, and catalog_category_view pages by default. The module supports multiple stores and currencies. Additionally, Lesti::Fpc provides mobile themes and custom price groups. Hit this link for further information. Please note that the extension is good for small projects, but if you have a growing store, I definitely recommend that you use Extendware Full Page Cache.

Figure 1-24. Lesti_Fpc
This solution possesses a positive reputation and tons of reviews from professionals. It features several add-ons that make it even faster, offers support for Redis, and provides reliable customer service. By using this full page cache, you will be able to receive help from Extendware specialists. Here are the core features of the module :
Extendware Full Page Cache does not use the database, handling 90% of all requests. Thus, you can see the same speed as in Varnish, but with a better cache hit rate and easier configurations.
The module enables entire page cache, groups of pages, or just specific pages related to an affected product. Thus, you don’t flush what you don’t really need to.
Moreover, Extendware Full Page Cache fully supports catalog sorting. Please note that other similar extensions do not support the default Magento sort order changing in the catalog, which is the reason for incorrect caching in the default category sort order.
There is multi-level cache support. The Full Page Cache extension offers three cache systems combined in one. Primary Page Cache increases server throughput by more than 100+ times. Secondary Page Cache offers hole punch support for logged users or visitors with products in a cart. Lightening Page Cache is 2–200 times faster than the primary cache level.
Don’t forget to check other features in our Extendware Full Page Cache review: Extendware Full Page Cache Magento Extension Review41. You can also purchase the extension there.
Magento Cache Crawler/Warmer Extensions
It’s extremely necessary to enhance your Full Page Cache Extension with a warmer/crawler module. This module crawls your ecommerce store to ensure that all pages load as fast as possible. In addition, a warmer/crawler extension refreshes old cached pages. Thus, all of your customers get the newest content at the fastest speed.
Moreover, cache warmer/crawler extensions help improve a website’s cache hit rate by pre-caching uncached pages. As a result, you get more cached and less uncached requests. A list of warmers is here: The Best Full Page Cache Warmers/Crawlers For Magento42. I recommend that you use a solution offered by maverick193. You can get it for free. The best paid module is Extendware, which provides more robust features.
CSS and JS Minification
Another method of the Magento speed optimization concerns JavaScript and CSS files. It is possible to combine, compress, and cache them to enhance Magento’s performance. I recommend that you use the Fooman Speedster Advanced Magento extension for the aforementioned operations. The module combines multiple JavaScript files or CSS files into a single file. It reduces the total size of loadable files and the number of HTTP requests, so you get a shorter page load time. You can download the Speedster Magento extension for free.
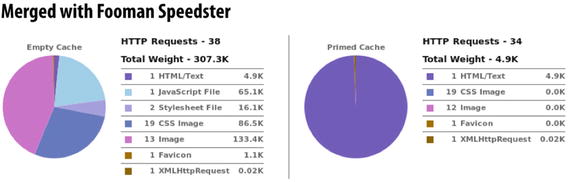
Figure 1-25. Fooman Speedster
Download Speedster Advanced Magento extension
Speedster Magento extension on GitHub
Extendware Minify JS / CSS / HTML Magento Extension43
Magento Cleaning
Due to an excellent logging system, the details of every request in Magento are logged. This leads to an oversized database, however, which slows down the website. Fortunately, there are many Magento cleaning solutions. Maintaining a database through log cleaning leads to a dramatic improvement in latency and performance. Nexcess explains how to optimize a large Magento database and increase the performance of an ecommerce store. You can take a look at a useful guide on Magikcommerce and these tips from different specialists. And don’t forget to protect yourself from future headaches with the Yireo_DisableLog Magento module. Since this tool stops Magento from logging things, you get a neater database that will never decrease the performance of your website.
Faster Re-index
Fast re-indexing is another aspect of the Magento server optimization. It reduces server loads by speeding up saving products in a catalog. As a result, you increase the performance of your online store.
By installing the Improved Indexing Magento module, you will significantly improve the speed of the back end. Thus, saving products and categories will be much faster with this extension, and your administrators will be able to perform more tasks in a minimal amount of time .
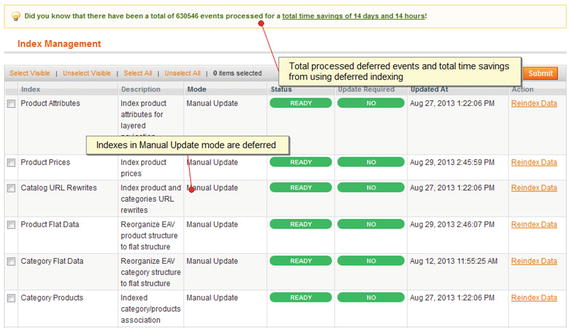
Figure 1-26. Improved Indexing
With the Fast Asynchronous Re-indexing extension, you will also boost the performance of your Magento website. This module reduces peak loads on a server by speeding up admin-related processes. When someone adds a new product or changes an existing one, a query to re-index goods occurs. With the Fast Asynchronous Re-indexing extension, a cron process performs data re-indexing in the background. Thus, admins can work continuously without any need to wait until re-indexing is finished.

Figure 1-27. Fast Asynchronous Re-indexing
Varnish Cache
Varnish is designed to minimize a number of contentions between threads. It stores data in virtual memory. The selection of what data goes to disk and what is stored in the OS cache occurs. As a result, you can avoid a situation where the data is cached by the operating system and at the same time moved to a disk.
The Turpentine Magento Extension is developed to improve Magento’s compatibility with Varnish. With the aid of Turpentine, you can improve your website’s performance by adding a fast-caching reverse proxy to its system. Unfortunately, the default solution doesn’t cache requests with cookies, so Magento’s front-end cookies cause a near zero hit-rate with Varnish. By installing the Turpentine Magento extension, you provide the system with Varnish configuration files (VCLs) and improve Magento’s behavior. Thus, Varnish works with Magento.
Turpentine on GitHub
You can use the official manual to learn how to use Magento + Varnish Cache. And don’t forget to check a comparison of Full Page Cache vs. Varnish Cache on Amasty.
Improved Magento Catalog Search
A reliable searching tool is useful for every ecommerce store. Luckily, there are a lot of extensions designed for providing visitors with the ability to find the desired content. I recommend that you pay attention to the Sphinx Search Ultimate and Managed Elasticsearch Magento extensions.
The Sphinx Search Ultimate extension helps you improve the quality of a search. The module supports more than 660 stop words and understands more than 60,000 synonyms. It provides your customers with the ability to perform a searching query by category names, tags, and product SKUs. The extension costs $149.
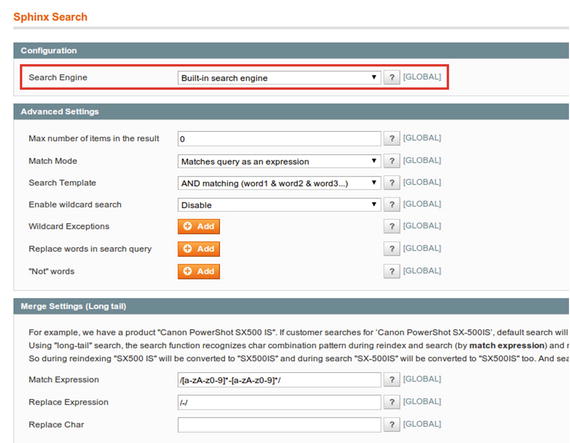
Figure 1-28. Sphinx Search Ultimate
Mirasvit Sphinx Search Ultimate Review44
The Managed Elasticsearch Magento extension provides one of the most powerful full-text search options available as an open source product. With this Magento module, you provide your customers with precise and reliable search results. Additionally, there is the opportunity to configure attribute names, descriptions, and SKUs as searchable attributes with this extension.
Download Managed Elasticsearch
How to Improve Checkout and Add to Cart Speed in Magento
Although you can cache static CMS pages, like products and categories, with Full Page Cache, along with a fast back-end cache storage, such as Redis or Memcached, you will still have slow dynamic pages. Thus, it is vital to increase checkout and add-to-cart speed in your Magento setup. There are also problems related to PHP/web server, which slow down your store. Next, I’ll teach you how to improve default performance, making your customers loyal to your brand.
One Step Checkout
First, I’d like to draw your attention to One Step Checkout extensions, since they are more user-friendly than a default solution. There is an appropriate list of such modules on the Firebear blog (The Best One Step / Page Checkout Extensions For Magento45). The best free tool is One Step/Page Checkout by IWD ( https://goo.gl/72qrA8 ). The most reliable paid solution is One Step Checkout ( http://goo.gl/2MjSf ). By installing one of these extensions, you significantly improve the time required for checkout.

Figure 1-29. One Step Checkout
PHP Accelerators
Another crucial aspect that helps to increase site speed is the usage of PHP accelerators designed to improve the performance of PHP apps. Most of them cache compiled opcode/bytecode to avoid overhead caused by compiling source code during each request. The cached code is stored in a shared memory and executed from there. As a result, PHP accelerators minimize the amount of slow disk reads and decrease memory copying at a runtime. The best PHP accelerators are described here: The Best PHP Accelerators46.
Cache Back End
You can easily improve your cache back end with the help of the Performance Cache Backends extension by Extendware. The module provides improved file-based and Redis-based caches optimized for tag flushing. As a result, you get a faster add-to-cart process, checkout, and product savings. The extension costs $149 and you can check its review here: Extendware Cache Backends / Faster Checkout Magento Extension47.
Indexing
Improved Indexing is another extension by Extendware aimed at improving the performance of your Magento store. The module increases the speed of the administrative back end. It reduces all slowdowns that occur when saving products or categories. As a result, you can perform the same amount of work faster. The price of Improved Indexing is $139. You can check the extension here: Extendware Improved Indexing Magento Extension Review48.
The Most Reliable Community Advice
By monitoring different forums, I’ve highlighted the following important steps:
To increase the speed of Magento checkout, disable the Mage_Rss module, since it forces a “cache clean” four times during a checkout process slowing down your website.
If you aren’t using downloadable products, turn off Mage_Downloadable. This will help to increase the checkout speed, as well as reduce the time necessary for cart actions when there are multiple items in a cart.
Set your indexes to manual and disable cache tag storage. Both changes provide a huge impact on performance as they prevent Magento from flushing out caches and re-indexing for each order. Unfortunately, these actions can make your content stale.
Perform some profiling and wire up xhprof/xhgui.
Disable Some Core Extensions
The following are some of the core extensions that need to be disabled.
Mage_Adminnotification
Mage_Authorizenet
Mage_Bundle (if it is not used on your website)
Mage_Downloadable
Mage_GiftMessage
Phoenix_Moneybookers
Mage_Paygate (along with disabled Mage_Paypal, Mage_PaypalUk, and Mage_Authorizenet)
Mage_Poll
Mage_Rating (if it is not used on your website)
Mage_Rss
Mage_Sendfriend
Mage_Tag (if it is not used on your website)
Mage_Weee (along with disabled Mage_XmlConnect)
You can turn off more core extensions, depending on your project, but these are the ones that should be disabled most often. Just make sure that you don’t break the stability of your Magento.
Always clean the cache and do full end-to-end store testing after disabling to make sure that everything works well and there are no errors.
Enterprise-Class Magento Performance Solutions
This section discusses Enterprise-class Magento performance solutions.
Dedicated Magento Multi-Servers/Clusters
Magento Enterprise Clusters by Nexcess offers the highest possible performance. All solutions utilize the latest security and performance enhancements. Each cluster is individually built, optimized, and customized for Magento, and all of them include access to Nexcess’ CDN. A basic solution is Two-Node Cluster, both a web application server and a database server. With this solution, you can split your Magento store load into two independent servers. In addition, you will get such features as extra firewalling and staging environments. Two-Node Cluster starts from $1,499 per month.
Similar to Nexcess is Rackspace. It hosts more Magento sites than any other competitor. The company provides simple and powerful templates for self-service management. Other advantages of Rackspace include flexible architecture options, end-to-end support, and exceptional customer experience.
Mgt-commerce also offers Enterprise-class performance solutions for Magento and provides first-rate hosting services. By choosing this option, you get additional time for managing your business, since Mgt-commerce offers four types of multi-server environments optimized for blazing speed. The basic solution starts at $249 .
And don’t forget to look at Dedicated Magento Cluster by Byte. It also aims at enhancing the performance of your website. The basic solution costs $1,800 per month.
How to Scale Magento in a Multi-Hosting Environment
In this tutorial on severalnines, the author shows how to cluster Magento, Nginx, and MySQL on multiple servers. The article is full of useful tips, demonstrative visual materials, and examples. There are also articles on Stack Exchange that show how to scale Magento in a multi-hosting environment. I recommend that you pay attention to a post by Valentine Okafor. It describes the process of moving a Magento database to a different server .
Now your Magento store has an incredible performance range but it is still insecure. Hackers can steal vital data from your website, turn off the ecommerce store, and even digitally rob your customers. Next, I explain how to avoid these problems by turning your Magento store into a fortress.
Security Guide
Thousands of Magento websites were infected with the Guruincsite malware, so it is extremely important to find out if your store is infected and to prevent it from the virus. For further information, check this article: Guruincsite Magento Disaster49.
SUPEE-6788 was released to help solve the Guruincsite problem. For further information about how to download and install the patch to remove the problem, visit our Magento security patches50 post.
Eighty percent of Magento shops worldwide are still vulnerable. Check the following infographic by Byte for further information. Alternatively, you can read the entire article related to the problem (the infographic is the illustration of the article). It describes the reason why people do not patch their Magento websites, so it might change your opinion about the security problems. 80% of Magento shops worldwide still vulnerable51.
Fortunately, you can easily scan your Magento shop for known security vulnerabilities on MageReport52.
Although Magento is the safest ecommerce platform, there are still additional security tricks that make it even safer. Thousands of Magento websites have been hacked during the past few years. Luckily, there are several useful methods developed to fix all the major problems. Next, the most important security tips and reliable security extensions are described. You can also check this guide: Magento Security Ultimate Guide53.
Name and Password
You should make all of your Magento passwords unique and strong. The same goes for your admin name. This simple step can help you improve the security of your website. Just create a password that is longer than eight characters and to some extent, you will prevent your store from being hacked. Note that passwords should combine numbers, letters, and special characters. Indeed, do not use weak usernames such as “admin” or “administrator”. If you are using an insecure name and password, you can always change them in System ➤ My Account.
Custom Path for Admin Panel
A default path to an admin panel has the following construction: http://storename.com/admin . Everyone knows it—consequently, it is among Magento security vulnerabilities. By changing it to more complex path—for example, http://storename.com/superadmin , you push the security of your ecommerce website to a new level. This small step is the best defense against broken authentication and session management attacks.
You can always change the Magento admin path in the app/etc/local.xml file. Find the line which contains <![CDATA[admin]]> and create a new string instead of admin, for instance, superadmin. The new code should look as follows: <![CDATA[superadmin]]>.
Two-Factor Authentication
Another reliable security technique is two-factor authentication. It adds an additional security layer to an existing one. The system requires two separate authentications to provide users with access. Thus, your Magento website becomes two times more secure. You can provide your admins with the two-factor authentication solution using one of these Magento modules: Xtento Two-Factor Authentication54 or Extendware Two-Factor Authentication55. More Admin Login Security Tools56.
Encrypted (HTTPS/SSL) Connection
Another essential security improvement is the usage of the HTTPS/SSL–secure URLs. By being HTTPS/SSL–encrypted , your ecommerce website is PCI-compliant as well. This means that you will get a secure data transfer between your site and server. Otherwise, there is a risk that data (database information and login details) will be intercepted by hackers.
To enable the HTTPS/SSL secure URLs, you should go to System ➤ Configuration ➤ General ➤ Web. Then, it is necessary to change “http” to “https” in the base URL, and enable the “Use secure URLs for both Frontend and Admin” feature.
File Upload with Secure FTP
In addition to HTTPS/SSL–secure URLs, you can also take care of the FTP connection with your server. Use SFTP because it provides an additional encryption of user credentials. This protocol uses a private key file for authentication. Make sure that file permissions are not set to 777; otherwise, anyone will be able to rewrite them.
Pre-Defined IP Addresses for Administrators
Magento provides the opportunity to set predefined IP addresses for accessing the admin panel, which is a robust security enhancement. You just have to create a list of IPs. This way, users with other addresses won’t be able to access the admin panel of your website.
To implement this security feature, find your .htaccess file and enter the following code:
1 AuthName "Protected Area"2 AuthType Basic3 <Limit GET POST>4 order deny,allow5 deny from all6 allow from 172.161.132.137 allow from 153.1198 </Limit>
Hence, you implement the user permission to access your admin panel with the 172.161.132.13 IP address, and for everyone whose IP address starts with 153.119. This technique supports an unlimited number of IP addresses.
Then, you should go to the Magento root directory and create a new folder called admin. Copy the index.php file of your Magento and paste it there. Now, you have to change relative paths to the config.php and Mage.php files. Change the following lines:
1 $compilerConfig = '../includes/config.php';2 $mageFilename = '../app/Mage.php';
You should only add '../'.
Now go to the. htaccess file and enter the following lines:
1 Redirect permanent /index.php/{admin_path} /admin/index.php/{admin_path}2 Redirect 301 /index.php/{admin_path} /admin/index.php/{admin_path}
Therefore, you will direct users coming to our admin to a new directory. {admin_path} indicates the new admin path that was manually changed .
This security step works only with static IP addresses. If your ISP assigns dynamic IP addresses, you shouldn’t implement this technique.
Malicious PHP Functions
There are malicious PHP functions that should be disabled. You can use more secure alternatives instead. To disable these functions, find your php.ini file, open it, and add the following code:
1 disable_functions = "apache_child_terminate, apache_setenv, define_syslog_variables, escap2 eshellarg, escapeshellcmd, eval, exec, fp, fput, ftp_connect, ftp_exec, ftp_get, ftp_login3 , ftp_nb_fput, ftp_put, ftp_raw, ftp_rawlist, highlight_file, ini_alter, ini_get_all, ini_4 restore, inject_code, mysql_pconnect, openlog, passthru, php_uname, phpAds_remoteInfo, php5 Ads_XmlRpc, phpAds_xmlrpcDecode, phpAds_xmlrpcEncode, popen, posix_getpwuid, posix_kill, p6 osix_mkfifo, posix_setpgid, posix_setsid, posix_setuid, posix_setuid, posix_uname, proc_cl7 ose, proc_get_status, proc_nice, proc_open, proc_terminate, shell_exec, syslog, system, xm8 lrpc_entity_decode"
Take into account that you can disable other functions in your php.ini file, as well as omit important functions from the code.
Directory Listing
Directory listing is among common server loopholes. It provides everyone with the ability to see the directory structure and location of all of its files by simply entering a website’s URL. Therefore, you should disable directory indexing by adding the following code in your .htaccess file:
1 Options -IndexesMySQL Injections
Since every Magento website has many form fields for user data input, hackers can easily steal this data by injecting MySQL statements. To protect your store from such a threat, you should use web firewalls (several apps are described next).
To solve this problem, update your Magento to the latest version because it always provides a lot of improvements, bug fixes, new features, and security enhancements. At the same time, there is the possibility of new, undiscovered problems related to the latest update.
Create backups of your Magento store regularly. This helps you decrease every hack damage level and you will be able to restore your Magento website faster.
Fix all email loopholes. Keep in mind that your email should not be widely known. It should be protected by a unique and secure password as well .
Check the security of your Magento website regularly. This will help you find all issues at early stages.
Always update your antivirus software. Older versions are not able to protect your store from the latest threats.
Find out where your browser comes from. The browser stores a lot of necessary information about your Magento website. Try not to save passwords in it because any access to your computer allows hackers to easily get your credentials.
Hide the local.xml file from public access. It contains sensitive data, such as database information and the encryption key. Hide it. You can do it by changing file permissions for local.xml to 600(-rw) or blocking a web access to the entire app directory.
Upgrade your OS to the most recent version. It should provide new security improvements.
Install Magento security patches. They are developed to fix all current security problems on your store. When writing this guide, SUPEE-6285 was the latest.
Make sure that your hosting provider is reliable and secure. Note that some hosting providers are not prepared for hacker attacks.
Provide limited permissions for files and documents. For downloadable documents, set only read permissions, so that no program will be able to modify them.
Disable Magento Connect Manager after installing extensions. This prevents any random changes .
Use only trusted Magento extensions from reliable sources, such as Magento Connect.
Change passwords for outside developers. You can reset your original passwords after work is done.
Check web server logs for errors or suspicious activities. This way, you will be able to detect threats at early stages.
Block unwanted countries if you are not shipping worldwide. You can utilize the GeoIP Legacy Apache module.
See the PDF for more tips.
Magento Security Extensions
First, check Amasty Security Suite for Magento57, since it is an all-in-one solution. Next, examine the following list.
The ET IP Security extension restricts access to your Magento website by IP addresses or IP masks, so you don’t have to implement this security technique manually. The module redirects customers without access to a page specified in settings (it can be just a blank page). The extension is free. Download ET IP Security Magento Extension.

Figure 1-30. ET IP Security
With the SecureTrading Magento module, you will be able to integrate your ecommerce website with STPP - The SecureTrading Payment Pages. This gateway provides a secure acceptance of online payments. Your store doesn’t even have to be PCI-compliant (but it should) with this module, since all of your customers will be redirected to the servers of SecureTrading to enter card information. This solution relies on iframes and custom CSS/JavaScript. It provides two payment methods: Payment Pages, which is based on redirection to Secure Trading, where credit card information is captured, and API, where all information is captured on your server (less secure). The module is also free. Download SecureTrading Magento Extensions.
With the help of Trusted Shops with Trustbadge, you provide your customers with insight into the reliability of your store. The extension shows a trust badge, which displays such information as reviews, trustmarks, and money-back guarantees. Although the module doesn’t provide any security fixes, it shows that your Magento store is a secure place. And you can download it for free. Download Trusted Shops with Trustbadge Magento Extension.
Authorize.Net CIM is designed for the improved payment security of your ecommerce website. It supports all Magento payment actions and allows customers to save payment information for future usage. As a result, they can enjoy a rapid checkout without disregarding PCI compliance. I should also mention that Authorize.Net CIM supports ACH and recurring profiles. The extension costs $599. Download Authorize.Net CIM with Recurring Profiles.
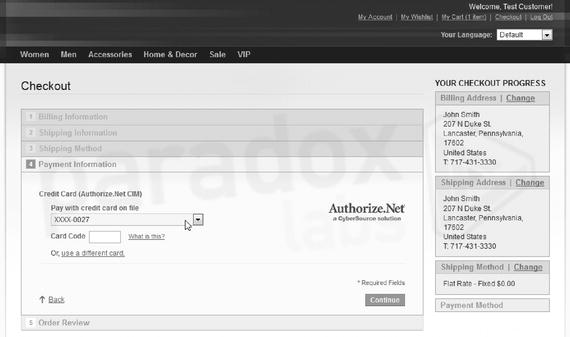
Figure 1-31. Authorize.Net CIM
With the Enhanced Admin Security: Two-Factor Authentication Magento module , you are able to enhance the security of your store by utilizing two-factor authentication. Thus, your admins will have to enter a username, password, and security code to log in to the system. The code, which is generated by an application on a smartphone, can be used only once within 30 seconds. You can download the Enhanced Admin Security Magento extension for $69. Download Enhanced Admin Security Magento Module.
Figure 1-32. Two-Factor Authentication
Magento: Two-Factor-Authentication is a free alternative to the previous solution. With this module, back-end users with access to Magento’s protected resources are asked to enter a one-time security code after standard authentication. The code is generated by the Google Authenticator application. Download Magento: Two-Factor-Authentication from GitHub.

Figure 1-33. Magento Two-Factor-Authentication
MageFirewall Security creates an additional layer of security around your Magento website by utilizing the Magento firewall. This extension relies on the Ninja Firewall rules to block attackers, blacklist them, and prevent their access to your site. MageFirewall uses a scanner to alert you if hackers break into your website. In addition, it provides recommendations on your store setup. The extension is free. Download MageFirewall Security from Magento Connect.

Figure 1-34. MageFirewall Security
Don’t forget to check an important article regarding Critical Security Patches, located here: http://goo.gl/JTXc83 . Security problems described in this article can be solved by installing the latest versions of the platform or manually. In this article, I shed light on all the solutions and provide relevant information about the problem. But don’t spend too much time on critical security patches; there is still a lot of work to do with search engine optimization (SEO).
SEO
Search engines provide your potential customers with a list of search results, where your ecommerce website is shown. This list often consists of hundreds of pages. You want to see your Magento store at the top; otherwise, it will be lost among the others, and your potential customers will never visit it. The only helpful solution to this problem is search engine optimization. I have gathered everything that you need to know about this process.
You can start your search engine optimization with the Magento extensions described earlier. You can also find the best solutions in this post: Best Magento SEO Extensions58. Additionally, you can check Magento Connect for more modules—just hit this link. If you need a single reliable solution, pay attention to the Creare SEO Magento extension. The module is free, but at the same time it is one of the most robust SEO solutions. It enhances your store with several new features, such as an HTML sitemap; unique category headings; Noindex on category filters; config editable .htaccess and robots.txt files; default page titles and metadescriptions for categories and products; discontinued products and 301 redirects; the ability to disable keywords and meta description tags; Twitter cards for product pages; a script for performance cleanup; the Breadcrumbs schema; a SEO checking page in admin; an XML sitemap fix; a product attribute validator; the canonical product redirect, and so forth. You can download Creare SEO from Magento Connect here. Hit this link for additional information about the extension.
Take into consideration that search engines love fast websites, and ecommerce stores are not an exception. So you can improve your rankings by making your store faster.
Just enhance the performance of your Magento website and you will get better SEO results. Moreover, you will make your customers more loyal, because they, as well as search engines, have a better opinion of faster websites.
In addition to extensions and performance, there are plenty of tips and tricks for guaranteed search engine optimization on every website. Next, you will find the most popular SEO solutions taken from this post: Ultimate Guide to Magento SEO59. Also check our DIY SEO articles60.
Stay Away from Manufacturer’s Descriptions
Many ecommerce merchants use manufacturer’s descriptions in their initial state. As a result, hundreds of web stores post the same content. Of course, this provides a negative impact on SEO, since search engines want to index only unique content. Add something new to the description of your goods, and you will get better rankings. I strongly recommend that you avoid copying content from other websites. Spend additional time (or money) on rewriting product descriptions.
Extract Benefits from Your Image Alt Tags
There is an “alt” property in the image HTML tag that was originally designed for slow Internet connections. But now it has a new purpose. The image alt tag can be used for the search engine optimization of your Magento store. Google relies on the content of alt tags to define what is on the page (mostly images). That’s why you should create small descriptions in the alt property in order to improve SEO.
Tool up with Link Building
A proper link-building strategy will significantly improve the SEO optimization of your Magento store. Also don’t forget about cross linking within your website. Check our blog post on Link Building Strategies to find out the core SEO improvements that you can perform with the help of this set of tactics.
Get More Profit from Similar Products
Let’s imagine that a visitor has landed on the web page of a product that he doesn’t want. You can still save the day by proposing similar products on the same page. Thus, the customer does not leave your site immediately and won’t provide a negative impact on your rankings. Moreover, you will be able to upsell by offering similar goods. Check this list of the Best Related Products Magento Extensions for additional information.
Utilize Popular Products Properly
Use your homepage to display products that are popular on the market or within your store. This will help engage your returning visitors immediately.
Make Discontinued Products Work for You
Some products from your ecommerce store probably no longer exist. But don’t be in haste deleting their pages. Instead, redirect your visitors from old pages to new ones by using the server 301 redirect code. You will preserve all of your page rankings this way, so don’t make obvious mistakes by deleting useful content.
What Should I Do with the 302 Redirects
Whereas the 301 redirect is a real SEO savior, the 302 redirect is a harmful one because it doesn’t pass any link juice to a new page (301 does). Thus, you lose traffic and rankings if you use the 302 redirect. However, it’s good to apply it with compare links, wish list links, geolocations, and currency switch links. Visit this page to find out more about the 302 redirect.
Create a Perfect 404 Page
Deleted page links stay in search engines for a certain amount of time. When a customer clicks such a link, the 404 error page is displayed. I recommend that you customize your 404 page to help visitors find the products that they are looking for. That’s why a custom 404 page can save you from losing traffic.
Better SEO Results with Good Navigation
When a random user visits your Magento store from a search engine page, but leaves it to perform another query, he provides a negative impact on your rankings. The core reason for such behavior is navigation. Provide your visitors with a proper user experience and you will prevent your Magento SEO from this negative impact. Therefore, make it easy for users to find the desired products within your store.
Clean up Your URLs from Store Codes
With default configurations, Magento adds store codes to URLs. These unique identifiers are good for locating products within your database, but they are inappropriate in URLs. Disable store codes by setting “Add Store Codes to URLs” to No. Go to the Configuration menu, select Web, and then Search Engine Optimization. You will see an appropriate option there.
Optimize your Magento Store Wisely with Google Analytics
With Google Analytics, you can get all the information that is essential for SEO optimization. Luckily, there is an opportunity to connect this service to your ecommerce store without any headaches, since Magento supports GA integration. Be wise and get more from available resources.
Turn Your Visitors into Buyers with the Aid of the Right Keywords
Keywords influence the effectiveness of optimization. Some keywords are more for “buying” than others. Pay attention to this nuance, and you will be able to gain more from your Magento website.
Unleash the Power of Blogging
By adding a blog to your digital store, you are able to improve its SEO. Post unique and relevant content, communicate with your visitors, provide them with useful information, and you will engage more customers.
Get More from Rich Snippets
Due to rich snippets , you can integrate different HTML5 components into your products, improving their SEO. For example, ratings and reviews integrated into products appear in search engine results and provide you with competitive advantages over other ecommerce websites (if they are a five-star ratings).
Enhance SEO with the Help of Security
Use SSL certificates to provide both customers and search engines with a sense of security. You will learn how to use SSL later in this chapter.
Never Forget About Your Robots.txt File
It is extremely important to make a custom robots.txt file . All ecommerce stores are different, so a generic robots.txt file is unacceptable. I strongly recommend that you consider applying the Google Webmaster Tool before using it on a web store.
Stay Mobile-Friendly
If you have an audience of mobile users, then you should provide them with a mobile-friendly version of your Magento store. According to Google’s policy, websites with a responsive design (or with a mobile version) get better rankings in a mobile search. Check our posts about Mobilegeddon and Responsive Design for a better understanding of the problem.
Be the King of Social Media
Utilize the power of social networks. You will not only improve your SEO, but you will get many more new buyers. Pay attention to the fact that Facebook and Twitter can become the driving forces of your sales. You just have to use them properly.
That’s all in regards to small SEO tips. More robust optimization is waiting for you next!
More Complex Search Engine Optimizations
If the preceding information is not enough for your ecommerce store, and you plan to implement more robust changes to improve SEO, then this section of the chapter is for you.
1. Start with the Basics
1.1. General Configurations
Magento is not only one of the safest ecommerce platforms, but it is one of the most SEO-friendly solutions and you can always make it even more SEO optimized.
I recommend that you update your store to the latest version of the platform and enable Server URL rewrites. Just go to System, open Configuration, click the Web options, and make an improvement in the Search Engines Optimization section. On the same screen, set Add Store Code to URLs (under URL Options) to No.
You can choose between a www and a non-www version of your website URL. But which version is more SEO-friendly?
There is no definite answer to this question, so you should decide which one is better for you. I only recommend that you create a 301 redirect if you change this setting. Use .htaccess with mod_rewrite, because it prevents Magento from adding SID queries to URLs.
1.2. Header
“Magento Commerce” is the default title of your Magento store. To improve your SEO, you should change this. You can do it in Configuration ➤ Design ➤ HTML Head. Change the default title to a new one that describes your store.
You can also add a store name to all of your website’s page titles in the Title Suffix field. Keep Prefix, Default Description, and Default Keywords fields empty.
There are production and non-production environments on your Magento store. Both have default robots. For non-production applications, you should set NOINDEX, NOFOLLOW; for all others, set INDEX, FOLLOW.
Don’t forget about canonical URLs. You can set them using one of these modules.
1.3. CMS Pages
To get better rankings, you can optimize your Magento store’s CMS pages . When they are filled with decent content, take both a page title and a SEF URL identifier, go to the Metadata tab, and create descriptions for the CMS pages that you are going to work with.
Keep the Keywords field empty. Please note that you should create descriptions with your customers in mind, because the descriptions are displayed on search results pages. Use only informative descriptions that you’ve written. Avoid using autogenerated descriptions.
1.4. Category
To prevent duplicate content issues associated with categories, you should disable the “Use categories path for product URLs” option. Go to System, open Configuration, find the Catalog options, and click Search Engine Optimization. Set the parameter to No.
To set category information , go to Catalog ➤ Manage Categories and Descriptions in Meta Description fields and create a short description. At the same time, use keyword-rich URLs in URL Key field. Keep the Page Title empty.
1.5. Product Pages
The optimization of product pages is almost the same as with categories. Keep in mind that Meta Title overwrites the title of a page.
Additional search engine optimization includes work with images. You should use the alt tag to make your Magento website more SEO-friendly.
2. Make the Most out of the Magento Template
2.1. Headings
Let’s start with the logo. In a default template, it is the <h1> tag, which should be used on the front page only! For other pages, use the <h3> tag or lower. Keep in mind that it is extremely important to use an <h1> tag for the title of content.
Don’t use headers in side columns and make all text relevant to your shop. Replace all <h4> tags for keywordless titles in <div> with <strong> tags.
Use an <h3> tag for product names and <h1> for a category name on category pages. In every product page, put the name of a product in an <h1> tag.
2.2 Clean up Code
Optimize your template file by moving JavaScript and CSS to external files. Keep your templates clean to get better SEO.
2.3. Speed up Your Store
If you don’t want to deal with a complicated tutorial, you can implement the following Magento SEO tips:
Enable caching features in System ➤ Cache Management.
Optimize host and server configurations.
Also, decrease the number of external files! This will help you improve Magento performance. You can even merge several external files into one.
3. The Curse of Duplicate Content
Your Magento store has a lot of duplicate content . Due to layered navigation and sorting options, every product can be available on up to four pages. You should get rid of copied content; search engines must spider it without indexing.
3.1. Noindex
Install this extension61 (or you can use an alternative solution) for the implementation of Noindex.
Go to Settings to check if the indexing of all non-content pages is prevented.
Set all options to Yes. Now, search engines can follow all the links from a set of pages but don’t show them while indexing .
3.2 Nofollow
Now it’s time to optimize your non-content pages (it can be painful). To prevent a negative impact from login and checkout pages, wish lists, RSS feeds, layered navigation, and other similar pages, go to your template files and manually add Nofollow to the appropriate links.
3.3 XML Sitemap
Use XML sitemap to provide search engines with information about your content. Furthermore, your store will be indexed faster. Go to Catalog ➤ Google Sitemap ➤ Add Sitemap to create a sitemap manually. Don’t forget to create a new XML sitemap every time you change your inventory.
4. Dealing with Layered Navigation
Layered navigation is one of the biggest optimization nightmares because it is the core reason for duplicate content. Therefore, I’ve decided to make a separate section related to this problem.
4.1. Canonical Tag
A canonical tag is the number-one remedy for layered navigation. It shows the URLs that are available for indexing purposes, so search engines index only appropriate content from your website. It is also necessary to mention the simplicity of the canonical tag implementation, so don’t be afraid to utilize this technique.
4.2. Parameter Handling
There is a Parameter Handling resource in the Google Webmaster Tool. You can utilize it to make your store even more SEO-friendly. The Parameter Handling resource tells Google how to interact with your Magento website pages. It’s a very powerful tool and you should combine it with the following technique.
4.3. Meta Rules
Use Meta Rules to curb layered navigation. They were partly described along with Noindex and Nofollow.
4.4. Ajax Navigation
Ajax navigation is the most complex and effective solution. It relies on filters to avoid the duplicate content issue. Thus, you don’t have to optimize Ajax navigation for better SEO results.
Integration with Google Services
Magento Integration with Google Services is another key part of search engine optimization. Next, I explain how to connect your store with Analytics, WebMaster, and AdWords.
Google Analytics Magento Integration
Google Analytics is one of your major analytics tools. This freemium service provides the ability to track big data related to the traffic of your ecommerce website. You can easily review online campaigns and see what happens on your online store in real time. With the help of the following Magento extensions, you will be able to integrate Google Analytics with your ecommerce website and enhance default abilities of the platform. See our blog post Magento Integration with Google Analytics and other Services62.
Google Analytics+ adds new features and advanced capabilities to the default module. The extension supports Universal Analytics and dynamic remarketing tags; helps improve conversions; tracks checkout process and AdWords conversions; and filters reports by different customers. Furthermore, you will be able to track data in a secondary profile and combine several sites in one account with this extension. The module is free.
Download the Google Analytics+ Magento Extension.
With the Google Universal Analytics by Aromicon module, you can also enhance your ecommerce store with Google Universal Analytics. The extension offers ecommerce tracking as well, so you don’t have to spend time on its manual implementation. In addition, you will get funnel tracking for checkout. Google Universal Analytics by Aromicon is compatible with Magento CE 1.4+ and Magento EE 1.10+. The module adds an appropriate script to the head or before the body end. You can download it free of charge.
Download Google Universal Analytics Magento Extension
Also see the Extendware Google Analytics Dashboard63. It helps you integrate the Google Analytics dashboard into the Magento back end.
If the methods described are not enough for you, read the following guidelines. The following five steps show how to implement all the ecommerce capabilities built into Google AdWords.
Magic with a new Universal Google Analytics Tracking Code
Get a new Universal Google Analytics tracking code and place it on your Magento store. Here are the steps to do so:
In the Google Analytics admin, find the Property column.
Choose the property that you’re going to work with.
Go to Tracking Info and select Tracking Code.
Copy and paste a new Universal GA tracking code into the source code of your website.
Every page of your Magento website has the html/head.phtml file with a child theme in it. You should paste the new code there before the closing tag. Don’t forget to place it on all the pages in your website; otherwise, data will be tracked imprecisely.
Use developer tools in a browser to check if the code was added in a proper way.
Preparation in Magento Admin
Now you should enable the Google API in your Magento store. In admin, navigate to Configure, find Sales, and go to Google API. You can enable Google Analytics API there.
Adding Google Analytics Demographics to the Game
Congratulations! You have implemented the standard Universal Google Analytics tracking code, but this is just the beginning. Unfortunately, you still don’t have the ability to see demographics data. Additional coding work is waiting for you next. Note that you will have to verify it under Audience-Demographics-Overview tab. I recommend that you check the following Google articles; each offers a detailed description of this process:
Enable Remarketing and Advertising Reporting Features in Google Analytics
About Advertising Features
Enabling eCommerce Tracking
The following information will help you set up ecommerce tracking based on Google Analytics. First, you need to enable a reporting view with ecommerce data:
Sign in to Google Analytics.
Use the Account ➤ Property ➤ View drop-down menu to navigate to the desired view.
Find the View column and select Ecommerce Settings there.
Enable an appropriate option by setting a toggle to ON.
You can also turn on Enhanced Ecommerce.
Submit all the aforementioned actions.
Go to Property Settings under Property column to find out your tracking id.
Now it’s time to work in Magento Admin. Navigate to System ➤ Configuration ➤ Google API ➤ Google Analytics. Paste your tracking id into the Account Number field.
Set Enable to Yes.
Save new configurations by clicking Save Config.
To properly use Google Tag Manager, check this setup guide. Note that you have to add basic page tracking. For third-party shopping carts and transaction tracking across separate domains, check this guide. Take into consideration that the feature is unnecessary if your ecommerce website and shopping cart software are on the same domain.
Keep in mind that you will have to work with JavaScript in order to collect ecommerce data from your website. Therefore, check this Google Analytics documentation on Ecommerce Tracking and this one on Enhanced Ecommerce Tracking.
To gather ecommerce data from Android and iOS apps, read this official documentation. I recommend that you check this post on an Internet-connected device, such as POS .
Setting up Conversion Tracking
In order to set up conversion tracking, take the following steps:
Go to the Account and Property columns in the Analytics admin.
Select your property.
Navigate to Tracking Info-Tracking Code.
Get a code.
Add it to the Magento HTML head in Configuration-Web-HTML Head.
However, you can also add the code manually, as follows:
With the aid of an FTP client, go to the /checkout/success.phtml file.
Use an editor to open the file.
Place the GA tracking code in the bottom of this file.
Save and upload the file.
Test that everything is OK with the URLs. You can do it under Real Time-Conversions. If a particular goal is not working, you should navigate to Admin-Goals and check that the URLs are correct. Take into account that destination should be set to the final success page.
Google Webmasters Magento Integration
With Google_Webmasters , you will get all the necessary data and a set of tools for making your Magento store Google-friendly. If you rely on traffic from this search engine (and I know that you do), the Google Webmasters integration is inevitable. Next, I will show you two ways of Google Sitemap Magento Implementation.
How to Manually Create Google Sitemap in Magento
The following explains How to Manually Create Google Sitemap in Magento
Log in to the Magento admin.
Navigate to Catalog-Google Sitemap.
Create a sitemap with the following URL: http://www.example.com/sitemap/sitemap.xml .
Required conditions: Set FTP to your server and sitemap folders chmoded to 777.
Navigate to the Magento admin and hit the Add Sitemap button.
Set up the default values.
Go to System ➤ Configuration ➤ Catalog ➤ Google Sitemap and configure the sitemap.
Check XML Tag definitions here.
Enter the following URL manually to begin the creation of the sitemap: http://www.example.co id/actualSitemapID.
I also suggest that you check this How to Set Up a Cron Job article.
Creare HTML Sitemap for SEO
With the help of this extension, you will be able to replace a default Magento paginated sitemap with an SEO-friendly one that lists all the categories of your ecommerce website in a cascading style. The Creare HTML Sitemap for SEO Magento module lists all CMS pages, as well as a few static pages. Thus, the categories in your online store are indexed correctly. In addition, you get an XML checker. To check the new sitemap, go to the following URL: yoursite.com/sitemap.
Download Creare HTML Sitemap for SEO
Also, take a look at the MageWorx Sitemap Suite64 and the Amasty SEO Toolkit65.
Google AdWords Magento Integration
Next, I explain the benefits of Magento integration with AdWords and show how to connect both systems together.
Google AdWords management and conversion tracking shows the effectiveness of ad clicks. If your Magento website is connected to AdWords, you can easily get data about website purchases, app downloads, phone calls, newsletter sign-up, and other conversions. Invest in your ecommerce store wisely and optimize your campaigns according to business goals with the aid of AdWords. You can easily integrate your Magento store using the LUKA Google AdWords Conversion Tracking Magento extension.
The LUKA Google AdWords Conversion Tracking Magento extension simplifies integration with AdWords. You just have to install the module to enable Google AdWords Conversion Tracking on your Magento website. Check the source code of LUKA Google AdWords Conversion Tracking on GitHub here. Note that the module is absolutely free. Download LUKA Google AdWords Conversion Tracking Magento Extension .
How to Check a Conversion Tracking Tag
To verify if AdWords “sees” a conversion tracking tag, go to your AdWords account. Find the Tools option. From a drop-down menu, choose Conversions. The tracking status is specified in front of every conversion action in the “Tracking status” column. The tag can be one of the following:
Unverified (Google hasn’t verified the tag on your website).
No recent conversions (during previous 7 days).
Recording conversions (everything is OK).
Tag inactive (Google doesn’t see the tag).
Removed (the name speaks for itself). Check this article for additional information.
Google Merchant Center Magento Integration
Google Merchant Center is a service, designed to help you with store and product information integration into Google Shopping. In order to work with the Google Merchant Center, you have to use your Google account or create a new one. Every Google account can be associated with only one Google Merchant Center account, but you can add extra users to your Google Base. At this stage, there are also two other conditions. Initially, you have to configure your account and choose your location and then agree to the Terms of Service.
Having set up your account and verified your website URL, you have to submit your product data. Before uploading any data files into Google Merchant Center, it is necessary to create and register your data feed—a file that includes attributes that define your products in a special way. The data feed is built like a classic RSS feed, but it also includes specific XML tags. Of course, you can perform all the actions manually, but there are numerous Magento extensions designed to simplify your interaction with Google Merchant Center; for example, Simple Google Shopping.
This module is established for exporting a well-structured and valid data feed from your Magento store to a Google Merchant account. Simple Google Shopping is highly configurable, easy to use, and provides support for several stores, VAT rates, and currencies. Get Simple Google Shopping Magento Extension.
The Google Shopping Feed extension is recommended by Google reps. Using this module you will be able to create a feed according to Google’s full specification. The main goal of the extension is to get as close as possible to a perfect data feed without maintaining it after the module’s installation. Download Google Shopping Feed Magento Extension.
By using the Magento Product Feed Generator, you have the ability to create product feeds for Google, eBay, and GetPrice. The extension supports CSV, XML, TXT, and other formats. With its aid, you can also get product details right from your admin. Get Magento Product Feed Generator Extension.
Using the Product Feed by Amasty Magento extension, you are able to generate a product feed in a short period of time (not more than few minutes). And it will take a day or two to put your products on high-traffic shopping platforms. Moreover, Product Feed by Amasty provides the opportunity to create an unlimited number of product feeds and separate them for all of your Magento store views. The extension works with Shopping.com, Google.com, Getprice.com, Myshopping.com, Shopmania.com, Nextag.com, and Amazon.com. Purchase Product Feed by Amasty.
The Product Feed Creator/Shopping Feeds module is a feed generator that allows you to create custom data feeds and then submit them to various product search engines. Product Feed Creator generates feeds for Google Product Search, Amazon, Shopping.com, Yahoo! Store, Channel Advisor, and dozens of other services. You can create feeds for your customers as well. This feature is useful for dropshipping and wholesale businesses. Get the extension.
Product Tags as a Powerful Cross Linking Tool
With the constant growth of information on the Internet, it’s becoming harder to sort it out by the various features. So, for example, if you find a picture of a nice pair of shoes and you decide to look for more like it, it will take you a lot of time, because you have no specific attributes for a search except for the shoes’ shape and color. Today, the problem seems to be solved thanks to a widespread use of so-called tags that play the role of peculiar labels that can be attributed to any online content. The main advantage of tags lies in their ability to specify the category of the content so that you can easily understand its origin, characteristics, and the reason for publishing.
Although tags are mostly used in social networks and bookmarking sites, they can be of particular interest to the ecommerce industry as well. For instance, if you use content tagging for your product marketing strategy, you can significantly increase your chances to attract a target audience to your website. There are a lot of possibilities with efficient product tagging that Magento retailers can adjust for their everyday needs, so I suggest getting acquainted with the main tagging principles and their application for every Magento store.
Public tagging allows users to apply various keywords to describe the content they see online. This type of tagging is widely used on bookmarking websites such as 9rules.com or Digg.com. For a website owner, having public tagging available means automatically getting your items indexed, which is important in terms of better search results rankings. Moreover, public tagging often suggests submitting links to particular content with a subsequent possibility of creating tags related to those links. After it’s done, it becomes possible for other users to find this content through entering tags in a search field.
In ecommerce retail, keyword research should be made first. Basically, a retailer has to understand which keywords are popular among the audience by checking their relevance in Google search requests. Furthermore, tags can become especially handy when dealing with a wide range of products. Although you can make traditional product categorization with the ability to search items by certain keywords, tagging allows you to set two or three keywords for each item that you have, so that if users click one of the tags, they are able to see the list of other items associated with the same keyword at once.
To make publisher tagging even more effective, you can also engage with book-marking websites. For this you should only be able to offer something useful to your customers. This could be thematic articles or any other business-related content, including infographics, event announcements, and photographs. You should note, however, that submitting clearly commercial content to bookmarking websites won’t be appreciated by their owners and audience.
Thus, public and publisher tagging can be equally useful for satisfying your SEO needs, although the former should require proper quality control, and the latter, more thorough preliminary analysis of the relevant keywords.
The process of submitting links to content and connecting them with related tags is actively used in public and publisher tagging and can be actualized in various forms. In general, it can be called cross linking or internal link building. One of the most often used types of cross linking is a tag cloud, which is visually represented by a cluster of tagged keywords placed in a specific area of a website. Each tag in a cloud is in fact a separate link that directs the user to an internal search results list containing all the posts or items of the website where a tagged word or phrase is mentioned. Not only does this simplify the users’ site navigation process, but it also is a good SEO approach in general.
You can find a full article about tags here: http://goo.gl/yyLQ2o . To summarize the material, I’d like to show you two useful extensions associated with product tagging .
With the help of the SEO Product Tag URLs extension, you can make your product tag links more efficient for a search engine to interpret them. For instance, if your internal links lack any keywords and instead consists of strange sequences of letters and numbers, their search engine readability will be quite low. SEO Product Tag URLs solves this problem by converting all of your links into nicely tagged URLs that make it much easier for a searcher to get to your product pages. Download SEO Product Tag URLs.
Admin Product Tagging gives you the opportunity to add as many tags as you want to your product pages from the very beginning of creating those pages. Unlike default Magento managing tools, which only make it possible to add tags after a product page has been created, this extension allows you to add tags every time you decide to edit a page. The main advantage of the extension is that you don’t have to approve each new tag from the Admin panel individually. Rather, every newly created tag is automatically saved as approved. This, however, does not extend to user tagging, which means that all the public tags still have to be approved separately. But if you get tired of doing it all the time, there is an additional function in Admin Product Tagging with which you can simply disable tagging product pages by customers. Download Admin Product Tagging.
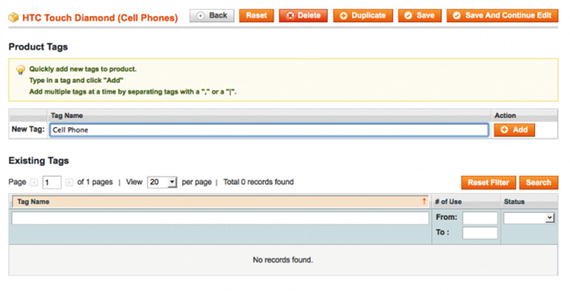
Figure 1-35. Admin Product Tagging
Now, your ecommerce store is almost ready for the first public launch, so it’s time for final preparations. Since your Magento website is installed and optimized for work, has high performance, incredible security, and good SEO, it’s time to learn more about the pre-launch checklist.
Pre-Launch Checklist
This is the final part of the chapter, which is based on the Complete Magento Pre-Launch Guide66. We all know that bringing any website live is a very stressful and responsible task, especially if it is a Magento ecommerce store. Your website should go live as soon as possible. At the same time, there are a lot of vital steps that you can easily forget about. If you don’t want to miss anything, read over the following list of pre-launch actions.
Change the base URL. The core_config_data database table stores URLs that should be updated when you move your Magento website live; otherwise, they refer back to a staging site. You can access these URLs through admin interface here: System ➤ Configuration ➤ Web. In this situation, it is essential not to miss a trailing forward slash.
Improve SEO with new HTML head settings. The HTML head contains original settings. In order to improve your SEO, you should change them. Use your own title, set keywords, and metadescriptions. You can do this here: System ➤ Configuration ➤ General ➤ Design ➤ HTML Head.
Provide your visitors with relevant contact information. An ecommerce website without email addresses and store information looks suspicious. By missing this little step, you can frighten your future customers, so don’t make this mistake. Go to System ➤ Configuration ➤ General and System ➤ Configuration ➤ Store Email Addresses. You can add all the necessary information there.
Create a favicon. Don’t start your ecommerce store without having created a favicon. It will still work if you forget about this step, but that does not mean that you should overlook having a favicon.
Take care of placeholder images. If a product doesn’t have an image, a placeholder image is used instead. You should create a set of such images for your store. You can upload them in System ➤ Configuration ➤ Catalog ➤ Product Image Placeholders. Alternatively, you can place them in catalog/products/placeholder/image.jpg (small_image.jpg and thumbnail.jpg).
Improve your security with a custom admin URL. The default Magento path to admin is insecure because everyone knows it. Luckily, you can always change it. Just go to the local.xml file and replace the admin frontname in the admin router with a custom one. Don’t forget to delete cache before visiting a new URL .
Provide your buyers with nice invoices. All the information on your Magento website should look good. The invoices should also look good. Thus, take care of the logo. You should upload it to an appropriate folder.
Offer transactional emails with the correct logo. It’s not a surprise that transactional and default emails use different logos. Therefore, you should save the correct image (logo_email.gif) in the theme directory. Note that there are Magento themes that are based on hard-coded values and require manual changes.
Customize your 404 page. What do you feel when you see a 404 page? You are a little bit disappointed, right? So are your customers. Don’t make them more disappointed with the default Magento block—customize your 404 page. Go to CMS ➤ Pages and make it better.
Customize the error page. Prevent your customers from seeing a default Magento error page. Adapt this page to the current Magento template by modifying files from the error directory. Additionally, you can disable stack trace printing. Open the errors/local.xml file and replace the print action with email. Set an email address.
Don’t forget about test data. You’ve probably created a lot of test data while testing your Magento store. Before going live, you should remove it. Products, orders, and customers created during development should be deleted.
Check tax settings. Go to System ➤ Configuration ➤ Sales ➤ Tax to check your current tax settings. You can also use appropriate Magento extensions to optimize these settings for certain markets. Go to Magento Connect or check this blog post to find suitable tools.
Set the shipping origin. Parallel to tax settings, you should set a shipping origin. Various countries require a different approach in providing the appropriate tax rates .
Import the right product inventory. Make sure that the necessary configurations are set up. Note that you may have to perform an additional import of stock levels.
Check shipping methods. Make sure that fixed products, cart fees, or other related features are configured. In a cart weight route, make sure that the weight is attached to all products.
Improve performance with this simple step. Flush JavaScript to a single file in order to reduce load time. Go to System ➤ Configuration ➤ Developer ➤ JavaScript Settings and perform all the required actions there. Keep in mind that inline JavaScript requires its own file to avoid page load slowdown.
Don’t ignore CSS minification. You can always use a CSS compressor to minify CSS data. Create a minified version in addition to a readable one.
Consider this additional advice on CSS. You can also combine your CSS files into a single one—just like in a JavaScript case. Take into consideration that this feature doesn’t work well with all Magento websites. I recommend that you check it on a staging server before going live, since it can have some unwanted side effects. Go to System ➤ Configuration ➤ Developer ➤ CSS Settings to flush CSS into a single file. Or you can use the Fooman Speedster Magento extension. It functions with both CSS and JavaScript files .
Use the maintenance.flag. Go to the root of your Magento installation and find the maintenance.flag file. It displays a holding page during your going online. Move the maintenance.flag file first, queueing the rest of Magento to transfer.
Inevitable index management. Please note that after performing any catalog changes, you should also re-index.
Utilize the power of system compilation. Reduce the load time of your ecommerce store by compiling the system. This will lead to a 50% performance increase in loading a page. You can find the necessary settings here at System ➤ Tools ➤ Compilation.
Enable caching. Caching is usually disabled during the development stage. Thus, you should enable and refresh it before going live; otherwise, you will decrease the performance of your website.
Integrate your store with Google Analytics. Magento supports integration with Google Analytics. You just have to set up your account and put its number in System ➤ Configuration ➤ Sales ➤ Google API ➤ Google Analytics.
… and with Google Base
Google Base integration is also supported by Magento. Check this article by Inchoo to find out more about this process.
Improve your SEO with Google Sitemap. Go to “Catalog-Google Sitemap” and select “Create Sitemap.” With the help of Webmaster Tools, point Google toward your sitemap.
Test how newsletter subscriptions work. Do not test this feature on real customers. It’s better to check how it works before going live. Test the opportunity to sign up and unsubscribe. Check whether newsletters can be sent out.
Make sure that your payment gateways work. It is extremely important to check that a payment gateway is ready to go live with your store; otherwise, you can lose the first customers. Enable SSL Certificate because many payment gateways will not function without this security feature.
Go live with all Magento extensions. Some modules from Magento Connect will not work without a license key. In order to go live with them, you should check if every key is still valid. Obtain new keys if necessary.
Take care of unnecessary modules. Your ecommerce store probably doesn’t need all default Magento features. Therefore, you can easily disable them. Go to System ➤ Configuration ➤ Advanced and turn off everything that you don’t need.
Enable product import/export with right PHP configurations. Keep in mind that the memory_limit and max_execution_time files should have only reasonable values. Restrictive values are often a reason of a product import/export fail.
Don’t forget to turn on crons. Some Magento components require regular updates, which run due to periodical scripts. You can find the needed configurations in System ➤ Configuration ➤ Advanced ➤ System. To modify the cron.php file, go to the root of your Magento installation. Check this page for a more detailed description of the process.
Clean logs. A database that contains logs becomes bloated. Thus, you have to clean it from time to time. You can even set a daily cleaning. The appropriate option is situated in System ➤ Configuration ➤ Advanced ➤ System ➤ Log cleaning.
Regularly backup your store. You can use the Automatic Database Backup Magento extension. This module will do everything for you. Just go to Magento Connect, install it, and get your backups.
Final Words About Performance
Before going live, test the performance of your site. As mentioned, a fast ecommerce store not only makes customers loyal, but also provides a positive impact on SEO. There are dozens of tools and extensions designed for checking the performance of your Magento website. You can use GTMetrix, YSlow, or any other convenient solution to find bottlenecks and fix them. Remember, your visitors always compare your store to other websites; that’s why they will move to a competitor if you provide them with a low performance.
For the More Curious
If these checklists are not enough for you, see this blog post. That Magento Pre-Launch Checklist includes some additional advice.
Magento Store Audit
In brick-and-mortar retail, a store audit is an examination of information about the effectiveness of different parameters, such as price, sales, or advertising campaign compared to that of any competitors or common standards. As for ecommerce in general and Magento in particular, this process is more complicated, since it consists of a wider number of variables that require different approaches in calculation. Luckily, there are a lot of tools and materials that can help you with a Magento store audit. The following guide offers a store audit checklist, resources, and techniques necessary for running the procedure. Being useful for all kinds of Magento specialists and store owners, it teaches how to estimate efforts, collect information about your Magento website, and keep the installation clean and healthy.
When it comes to auditing a Magento website, the first difference from a brick-and-mortar store audit is the necessity to measure a site speed. That’s where PageSpeed Insights67, a product from the Google Developers kit, is helpful.
The next important difference is security. Although you can examine the safety of a brick-and-mortar store, this parameter is not as important as in ecommerce. In Magento, a store audit requires finding and fixing various security vulnerabilities. Chances are your website lacks some crucial patches or has other holes. You can find all of these security problems with the aid of MageReport, a free service that gives you a quick insight into the security status of your Magento store. Besides showing all current security problems, the service teaches you how to fix possible vulnerabilities.
Although the idea behind Mage Scan is to evaluate the security and quality of a Magento website, you don’t have access to further work with a potential developer or a new client, you can easily utilize Mage Scan68 in a Magento website audit.
Toolbox for Magento Shop Audit is another vital software solution. With the generate-reports.sh script, you can get various reports on a Magento installation. All of these reports are a vital foundation in a Magento website audit.
Toolbox for Magento Shop Audit requires copying files from its repository69 right into your Magento installation. Then, you can easily run the script and get all the necessary data. The script downloads a clean Magento source from the Magento website to run the audit. The following are some useful articles related to the topic:
Conclusion
Your Magento website is now live, but don’t expect that this is the end of your development process. Chances are that your ecommerce store contains bugs, so you should be ready to discover and fix them as soon as possible. There are also a lot of SEO, performance, and security improvements to be implemented.
I strongly recommend that you create two separate versions of your Magento store. One should be directed at public, while the other one should become your laboratory. If experiments are successful and you are content with your results, push an improvement online. Thus, your customers won’t see your fails, but your store will always get useful updates and fixes. What are these updates and fixes? I describe all of them in this book. Growth is the next step in your ecommerce development.
Footnotes
15 https://firebearstudio.com/blog/the-best-must-have-magento-extensions-2014-performance-seo-frontendui-loyaltyreferral-campaigns-systembackend-marketingsales.html#performance .
16 https://firebearstudio.com/blog/the-best-must-have-magento-extensions-2014-performance-seo-frontendui-loyaltyreferral-campaigns-systembackend-marketingsales.html#seo .
17 https://firebearstudio.com/blog/the-best-must-have-magento-extensions-2014-performance-seo-frontendui-loyaltyreferral-campaigns-systembackend-marketingsales.html#frontend .
18 https://firebearstudio.com/blog/the-best-must-have-magento-extensions-2014-performance-seo-frontendui-loyaltyreferral-campaigns-systembackend-marketingsales.html#loyality .
22 https://firebearstudio.com/blog/the-best-must-have-magento-extensions-2014-performance-seo-frontendui-loyaltyreferral-campaigns-systembackend-marketingsales.html#loyality .
23 https://firebearstudio.com/blog/the-best-must-have-magento-extensions-2014-performance-seo-frontendui-loyaltyreferral-campaigns-systembackend-marketingsales.html#marketing .
27 https://firebearstudio.com/blog/how-to-install-magento-extensions-magento-connect-ftp-ssh-modman-composer.html .
30 https://firebearstudio.com/blog/top-magento-extensions-for-custom-shipping-methods-and-rules.html .
36 https://firebearstudio.com/blog/magento-performance-ultimate-guide-mysql-opcache-cache-cdn-nginx.html .
47 https://firebearstudio.com/blog/extendware-cache-backends-faster-checkout-magento-extension.html .
50 https://firebearstudio.com/blog/magento-critical-security-patches-supee-5344-and-supee-1533-shoplift.html .
55 https://firebearstudio.com/blog/extendware-two-factor-authentication-magento-extension-review.html .
62 https://firebearstudio.com/blog/magento-integration-with-google-services-merchant-center-analytics-webmaster-adwords-trusted-shops.html .
63 https://firebearstudio.com/blog/extendware-google-analytics-dashboard-magento-extension-review.html .